
java处理http请求之Apache httpClient入门教程
说明
本文示例代码基于 4.5.13 版本
转载请注明出处:https://www.cnblogs.com/qnlcy/p/15378446.html
一、项目介绍
Apache 提供用来做http请求的项目有两个,3.x 版本的项目叫做 The Commons HttpClient。
它一开始是 Apache Jakarta Common 下的子项目,后来独立出去了,现在这个项目已经结束了它的生命周期,不再开发和维护。
取而代之的是 4.x 版本的 Apache Httpcomponents 项目,它包括 HttpClient 和 HttpCore 两大模块,能提供更好的性能和更大的灵活性。
二、项目模块
Apache Httpcomponents 项目包括 HttpClient 和 HttpCore 两大模块,其中,HttpCore 是一套HTTP协议实现包。而 HttpClient 是基于HttpCore的一套客户端。
三、使用方式
使用 Httpclient 需要经过如下步骤
- 创建
HttpClient - 创建 http 请求,如
HttpGet、HttpPost - 添加请求参数
- 添加请求设置,如超时等
- 使用
HttpClient执行 http 请求 - 读取返回内容并释放连接
3.1 创建 HttpClient
3.1.1 创建默认客户端:
CloseableHttpClient httpclient = HttpClients.createDefault();
一些重要的默认配置:
- 默认连接池大小10,每域名最大连接5
- 连接池中连接存活时间
connTimeToLive = -1,默认单位为毫秒,默认连接不失效 - 域名验证器为
DefaultHostnameVerifier, 会验证域名 - SSL 上下文为
SSLContext.getInstance("TLS"),没有使用密钥管理器(KeyManager)和信任管理器(TrustManager)
3.1.2 自定义客户端
- 失败不重试
CloseableHttpClient client = HttpClients.custom().setRetryHandler((e, i, c) -> false).build();
- 自定义连接池
 //设置自定义连接池
    @Test
    public void customConnectionPool() throws Exception {
        //1.创建 https 需要的 SslContext 相关内容
        //1.1 创建 SslContext
        KeyStore ks = KeyStore.getInstance(KeyStore.getDefaultType());
        ks.load(new FileInputStream("证书文件"), "密码".toCharArray());
        SSLContext sslContext = SSLContexts.custom().loadTrustMaterial(TrustAllStrategy.INSTANCE)
                .loadKeyMaterial(ks, "证书密码".toCharArray()).build();
        //1.2 创建 SSLConnectionSocketFactory
        SSLConnectionSocketFactory sslConnectionSocketFactory = new SSLConnectionSocketFactory(sslContext, new String[]{"SSLv3", "TLSv1.1", "TLSv1.2"}, null,
                NoopHostnameVerifier.INSTANCE);

        //2.创建连接池
        //2.1 构建协议 registry
        Registry<ConnectionSocketFactory> registry = RegistryBuilder.<ConnectionSocketFactory>create()
                .register("http", PlainConnectionSocketFactory.getSocketFactory())
                .register("https", sslConnectionSocketFactory)
                .build();
        PoolingHttpClientConnectionManager poolingHttpClientConnectionManager = new PoolingHttpClientConnectionManager(registry);
        //3.连接池针对所有连接、每域名的连接的数量设置
        poolingHttpClientConnectionManager.setMaxTotal(100);
        poolingHttpClientConnectionManager.setDefaultMaxPerRoute(20);

        //4.创建client
        CloseableHttpClient client =
        HttpClients.custom().setConnectionManager(poolingHttpClientConnectionManager).build();
    }
3.2 创建 Http 请求
创建 HttpGet、HttpPost 请求
    @Test
    public void getAndPost(){
        //1.创建get请求
        HttpGet get = new HttpGet("https://www.baidu.com");

        //2.创建post请求
        HttpPost post = new HttpPost("https://www.baidu.com");

        //3.其他如 HttpPut、HttpOptions、HttpTrace、HttpDelete、HttpPatch
    }
3.3 添加请求参数
    @Test
    public void addParams() throws IOException {
        HttpPost post = new HttpPost("https://www.baidu.com");
        //1.底层流,基础参数
        BasicHttpEntity basicHttpEntity = new BasicHttpEntity();
        //1.1添加参数内容
        InputStream bis = new ByteArrayInputStream("参数".getBytes());
        basicHttpEntity.setContent(bis);
        //1.2设置内容长度
        basicHttpEntity.setContentLength(bis.available());
        //1.3取消分块发送
        basicHttpEntity.setChunked(false);
        post.setEntity(basicHttpEntity);

        //2.字节码类型参数
        HttpEntity entity = new ByteArrayEntity("name=zhangsan&age=100".getBytes());
        post.setEntity(entity);

        //3.字符串类型参数
        entity = new StringEntity("name=zhangsan&age=100");
        post.setEntity(entity);

        //4.流式参数,用法与BasicHttpEntity类似,内容和长度严格匹配
        entity = new InputStreamEntity(bis,bis.available());
        post.setEntity(entity);

        //5.文件类型参数
        entity = new FileEntity(new File("上传文件"));
        post.setEntity(entity);

        //6.添加请求头
        post.addHeader("Content-Type","text/html;charset=UTF-8");

        Header contentType = new BasicHeader("Content-Type","text/html;charset=UTF-8");
        post.addHeader(contentType);

        Header host = new BasicHeader("Host","www.baidu.com");
        post.setHeaders(new Header[]{contentType,host});

    }
3.4 添加请求设置
    @Test
    public void requestConfig(){
        //1.配置RequestConfig
        RequestConfig requestConfig = RequestConfig.custom()
        .setConnectionRequestTimeout(10000) //从连接池获取可用连接的超时时间,单位毫秒
        .setSocketTimeout(5000) //请求获取数据的超时时间
        .setConnectTimeout(4000) //连接超时时间
        .build();
        HttpPost post = new HttpPost("https://www.baidu.com");
        //2.设置到post请求当中
        post.setConfig(requestConfig);

        //也可以当作默认值,设置到client当中,此client都会按这个超时处理
        CloseableHttpClient client = HttpClients.custom().setDefaultRequestConfig(requestConfig).build();
    }
3.4.1 超时时间说明
| 超时类型 | 说明 |
|---|---|
| connectionTimeout | 连接建立时间,即3次握手时间,默认值-1 |
| socketTimeout | 连接后,数据传输过程中数据包之间间隔的最大时间,默认值-1 |
| connectionRequestTimeout | 从连接池获取连接的超时时间,默认值-1 |
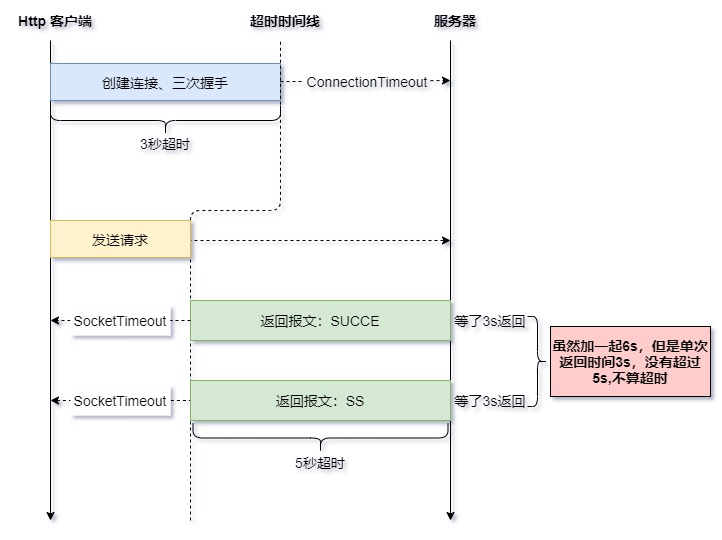
注意:
socketTimeout和connectionRequestTimeout如果不设置,请求会阻塞。但是
connectionTimeout的情况有所不同,它依赖于各平台的socket超时时间设置。windows 10 实测为 20s, linux 平台则不定,它会按
/proc/sys/net/ipv4/tcp_syn_retries中配置的次数重试,一般为3s\7s\15s\31s\63s递增另外,即使 java 程序返回了超时结果,但是linux服务器依旧在执行重试直到服务器端超时,为了提高资源利用率,可以手动关闭
关于 linux socket 超时的问题,请参阅 无毁的湖光-Al 的 从linux源码看socket(tcp)的timeout
3.5 执行 http 请求
执行 http 请求比较简单,直接调用 execute() 方法即可
    @Test
    public void execute(){
        CloseableHttpClient client = HttpClients.createDefault();
        try {
            client.execute(new HttpPost("https://www.baidu.com"));
            client.execute(new HttpGet("https://www.baidu.com"));
        } catch (IOException e) {
            e.printStackTrace();
        }
    }
3.6 读取返回内容并释放连接
服务器返回结果被封装到 HttpResponse 对象里,我们可以从这里拿到我们想要的返回结果
    @Test
    public void getResponse() {
        CloseableHttpClient client = HttpClients.createDefault();
        CloseableHttpResponse httpResponse = null;
        final HttpGet httpGet = new HttpGet("https://www.baidu.com");
        try {
            httpResponse = client.execute(httpGet);
            //1.获取返回状态
            System.out.println(httpResponse.getStatusLine().getStatusCode());
            //2.获取返回头信息
            Header[] headers = httpResponse.getAllHeaders();
            for (Header header : headers) {
                System.out.println(header.getName() + ":" + header.getValue());
            }
            //3.获取返回消息体
            HttpEntity entity = httpResponse.getEntity();
            if(null != entity){
                //3.1 得到返回结果并关闭流,与下面的只能执行一个,因为流只能读取一次
                String content = EntityUtils.toString(entity);
                System.out.println(content);
                //3.2 得到返回结果并关闭流,与上面的只能执行一个
//              byte[] contents = EntityUtils.toByteArray(entity);
            }
        } catch (IOException e) {
            e.printStackTrace();
        } finally {
            if (null != httpResponse) {
                //4.归还连接到连接池
                try {
                    httpResponse.close();
                } catch (IOException e) {
                    e.printStackTrace();
                }
            }
            //如果复用 httpGet ,则重置其状态使其可以重复使用
            httpGet.releaseConnection();
        }

        //只在应用关闭的时候关闭client
        try {
            client.close();
        } catch (IOException e) {
            e.printStackTrace();
        }
    }

