qemu上跑stm32 模拟stm32开发板
qemu早就可以跑stm32程序了。很简单:
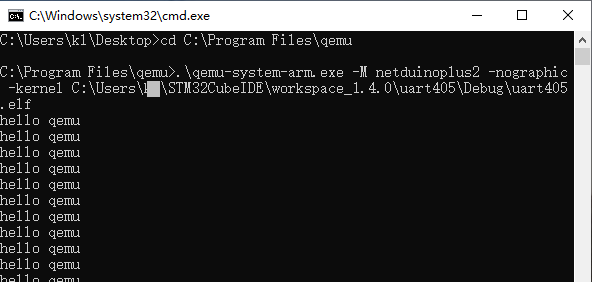
windows bat:
cd C:\Program Files\qemu
.\qemu-system-arm.exe ^
-M netduinoplus2 ^
-nographic ^
-kernel C:\Users\kk\STM32CubeIDE\workspace_1.4.0\uart405\Debug\uart405.elf
pause
(在window上安装qemu软件,然后把这段保存成 .bat 脚本,运行。然后就能在cmd窗口下看到程序的打印)
qemu到它的官网直接下载安装包就行,windows下安装完就能用。过去1年了还有人看博客自己下载源码编译呢,没必要。
还能仿真全志的H3芯片,linux开发板,uboot、linux等等用buildroot一键搞定。
有人试过这个方法,没有打印。应该是版本问题。我的qemu: 6.0.90
.\qemu-system-arm.exe --version
QEMU emulator version 6.0.90 (v6.1.0-rc0-11876-g4d03172729-dirty)
Copyright (c) 2003-2021 Fabrice Bellard and the QEMU Project developers
cubeIDE:1.4.0
---------------------------------另外,github上还有许多其他人改的qemu,外设更多。像spi iic这种,需要再想办法加命令挂虚拟设备。实际上不如proteus好用
linux上的shell脚本可做类似修改。
1. stm32的源码:
不废话了,就是用stm32cubeIDE一键生成的代码,选STM32F405RG,会stm32的知道,没有难度。uart没有使用中断。rcc用的内部晶振,其实就是默认配置一点都没改。keil编译的.axf文件也行,都是elf文件,后缀名没关系。
改动只有:
  /* Initialize all configured peripherals */
  MX_GPIO_Init();
  MX_USART1_UART_Init();
  /* USER CODE BEGIN 2 */
  char *pData = "hello qemu\n";
  /* USER CODE END 2 */

  /* Infinite loop */
  /* USER CODE BEGIN WHILE */
  while (1)
  {
	  HAL_UART_Transmit(&huart1, (uint8_t*)pData, strlen(pData), 100);
	  HAL_Delay(1000);

    /* USER CODE END WHILE */

    /* USER CODE BEGIN 3 */
  }
2. 重点说说qemu的源码:
hw/arm/netduinoplus2.c
static void netduinoplus2_init(MachineState *machine)
{
    DeviceState *dev;

    /*
     * TODO: ideally we would model the SoC RCC and let it handle
     * system_clock_scale, including its ability to define different
     * possible SYSCLK sources.
     */
    system_clock_scale = NANOSECONDS_PER_SECOND / SYSCLK_FRQ;

    dev = qdev_new(TYPE_STM32F405_SOC);
    qdev_prop_set_string(dev, "cpu-type", ARM_CPU_TYPE_NAME("cortex-m4"));
    sysbus_realize_and_unref(SYS_BUS_DEVICE(dev), &error_fatal);

    armv7m_load_kernel(ARM_CPU(first_cpu),
                       machine->kernel_filename,
                       FLASH_SIZE);
}
netduinoplus2是一种开发板,亚马逊上有卖。它内置的就是一个STM32F405RG
在qemu里真正的芯片实现:hw/arm/stm32f405_soc.c
目前只实现了几个外设,大部分是未实现的
#define SYSCFG_ADD                     0x40013800
static const uint32_t usart_addr[] = { 0x40011000, 0x40004400, 0x40004800,
                                       0x40004C00, 0x40005000, 0x40011400,
                                       0x40007800, 0x40007C00 };
/* At the moment only Timer 2 to 5 are modelled */
static const uint32_t timer_addr[] = { 0x40000000, 0x40000400,
                                       0x40000800, 0x40000C00 };
static const uint32_t adc_addr[] = { 0x40012000, 0x40012100, 0x40012200,
                                     0x40012300, 0x40012400, 0x40012500 };
static const uint32_t spi_addr[] =   { 0x40013000, 0x40003800, 0x40003C00,
                                       0x40013400, 0x40015000, 0x40015400 };
#define EXTI_ADDR                      0x40013C00

#define SYSCFG_IRQ               71
static const int usart_irq[] = { 37, 38, 39, 52, 53, 71, 82, 83 };
static const int timer_irq[] = { 28, 29, 30, 50 };
#define ADC_IRQ 18
static const int spi_irq[] =   { 35, 36, 51, 0, 0, 0 };
static const int exti_irq[] =  { 6, 7, 8, 9, 10, 23, 23, 23, 23, 23, 40,
                                 40, 40, 40, 40, 40} ;
0x40011000就是uart1基地址,这个和stm32代码、STM32F405RG是配套的。
uart1会被qemu默认映射到cmd窗口。qemu还支持映射到文件、网络端口等等,参考qemu文档
qemu支持gdb调试,会生成gdb server。命令如下
-gdb tcp::10101 ^
-S
可以用stm32cubeIDE通过TCP 端口远程调试qemu里的程序。有时间再试
另外esp32官方的qemu增加了一个以太网phy设备:openeth,就支持网络了。理论上stm32有也能这么搞,但是没有看到过有人加这个东西玩

 浙公网安备 33010602011771号