Java程序员 Cocos 2.x 初体验(Helloworld),飞机大战游戏
参考野生程序君教程
1. 环境搭建
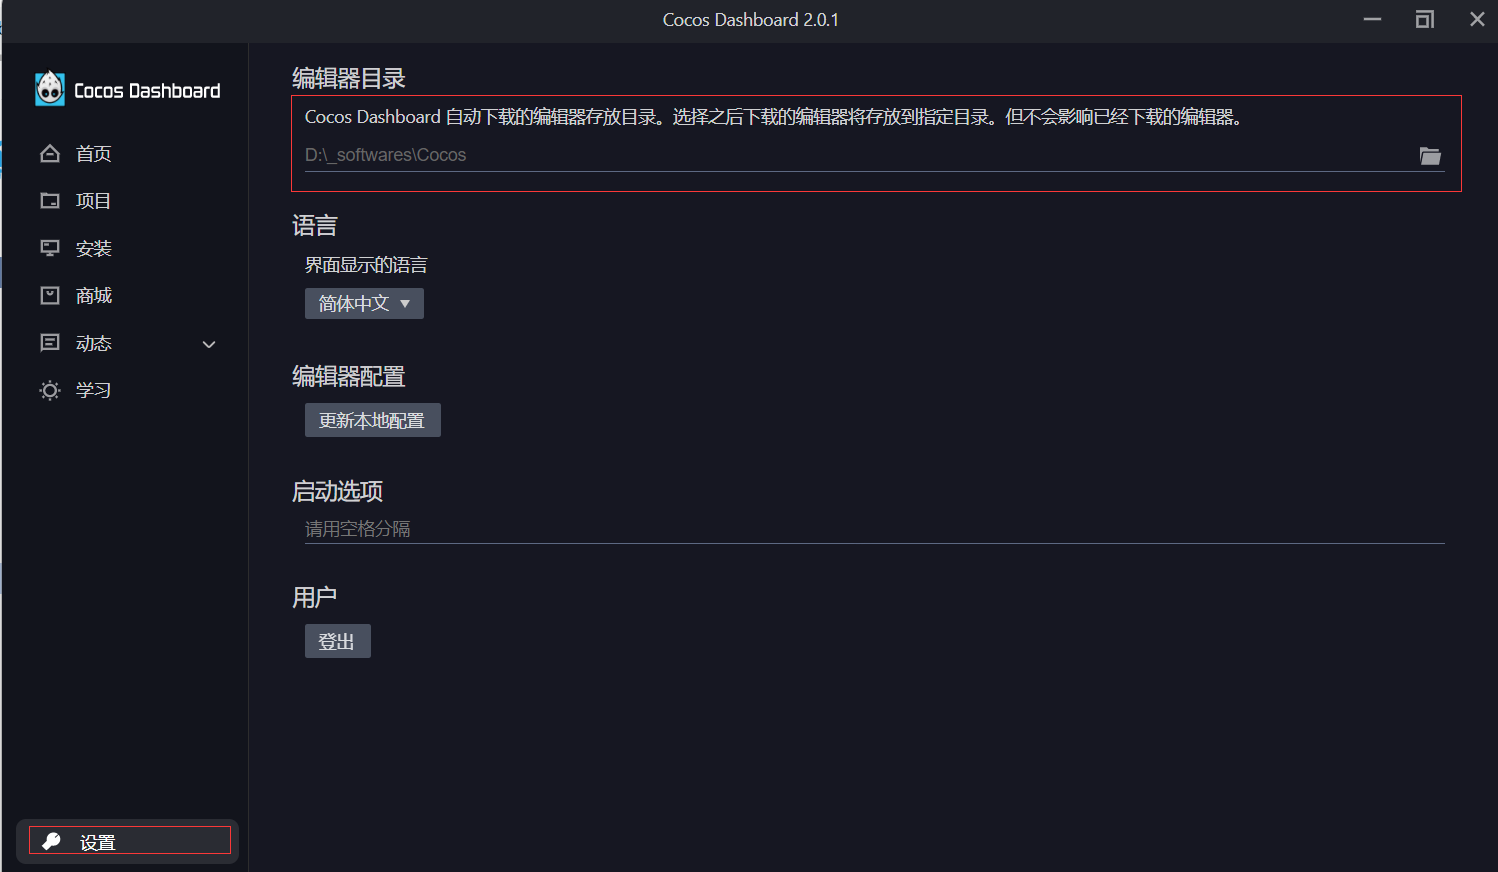
在Cocos官网下载CocosDashboard_2.0.1.exe,安装,启动后设置编辑的目录(默认情况下,编辑器安装在C盘中,每一个版本的编辑会占用较大的空间,所以这里将编辑器安装目录配置在的D盘)

在安装列表中新增编辑器2.x安装:

2. 创建项目
启动 CocosDashboard 创建空白的2D项目,命名为PlaneWar2D,编辑器打开后按 Ctrl + S 保存场景为game(保存在资源管理器的assets/sence目录下,注意需要自己创建sence目录)。
在assets目录下,创建下列目录:
- prefab: 存放预制体
- resources: 游戏资源(图片、声音等),特别注意这个文件夹的名称是cocos约定的,必须是resources
- script: 存放游戏脚本
3. 资源准备
游戏资源可以使用微信小游戏(https://gamemaker.weixin.qq.com/)中提供的资源,这里简单介绍一种下载资源的方式:
- 通过F12查看资源连接地址,通过下载工具或Postman将资源下载到本地中
所下载游戏资源仅用于开发学习使用,如若涉及侵权,联系删除
4. 游戏背景
调整场景中Canvas的尺寸:375x667,将resources/img中的background图片拖到场景中(非Canvas子节点,同级节点),并调整其大小和位置:
x:0
y:0
w:375
h:667
重复以上操作,新增多一张背景,用于滚动显示背景,两张背景的分别命名为bg1,bg2,将bg2的x设置为-667。

- 滚动背景
创建一个空节点(右键创建,Anchor=0,0),命名为background,将上面的bg1和bg2拖到background下面,作为其子节点,并为background节点创建Typescript脚本组件,用于控制背景的滚动。
点击编辑器菜单栏中的“文件”->“设置”,在数据编辑中,配置外部脚本编辑器为VSCode
关于脚本的开发手册可以查看下面这个文档:
涉及的API文档:
Background.ts:
const { ccclass, property } = cc._decorator;

@ccclass
export default class Background extends cc.Component {
  bg1: cc.Node;
  bg2: cc.Node;
  size: cc.Size;

  @property
  speed: number = 50;
  // LIFE-CYCLE CALLBACKS:

  onLoad() {
    this.bg1 = this.node.children[0];
    this.bg2 = this.node.children[1];
    // cc.view is the singleton object which represents the game window.
    this.size = cc.view.getCanvasSize();
    cc.log(this.size)
  }

  start() {}

  update(deltaTime: number) {
    // TODO windows11.屏幕缩放的情况下有问题(会出现断层的情况)
    this.bg1.setPosition(0, this.bg1.position.y - this.speed * deltaTime);
    this.bg2.setPosition(0, this.bg2.position.y - this.speed * deltaTime);
    if (this.bg1.position.y < -this.size.height) {
        this.bg1.setPosition(0, this.bg2.position.y + this.size.height)
    }
    if (this.bg2.position.y < -this.size.height) {
        this.bg2.setPosition(0, this.bg1.position.y + this.size.height)
    }
  }
}
5. 玩家飞机
将assets/resources/img/player拖到场景中(非Canvas子节点),并为其创建Typescript脚本组件,这里需要用到事件系统,参考文档如下:
https://docs.cocos.com/creator/2.4/manual/zh/scripting/internal-events.html
Player.ts
const { ccclass, property } = cc._decorator;

@ccclass
export default class Player extends cc.Component {
  size: cc.Size;
  moving: boolean = false;
  @property
  speed: number = 100;

  onLoad() {
    this.size = cc.view.getCanvasSize();
  }

  start() {
    this.initializeTouchEvent();
  }

  // update (deltaTime: number) {}

  initializeTouchEvent() {
    this.node.on(cc.Node.EventType.TOUCH_START, () => (this.moving = true));
    this.node.on(cc.Node.EventType.TOUCH_END, () => (this.moving = false));
    this.node.on(cc.Node.EventType.TOUCH_MOVE, (e: cc.Event.EventTouch) => {
      if (this.moving) {
        this.node.setPosition(e.getLocation());

        if (this.node.x - this.node.width / 2 < 0) {
          this.node.setPosition(this.node.width / 2, this.node.position.y);
        } else if (this.node.x + this.node.width / 2 > this.size.width) {
          this.node.setPosition(
            this.size.width - this.node.width / 2,
            this.node.position.y
          );
        }

        if (this.node.y - this.node.height / 2 < 0) {
          this.node.setPosition(this.node.x, this.node.height / 2);
        } else if (this.node.y + this.node.height / 2 > this.size.height) {
          this.node.setPosition(
            this.node.position.x,
            this.size.height - this.node.height / 2
          );
        }
      }
    });
  }
}

6. 飞机子弹
将assets/resources/img/bullet拖到场景中(非Canvas子节点),并为其创建Typescript脚本组件,这里使用的是cocos的预制体,参考文档如下:
https://docs.cocos.com/creator/2.4/manual/zh/asset-workflow/prefab.html
为bullet节点添加Typescript组件,然拖到assets/prefab中,制作成预制体。
Bullet.ts
const { ccclass, property } = cc._decorator;

@ccclass
export default class Bullet extends cc.Component {
  size: cc.Size;
  speed: number = 100;

  start() {}

  update(deltaTime: number) {
    this.node.setPosition(
      this.node.position.x,
      this.node.position.y + this.speed * deltaTime
    );
    if (this.node.position.y + this.node.height > this.size.height) {
      this.node.removeFromParent(true);
      this.destroy();
    }
  }
}
7. 发射子弹
在Player.ts声明子弹预制体,然后将bullet预制体挂载在Player节点脚本组件的bullet属性中。
@property(cc.Prefab)
bullet: cc.Prefab = null;
使用定时器发送子弹:
https://docs.cocos.com/creator/2.4/manual/zh/scripting/scheduler.html
  @property
  interval: number = 0.5;

  start() {
    this.schedule(() => this.playBullet(), this.interval);
  }

  playBullet() {
    const bullet = cc.instantiate(this.bullet);
    bullet.setParent(cc.director.getScene());
    bullet.setPosition(
      this.node.position.x,
      this.node.position.y + this.node.height / 2
    );
  }
8. 产生敌机
敌机也是预制体,跟子弹创建类似,不过敌机由背景产生。
Enemy.ts
const { ccclass, property } = cc._decorator;

@ccclass
export default class Enemy extends cc.Component {
  size: cc.Size;
  @property
  speed: number = 150;
  onLoad() {
    this.size = cc.view.getCanvasSize();
  }

  start() {
    this.node.x =
      Math.random() * (this.size.width - this.node.width) + this.node.width / 2;
    this.node.y = this.size.height;
  }

  update(deltaTime: number) {
    this.node.setPosition(
      this.node.position.x,
      this.node.position.y - this.speed * deltaTime
    );
    if (this.node.position.y + this.node.height < 0) {
      this.node.removeFromParent(true);
      this.destroy();
    }
  }
}
Background.ts
  @property
  interval: number = 1;

  @property(cc.Prefab)
  enemy: cc.Prefab = null;

  onLoad() {
    this.schedule(() => this.createEnemy(), this.interval);
  }

  createEnemy() {
    const enemy = cc.instantiate(this.enemy);
    enemy.setParent(cc.director.getScene());
  }
9. 播放声音
- bgm
给背景节点添加声音组件(其他组件->AudioSource),然后将assets/resources/audio中的bgm.mp3拖到AudioSource组件的clip属性中,并勾选PlayOnLoad和Loop属性。
- bullet
子弹播放的音效,由产生子弹的函数控制,代码如下:
  playBullet() {
    cc.resources.load(
      "audio/bullet",
      cc.AudioClip,
      (error, clicp: cc.AudioClip) => {
        cc.audioEngine.playEffect(clicp, false);
      }
    );
    const bullet = cc.instantiate(this.bullet);
    bullet.setParent(cc.director.getScene());
    bullet.setPosition(
      this.node.position.x,
      this.node.position.y + this.node.height / 2
    );
  }
参考文档:
https://docs.cocos.com/creator/2.4/manual/zh/scripting/dynamic-load-resources.html
https://docs.cocos.com/creator/2.4/api/zh/classes/audioEngine.html
10. 碰撞处理
为子弹(tag=0)、敌机(tag=1)、玩家飞机(tag=2)新增碰撞组件,相关文档:
https://docs.cocos.com/creator/2.4/manual/zh/physics/collision/collision-manager.html
在Background.ts开启碰撞功能:
cc.director.getCollisionManager().enabled = true;
在Enemy.ts处理碰撞事件:
  onCollisionEnter(other: cc.Collider, self: cc.Collider) {
    if (this.dead) {
      return;
    }
    if (other.tag === 0) {
      // bullet
      other.getComponent(Bullet).playBoom();
      this.playBoom();
    } else if (other.tag === 2) {
      // player
    }
  }

  playBoom() {
    this.dead = true;
    cc.resources.load(
      "audio/boom",
      cc.AudioClip,
      (error, clip: cc.AudioClip) => {
        cc.audioEngine.playEffect(clip, false);
      }
    );
    this.schedule(
      () => {
        cc.resources.load(
          `img/explosion${this.frame}`,
          cc.SpriteFrame,
          (error, sf: cc.SpriteFrame) => {
            this.getComponent(cc.Sprite).spriteFrame = sf;
            this.frame++;
          }
        );
      },
      0.05,
      20,
      0
    );
  }
11. 分数记录
在Background节点下面创建Label UI节点,调整其位置和大小,在Background.ts新增score属性记录分数,新增updateScore方法更新分数:
  updateScore() {
    this.scr.getComponent(cc.Label).string = `分数:${++this.score}`;
  }
在Enemy.ts调用更新分数:
  onCollisionEnter(other: cc.Collider, self: cc.Collider) {
    if (this.dead) {
      return;
    }
    if (other.tag === 0) {
      // bullet
      other.getComponent(Bullet).playBoom();
      cc.find("background").getComponent(Background).updateScore();
      this.playBoom();
    } else if (other.tag === 2) {
      // player
    }
  }

12. 结束游戏
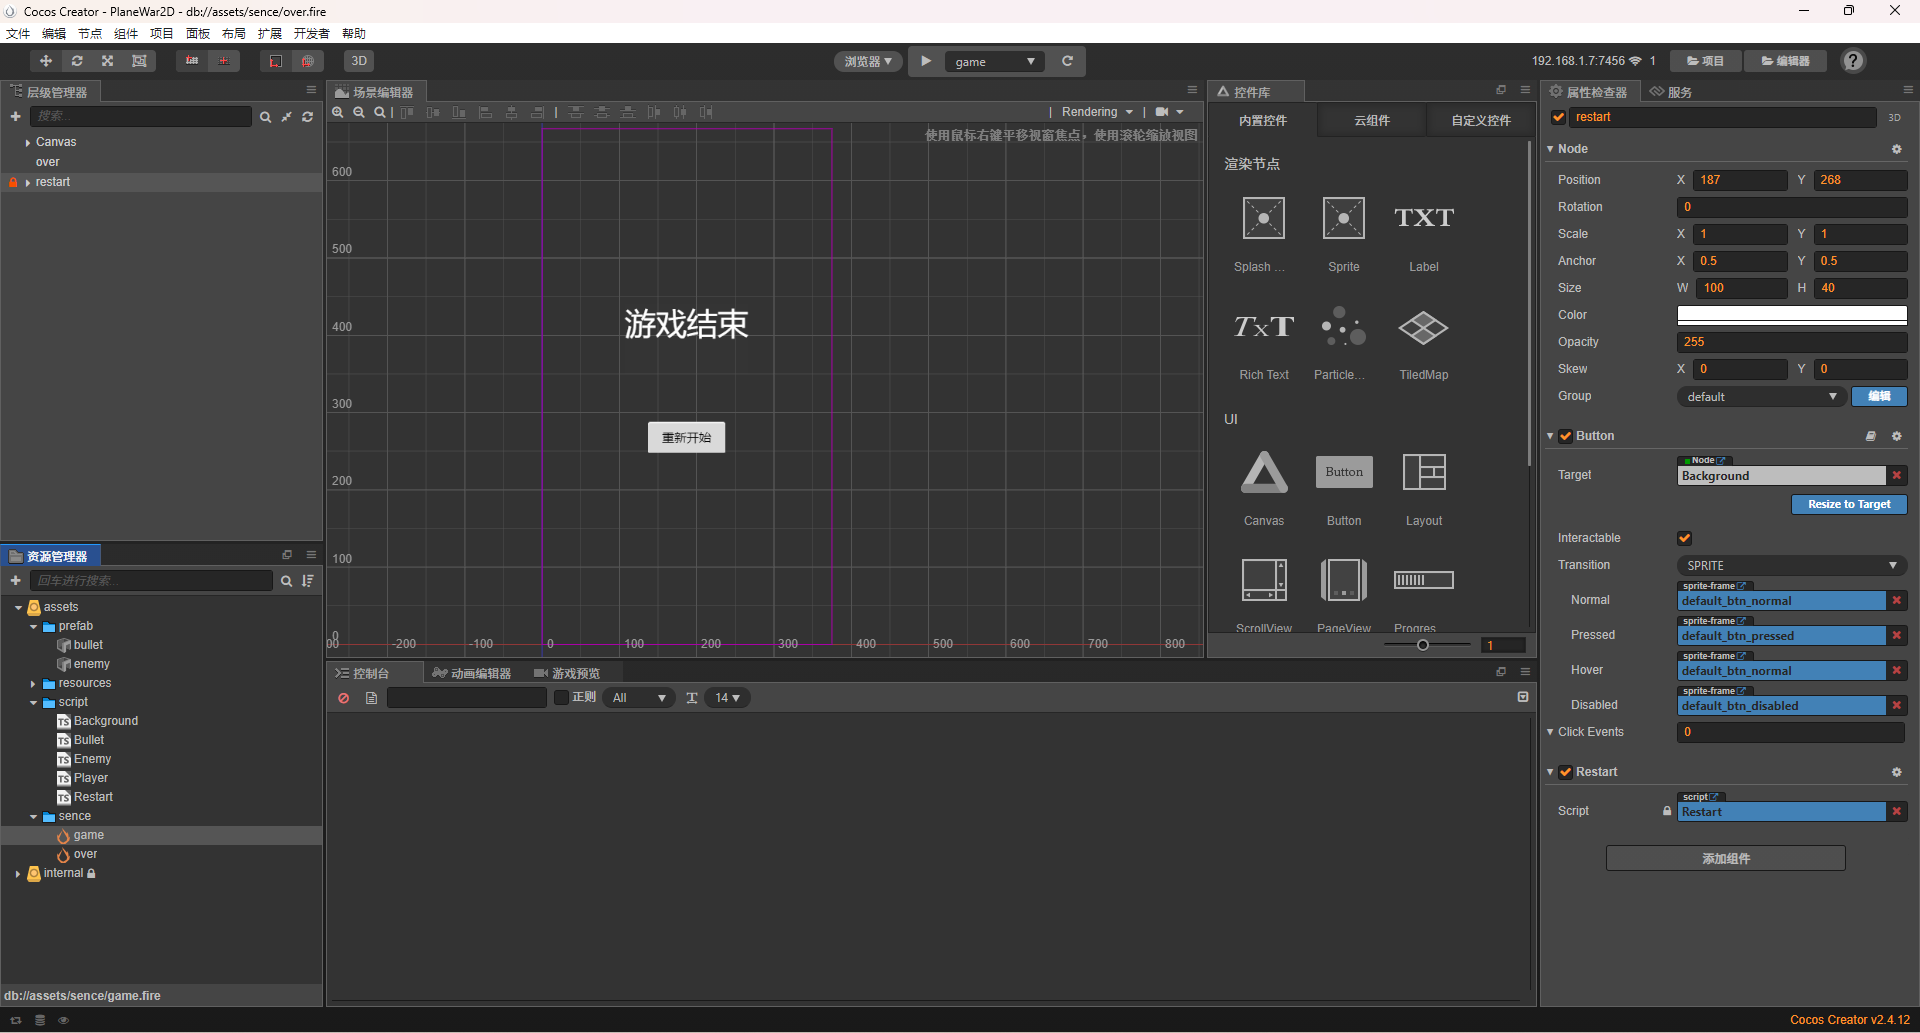
当玩家飞机与敌机碰撞时,游戏结束,创建新的游戏场景(over),在场景中添加游戏结束的Label和重新开始的Button节点。

调整碰撞处理函数,当玩家飞机被撞时,切换到游戏结束场景:
  onCollisionEnter(other: cc.Collider, self: cc.Collider) {
    if (this.dead) {
      return;
    }
    if (other.tag === 0) {
      // bullet
      other.getComponent(Bullet).playBoom();
      cc.find("background").getComponent(Background).updateScore();
      this.playBoom();
    } else if (other.tag === 2) {
      // player
      cc.director.loadScene("over");
    }
  }
给按钮节点restart,添加脚本组件Restart.ts,当点击重新开始按钮的时候切换场景:
Restart.ts
const { ccclass, property } = cc._decorator;

@ccclass
export default class Restart extends cc.Component {
  onLoad() {
    this.node.getComponent(cc.Button).node.on(
      "click",
      () => {
        cc.director.loadScene("game");
      },
      this
    );
  }

  start() {}
}
此部分涉及的文档有:
https://docs.cocos.com/creator/2.4/manual/zh/scripting/scene-managing.html
https://docs.cocos.com/creator/2.4/manual/zh/components/button.html


