Ubuntu 安装nginx,部署网站,支持http2,会话亲和性
https://www.nginx.com/resources/admin-guide/load-balancer/
https://github.com/gplessis/dotdeb-nginx/blob/jessie/debian/conf/nginx.conf#L4
1、更新Ubuntu
# add-apt-repository ppa:ondrej/nginx  #仓库名称
# apt-get update
# apt-get install -y libssl1.0.2 openssl
2、安装Nginx
# apt-get install -y nginx
# apt-get install -y nginx-extras
查看nginx启用模块
nginx -V
浏览器输入IP地址可以打开Nginx服务页面

3、设置Nginx通用配置文件
Nginx反向代理以及负载均衡配置
cat /etc/nginx/nginx.conf

user nginx;
worker_processes 4;
pid /var/run/nginx.pid;

events {
    worker_connections 10240;
    # multi_accept on;
}

http {

    ##
    # Basic Settings
    ##

    sendfile on;
    tcp_nopush on;
    tcp_nodelay on;
    keepalive_timeout 65;
    types_hash_max_size 2048;
    server_tokens off;   #关闭显示nginx版本
    server_names_hash_bucket_size 64;
    # server_name_in_redirect off;

    include /etc/nginx/mime.types;
    default_type application/octet-stream;

    ##
    # SSL Settings
    ##

    #ssl_protocols TLSv1 TLSv1.1 TLSv1.2; # Dropping SSLv3, ref: POODLE
    ssl_protocols TLSv1.2 TLSv1.3;
    ssl_prefer_server_ciphers on;
   # ssl_ciphers "ECDHE-RSA-AES128-GCM-SHA256:ECDHE-ECDSA-AES128-GCM-SHA256:ECDHE-RSA-AES256-GCM-SHA384:EECDH+AESGCM:EDH+AESGCM:AES256+EECDH:AES256+EDH";
    ssl_ciphers "TLS_ECDHE_RSA_WITH_AES_256_CBC_SHA384:TLS_ECDHE_RSA_WITH_AES_256_CBC_SHA:TLS_ECDHE_RSA_WITH_AES_128_CBC_SHA256:TLS_ECDHE_RSA_WITH_AES_128_CBC_SHA:ECDHE-RSA-AES128-GCM-SHA256:ECDHE-ECDSA-AES128-GCM-SHA256:ECDHE-RSA-AES256-GCM-SHA384:EECDH+AESGCM:EDH+AESGCM:AES256+EECDH:AES256+EDH";
    ssl_ecdh_curve secp384r1; # Requires nginx >= 1.1.0
    ssl_session_cache shared:SSL:10m;
    ssl_session_tickets off; # Requires nginx >= 1.5.9
    # ssl_stapling on; # Requires nginx >= 1.3.7
    ssl_stapling_verify on; # Requires nginx => 1.3.7

    ##
    # Logging Settings
    ##

    log_format main '$remote_addr - $remote_user [$time_local] "$request" '
                '$status $body_bytes_sent "$http_referer" '
                '"$http_user_agent" "$http_x_forwarded_for"';
    access_log /data/log/nginx/nginx.log;
    error_log /data/log/nginx/error.log;

    ##
    # Gzip Settings
    ##

    gzip on;
    gzip_vary on;
    gzip_min_length 1k;
    gzip_buffers 4 32k;
    gzip_disable "msie6";
    gzip_disable "MSIE [1-6].";
    gzip_http_version 1.1;
    gzip_comp_level 3;
    gzip_types text/plain application/x-javascript text/css application/xml text/javascript application/javascript application/json;
    ##
    # Proxy Headers
    ##
    include /etc/nginx/proxy.conf;   #设置代理头信息
    #more_set_headers 'Server: tbdress-DL-1';

    ##
    # filter ip
    ##
    include /etc/nginx/blocksip.conf;  #过滤IP地址

    ##
    # Virtual Host Configs
    ##

   # include /etc/nginx/conf.d/*.conf;
    include /etc/nginx/sites-enabled/*.conf;  #配置各个站点的信息
}
4、设置Nginx代理
cat /etc/nginx/proxy.conf

proxy_redirect          off;
proxy_set_header        Host $host;
#proxy_set_header       X-Real-IP $remote_addr; #获取真实IP
proxy_set_header        X-Forwarded-For   $proxy_add_x_forwarded_for; #获取代理者的真实ip
client_max_body_size    10m;
client_body_buffer_size 128k;
proxy_connect_timeout   90;
proxy_send_timeout      90;
proxy_read_timeout      90;
proxy_buffer_size       4k;
proxy_buffers           4 32k;
proxy_busy_buffers_size 64k;
proxy_temp_file_write_size 64k;
5、设置站点配置信息
cd /etc/nginx/sites-enabled/site.conf

upstream local_iis_80 {
    ip_hash;
    #least_conn;
    server 后端IP1:80 max_fails=2 fail_timeout=10s weight=10;
    server 后端IP2:80 max_fails=2 fail_timeout=10s weight=10;
    keepalive 45;  #防止出现nginx向后端发请求的时候连接打爆了
}

upstream local_iis_443 {
    ip_hash;
    #least_conn;
    server 后端IP1:443 max_fails=2 fail_timeout=10s weight=10;
    server 后端IP1:443 max_fails=2 fail_timeout=10s weight=10;
    keepalive 45;  #防止出现nginx向后端发请求的时候连接打爆了
}

server {
    listen 80;
    charset utf-8;

    location / {
        proxy_pass http://local_iis_80;
    }
}

server {
    listen 443 ssl http2;                 #支持http2
    charset utf-8;

    ssl_certificate /data/cert/证书.crt;
    ssl_certificate_key /data/cert/证书.key;

    location / {
        proxy_pass https://local_iis_443;
    }
}
6、查看防火墙
iptables -L -n -v
7、此时我们修改了文件,是不是就意思着必须先关了nginx再重新启动了,其实不必,nginx可以重新加载文件的。
我们直接运行:
nginx -s reload
如果不想直接加载,而只是想看看自己的配置文件有没有问题,可以直接输入:
nginx -t
或者合并执行,
nginx -t && nginx -s reload
Ubuntu默认防火墙安装、启用、配置、端口、查看状态相关信息
会话亲和性
1. nginx
属于nginx负载均衡的范畴:https://docs.nginx.com/nginx/admin-guide/load-balancer/http-load-balancer/
示例如下:
upstream backend {
    server backend1.example.com;
    server backend2.example.com;
    sticky cookie srv_id expires=1h domain=.example.com path=/;
}
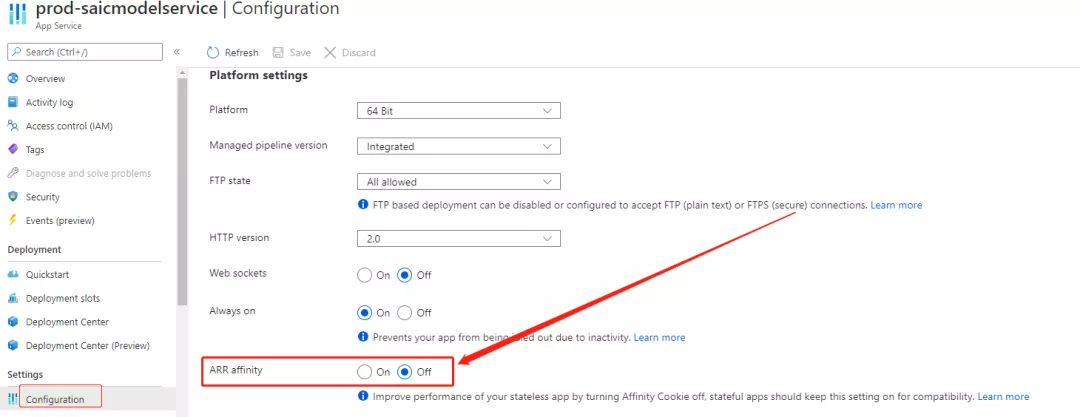
2. Azure App Service
Azure pp Service是Azure云平台提供的App托管服务,具备多实例自动缩放的能力, 其有关会话亲和性的配置如图:
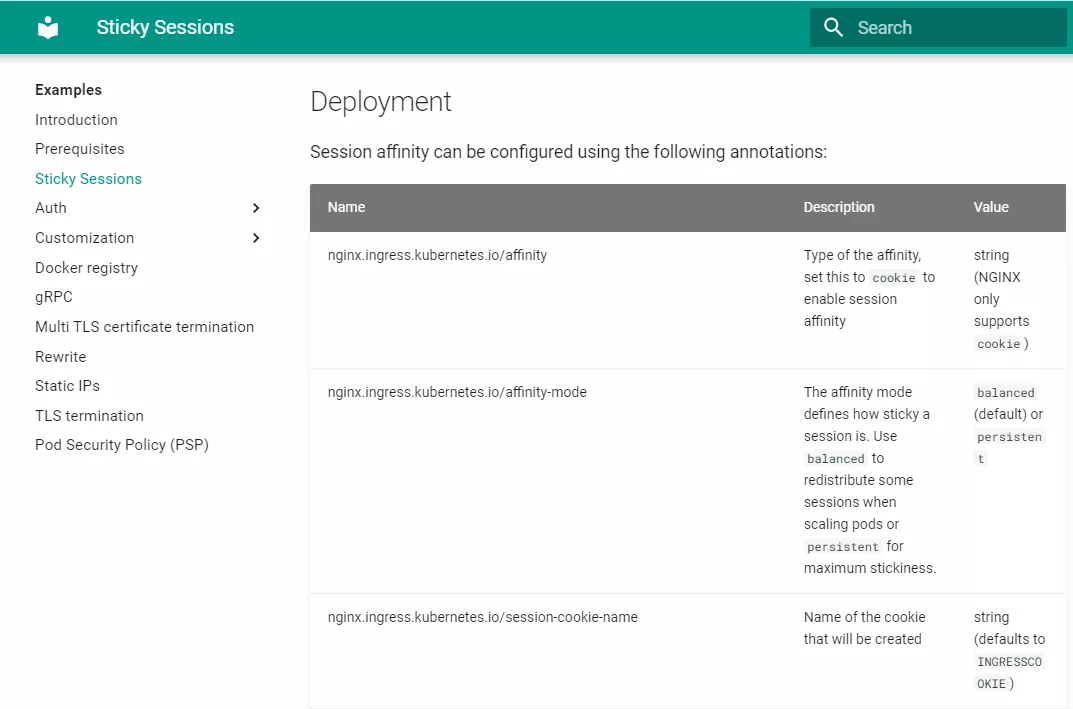
3. K8S nginx-ingress
注解 nginx.ingress.kubernetes.io/affinity 在入口的所有上游中启用和设置亲和性类型。
这样,请求将总是被定向到相同的上游服务器。
https://kubernetes.github.io/ingress-nginx/examples/affinity/cookie/

 浙公网安备 33010602011771号