13.动态权限配置
要利用spring security做动态权限控制,首先看一下数据库的权限控制的表
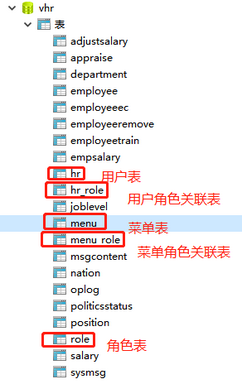
首先用户登录成功后,会有用户id,根据用户id我可以查询出来他有哪些角色,根据他的角色我可以查询出来他可以操作哪些菜单,再到menu表中查看操作了哪些菜单
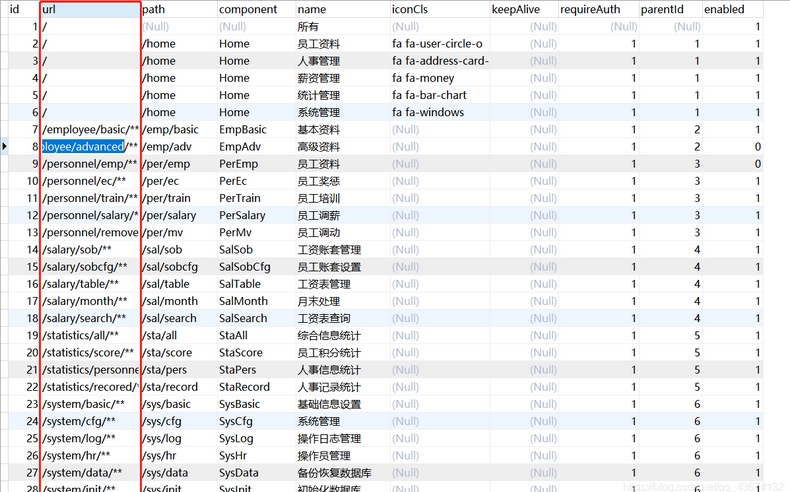
在进行接口设计的时候必须要和数据库种的menu表中的url属性时对应的
思路:
简单来说分为两步:第一步,用户先从前端发起一个http请求,拿到http请求后,去分析地址和数据库中的menu表中的哪一个是url是相匹配的,就先看一下用户请求地址跟这里边的哪一个是吻合的,第一步的核心目的是根据用户的请求地址分析出来它所需要的角色,也就是当前的请求需要哪些角色才能访问。第二步是去判断当前用户是否具备它需要的角色。
注意:角色不分配给一级菜单,只分配给二级菜单,因为一级并没有一些实质性的接口
CustomFilterInvocationSecurityMetadataSource类
在config包中创建一个CustomFilterInvocationSecurityMetadataSource类,该类的作用是根据用户传来的请求地址,分析出请求需要的角色,该类需要实现FilterInvocationSecurityMetadataSource类并重写三个方法,第一个方法是最重要的。
第一个方法的Collection:当前请求需要的角色 Object:实际上是一个filterInvocation对象 (invocation调用)
从filterInvocation里面可以获取当前请求地址,拿到地址后,我就要那这个地址去数据库里面跟这里的每一个菜单项去匹配,看是符合哪一个模式,然后再去看这个模式需要哪些角色。
String requestUrl = ((FilterInvocation)Object).getRequestUrl();
@Component
public class CustomFilterInvocationSecurityMetadataSource implements FilterInvocationSecurityMetadataSource {

    @Autowired
    MenuService menuService;

    AntPathMatcher antPathMatcher = new AntPathMatcher();
//    collenction:当前请求需要的角色  Object:实际上是一个filterInvocation对象
    @Override
    public Collection<ConfigAttribute> getAttributes(Object object) throws IllegalArgumentException {
        //从filterInvocation里面可以获取当前请求的地址,拿到地址后,我就要拿这个地址去数据库里面跟这里的每一个菜单项去匹配,看是符合哪一个模式,然后再去看这个模式需要哪些角色
        String requestUrl = ((FilterInvocation) object).getRequestUrl();
        return null;
    }

    @Override
    public Collection<ConfigAttribute> getAllConfigAttributes() {
        return null;
    }

    @Override
    public boolean supports(Class<?> aClass) {
        return true;
    }
}
修改model中的menu实体类
新加了private List
public class Menu implements Serializable {
    private Integer id;

    private String url;

    private String path;

    private String component;

    private String name;

    private String iconCls;

    private Integer parentId;

    private Boolean enabled;

    private Meta meta;

    private List<Menu> children;  //children里面放的是List集合的Menu

    //这个菜单项需要哪些角色才能访问
    private List<Role> roles;

    //省略getter和setter
修改service包中的MenuService类
在service包的MenuService类中添加一个根据角色获取所有菜单的方法,返回在menuMapper接口中查询到的数据
@Service
public class MenuService {

    @Autowired
    MenuMapper menuMapper;

    /**
     * 通过用户id获取菜单
     * @return
     */
    public List<Menu> getMenusByHrId() {
        //要传入id了,id从哪里来,我们登录的用户信息保存到security里面
        return menuMapper.getMenusByHrId(((Hr) SecurityContextHolder.getContext().getAuthentication().getPrincipal()).getId());
        //SecurityContextHolder里面有一个getContext()方法.getAuthentication()它里面的getPrincipal(),Principal它是当前登录的用户对象,然后强转成Hr对象再获取它里面的id
    }

    /**
     * 获取所有的菜单角色   一对多 一个菜单项有多个角色
     * @return
     */
//    @Cacheable
    public List<Menu> getAllMenusWithRole(){
        return menuMapper.getAllMenusWithRole();
    }
}
修改mapper中的MenuMapper接口
@Repository
public interface MenuMapper {
    int deleteByPrimaryKey(Integer id);

    int insert(Menu record);

    int insertSelective(Menu record);

    Menu selectByPrimaryKey(Integer id);

    int updateByPrimaryKeySelective(Menu record);

    int updateByPrimaryKey(Menu record);

    List<Menu> getMenusByHrId(Integer hrid);

    List<Menu> getAllMenusWithRole();
}
这个方法先不写,现在sql数据库里面把sql语句先写好,写对了,再复制过去
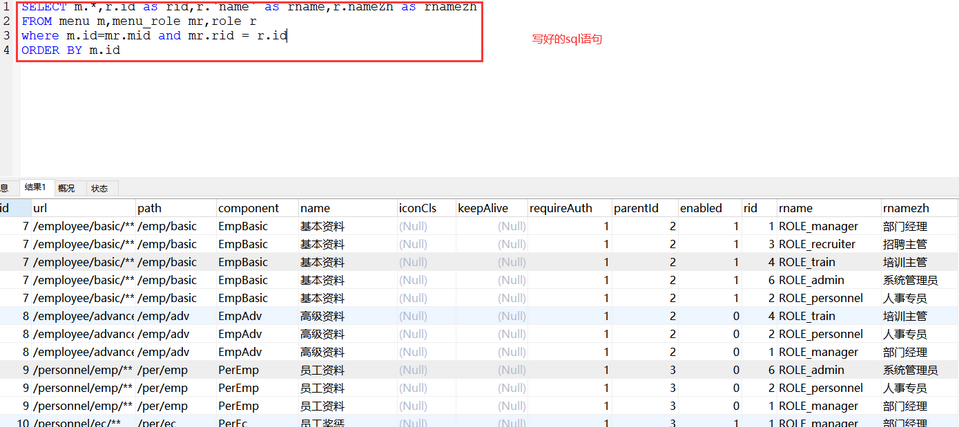
定义MenuMapper.xml
<resultMap id="MenuWithRole" type="com.lqg.vhr.model.Menu" extends="BaseResultMap">
    <collection property="roles" ofType="com.lqg.vhr.model.Role">
      <id column="rid" property="id"/>
      <result column="rname" property="name"/>
      <result column="rnameZh" property="nameZh"/>
    </collection>
  </resultMap>
  <select id="getAllMenusWithRole" resultMap="MenuWithRole">
    SELECT m.*,r.id as rid,r.`name` as rname,r.nameZh as rnamezh
    from menu m,menu_role mr,role r
    where m.id=mr.mid and mr.rid=r.id
    ORDER BY m.id
  </select>
在CustomFilterInvocationSecurityMetadataSource配置类里面注入MenuService,然后通过menuService.getAllMenusWithRole()
获取到所有的菜单数据了,这个方法大多数情况下都不会变,可以在service层的该方法上加上@Cacheable缓存
@Component
public class CustomFilterInvocationSecurityMetadataSource implements FilterInvocationSecurityMetadataSource {

    @Autowired
    MenuService menuService;

    AntPathMatcher antPathMatcher = new AntPathMatcher();
//    collenction:当前请求需要的角色  Object:实际上是一个filterInvocation对象
    @Override
    public Collection<ConfigAttribute> getAttributes(Object object) throws IllegalArgumentException {
        //从filterInvocation里面可以获取当前请求的地址,拿到地址后,我就要拿这个地址去数据库里面跟这里的每一个菜单项去匹配,看是符合哪一个模式,然后再去看这个模式需要哪些角色
        String requestUrl = ((FilterInvocation) object).getRequestUrl();
//      这个方法每次请求都会调用
        List<Menu> menus = menuService.getAllMenusWithRole();
        //比较request跟这menus里面的url是否一致 遍历menus 借助AntPathMatcher工具进行
        for (Menu menu : menus) {
//          String pattern:menus里面的规则
            if (antPathMatcher.match(menu.getUrl(),requestUrl)){
                List<Role> roles = menu.getRoles();
                String[] str = new String[roles.size()];
                for (int i = 0; i < roles.size(); i++) {
                    str[i] = roles.get(i).getName();
                }
                return SecurityConfig.createList(str);
            }
        }
//      没匹配上的统一登录之后就可以访问  "ROLE_LOGIN"只是一个标记
        return SecurityConfig.createList("ROLE_LOGIN");
    }

    @Override
    public Collection<ConfigAttribute> getAllConfigAttributes() {
        return null;
    }

    @Override
    public boolean supports(Class<?> aClass) {
        return true;
    }
}
这样我们的第一步就完成了,第一步的核心目的:根据用户的请求地址分析出它所需要的角色
CustomUrlMyDecisionManager配置类
第二步:判断当前用户是否具备这些角色,我要在config配置包里面定义CustomUrlMyDecisionManager配置类,该类需要实现AccessDecisionManager并重写三个方法,第一个方法是最重要的
@Component
public class CustomUrlMyDecisionManager implements AccessDecisionManager {
    /**
     *
     * @param authentication 当前登录的用户
     * @param object 请求对象
     * @param configAttributes 是CustomFilterInvocationSecurityMetadataSource类中的getAttributes方法的返回值
     * @throws AccessDeniedException
     * @throws InsufficientAuthenticationException
     */
    //很好比对,用户的角色在authentication里面,需要的角色在configAttributes里面,再区比较他们俩集合里面有没有包含关系就行
    @Override
    public void decide(Authentication authentication, Object object, Collection<ConfigAttribute> configAttributes) throws AccessDeniedException, InsufficientAuthenticationException {
        //遍历需要的角色
        for (ConfigAttribute configAttribute : configAttributes) {
            //它需要的角色
            String needRole = configAttribute.getAttribute();
            //如果它需要的角色是"ROLE_LOGIN"
            if ("ROLE_LOGIN".equals(needRole)){
                //如果当前用户是匿名用户的实例的话,就是没登录
                if (authentication instanceof AnonymousAuthenticationToken){
                    //没登录就抛出异常
                    throw new AccessDeniedException("尚未登录,请登录!");
                }else {
                    return;
                }
            }
            //获取当前登录用户的角色
            Collection<? extends GrantedAuthority> authorities = authentication.getAuthorities();
            //
            for (GrantedAuthority authority : authorities) {
                //如果这两个东西是相等的
                if (authority.getAuthority().equals(needRole)){
                    return;
                }
            }
        }
        throw new AccessDeniedException("权限不足,请联系管理员!");
    }

    @Override
    public boolean supports(ConfigAttribute configAttribute) {
        return true;
    }

    @Override
    public boolean supports(Class<?> aClass) {
        return true;
    }
}
CustomUrlMyDecisionManager配置类的作用是分析用户需要的角色你是否具备,如果具备,让请求继续往下走,如果不具备,则抛异常
两个关键类定义好了,接口来在SecurityConfig配置类里面把这两个定义好的配置类引入进来
@Configuration
public class SecurityConfig extends WebSecurityConfigurerAdapter {

    @Autowired
    HrService hrService;

    @Autowired
    CustomFilterInvocationSecurityMetadataSource customFilterInvocationSecurityMetadataSource;

    @Autowired
    CustomUrlMyDecisionManager customUrlMyDecisionManager;

    @Bean
    PasswordEncoder passwordEncoder(){
        return new BCryptPasswordEncoder();
    }

    //要有一个configure方法吧hrService整进来
    @Override
    protected void configure(AuthenticationManagerBuilder auth) throws Exception {
        auth.userDetailsService(hrService);
    }

    //配置登录成功或者登录失败向前端传送json数据
    @Override
    protected void configure(HttpSecurity http) throws Exception {
        http.authorizeRequests()
                //剩下的其他请求都是登录之后就能访问的
//                .anyRequest().authenticated()
                .withObjectPostProcessor(new ObjectPostProcessor<FilterSecurityInterceptor>() {
                    @Override
                    public <O extends FilterSecurityInterceptor> O postProcess(O object) {
                        object.setAccessDecisionManager(customUrlMyDecisionManager);
                        object.setSecurityMetadataSource(customFilterInvocationSecurityMetadataSource);
                        return object;
                    }
                })
                .and()
                //表单登录
                .formLogin()
                //修改默认登录的username
                .usernameParameter("username")
                //修改默认登录的password
                .passwordParameter("password")
                //处理表单登录的url路径
                .loginProcessingUrl("/doLogin")
                //默认看到的登录页面,如果是前后端分离的话,就不用配置登录页面
                .loginPage("/login")
                //登录成功的处理
                .successHandler(new AuthenticationSuccessHandler() {
                    @Override
                    public void onAuthenticationSuccess(HttpServletRequest req, HttpServletResponse resp, Authentication authentication) throws IOException, ServletException {
                        //如果登录成功就返回一段json
                        resp.setContentType("application/json;charset=utf-8");
                        //这是往出写的
                        PrintWriter out = resp.getWriter();
                        //登录成功的hr对象
                        Hr hr = (Hr)authentication.getPrincipal();
                        hr.setPassword(null);
                        RespBean ok = RespBean.ok("登录成功!", hr);
                        //把hr写成字符串
                        String s = new ObjectMapper().writeValueAsString(ok);
                        //把字符串写出去
                        out.write(s);
                        out.flush();
                        out.close();


                    }
                })
                //登录失败的处理
                .failureHandler(new AuthenticationFailureHandler() {
                    @Override
                    public void onAuthenticationFailure(HttpServletRequest req, HttpServletResponse resp, AuthenticationException exception) throws IOException, ServletException {
                        //如果登录成功就返回一段json
                        resp.setContentType("application/json;charset=utf-8");
                        //这是往出写的
                        PrintWriter out = resp.getWriter();
                        RespBean respBean = RespBean.error("登录失败!");
                        if(exception instanceof LockedException){
                            respBean.setMsg("账户被锁定,请联系管理员!");
                        }else if (exception instanceof CredentialsExpiredException){
                            respBean.setMsg("密码过期,请联系管理员!");
                        }else if (exception instanceof AccountExpiredException){
                            respBean.setMsg("账户过期,请联系管理员!");
                        }else if (exception instanceof DisabledException){
                            respBean.setMsg("账户被禁用,请联系管理员!");
                        }else if (exception instanceof BadCredentialsException){
                            respBean.setMsg("用户名或者密码输入错误,请重新输入!");
                        }
                        out.write(new ObjectMapper().writeValueAsString(respBean));
                        out.flush();
                        out.close();
                    }
                })
                //跟登录相关的接口就能直接访问
                .permitAll()
                .and()
                .logout()
                //注销成功后的回调
                .logoutSuccessHandler(new LogoutSuccessHandler() {
                    @Override
                    public void onLogoutSuccess(HttpServletRequest req, HttpServletResponse resp, Authentication authentication) throws IOException, ServletException {
                        resp.setContentType("application/json;charset=utf-8");
                        PrintWriter out = resp.getWriter();
                        out.write(new ObjectMapper().writeValueAsString(RespBean.ok("注销成功!")));
                        out.flush();
                        out.close();
                    }
                })
                .permitAll()
                .and()
                //关闭csrf攻击
                .csrf().disable();

    }

}
测试
接下来在HelloController控制类里面写两个方法测试一下
@Controller
public class HelloController {

    @GetMapping("/hello")
    public String hello(){
        return "hello";
    }

    @GetMapping("/employee/basic/hello")
    public String hello2(){
        return "/emp/basic/hello";
    }

    @GetMapping("/employee/advanced/hello")
    public String hello3(){
        return "/emp/adv/hello";
    }
}
打开postman准备测试
登录成功再访问新添加的两个接口都是403,forbidden,这是不对的
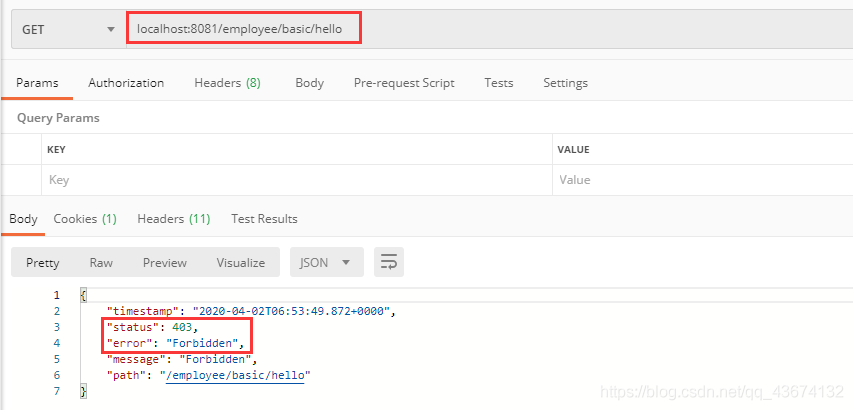
再返回看一下登录时的数据
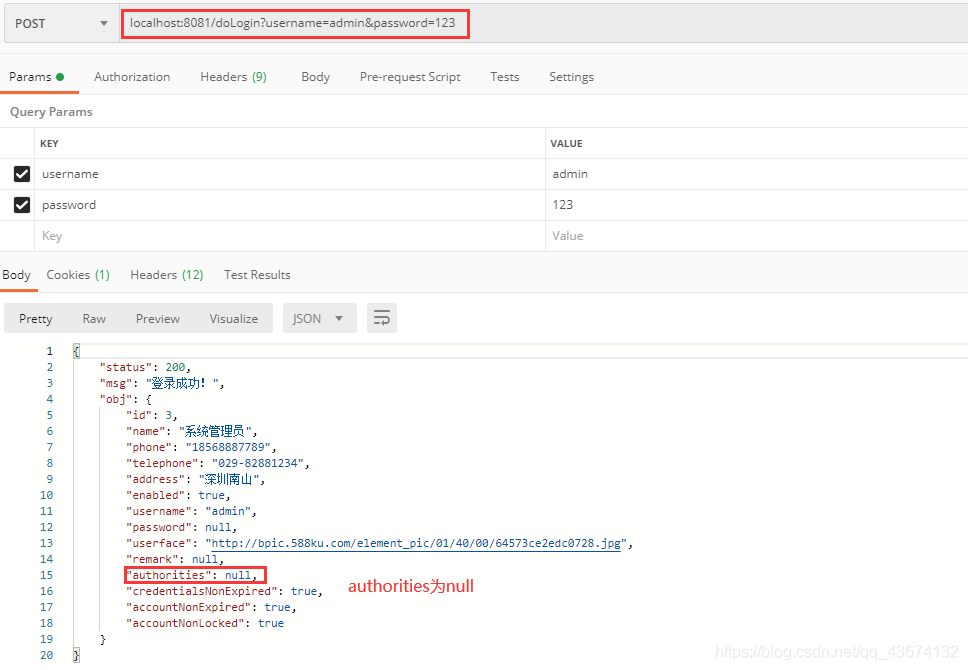
这里为null是因为我们从头到尾都没有去处理用户角色
查看用户Hr类的返回用户的所有角色的方法的返回值为null,我要给用户搞角色,就可以在hr类里面放一个role集合属性
还要给roles赋值,因为默认登录成功之后,用户是没有角色的
public class Hr implements UserDetails {
    /**
     * hrID
     */
    private Integer id;

    /**
     * 姓名
     */
    private String name;

    /**
     * 手机号码
     */
    private String phone;

    /**
     * 住宅电话
     */
    private String telephone;

    /**
     * 联系地址
     */
    private String address;

    private Boolean enabled;

    /**
     * 用户名
     */
    private String username;

    /**
     * 密码
     */
    private String password;

    private String userface;

    private String remark;

    private List<Role> roles;


    /**
     * 账户是否没有过期
     * @return
     */
    @Override
    public boolean isAccountNonExpired() {
        return true;
    }

    /**
     * 账户是否被锁定
     * @return
     */
    @Override
    public boolean isAccountNonLocked() {
        return true;
    }

    /**
     * 密码是否没有过期
     * @return
     */
    @Override
    public boolean isCredentialsNonExpired() {
        return true;
    }

    /**
     * 是否可用
     * @return
     */
    @Override
    public boolean isEnabled() {
        return enabled;
    }

    public void setUsername(String username) {
        this.username = username;
    }

    /**
     *返回用户的所有角色
     * @return
     */
    @Override
    public Collection<? extends GrantedAuthority> getAuthorities() {
        List<SimpleGrantedAuthority> authorities = new ArrayList<>(roles.size());
        for (Role role : roles) {
            authorities.add(new SimpleGrantedAuthority(role.getName()));
        }
        return authorities;
    }
}
在HrService类里面用户登录成功之后,给用户设置角色
@Service
public class HrService implements UserDetailsService {

    @Autowired
    HrMapper hrMapper;

    @Override
    public UserDetails loadUserByUsername(String s) throws UsernameNotFoundException {
        Hr hr = hrMapper.loadUserByUsername(s);
        if (hr == null) {
            throw new UsernameNotFoundException("用户名不对");
        }
        //登录成功之后,给用户设置角色
        hr.setRoles(hrMapper.getHrRolesById(hr.getId()));
        return hr;
    }
}
在HrMapper接口里边加上getHrRolesById的方法
@Repository
public interface HrMapper {
    int deleteByPrimaryKey(Integer id);

    int insert(Hr record);

    int insertSelective(Hr record);

    Hr selectByPrimaryKey(Integer id);

    int updateByPrimaryKeySelective(Hr record);

    int updateByPrimaryKey(Hr record);

    /**
     * 通过用户名查找用户
     * @param username
     * @return
     */
    Hr loadUserByUsername(String username);

    List<Role> getHrRolesById(Integer id);
}
在HrMapper.xml文件里面加上如下代码
<select id="getHrRolesById" resultType="com.lqg.vhr.model.Role">
    select r.* from role r,hr_role hrr where hrr.rid=r.id and hrid=#{id}
</select>
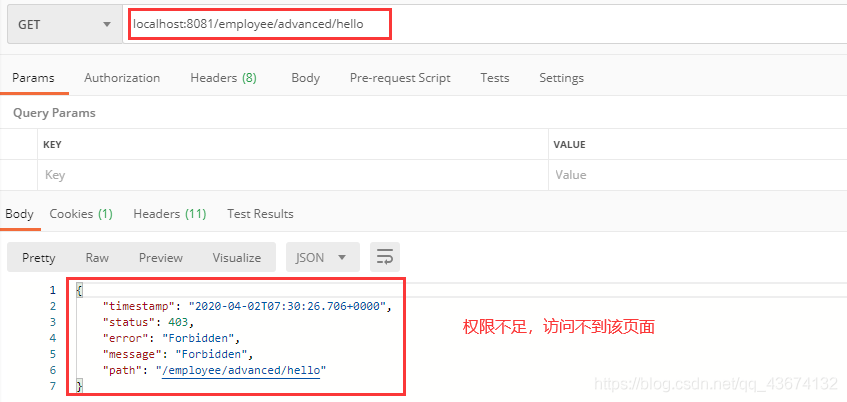
现在再重启项目,登录成功之后访问localhost:8081/employee/basic/hello,显示如下:

还有个小bug就是没有登录之前,就访问接口,会出来如下页面:
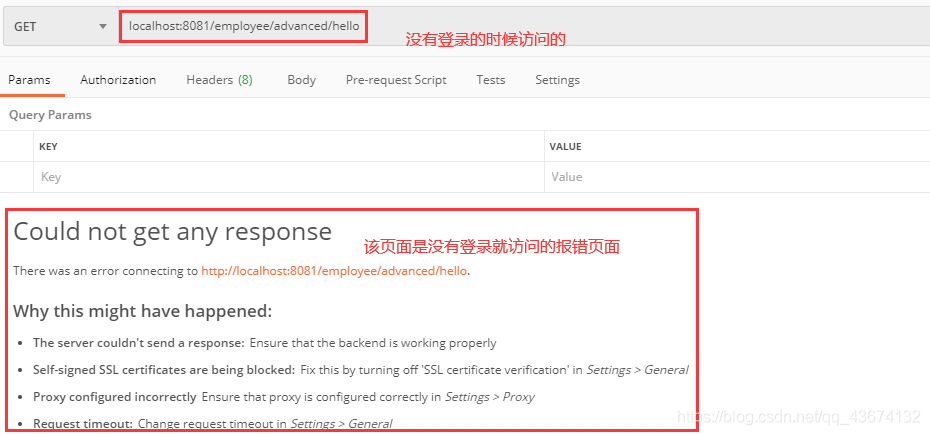
解决方法:
可以在SecurityConfig配置类里面加个方法即可,代码如下:
@Override
public void configure(WebSecurity web) throws Exception {
    web.ignoring().antMatchers("/login");
}
至此,后端接口权限设计已经完成了


