Spring Security
基本用法
- 创建项目,添加依赖
<dependency>
    <groupId>org.springframework.boot</groupId>
    <artifactId>spring-boot-starter-web</artifactId>
</dependency>
<dependency>
    <groupId>org.springframework.cloud</groupId>
    <artifactId>spring-cloud-starter-security</artifactId>
</dependency>
只要开发者在项目中添加了spring-boot-starter-security依赖,项目中所有资源都会被保护起来。
- 添加hello接口
@RestController
public class HelloController {
    @GetMapping("/hello")
    public String hello(){
        return "hello";
    }
}
- 启动项目测试
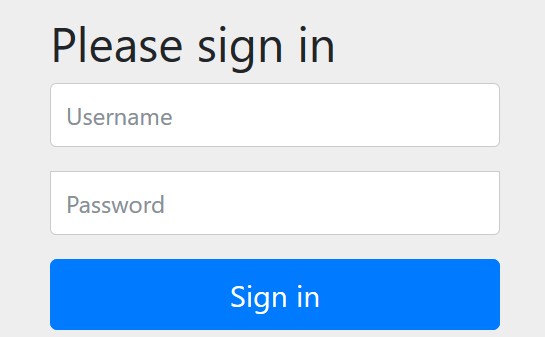
接下来启动项目,启动成功后,访问/hello接口会自动跳转到登陆页面,这个登陆页面是由Spring Security提供的
默认的用户名是user ,默认的登录密码则在每次启动项目时随机生成, 查看项目启动日志,
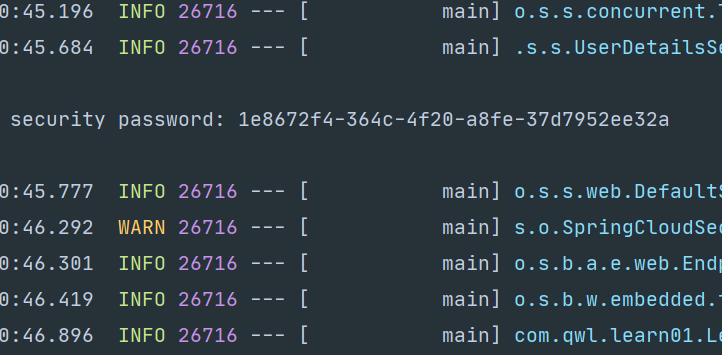
从项目启动日志中可以看到默认的登录密码,登录成功后,用户就可以访问“/hello ”接口了。
配置用户名和密码
可以在application.properties 中配置默认的用户名、密码以及用户角色,配置方式如下:
spring.security.user.name=user
spring.security.user.password=123
spring.security.user.roles=admin
当开发者在application . properties 中配置了默认的用户名和密码后,再次启动项目,项目启动日志就不会打印出随机生成的密码了,用户可直接使用配置好的用户名和密码登录,登录成功后,用户还具有一个角色一admin。
基于内存的认证
可以自定义类继承WebSecurityConfigurerAdapter,进而实现对Spring Security更多自定义配置,例如基于内存的认证,配置方式如下:
@Configuration
public class MyWebSecurityConfig extends WebSecurityConfigurerAdapter {
    @Bean
    PasswordEncoder passwordEncoder(){
        return NoOpPasswordEncoder.getInstance();
    }

    @Override
    protected void configure(AuthenticationManagerBuilder auth) throws Exception {
        auth.inMemoryAuthentication()
                .withUser("admin").password("123").roles("ADMIN","USER")
                .and()
                .withUser("user").password("123").roles("USER");
    }
}
自定义MyWebSecurityConfig继承自WebSecurityConfigurerAdapter,并重写configure(AuthenticationManagerBuilder auth)方法,在该方法中配置了两个用户。
HttpSecurity
虽然现在可以实现认证功能,但是受保护的资源都是默认的,而且也不能根据实际情况进行角色管理,如果要实现这些功能,就需要重写WebSecurityConfigurerAdapter的另一个方法:
@Configuration
public class MyWebSecurityConfig extends WebSecurityConfigurerAdapter {
    @Bean
    PasswordEncoder passwordEncoder(){
        return NoOpPasswordEncoder.getInstance();
    }

    @Override
    protected void configure(AuthenticationManagerBuilder auth) throws Exception {
        auth.inMemoryAuthentication()
                .withUser("root").password("123").roles("ADMIN","DBA")
                .and()
                .withUser("admin").password("123").roles("ADMIN","USER")
                .and()
                .withUser("user").password("123").roles("USER");
    }

    @Override
    protected void configure(HttpSecurity http) throws Exception {
        http.authorizeRequests()
                .antMatchers("/admin/**")
                .hasRole("ADMIN")
                .antMatchers("/user/**")
                .access("hasAnyRole('ADMIN','USER')")
                .antMatchers("/db/**")
                .access("hasRole('ADMIN') and hasRole('DBA')")
                .anyRequest()
                .authenticated() //除了前面定义的URL模式之外,用户访问其他的URL都必须认证后访问
                .and()
                .formLogin()//开启表单登录,即用户一开始看到的登录页面,同时配置了登录接口为”/login“,即可以直接调用”/login“接口
                .loginProcessingUrl("login")//配置loginProcessingUrl接口主要是方便ajax或者移动端调动登录接口
                .permitAll()//和登录相关的接口都不需要认证即可访问
                .and()
                .csrf()//关闭csrf
                .disable();
    }
}
配置完成后,接下来在Controller中添加如下接口进行测试
@RestController
public class HelloController {
    @GetMapping("admin/hello")
    public String admin(){
        return "admin";
    }
    @GetMapping("/user/hello")
    public String user(){
        return "hello user";
    }
    @GetMapping("/db/hello")
    public String dba(){
        return "hello dba";
    }
    @GetMapping("hello")
    public String hello(){
        return "hello";
    }
}
登录表单详细配置
迄今为止,登录表单一直使用SpringSecurity提供的页面,登录成功后也是默认的页面跳转,但是前后端分离正在成为企业级应用开发的主流,在前后端分离的开发方式中,前后端的数据交互通过JSON进行,这时,登录成功后就不是页面跳转了,而是一段JSON提示,要实现这些功能,只需要完善上文的配置,代码如下:
@Configuration
public class MyWebSecurityConfig extends WebSecurityConfigurerAdapter {
@Bean
PasswordEncoder passwordEncoder(){
return NoOpPasswordEncoder.getInstance();
}
@Override
protected void configure(AuthenticationManagerBuilder auth) throws Exception {
auth.inMemoryAuthentication()
.withUser("root").password("123").roles("ADMIN","DBA")
.and()
.withUser("admin").password("123").roles("ADMIN","USER")
.and()
.withUser("user").password("123").roles("USER");
}
@Override
protected void configure(HttpSecurity http) throws Exception {
http.authorizeRequests()
.antMatchers("/admin/**")
.hasRole("ADMIN")
.antMatchers("/user/**")
.access("hasAnyRole('ADMIN','USER')")
.antMatchers("/db/**")
.access("hasRole('ADMIN') and hasRole('DBA')")
.anyRequest()
.authenticated() //除了前面定义的URL模式之外,用户访问其他的URL都必须认证后访问
.and()
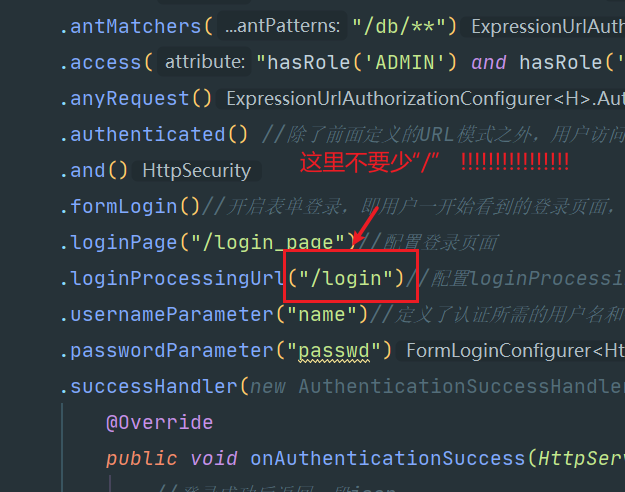
.formLogin()//开启表单登录,即用户一开始看到的登录页面,同时配置了登录接口为”/login“,即可以直接调用”/login“接口
.loginPage("/login_page")//配置登录页面
.loginProcessingUrl("/login")//配置loginProcessingUrl接口主要是方便ajax或者移动端调动登录接口
.usernameParameter("name")//定义了认证所需的用户名和密码的参数名
.passwordParameter("passwd")
.successHandler(new AuthenticationSuccessHandler() {
@Override
public void onAuthenticationSuccess(HttpServletRequest httpServletRequest, HttpServletResponse httpServletResponse, Authentication authentication) throws IOException, ServletException {
//登录成功后返回一段json
Object principal = authentication.getPrincipal();
httpServletResponse.setContentType("application/json;charset=utf-8");
PrintWriter out = httpServletResponse.getWriter();
httpServletResponse.setStatus(200);
Map<String,Object> map = new HashMap<>();
map.put("status", 200);
map.put("msg", principal);
ObjectMapper om = new ObjectMapper();
out.write(om.writeValueAsString(map));
out.flush();
out.close();
}
})
.failureHandler(new AuthenticationFailureHandler() {
@Override
public void onAuthenticationFailure(HttpServletRequest httpServletRequest, HttpServletResponse httpServletResponse, AuthenticationException e) throws IOException, ServletException {
httpServletResponse.setContentType("application/json;charset=utf-8");
PrintWriter out = httpServletResponse.getWriter();
httpServletResponse.setStatus(401);
Map<String,Object> map = new HashMap<>();
map.put("status", 401);
if (e instanceof LockedException) {
map.put("msg", "账户被锁定,登录失败!");
} else if (e instanceof BadCredentialsException) {
map.put("msg", "账户名或密码输入错误,登录失败!");
} else if (e instanceof DisabledException) {
map.put("msg","账户被禁用,登录失败!");
} else if (e instanceof AccountExpiredException) {
map.put("msg","账户已过期,登陆失败");
} else if (e instanceof CredentialsExpiredException) {
map.put("msg", "密码已过期,登录失败");
}else{
map.put("msg", "登录失败");
}
ObjectMapper om = new ObjectMapper();
out.write(om.writeValueAsString(map));
out.flush();
out.close();
}
})
.permitAll()//和登录相关的接口都不需要认证即可访问
.and()
.csrf()//关闭csrf
.disable();
}
}
注销登录配置
@Configuration
public class MyWebSecurityConfig extends WebSecurityConfigurerAdapter {
@Bean
PasswordEncoder passwordEncoder(){
return NoOpPasswordEncoder.getInstance();
}
@Override
protected void configure(AuthenticationManagerBuilder auth) throws Exception {
auth.inMemoryAuthentication()
.withUser("root").password("123").roles("ADMIN","DBA")
.and()
.withUser("admin").password("123").roles("ADMIN","USER")
.and()
.withUser("user").password("123").roles("USER");
}
@Override
protected void configure(HttpSecurity http) throws Exception {
http.authorizeRequests()
.antMatchers("/admin/**")
.hasRole("ADMIN")
.antMatchers("/user/**")
.access("hasAnyRole('ADMIN','USER')")
.antMatchers("/db/**")
.access("hasRole('ADMIN') and hasRole('DBA')")
.anyRequest()
.authenticated() //除了前面定义的URL模式之外,用户访问其他的URL都必须认证后访问
.and()
.formLogin()//开启表单登录,即用户一开始看到的登录页面,同时配置了登录接口为”/login“,即可以直接调用”/login“接口
.loginPage("/login_page")//配置登录页面
.loginProcessingUrl("/login")//配置loginProcessingUrl接口主要是方便ajax或者移动端调动登录接口
.usernameParameter("name")//定义了认证所需的用户名和密码的参数名
.passwordParameter("passwd")
.successHandler(new AuthenticationSuccessHandler() {
@Override
public void onAuthenticationSuccess(HttpServletRequest httpServletRequest, HttpServletResponse httpServletResponse, Authentication authentication) throws IOException, ServletException {
//登录成功后返回一段json
Object principal = authentication.getPrincipal();
httpServletResponse.setContentType("application/json;charset=utf-8");
PrintWriter out = httpServletResponse.getWriter();
httpServletResponse.setStatus(200);
Map<String,Object> map = new HashMap<>();
map.put("status", 200);
map.put("msg", principal);
ObjectMapper om = new ObjectMapper();
out.write(om.writeValueAsString(map));
out.flush();
out.close();
}
})
.failureHandler(new AuthenticationFailureHandler() {
@Override
public void onAuthenticationFailure(HttpServletRequest httpServletRequest, HttpServletResponse httpServletResponse, AuthenticationException e) throws IOException, ServletException {
httpServletResponse.setContentType("application/json;charset=utf-8");
PrintWriter out = httpServletResponse.getWriter();
httpServletResponse.setStatus(401);
Map<String,Object> map = new HashMap<>();
map.put("status", 401);
if (e instanceof LockedException) {
map.put("msg", "账户被锁定,登录失败!");
} else if (e instanceof BadCredentialsException) {
map.put("msg", "账户名或密码输入错误,登录失败!");
} else if (e instanceof DisabledException) {
map.put("msg","账户被禁用,登录失败!");
} else if (e instanceof AccountExpiredException) {
map.put("msg","账户已过期,登陆失败");
} else if (e instanceof CredentialsExpiredException) {
map.put("msg", "密码已过期,登录失败");
}else{
map.put("msg", "登录失败");
}
ObjectMapper om = new ObjectMapper();
out.write(om.writeValueAsString(map));
out.flush();
out.close();
}
})
.permitAll()
.and()
.logout()//开启注销登录配置
.logoutUrl("/logout")//配置注销登录请求URL为“/logout”,默认也是“/logout”
.clearAuthentication(true)//表示是否清除身份认证信息,默认为true,表示清除
.invalidateHttpSession(true)//表示是否使Session失效,默认为true
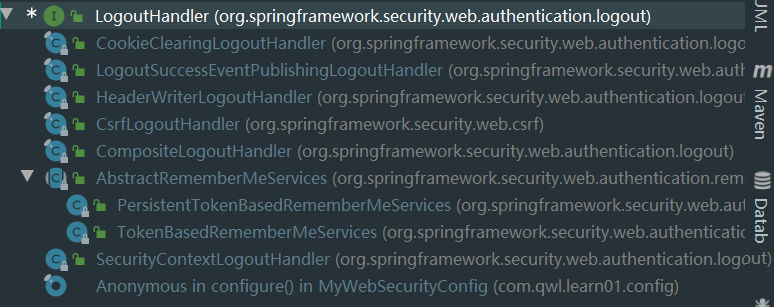
.addLogoutHandler(new LogoutHandler() {//配置一个LogoutHandler,开发者可以在LogoutHandler
// 中完成一些数据清除工作,例如Cookie的清除,springSecurity提供了一些常见的实现如,图
@Override
public void logout(HttpServletRequest httpServletRequest, HttpServletResponse httpServletResponse, Authentication authentication) {
}
})
.logoutSuccessHandler(new LogoutSuccessHandler() {//可以在这里处理注销成功后的业务逻辑,例如返回一段JSON
// 提示或跳转到登陆页面
@Override
public void onLogoutSuccess(HttpServletRequest httpServletRequest, HttpServletResponse httpServletResponse, Authentication authentication) throws IOException, ServletException {
//httpServletResponse.sendRedirect("/login_page");
httpServletResponse.setContentType("application/json;charset=utf-8");
PrintWriter out = httpServletResponse.getWriter();
Map<String, Object> map = new HashMap<>();
map.put("status", 200);
map.put("msg","注销登录成功");
out.write(new ObjectMapper().writeValueAsString(map));
out.flush();
out.close();
}
})
//和登录相关的接口都不需要认证即可访问
.and()
.csrf()//关闭csrf
.disable();
}
}
多个HttpSecurity
如果业务比较复杂,可以配置多个HttpSecurity,实现对WebSecurityConfigurerAdapter的多次扩展,代码如下:
@Configuration
public class MultiHttpSecurityConfig {
    @Bean
    PasswordEncoder passwordEncoder(){
        return NoOpPasswordEncoder.getInstance();
    }

    @Autowired
    protected void configure(AuthenticationManagerBuilder auth)throws Exception{
        auth.inMemoryAuthentication()
                .withUser("admin").password("123").roles("ADMIN", "USER")
                .and()
                .withUser("user").password("123").roles("USER");
    }

    @Configuration
    @Order(1)
    public static class AdminSecurityConfig extends WebSecurityConfigurerAdapter{
        @Override
        protected void configure(HttpSecurity http)throws Exception{
            http.antMatcher("/admin/**").authorizeRequests()
                    .anyRequest().hasRole("ADMIN");

        }
    }
    @Configuration
    public static class OtherSecurityConfig extends WebSecurityConfigurerAdapter{
        protected void configure(HttpSecurity http) throws Exception{
            http.authorizeRequests()
                    .anyRequest().authenticated()
                    .and()
                    .formLogin()
                    .loginProcessingUrl("/login")
                    .permitAll()
                    .and()
                    .csrf()
                    .disable();
        }
    }
}
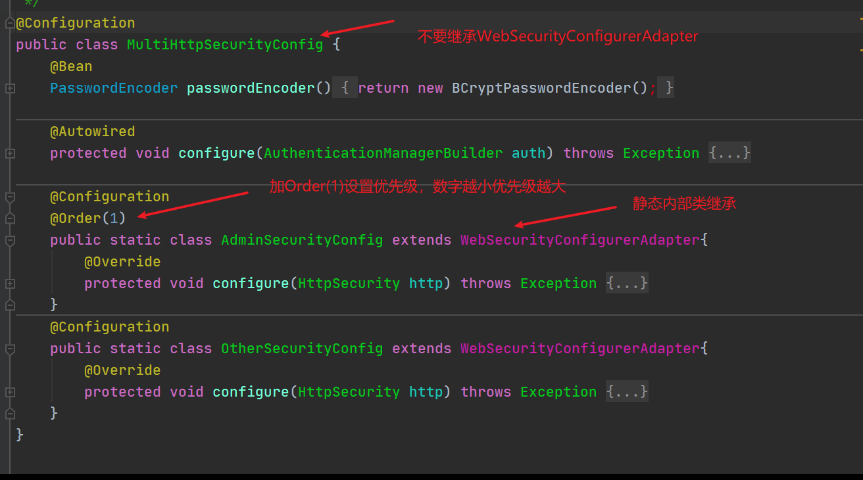
自己直多个HttpSecurity 时, MultiHttpSecurityConfig不需要继承WebSecurityConfigurerAdapter,在MultiHttpSecurityConfig 中创建静态内部类继承WebS ecurityConfigurerAdapter 即可,静态内部类上添加@Configuration注解和@Order注解,@Order注解表示该配直的优先级,数字越小优先级越大,未加@Order 注解的配置优先级最小。
密码加密
密码加密一般会用到散列函数,又称散列算法,哈希函数,这是一种从任何数据中创建数字“指纹”的方法。散列函数把消息或数据压缩成摘要,使得数据量变小,将数据的格式固定下来,然后将数据打乱混合,重新创建一个散列值。散列值通常用一个短的随机字母和数字组成的字符串来表示。好的散列函数在输入域中很少出现散列冲突。在散列表和数据处理中,不抑制冲突来区别数据会使得数据库记录更难找到。我们常用的散列函数有MD5 消息摘要算法、安全散列算法。
但是仅仅使用散列函数还不够,为了增加密码的安全性,一般在密码加密过程中还需要加盐,所谓的盐可以是一个随机数,也可以是用户名,加盐之后,即使密码明文相同的用户生成的密码,密文也不相同,这可以极大地提高密码的安全性。但是传统的加盐方式需要在数据库中有专门的字段来记录盐值,这个字段可能是用户名字段(因为用户名唯一),也可能是一个专门记录盐值的字段,这样的配置比较烦琐。Spring Security 提供了多种密码加密方案,官方推荐使用BCryptPasswordEncoder, BCryptPasswordEncoder 使用BCrypt 强哈希函数,开发者在使用时可以选择提供strength 和SecureRandom 实例。strength 越大,密钥的迭代次数越多,密钥的迭代数为2"strength 。strength 取值在4~31 之间,默认为10 。
实践
在Spring Boot 中配置密码加密非常容易,只需要修改上文配置的PasswordEncoder这个Bean的实现即可,代码如下:
@Bean
PasswordEncoder passwordEncoder(){
    return new BCryptPasswordEncoder(10);
}
创建BCryptPasswordEncoder 时传入的参数10 就是strength ,即密钥的法代次数(也可以不配置,默认为10 )
一般情况下,用户信息是存储在数据库中的,因此需要在用户注册时对密码进行加密处理,代码如下:
@Service
public class RegService{
    public int reg(String username,String password){
        BCryptPasswordEncoder encoder = new BCryptPasswordEncoder();
        String encodePassword = encoder.encode(password);
        return saveToDb(username, encodePassword);
    }
}
用户将密码从前端传来之后, 通过调用BCryptPasswordEncoder 实例中的encode 方法对密码进行加密处理,加密完成后将密文存入数据库。
生成密码
@Test
void contextLoads() {
    for (int i = 0; i < 10; i++) {
        BCryptPasswordEncoder encoder = new BCryptPasswordEncoder();
        System.out.println(encoder.encode("123"));

    }
}
方法安全
配置类中开启
上文介绍的认证与授权都是基于 URL 的,开发者也可以通过注解来灵活地配置方法安全,要使用相关注解,
首先要通过@EnableGlobalMethodSecurity 注解开启基于注解的安全配置:
@Configuration
@EnableGlobalMethodSecurity(prePostEnabled = true,securedEnabled = true)
public class MultiHttpSecurityConfig {
}
@EnableGlobalMethodSecurity(prePostEnabled = true, securedEnabled = true)
prePostEnabled=true会解锁@PreAuthorize和 @PostAuthorize两个注解,顾名思义,@PreAuthorize注解会在方法执行前进行验证,而@PostAuthorize注解在方法执行后进行校验
securedEnable=true会解锁@Secured注解
@PreAuthorize 注解, 在方法调用之前, 基于表达式结果来限制方法的使用.
@PostAuthorize 注解, 允许方法调用, 但是如果表达式结果为 false, 将抛出一个安全性异常.
@PostFilter 注解, 允许方法调用, 但必要按照表达式来过滤方法的结果.
@PreFilter 注解, 允许方法调用, 但必须在进入方法之前过来输入值.
例子:
@PreAuthorize("hasRole('ADMIN')") //必须有 ROLE_ADMIN 角色
public void addBook(Book book);

//必须同时具备 ROLE_ADMIN 和 ROLE_DBA 角色
@PreAuthorize("hasRole('ADMIN') AND hasRole('DBA')")
public void addBook(Book book);

@PreAuthorize ("#book.owner == authentication.name")
public void deleteBook(Book book);

@PostAuthorize ("returnObject.owner == authentication.name")
public Book getBook();
securedEnabled=true 会解锁@Secured 注解。
只有满足角色的用户才能访问被注解的方法, 否则将会抛出 AccessDenied 异常.
例子:
@Secured("ROLE_TELLER","ROLE_ADMIN"), 该方法只允许 ROLE_TELLER 或 ROLE_ADMIN 角色的用户访问.
@Secured("IS_AUTHENTICATED_ANONYMOUSLY"), 该方法允许匿名用户访问.
编写方法
@Service
public class MethodService {

    @PreAuthorize("hasRole('admin')") //会在方法执行前进行验证
    public String admin() {
        return "hello admin";
    }

    @Secured("ROLE_user")
    public String user() {
        return "hello user";
    }

    @PreAuthorize("hasAnyRole('admin','user')")
    public String hello() {
        return "hello hello";
    }
}
在 controller 注入 MthodService 不同接口调用不同业务方法
@RestController
public class HelloController {

    @Autowired
    private MethodService methodService;

    @GetMapping("/hello1")
    public String hello1() {
        return methodService.admin();
    }

    @GetMapping("/hello2")
    public String admin() {
        return methodService.user();
    }

    @GetMapping("/hello3")
    public String user() {
        return methodService.hello();
    }
}
