JUC学习笔记——共享模型之管程
JUC学习笔记——共享模型之管程
在本系列内容中我们会对JUC做一个系统的学习,本片将会介绍JUC的管程部分
我们会分为以下几部分进行介绍:
- 共享问题
- 共享问题解决方案
- 线程安全分析
- Monitor
- synchronized锁
- Wait/notify
- 模式之保护性暂停
- 模式之生产者消费者
- park
- 线程状态转换详解
- 多锁操作
- 活跃性
- ReentrantLock
- 同步模式之顺序控制
共享问题
这小节我们将会介绍共享问题
共享问题概述
我们首先来简单介绍一下贡献问题的产生原因:
- 操作系统目前只操纵一个CPU单位(单核CPU)
- 但是有两个线程都需要CPU来运行程序,所以操作系统采用时间片分配CPU
- 假设一个线程负责i++,一个线程负责i--,但我们需要注意共享数据的存放不是在线程中而是在内存里
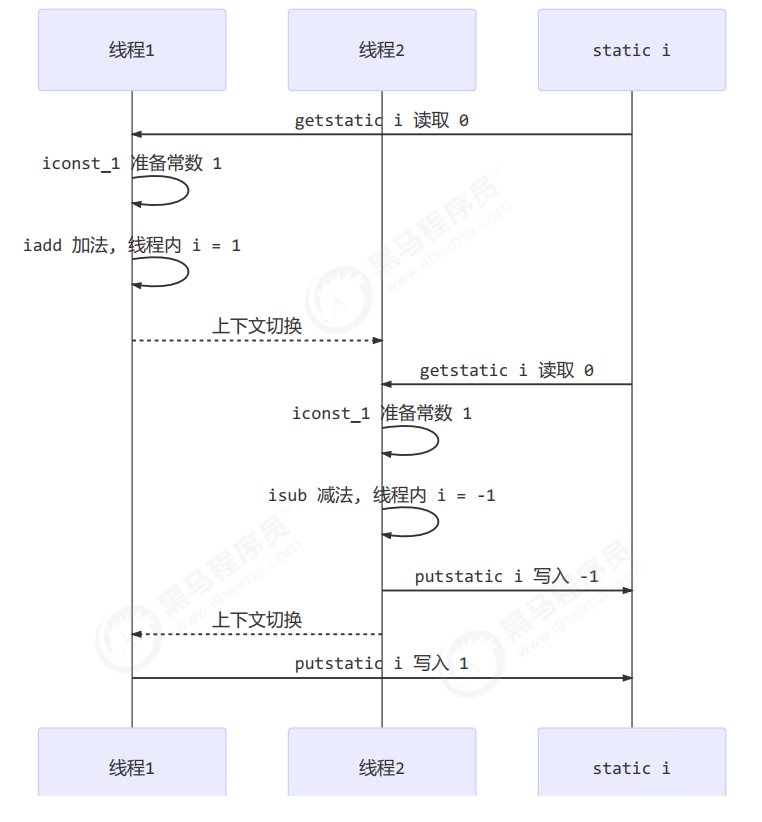
- 假设一个线程取到数据,并进行i++操作之后,但并未将数据放入时,发生了上下文转换,这时另一个线程完成了i--操作
- 这时另一个线程的操作结果为0-1:-1,结果这个线程继续操作,将计算后的数据直接放入,结果变为了1,结果错误引发共享问题
实际代码体现
我们采用实际代码给出示例:
// 针对counter,我们一个线程++,一个线程--各运行5000次
static int counter = 0;
public static void main(String[] args) throws InterruptedException {
    Thread t1 = new Thread(() -> {
        for (int i = 0; i < 5000; i++) {
            counter++;
        }
    }, "t1");
    Thread t2 = new Thread(() -> {
        for (int i = 0; i < 5000; i++) {
            counter--;
        }
    }, "t2");
    t1.start();
    t2.start();
    t1.join();
    t2.join();
    log.debug("{}",counter);
}


// 但结果却不是0,经常为-5000~5000之间的数
我们可以从底层代码分析问题:
/*i++底层代码*/

getstatic i // 获取静态变量i的值
iconst_1 	// 准备常量1
iadd 		// 自增
putstatic i // 将修改后的值存入静态变量i

/*i--底层代码*/

getstatic i // 获取静态变量i的值
iconst_1 	// 准备常量1
isub 		// 自减
putstatic i // 将修改后的值存入静态变量i
我们会发现他们的底层代码并不是一步实现,而是多步操作一同实现
在单线程下,按照正常顺序实现自然不会出错:
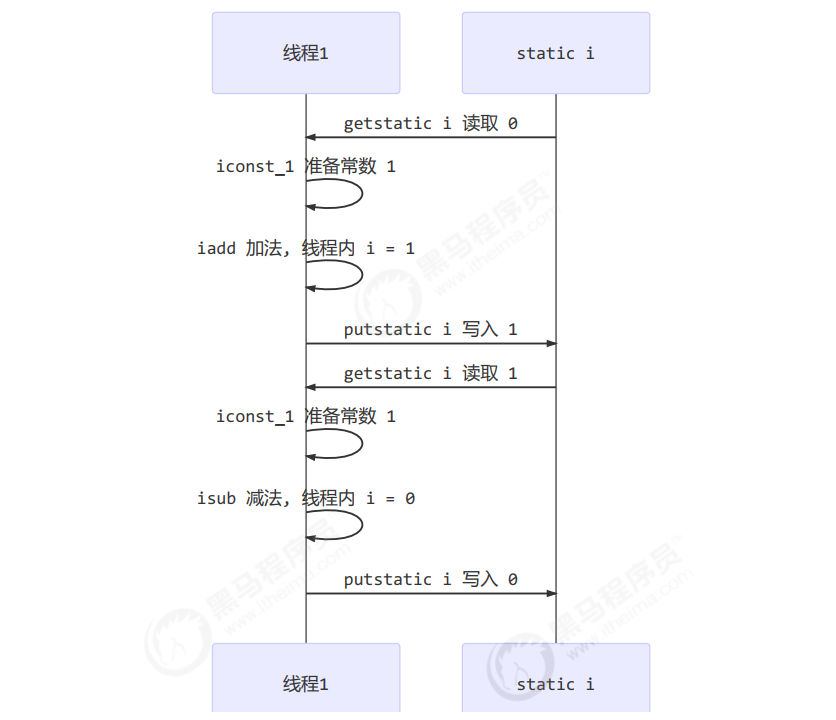
但是如果是多线程,就会因为上下文切换的缘由导致部分步骤出现交杂(我们给出正数示例):
临界区和竞态条件
首先我们来简单介绍一下临界区:
- 一段代码块内如果存在对共享资源的多线程读写操作,称这段代码块为临界区
- 例如我们上述共享问题中的i就是共享资源,而对i操作的i++和i--操作都可以被称为临界区
针对临界区我们需要注意以下内容:
- 一个程序运行多个线程本身是没有问题的
- 多个线程读共享资源其实也没有问题
- 但是在多个线程对共享资源读写操作时发生指令交错,就会出现问题
然后我们再来介绍一下竞态条件:
- 多个线程在临界区内执行,由于代码的执行序列不同而导致结果无法预测,称之为发生了竞态条件
共享问题解决方案
这小节我们将会介绍共享问题解决方案
共享问题解决方案总述
我们的共享问题主要采用以下两种方案解决:
- 阻塞式的解决方案:synchronized,Lock
- 非阻塞式的解决方案:原子变量
synchronized简述
首先我们简单介绍一下synchronized:
- 俗称的【对象锁】,采用互斥的方式使目前至多只有一个线程能持有【对象锁】其它线程再想获取这个【对象锁】时就会阻塞住。
- 这样就能保证拥有锁的线程可以安全的执行临界区内的代码,不用担心线程上下文切换
我们先来介绍synchronized的语法:
// 线程1, 线程2 都使用同一对象作为锁,这样一个运行,另一个处于blocked阻塞
synchronized(对象)
{
    临界区
}
我们再给出相关代码示例:
// 我们创建一个room对象来作为锁,注意处理共享问题的线程需要绑定同一个锁

static int counter = 0;
static final Object room = new Object();
public static void main(String[] args) throws InterruptedException {
    Thread t1 = new Thread(() -> {
        for (int i = 0; i < 5000; i++) {
            synchronized (room) {
                counter++;
            }
        }
    }, "t1");
    Thread t2 = new Thread(() -> {
        for (int i = 0; i < 5000; i++) {
            synchronized (room) {
                counter--;
            }
        }
    }, "t2");
    t1.start();
    t2.start();
    t1.join();
    t2.join();
    log.debug("{}",counter);
}
我们做简单解释:
- synchronized相当于一个方法用来设置一个房间
- room对象相当于一个锁,这个锁控制着房间,而房间中放着所有对应的synchronized里面的代码
- 多个线程谁先进入room就可以获得钥匙,然后如果想要进入这个房间操作,只有有钥匙的线程才可以
- 当该线程操作结束后,就会主动将钥匙让出来,其他线程就可以进行抢夺钥匙,哪个线程获得钥匙就可以继续操作
- 同时我们需要注意时间片结束并不意味着解开锁,就算轮到其他线程的时间片,他们也不能进入到房间里去执行他们的代码
synchronized思考
synchronized 实际是用对象锁保证了临界区内代码的原子性,临界区内的代码对外是不可分割的,不会被线程切换所打断。
我们简单给出三个思考问题:
// - 如果把 synchronized(obj) 放在 for 循环的外面,如何理解?-- 原子性
会将for循环也作为原子性的一部分,会连续执行5000次之后才释放锁给另一个线程使用

// - 如果 t1 synchronized(obj1) 而 t2 synchronized(obj2) 会怎样运作?-- 锁对象
两个线程使用不同的锁,自然就对应不同的房间,不具有安全性

// -如果 t1 synchronized(obj) 而 t2 没有加会怎么样?如何理解?-- 锁对象
一个线程使用锁,另一个不使用,自然不具有互斥关系,不具有安全性
对象解决共享问题
我们同样也可以直接采用一个类和synchronized搭配来解决共享问题
// 我们自定义一个类,里面装有数据,我们采用synchronized解决共享问题
class Room {

    // value值是属于room对象的
    int value = 0;

    // 这里的 synchronized 里面的 this 指的是创建的类的实际对象

    public void increment() {
        synchronized (this) {
            value++;
        }
    }

    public void decrement() {
        synchronized (this) {
            value--;
        }
    }

    public int get() {
        synchronized (this) {
            return value;
        }
    }
}

@Slf4j
public class Test1 {

    public static void main(String[] args) throws InterruptedException {
        // 注意:这里线程1,2采用的是一个roon对象,所以他们的value值是共享的
        Room room = new Room();

        Thread t1 = new Thread(() -> {
            for (int j = 0; j < 5000; j++) {
                room.increment();
            }
        }, "t1");

        Thread t2 = new Thread(() -> {
            for (int j = 0; j < 5000; j++) {
                room.decrement();
            }
        }, "t2");

        t1.start();
        t2.start();
        t1.join();
        t2.join();

        log.debug("count: {}" , room.get());
    }
}
synchronized方法使用
我们的synchronized有时也会用于类的方法中,具有不同的意义:
// 首先是将synchronized放在普通的方法上:下面两个class是等价的,这里的this指的是对象本身

class Test{
    public synchronized void test() {

    }
}

class Test{
    public void test() {
        synchronized(this) {

        }
    }
}

// 再者就是将synchronized放在静态方法上:下面两个class是等价的,这里的Test.class指的是类本身

class Test{
    public synchronized static void test() {
    }
}

class Test{
    public static void test() {
        synchronized(Test.class) {

        }
    }
}
"线程八锁"思考题
我们来给出面试常用的线程八锁思考题来进行自身检测:
/*第1题*/

@Slf4j(topic = "c.Number")
class Number{
    public synchronized void a() {
        log.debug("1");
    }
    public synchronized void b() {
        log.debug("2");
    }
}
public static void main(String[] args) {
    Number n1 = new Number();
    new Thread(()->{ n1.a(); }).start();
    new Thread(()->{ n1.b(); }).start();
}

// 结果:1,2或2,1
// 解析:两者都绑定n1对象锁,互斥关系

/*第2题*/

@Slf4j(topic = "c.Number")
class Number{
    public synchronized void a() {
        sleep(1);
        log.debug("1");
    }
    public synchronized void b() {
        log.debug("2");
    }
}
public static void main(String[] args) {
    Number n1 = new Number();
    new Thread(()->{ n1.a(); }).start();
    new Thread(()->{ n1.b(); }).start();
}

// 结果:1s后1,2或2,1s后1
// 解析:两者都绑定n1对象锁,互斥关系;sleep不具有任何关系

/*第3题*/

@Slf4j(topic = "c.Number")
class Number{
    public synchronized void a() {
        sleep(1);
        log.debug("1");
    }
    public synchronized void b() {
        log.debug("2");
    }
    public void c() {
        log.debug("3");
    }
}
public static void main(String[] args) {
    Number n1 = new Number();
    new Thread(()->{ n1.a(); }).start();
    new Thread(()->{ n1.b(); }).start();
    new Thread(()->{ n1.c(); }).start();
}

// 结果:3 1s 12 或 23 1s 1 或 32 1s 1
// 解析:a,b都是n1对象锁,c不具有锁

/*第4题*/

@Slf4j(topic = "c.Number")
class Number{
    public synchronized void a() {
        sleep(1);
        log.debug("1");
    }
    public synchronized void b() {
        log.debug("2");
    }
}
public static void main(String[] args) {
    Number n1 = new Number();
    Number n2 = new Number();
    new Thread(()->{ n1.a(); }).start();
    new Thread(()->{ n2.b(); }).start();
}

// 结果:2 1s 后 1
// 解析:a是n1的对象锁,b是n2的对象锁,不具有互斥关系

/*第5题*/

@Slf4j(topic = "c.Number")
class Number{
    public static synchronized void a() {
        sleep(1);
        log.debug("1");
    }
    public synchronized void b() {
        log.debug("2");
    }
}
public static void main(String[] args) {
    Number n1 = new Number();
    new Thread(()->{ n1.a(); }).start();
    new Thread(()->{ n1.b(); }).start();
}

// 结果:2 1s 后 1
// 解析:a采用类锁,b采用n1对象锁,不具有互斥关系

/*第6题*/

@Slf4j(topic = "c.Number")
class Number{
    public static synchronized void a() {
        sleep(1);
        log.debug("1");
    }
    public static synchronized void b() {
        log.debug("2");
    }
}
public static void main(String[] args) {
    Number n1 = new Number();
    new Thread(()->{ n1.a(); }).start();
    new Thread(()->{ n1.b(); }).start();
}

// 结果:1s 后12, 或 2 1s后 1
// 解析:两者都是类锁,具有互斥关系

/*第7题*/

@Slf4j(topic = "c.Number")
class Number{
    public static synchronized void a() {
        sleep(1);
        log.debug("1");
    }
    public synchronized void b() {
        log.debug("2");
    }
}
public static void main(String[] args) {
    Number n1 = new Number();
    Number n2 = new Number();
    new Thread(()->{ n1.a(); }).start();
    new Thread(()->{ n2.b(); }).start();
}

// 结果:2 1s 后 1
// 解析:a采用类锁,b采用n2对象锁,不具有互斥关系

/*第8题*/

@Slf4j(topic = "c.Number")
class Number{
    public static synchronized void a() {
        sleep(1);
        log.debug("1");
    }
    public static synchronized void b() {
        log.debug("2");
    }
}
public static void main(String[] args) {
    Number n1 = new Number();
    Number n2 = new Number();
    new Thread(()->{ n1.a(); }).start();
    new Thread(()->{ n2.b(); }).start();
}

// 结果:1s 后12, 或 2 1s后 1
// 解析:两者都是类锁,具有互斥关系
线程安全分析
这小节我们将会介绍线程安全分析
变量线程安全问题
首先我们来思考成员变量和静态变量的安全性:
- 如果它们没有共享,则线程安全
- 如果它们被共享了:如果只有读操作,则线程安全
- 如果它们被共享了:如果有读写操作,则这段代码是临界区,需要考虑线程安全
我们再来思索一下局部变量的安全性:
- 局部变量是线程安全的
- 局部变量引用的对象:如果该对象没有逃离方法的作用访问,它是线程安全的
- 局部变量引用的对象:如果该对象逃离方法的作用范围,需要考虑线程安全
我们通过简单代码进行测试:
/*局部变量*/

// 源代码展示:
public static void test1() {
    int i = 10;
    i++;
}

// 我们查看底层代码:每个线程调用 test1() 方法时局部变量 i,会在每个线程的栈帧内存中被创建多份,因此不存在共享
public static void test1();
 descriptor: ()V
 flags: ACC_PUBLIC, ACC_STATIC
 Code:
 stack=1, locals=1, args_size=0
 0: bipush 10
 2: istore_0
 3: iinc 0, 1
 6: return
 LineNumberTable:
 line 10: 0
 line 11: 3
 line 12: 6
 LocalVariableTable:
 Start Length Slot Name Signature
 3        4     0   i      I

/*成员变量*/

// 源代码展示:
static final int THREAD_NUMBER = 2;
static final int LOOP_NUMBER = 200;
public static void main(String[] args) {
    // 一个test对象
    ThreadUnsafe test = new ThreadUnsafe();
    // 两个线程去操纵
    for (int i = 0; i < THREAD_NUMBER; i++) {
        // 均执行method1方法
        new Thread(() -> {
            test.method1(LOOP_NUMBER);
        }, "Thread" + i).start();
    }
}

class ThreadUnsafe {
    // 这里的list是属于对象的,创建在堆中,属于线程共同操纵对象
    ArrayList<String> list = new ArrayList<>();
    // 不断调用method2,3方法200次
    public void method1(int loopNumber) {
        for (int i = 0; i < loopNumber; i++) {
            // { 临界区, 会产生竞态条件
            method2();
            method3();
            // } 临界区
        }
    }
    private void method2() {
        list.add("1");
    }
    private void method3() {
        list.remove(0);
    }
}

// 运行结果的其中一种:如果线程2 还未 add,线程1 remove 就会报错
Exception in thread "Thread1" java.lang.IndexOutOfBoundsException: Index: 0, Size: 0
 at java.util.ArrayList.rangeCheck(ArrayList.java:657)
 at java.util.ArrayList.remove(ArrayList.java:496)
 at cn.itcast.n6.ThreadUnsafe.method3(TestThreadSafe.java:35)
 at cn.itcast.n6.ThreadUnsafe.method1(TestThreadSafe.java:26)
 at cn.itcast.n6.TestThreadSafe.lambda$main$0(TestThreadSafe.java:14)
 at java.lang.Thread.run(Thread.java:748)

/*成员变量局部优化*/

// 源代码展示
static final int THREAD_NUMBER = 2;
static final int LOOP_NUMBER = 200;
public static void main(String[] args) {
    // 一个test对象
    ThreadUnsafe test = new ThreadUnsafe();
    // 两个线程去操纵
    for (int i = 0; i < THREAD_NUMBER; i++) {
        // 均执行method1方法
        new Thread(() -> {
            test.method1(LOOP_NUMBER);
        }, "Thread" + i).start();
    }
}

class ThreadSafe {
    public final void method1(int loopNumber) {
        // 这里将list变为局部变量,每个线程独自在自己的栈中创建,就不会产生安全问题
        ArrayList<String> list = new ArrayList<>();
        for (int i = 0; i < loopNumber; i++) {
            method2(list);
            method3(list);
        }
    }
    private void method2(ArrayList<String> list) {
        list.add("1");
    }
    private void method3(ArrayList<String> list) {
        list.remove(0);
    }
}

/*方法public化缺陷*/

// 源代码展示:
class ThreadSafe {
    public final void method1(int loopNumber) {
        ArrayList<String> list = new ArrayList<>();
        for (int i = 0; i < loopNumber; i++) {
            method2(list);
            method3(list);
        }
    }
    public void method2(ArrayList<String> list) {
        list.add("1");
    }
    public void method3(ArrayList<String> list) {
        list.remove(0);
    }
}
class ThreadSafeSubClass extends ThreadSafe{
    @Override
    public void method3(ArrayList<String> list) {
        new Thread(() -> {
            list.remove(0);
        }).start();
    }
}

// 如果我们将method2,3改为public,就可能会导致其他线程直接调用method2,3导致安全性问题
// 同时甚至可能出现其他子类继承父类导致修改原方法,同时创建一个线程导致多线程问题出现
常见线程安全类
我们在下面介绍一下我们常用的线程安全类:
- String
- Integer
- StringBuffer
- Random
- Vector
- Hashtable
- java.util.concurrent 包下的类
同时我们需要知道无法改变的类型也是线程安全的:
- String、Integer 等都是不可变类,因为其内部的状态不可以改变,因此它们的方法都是线程安全的
- 这里需要注意:String的各类修改方法都是直接创建一个新的String类型而不是在String本体进行增删
我们再进行简单解释:
- 线程安全类的每个方法是原子的
- 但注意它们多个方法的组合不是原子的!
我们采用代码进行简单解释:
/*下述的单个方法都是原子且安全性的*/

Hashtable table = new Hashtable();

new Thread(()->{
    table.put("key", "value1");
}).start();

new Thread(()->{
    table.put("key", "value2");
}).start();

/*但当这些方法组合起来,就无法保证其线程安全性*/

Hashtable table = new Hashtable();

// 线程1,线程2都执行时,可能出现下述情况
// 线程1get==null,线程2get==null,线程2put,线程1put;导致线程安全性错误出现
if( table.get("key") == null) {
	table.put("key", value);
}
常见题型分析
我们直接给出代码来进行题型分析:
/*题目1*/

// MyServlet是Servlet类,应用于Tomcat的多线程上
public class MyServlet extends HttpServlet {
    // 是否安全?不是,不属于线程安全类
    Map<String,Object> map = new HashMap<>();
    // 是否安全?是,属于不变类型
    String S1 = "...";
    // 是否安全?是,属于不变类型
    final String S2 = "...";
    // 是否安全?不是,不属于线程安全类
    Date D1 = new Date();
    // 是否安全?是,属于不变类型
    final Date D2 = new Date();

    public void doGet(HttpServletRequest request, HttpServletResponse response) {
        // 使用上述变量
    }
}

/*题目2*/

public class MyServlet extends HttpServlet {
    // 是否安全?不是,底层使用Impl,里面包含了count这个共享数据,且没有使用锁
    private UserService userService = new UserServiceImpl();

    public void doGet(HttpServletRequest request, HttpServletResponse response) {
        userService.update(...);
    }
}
public class UserServiceImpl implements UserService {
    // 记录调用次数
    private int count = 0;

    public void update() {
        // ...
        count++;
    }
}

/*题目3*/

// 这里是Spring的@Aspect,属于单例,也是共享
@Aspect
@Component
public class MyAspect {
    // 是否安全? 不是,start属于共享数据
    private long start = 0L;

    @Before("execution(* *(..))")
    public void before() {
        start = System.nanoTime();
    }

    @After("execution(* *(..))")
    public void after() {
        long end = System.nanoTime();
        System.out.println("cost time:" + (end-start));
    }
}

/*题目4*/

public class MyServlet extends HttpServlet {
    // 是否安全 是,调用Dao,不具有可变参数
    private UserService userService = new UserServiceImpl();

    public void doGet(HttpServletRequest request, HttpServletResponse response) {
        userService.update(...);
    }
}
public class UserServiceImpl implements UserService {
    // 是否安全 是,调用Dao,不具有可变参数
    private UserDao userDao = new UserDaoImpl();

    public void update() {
        userDao.update();
    }
}
public class UserDaoImpl implements UserDao {
    public void update() {
        String sql = "update user set password = ? where username = ?";
        // 是否安全 是,因为不具有可变参数
        try (Connection conn = DriverManager.getConnection("","","")){
            // ...
        } catch (Exception e) {
            // ...
        }
    }
}

/*题目5*/

public class MyServlet extends HttpServlet {
    // 是否安全 不是,具有conn可变参数
    private UserService userService = new UserServiceImpl();

    public void doGet(HttpServletRequest request, HttpServletResponse response) {
        userService.update(...);
    }
}
public class UserServiceImpl implements UserService {
    // 是否安全 不是,具有conn可变参数
    private UserDao userDao = new UserDaoImpl();

    public void update() {
        userDao.update();
    }
}
public class UserDaoImpl implements UserDao {
    // 是否安全 不是,具有conn可变参数
    private Connection conn = null;
    public void update() throws SQLException {
        String sql = "update user set password = ? where username = ?";
        conn = DriverManager.getConnection("","","");
        // ...
        conn.close();
    }
}

/*题目6*/

public class MyServlet extends HttpServlet {
    // 是否安全 但是这里是安全的
    // 虽然底层将conn创建在堆里,但是impl层创建了多个userDao对象,导致产生了多个conn不产生安全问题
    private UserService userService = new UserServiceImpl();

    public void doGet(HttpServletRequest request, HttpServletResponse response) {
        userService.update(...);
    }
}
public class UserServiceImpl implements UserService {
    public void update() {
        UserDao userDao = new UserDaoImpl();
        userDao.update();
    }
}
public class UserDaoImpl implements UserDao {
    // 是否安全 不是,具有conn可变参数
    private Connection = null;
    public void update() throws SQLException {
        String sql = "update user set password = ? where username = ?";
        conn = DriverManager.getConnection("","","");
        // ...
        conn.close();
    }
}

/*题目7*/

public abstract class Test {

    public void bar() {
        // 是否安全 不是,局部变量交付给抽象类,抽象类后续子类可能会产生修改:称为外星方法
        SimpleDateFormat sdf = new SimpleDateFormat("yyyy-MM-dd HH:mm:ss");
        foo(sdf);
    }

    public abstract foo(SimpleDateFormat sdf);


    public static void main(String[] args) {
        new Test().bar();
    }
}
经典习题分析
我们给出两个经典习题分析:
/*卖票问题*/

// 源码展示:
public class ExerciseSell {
    public static void main(String[] args) {
        TicketWindow ticketWindow = new TicketWindow(2000);
        List<Thread> list = new ArrayList<>();
        // 用来存储买出去多少张票
        List<Integer> sellCount = new Vector<>();
        for (int i = 0; i < 2000; i++) {
            Thread t = new Thread(() -> {
                // 分析这里的竞态条件
                int count = ticketWindow.sell(randomAmount());
                sellCount.add(count);
            });
            list.add(t);
            t.start();
        }
        list.forEach((t) -> {
            try {
                t.join();
            } catch (InterruptedException e) {
                e.printStackTrace();
            }
        });
        // 买出去的票求和
        log.debug("selled count:{}",sellCount.stream().mapToInt(c -> c).sum());
        // 剩余票数
        log.debug("remainder count:{}", ticketWindow.getCount());
    }
    // Random 为线程安全
    static Random random = new Random();
    // 随机 1~5
    public static int randomAmount() {
        return random.nextInt(5) + 1;
    }
}

// 卖票窗口
class TicketWindow {

    // 票数,属于共享数据
    private int count;

    public TicketWindow(int count) {
        this.count = count;
    }

    public int getCount() {
        return count;
    }

    public int sell(int amount) {
        if (this.count >= amount) {
            this.count -= amount;
            return amount;
        } else {
            return 0;
        }
    }
}

// 问题分析:
TicketWindow卖票窗口的票属于共享数据,对共享数据的修改需要进行上锁处理,所以我们需要对sell使用synchronized

// 修改展示:
public class ExerciseSell {
    public static void main(String[] args) {
        TicketWindow ticketWindow = new TicketWindow(2000);
        List<Thread> list = new ArrayList<>();
        List<Integer> sellCount = new Vector<>();
        for (int i = 0; i < 2000; i++) {
            Thread t = new Thread(() -> {
                int count = ticketWindow.sell(randomAmount());
                sellCount.add(count);
            });
            list.add(t);
            t.start();
        }
        list.forEach((t) -> {
            try {
                t.join();
            } catch (InterruptedException e) {
                e.printStackTrace();
            }
        });
        log.debug("selled count:{}",sellCount.stream().mapToInt(c -> c).sum());
        log.debug("remainder count:{}", ticketWindow.getCount());
    }
    static Random random = new Random();
    public static int randomAmount() {
        return random.nextInt(5) + 1;
    }
}
class TicketWindow {
    private int count;
    public TicketWindow(int count) {
        this.count = count;
    }
    public int getCount() {
        return count;
    }
    //在方法上加一个synchronized即可
    public synchronized int sell(int amount) {
        if (this.count >= amount) {
            this.count -= amount;
            return amount;
        } else {
            return 0;
        }
    }
}
/*转账问题*/

// 源码展示
public class ExerciseTransfer {
    public static void main(String[] args) throws InterruptedException {
        Account a = new Account(1000);
        Account b = new Account(1000);
        Thread t1 = new Thread(() -> {
            for (int i = 0; i < 1000; i++) {
                a.transfer(b, randomAmount());
            }
        }, "t1");
        Thread t2 = new Thread(() -> {
            for (int i = 0; i < 1000; i++) {
                b.transfer(a, randomAmount());
            }
        }, "t2");
        t1.start();
        t2.start();
        t1.join();
        t2.join();
        // 查看转账2000次后的总金额
        log.debug("total:{}",(a.getMoney() + b.getMoney()));
    }
    // Random 为线程安全
    static Random random = new Random();
    // 随机 1~100
    public static int randomAmount() {
        return random.nextInt(100) +1;
    }
}
class Account {
    private int money;
    public Account(int money) {
        this.money = money;
    }
    public int getMoney() {
        return money;
    }
    public void setMoney(int money) {
        this.money = money;
    }
    public void transfer(Account target, int amount) {
        if (this.money > amount) {
            this.setMoney(this.getMoney() - amount);
            target.setMoney(target.getMoney() + amount);
        }
    }
}

// 问题分析:
我们的transfer方法中存在两个对象,一个自身对象,一个被转账用户对象,所以无法使用synchronized方法
但是我们可以暂时将他设置为 static synchronized 直接对账户整体进行上锁来处理问题~

// 修改后代码:
public class ExerciseTransfer {
    public static void main(String[] args) throws InterruptedException {
        Account a = new Account(1000);
        Account b = new Account(1000);
        Thread t1 = new Thread(() -> {
            for (int i = 0; i < 1000; i++) {
                a.transfer(b, randomAmount());
            }
        }, "t1");
        Thread t2 = new Thread(() -> {
            for (int i = 0; i < 1000; i++) {
                b.transfer(a, randomAmount());
            }
        }, "t2");
        t1.start();
        t2.start();
        t1.join();
        t2.join();

        log.debug("total:{}",(a.getMoney() + b.getMoney()));
    }

    static Random random = new Random();

    public static int randomAmount() {
        return random.nextInt(100) +1;
    }
}
class Account {
    private int money;
    public Account(int money) {
        this.money = money;
    }
    public int getMoney() {
        return money;
    }
    public void setMoney(int money) {
        this.money = money;
    }
    public static synchronized void transfer(Account target, int amount) {
        if (this.money > amount) {
            this.setMoney(this.getMoney() - amount);
            target.setMoney(target.getMoney() + amount);
        }
    }
}
Monitor
这小节我们将会介绍Monitor
Java对象头
在正式开始Monitor介绍之前,我们先来介绍一下Java对象头的定义:
# 以下内容均以32位虚拟机为例

# 普通对象
|--------------------------------------------------------------|
|                    Object Header (64 bits)                   |
|------------------------------------|-------------------------|
|       Mark Word (32 bits)          |   Klass Word (32 bits)  |
|------------------------------------|-------------------------|

# 数组对象
|---------------------------------------------------------------------------------|
|                             Object Header (96 bits)                             |
|--------------------------------|-----------------------|------------------------|
|        Mark Word(32bits)       |   Klass Word(32bits)  |  array length(32bits)  |
|--------------------------------|-----------------------|------------------------|

# 其中 Mark Word 结构为
|-------------------------------------------------------|--------------------|
|                  Mark Word (32 bits)                  |        State       |
|-------------------------------------------------------|--------------------|
|    hashcode:25  | age:4 |   biased_lock:0   |   01    |       Normal       |
|-------------------------------------------------------|--------------------|
|thread:23|epoch:2| age:4 |   biased_lock:1   |   01    |       Biased       |
|-------------------------------------------------------|--------------------|
|          ptr_to_lock_record:30              |   00    | Lightweight Locked |
|-------------------------------------------------------|--------------------|
|          ptr_to_heavyweight_monitor:30      |   10    | Heavyweight Locked |
|-------------------------------------------------------|--------------------|
|                                             |   11    |    Marked for GC   |
|-------------------------------------------------------|--------------------|

# 其中Klass Word主要存储对象类型名称

# 64位虚拟机的 Mark Word 结构为
|--------------------------------------------------------------------|--------------------|
|                          Mark Word (64 bits)                       |        State       |
|--------------------------------------------------------------------|--------------------|
| unused:25 | hashcode:31 | unused:1 | age:4 | biased_lock:0 |  01   |        Normal      |
|--------------------------------------------------------------------|--------------------|
| thread:54 |   epoch:2   | unused:1 | age:4 | biased_lock:1 |  01   |        Biased      |
|--------------------------------------------------------------------|--------------------|
|                    ptr_to_lock_record:62                   |  00   | Lightweight Locked |
|--------------------------------------------------------------------|--------------------|
|                 ptr_to_heavyweight_monitor:62              |  10   | Heavyweight Locked |
|--------------------------------------------------------------------|--------------------|
|                                                            |  11   |    Marked for GC   |
|--------------------------------------------------------------------|--------------------|
Monitor概述
我们来简单介绍一下Monitor:
- Monitor 被翻译为监视器或管程
- 每个 Java 对象都可以关联一个 Monitor 对象,就是我们之前创建的obj对象
- 如果使用 synchronized 给对象上锁(重量级)之后,该对象头的 Mark Word 中就被设置指向 Monitor 对象的指针
我们给出简单示例图:
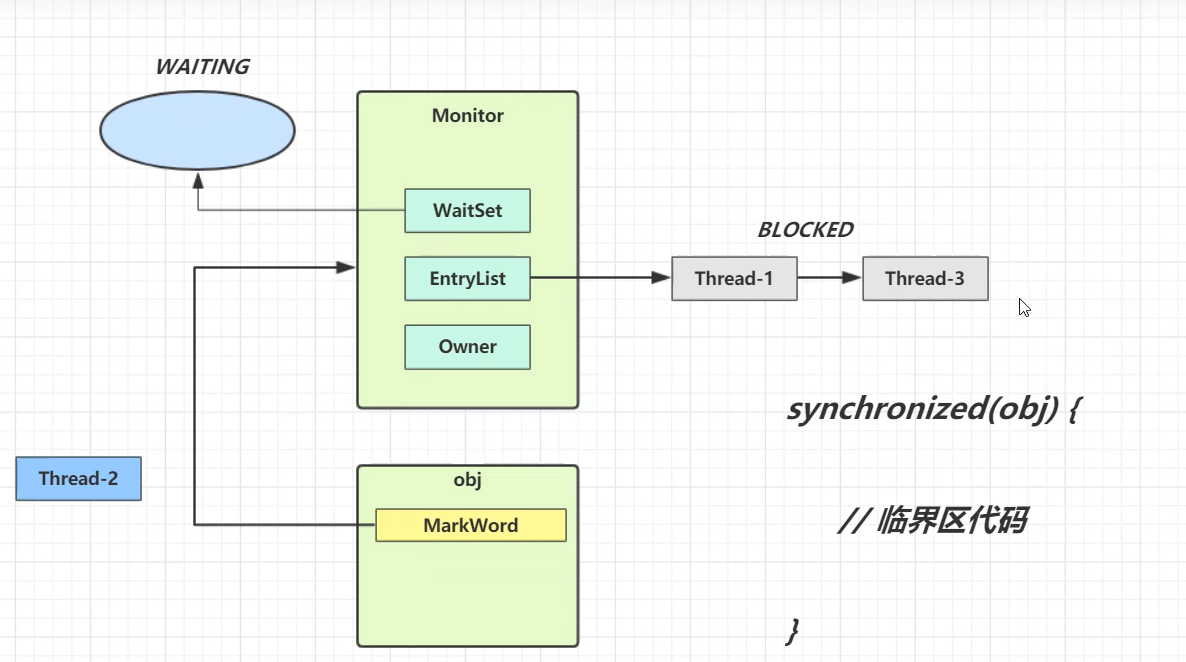
我们来做简单解释:
-
每个obj都由MarkWord来绑定一个Monitor
-
每个线程都需要经过synchronized(obj)方法进入Monitor
-
首先Monitor主要分为三个部分:WaitSet,EntryList,Owner
-
Owner:属于当前Monitor的正常运行区间,例如Thread-2就是目前运行线程
-
EntryList:属于当前Monitor的等待运行区间,需要等到Thread-2结束线程释放锁资源,Thread3等才可以抢夺锁
-
WaitSet:属于之前获得过锁,但条件不满足进入 WAITING 状态的线程,后面讲 wait-notify 时会分析
此外我们还需要注意:
- synchronized 必须是进入同一个对象的 monitor 才有上述的效果
- 不加 synchronized 的对象不会关联监视器,不遵从以上规则
synchronized锁
这小节我们将会介绍synchronized底层原理和相关锁的内容
synchronized原理
我们会从底层代码来讲解synchronized的原理:
/*源码*/

static final Object lock = new Object();
static int counter = 0;
public static void main(String[] args) {
    synchronized (lock) {
        counter++;
    }
}

/*底层字节码*/

public static void main(java.lang.String[]);
descriptor: ([Ljava/lang/String;)V
              flags: ACC_PUBLIC, ACC_STATIC
              Code:
              stack=2, locals=3, args_size=1

              // 下面是正式字节码过程

              // 正常运行阶段
              0: getstatic #2 // <- lock引用 (synchronized开始)
              3: dup
              4: astore_1 // lock引用 -> slot 1(这里提前存储一份锁对象,用于后续的解锁)
              5: monitorenter // 将 lock对象 MarkWord 置为 Monitor 指针(这里进行了上锁)
              6: getstatic #3 // <- i
              9: iconst_1 // 准备常数 1
              10: iadd // +1
              11: putstatic #3 // -> i
              14: aload_1 // <- lock引用
              15: monitorexit // 将 lock对象 MarkWord 重置, 唤醒 EntryList(这里进行了解锁)
              16: goto 24

              // 报错补救阶段(去除锁)
              19: astore_2 // e -> slot 2
              20: aload_1 // <- lock引用
              21: monitorexit // 将 lock对象 MarkWord 重置, 唤醒 EntryList
              22: aload_2 // <- slot 2 (e)
              23: athrow // throw e

              // 代码结束
              24: return

              // 这里是异常检测器:当出现异常时,移动到异常处理底层代码区域进行解锁操作
              Exception table:
              from to target type
              6    16  19    any
              19   22  19    any
              LineNumberTable:
              line 8: 0
              line 9: 6
              line 10: 14
              line 11: 24
              LocalVariableTable:
              Start Length Slot Name Signature
              0     25     0    args [Ljava/lang/String;
              StackMapTable: number_of_entries = 2
              frame_type = 255 /* full_frame */
              offset_delta = 19
              locals = [ class "[Ljava/lang/String;", class java/lang/Object ]
              stack = [ class java/lang/Throwable ]
              frame_type = 250 /* chop */
              offset_delta = 4
轻量级锁
我们首先来简单介绍一下轻量级锁:
- 如果一个对象虽然有多线程要加锁,但加锁的时间是错开的(也就是没有竞争),那么可以使用轻量级锁来优化。
我们用一个简单的代码实现轻量级锁:
// 下面两个代码都调用了锁,但是他们归根结底属于一个流程,时间错开,这时系统就会避免直接使用Monitor而是用轻量级锁进行优化

static final Object obj = new Object();
public static void method1() {
    synchronized( obj ) {
        // 同步块 A
        method2();
    }
}
public static void method2() {
    synchronized( obj ) {
        // 同步块 B
    }
}
我们来展示一下实现流程(00轻量级锁,01无锁):
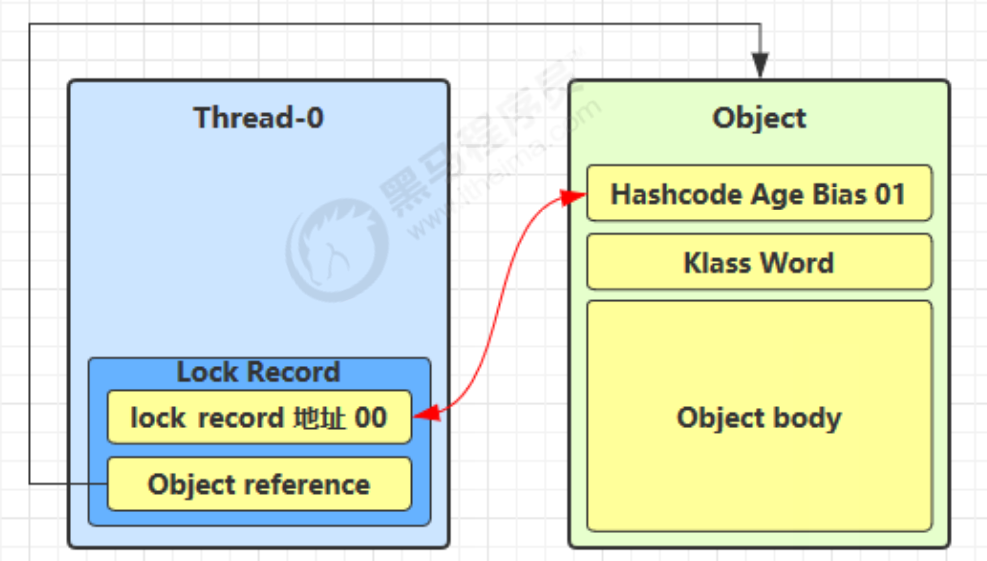
- 创建锁记录(Lock Record)对象,每个线程都的栈帧都会包含一个锁记录的结构,内部可以存储锁定对象的Mark Word
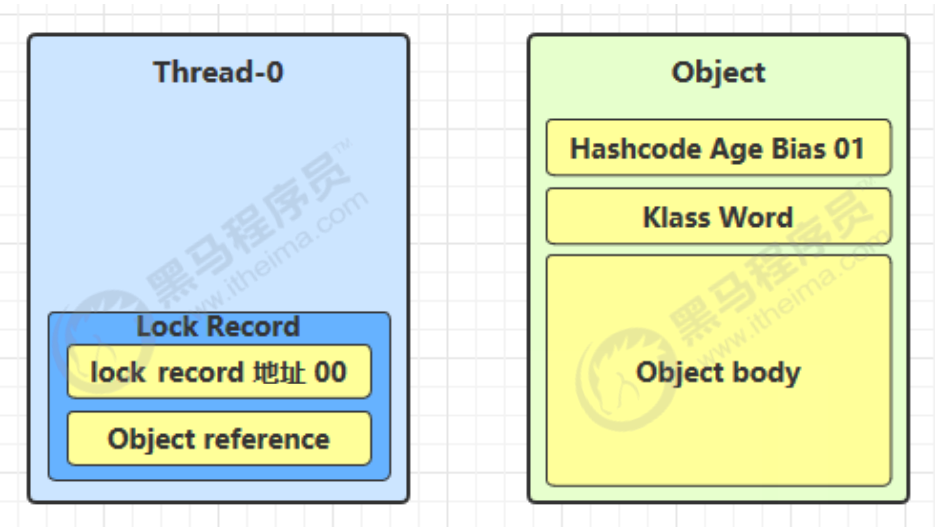
- 让锁记录中 Object reference 指向锁对象,并尝试用 cas 替换 Object 的 Mark Word,将 Mark Word 的值存入锁记录
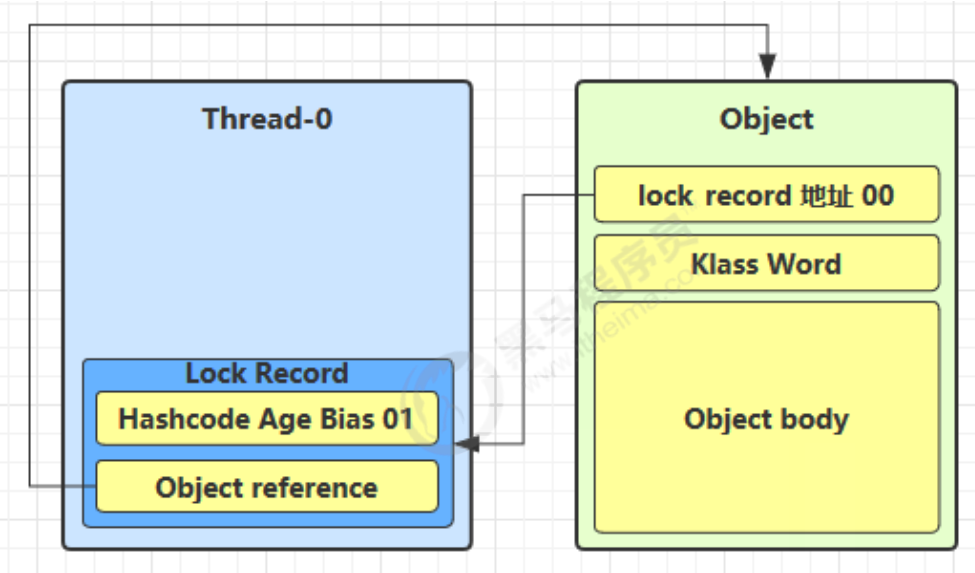
- 如果 cas 替换成功,对象头中存储了 锁记录地址和状态 00 ,表示由该线程给对象加锁,这时图示如下
- 当退出 synchronized 代码块(解锁时)如果有取值为 null 的锁记录,表示有重入,这时重置锁记录,表示重入计数减一
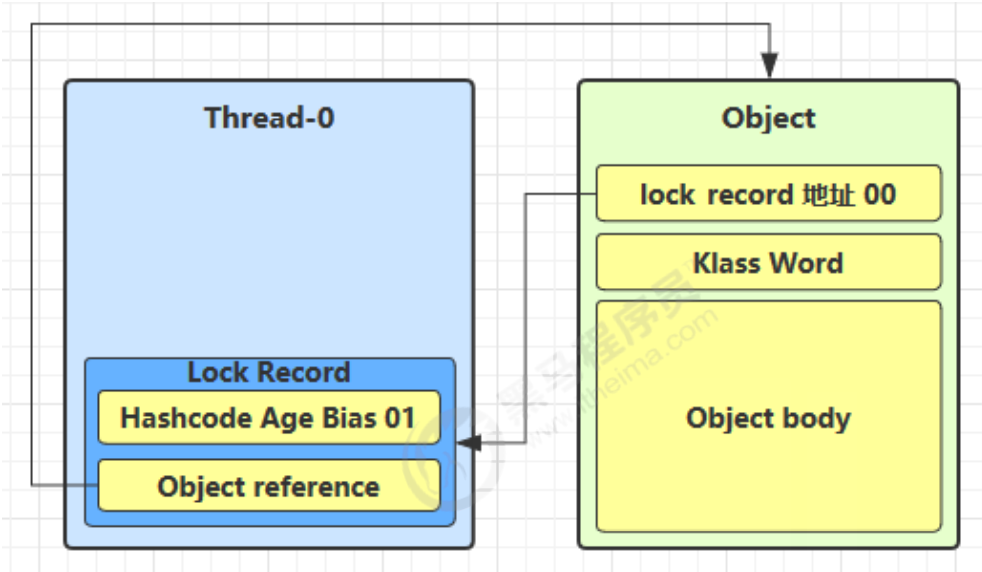
- 当退出 synchronized 代码块(解锁时)锁记录的值不为 null,这时使用 cas 将 Mark Word 的值恢复给对象头
除此之外我们需要注意cas切换不是每次都成功的:
- 如果是其它线程已经持有了该 Object 的轻量级锁,这时表明有竞争,进入锁膨胀过程
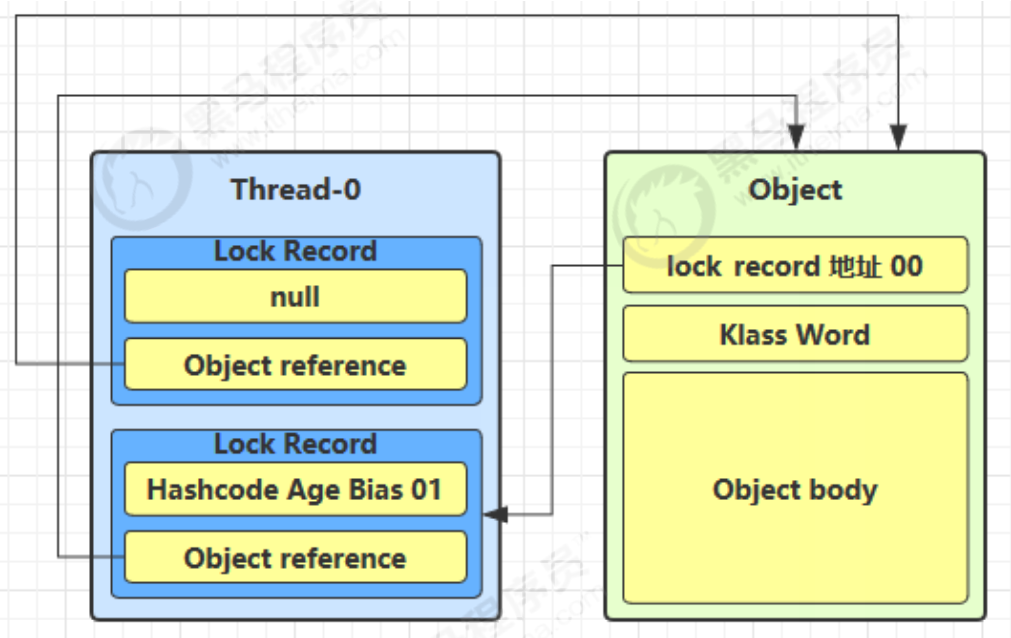
- 如果是自己执行了 synchronized 锁重入,那么再添加一条 Lock Record 作为重入的计数
此外最后的cas恢复操作也不是都成功的:
- 成功,则解锁成功
- 失败,说明轻量级锁进行了锁膨胀或已经升级为重量级锁,进入重量级锁解锁流程
我们给出锁重入时的展示图:
锁膨胀
我们首先简单介绍一下锁膨胀:
- 如果在尝试加轻量级锁的过程中,CAS 操作无法成功,这时一种情况就是有其它线程为此对象加上了轻量级锁(有竞争)
- 这时需要进行锁膨胀,将轻量级锁变为重量级锁。
我们给出部分内容展示:
- 当 Thread-1 进行轻量级加锁时,Thread-0 已经对该对象加了轻量级锁
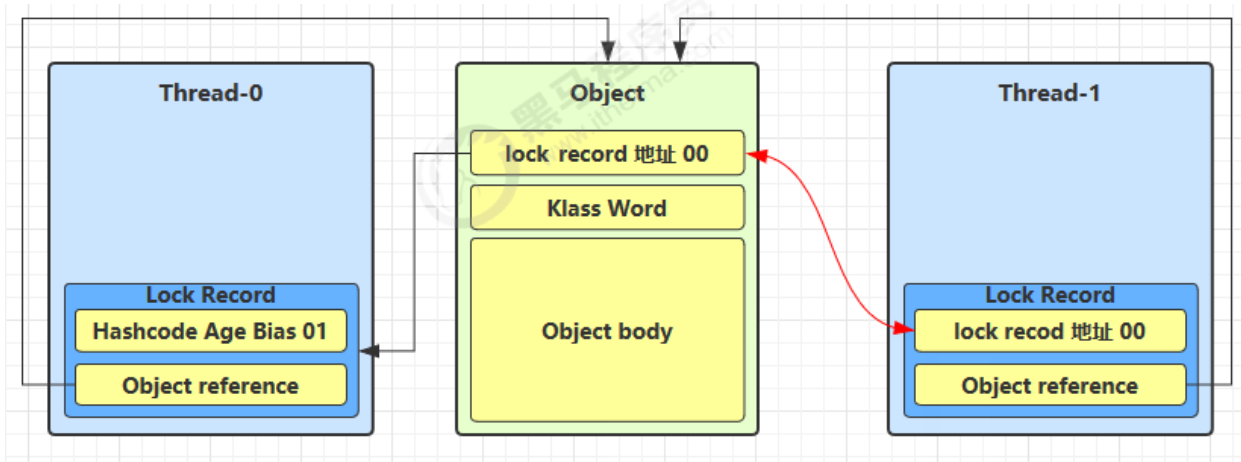
- 这时 Thread-1 加轻量级锁失败,进入锁膨胀流程
- 即为 Object 对象申请 Monitor 锁,让 Object 指向重量级锁地址 ,然后自己进入 Monitor 的 EntryList BLOCKED
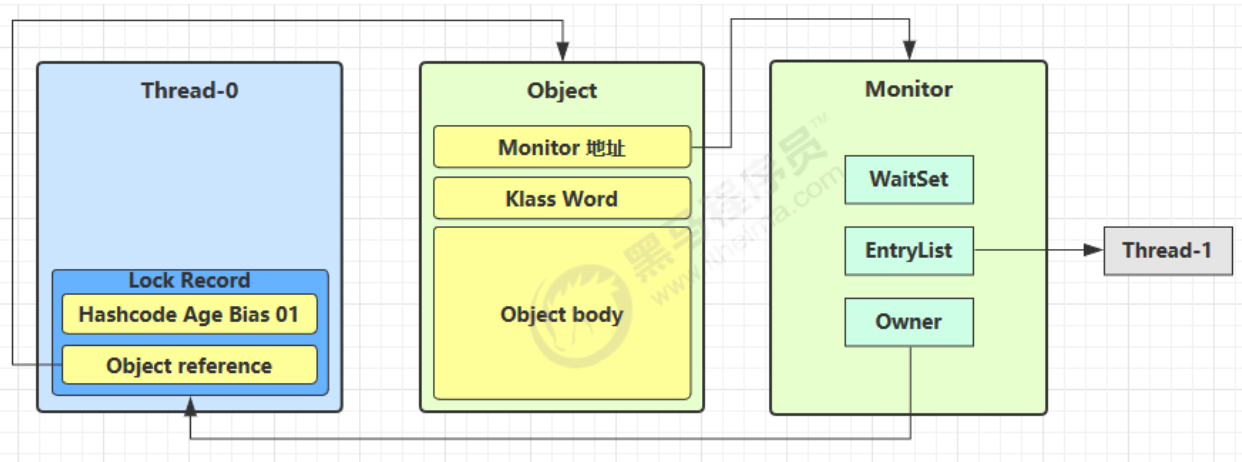
- 当 Thread-0 退出同步块解锁时,使用 cas 将 Mark Word 的值恢复给对象头,失败。
- 这时会进入重量级解锁 流程,即按照 Monitor 地址找到 Monitor 对象,设置 Owner 为 null,唤醒 EntryList 中 BLOCKED 线程
自旋优化
我们同样先来介绍一下自旋优化:
- 重量级锁竞争的时候,还可以使用自旋来进行优化
- 如果当前线程自旋成功(即这时候持锁线程已经退出了同步块,释放了锁),这时当前线程就可以避免阻塞。
我们给出自旋成功的案例:
| 线程1 ( core 1上) | 对象Mark | 线程2 ( core 2上) |
|---|---|---|
| - | 10(重量锁) | - |
| 访问同步块,获取monitor | 10(重量锁)重量锁指针 | - |
| 成功(加锁) | 10(重量锁)重量锁指针 | - |
| 执行同步块 | 10(重量锁)重量锁指针 | - |
| 执行同步块 | 10(重量锁)重量锁指针 | 访问同步块,获取 monitor |
| 执行同步块 | 10(重量锁)重量锁指针 | 自旋重试 |
| 执行完毕 | 10(重量锁)重量锁指针 | 自旋重试 |
| 成功(解锁) | 01(无锁) | 自旋重试 |
| - | 10(重量锁)重量锁指针 | 成功(加锁) |
| - | 10(重量锁)重量锁指针 | 执行同步块 |
| - | ... | ... |
我们也给出自旋失败的案例:
| 线程1 ( core 1上) | 对象Mark | 线程2( core 2上) |
|---|---|---|
| - | 10(重量锁) | - |
| 访问同步块,获取monitor | 10(重量锁)重量锁指针 | - |
| 成功(加锁) | 10(重量锁)重量锁指针 | - |
| 执行同步块 | 10(重量锁)重量锁指针 | - |
| 执行同步块 | 10(重量锁)重量锁指针 | 访问同步块,获取monitor |
| 执行同步块 | 10(重量锁)重量锁指针 | 自旋重试 |
| 执行同步块 | 10(重量锁)重量锁指针 | 自旋重试 |
| 执行同步块 | 10(重量锁)重量锁指针 | 自旋重试 |
| 执行同步块 | 10(重量锁)重量锁指针 | 阻塞 |
| - | ... | ... |
我们针对自旋添加一些注意信息:
- Java 7 之后不能控制是否开启自旋功能
- 自旋会占用 CPU 时间,单核 CPU 自旋就是浪费,多核 CPU 自旋才能发挥优势。
- 在 Java 6 之后自旋锁是自适应的,比如对象刚刚的一次自旋操作成功过,那么认为这次自旋成功的可能性会高,就多自旋几次
- 在 Java 6 之后自旋锁是自适应的,比如对象刚刚的一次自旋操作失败,那么就认为这次自旋成功的可能性会低,少自旋甚至不自旋
偏向锁
我们再来介绍一下偏向锁:
-
轻量级锁在没有竞争时(就自己这个线程),每次重入仍然需要执行 CAS 操作。
-
偏向锁:只有第一次使用 CAS 将线程 ID 设置到对象的 Mark Word 头,之后发现 这个线程ID是自己的表示没有竞争,不用重新 CAS。
-
以后只要不发生竞争,这个对象就归该线程所有
我们给出一个简单实例:
// 下述三个操作完全不具有时间冲突,相当于全由m1来管辖,这时m1使用会进行cas更换,后续m2,m3均不会进行cas切换

static final Object obj = new Object();
public static void m1() {
    synchronized( obj ) {
        // 同步块 A
        m2();
    }
}
public static void m2() {
    synchronized( obj ) {
        // 同步块 B
        m3();
    }
}
public static void m3() {
    synchronized( obj ) {
        // 同步块 C
    }
}
我们给出简单示例图:
偏向状态
首先我们回忆一下对象头格式:
|--------------------------------------------------------------------|--------------------|
|                          Mark Word (64 bits)                       |        State       |
|--------------------------------------------------------------------|--------------------|
| unused:25 | hashcode:31 | unused:1 | age:4 | biased_lock:0 |  01   |        Normal      |
|--------------------------------------------------------------------|--------------------|
| thread:54 |   epoch:2   | unused:1 | age:4 | biased_lock:1 |  01   |        Biased      |
|--------------------------------------------------------------------|--------------------|
|                    ptr_to_lock_record:62                   |  00   | Lightweight Locked |
|--------------------------------------------------------------------|--------------------|
|                 ptr_to_heavyweight_monitor:62              |  10   | Heavyweight Locked |
|--------------------------------------------------------------------|--------------------|
|                                                            |  11   |    Marked for GC   |
|--------------------------------------------------------------------|--------------------|
我们进行简单解释:
- Normal:正常锁
- Biased:正常偏向锁
- Lightweight Locked :轻量级锁
- Heavyweight Locked:重量级锁
- biased_lock : 控制偏向锁的开启的码位
我们针对偏向锁进行简单解释:
- 如果开启了偏向锁(默认开启)那么对象创建后,markword值为0x05即最后3位为101,这时它的 thread、epoch、age 都为 0
- 偏向锁是默认是延迟的,不会在程序启动时立即生效
- 如果想避免延迟,可以加 VM 参数- XX:BiasedLockingStartupDelay=0来禁用延迟
- 如果没有开启偏向锁,那么对象创建后,markword 值为 0x01 即最后 3 位为 001
- 这时它的 hashcode、 age 都为 0,第一次用到 hashcode 时才会赋值
- 但是如果调用了hashcode方法就会导致覆盖掉biased_lock关闭偏向锁
撤销偏向状态
我们这里总结了三种撤销偏向状态的方法
撤销 - 调用对象 hashCode
我们给出简单解释:
- hashcode与biased_lock的字节码位置冲突,若调用hashcode方法得到hashcode就会覆盖掉biased_lock位置,导致偏向锁失效
- 调用了对象的hashCode,但偏向锁的对象MarkWord中存储的是线程 id,如果调用hashCode会导致偏向锁被 撤销
- 轻量级锁会在锁记录中记录 hashCode
- 重量级锁会在 Monitor 中记录 hashCode
撤销 - 其它线程使用对象
我们给出简单解释:
- 当有其它线程使用偏向锁对象时,会将偏向锁升级为轻量级锁
我们给出简单示例:
/*主代码*/

private static void test2() throws InterruptedException {
    Dog d = new Dog();
    Thread t1 = new Thread(() -> {
        synchronized (d) {
            log.debug(ClassLayout.parseInstance(d).toPrintableSimple(true));
        }
        synchronized (TestBiased.class) {
            TestBiased.class.notify();
        }
        // 如果不用 wait/notify 使用 join 必须打开下面的注释
        // 因为:t1 线程不能结束,否则底层线程可能被 jvm 重用作为 t2 线程,底层线程 id 是一样的
        /*try {
         	System.in.read();
         } catch (IOException e) {
         	e.printStackTrace();
         }*/
    }, "t1");
    t1.start();
    Thread t2 = new Thread(() -> {
        synchronized (TestBiased.class) {
            try {
                TestBiased.class.wait();
            } catch (InterruptedException e) {
                e.printStackTrace();
            }
        }
        log.debug(ClassLayout.parseInstance(d).toPrintableSimple(true));
        synchronized (d) {
            log.debug(ClassLayout.parseInstance(d).toPrintableSimple(true));
        }
        log.debug(ClassLayout.parseInstance(d).toPrintableSimple(true));
    }, "t2");
    t2.start();
}

/*结果*/
[t1] - 00000000 00000000 00000000 00000000 00011111 01000001 00010000 00000101
[t2] - 00000000 00000000 00000000 00000000 00011111 01000001 00010000 00000101
[t2] - 00000000 00000000 00000000 00000000 00011111 10110101 11110000 01000000
[t2] - 00000000 00000000 00000000 00000000 00000000 00000000 00000000 00000001
撤销 - 调用 wait/notify
我们进行简单解释:
- wait和notify方法都是重量级锁的专属方法,如果调用就会导致升级为重量级锁
我们给出简单代码示例:
/*主代码*/

public static void main(String[] args) throws InterruptedException {
    Dog d = new Dog();
    Thread t1 = new Thread(() -> {
        log.debug(ClassLayout.parseInstance(d).toPrintableSimple(true));
        synchronized (d) {
            log.debug(ClassLayout.parseInstance(d).toPrintableSimple(true));
            try {
                d.wait();
            } catch (InterruptedException e) {
                e.printStackTrace();
            }
            log.debug(ClassLayout.parseInstance(d).toPrintableSimple(true));
        }
    }, "t1");
    t1.start();
    new Thread(() -> {
        try {
            Thread.sleep(6000);
        } catch (InterruptedException e) {
            e.printStackTrace();
        }
        synchronized (d) {
            log.debug("notify");
            d.notify();
        }
    }, "t2").start();
}

/*结果*/
[t1] - 00000000 00000000 00000000 00000000 00000000 00000000 00000000 00000101
[t1] - 00000000 00000000 00000000 00000000 00011111 10110011 11111000 00000101
[t2] - notify
[t1] - 00000000 00000000 00000000 00000000 00011100 11010100 00001101 11001010
批量重偏向
我们先来介绍一下批量重偏向:
-
如果对象虽然被多个线程访问,但没有竞争,这时偏向了线程 T1 的对象仍有机会重新偏向 T2,重偏向会重置对象 的 Thread ID
-
当撤销偏向锁阈值超过 20 次后,jvm 会这样觉得偏向对象错误,于是会在给这些对象加锁时重新偏向至加锁线程
我们给出简单代码示例:
/*主代码*/

private static void test3() throws InterruptedException {
    Vector<Dog> list = new Vector<>();
    Thread t1 = new Thread(() -> {
        for (int i = 0; i < 30; i++) {
            Dog d = new Dog();
            list.add(d);
            synchronized (d) {
                log.debug(i + "\t" + ClassLayout.parseInstance(d).toPrintableSimple(true));
            }
        }
        synchronized (list) {
            list.notify();
        }
    }, "t1");
    t1.start();

    Thread t2 = new Thread(() -> {
        synchronized (list) {
            try {
                list.wait();
            } catch (InterruptedException e) {
                e.printStackTrace();
            }
        }
        log.debug("===============> ");
        for (int i = 0; i < 30; i++) {
            Dog d = list.get(i);
            log.debug(i + "\t" + ClassLayout.parseInstance(d).toPrintableSimple(true));
            synchronized (d) {
                log.debug(i + "\t" + ClassLayout.parseInstance(d).toPrintableSimple(true));
            }
            log.debug(i + "\t" + ClassLayout.parseInstance(d).toPrintableSimple(true));
        }
    }, "t2");
    t2.start();
}

/*结果*/

// 我们会发现,最开始都是101,这里设置了偏向锁
[t1] - 0 00000000 00000000 00000000 00000000 00011111 11110011 11100000 00000101
[t1] - 1 00000000 00000000 00000000 00000000 00011111 11110011 11100000 00000101
[t1] - 2 00000000 00000000 00000000 00000000 00011111 11110011 11100000 00000101
[t1] - 3 00000000 00000000 00000000 00000000 00011111 11110011 11100000 00000101
[t1] - 4 00000000 00000000 00000000 00000000 00011111 11110011 11100000 00000101
[t1] - 5 00000000 00000000 00000000 00000000 00011111 11110011 11100000 00000101
[t1] - 6 00000000 00000000 00000000 00000000 00011111 11110011 11100000 00000101
[t1] - 7 00000000 00000000 00000000 00000000 00011111 11110011 11100000 00000101
[t1] - 8 00000000 00000000 00000000 00000000 00011111 11110011 11100000 00000101
[t1] - 9 00000000 00000000 00000000 00000000 00011111 11110011 11100000 00000101
[t1] - 10 00000000 00000000 00000000 00000000 00011111 11110011 11100000 00000101
[t1] - 11 00000000 00000000 00000000 00000000 00011111 11110011 11100000 00000101
[t1] - 12 00000000 00000000 00000000 00000000 00011111 11110011 11100000 00000101
[t1] - 13 00000000 00000000 00000000 00000000 00011111 11110011 11100000 00000101
[t1] - 14 00000000 00000000 00000000 00000000 00011111 11110011 11100000 00000101
[t1] - 15 00000000 00000000 00000000 00000000 00011111 11110011 11100000 00000101
[t1] - 16 00000000 00000000 00000000 00000000 00011111 11110011 11100000 00000101
[t1] - 17 00000000 00000000 00000000 00000000 00011111 11110011 11100000 00000101
[t1] - 18 00000000 00000000 00000000 00000000 00011111 11110011 11100000 00000101
[t1] - 19 00000000 00000000 00000000 00000000 00011111 11110011 11100000 00000101
[t1] - 20 00000000 00000000 00000000 00000000 00011111 11110011 11100000 00000101
[t1] - 21 00000000 00000000 00000000 00000000 00011111 11110011 11100000 00000101
[t1] - 22 00000000 00000000 00000000 00000000 00011111 11110011 11100000 00000101
[t1] - 23 00000000 00000000 00000000 00000000 00011111 11110011 11100000 00000101
[t1] - 24 00000000 00000000 00000000 00000000 00011111 11110011 11100000 00000101
[t1] - 25 00000000 00000000 00000000 00000000 00011111 11110011 11100000 00000101
[t1] - 26 00000000 00000000 00000000 00000000 00011111 11110011 11100000 00000101
[t1] - 27 00000000 00000000 00000000 00000000 00011111 11110011 11100000 00000101
[t1] - 28 00000000 00000000 00000000 00000000 00011111 11110011 11100000 00000101
[t1] - 29 00000000 00000000 00000000 00000000 00011111 11110011 11100000 00000101
[t2] - ===============>
 // 我们会发现这里从101偏向锁撤销,然后变为000无锁,然后变为001轻量级锁
[t2] - 0 00000000 00000000 00000000 00000000 00011111 11110011 11100000 00000101
[t2] - 0 00000000 00000000 00000000 00000000 00100000 01011000 11110111 00000000
[t2] - 0 00000000 00000000 00000000 00000000 00000000 00000000 00000000 00000001
[t2] - 1 00000000 00000000 00000000 00000000 00011111 11110011 11100000 00000101
[t2] - 1 00000000 00000000 00000000 00000000 00100000 01011000 11110111 00000000
[t2] - 1 00000000 00000000 00000000 00000000 00000000 00000000 00000000 00000001
[t2] - 2 00000000 00000000 00000000 00000000 00011111 11110011 11100000 00000101
[t2] - 2 00000000 00000000 00000000 00000000 00100000 01011000 11110111 00000000
[t2] - 2 00000000 00000000 00000000 00000000 00000000 00000000 00000000 00000001
[t2] - 3 00000000 00000000 00000000 00000000 00011111 11110011 11100000 00000101
[t2] - 3 00000000 00000000 00000000 00000000 00100000 01011000 11110111 00000000
[t2] - 3 00000000 00000000 00000000 00000000 00000000 00000000 00000000 00000001
[t2] - 4 00000000 00000000 00000000 00000000 00011111 11110011 11100000 00000101
[t2] - 4 00000000 00000000 00000000 00000000 00100000 01011000 11110111 00000000
[t2] - 4 00000000 00000000 00000000 00000000 00000000 00000000 00000000 00000001
[t2] - 5 00000000 00000000 00000000 00000000 00011111 11110011 11100000 00000101
[t2] - 5 00000000 00000000 00000000 00000000 00100000 01011000 11110111 00000000
[t2] - 5 00000000 00000000 00000000 00000000 00000000 00000000 00000000 00000001
[t2] - 6 00000000 00000000 00000000 00000000 00011111 11110011 11100000 00000101
[t2] - 6 00000000 00000000 00000000 00000000 00100000 01011000 11110111 00000000
[t2] - 6 00000000 00000000 00000000 00000000 00000000 00000000 00000000 00000001
[t2] - 7 00000000 00000000 00000000 00000000 00011111 11110011 11100000 00000101
[t2] - 7 00000000 00000000 00000000 00000000 00100000 01011000 11110111 00000000
[t2] - 7 00000000 00000000 00000000 00000000 00000000 00000000 00000000 00000001
[t2] - 8 00000000 00000000 00000000 00000000 00011111 11110011 11100000 00000101
[t2] - 8 00000000 00000000 00000000 00000000 00100000 01011000 11110111 00000000
[t2] - 8 00000000 00000000 00000000 00000000 00000000 00000000 00000000 00000001
[t2] - 9 00000000 00000000 00000000 00000000 00011111 11110011 11100000 00000101
[t2] - 9 00000000 00000000 00000000 00000000 00100000 01011000 11110111 00000000
[t2] - 9 00000000 00000000 00000000 00000000 00000000 00000000 00000000 00000001
[t2] - 10 00000000 00000000 00000000 00000000 00011111 11110011 11100000 00000101
[t2] - 10 00000000 00000000 00000000 00000000 00100000 01011000 11110111 00000000
[t2] - 10 00000000 00000000 00000000 00000000 00000000 00000000 00000000 00000001
[t2] - 11 00000000 00000000 00000000 00000000 00011111 11110011 11100000 00000101
[t2] - 11 00000000 00000000 00000000 00000000 00100000 01011000 11110111 00000000
[t2] - 11 00000000 00000000 00000000 00000000 00000000 00000000 00000000 00000001
[t2] - 12 00000000 00000000 00000000 00000000 00011111 11110011 11100000 00000101
[t2] - 12 00000000 00000000 00000000 00000000 00100000 01011000 11110111 00000000
[t2] - 12 00000000 00000000 00000000 00000000 00000000 00000000 00000000 00000001
[t2] - 13 00000000 00000000 00000000 00000000 00011111 11110011 11100000 00000101
[t2] - 13 00000000 00000000 00000000 00000000 00100000 01011000 11110111 00000000
[t2] - 13 00000000 00000000 00000000 00000000 00000000 00000000 00000000 00000001
[t2] - 14 00000000 00000000 00000000 00000000 00011111 11110011 11100000 00000101
[t2] - 14 00000000 00000000 00000000 00000000 00100000 01011000 11110111 00000000
[t2] - 14 00000000 00000000 00000000 00000000 00000000 00000000 00000000 00000001
[t2] - 15 00000000 00000000 00000000 00000000 00011111 11110011 11100000 00000101
[t2] - 15 00000000 00000000 00000000 00000000 00100000 01011000 11110111 00000000
[t2] - 15 00000000 00000000 00000000 00000000 00000000 00000000 00000000 00000001
[t2] - 16 00000000 00000000 00000000 00000000 00011111 11110011 11100000 00000101
[t2] - 16 00000000 00000000 00000000 00000000 00100000 01011000 11110111 00000000
[t2] - 16 00000000 00000000 00000000 00000000 00000000 00000000 00000000 00000001
[t2] - 17 00000000 00000000 00000000 00000000 00011111 11110011 11100000 00000101
[t2] - 17 00000000 00000000 00000000 00000000 00100000 01011000 11110111 00000000
[t2] - 17 00000000 00000000 00000000 00000000 00000000 00000000 00000000 00000001
[t2] - 18 00000000 00000000 00000000 00000000 00011111 11110011 11100000 00000101
[t2] - 18 00000000 00000000 00000000 00000000 00100000 01011000 11110111 00000000
[t2] - 18 00000000 00000000 00000000 00000000 00000000 00000000 00000000 00000001
// 在这里超过阈值之后,直接将该锁的偏向对象设置为t2线程,所有锁都设置为了101偏向锁
[t2] - 19 00000000 00000000 00000000 00000000 00011111 11110011 11100000 00000101
[t2] - 19 00000000 00000000 00000000 00000000 00011111 11110011 11110001 00000101
[t2] - 19 00000000 00000000 00000000 00000000 00011111 11110011 11110001 00000101
[t2] - 20 00000000 00000000 00000000 00000000 00011111 11110011 11100000 00000101
[t2] - 20 00000000 00000000 00000000 00000000 00011111 11110011 11110001 00000101
[t2] - 20 00000000 00000000 00000000 00000000 00011111 11110011 11110001 00000101
[t2] - 21 00000000 00000000 00000000 00000000 00011111 11110011 11100000 00000101
[t2] - 21 00000000 00000000 00000000 00000000 00011111 11110011 11110001 00000101
[t2] - 21 00000000 00000000 00000000 00000000 00011111 11110011 11110001 00000101
[t2] - 22 00000000 00000000 00000000 00000000 00011111 11110011 11100000 00000101
[t2] - 22 00000000 00000000 00000000 00000000 00011111 11110011 11110001 00000101
[t2] - 22 00000000 00000000 00000000 00000000 00011111 11110011 11110001 00000101
[t2] - 23 00000000 00000000 00000000 00000000 00011111 11110011 11100000 00000101
[t2] - 23 00000000 00000000 00000000 00000000 00011111 11110011 11110001 00000101
[t2] - 23 00000000 00000000 00000000 00000000 00011111 11110011 11110001 00000101
[t2] - 24 00000000 00000000 00000000 00000000 00011111 11110011 11100000 00000101
[t2] - 24 00000000 00000000 00000000 00000000 00011111 11110011 11110001 00000101
[t2] - 24 00000000 00000000 00000000 00000000 00011111 11110011 11110001 00000101
[t2] - 25 00000000 00000000 00000000 00000000 00011111 11110011 11100000 00000101
[t2] - 25 00000000 00000000 00000000 00000000 00011111 11110011 11110001 00000101
[t2] - 25 00000000 00000000 00000000 00000000 00011111 11110011 11110001 00000101
[t2] - 26 00000000 00000000 00000000 00000000 00011111 11110011 11100000 00000101
[t2] - 26 00000000 00000000 00000000 00000000 00011111 11110011 11110001 00000101
[t2] - 26 00000000 00000000 00000000 00000000 00011111 11110011 11110001 00000101
[t2] - 27 00000000 00000000 00000000 00000000 00011111 11110011 11100000 00000101
[t2] - 27 00000000 00000000 00000000 00000000 00011111 11110011 11110001 00000101
[t2] - 27 00000000 00000000 00000000 00000000 00011111 11110011 11110001 00000101
[t2] - 28 00000000 00000000 00000000 00000000 00011111 11110011 11100000 00000101
[t2] - 28 00000000 00000000 00000000 00000000 00011111 11110011 11110001 00000101
[t2] - 28 00000000 00000000 00000000 00000000 00011111 11110011 11110001 00000101
[t2] - 29 00000000 00000000 00000000 00000000 00011111 11110011 11100000 00000101
[t2] - 29 00000000 00000000 00000000 00000000 00011111 11110011 11110001 00000101
[t2] - 29 00000000 00000000 00000000 00000000 00011111 11110011 11110001 00000101
批量撤销
我们来简单介绍一下批量撤销:
- 当撤销偏向锁阈值超过 40 次后,jvm 会这样觉得偏向错误,根本就不该偏向。
- 于是整个类的所有对象 都会变为不可偏向的,新建的对象也是不可偏向的。
我们给出简单代码示例:
/*主代码*/

static Thread t1,t2,t3;
private static void test4() throws InterruptedException {
    Vector<Dog> list = new Vector<>();
    int loopNumber = 39;
    t1 = new Thread(() -> {
        for (int i = 0; i < loopNumber; i++) {
            Dog d = new Dog();
            list.add(d);
            synchronized (d) {
                log.debug(i + "\t" + ClassLayout.parseInstance(d).toPrintableSimple(true));
            }
        }
        LockSupport.unpark(t2);
    }, "t1");
    t1.start();
    t2 = new Thread(() -> {
        LockSupport.park();
        log.debug("===============> ");
        for (int i = 0; i < loopNumber; i++) {
            Dog d = list.get(i);
            log.debug(i + "\t" + ClassLayout.parseInstance(d).toPrintableSimple(true));
            synchronized (d) {
                log.debug(i + "\t" + ClassLayout.parseInstance(d).toPrintableSimple(true));
            }
            log.debug(i + "\t" + ClassLayout.parseInstance(d).toPrintableSimple(true));
        }
        LockSupport.unpark(t3);
    }, "t2");
    t2.start();
    t3 = new Thread(() -> {
        LockSupport.park();
        log.debug("===============> ");
        for (int i = 0; i < loopNumber; i++) {
            Dog d = list.get(i);
            log.debug(i + "\t" + ClassLayout.parseInstance(d).toPrintableSimple(true));
            synchronized (d) {
                log.debug(i + "\t" + ClassLayout.parseInstance(d).toPrintableSimple(true));
            }
            log.debug(i + "\t" + ClassLayout.parseInstance(d).toPrintableSimple(true));
        }
    }, "t3");
    t3.start();
    t3.join();
    log.debug(ClassLayout.parseInstance(new Dog()).toPrintableSimple(true));
}

/*运行结果*/
由于过长不做展示了,我们简单介绍一下

最开始a为偏向锁,无撤销行为
然后b开始时进行撤销,为轻量级锁,在撤销20次之后转化为重偏向,改为偏向锁
最后c开始时撤销,但是撤销次20之后(总计40次),导致jvm启动了批量撤销,这时我们的该类中就不会再出现偏向锁,全为轻量级锁和重量锁
锁清除
我们先来介绍一下锁清除操作:
- 由于系统编译前都会经过JIT即时编译器重新编译
- 如果一个线程被锁固定,但是又没有其他线程争抢锁,就会自动将这个锁去掉来加快速率
JIT即时编译的锁清除操作默认是开启的,我们可以调整参数使其关闭:
- -XX:-EliminateLocks
Wait/notify
这小节我们将会介绍Wait/notify的使用以及相关思想
Wait/notify原理
我们首先介绍一下Wait/notify:
- wait:线程等待,但等待期间会放弃lock锁的所属权
- notify:唤醒等待线程,线程重新进入竞争区竞争lock锁的所属权
我们给出一张原理图:
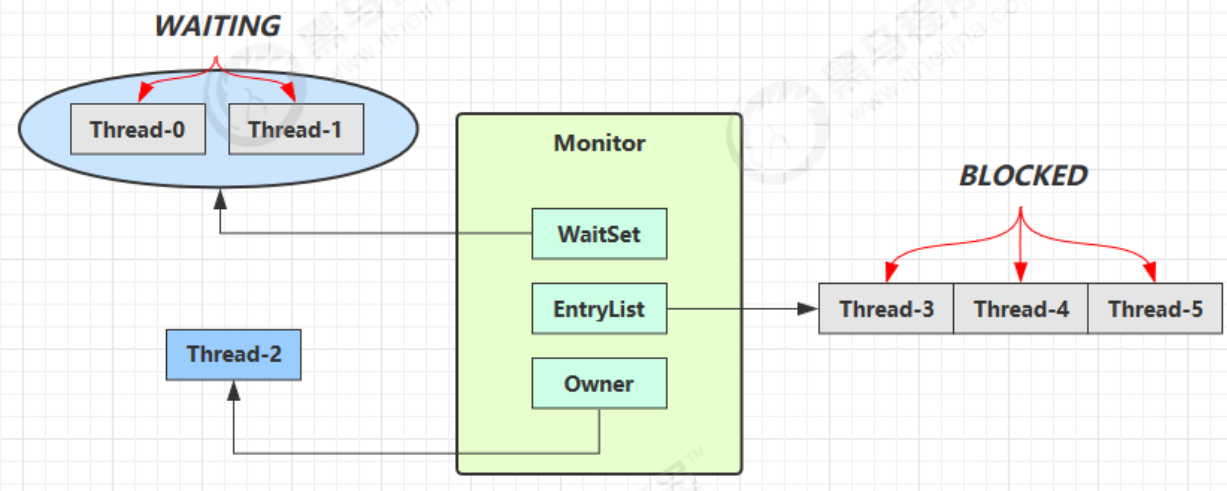
我们对该图进行简单介绍:
- Owner 线程发现条件不满足,调用 wait 方法,即可进入 WaitSet 变为 WAITING 状态
- BLOCKED 和 WAITING 的线程都处于阻塞状态,不占用 CPU 时间片
- BLOCKED 线程会在 Owner 线程释放锁时唤醒
- WAITING 线程会在 Owner 线程调用 notify 或 notifyAll 时唤醒,但唤醒后并不意味者立刻获得锁,仍需进入 EntryList 重新竞争
API 介绍
我们介绍一下常用的Wait/notify的API:
obj.wait()让进入 object 监视器的线程到 waitSet 等待obj.notify()在 object 上正在 waitSet 等待的线程中挑一个唤醒obj.notifyAll()让 object 上正在 waitSet 等待的线程全部唤醒
我们仍旧通过简单的代码展示体验API:
/*主代码*/

// 它们都是线程之间进行协作的手段,都属于 Object 对象的方法。必须获得此对象的锁,才能调用这几个方法
final static Object obj = new Object();
public static void main(String[] args) {
    new Thread(() -> {
        synchronized (obj) {
            log.debug("执行....");
            try {
                obj.wait(); // 让线程在obj上一直等待下去
            } catch (InterruptedException e) {
                e.printStackTrace();
            }
            log.debug("其它代码....");
        }
    }).start();
    new Thread(() -> {
        synchronized (obj) {
            log.debug("执行....");
            try {
                obj.wait(); // 让线程在obj上一直等待下去
            } catch (InterruptedException e) {
                e.printStackTrace();
            }
            log.debug("其它代码....");
        }
    }).start();
    // 主线程两秒后执行
    sleep(2);
    log.debug("唤醒 obj 上其它线程");
    synchronized (obj) {
        obj.notify(); // 唤醒obj上一个线程
        // obj.notifyAll(); // 唤醒obj上所有等待线程
    }
}

/*调用notify*/
20:00:53.096 [Thread-0] c.TestWaitNotify - 执行....
20:00:53.099 [Thread-1] c.TestWaitNotify - 执行....
20:00:55.096 [main] c.TestWaitNotify - 唤醒 obj 上其它线程
20:00:55.096 [Thread-0] c.TestWaitNotify - 其它代码....

/*调用notifyAll*/
19:58:15.457 [Thread-0] c.TestWaitNotify - 执行....
19:58:15.460 [Thread-1] c.TestWaitNotify - 执行....
19:58:17.456 [main] c.TestWaitNotify - 唤醒 obj 上其它线程
19:58:17.456 [Thread-1] c.TestWaitNotify - 其它代码....
19:58:17.456 [Thread-0] c.TestWaitNotify - 其它代码....
此外wait方法还可以设置时间:
wait()方法会释放对象的锁,进入 WaitSet 等待区,从而让其他线程就机会获取对象的锁。无限制等待,直到 notify 为止wait(long n)有时限的等待, 到 n 毫秒后结束等待,或是被 notify
Wait/Sleep区别
我们在这里简单介绍一下两者区别:
- sleep 是 Thread 方法,而 wait 是 Object 的方法
- sleep 不需要强制和 synchronized 配合使用,但 wait 需要 和 synchronized 一起用
- sleep 在睡眠的同时,不会释放对象锁的,但 wait 在等待的时候会释放对象锁
- 它们 状态 TIMED_WAITING
wait notify 正常使用
我们通过循序渐进的形式来讲解wait notify的使用:
/*代码介绍*/

我们希望让工人干活,但是工人需要在屋子里干活
小南需要有烟才能干活,小女需要有外卖才能干活,其他人可以直接干活
我们希望模拟最好的干活场景


/*第一层*/

// 主代码
static final Object room = new Object();
static boolean hasCigarette = false;
static boolean hasTakeout = false;

new Thread(() -> {
    synchronized (room) {
        log.debug("有烟没?[{}]", hasCigarette);
        if (!hasCigarette) {
            log.debug("没烟,先歇会!");
            sleep(2);
        }
        log.debug("有烟没?[{}]", hasCigarette);
        if (hasCigarette) {
            log.debug("可以开始干活了");
        }
    }
}, "小南").start();
for (int i = 0; i < 5; i++) {
    new Thread(() -> {
        synchronized (room) {
            log.debug("可以开始干活了");
        }
    }, "其它人").start();
}
sleep(1);
new Thread(() -> {
    // 这里能不能加 synchronized (room)?
    hasCigarette = true;
    log.debug("烟到了噢!");
}, "送烟的").start();

// 结果展示
20:49:49.883 [小南] c.TestCorrectPosture - 有烟没?[false]
20:49:49.887 [小南] c.TestCorrectPosture - 没烟,先歇会!
20:49:50.882 [送烟的] c.TestCorrectPosture - 烟到了噢!
20:49:51.887 [小南] c.TestCorrectPosture - 有烟没?[true]
20:49:51.887 [小南] c.TestCorrectPosture - 可以开始干活了
20:49:51.887 [其它人] c.TestCorrectPosture - 可以开始干活了
20:49:51.887 [其它人] c.TestCorrectPosture - 可以开始干活了
20:49:51.888 [其它人] c.TestCorrectPosture - 可以开始干活了
20:49:51.888 [其它人] c.TestCorrectPosture - 可以开始干活了
20:49:51.888 [其它人] c.TestCorrectPosture - 可以开始干活了

// 问题说明
- 其它干活的线程,都要一直阻塞,效率太低
- 小南线程必须睡足 2s 后才能醒来,就算烟提前送到,也无法立刻醒来
- 加了 synchronized (room) 后,就好比小南在里面反锁了门睡觉,烟根本没法送进门,main 没加 synchronized 就好像 main 线程是翻窗户进来的

// 解决方法
- 使用 wait - notify 机制

/*第二层*/

// 主代码
new Thread(() -> {
    synchronized (room) {
        log.debug("有烟没?[{}]", hasCigarette);
        if (!hasCigarette) {
            log.debug("没烟,先歇会!");
            try {
                room.wait(2000);
            } catch (InterruptedException e) {
                e.printStackTrace();
            }
        }
        log.debug("有烟没?[{}]", hasCigarette);
        if (hasCigarette) {
            log.debug("可以开始干活了");
        }
    }
}, "小南").start();
for (int i = 0; i < 5; i++) {
    new Thread(() -> {
        synchronized (room) {
            log.debug("可以开始干活了");
        }
    }, "其它人").start();
}
sleep(1);
new Thread(() -> {
    synchronized (room) {
        hasCigarette = true;
        log.debug("烟到了噢!");
        room.notify();
    }
}, "送烟的").start();

// 结果
解决了其它干活的线程阻塞的问题

// 问题
但如果有其它线程也在等待条件呢?

/*第三层*/

// 主代码
new Thread(() -> {
    synchronized (room) {
        log.debug("有烟没?[{}]", hasCigarette);
        if (!hasCigarette) {
            log.debug("没烟,先歇会!");
            try {
                room.wait();
            } catch (InterruptedException e) {
                e.printStackTrace();
            }
        }
        log.debug("有烟没?[{}]", hasCigarette);
        if (hasCigarette) {
            log.debug("可以开始干活了");
        } else {
            log.debug("没干成活...");
        }
    }
}, "小南").start();
new Thread(() -> {
    synchronized (room) {
        Thread thread = Thread.currentThread();
        log.debug("外卖送到没?[{}]", hasTakeout);
        if (!hasTakeout) {
            log.debug("没外卖,先歇会!");
            try {
                room.wait();
            } catch (InterruptedException e) {
                e.printStackTrace();
            }
        }
        log.debug("外卖送到没?[{}]", hasTakeout);
        if (hasTakeout) {
            log.debug("可以开始干活了");
        } else {
            log.debug("没干成活...");
        }
    }
}, "小女").start();
sleep(1);
new Thread(() -> {
    synchronized (room) {
        hasTakeout = true;
        log.debug("外卖到了噢!");
        room.notify();
    }
}, "送外卖的").start();

// 结果
20:53:12.173 [小南] c.TestCorrectPosture - 有烟没?[false]
20:53:12.176 [小南] c.TestCorrectPosture - 没烟,先歇会!
20:53:12.176 [小女] c.TestCorrectPosture - 外卖送到没?[false]
20:53:12.176 [小女] c.TestCorrectPosture - 没外卖,先歇会!
20:53:13.174 [送外卖的] c.TestCorrectPosture - 外卖到了噢!
20:53:13.174 [小南] c.TestCorrectPosture - 有烟没?[false]
20:53:13.174 [小南] c.TestCorrectPosture - 没干成活...

// 问题
notify 只能随机唤醒一个 WaitSet 中的线程,这时如果有其它线程也在等待,那么就可能唤醒不了正确的线 程,称之为【虚假唤醒】

// 解决方法
- 改为 notifyAll

/*第四层*/

// 主代码
new Thread(() -> {
    synchronized (room) {
        log.debug("有烟没?[{}]", hasCigarette);
        if (!hasCigarette) {
            log.debug("没烟,先歇会!");
            try {
                room.wait();
            } catch (InterruptedException e) {
                e.printStackTrace();
            }
        }
        log.debug("有烟没?[{}]", hasCigarette);
        if (hasCigarette) {
            log.debug("可以开始干活了");
        } else {
            log.debug("没干成活...");
        }
    }
}, "小南").start();
new Thread(() -> {
    synchronized (room) {
        Thread thread = Thread.currentThread();
        log.debug("外卖送到没?[{}]", hasTakeout);
        if (!hasTakeout) {
            log.debug("没外卖,先歇会!");
            try {
                room.wait();
            } catch (InterruptedException e) {
                e.printStackTrace();
            }
        }
        log.debug("外卖送到没?[{}]", hasTakeout);
        if (hasTakeout) {
            log.debug("可以开始干活了");
        } else {
            log.debug("没干成活...");
        }
    }
}, "小女").start();
sleep(1);
new Thread(() -> {
    synchronized (room) {
        hasTakeout = true;
        log.debug("外卖到了噢!");
        room.notify();
    }
}, "送外卖的").start();

// 结果
20:53:12.173 [小南] c.TestCorrectPosture - 有烟没?[false]
20:53:12.176 [小南] c.TestCorrectPosture - 没烟,先歇会!
20:53:12.176 [小女] c.TestCorrectPosture - 外卖送到没?[false]
20:53:12.176 [小女] c.TestCorrectPosture - 没外卖,先歇会!
20:53:13.174 [送外卖的] c.TestCorrectPosture - 外卖到了噢!
20:53:13.174 [小南] c.TestCorrectPosture - 有烟没?[false]
20:53:13.174 [小南] c.TestCorrectPosture - 没干成活...

// 问题
- 用 notifyAll 仅解决某个线程的唤醒问题,但使用 if + wait 判断仅有一次机会,一旦条件不成立,就没有重新判断的机会了

// 解决方法
- 用 while + wait,当条件不成立,再次 wait

/*第五层*/

// 主代码
while (!hasCigarette) {
    log.debug("没烟,先歇会!");
    try {
        room.wait();
    } catch (InterruptedException e) {
        e.printStackTrace();
    }
}

// 结果
20:58:34.322 [小南] c.TestCorrectPosture - 有烟没?[false]
20:58:34.326 [小南] c.TestCorrectPosture - 没烟,先歇会!
20:58:34.326 [小女] c.TestCorrectPosture - 外卖送到没?[false]
20:58:34.326 [小女] c.TestCorrectPosture - 没外卖,先歇会!
20:58:35.323 [送外卖的] c.TestCorrectPosture - 外卖到了噢!
20:58:35.324 [小女] c.TestCorrectPosture - 外卖送到没?[true]
20:58:35.324 [小女] c.TestCorrectPosture - 可以开始干活了
20:58:35.324 [小南] c.TestCorrectPosture - 没烟,先歇会!
最后我们给出一个wait notify使用的标准模板:
/*标准模板*/

synchronized(lock) {
    while(条件不成立) {
        lock.wait();
    }
    // 干活
}

//另一个线程
synchronized(lock) {
    lock.notifyAll();
}
模式之保护性暂停
我们将介绍一种新的模式:保护性暂停
简单介绍
我们来介绍一种新的模型:
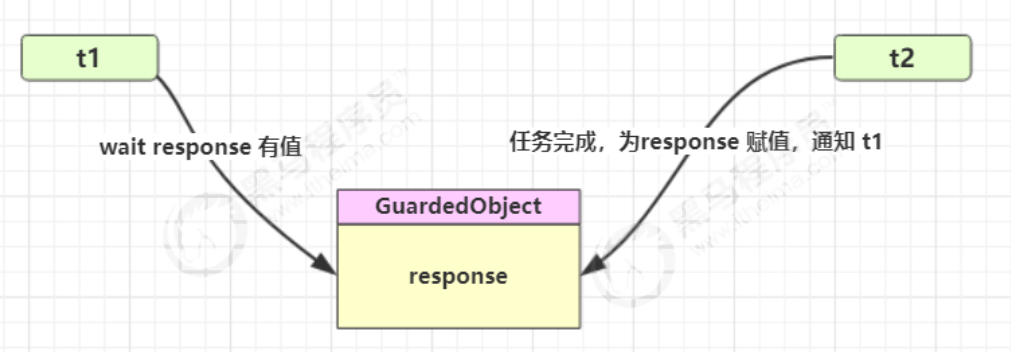
- 即 Guarded Suspension,用在一个线程等待另一个线程的执行结果
我们讲一下注意点:
- 有一个结果需要从一个线程传递到另一个线程,让他们关联同一个 GuardedObject
- 如果有结果不断从一个线程到另一个线程那么可以使用消息队列(见生产者/消费者)
- JDK 中,join 的实现、Future 的实现,采用的就是此模式
- 因为要等待另一方的结果,因此归类到同步模式‘
我们给出模式图:
具体实现
我们给出基本实现形式:
/*主函数*/

public static void main(String[] args) {

    GuardedObject guardedObject = new GuardedObject();

    new Thread(() -> {
        try {
            // 子线程执行下载
            List<String> response = download();
            log.debug("download complete...");
            guardedObject.complete(response);
        } catch (IOException e) {
            e.printStackTrace();
        }
    }).start();

    log.debug("waiting...");
    // 主线程阻塞等待
    Object response = guardedObject.get();
    log.debug("get response: [{}] lines", ((List<String>) response).size());
}

/*方法类*/

class GuardedObject {

    // 我们需要提交的结果
    private Object response;

    // 我们统一设置的锁
    private final Object lock = new Object();

    // 这个是得到方法,我们的主线程直接调取方法即可
    public Object get() {
        synchronized (lock) {
			// 条件不满足则等待
            while (response == null) {
                try {
                    lock.wait();
                } catch (InterruptedException e) {
                    e.printStackTrace();
                }
            }
            return response;
        }
    }

    // 这个是提交方法,我们的主线程直接调取方法即可
    public void complete(Object response) {
        synchronized (lock) {
			// 条件满足,通知等待线程
            this.response = response;
            lock.notifyAll();
        }
    }
}

/*运行结果*/
08:42:18.568 [main] c.TestGuardedObject - waiting...
08:42:23.312 [Thread-0] c.TestGuardedObject - download complete...
08:42:23.312 [main] c.TestGuardedObject - get response: [3] lines
实现改进1
我们当然不希望等待线程一直等待下去,所以我们可以设置一个等待的最大限制:
/*主线程*/

public static void main(String[] args) {
    GuardedObjectV2 v2 = new GuardedObjectV2();
    new Thread(() -> {
        sleep(1);
        v2.complete(null);
        sleep(1);
        v2.complete(Arrays.asList("a", "b", "c"));
    }).start();
    Object response = v2.get(2500);
    if (response != null) {
        log.debug("get response: [{}] lines", ((List<String>) response).size());
    } else {
        log.debug("can't get response");
    }
}

/*方法类*/

class GuardedObjectV2 {

    private Object response;
    private final Object lock = new Object();

    public Object get(long millis) {
        synchronized (lock) {
            // 1) 记录最初时间
            long begin = System.currentTimeMillis();
			// 2) 已经经历的时间
            long timePassed = 0;
            while (response == null) {
				// 4) 假设 millis 是 1000,结果在 400 时唤醒了,那么还有 600 要等
                long waitTime = millis - timePassed;
                log.debug("waitTime: {}", waitTime);
                if (waitTime <= 0) {
                    log.debug("break...");
                    break;
                }
                try {
                    lock.wait(waitTime);
                } catch (InterruptedException e) {
                    e.printStackTrace();
                }
				// 3) 如果提前被唤醒,这时已经经历的时间假设为 400
                timePassed = System.currentTimeMillis() - begin;
                log.debug("timePassed: {}, object is null {}",
                        timePassed, response == null);
            }
            return response;
        }
    }

    public void complete(Object response) {
        synchronized (lock) {
			// 条件满足,通知等待线程
            this.response = response;
            log.debug("notify...");
            lock.notifyAll();
        }
    }
}

/*输出(未超时版)*/
08:49:39.917 [main] c.GuardedObjectV2 - waitTime: 2500
08:49:40.917 [Thread-0] c.GuardedObjectV2 - notify...
08:49:40.917 [main] c.GuardedObjectV2 - timePassed: 1003, object is null true
08:49:40.917 [main] c.GuardedObjectV2 - waitTime: 1497
08:49:41.918 [Thread-0] c.GuardedObjectV2 - notify...
08:49:41.918 [main] c.GuardedObjectV2 - timePassed: 2004, object is null false
08:49:41.918 [main] c.TestGuardedObjectV2 - get response: [3] lines

/*输出(超时版)*/
08:47:54.963 [main] c.GuardedObjectV2 - waitTime: 1500
08:47:55.963 [Thread-0] c.GuardedObjectV2 - notify...
08:47:55.963 [main] c.GuardedObjectV2 - timePassed: 1002, object is null true
08:47:55.963 [main] c.GuardedObjectV2 - waitTime: 498
08:47:56.461 [main] c.GuardedObjectV2 - timePassed: 1500, object is null true
08:47:56.461 [main] c.GuardedObjectV2 - waitTime: 0
08:47:56.461 [main] c.GuardedObjectV2 - break...
08:47:56.461 [main] c.TestGuardedObjectV2 - can't get response
08:47:56.963 [Thread-0] c.GuardedObjectV2 - notify...
实现改进2
但是我们的实际项目中,我们会进行多任务的工作,我们下面来进行改造
我们先对项目进行介绍:
- 图中 Futures 就好比居民楼一层的信箱(每个信箱有房间编号)
- 左侧的 t0,t2,t4 就好比等待邮件的居民,右 侧的 t1,t3,t5 好比邮递员 。
我们在对耦合类进行介绍:
- 如果需要在多个类之间使用 GuardedObject 对象,作为参数传递不是很方便,因此设计一个用来解耦的中间类
- 这样不仅能够解耦【结果等待者】和【结果生产者】,还能够同时支持多个任务的管理。
我们给出项目的一张展示图:
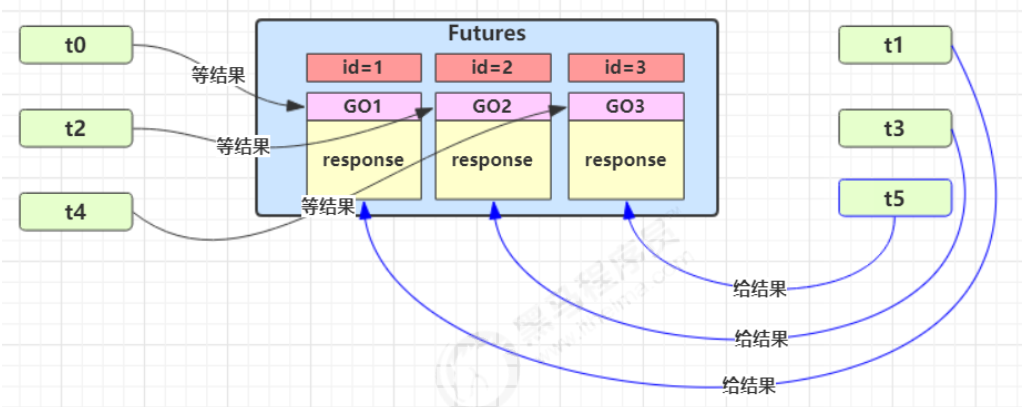
我们来展示具体实现代码:
/*当然下面项目的逻辑并非很通顺,我们这里也只是对模式进行介绍而设计的*/

/*测试主函数*/

public static void main(String[] args) throws InterruptedException {
    for (int i = 0; i < 3; i++) {
        new People().start();
    }
    Sleeper.sleep(1);
    for (Integer id : Mailboxes.getIds()) {
        new Postman(id, "内容" + id).start();
    }
}

/*业务层实现*/

class People extends Thread{
    @Override
    public void run() {
        // 收信
        GuardedObject guardedObject = Mailboxes.createGuardedObject();
        log.debug("开始收信 id:{}", guardedObject.getId());
        Object mail = guardedObject.get(5000);
        log.debug("收到信 id:{}, 内容:{}", guardedObject.getId(), mail);
    }
}

class Postman extends Thread {
    private int id;
    private String mail;
    public Postman(int id, String mail) {
        this.id = id;
        this.mail = mail;
    }
    @Override
    public void run() {
        GuardedObject guardedObject = Mailboxes.getGuardedObject(id);
        log.debug("送信 id:{}, 内容:{}", id, mail);
        guardedObject.complete(mail);
    }
}

/*解耦类交互*/

class Mailboxes {

    private static Map<Integer, GuardedObject> boxes = new Hashtable<>();

    private static int id = 1;
    // 产生唯一 id,方法必须声明为synchronized
    private static synchronized int generateId() {
        return id++;
    }

    public static GuardedObject getGuardedObject(int id) {
        return boxes.remove(id);
    }

    public static GuardedObject createGuardedObject() {
        GuardedObject go = new GuardedObject(generateId());
        boxes.put(go.getId(), go);
        return go;
    }

    public static Set<Integer> getIds() {
        return boxes.keySet();
    }
}

/*底层实现*/

class GuardedObject {

    // 标识 Guarded Object
    private int id;

    public GuardedObject(int id) {
        this.id = id;
    }

    public int getId() {
        return id;
    }

    // 结果
    private Object response;

    // 获取结果
    // timeout 表示要等待多久 2000
    public Object get(long timeout) {
        synchronized (this) {
            // 开始时间 15:00:00
            long begin = System.currentTimeMillis();
            // 经历的时间
            long passedTime = 0;
            while (response == null) {
                // 这一轮循环应该等待的时间
                long waitTime = timeout - passedTime;
                // 经历的时间超过了最大等待时间时,退出循环
                if (timeout - passedTime <= 0) {
                    break;
                }
                try {
                    this.wait(waitTime); // 虚假唤醒 15:00:01
                } catch (InterruptedException e) {
                    e.printStackTrace();
                }
                // 求得经历时间
                passedTime = System.currentTimeMillis() - begin; // 15:00:02 1s
            }
            return response;
        }
    }

    // 产生结果
    public void complete(Object response) {
        synchronized (this) {
            // 给结果成员变量赋值
            this.response = response;
            this.notifyAll();
        }
    }

}

/*运行结果*/
10:35:05.689 c.People [Thread-1] - 开始收信 id:3
10:35:05.689 c.People [Thread-2] - 开始收信 id:1
10:35:05.689 c.People [Thread-0] - 开始收信 id:2
10:35:06.688 c.Postman [Thread-4] - 送信 id:2, 内容:内容2
10:35:06.688 c.Postman [Thread-5] - 送信 id:1, 内容:内容1
10:35:06.688 c.People [Thread-0] - 收到信 id:2, 内容:内容2
10:35:06.688 c.People [Thread-2] - 收到信 id:1, 内容:内容1
10:35:06.688 c.Postman [Thread-3] - 送信 id:3, 内容:内容3
10:35:06.689 c.People [Thread-1] - 收到信 id:3, 内容:内容3
模式之生产者消费者
我们将介绍一种新的模式:生产者消费者
简单介绍
我们来介绍一种新的模型:
- 这里由一系列生产者只负责生产,一系列消费之只负责消费,不用负责对应关系
我们对其进行部分介绍:
- 与前面的保护性暂停中的 GuardObject 不同,不需要产生结果和消费结果的线程一一对应
- 消费队列可以用来平衡生产和消费的线程资源
- 生产者仅负责产生结果数据,不关心数据该如何处理,而消费者专心处理结果数据
- 消息队列是有容量限制的,满时不会再加入数据,空时不会再消耗数据
- JDK 中各种阻塞队列,采用的就是这种模式
我们给出该模式的展示图:

具体实现
我们给出基本实现形式:
/*主函数*/

MessageQueue messageQueue = new MessageQueue(2);

// 4 个生产者线程, 下载任务
for (int i = 0; i < 4; i++) {
    int id = i;
    new Thread(() -> {
        try {
            log.debug("download...");
            List<String> response = Downloader.download();
            log.debug("try put message({})", id);
            messageQueue.put(new Message(id, response));
        } catch (IOException e) {
            e.printStackTrace();
        }
    }, "生产者" + i).start();
}

// 1 个消费者线程, 处理结果
new Thread(() -> {
    while (true) {
        Message message = messageQueue.take();
        List<String> response = (List<String>) message.getMessage();
        log.debug("take message({}): [{}] lines", message.getId(), response.size());
    }
}, "消费者").start();

/*模式底层代码*/

class Message {

    private int id;
    private Object message;

    public Message(int id, Object message) {
        this.id = id;
        this.message = message;
    }

    public int getId() {
        return id;
    }

    public Object getMessage() {
        return message;
    }
}

class MessageQueue {

    private LinkedList<Message> queue;
    private int capacity;

    public MessageQueue(int capacity) {
        this.capacity = capacity;
        queue = new LinkedList<>();
    }

    public Message take() {
        synchronized (queue) {
            while (queue.isEmpty()) {
                log.debug("没货了, wait");
                try {
                    queue.wait();
                } catch (InterruptedException e) {
                    e.printStackTrace();
                }
            }
            Message message = queue.removeFirst();
            queue.notifyAll();
            return message;
        }
    }

    public void put(Message message) {
        synchronized (queue) {
            while (queue.size() == capacity) {
                log.debug("库存已达上限, wait");
                try {
                    queue.wait();
                } catch (InterruptedException e) {
                    e.printStackTrace();
                }
            }
            queue.addLast(message);
            queue.notifyAll();
        }
    }
}

/*运行结果*/

10:48:38.070 [生产者3] c.TestProducerConsumer - download...
10:48:38.070 [生产者0] c.TestProducerConsumer - download...
10:48:38.070 [消费者] c.MessageQueue - 没货了, wait
10:48:38.070 [生产者1] c.TestProducerConsumer - download...
10:48:38.070 [生产者2] c.TestProducerConsumer - download...
10:48:41.236 [生产者1] c.TestProducerConsumer - try put message(1)
10:48:41.237 [生产者2] c.TestProducerConsumer - try put message(2)
10:48:41.236 [生产者0] c.TestProducerConsumer - try put message(0)
10:48:41.237 [生产者3] c.TestProducerConsumer - try put message(3)
10:48:41.239 [生产者2] c.MessageQueue - 库存已达上限, wait
10:48:41.240 [生产者1] c.MessageQueue - 库存已达上限, wait
10:48:41.240 [消费者] c.TestProducerConsumer - take message(0): [3] lines
10:48:41.240 [生产者2] c.MessageQueue - 库存已达上限, wait
10:48:41.240 [消费者] c.TestProducerConsumer - take message(3): [3] lines
10:48:41.240 [消费者] c.TestProducerConsumer - take message(1): [3] lines
10:48:41.240 [消费者] c.TestProducerConsumer - take message(2): [3] lines
10:48:41.240 [消费者] c.MessageQueue - 没货了, wait
park
这小节我们将会介绍park的使用
park基本使用
我们首先来介绍一下park和unpark:
- 它们是 LockSupport 类中的方法,用于控制线程的暂停
我们来介绍一下park的特点(与Wait和notify的区别):
- wait,notify 和 notifyAll 必须配合 Object Monitor 一起使用,而 park,unpark 不必
- park & unpark 是以线程为单位来【阻塞】和【唤醒】线程
- 而 notify 只能随机唤醒一个等待线程,notifyAll 是唤醒所有等待线程,就不那么【精确】
- park & unpark 可以先 unpark,而 wait & notify 不能先 notify
我们给出基本的使用格式:
// 暂停当前线程
LockSupport.park();

// 恢复某个线程的运行
LockSupport.unpark(暂停线程对象)
我们给出一个简单的案例:
/*先park后unpark*/

// 代码
Thread t1 = new Thread(() -> {
    log.debug("start...");
    sleep(1);
    log.debug("park...");
    LockSupport.park();
    log.debug("resume...");
},"t1");
t1.start();
sleep(2);
log.debug("unpark...");
LockSupport.unpark(t1);

// 结果
18:42:52.585 c.TestParkUnpark [t1] - start...
18:42:53.589 c.TestParkUnpark [t1] - park...
18:42:54.583 c.TestParkUnpark [main] - unpark...
18:42:54.583 c.TestParkUnpark [t1] - resume...

/*先unpark后park*/

// 代码
Thread t1 = new Thread(() -> {
    log.debug("start...");
    sleep(2);
    log.debug("park...");
    LockSupport.park();
    log.debug("resume...");
}, "t1");
t1.start();
sleep(1);
log.debug("unpark...");
LockSupport.unpark(t1);

// 结果
18:43:50.765 c.TestParkUnpark [t1] - start...
18:43:51.764 c.TestParkUnpark [main] - unpark...
18:43:52.769 c.TestParkUnpark [t1] - park...
18:43:52.769 c.TestParkUnpark [t1] - resume...

/*结论*/
不管是先park后unpark还是先unpark再park,unpark都起到了解锁的作用!
park底层讲解
我们来讲解一下park的底层思路,这样你就能明白unpark为什么位置随意摆放了!
每个线程都有自己的一个 Parker 对象(由C++编写,java中不可见),由三部分组成 _counter , _cond 和 _mutex
我们只需要了解counter即可:
- counter:线程可执行次数,最小为0,最多为1;默认为0
那么我们再来解析park和unpark操作:
- park:检查当前的counter次数,如果为1,就继续执行,并将其--;如果为0,就停止线程操作
- unpark:将counter++;并且检查当前线程状态,若为暂停,则将counter--,同时启动线程;若为运行,直接counter++即可
我们采用一个简单的比喻:
- _counter 就好比背包中 的备用干粮(0 为耗尽,1 为充足)
- 调用 park 就是要看需不需要停下来歇息
- 如果备用干粮耗尽,那么钻进帐篷歇息
- 如果备用干粮充足,那么不需停留,继续前进
- 调用 unpark,就好比令干粮充足
- 如果这时线程还在休息,就唤醒让他继续前进
- 如果这时线程还在运行,那么下次他调用 park 时,仅是消耗掉备用干粮,不需停留继续前进
我们分别给出三种状态展示:
- 第一种
1. 当前线程调用 Unsafe.park() 方法
2. 检查 _counter ,本情况为 0,这时,获得 _mutex 互斥锁
3. 线程进入 _cond 条件变量阻塞
4. 设置 _counter = 0
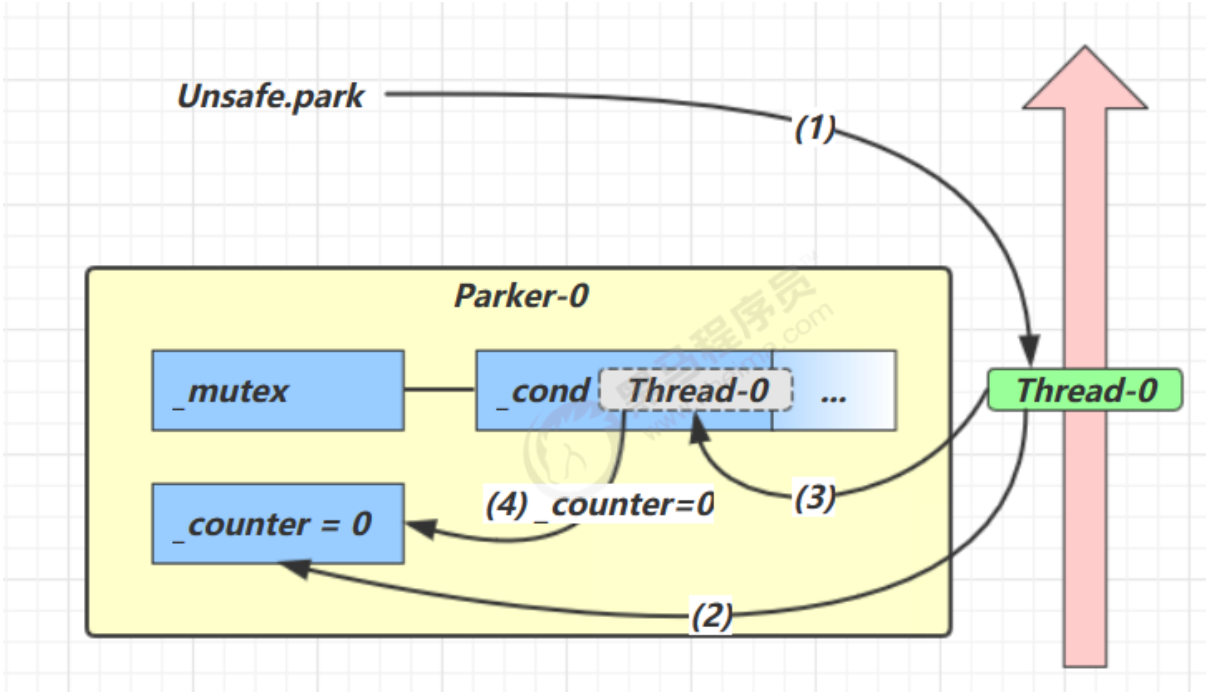
- 第二种
1. 调用 Unsafe.unpark(Thread_0) 方法,设置 _counter 为 1
2. 唤醒 _cond 条件变量中的 Thread_0
3. Thread_0 恢复运行
4. 设置 _counter 为 0
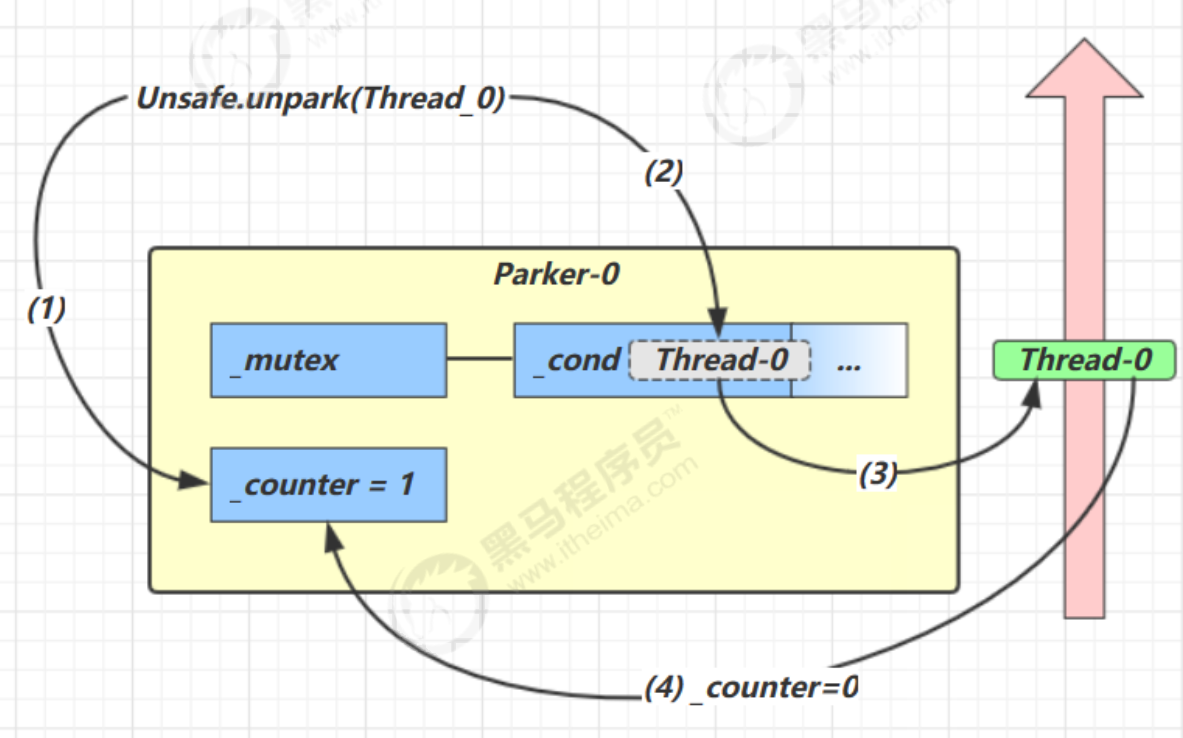
- 第三种
1. 调用 Unsafe.unpark(Thread_0) 方法,设置 _counter 为 1
2. 当前线程调用 Unsafe.park() 方法
3. 检查 _counter ,本情况为 1,这时线程无需阻塞,继续运行
4. 设置 _counter 为 0
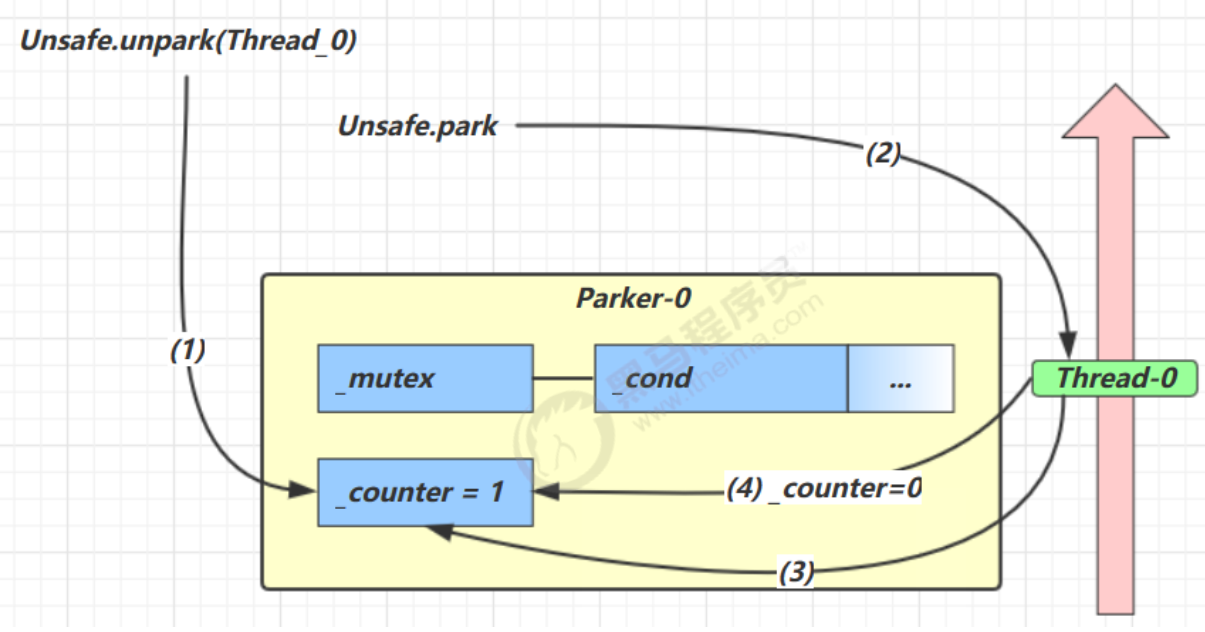
线程状态转换详解
这小节我们将会介绍线程状态转换的所有情况
线程状态转换示意图
我们首先给出总的展示图:
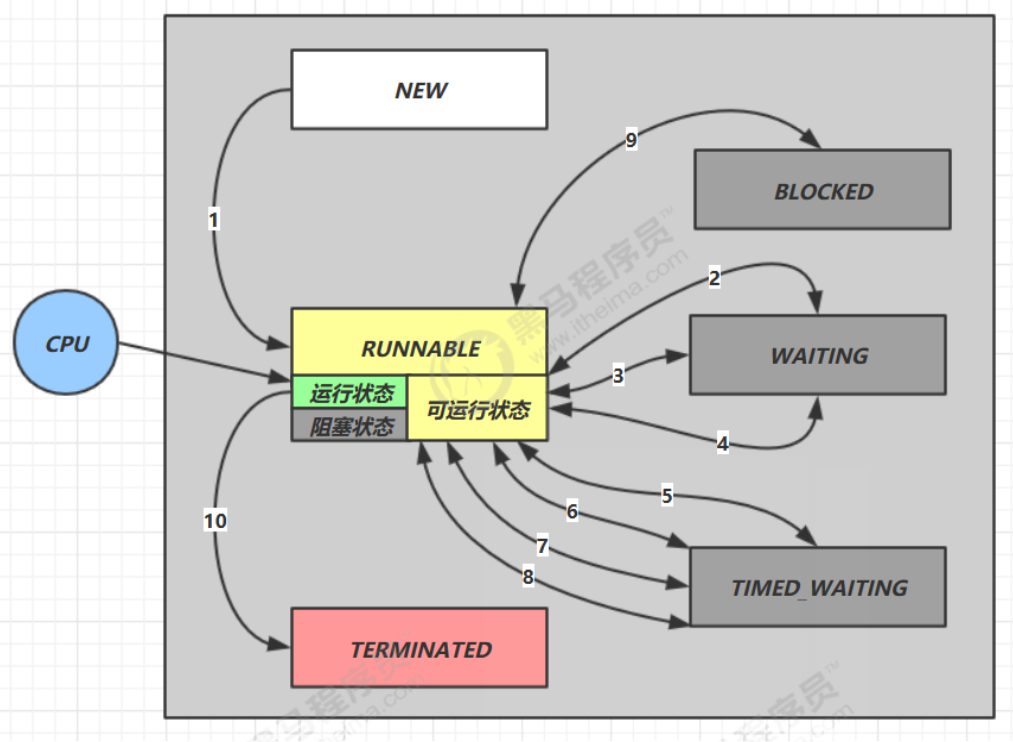
情况 1 NEW --> RUNNABLE
- 当调用
t.start()方法时,由 NEW --> RUNNABLE
情况 2 RUNNABLE <--> WAITING
t 线程用 synchronized(obj) 获取了对象锁后
- 调用
obj.wait()方法时,t 线程从RUNNABLE --> WAITING - 调用
obj.notify(),obj.notifyAll(),t.interrupt()时- 竞争锁成功,t 线程从
WAITING --> RUNNABLE - 竞争锁失败,t 线程从
WAITING --> BLOCKED
- 竞争锁成功,t 线程从
情况 3 RUNNABLE <--> WAITING
- 当前线程调用
t.join()方法时,当前线程从RUNNABLE --> WAITING注意是当前线程在t 线程对象的监视器上等待 - t 线程运行结束,或调用了当前线程的 interrupt() 时,当前线程从
WAITING --> RUNNABLE
情况 4 RUNNABLE <--> WAITING
- 当前线程调用
LockSupport.park()方法会让当前线程从RUNNABLE --> WAITING - 调用
LockSupport.unpark(目标线程) 或调用了线程 的interrupt(),会让目标线程从WAITING --> RUNNABLE
情况 5 RUNNABLE <--> TIMED_WAITING
t 线程用 synchronized(obj) 获取了对象锁后
- 调用
obj.wait(long n)方法时,t 线程从RUNNABLE --> TIMED_WAITING - t 线程等待时间超过了 n 毫秒,或调用
obj.notify(),obj.notifyAll(),t.interrupt()时- 竞争锁成功,t 线程从
TIMED_WAITING --> RUNNABLE - 竞争锁失败,t 线程从
TIMED_WAITING --> BLOCKED
- 竞争锁成功,t 线程从
情况 6 RUNNABLE <--> TIMED_WAITING
- 当前线程调用
t.join(long n)方法时,当前线程从RUNNABLE --> TIMED_WAITING注意是当前线程在t 线程对象的监视器上等待 - 当前线程等待时间超过了 n 毫秒,或t 线程运行结束,或调用了当前线程的
interrupt()时,当前线程从TIMED_WAITING --> RUNNABLE
情况 7 RUNNABLE <--> TIMED_WAITING
- 当前线程调用
Thread.sleep(long n),当前线程从RUNNABLE --> TIMED_WAITING - 当前线程等待时间超过了 n 毫秒,当前线程从
TIMED_WAITING --> RUNNABLE
情况 8 RUNNABLE <--> TIMED_WAITING
- 当前线程调用
LockSupport.parkNanos(long nanos)或LockSupport.parkUntil(long millis)时,当前线程从RUNNABLE --> TIMED_WAITING - 调用
LockSupport.unpark(目标线程) 或调用了线程 的interrupt(),或是等待超时,会让目标线程从TIMED_WAITING--> RUNNABLE
情况 9 RUNNABLE <--> BLOCKED
- t 线程用
synchronized(obj)获取了对象锁时如果竞争失败,从RUNNABLE --> BLOCKED - 持 obj 锁线程的同步代码块执行完毕,会唤醒该对象上所有
BLOCKED的线程重新竞争,如果其中 t 线程竞争 成功,从BLOCKED --> RUNNABLE,其它失败的线程仍然BLOCKED
情况 10 RUNNABLE <--> TERMINATED
- 当前线程所有代码运行完毕,进入
TERMINATED
多锁操作
这小节我们将会介绍多锁操作
多锁操作简述
首先我们来介绍一下多锁操作:
- 我们在实际开发中一把锁并不能解决所有问题,我们需要采用不同的锁来加快速率
我们给出多锁操作的优缺点:
- 好处,是可以增强并发度
- 坏处,如果一个线程需要同时获得多把锁,就容易发生死锁
- 前提:两把锁锁住的两段代码互不相关
我们给出一个简单的多锁操作案例:
/*问题*/
一间大屋子有两个功能:睡觉、学习,互不相干。

现在小南要学习,小女要睡觉,但如果只用一间屋子(一个对象锁)的话,那么并发度很低

解决方法是准备多个房间(多个对象锁)

/*代码*/

// 主代码
BigRoom bigRoom = new BigRoom();

new Thread(() -> {
    bigRoom.compute();
},"小南").start();

new Thread(() -> {
    bigRoom.sleep();
},"小女").start();

// 多锁操作
class BigRoom {

    private final Object studyRoom = new Object();

    private final Object bedRoom = new Object();

    public void sleep() {
        synchronized (bedRoom) {
            log.debug("sleeping 2 小时");
            Sleeper.sleep(2);
        }
    }

    public void study() {
        synchronized (studyRoom) {
            log.debug("study 1 小时");
            Sleeper.sleep(1);
        }
    }
}

/*结果*/
12:15:35.069 [小南] c.BigRoom - study 1 小时
12:15:35.069 [小女] c.BigRoom - sleeping 2 小时
活跃性
这小节我们将会介绍活跃性
死锁
我们首先介绍一下死锁:
- 一个线程需要同时获取多把锁,这时就容易发生死锁
t1 线程获得A对象锁,接下来想获取B对象的锁t2 线程获得B对象锁,接下来想获取A对象的锁
我们给出一个实际案例:
/*代码展示*/

Object A = new Object();

Object B = new Object();

Thread t1 = new Thread(() -> {
    synchronized (A) {
        log.debug("lock A");
        sleep(1);
        synchronized (B) {
            log.debug("lock B");
            log.debug("操作...");
        }
    }
}, "t1");

Thread t2 = new Thread(() -> {
    synchronized (B) {
        log.debug("lock B");
        sleep(0.5);
        synchronized (A) {
            log.debug("lock A");
            log.debug("操作...");
        }
    }
}, "t2");

t1.start();
t2.start();

/*结果*/
12:22:06.962 [t2] c.TestDeadLock - lock B
12:22:06.962 [t1] c.TestDeadLock - lock A
活锁
我们再来介绍一下活锁:
- 活锁出现在两个线程互相改变对方的结束条件,最后谁也无法结束
我们给出一个简单案例:
public class TestLiveLock {

    static volatile int count = 10;

    static final Object lock = new Object();

    public static void main(String[] args) {
        new Thread(() -> {
            // 期望减到 0 退出循环
            while (count > 0) {
                sleep(0.2);
                count--;
                log.debug("count: {}", count);
            }
        }, "t1").start();

        new Thread(() -> {
            // 期望超过 20 退出循环
            while (count < 20) {
                sleep(0.2);
                count++;
                log.debug("count: {}", count);
            }
        }, "t2").start();

    }
}
活锁解决方法:
- 错开线程的运行时间,使得一方不能改变另一方的结束条件。
- 将睡眠时间调整为随机数。
饥饿
我们来简单介绍一下饥饿:
- 一个线程由于优先级太低,始终得不到 CPU 调度执行,也不能够结束,饥饿的情况不易演示,讲读写锁时会涉及饥饿问题
我们这里给出一个简单案例:
- 我们在开始时创建一个优先级为1的操作
- 然后我们不断创建优先级大于1的操作,这些操作导致CPU没有空闲时间
- 最后所有进程都在不断执行,但是由于最开始的操作优先级过低无法调度,导致造成饥饿
ReentrantLock
这小节我们将会介绍ReentrantLock
ReentrantLock简述
我们首先介绍一下ReentrantLock:
- ReentrantLock也是一种锁,级别同synchronized锁相同,但是相比而言更加高级
我们来介绍ReentrantLock的优势:
- 可中断
- 可以设置超时时间
- 可以设置为公平锁
- 支持多个条件变量
- 与 synchronized 一样,都支持可重入
我们来介绍一下基本语法:
// 创造对象
private ReentrantLock reentrantLock;

// 获取锁(上锁)
reentrantLock.lock();

try {
 // 临界区
} finally {
 // 释放锁
 reentrantLock.unlock();
}
可重入性
我们首先来介绍一下可重入性:
- 可重入是指同一个线程如果首次获得了这把锁,那么因为它是这把锁的拥有者,因此有权利再次获取这把锁
- 如果是不可重入锁,那么第二次获得锁时,自己也会被锁挡住。
我们给出一个简单案例:
/*代码展示*/

static ReentrantLock lock = new ReentrantLock();
public static void main(String[] args) {
    method1();
}
public static void method1() {
    lock.lock();
    try {
        log.debug("execute method1");
        method2();
    } finally {
        lock.unlock();
    }
}
public static void method2() {
    lock.lock();
    try {
        log.debug("execute method2");
        method3();
    } finally {
        lock.unlock();
    }
}
public static void method3() {
    lock.lock();
    try {
        log.debug("execute method3");
    } finally {
        lock.unlock();
    }
}

/*结果展示*/
17:59:11.862 [main] c.TestReentrant - execute method1
17:59:11.865 [main] c.TestReentrant - execute method2
17:59:11.865 [main] c.TestReentrant - execute method3

/*结果分析*/
上述的的调用均由main线程调用
方法中均采用了lock方法上锁,且main一直没有解锁
由于具有可重入性,main可以执行m1,m2,m3的方法,如果没有可重入性,则会导致线程卡死
可打断性
我们来简单介绍一下可打断性:
- 可打断指的是处于阻塞状态等待锁的线程可以被打断等待。
- 注意
lock.lockInterruptibly()和lock.trylock()方法是可打断的,lock.lock()不是。 - 可打断的意义在于避免得不到锁的线程无限制地等待下去,防止死锁的一种方式。
我们给出一个简单的示例:
/*可打断性代码展示(lock.lockInterruptibly)*/

ReentrantLock lock = new ReentrantLock();

Thread t1 = new Thread(() -> {
    log.debug("启动...");
    try {
        lock.lockInterruptibly();
    } catch (InterruptedException e) {
        e.printStackTrace();
        log.debug("等锁的过程中被打断");
        return;
    }
    try {
        log.debug("获得了锁");
    } finally {
        lock.unlock();
    }
}, "t1");

lock.lock();
log.debug("获得了锁");
t1.start();

try {
    sleep(1);
    t1.interrupt();
    log.debug("执行打断");
} finally {
    lock.unlock();
}

/*可打断性结果展示(lock.lockInterruptibly)*/

18:02:40.520 [main] c.TestInterrupt - 获得了锁
18:02:40.524 [t1] c.TestInterrupt - 启动...
18:02:41.530 [main] c.TestInterrupt - 执行打断
java.lang.InterruptedException
 		at
java.util.concurrent.locks.AbstractQueuedSynchronizer.doAcquireInterruptibly(AbstractQueuedSynchr
onizer.java:898)
 		at
java.util.concurrent.locks.AbstractQueuedSynchronizer.acquireInterruptibly(AbstractQueuedSynchron
izer.java:1222)
 		at java.util.concurrent.locks.ReentrantLock.lockInterruptibly(ReentrantLock.java:335)
 		at cn.itcast.n4.reentrant.TestInterrupt.lambda$main$0(TestInterrupt.java:17)
 		at java.lang.Thread.run(Thread.java:748)
18:02:41.532 [t1] c.TestInterrupt - 等锁的过程中被打断

/*不可打断性代码展示(lock.lock())*/

ReentrantLock lock = new ReentrantLock();

Thread t1 = new Thread(() -> {
    log.debug("启动...");
    try {
        lock.lock();
    } catch (InterruptedException e) {
        e.printStackTrace();
        log.debug("等锁的过程中被打断");
        return;
    }
    try {
        log.debug("获得了锁");
    } finally {
        lock.unlock();
    }
}, "t1");

lock.lock();
log.debug("获得了锁");
t1.start();

try {
    sleep(1);
    t1.interrupt();
    log.debug("执行打断");
} finally {
    lock.unlock();
}

/*不可打断性结果展示(lock.lock)*/

18:06:56.261 [main] c.TestInterrupt - 获得了锁
18:06:56.265 [t1] c.TestInterrupt - 启动...
18:06:57.266 [main] c.TestInterrupt - 执行打断 // 这时 t1 并没有被真正打断, 而是仍继续等待锁
18:06:58.267 [main] c.TestInterrupt - 释放了锁
18:06:58.267 [t1] c.TestInterrupt - 获得了锁
锁超时
我们的Reentrant Lock可以设置锁超时特性:
// 立刻检测
lock.tryLock()

// 时间内检测
lock.tryLock(1, TimeUnit.SECONDS)
我们给出简单示例:
/*立刻检测代码展示*/

ReentrantLock lock = new ReentrantLock();
Thread t1 = new Thread(() -> {
    log.debug("启动...");
    if (!lock.tryLock()) {
        log.debug("获取立刻失败,返回");
        return;
    }
    try {
        log.debug("获得了锁");
    } finally {
        lock.unlock();
    }
}, "t1");
lock.lock();
log.debug("获得了锁");
t1.start();
try {
    sleep(2);
} finally {
    lock.unlock();
}

/*立刻检测结果*/

18:15:02.918 [main] c.TestTimeout - 获得了锁
18:15:02.921 [t1] c.TestTimeout - 启动...
18:15:02.921 [t1] c.TestTimeout - 获取立刻失败,返回

/*延时检测代码展示*/

ReentrantLock lock = new ReentrantLock();
Thread t1 = new Thread(() -> {
    log.debug("启动...");
    try {
        if (!lock.tryLock(1, TimeUnit.SECONDS)) {
            log.debug("获取等待 1s 后失败,返回");
            return;
        }
    } catch (InterruptedException e) {
        e.printStackTrace();
    }
    try {
        log.debug("获得了锁");
    } finally {
        lock.unlock();
    }
}, "t1");
lock.lock();
log.debug("获得了锁");
t1.start();
try {
    sleep(2);
} finally {
    lock.unlock();
}

/*延时检测结果*/

18:19:40.537 [main] c.TestTimeout - 获得了锁
18:19:40.544 [t1] c.TestTimeout - 启动...
18:19:41.547 [t1] c.TestTimeout - 获取等待 1s 后失败,返回
同时我们会发现这个特性可以用来解决哲学家用餐问题:
/*主代码*/

class Philosopher extends Thread {

    Chopstick left;
    Chopstick right;

    public Philosopher(String name, Chopstick left, Chopstick right) {
        super(name);
        this.left = left;
        this.right = right;
    }

    @Override
    public void run() {
        while (true) {
            // 尝试获得左手筷子(当获取失败会释放当前资源,不会导致资源堵塞)
            if (left.tryLock()) {
                try {
                    // 尝试获得右手筷子(当获取失败会释放当前资源,不会导致资源堵塞)
                    if (right.tryLock()) {
                        try {
                            eat();
                        } finally {
                            right.unlock();
                        }
                    }
                } finally {
                    left.unlock();
                }
            }
        }
    }

    private void eat() {
        log.debug("eating...");
        Sleeper.sleep(1);
    }

}

/*筷子类*/

class Chopstick extends ReentrantLock {

    String name;

    public Chopstick(String name) {
        this.name = name;
    }

    @Override
    public String toString() {
        return "筷子{" + name + '}';
    }
}
公平锁
我们来简单解释一下公平锁:
- 公平锁会有系统来做出判断,主动按照顺序来控制锁的归属权
默认情况下,公平锁是关闭的,我们如果开启需要手动设置:
// 开启公平锁
ReentrantLock lock = new ReentrantLock(true);
我们需要注意:
- 公平锁一般没有必要,会降低并发度
条件变量
我们首先来介绍一下条件变量:
-
条件变量相比于休息室,当当前线程无法继续运行时,我们将其设置进条件变量进行暂停操作
-
synchronized 中也有条件变量,就是我们讲原理时那个 waitSet 休息室,当条件不满足时进入 waitSet 等待
我们需要注意的是ReentrantLock的条件变量是优秀的:
- synchronized 是那些不满足条件的线程都在一间休息室等消息
- 而 ReentrantLock 支持多间休息室,有专门等烟的休息室、专门等早餐的休息室、唤醒时也是按休息室来唤 醒
我们来讲一些使用要点:
- await 前需要获得锁
- await 执行后,会释放锁,进入 conditionObject 等待
- await 的线程被唤醒(或打断、或超时)取重新竞争 lock 锁
- 竞争 lock 锁成功后,从 await 后继续执行
我们给出一些简单的使用指南:
// 首先需要一个ReentrantLock对象
public ReentrantLock reentrantLock;

// 我们需要根据对象设置一些条件变量
static Condition waitCigaretteQueue = lock.newCondition();
static Condition waitbreakfastQueue = lock.newCondition();

// 表示这个线程将会在waitCigaretteQueue的条件变量中休息,相当于wait
waitCigaretteQueue.await();

// 这个就表示将waitCigaretteQueue的线程释放一个,相当于notify
waitCigaretteQueue.signal();

// 这个就表示将waitCigaretteQueue的线程释放全部,相当于notifyAll
waitCigaretteQueue.signalAll();
我们给出一个简单实例:
/*代码展示*/

static ReentrantLock lock = new ReentrantLock();
static Condition waitCigaretteQueue = lock.newCondition();
static Condition waitbreakfastQueue = lock.newCondition();
static volatile boolean hasCigrette = false;
static volatile boolean hasBreakfast = false;
public static void main(String[] args) {
    new Thread(() -> {
        try {
            lock.lock();
            while (!hasCigrette) {
                try {
                    waitCigaretteQueue.await();
                } catch (InterruptedException e) {
                    e.printStackTrace();
                }
            }
            log.debug("等到了它的烟");
        } finally {
            lock.unlock();
        }
    }).start();
    new Thread(() -> {
        try {
            lock.lock();
            while (!hasBreakfast) {
                try {
                    waitbreakfastQueue.await();
                } catch (InterruptedException e) {
                    e.printStackTrace();
                }
            }
            log.debug("等到了它的早餐");
        } finally {
            lock.unlock();
        }
    }).start();
    sleep(1);
    sendBreakfast();
    sleep(1);
    sendCigarette();
}
private static void sendCigarette() {
    lock.lock();
    try {
        log.debug("送烟来了");
        hasCigrette = true;
        waitCigaretteQueue.signal();
    } finally {
        lock.unlock();
    }
}
private static void sendBreakfast() {
    lock.lock();
    try {
        log.debug("送早餐来了");
        hasBreakfast = true;
        waitbreakfastQueue.signal();
    } finally {
        lock.unlock();
    }
}

/*结果展示*/

18:52:27.680 [main] c.TestCondition - 送早餐来了
18:52:27.682 [Thread-1] c.TestCondition - 等到了它的早餐
18:52:28.683 [main] c.TestCondition - 送烟来了
18:52:28.683 [Thread-0] c.TestCondition - 等到了它的烟
同步模式之顺序控制
我们在这里介绍一下同步模型下的顺序控制的几种方法
固定运行顺序
我们需要以固定的顺序来执行线程,例如先打印2在打印1
wait notify 版
我们直接给出相关代码:
// 用来同步的对象
static Object obj = new Object();

// t2 运行标记, 代表 t2 是否执行过
static boolean t2runed = false;

public static void main(String[] args) {

    Thread t1 = new Thread(() -> {
        synchronized (obj) {
            // 如果 t2 没有执行过
            while (!t2runed) {
                try {
                    // t1 先等一会
                    obj.wait();
                } catch (InterruptedException e) {
                    e.printStackTrace();
                }
            }
        }
        System.out.println(1);
    });

    Thread t2 = new Thread(() -> {
        System.out.println(2);
        synchronized (obj) {
            // 修改运行标记
            t2runed = true;
            // 通知 obj 上等待的线程(可能有多个,因此需要用 notifyAll)
            obj.notifyAll();
        }
    });

    t1.start();
    t2.start();
}
Park Unpark 版
我们之前的wait/notify相对而言比较麻烦:
- 首先,需要保证先 wait 再 notify,否则 wait 线程永远得不到唤醒。因此使用了『运行标记』来判断该不该 wait
- 第二,如果有些干扰线程错误地 notify 了 wait 线程,条件不满足时还要重新等待,使用了 while 循环来解决 此问题
- 最后,唤醒对象上的 wait 线程需要使用 notifyAll,因为『同步对象』上的等待线程可能不止一个
我们采用park和unpark来进行简化操作:
Thread t1 = new Thread(() -> {
    try { Thread.sleep(1000); } catch (InterruptedException e) { }
    // 当没有『许可』时,当前线程暂停运行;有『许可』时,用掉这个『许可』,当前线程恢复运行
    LockSupport.park();
    System.out.println("1");
});

Thread t2 = new Thread(() -> {
    System.out.println("2");
    // 给线程 t1 发放『许可』(多次连续调用 unpark 只会发放一个『许可』)
    LockSupport.unpark(t1);
});

t1.start();
t2.start();
交替输出顺序
我们需要以固定的交替顺序来执行线程,例如先t1后t2执行五次
wait notify 版
我们直接给出相关代码:
public class TestState {
        SyncWaitNotify syncWaitNotify = new SyncWaitNotify(1, 5);
        new Thread(() -> {
            syncWaitNotify.print(1, 2, "a");
        }).start();
        new Thread(() -> {
            syncWaitNotify.print(2, 3, "b");
        }).start();
        new Thread(() -> {
            syncWaitNotify.print(3, 1, "c");
        }).start();
}

class SyncWaitNotify {
    private int flag;
    private int loopNumber;
    public SyncWaitNotify(int flag, int loopNumber) {
        this.flag = flag;
        this.loopNumber = loopNumber;
    }
    public void print(int waitFlag, int nextFlag, String str) {
        for (int i = 0; i < loopNumber; i++) {
            synchronized (this) {
                while (this.flag != waitFlag) {
                    try {
                        this.wait();
                    } catch (InterruptedException e) {
                        e.printStackTrace();
                    }
                }
                System.out.print(str);
                flag = nextFlag;
                this.notifyAll();
            }
        }
    }
}
Lock 条件变量版
我们直接给出相关代码:
public class TestState {
    AwaitSignal as = new AwaitSignal(5);

    Condition aWaitSet = as.newCondition();
    Condition bWaitSet = as.newCondition();
    Condition cWaitSet = as.newCondition();

    new Thread(() -> {
        as.print("a", aWaitSet, bWaitSet);
    }).start();

    new Thread(() -> {
        as.print("b", bWaitSet, cWaitSet);
    }).start();

    new Thread(() -> {
        as.print("c", cWaitSet, aWaitSet);
    }).start();

    as.start(aWaitSet);
}

class AwaitSignal extends ReentrantLock {
    public void start(Condition first) {
        this.lock();
        try {
            log.debug("start");
            first.signal();
        } finally {
            this.unlock();
        }
    }
    public void print(String str, Condition current, Condition next) {
        for (int i = 0; i < loopNumber; i++) {
            this.lock();
            try {
                current.await();
                log.debug(str);
                next.signal();
            } catch (InterruptedException e) {
                e.printStackTrace();
            } finally {
                this.unlock();
            }
        }
    }
    // 循环次数
    private int loopNumber;
    public AwaitSignal(int loopNumber) {
        this.loopNumber = loopNumber;
    }
}
Park Unpark 版
我们直接给出相关代码:
public class TestState {
    SyncPark syncPark = new SyncPark(5);

    Thread t1 = new Thread(() -> {
        syncPark.print("a");
    });

    Thread t2 = new Thread(() -> {
        syncPark.print("b");
    });

    Thread t3 = new Thread(() -> {
        syncPark.print("c\n");
    });

    syncPark.setThreads(t1, t2, t3);

    syncPark.start();
}

class SyncPark {
    private int loopNumber;
    private Thread[] threads;
    public SyncPark(int loopNumber) {
        this.loopNumber = loopNumber;
    }
    public void setThreads(Thread... threads) {
        this.threads = threads;
    }
    public void print(String str) {
        for (int i = 0; i < loopNumber; i++) {
            LockSupport.park();
            System.out.print(str);
            LockSupport.unpark(nextThread());
        }
    }
    private Thread nextThread() {
        Thread current = Thread.currentThread();
        int index = 0;
        for (int i = 0; i < threads.length; i++) {
            if(threads[i] == current) {
                index = i;
                break;
            }
        }
        if(index < threads.length - 1) {
            return threads[index+1];
        } else {
            return threads[0];
        }
    }
    public void start() {
        for (Thread thread : threads) {
            thread.start();
        }
        LockSupport.unpark(threads[0]);
    }
}
本章小结
本章我们需要重点掌握的是
- 分析多线程访问共享资源时,哪些代码片段属于临界区
- 使用 synchronized 互斥解决临界区的线程安全问题
- 掌握 synchronized 锁对象语法
- 掌握 synchronzied 加载成员方法和静态方法语法
- 掌握 wait/notify 同步方法
- 使用 lock 互斥解决临界区的线程安全问题
- 掌握 lock 的使用细节:可打断、锁超时、公平锁、条件变量
- 学会分析变量的线程安全性、掌握常见线程安全类的使用
- 线程安全类的方法是原子性的,但方法之间的组合要具体分析。
- 了解线程活跃性问题:死锁、活锁、饥饿。
- 解决死锁、饥饿的方式:ReentranLock
- 应用方面
- 互斥:使用 synchronized 或 Lock 达到共享资源互斥效果
- 同步:使用 wait/notify 或 Lock 的条件变量来达到线程间通信效果
- 原理方面
- monitor、synchronized 、wait/notify 原理
- synchronized 进阶原理
- park & unpark 原理
- 模式方面
- 同步模式之保护性暂停
- 异步模式之生产者消费者
- 同步模式之顺序控制
结束语
到这里我们JUC的共享模型之管程就结束了,希望能为你带来帮助~
附录
该文章属于学习内容,具体参考B站黑马程序员满老师的JUC完整教程
这里附上视频链接:04.001-本章内容_哔哩哔哩_bilibili


