谷粒商城集群篇笔记--1--p353
谷粒商城集群篇
暂时只学到p353集
0.学习目标
- 理解各种概念
- 搭建好环境
- 经常复习
- 上传jar,实际手动实践、动手练习
一、k8s 集群部署
1、k8s 快速入门
1.1)、简介
Kubernetes 简称 k8s。是用于自动部署,扩展和管理容器化应用程序的开源系统。
中文官网:https://kubernetes.io/zh/
中文社区:https://www.kubernetes.org.cn/
官方文档:https://kubernetes.io/zh/docs/home/
社区文档:http://docs.kubernetes.org.cn/
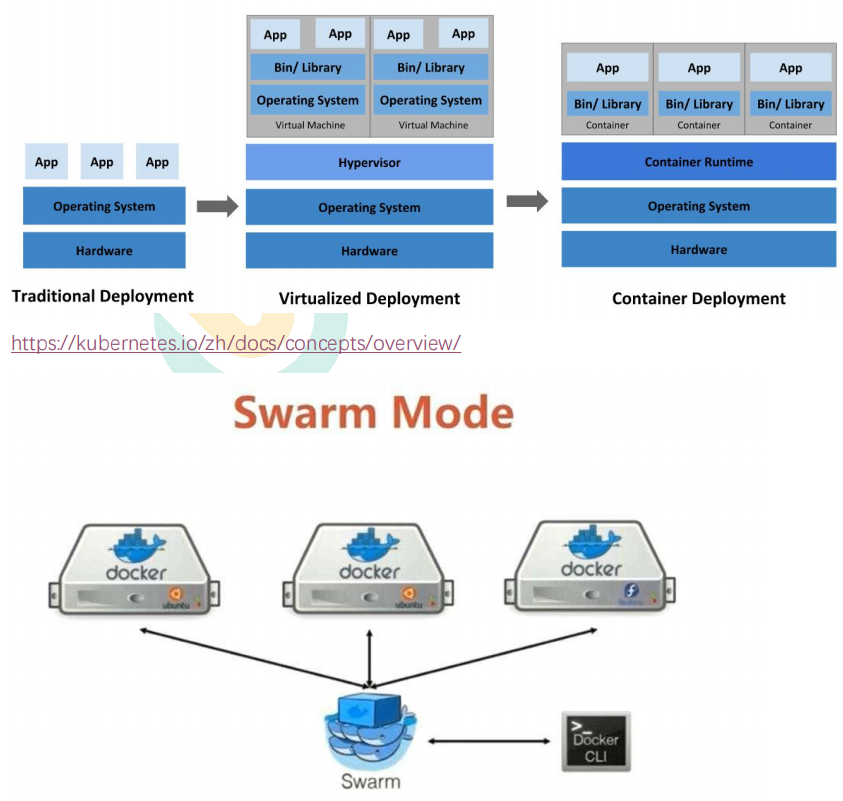
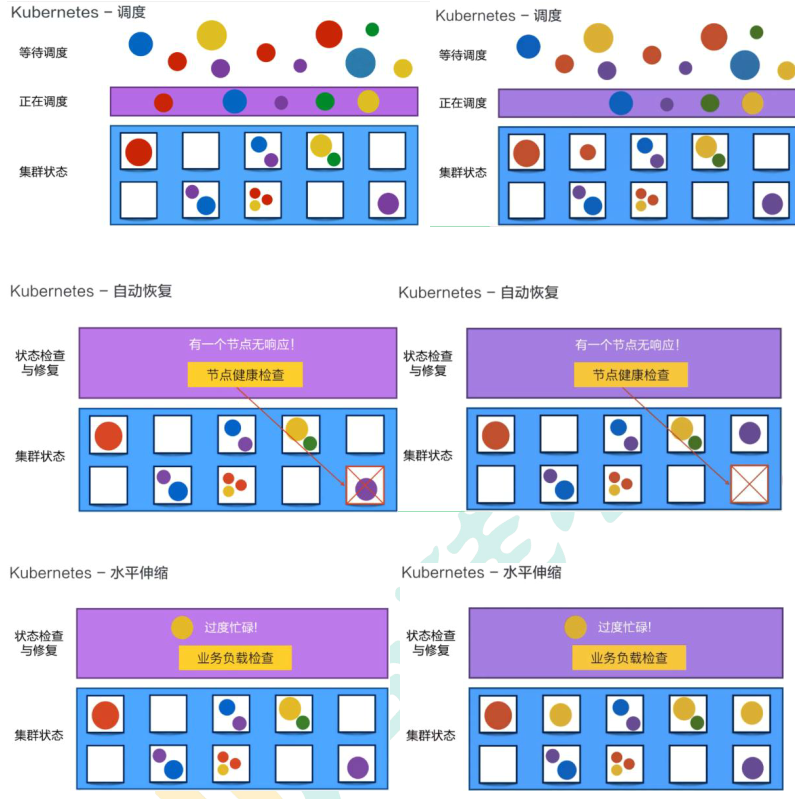
- 部署方式的进化
1.2)、架构
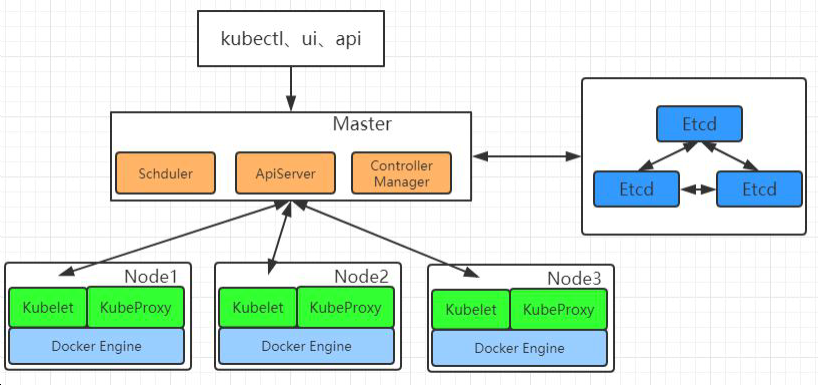
(1)、整体主从方式
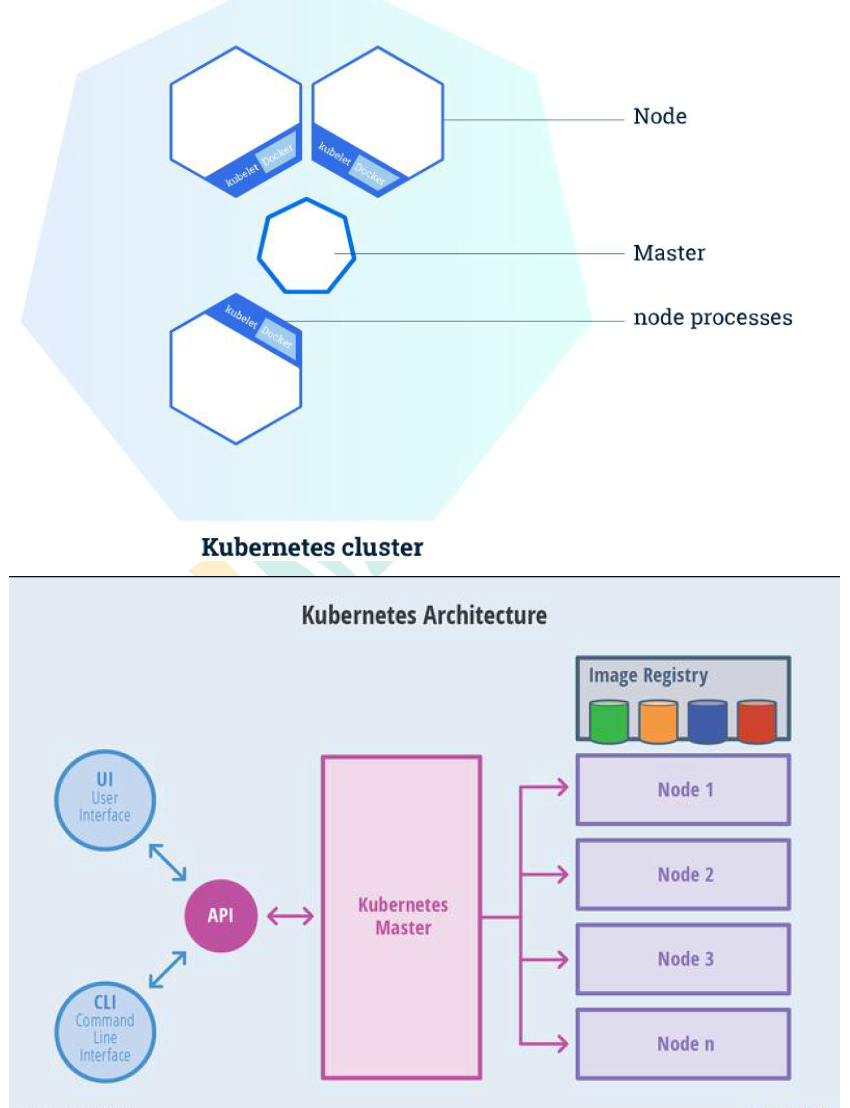
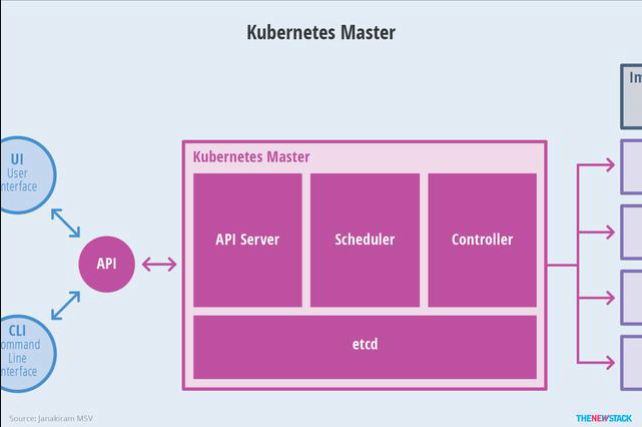
(2)、Master 节点架构
-
kube-apiserver
- 对外暴露 K8S 的 api 接口,是外界进行资源操作的唯 一入口
- 提供认证、授权、访问控制、API 注册和发现等机制
- 对外暴露 K8S 的 api 接口,是外界进行资源操作的唯 一入口
-
etcd
- etcd 是兼具一致性和高可用性的键值数据库(类似redis),可以作为保存 Kubernetes 所有集
群数据的后台数据库。 - Kubernetes 集群的 etcd 数据库通常需要有个备份计划
- etcd 是兼具一致性和高可用性的键值数据库(类似redis),可以作为保存 Kubernetes 所有集
-
kube-scheduler
包工头,负责指挥
- 主节点上的组件,该组件监视那些新创建的未指定运行节点的 Pod,并选择节点
让 Pod 在上面运行。 - 所有对 k8s 的集群操作,都必须经过主节点进行调度
- 主节点上的组件,该组件监视那些新创建的未指定运行节点的 Pod,并选择节点
-
kube-controller-manager
-
在主节点上运行控制器的组件
-
这些控制器包括:
-
节点控制器(Node Controller): 负责在节点出现故障时进行通知和响应。
-
副本控制器(Replication Controller): 负责为系统中的每个副本控制器对象维
护正确数量的 Pod。 -
端点控制器(Endpoints Controller): 填充端点(Endpoints)对象(即加入 Service
与 Pod)。 -
服务帐户和令牌控制器(Service Account & Token Controllers): 为新的命名
空间创建默认帐户和 API 访问令牌 -
其他还有些云控制器(了解即可)
-
(3)、Node 节点架构
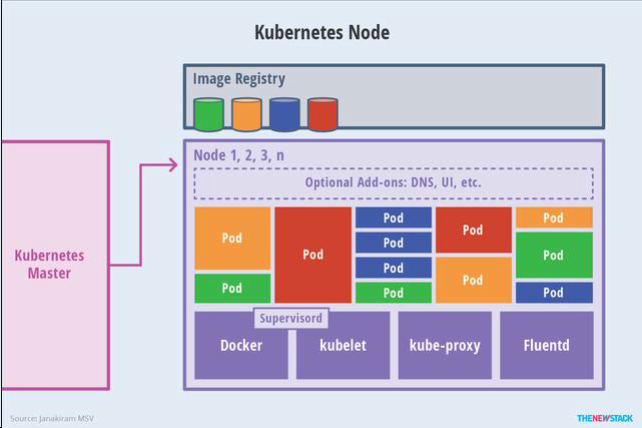
Node节点都有如下组件组成
-
kubelet
- 一个在集群中每个节点上运行的代理。它保证容器都运行在 Pod 中。
- myps:一个pod包括多个容器,这些容器共同组成一个服务对外提供功能
- 一个在集群中每个节点上运行的代理。它保证容器都运行在 Pod 中。
-
负责维护容器的生命周期,同时也负责 Volume(CSI)和网络(CNI)的管理;
-
kube-proxy
-
负责为 Service 提供 cluster 内部的服务发现和负载均衡;
myps: 大家可以当成网卡路由器
-
-
容器运行环境(Container Runtime)
- 容器运行环境是负责运行容器的软件。
- Kubernetes 支持多个容器运行环境: Docker、 containerd、cri-o、 rktlet 以及任
何实现 Kubernetes CRI (容器运行环境接口)。
-
fluentd 日志
- 是一个守护进程,它有助于提供集群层面日志 集群层面的日志
1.3)、全概念(重要)
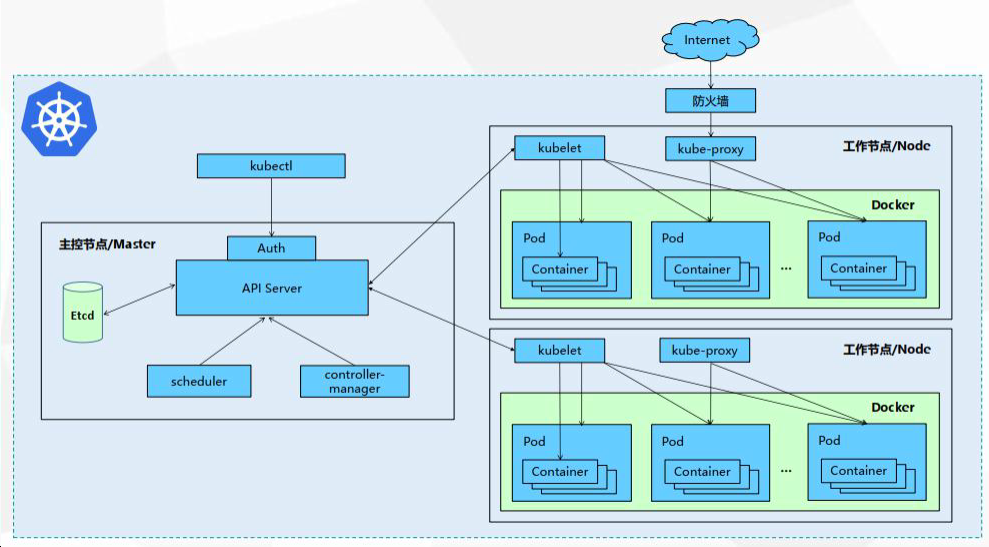
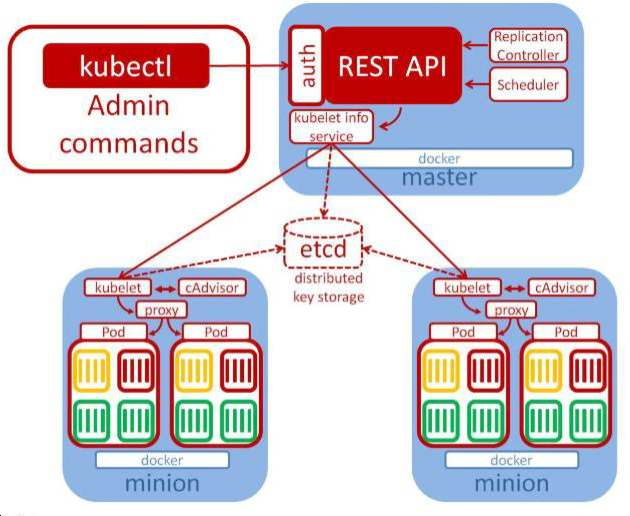
完整概念图如下:
(先听一下,后面用到会仔细在讲)把这些概念整体串起来的讲的视频大概在B站视频22:00分钟处
-
Container:容器,可以是 docker 启动的一个容器
-
Pod:
- k8s 使用 Pod 来组织一组容器
- 一个 Pod 中的所有容器共享同一网络。
- Pod 是 k8s 中的最小部署单元
-
Volume
- 声明在 Pod 容器中可访问的文件目录
- 可以被挂载在 Pod 中一个或多个容器指定路径下
- 支持多种后端存储抽象(本地存储,分布式存储,云存
储…)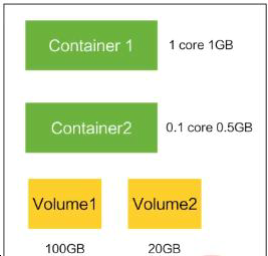
-
Controllers:更高层次对象,部署和管理 Pod;
- ReplicaSet:确保预期的 Pod 副本数量
- Deplotment:无状态应用部署
- StatefulSet:有状态应用部署
- DaemonSet:确保所有 Node 都运行一个指定 Pod
- Job:一次性任务
- Cronjob:定时任务
-
Deployment:
定义一组 Pod 的副本数目、版本等
通过控制器(Controller)维持 Pod 数目(自动回
复失败的 Pod)
通过控制器以指定的策略控制版本(滚动升级,回滚等) -
Service
-
定义一组 Pod 的访问策略
-
Pod 的负载均衡,提供一个或者多个 Pod 的稳定
访问地址例如:讲cart服务部署到了5个pod中,这个5个pod就组成一个service对外服务,我们访问的时候就访问这一个service即可,由service提供负载均衡
-
支持多种方式(ClusterIP、NodePort、LoadBalance)
-
-
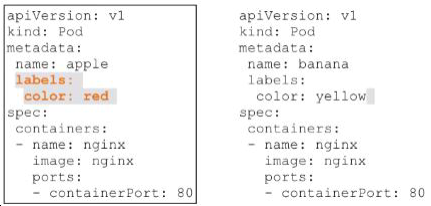
Label:标签,用于对象资源的查询,筛选
-
Namespace:命名空间,逻辑隔离
- 一个集群内部的逻辑隔离机制(鉴权,资源) 每个资源都属于一个 namesp ace
- 同一个 namespace 所有资源名不能重复
- 不同 namespace 可以资源名重复
API:
我们通过 kubernetes 的 API 来操作整个集群。
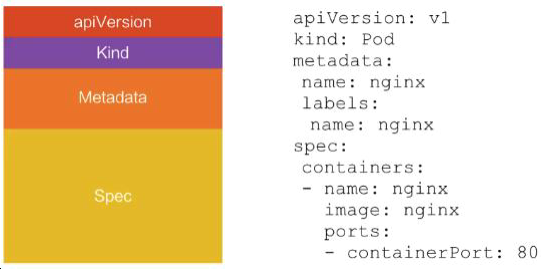
可以通过 kubectl、ui、curl 最终发送 http+json/yaml 方式的请求给 API Server,然后控制k8s集群。k8s 里的所有的资源对象都可以采用 yaml 或 JSON 格式的文件定义或描述
1.4)、快速体验
(1)、安装 minikube
这是一个简单的单节点的开发测试的方式z
https://github.com/kubernetes/minikube/releases
下载 minikube-windows-amd64.exe 改名为 minikube.exe
打开 VirtualBox,打开 cmd,
运行
minikube start --vm-driver=virtualbox --registry-mirror=https://registry.docker-cn.com 等待 20 分钟左右即可
这是一个简单的单节点的开发测试的方式,我们应该搭建一个集群的方式,所以我们用下面的另一种方式
(2)、体验 nginx 部署升级

5)、流程叙述
1、通过 Kubectl 提交一个创建 RC(Replication Controller)的请求,该请求通过 APIServer 被写入 etcd 中
2、此时 Controller Manager 通过 API Server 的监听资源变化的接口监听到此 RC 事件
3、分析之后,发现当前集群中还没有它所对应的 Pod 实例,
4、于是根据 RC 里的 Pod 模板定义生成一个 Pod 对象,通过 APIServer 写入 etcd
5、此事件被 Scheduler 发现,它立即执行一个复杂的调度流程,为这个新 Pod 选定个落户的 Node,然后通过 API Server 将这一结果写入到 etcd 中,
6、目标 Node 上运行的 Kubelet 进程通过 APIServer 监测到这个“新生的”Pod,并按照它的定义,启动该 Pod 并任劳任怨地负责它的下半生,直到 Pod 的生命结束。
7、随后,我们通过 Kubectl 提交一个新的映射到该 Pod 的 Service 的创建请求
8、ControllerManager 通过 Label 标签查询到关联的 Pod 实例,然后生成 Service 的 Endpoints 信息,并通过 APIServer 写入到 etcd 中,
9、接下来,所有 Node 上运行的 Proxy 进程通过 APIServer 查询并监听 Service 对象其对应的 Endpoints 信息,建立一个软件方式的负载均衡器来实现 Service 访问到后端Pod 的流量转发功能。
k8s 里的所有的资源对象都可以采用 yaml 或 JSON 格式的文件定义或描述

2、k8s 集群安装(重点)
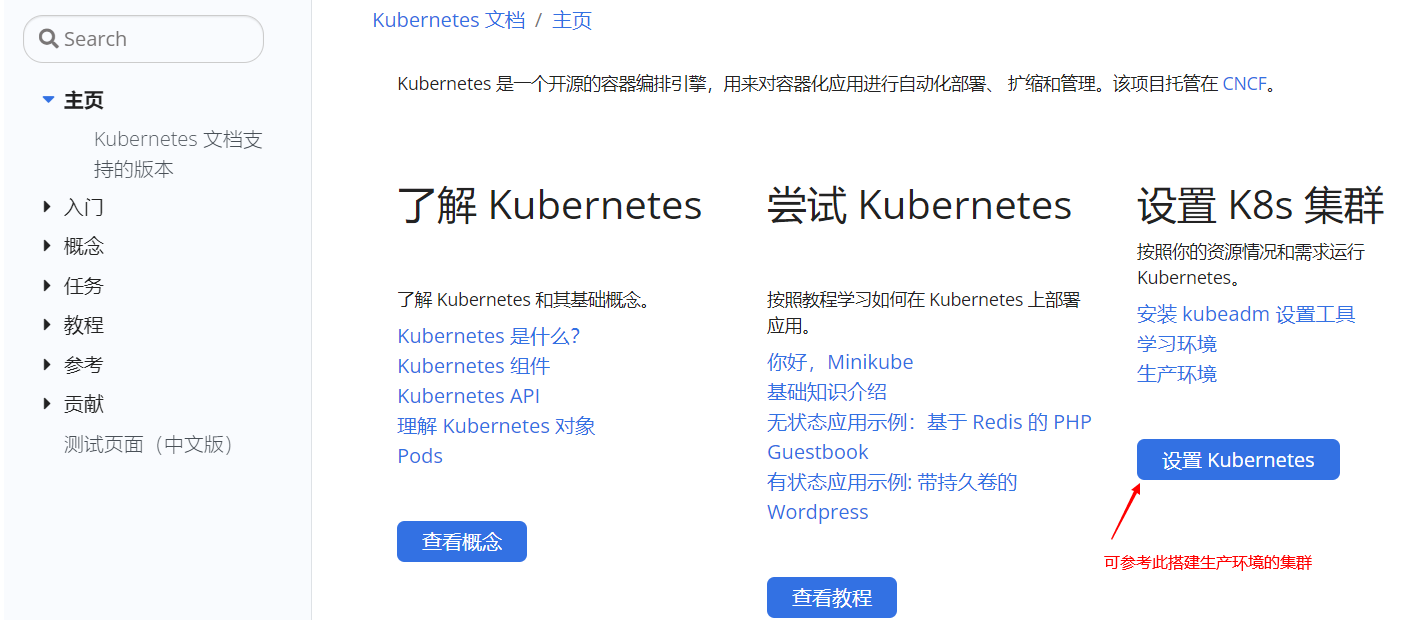
集群安装
2.1)、kubeadm
kubeadm 是官方社区推出的一个用于快速部署 kubernetes 集群的工具。 这个工具能通过两条指令完成一个 kubernetes 集群的部署:
-
创建一个 Master 节点
$ kubeadm init
-
将一个 Node 节点加入到当前集群中
$ kubeadm join <Master 节点的 IP 和端口 >
2.2)、前置要求
一台或多台机器,操作系统 CentOS7.x-86_x64 硬件配置:
2GB 或更多 RAM,2 个 CPU 或更多 CPU,硬盘 30GB 或更多
集群中所有机器之间网络互通 可以访问外网,需要拉取镜像
禁止 swap 分区
2.3)、部署步骤
1.在所有节点上安装 Docker 和 kubeadm
2.部署 Kubernetes Master
3.部署容器网络插件
4.部署 Kubernetes Node,将节点加入 Kubernetes 集群中 5.部署 Dashboard Web 页面,可视化查看 Kubernetes 资源
2.4)、环境准备
(1)、准备工作
-
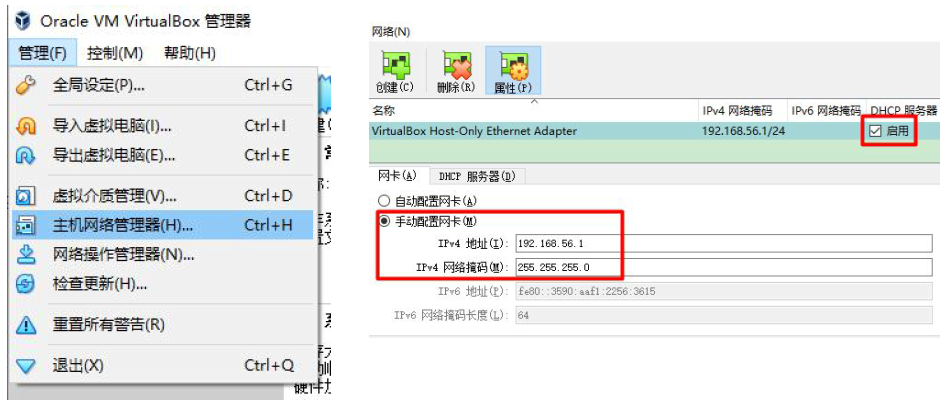
我们可以使用 vagrant 快速创建三个虚拟机。虚拟机启动前先设置 virtualbox 的主机网
络。现全部统一为 192.168.56.1,以后所有虚拟机都是 56.x 的 ip 地址-
找到Vagrantfile文件打开如下
Vagrant.configure("2") do |config|
   (1..3).each do |i|
        config.vm.define "k8s-node#{i}" do |node|
            # 设置虚拟机的Box
            node.vm.box = "centos/7"

            # 设置虚拟机的主机名
            node.vm.hostname="k8s-node#{i}"

            # 设置虚拟机的IP
            node.vm.network "private_network", ip: "192.168.56.#{99+i}", netmask: "255.255.255.0"

            # 设置主机与虚拟机的共享目录
            # node.vm.synced_folder "~/Documents/vagrant/share", "/home/vagrant/share"

            # VirtaulBox相关配置
            node.vm.provider "virtualbox" do |v|
                # 设置虚拟机的名称
                v.name = "k8s-node#{i}"
                # 设置虚拟机的内存大小
                v.memory = 4096
                # 设置虚拟机的CPU个数
                v.cpus = 4
            end
        end
   end
end
所有虚拟机设置为 4 核 4G
-
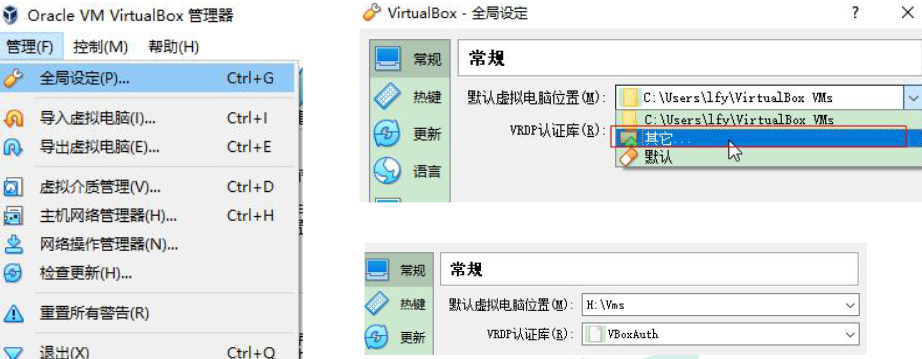
- 设置虚拟机存储目录,防止硬盘空间不足
(2)、依据配置创建并启动三个虚拟机
-
使用我们提供的 Vagrantfile 文件中的配置创建三个虚拟机
- 将k8s这个文件夹复制到非中文无空格目录下,在此目录中启动cmd窗口,运行/输入 vagrant up 即可依据此文件夹下的Vagrantfile文件中的配置 创建并启动三个虚拟机。其实 vagrant 完全可以一键部署全部 k8s 集群。
https://github.com/rootsongjc/kubernetes-vagrant-centos-cluster
http://github.com/davidkbainbridge/k8s-playground
- 将k8s这个文件夹复制到非中文无空格目录下,在此目录中启动cmd窗口,运行/输入 vagrant up 即可依据此文件夹下的Vagrantfile文件中的配置 创建并启动三个虚拟机。其实 vagrant 完全可以一键部署全部 k8s 集群。
-
进入三个虚拟机,开启 root 的密码访问权限。
# 第一步
Vagrant ssh XXX 进去系统之后
su root 密码为 vagrant
vi /etc/ssh/sshd_config
敲键盘 i ,会进入文本插入模式
找到这一行并修改为 PasswordAuthentication yes/no改成yes
按键盘 ESC 输入冒号 + wq # 这样会对刚才编辑的文本进行保存和退出
重启服务 service sshd restart
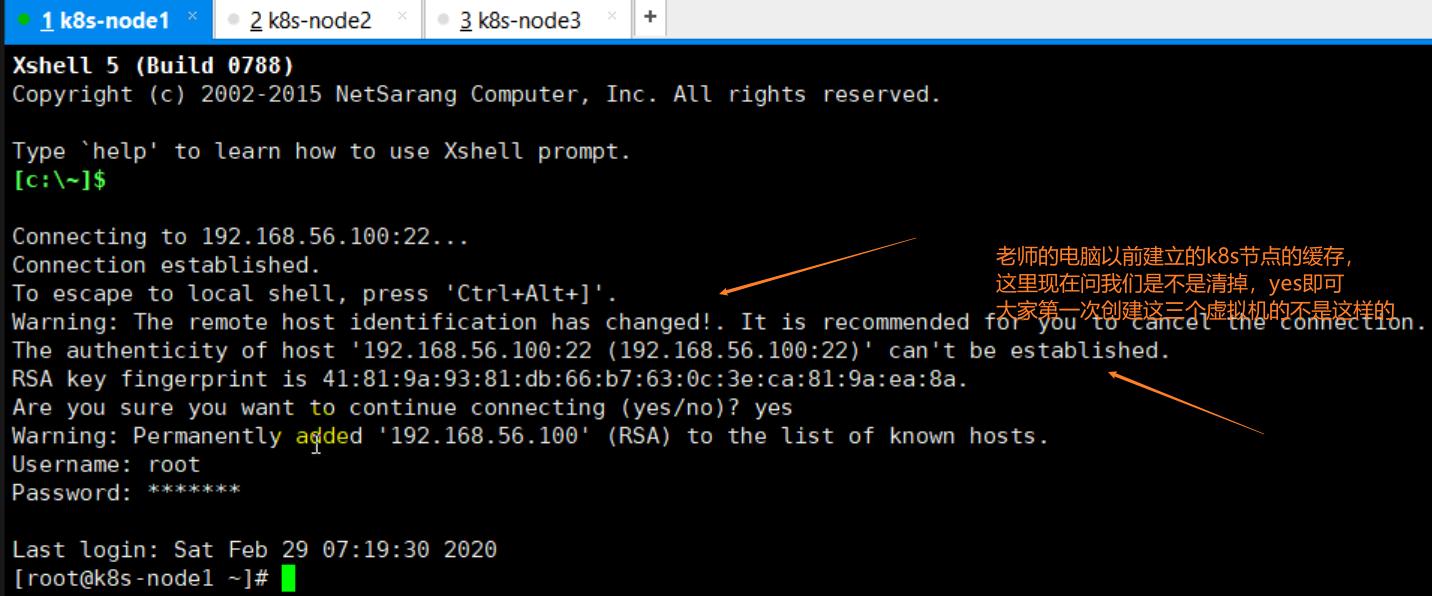
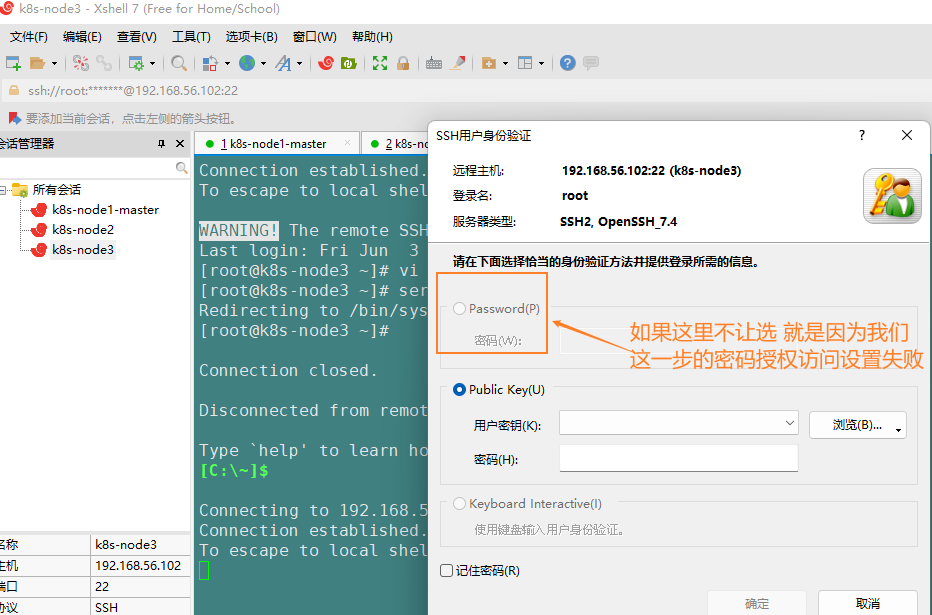
如果这里不让选 就是因为我们这一步的密码授权访问设置失败
-
设置好 NAT 网络
在VirtualBox界面上操作如下:
添加主机名与 IP 对应关系
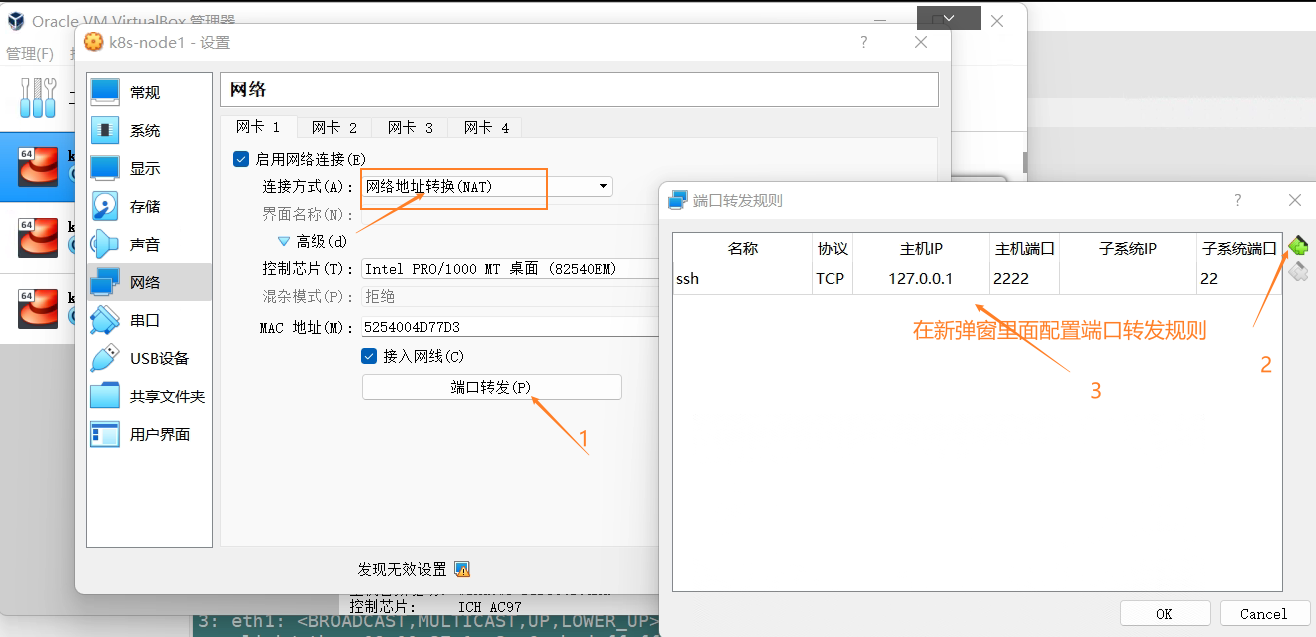
由于上面三个node的网卡2的地址都是一样的,然后通过配置端口转发的方式
(这样在k8s中不能使用,会出问题的)

我们需要改成每个网卡2的地址都不一样才行
所以按照如下图步骤执行
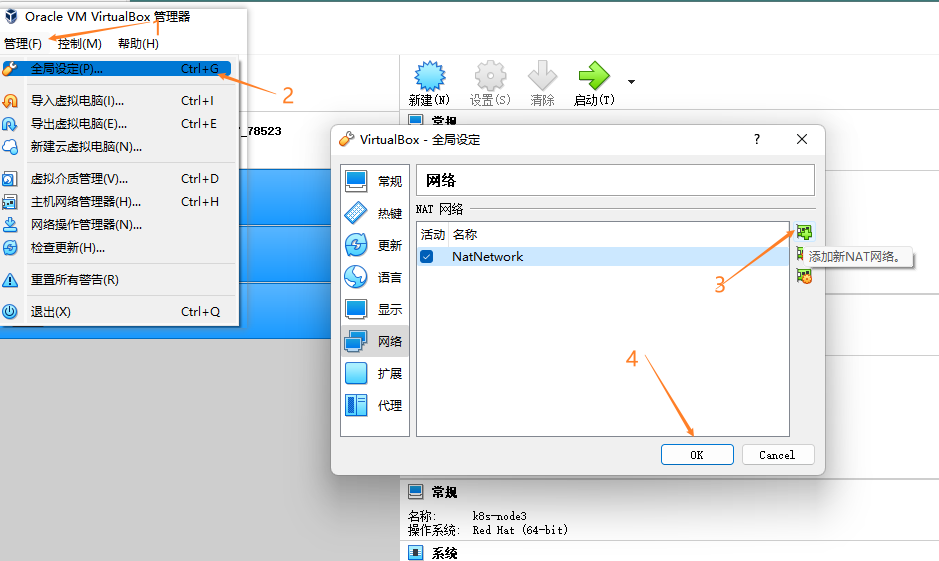
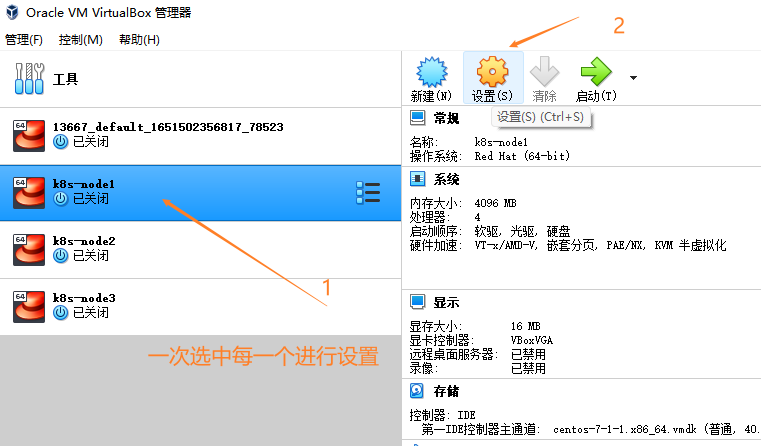
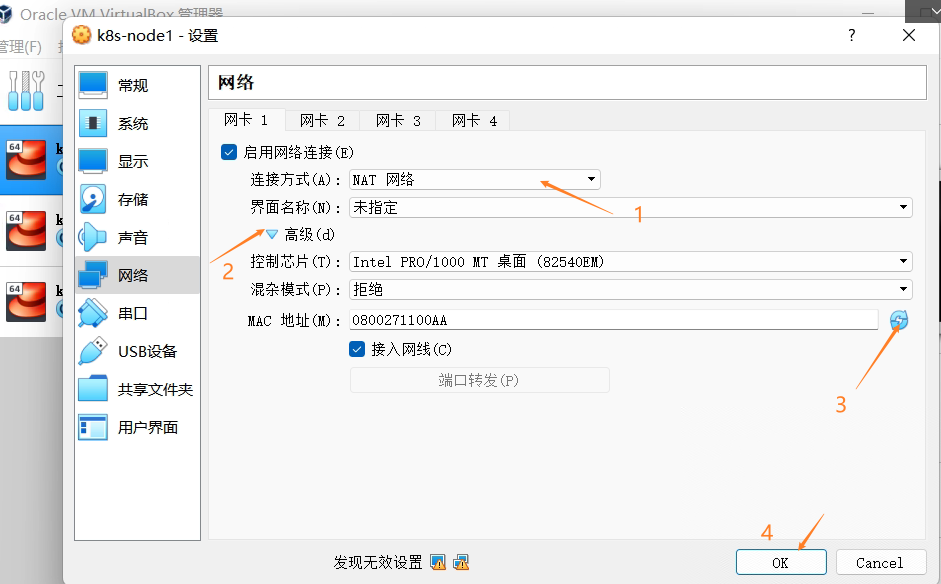
我们的node的网卡2中的仅主机网络是为了我们的xshell连接虚拟机(宿主机连虚拟机)方便才这样设置的(网卡1是为了k8s使用设置的)
-
接下来再启动三个虚拟机,并用xshell连接上
输入 ip route show

再输入ip addr (如下图,ip已经不一样了)
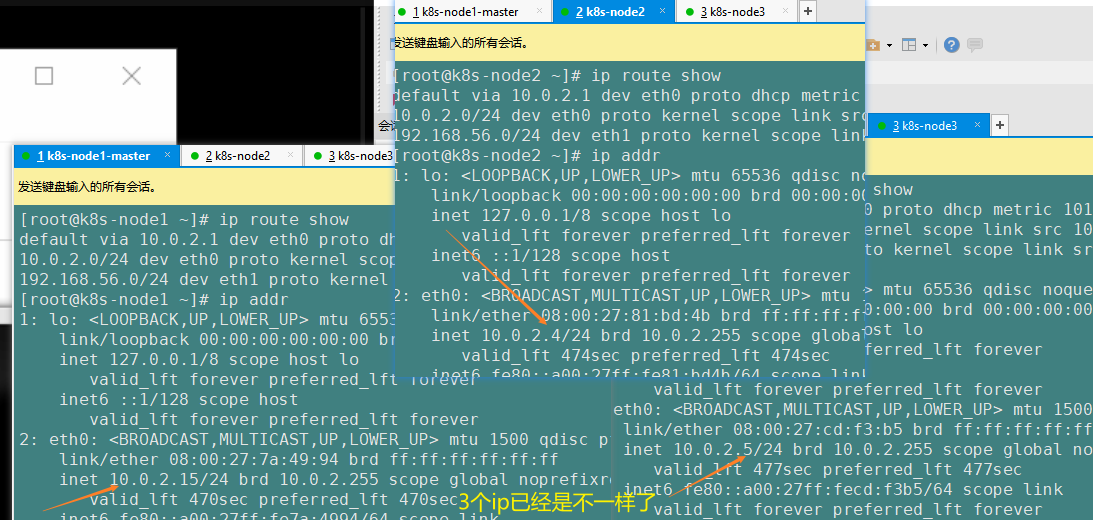
-
然后我们ping一下ip,发现三个虚拟机之间已经能ping通了

ping baidu.com 也能ping得通
如上这样设置就是已经将我们是网络环境设置好了
(3)、设置 linux 环境(三个节点都执行)
-
关闭防火墙:
因为在开发环境,我们就关闭所有的防火墙即可,这样我们就不用麻烦去配置每个Linux的防火墙进出规则了
systemctl stop firewalld
systemctl disable firewalld -
关闭 selinux:
这是Linux默认的安全策略,我们执行如下命令直接禁掉即可
sed -i 's/enforcing/disabled/' /etc/selinux/config
setenforce 0 # 禁掉全局默认如下图:
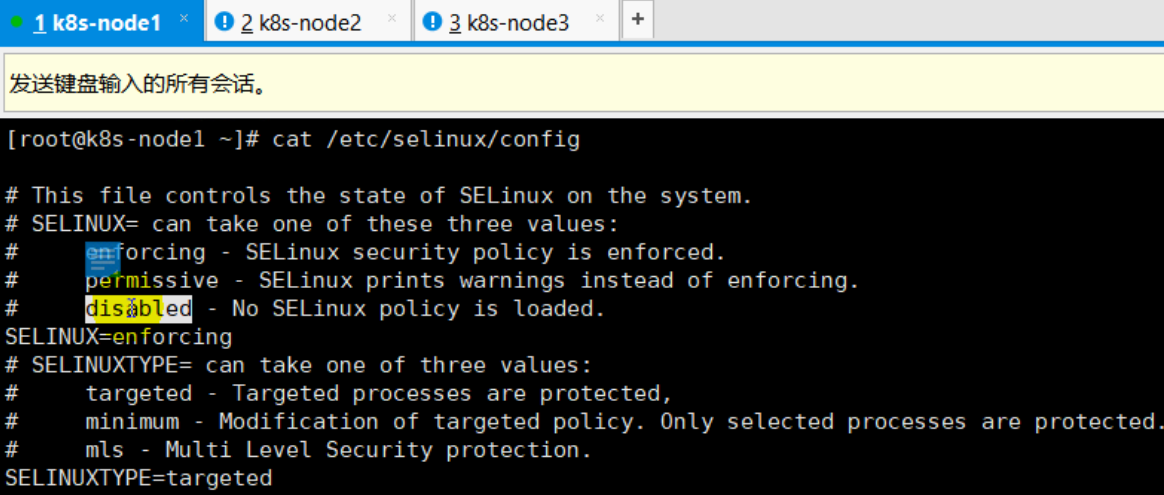
cat /etc/selinux/config


-
关闭 swap:
关闭内存交换,
否则k8s工作会有性能和工作问题
-
swapoff -a 临时关闭(即只关闭当前会话窗口)
-
sed -ri 's/.swap./#&/' /etc/fstab 永久关闭
free -g 验证,swap 必须为 0;执行永久关闭命令前图示:
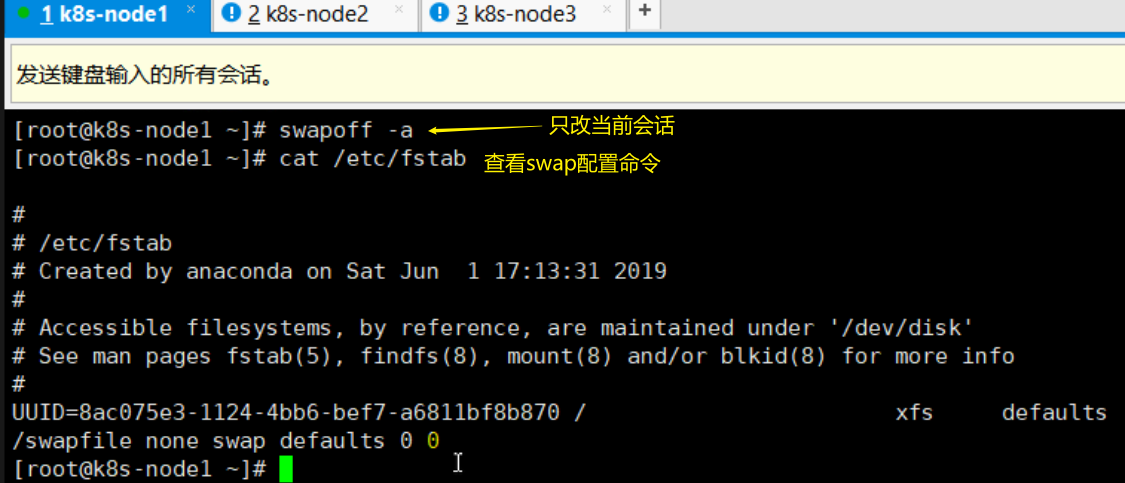
执行sed -ri 's/.swap./#&/' /etc/fstab 永久关闭命令后图示: (相当于注释掉了)

-
-
添加主机名与 IP 对应关系
示例如下:
vi /etc/hosts
10.0.2.15 k8s-node1
10.0.2.24 k8s-node2
10.0.2.25 k8s-node3k8s-node1就是我们的主机名
查看主机名称的命令: hostname
因为我们的虚拟机在创建的时候就已经在Vagrantfile的文件中配置了主机名称,所以现在就有名称如上了,如果想单独设置名称,可以使用如下命令指定新的 hostname
hostnamectl set-hostname
:指定新的 hostname -
设置完主机名之后,我们需要设置一下我们的主机名与ip的对应关系(这个ip选默认网卡的ip,我们的默认网卡是eth0),目的是让这三台主机都知道:如果使用域名访问其他主机的话,都知道所访问的域名对应的ip是什么。(myps: 相当于Windows系统中的host文件中的 主机名与 IP 对应关系 )
注意:还是批量发送所有的会话窗口
vi /etc/hosts  	# 在这个文件中配置主机名与 IP 对应关系
10.0.2.15 k8s-node1
10.0.2.4 k8s-node2
10.0.2.5 k8s-node3
# 这里一定要选择我们的默认网卡的ip

su 切换过来 -
-
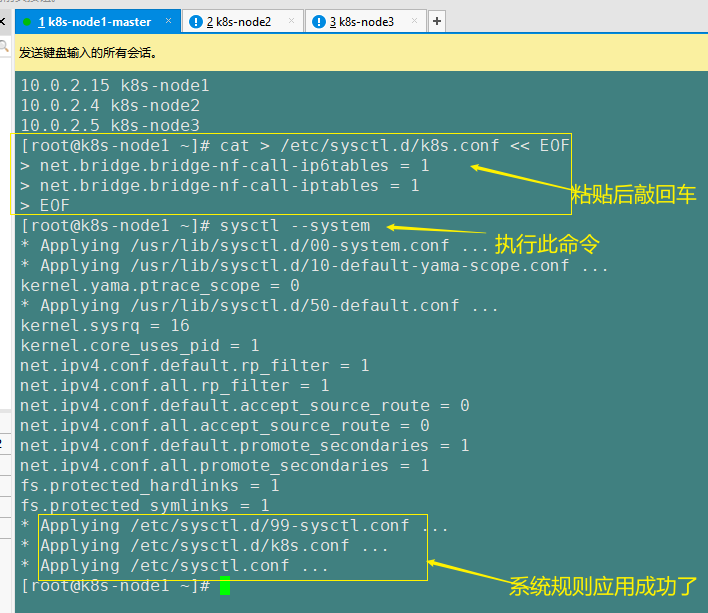
将桥接的 IPv4 流量传递到 iptables 的链:
cat > /etc/sysctl.d/k8s.conf << EOF
net.bridge.bridge-nf-call-ip6tables = 1
net.bridge.bridge-nf-call-iptables = 1
EOF
先执行上面的配置,然后执行下面这行命令:让系统应用上面的配置
sysctl --system
> 如果上面不做的话,可能会有一些流量的统计缺失,造成流量统计不准确,所以我们最好都加上。
>
> 结果如下图示:
>
> 
- 疑难问题:(如果遇见)
遇见提示是只读的文件系统,运行如下命令
mount -o remount rw /
- **date 查看时间 (可选)**
yum install -y ntpdate
ntpdate time.windows.com 同步最新时间
- 或者使用如下命令
```sh
cp /usr/share/zoneinfo/Asia/Shanghai /etc/localtime
```
#### **(4)、备份(重要)**
virtualBox备份过程如下图:
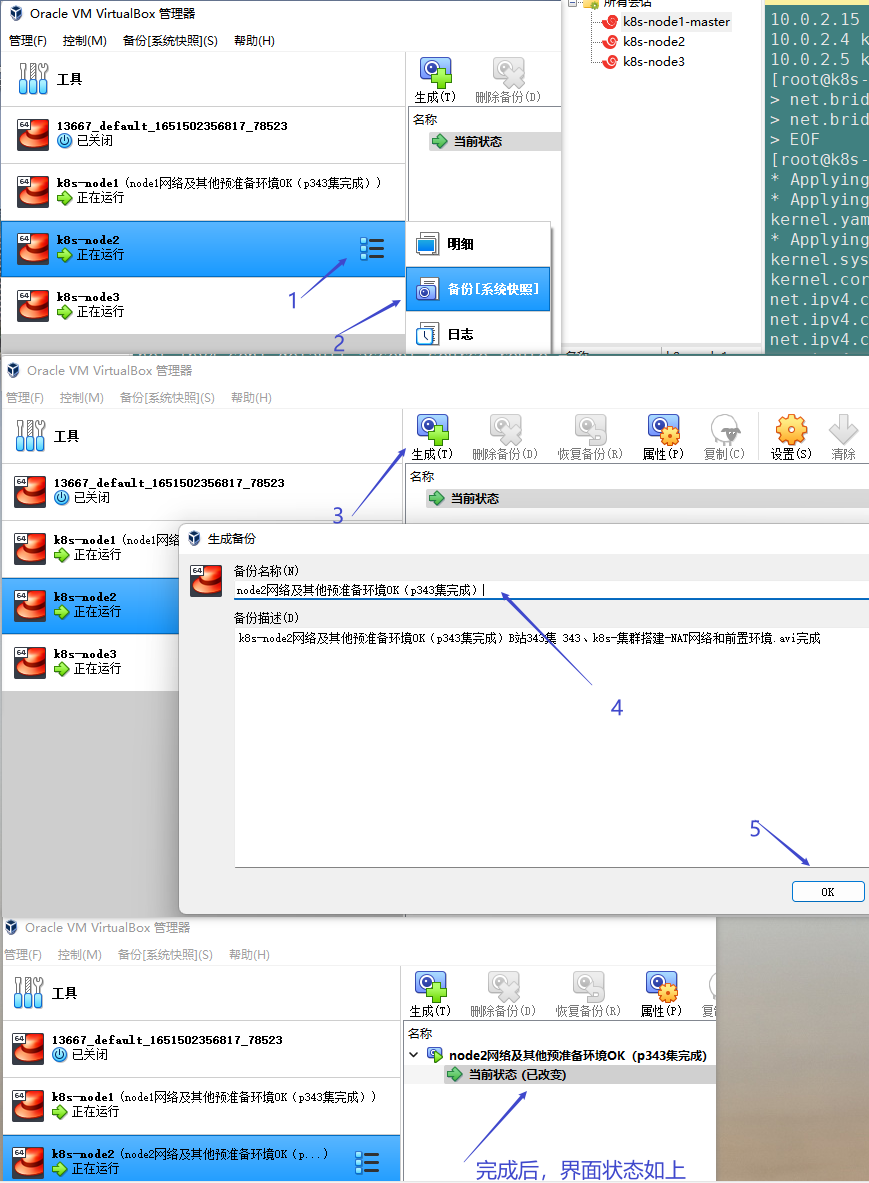
### 2.5)、在所有节点安装 Docker、kubeadm、kubelet、kubectl
回忆介绍
- **Docker**是运行环境
- **kubeadm**
> kubeadm 是官方社区推出的一个用于快速部署 kubernetes 集群的工具。 这个工具能通过两条指令完成一个 kubernetes 集群的部署:
>
> - **创建一个 Master 节点**
>
> $ kubeadm init
>
> - **将一个 Node 节点加入到当前集群中**
>
> $ kubeadm join <Master 节点的 IP 和端口 >
- **kubelet**
> 
- **kubectl**
需要使用命令行来进行k8s的话需要安装,只安装在master节点也行,但是我们这次三个节点都安装
> 
Kubernetes 默认 CRI(容器运行时)为 Docker,因此先安装 Docker。
#### (1)、安装 docker
##### 1、卸载系统之前的 docker
```sh
sudo yum remove docker \
docker-client \
docker-client-latest \
docker-common \
docker-latest \
docker-latest-logrotate \
docker-logrotate \
docker-engine
2、安装 Docker-CE
- 安装必须的依赖
sudo yum install -y yum-utils \
device-mapper-persistent-data \
lvm2
需要等待一点时间,等待三个节点都安装完成 如下图:
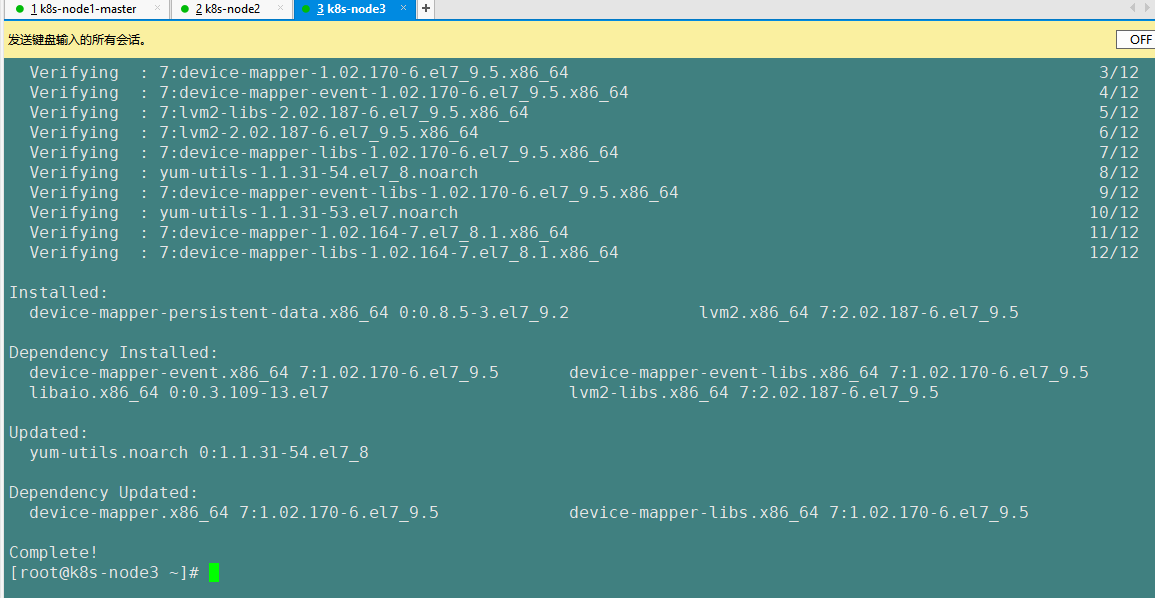
-
设置 docker repo 的 yum 位置 (即 : 设置yum源)
sudo yum-config-manager \ --add-repo \ https://download.docker.com/linux/centos/docker-ce.repo -
安装 docker,以及 docker-cli
sudo yum install -y docker-ce docker-ce-cli containerd.iops:以上命令如果都是root用户执行的话,也不需要复制 sudo,安装完成后会如下图
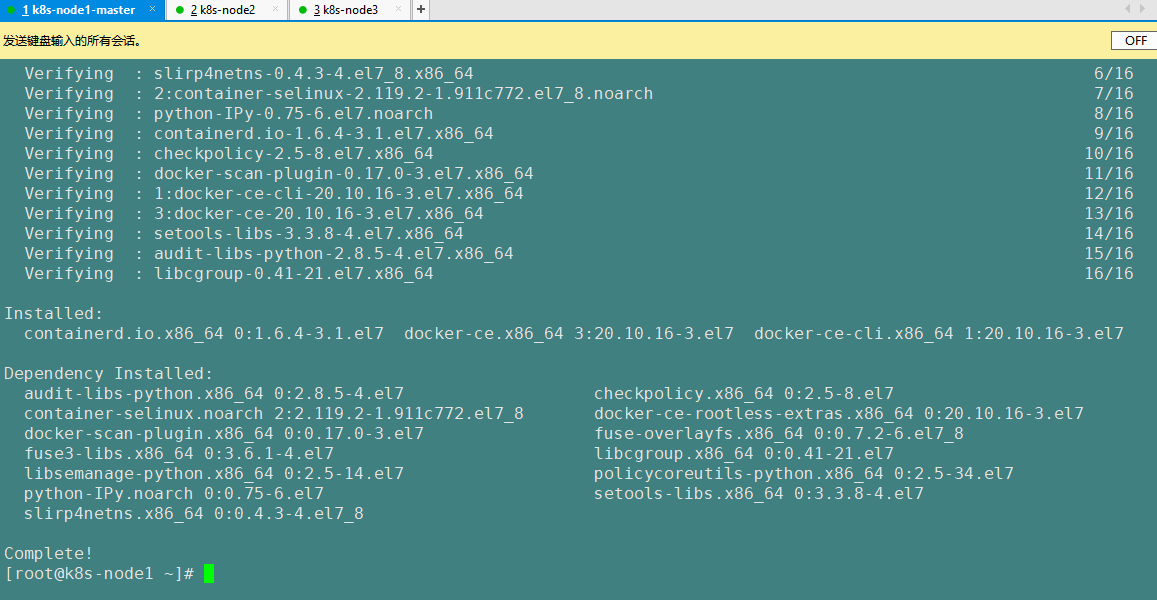
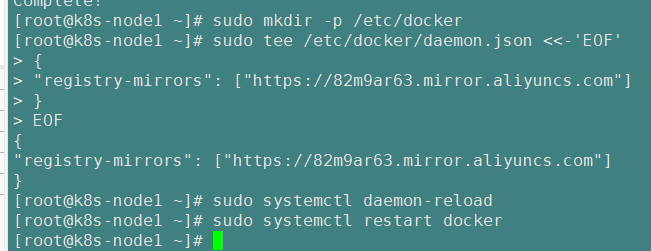
3、配置 docker 加速
sudo mkdir -p /etc/docker
sudo tee /etc/docker/daemon.json <<-'EOF'
{
"registry-mirrors": ["https://82m9ar63.mirror.aliyuncs.com"]
}
EOF
sudo systemctl daemon-reload
sudo systemctl restart docker

# 上述4个命令一起执行即可
4、启动 docker & 设置 docker 开机自启
因为我们 k8s的其他全部操作都是基于docker的,所以需要我们将docker配置成开机启动,否则无法往下运行
systemctl enable docker # 设置开机启动docker
基础环境准备好,可以 一下;为 node3 分配 16g,剩下的 3g。方便未来
侧测试
(2)、添加阿里云 yum 源
cat > /etc/yum.repos.d/kubernetes.repo << EOF
[kubernetes]
name=Kubernetes
baseurl=https://mirrors.aliyun.com/kubernetes/yum/repos/kubernetes-el7-x86_64
enabled=1
gpgcheck=0
repo_gpgcheck=0
gpgkey=https://mirrors.aliyun.com/kubernetes/yum/doc/yum-key.gpg
https://mirrors.aliyun.com/kubernetes/yum/doc/rpm-package-key.gpg
EOF
(3)、安装 kubeadm,kubelet 和 kubectl
yum list|grep kube # 检查yum源中有没有 kube 相关的资源
上面这步可以不执行,因为下面我们会指定和视频课程中一样的版本,这样会避免版本冲突,以及后面环境不匹配等待问题
yum install -y kubelet-1.17.3 kubeadm-1.17.3 kubectl-1.17.3
systemctl enable kubelet # 设置开机启动?
现在我们启动kubelet (但是默认我们是启动不成功的)
systemctl start kubelet
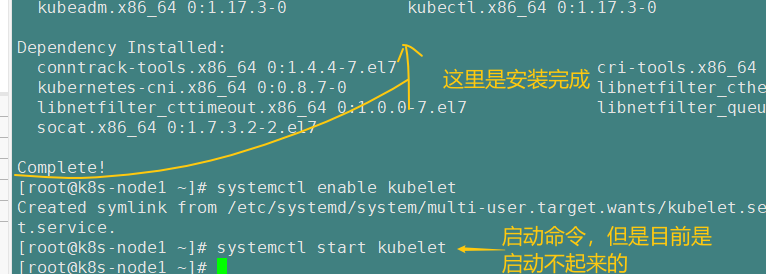
执行 systemctl enable kubelet 查看日志

因为我们配置是不完全的,所以这里是启动不起来的,我们不要在这里卡住,接着往下设置即可
kubernetes命令集合(官网)
Kubectl Reference Docs (kubernetes.io)
2.6)、部署 k8s-master
(1)、master 节点初始化
找一个节点进行改名,当作master节点
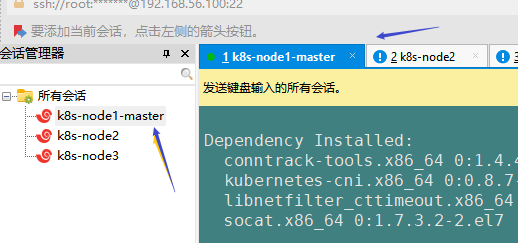
注意: 下面这种方法只是介绍一下,我们用另外一种方法(在下面)
kubeadm init \
--apiserver-advertise-address=10.0.2.15 \	# 这实际上就是我们的master主节点的地址,需要确认好
--image-repository registry.cn-hangzhou.aliyuncs.com/google_containers \
--kubernetes-version v1.17.3 \
--service-cidr=10.96.0.0/16 \
--pod-network-cidr=10.244.0.0/16
对上面命令的介绍
- 我们对k8s多有的操作都需要经过apiserver, 所以上面命令第二行需要指定apiserver的地址
- 第三行: 由于 init命令会默认拉取镜像地址 k8s.gcr.io 国内无法访问,这里指定阿里云镜像仓库地址。可以手动
按照我们的 images.sh 先拉取镜像,
地址变为 registry.aliyuncs.com/google_containers 也可以。- 第4行 : 指定版本,和上次我们指定的版本一样
- 第5行 :--service-cidr=10.96.0.0/16 \ 表示:几个pod组成一个service对外提供服务,而这样的service有多个,多个service之间也需要通信,也需要指定ip网段来生成ip
- 第6行: --pod-network-cidr=10.244.0.0/16 kebelet将几个容器形成一个pod,然后各个pod之间也要通信,通信则需要一个ip,我们需要这样指定ip网段 并生成ip
由于 init命令会默认拉取镜像地址 k8s.gcr.io 国内无法访问,这里指定阿里云镜像仓库地址。可以手动
按照我们的 images.sh 先拉取镜像,
地址变为 registry.aliyuncs.com/google_containers 也可以。
--pod-network-cidr中的cidr
科普:无类别域间路由(Classless Inter-Domain Routing、CIDR)是一个用于给用户分配 IP
地址以及在互联网上有效地路由 IP 数据包的对 IP 地址进行归类的方法。
注意: 上面这种方法只是介绍一下,我们用另外一种方法(在下面)
以上配置在拉取下载镜像中可能失败且无法监控,我们现在用另外一种方式,如下:
打开资料:k8s文件夹中的master_images.sh文件,如下:
#!/bin/bash

images=(
	kube-apiserver:v1.17.3
    kube-proxy:v1.17.3
	kube-controller-manager:v1.17.3
	kube-scheduler:v1.17.3
	coredns:1.6.5
	etcd:3.4.3-0
    pause:3.1
)

for imageName in ${images[@]} ; do
    docker pull registry.cn-hangzhou.aliyuncs.com/google_containers/$imageName
#   docker tag registry.cn-hangzhou.aliyuncs.com/google_containers/$imageName  k8s.gcr.io/$imageName
# 由于我们已经指定了下载镜像的地址,这里就不用指定镜像和指定标签了
done
具体执行步骤:
执行上面这个文件,我们就能实时监控 ,具体执行步骤如下:
- 上传 k8s 整个文件夹到node1

- 赋予master_images.sh执行权限
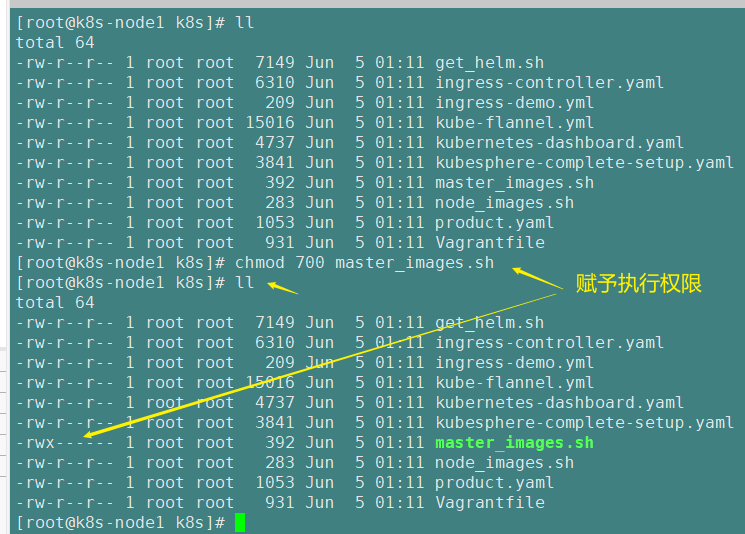
-
执行master_images.sh文件
等待镜像下载完成(大约需要10分钟左右)

- 现在就可以执行 ”1)、master 节点初始化“ 里面的命令了
kubeadm init \
--apiserver-advertise-address=10.0.2.15 \
--image-repository registry.cn-hangzhou.aliyuncs.com/google_containers \
--kubernetes-version v1.17.3 \
--service-cidr=10.96.0.0/16 \
--pod-network-cidr=10.244.0.0/16
等待执行完成如下
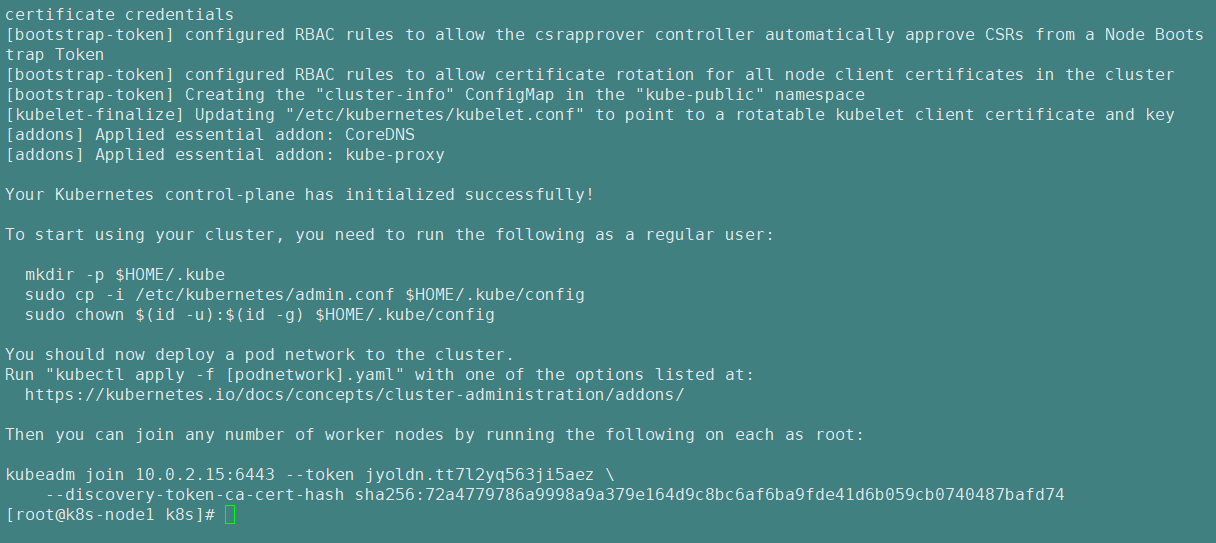
复制上边的图片中的命令执行(可以使用普通用户执行,但是我们现在是学习阶段,只有一个root用户,直接执行即可)
  mkdir -p $HOME/.kube
  sudo cp -i /etc/kubernetes/admin.conf $HOME/.kube/config
  sudo chown $(id -u):$(id -g) $HOME/.kube/config
- 控制台的命令复制留存
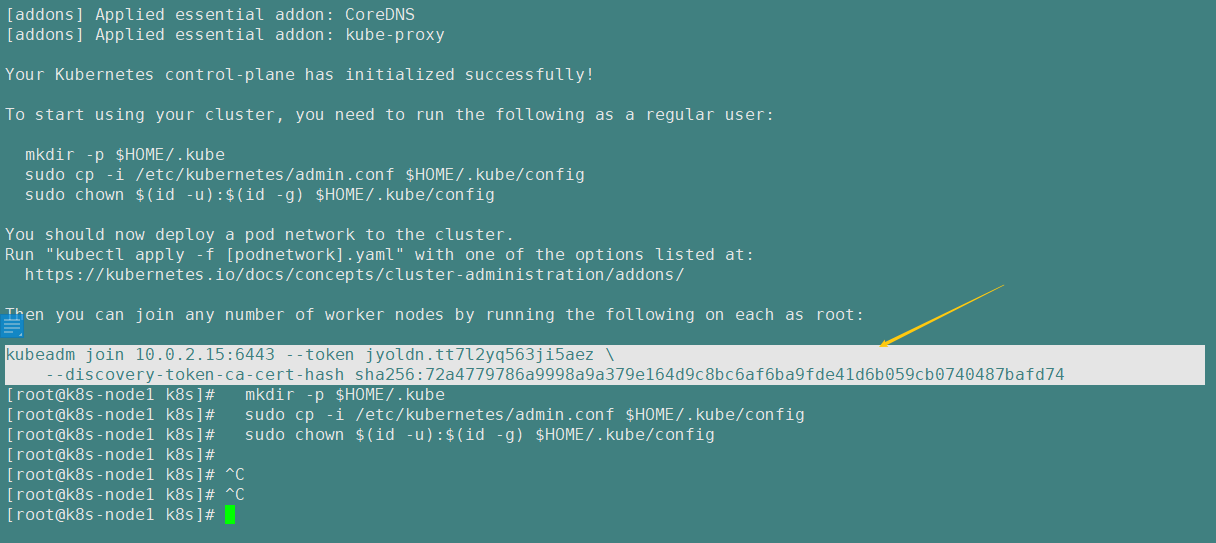
控制台的命令复制过来,后面在其他node中加入主节点会用到(注意:这个token令牌是有 有效期的)
kubeadm join 10.0.2.15:6443 --token hthcdb.plhn2wyy77pl8sdp \
    --discovery-token-ca-cert-hash sha256:0cbf3fd5a36d5637479c7f196eca50b1f1b95319880cbdce745931bf40baeced
备份
kubeadm join 10.0.2.15:6443 --token jyoldn.tt7l2yq563ji5aez \
    --discovery-token-ca-cert-hash sha256:72a4779786a9998a9a379e164d9c8bc6af6ba9fde41d6b059cb0740487bafd74
# 后面在其他节点执行这个命令即可加入master节点
- 部署pod之间的网络配置
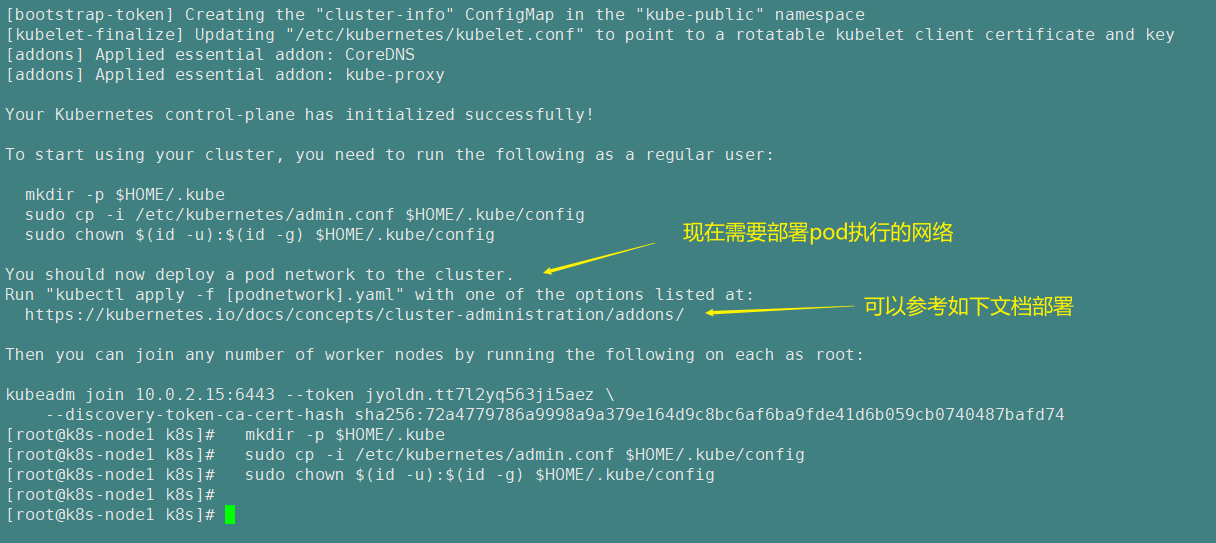
提供网络的组件有很多,我们使用Flannel
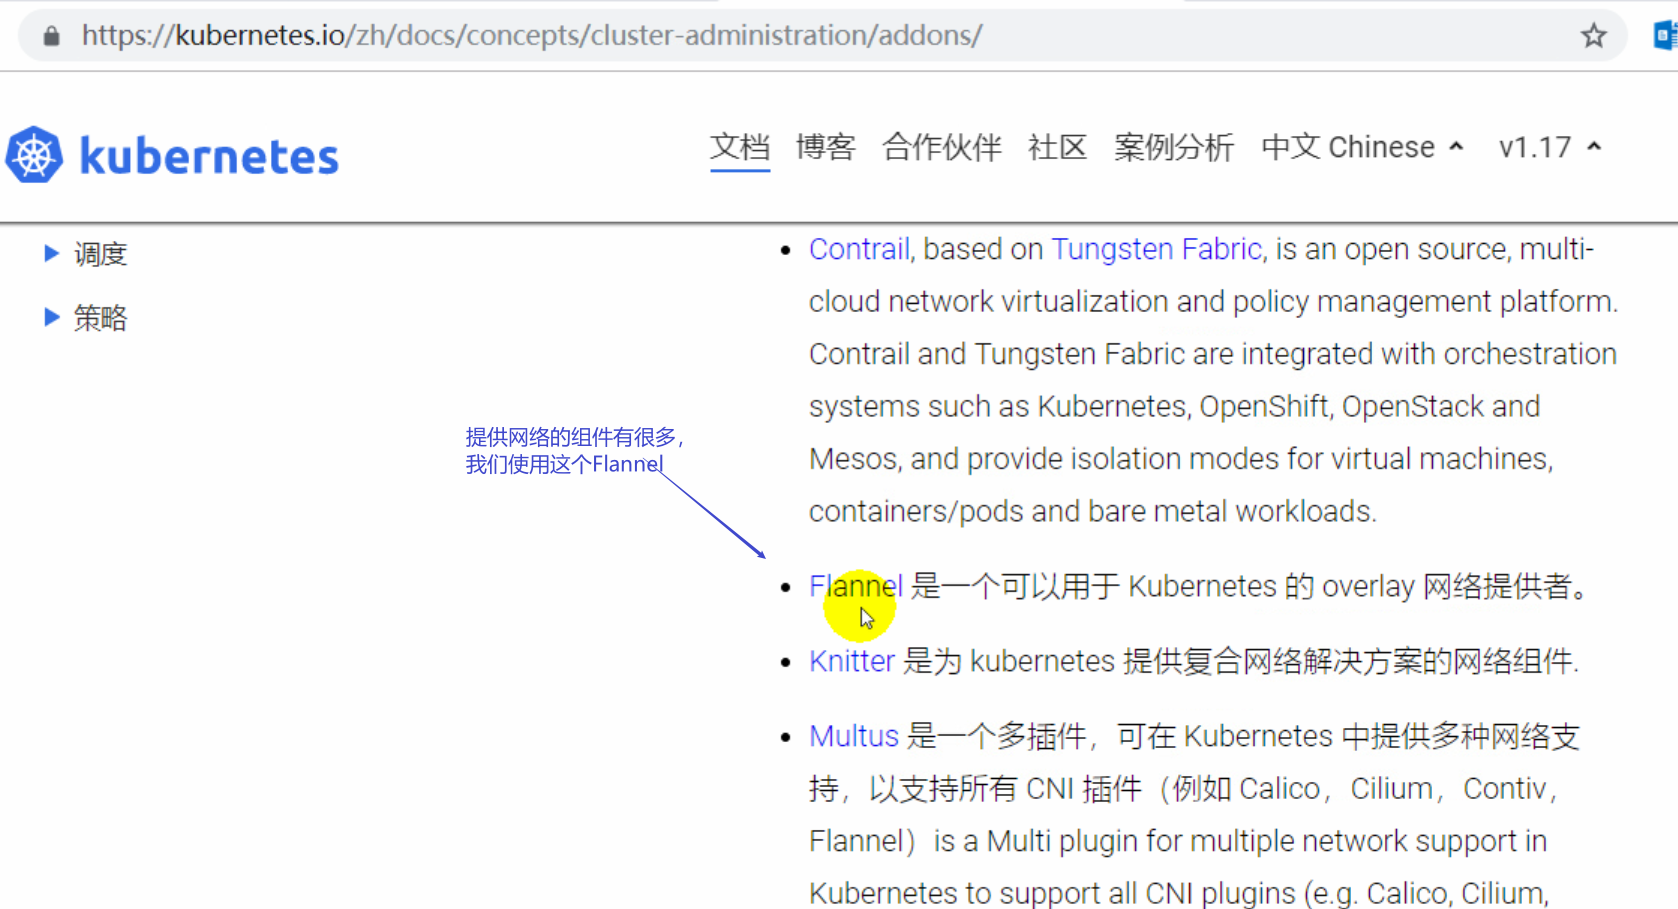
视频是跳着讲的 先讲这一步 : 7、安装 Pod 网络插件(CNI)
kubectl apply -f \
https://raw.githubusercontent.com/coreos/flannel/master/Documentation/kube-flannel.yml
以上地址可能被墙,导致大家下载失败。大家获取上传我们下载好的 flannel.yml 运行即可,同时 flannel.yml 中
指定的 images 访问不到可以去 docker hub 找一个
访问失败报错如下

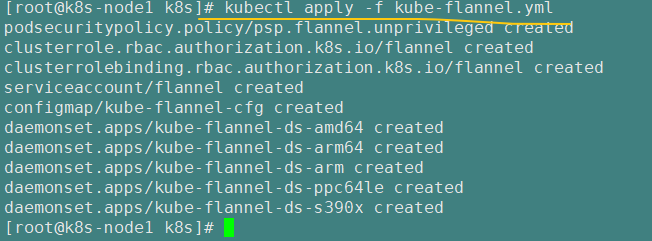
所以执行这一步,配置pod之间的网络,(即 依据 kube-flannel.yml文件中的配置执行 kubectl apply -f),执行命令如下
kubectl apply -f kube-flannel.yml
- kubectl get pods 获取所有节点中的pod(类似于命令docker ps)
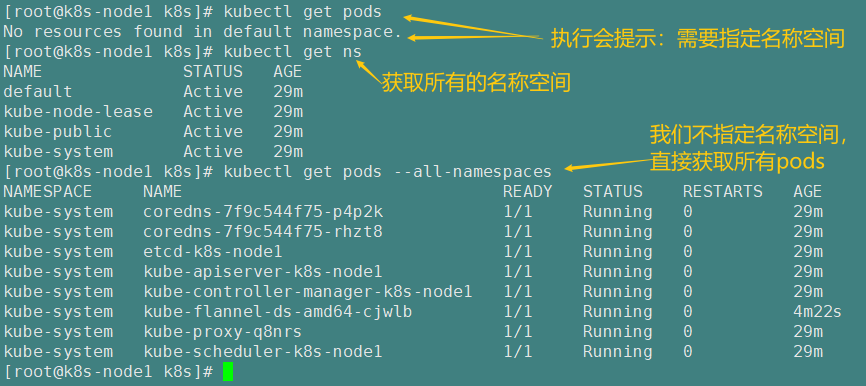

- 注意:后面的操作,必须是上图中所有的pods是Running状态才行; node1是ready状态
其他node加入主节点
-
运行之前初始化master节点完成后控制它输出的token命令‘
kubeadm join 10.0.2.15:6443 --token jyoldn.tt7l2yq563ji5aez \
    --discovery-token-ca-cert-hash sha256:72a4779786a9998a9a379e164d9c8bc6af6ba9fde41d6b059cb0740487bafd74
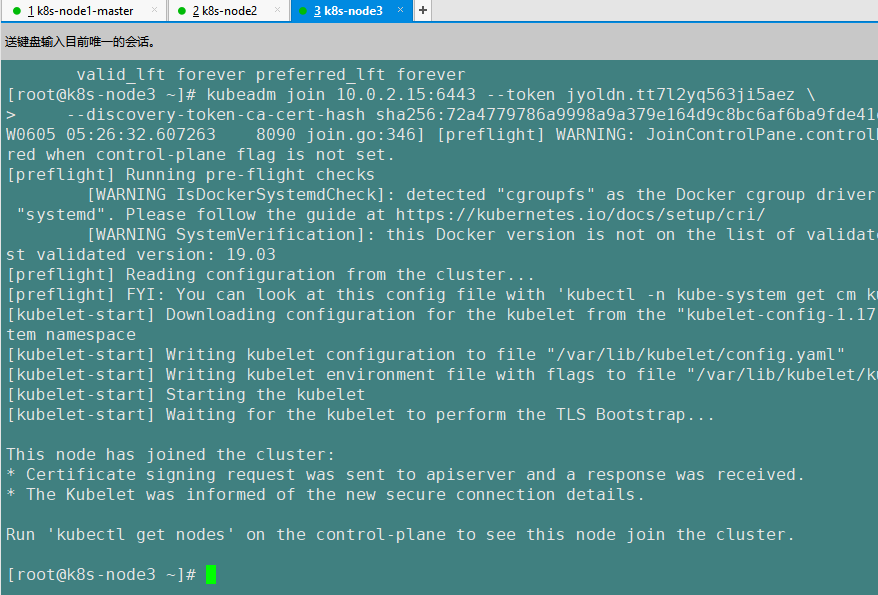
执行完join命令之后,结果如上图,稍等片刻等STATUS变成Ready即可
执行 watch kubectl get pod -n kube-system -o wide 监控 pod 进度

等 3-10 分钟,完全都是 running 以后使用 kubectl get nodes 检查状态
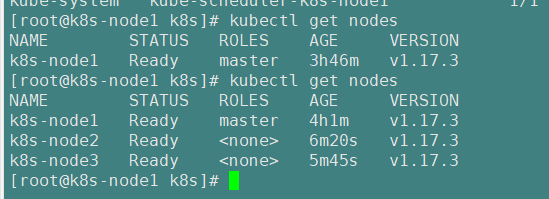
以下步骤是未使用的,(如果上面执行的过程中有报错可以参考下面的这部分原文档的笔记寻找答案)
运行完成提前复制:加入集群的令牌
(2)、测试 kubectl(主节点执行)
mkdir -p $HOME/.kube
sudo cp -i /etc/kubernetes/admin.conf $HOME/.kube/config
sudo chown $(id -u):$(id -g) $HOME/.kube/config
$ kubectl get nodes 	# 获取所有节点
目前 master 状态为 notready。等待网络加入完成即可。
journalctl -u kubelet 查看 kubelet 日志
kubeadm join 10.0.2.15:6443 --token jyoldn.tt7l2yq563ji5aez \
    --discovery-token-ca-cert-hash sha256:72a4779786a9998a9a379e164d9c8bc6af6ba9fde41d6b059cb0740487bafd74
2.7、安装 Pod 网络插件(CNI)
$ kubectl apply -f
https://raw.githubusercontent.com/coreos/flannel/master/Documentation/kube-flannel.yml
以上地址可能被墙,大家获取上传我们下载好的 flannel.yml 运行即可,同时 flannel.yml 中
指定的 images 访问不到可以去 docker hub 找一个
wget yml 的地址
vi 修改 yml 所有 amd64 的地址都修改了即可。
等待大约 3 分钟
kubectl get pods -n kube-system 查看指定名称空间的 pods
kubectl get pods –all-namespace 查看所有名称空间的 pods
$ ip link set cni0 down 如果网络出现问题,关闭 cni0,重启虚拟机继续测试
执行 watch kubectl get pod -n kube-system -o wide 监控 pod 进度
等 3-10 分钟,完全都是 running 以后继续
2.8、加入 Kubernetes Node
在 Node 节点执行。
向集群添加新节点,执行在 kubeadm init 输出的 kubeadm join 命令:
确保 node 节点成功
token 过期怎么办
kubeadm token create --print-join-command
kubeadm token create --ttl 0 --print-join-command
kubeadm join --token y1eyw5.ylg568kvohfdsfco --discovery-token-ca-cert-hash
sha256: 6c35e4f73f72afd89bf1c8c303ee55677d2cdb1342d67bb23c852aba2efc7c73
执行 watch kubectl get pod -n kube-system -o wide 监控 pod 进度

等 3-10 分钟,完全都是 running 以后使用 kubectl get nodes 检查状态
tiller-deploy-5d79cb9bfd-grrrk
2.9)、入门操作 kubernetes 集群
这里主要讲解了一下操作示例,让大家体验一下基本入门操作
2.9.1)、部署一个 tomcat
kubectl create deployment tomcat6 --image=tomcat:6.0.53-jre8
kubectl get pods -o wide 可以获取到 tomcat 信息
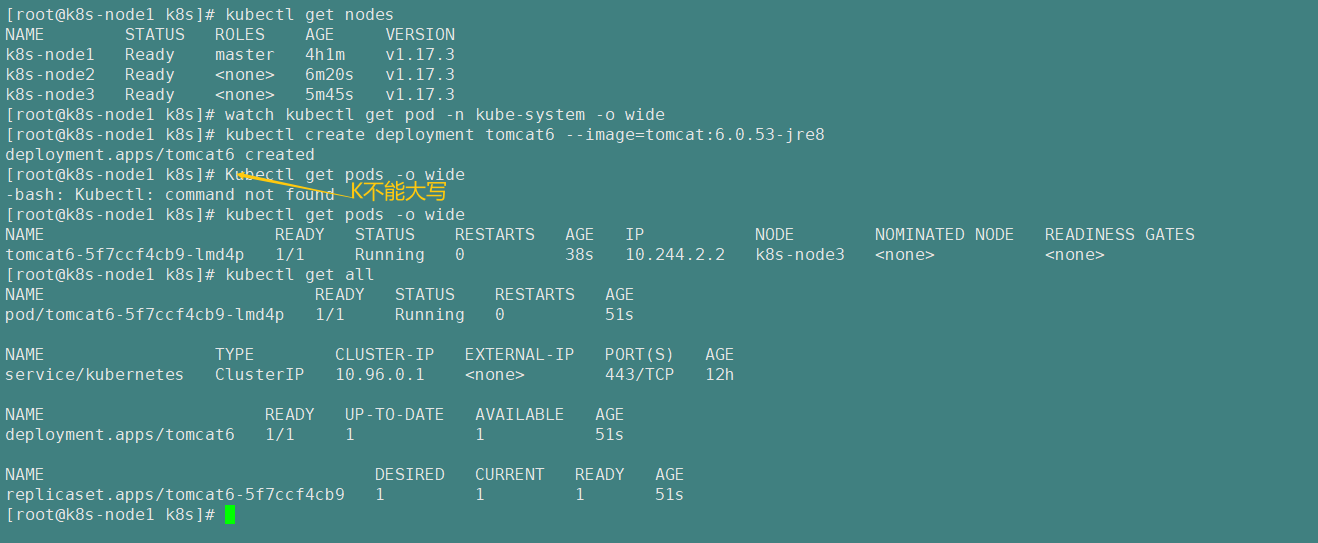
视频中讲解了模拟node3当机的情况下,k8s会自动在node1节点中再拉起一个新的tomcat,同时向node3发送了终止的命令(虽然宕机状态的node3收不到,但是等node3恢复的时候就会收到这个命令)

2.9.2)、暴露 nginx 访问
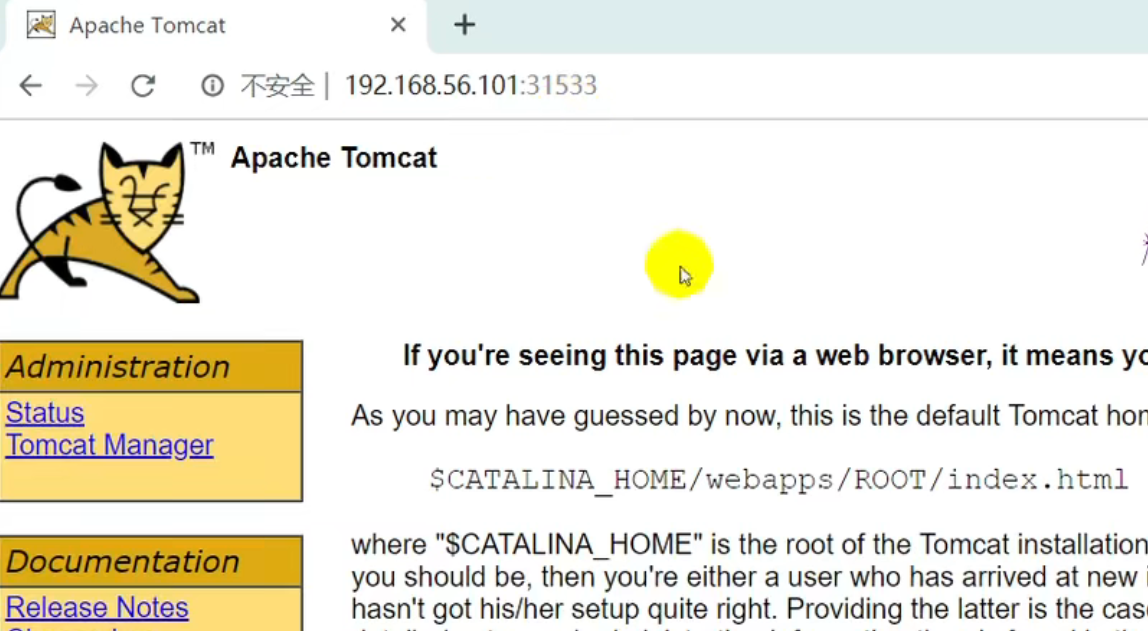
kubectl expose deployment tomcat6 --port=80 --target-port=8080 --type=NodePort
kubectl expose deployment tomcat6 --port=80 --target-port=8080 --type=NodePort
Pod 的 80 映射容器的 8080;service 会代理 Pod 的 80
ps: expose 暴露一个部署 tomcat6
-- port=80 pod的端口
--target-port=8080 pod里面的docker容器的端口是8080
--type=NodePort 以节点端口的模式暴露为一个service
最里层的tomcat暴露的端口是8080 ==》容器组合成的pod暴露的是--port=80 ==》--type=NodePort 以NodePort模式暴露出去的是一个service(这里service没有指定端口,会随机分配一个端口)

这个时候已经可以使用浏览器访问我们k8s里面的tomcat的service了

2.9.3)、动态扩容测试
kubectl get deployment
应用升级 kubectl set image (--help 查看帮助)
扩容: kubectl scale --replicas=3 deployment tomcat6
kubectl scale --replicas=3 deployment tomcat6
# --replicas=3 扩容三份
# deployment tomcat6 指定扩容哪次/个 的部署
# 扩容到的每个节点的每个service 都可以通过浏览器访问了
扩容了多份,所有无论访问哪个 node 的指定端口,都可以访问到 tomcat6

2.9.4)、以上操作的 yaml 获取
参照 : 第四章 k8s 细节
2.9.5)、删除
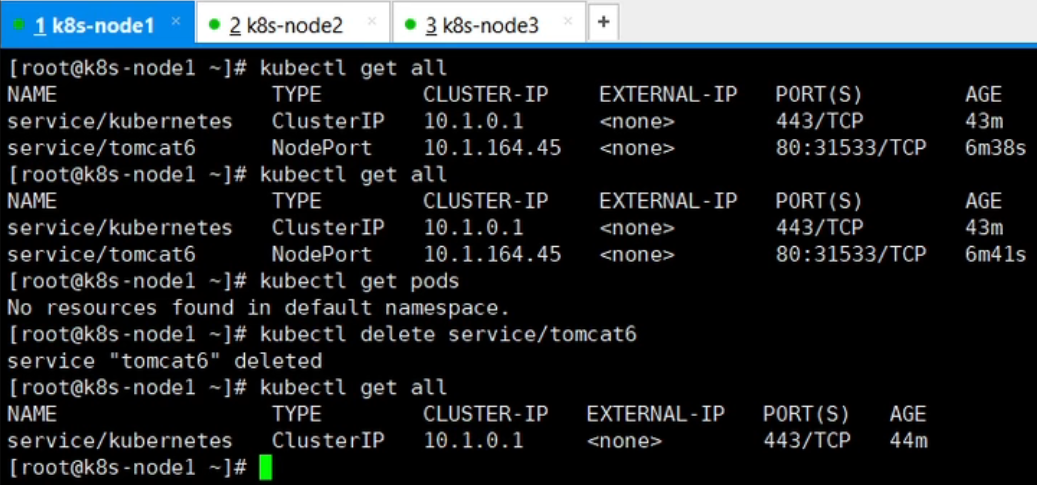
Kubectl get all
kubectl delete deploy/nginx
kubectl delete service/nginx-service
流程;创建 deployment 会管理 replicas,replicas 控制 pod 数量,有 pod 故障会自动拉起
新的 pod
2.10)、安装k8s官方默认 dashboard
安装k8s官方默认 dashboard 控制台(可视界面) (p350集前2分钟简单介绍了下,但是我们这次不安装这个,我们会安装一个更强大的控制台:KubeSphere)
1、部署 dashboard
$ kubectl apply -f
https://raw.githubusercontent.com/kubernetes/dashboard/v1.10.1/src/deploy/recommende
d/kubernetes-dashboard.yaml
文件在k8s文件夹中,是kubernetes-dashboard.yaml文件
墙的原因,文件已经放在我们的 code 目录,自行上传
文件中无法访问的镜像,自行去 docker hub 找
2、暴露 dashboard 为公共访问
默认 Dashboard 只能集群内部访问,修改 Service 为 NodePort 类型,暴露到外部:
kind: Service
	apiVersion: v1
    metadata:
	labels:
        k8s-app: kubernetes-dashboard
    name: kubernetes-dashboard
    namespace: kube-system
spec:
	type: NodePort
	ports:
		- port: 443
	targetPort: 8443
	nodePort: 30001
	selector:
		k8s-app: kubernetes-dashboard
访问地址:http://NodeIP:30001
3、创建授权账户
$ kubectl create serviceaccount dashboard-admin -n kube-system
$ kubectl create clusterrolebinding dashboard-admin --clusterrole=cluster-admin
--serviceaccount=kube-system:dashboard-admin
$ kubectl describe secrets -n kube-system $(kubectl -n kube-system get secret | awk
'/dashboard-admin/{print $1}')
使用输出的 token 登录 Dashboard。
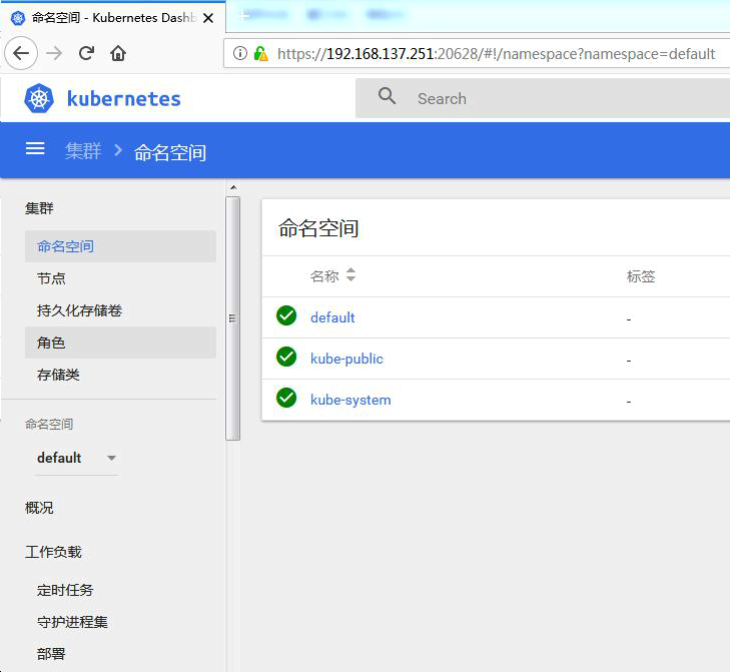
上面是默认的控制台页面
二、KubeSphere
p350集
默认的 dashboard 没啥用,我们用 kubesphere 可以打通全部的 devops 链路。
Kubesphere 集成了很多套件,集群要求较高
https://kubesphere.io/
另外一个控制台 Kuboard 也很不错,集群要求不高
https://kuboard.cn/support/
1、简介
KubeSphere 是一款面向云原生设计的开源项目,在目前主流容器调度平台 Kubernetes 之
上构建的分布式多租户容器管理平台,提供简单易用的操作界面以及向导式操作方式,在降
低用户使用容器调度平台学习成本的同时,极大降低开发、测试、运维的日常工作的复杂度。
2、安装
1、前提条件
https://kubesphere.io/docs/v2.1/zh-CN/installation/prerequisites/
2、安装前提环境
1、安装 helm(master 节点执行)
Helm 是 Kubernetes 的包管理器。包管理器类似于我们在 Ubuntu 中使用的 apt、Centos
中使用的 yum 或者 Python 中的 pip 一样,能快速查找、下载和安装软件包。Helm 由客
户端组件 helm 和服务端组件 Tiller 组成, 能够将一组 K8S 资源打包统一管理, 是查找、共
享和使用为 Kubernetes 构建的软件的最佳方式。
1)、安装
给的文件21年4月22无法使用: 获取不到版本信息: 建议直接修改第 114 行yaml配置为: HELM_DIST="helm-v2.16.10-$OS-$ARCH.tar.gz"
2.1)、不能依据视频中的讲解安装
按视频中安装会卡住,我们现在需要依据如下步骤安装,
(92条消息) 一定要先看!Kubernetes+KubeSphere+DevOps的安装与踩坑_堡望的博客-CSDN博客
(92条消息) 删除一直处于terminating状态的namespace_等风来也chen的博客-CSDN博客
-
去官网下载 helm 2.6.3离线安装包
下载地址: Releases · helm/helm · GitHub
-
上传到k8s平级的目录
-
执行如下命令
tar zxvf helm-v2.16.3-linux-amd64.tar.gz mv linux-amd64/helm /usr/local/bin/helm -
rabc角色创建
kubectl create serviceaccount --namespace kube-system tiller kubectl create clusterrolebinding tiller-cluster-rule --clusterrole=cluster-admin --serviceaccount=kube-system:tiller -
helm init
helm init --upgrade -i registry.cn-hangzhou.aliyuncs.com/google_containers/tiller:v2.16.3 --stable-repo-url https://kubernetes.oss-cn-hangzhou.aliyuncs.com/charts --history-max 300 -
查看
helm version
以下是参考文章
文章地址: HELM 2.14 安装
helm 2.6.3离线安装包下载地址: Releases · helm/helm · GitHub
清理老helm
helm reset --force
kubectl delete serviceaccount  tiller --namespace kube-system
kubectl delete clusterrolebinding tiller-cluster-rule
kubectl delete deployment tiller-deploy --namespace kube-system
helm客户端安装
wget https://get.helm.sh/helm-v2.14.1-linux-amd64.tar.gz
tar zxvf helm-v2.16.3-linux-amd64.tar.gz
mv linux-amd64/helm /usr/local/bin/helm
rabc角色
kubectl create serviceaccount --namespace kube-system tiller
kubectl create clusterrolebinding tiller-cluster-rule --clusterrole=cluster-admin --serviceaccount=kube-system:tiller
helm init
helm init --upgrade -i registry.cn-hangzhou.aliyuncs.com/google_containers/tiller:v2.16.3 --stable-repo-url https://kubernetes.oss-cn-hangzhou.aliyuncs.com/charts --history-max 300
查看:
helm version
Client: &version.Version{SemVer:"v2.14.1", GitCommit:"5270352a09c7e8b6e8c9593002a73535276507c0", GitTreeState:"clean"}
Server: &version.Version{SemVer:"v2.14.1", GitCommit:"5270352a09c7e8b6e8c9593002a73535276507c0", GitTreeState:"clean"}

kubectl get deployment tiller-deploy -n kube-system
测试:
helm install stable/nginx-ingress --name nginx-ingress
helm ls
helm delete nginx-ingress
tiller-deploy-5d79cb9bfd-grrrk
查看tiller-deploy-7555cf9759-sv8rj pod日志信
kubectl describe pod tiller-deploy-5d79cb9bfd-grrrk -n kube-system
helm init --service-account=tiller --tiller-image=registry.cn-hangzhou.aliyuncs.com/google_containers/tiller:v2.14.0 --history-max 300
helm init --service-account=tiller --tiller-image=jessestuart/tiller:v2.14.0 --history-max 300
其他参考文章
解决k8s helm安装tiller出现ImagePullBackOff,ErrImagePull错误
(92条消息) 解决k8s helm安装tiller出现ImagePullBackOff,ErrImagePull错误_你笑起来丿真好看的博客-CSDN博客_errimagepull
安装完成如图:
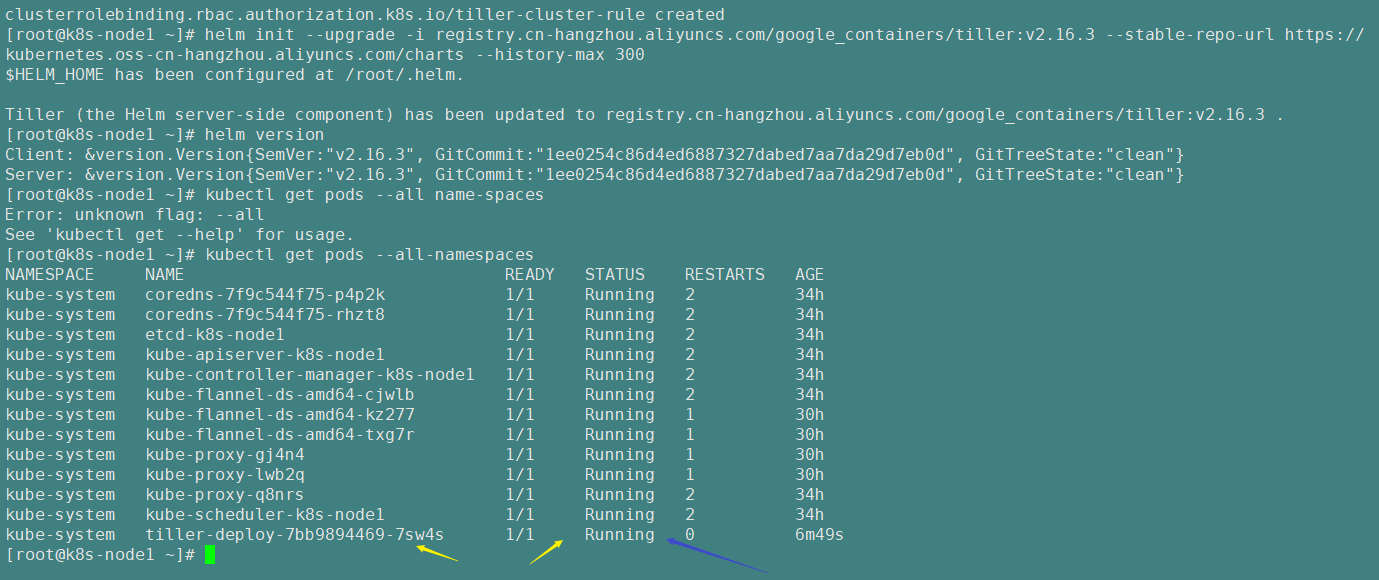
到目前我们已经完成前置环境1
2.2)、前置环境2
还有前置环境2没有完成
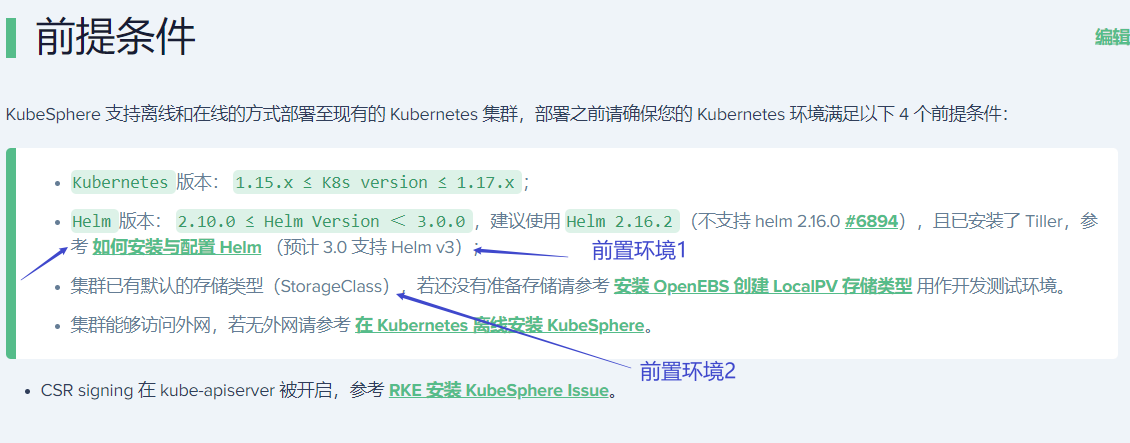

kubectl get node -o wide
2.2.2、确认 master 节点是否有 Taint,
如下看到 master 节点有 Taint。
kubectl describe node k8s-node1 | grep Taint

控制台输出:
Taints:              node-role.kubernetes.io/master:NoSchedule
2.2.3、去掉 master 节点的 Taint:(去掉污点)
kubectl taint nodes k8s-node1 node-role.kubernetes.io=master:NoSchedule-

控制台输出如下:
node/k8s-node1 untainted

2.2.5现在安装 OpenEBS
官方文档
安装 OpenEBS 创建 LocalPV 存储类型 | KubeSphere Documents
-
创建 OpenEBS 的 namespace
,OpenEBS 相关资源将创建在这个 namespace 下:
kubectl create ns openebs

# 执行后可以使用 kubectl get ns 查看所有的名称空间
-
安装 OpenEBS,
以下列出A、B两种方法,可参考其中任意一种进行创建:
A. 若集群已安装了 Helm,可通过 Helm 命令来安装 OpenEBS:
helm init

helm install --namespace openebs --name openebs stable/openebs --version 1.5.0
B. 除此之外 还可以通过 kubectl 命令安装:
kubectl apply -f https://openebs.github.io/charts/openebs-operator-1.5.0.yaml这步有报错如下:

可以参考文章解决: (92条消息) 在Kubernetes上最小化安装KubeSphere_xiaomu_a的博客-CSDN博客_kubesphere 最小化安装
其他有用的文章:
第2.2.5步报错:
直接按照这里执行,可以不报错
vi openebs-operator.yaml
-
复制如下粘贴到上面的yaml文件中
# # DEPRECATION NOTICE # This operator file is deprecated in 2.11.0 in favour of individual operators # for each storage engine and the file will be removed in version 3.0.0 # # Further specific components can be deploy using there individual operator yamls # # To deploy cStor: # https://github.com/openebs/charts/blob/gh-pages/cstor-operator.yaml # # To deploy Jiva: # https://github.com/openebs/charts/blob/gh-pages/jiva-operator.yaml # # To deploy Dynamic hostpath localpv provisioner: # https://github.com/openebs/charts/blob/gh-pages/hostpath-operator.yaml # # # This manifest deploys the OpenEBS control plane components, with associated CRs & RBAC rules # NOTE: On GKE, deploy the openebs-operator.yaml in admin context # Create the OpenEBS namespace apiVersion: v1 kind: Namespace metadata: name: openebs --- # Create Maya Service Account apiVersion: v1 kind: ServiceAccount metadata: name: openebs-maya-operator namespace: openebs --- # Define Role that allows operations on K8s pods/deployments kind: ClusterRole apiVersion: rbac.authorization.k8s.io/v1 metadata: name: openebs-maya-operator rules: - apiGroups: ["*"] resources: ["nodes", "nodes/proxy"] verbs: ["*"] - apiGroups: ["*"] resources: ["namespaces", "services", "pods", "pods/exec", "deployments", "deployments/finalizers", "replicationcontrollers", "replicasets", "events", "endpoints", "configmaps", "secrets", "jobs", "cronjobs"] verbs: ["*"] - apiGroups: ["*"] resources: ["statefulsets", "daemonsets"] verbs: ["*"] - apiGroups: ["*"] resources: ["resourcequotas", "limitranges"] verbs: ["list", "watch"] - apiGroups: ["*"] resources: ["ingresses", "horizontalpodautoscalers", "verticalpodautoscalers", "certificatesigningrequests"] verbs: ["list", "watch"] - apiGroups: ["*"] resources: ["storageclasses", "persistentvolumeclaims", "persistentvolumes"] verbs: ["*"] - apiGroups: ["volumesnapshot.external-storage.k8s.io"] resources: ["volumesnapshots", "volumesnapshotdatas"] verbs: ["get", "list", "watch", "create", "update", "patch", "delete"] - apiGroups: ["apiextensions.k8s.io"] resources: ["customresourcedefinitions"] verbs: [ "get", "list", "create", "update", "delete", "patch"] - apiGroups: ["openebs.io"] resources: [ "*"] verbs: ["*" ] - apiGroups: ["cstor.openebs.io"] resources: [ "*"] verbs: ["*" ] - apiGroups: ["coordination.k8s.io"] resources: ["leases"] verbs: ["get", "watch", "list", "delete", "update", "create"] - apiGroups: ["admissionregistration.k8s.io"] resources: ["validatingwebhookconfigurations", "mutatingwebhookconfigurations"] verbs: ["get", "create", "list", "delete", "update", "patch"] - nonResourceURLs: ["/metrics"] verbs: ["get"] - apiGroups: ["*"] resources: ["poddisruptionbudgets"] verbs: ["get", "list", "create", "delete", "watch"] --- # Bind the Service Account with the Role Privileges. # TODO: Check if default account also needs to be there kind: ClusterRoleBinding apiVersion: rbac.authorization.k8s.io/v1 metadata: name: openebs-maya-operator subjects: - kind: ServiceAccount name: openebs-maya-operator namespace: openebs roleRef: kind: ClusterRole name: openebs-maya-operator apiGroup: rbac.authorization.k8s.io --- apiVersion: apps/v1 kind: Deployment metadata: name: maya-apiserver namespace: openebs labels: name: maya-apiserver openebs.io/component-name: maya-apiserver openebs.io/version: 2.12.0 spec: selector: matchLabels: name: maya-apiserver openebs.io/component-name: maya-apiserver replicas: 1 strategy: type: Recreate rollingUpdate: null template: metadata: labels: name: maya-apiserver openebs.io/component-name: maya-apiserver openebs.io/version: 2.12.0 spec: serviceAccountName: openebs-maya-operator containers: - name: maya-apiserver imagePullPolicy: IfNotPresent image: openebs/m-apiserver:2.12.0 ports: - containerPort: 5656 env: # OPENEBS_IO_KUBE_CONFIG enables maya api service to connect to K8s # based on this config. This is ignored if empty. # This is supported for maya api server version 0.5.2 onwards #- name: OPENEBS_IO_KUBE_CONFIG # value: "/home/ubuntu/.kube/config" # OPENEBS_IO_K8S_MASTER enables maya api service to connect to K8s # based on this address. This is ignored if empty. # This is supported for maya api server version 0.5.2 onwards #- name: OPENEBS_IO_K8S_MASTER # value: "http://172.28.128.3:8080" # OPENEBS_NAMESPACE provides the namespace of this deployment as an # environment variable - name: OPENEBS_NAMESPACE valueFrom: fieldRef: fieldPath: metadata.namespace # OPENEBS_SERVICE_ACCOUNT provides the service account of this pod as # environment variable - name: OPENEBS_SERVICE_ACCOUNT valueFrom: fieldRef: fieldPath: spec.serviceAccountName # OPENEBS_MAYA_POD_NAME provides the name of this pod as # environment variable - name: OPENEBS_MAYA_POD_NAME valueFrom: fieldRef: fieldPath: metadata.name # If OPENEBS_IO_CREATE_DEFAULT_STORAGE_CONFIG is false then OpenEBS default # storageclass and storagepool will not be created. - name: OPENEBS_IO_CREATE_DEFAULT_STORAGE_CONFIG value: "true" # OPENEBS_IO_INSTALL_DEFAULT_CSTOR_SPARSE_POOL decides whether default cstor sparse pool should be # configured as a part of openebs installation. # If "true" a default cstor sparse pool will be configured, if "false" it will not be configured. # This value takes effect only if OPENEBS_IO_CREATE_DEFAULT_STORAGE_CONFIG # is set to true - name: OPENEBS_IO_INSTALL_DEFAULT_CSTOR_SPARSE_POOL value: "false" # OPENEBS_IO_INSTALL_CRD environment variable is used to enable/disable CRD installation # from Maya API server. By default the CRDs will be installed # - name: OPENEBS_IO_INSTALL_CRD # value: "true" # OPENEBS_IO_BASE_DIR is used to configure base directory for openebs on host path. # Where OpenEBS can store required files. Default base path will be /var/openebs # - name: OPENEBS_IO_BASE_DIR # value: "/var/openebs" # OPENEBS_IO_CSTOR_TARGET_DIR can be used to specify the hostpath # to be used for saving the shared content between the side cars # of cstor volume pod. # The default path used is /var/openebs/sparse #- name: OPENEBS_IO_CSTOR_TARGET_DIR # value: "/var/openebs/sparse" # OPENEBS_IO_CSTOR_POOL_SPARSE_DIR can be used to specify the hostpath # to be used for saving the shared content between the side cars # of cstor pool pod. This ENV is also used to indicate the location # of the sparse devices. # The default path used is /var/openebs/sparse #- name: OPENEBS_IO_CSTOR_POOL_SPARSE_DIR # value: "/var/openebs/sparse" # OPENEBS_IO_JIVA_POOL_DIR can be used to specify the hostpath # to be used for default Jiva StoragePool loaded by OpenEBS # The default path used is /var/openebs # This value takes effect only if OPENEBS_IO_CREATE_DEFAULT_STORAGE_CONFIG # is set to true #- name: OPENEBS_IO_JIVA_POOL_DIR # value: "/var/openebs" # OPENEBS_IO_LOCALPV_HOSTPATH_DIR can be used to specify the hostpath # to be used for default openebs-hostpath storageclass loaded by OpenEBS # The default path used is /var/openebs/local # This value takes effect only if OPENEBS_IO_CREATE_DEFAULT_STORAGE_CONFIG # is set to true #- name: OPENEBS_IO_LOCALPV_HOSTPATH_DIR # value: "/var/openebs/local" - name: OPENEBS_IO_JIVA_CONTROLLER_IMAGE value: "openebs/jiva:2.12.1" - name: OPENEBS_IO_JIVA_REPLICA_IMAGE value: "openebs/jiva:2.12.1" - name: OPENEBS_IO_JIVA_REPLICA_COUNT value: "3" - name: OPENEBS_IO_CSTOR_TARGET_IMAGE value: "openebs/cstor-istgt:2.12.0" - name: OPENEBS_IO_CSTOR_POOL_IMAGE value: "openebs/cstor-pool:2.12.0" - name: OPENEBS_IO_CSTOR_POOL_MGMT_IMAGE value: "openebs/cstor-pool-mgmt:2.12.0" - name: OPENEBS_IO_CSTOR_VOLUME_MGMT_IMAGE value: "openebs/cstor-volume-mgmt:2.12.0" - name: OPENEBS_IO_VOLUME_MONITOR_IMAGE value: "openebs/m-exporter:2.12.0" - name: OPENEBS_IO_CSTOR_POOL_EXPORTER_IMAGE value: "openebs/m-exporter:2.12.0" - name: OPENEBS_IO_HELPER_IMAGE value: "openebs/linux-utils:2.12.0" # OPENEBS_IO_ENABLE_ANALYTICS if set to true sends anonymous usage # events to Google Analytics - name: OPENEBS_IO_ENABLE_ANALYTICS value: "true" - name: OPENEBS_IO_INSTALLER_TYPE value: "openebs-operator" # OPENEBS_IO_ANALYTICS_PING_INTERVAL can be used to specify the duration (in hours) # for periodic ping events sent to Google Analytics. # Default is 24h. # Minimum is 1h. You can convert this to weekly by setting 168h #- name: OPENEBS_IO_ANALYTICS_PING_INTERVAL # value: "24h" livenessProbe: exec: command: - sh - -c - /usr/local/bin/mayactl - version initialDelaySeconds: 30 periodSeconds: 60 readinessProbe: exec: command: - sh - -c - /usr/local/bin/mayactl - version initialDelaySeconds: 30 periodSeconds: 60 --- apiVersion: v1 kind: Service metadata: name: maya-apiserver-service namespace: openebs labels: openebs.io/component-name: maya-apiserver-svc spec: ports: - name: api port: 5656 protocol: TCP targetPort: 5656 selector: name: maya-apiserver sessionAffinity: None --- apiVersion: apps/v1 kind: Deployment metadata: name: openebs-provisioner namespace: openebs labels: name: openebs-provisioner openebs.io/component-name: openebs-provisioner openebs.io/version: 2.12.0 spec: selector: matchLabels: name: openebs-provisioner openebs.io/component-name: openebs-provisioner replicas: 1 strategy: type: Recreate rollingUpdate: null template: metadata: labels: name: openebs-provisioner openebs.io/component-name: openebs-provisioner openebs.io/version: 2.12.0 spec: serviceAccountName: openebs-maya-operator containers: - name: openebs-provisioner imagePullPolicy: IfNotPresent image: openebs/openebs-k8s-provisioner:2.12.0 env: # OPENEBS_IO_K8S_MASTER enables openebs provisioner to connect to K8s # based on this address. This is ignored if empty. # This is supported for openebs provisioner version 0.5.2 onwards #- name: OPENEBS_IO_K8S_MASTER # value: "http://10.128.0.12:8080" # OPENEBS_IO_KUBE_CONFIG enables openebs provisioner to connect to K8s # based on this config. This is ignored if empty. # This is supported for openebs provisioner version 0.5.2 onwards #- name: OPENEBS_IO_KUBE_CONFIG # value: "/home/ubuntu/.kube/config" - name: NODE_NAME valueFrom: fieldRef: fieldPath: spec.nodeName - name: OPENEBS_NAMESPACE valueFrom: fieldRef: fieldPath: metadata.namespace # OPENEBS_MAYA_SERVICE_NAME provides the maya-apiserver K8s service name, # that provisioner should forward the volume create/delete requests. # If not present, "maya-apiserver-service" will be used for lookup. # This is supported for openebs provisioner version 0.5.3-RC1 onwards #- name: OPENEBS_MAYA_SERVICE_NAME # value: "maya-apiserver-apiservice" # LEADER_ELECTION_ENABLED is used to enable/disable leader election. By default # leader election is enabled. #- name: LEADER_ELECTION_ENABLED # value: "true" # OPENEBS_IO_JIVA_PATCH_NODE_AFFINITY is used to enable/disable setting node affinity # to the jiva replica deployments. Default is `enabled`. The valid values are # `enabled` and `disabled`. #- name: OPENEBS_IO_JIVA_PATCH_NODE_AFFINITY # value: "enabled" # Process name used for matching is limited to the 15 characters # present in the pgrep output. # So fullname can't be used here with pgrep (>15 chars).A regular expression # that matches the entire command name has to specified. # Anchor `^` : matches any string that starts with `openebs-provis` # `.*`: matches any string that has `openebs-provis` followed by zero or more char livenessProbe: exec: command: - sh - -c - test `pgrep -c "^openebs-provisi.*"` = 1 initialDelaySeconds: 30 periodSeconds: 60 --- apiVersion: apps/v1 kind: Deployment metadata: name: openebs-snapshot-operator namespace: openebs labels: name: openebs-snapshot-operator openebs.io/component-name: openebs-snapshot-operator openebs.io/version: 2.12.0 spec: selector: matchLabels: name: openebs-snapshot-operator openebs.io/component-name: openebs-snapshot-operator replicas: 1 strategy: type: Recreate template: metadata: labels: name: openebs-snapshot-operator openebs.io/component-name: openebs-snapshot-operator openebs.io/version: 2.12.0 spec: serviceAccountName: openebs-maya-operator containers: - name: snapshot-controller image: openebs/snapshot-controller:2.12.0 imagePullPolicy: IfNotPresent env: - name: OPENEBS_NAMESPACE valueFrom: fieldRef: fieldPath: metadata.namespace # Process name used for matching is limited to the 15 characters # present in the pgrep output. # So fullname can't be used here with pgrep (>15 chars).A regular expression # that matches the entire command name has to specified. # Anchor `^` : matches any string that starts with `snapshot-contro` # `.*`: matches any string that has `snapshot-contro` followed by zero or more char livenessProbe: exec: command: - sh - -c - test `pgrep -c "^snapshot-contro.*"` = 1 initialDelaySeconds: 30 periodSeconds: 60 # OPENEBS_MAYA_SERVICE_NAME provides the maya-apiserver K8s service name, # that snapshot controller should forward the snapshot create/delete requests. # If not present, "maya-apiserver-service" will be used for lookup. # This is supported for openebs provisioner version 0.5.3-RC1 onwards #- name: OPENEBS_MAYA_SERVICE_NAME # value: "maya-apiserver-apiservice" - name: snapshot-provisioner image: openebs/snapshot-provisioner:2.12.0 imagePullPolicy: IfNotPresent env: - name: OPENEBS_NAMESPACE valueFrom: fieldRef: fieldPath: metadata.namespace # OPENEBS_MAYA_SERVICE_NAME provides the maya-apiserver K8s service name, # that snapshot provisioner should forward the clone create/delete requests. # If not present, "maya-apiserver-service" will be used for lookup. # This is supported for openebs provisioner version 0.5.3-RC1 onwards #- name: OPENEBS_MAYA_SERVICE_NAME # value: "maya-apiserver-apiservice" # LEADER_ELECTION_ENABLED is used to enable/disable leader election. By default # leader election is enabled. #- name: LEADER_ELECTION_ENABLED # value: "true" # Process name used for matching is limited to the 15 characters # present in the pgrep output. # So fullname can't be used here with pgrep (>15 chars).A regular expression # that matches the entire command name has to specified. # Anchor `^` : matches any string that starts with `snapshot-provis` # `.*`: matches any string that has `snapshot-provis` followed by zero or more char livenessProbe: exec: command: - sh - -c - test `pgrep -c "^snapshot-provis.*"` = 1 initialDelaySeconds: 30 periodSeconds: 60 --- apiVersion: apiextensions.k8s.io/v1 kind: CustomResourceDefinition metadata: annotations: controller-gen.kubebuilder.io/version: v0.5.0 creationTimestamp: null name: blockdevices.openebs.io spec: group: openebs.io names: kind: BlockDevice listKind: BlockDeviceList plural: blockdevices shortNames: - bd singular: blockdevice scope: Namespaced versions: - additionalPrinterColumns: - jsonPath: .spec.nodeAttributes.nodeName name: NodeName type: string - jsonPath: .spec.path name: Path priority: 1 type: string - jsonPath: .spec.filesystem.fsType name: FSType priority: 1 type: string - jsonPath: .spec.capacity.storage name: Size type: string - jsonPath: .status.claimState name: ClaimState type: string - jsonPath: .status.state name: Status type: string - jsonPath: .metadata.creationTimestamp name: Age type: date name: v1alpha1 schema: openAPIV3Schema: description: BlockDevice is the Schema for the blockdevices API properties: apiVersion: description: 'APIVersion defines the versioned schema of this representation of an object. Servers should convert recognized schemas to the latest internal value, and may reject unrecognized values. More info: https://git.k8s.io/community/contributors/devel/sig-architecture/api-conventions.md#resources' type: string kind: description: 'Kind is a string value representing the REST resource this object represents. Servers may infer this from the endpoint the client submits requests to. Cannot be updated. In CamelCase. More info: https://git.k8s.io/community/contributors/devel/sig-architecture/api-conventions.md#types-kinds' type: string metadata: type: object spec: description: DeviceSpec defines the properties and runtime status of a BlockDevice properties: aggregateDevice: description: AggregateDevice was intended to store the hierarchical information in cases of LVM. However this is currently not implemented and may need to be re-looked into for better design. To be deprecated type: string capacity: description: Capacity properties: logicalSectorSize: description: LogicalSectorSize is blockdevice logical-sector size in bytes format: int32 type: integer physicalSectorSize: description: PhysicalSectorSize is blockdevice physical-Sector size in bytes format: int32 type: integer storage: description: Storage is the blockdevice capacity in bytes format: int64 type: integer required: - storage type: object claimRef: description: ClaimRef is the reference to the BDC which has claimed this BD properties: apiVersion: description: API version of the referent. type: string fieldPath: description: 'If referring to a piece of an object instead of an entire object, this string should contain a valid JSON/Go field access statement, such as desiredState.manifest.containers[2]. For example, if the object reference is to a container within a pod, this would take on a value like: "spec.containers{name}" (where "name" refers to the name of the container that triggered the event) or if no container name is specified "spec.containers[2]" (container with index 2 in this pod). This syntax is chosen only to have some well-defined way of referencing a part of an object. TODO: this design is not final and this field is subject to change in the future.' type: string kind: description: 'Kind of the referent. More info: https://git.k8s.io/community/contributors/devel/sig-architecture/api-conventions.md#types-kinds' type: string name: description: 'Name of the referent. More info: https://kubernetes.io/docs/concepts/overview/working-with-objects/names/#names' type: string namespace: description: 'Namespace of the referent. More info: https://kubernetes.io/docs/concepts/overview/working-with-objects/namespaces/' type: string resourceVersion: description: 'Specific resourceVersion to which this reference is made, if any. More info: https://git.k8s.io/community/contributors/devel/sig-architecture/api-conventions.md#concurrency-control-and-consistency' type: string uid: description: 'UID of the referent. More info: https://kubernetes.io/docs/concepts/overview/working-with-objects/names/#uids' type: string type: object details: description: Details contain static attributes of BD like model,serial, and so forth properties: compliance: description: Compliance is standards/specifications version implemented by device firmware such as SPC-1, SPC-2, etc type: string deviceType: description: DeviceType represents the type of device like sparse, disk, partition, lvm, crypt enum: - disk - partition - sparse - loop - lvm - crypt - dm - mpath type: string driveType: description: DriveType is the type of backing drive, HDD/SSD enum: - HDD - SSD - Unknown - "" type: string firmwareRevision: description: FirmwareRevision is the disk firmware revision type: string hardwareSectorSize: description: HardwareSectorSize is the hardware sector size in bytes format: int32 type: integer logicalBlockSize: description: LogicalBlockSize is the logical block size in bytes reported by /sys/class/block/sda/queue/logical_block_size format: int32 type: integer model: description: Model is model of disk type: string physicalBlockSize: description: PhysicalBlockSize is the physical block size in bytes reported by /sys/class/block/sda/queue/physical_block_size format: int32 type: integer serial: description: Serial is serial number of disk type: string vendor: description: Vendor is vendor of disk type: string type: object devlinks: description: DevLinks contains soft links of a block device like /dev/by-id/... /dev/by-uuid/... items: description: DeviceDevLink holds the mapping between type and links like by-id type or by-path type link properties: kind: description: Kind is the type of link like by-id or by-path. enum: - by-id - by-path type: string links: description: Links are the soft links items: type: string type: array type: object type: array filesystem: description: FileSystem contains mountpoint and filesystem type properties: fsType: description: Type represents the FileSystem type of the block device type: string mountPoint: description: MountPoint represents the mountpoint of the block device. type: string type: object nodeAttributes: description: NodeAttributes has the details of the node on which BD is attached properties: nodeName: description: NodeName is the name of the Kubernetes node resource on which the device is attached type: string type: object parentDevice: description: "ParentDevice was intended to store the UUID of the parent Block Device as is the case for partitioned block devices. \n For example: /dev/sda is the parent for /dev/sda1 To be deprecated" type: string partitioned: description: Partitioned represents if BlockDevice has partitions or not (Yes/No) Currently always default to No. To be deprecated enum: - "Yes" - "No" type: string path: description: Path contain devpath (e.g. /dev/sdb) type: string required: - capacity - devlinks - nodeAttributes - path type: object status: description: DeviceStatus defines the observed state of BlockDevice properties: claimState: description: ClaimState represents the claim state of the block device enum: - Claimed - Unclaimed - Released type: string state: description: State is the current state of the blockdevice (Active/Inactive/Unknown) enum: - Active - Inactive - Unknown type: string required: - claimState - state type: object type: object served: true storage: true subresources: {} status: acceptedNames: kind: "" plural: "" conditions: [] storedVersions: [] --- apiVersion: apiextensions.k8s.io/v1 kind: CustomResourceDefinition metadata: annotations: controller-gen.kubebuilder.io/version: v0.5.0 creationTimestamp: null name: blockdeviceclaims.openebs.io spec: group: openebs.io names: kind: BlockDeviceClaim listKind: BlockDeviceClaimList plural: blockdeviceclaims shortNames: - bdc singular: blockdeviceclaim scope: Namespaced versions: - additionalPrinterColumns: - jsonPath: .spec.blockDeviceName name: BlockDeviceName type: string - jsonPath: .status.phase name: Phase type: string - jsonPath: .metadata.creationTimestamp name: Age type: date name: v1alpha1 schema: openAPIV3Schema: description: BlockDeviceClaim is the Schema for the blockdeviceclaims API properties: apiVersion: description: 'APIVersion defines the versioned schema of this representation of an object. Servers should convert recognized schemas to the latest internal value, and may reject unrecognized values. More info: https://git.k8s.io/community/contributors/devel/sig-architecture/api-conventions.md#resources' type: string kind: description: 'Kind is a string value representing the REST resource this object represents. Servers may infer this from the endpoint the client submits requests to. Cannot be updated. In CamelCase. More info: https://git.k8s.io/community/contributors/devel/sig-architecture/api-conventions.md#types-kinds' type: string metadata: type: object spec: description: DeviceClaimSpec defines the request details for a BlockDevice properties: blockDeviceName: description: BlockDeviceName is the reference to the block-device backing this claim type: string blockDeviceNodeAttributes: description: BlockDeviceNodeAttributes is the attributes on the node from which a BD should be selected for this claim. It can include nodename, failure domain etc. properties: hostName: description: HostName represents the hostname of the Kubernetes node resource where the BD should be present type: string nodeName: description: NodeName represents the name of the Kubernetes node resource where the BD should be present type: string type: object deviceClaimDetails: description: Details of the device to be claimed properties: allowPartition: description: AllowPartition represents whether to claim a full block device or a device that is a partition type: boolean blockVolumeMode: description: 'BlockVolumeMode represents whether to claim a device in Block mode or Filesystem mode. These are use cases of BlockVolumeMode: 1) Not specified: VolumeMode check will not be effective 2) VolumeModeBlock: BD should not have any filesystem or mountpoint 3) VolumeModeFileSystem: BD should have a filesystem and mountpoint. If DeviceFormat is specified then the format should match with the FSType in BD' type: string formatType: description: Format of the device required, eg:ext4, xfs type: string type: object deviceType: description: DeviceType represents the type of drive like SSD, HDD etc., nullable: true type: string hostName: description: Node name from where blockdevice has to be claimed. To be deprecated. Use NodeAttributes.HostName instead type: string resources: description: Resources will help with placing claims on Capacity, IOPS properties: requests: additionalProperties: anyOf: - type: integer - type: string pattern: ^(\+|-)?(([0-9]+(\.[0-9]*)?)|(\.[0-9]+))(([KMGTPE]i)|[numkMGTPE]|([eE](\+|-)?(([0-9]+(\.[0-9]*)?)|(\.[0-9]+))))?$ x-kubernetes-int-or-string: true description: 'Requests describes the minimum resources required. eg: if storage resource of 10G is requested minimum capacity of 10G should be available TODO for validating' type: object required: - requests type: object selector: description: Selector is used to find block devices to be considered for claiming properties: matchExpressions: description: matchExpressions is a list of label selector requirements. The requirements are ANDed. items: description: A label selector requirement is a selector that contains values, a key, and an operator that relates the key and values. properties: key: description: key is the label key that the selector applies to. type: string operator: description: operator represents a key's relationship to a set of values. Valid operators are In, NotIn, Exists and DoesNotExist. type: string values: description: values is an array of string values. If the operator is In or NotIn, the values array must be non-empty. If the operator is Exists or DoesNotExist, the values array must be empty. This array is replaced during a strategic merge patch. items: type: string type: array required: - key - operator type: object type: array matchLabels: additionalProperties: type: string description: matchLabels is a map of {key,value} pairs. A single {key,value} in the matchLabels map is equivalent to an element of matchExpressions, whose key field is "key", the operator is "In", and the values array contains only "value". The requirements are ANDed. type: object type: object type: object status: description: DeviceClaimStatus defines the observed state of BlockDeviceClaim properties: phase: description: Phase represents the current phase of the claim type: string required: - phase type: object type: object served: true storage: true subresources: {} status: acceptedNames: kind: "" plural: "" conditions: [] storedVersions: [] --- # This is the node-disk-manager related config. # It can be used to customize the disks probes and filters apiVersion: v1 kind: ConfigMap metadata: name: openebs-ndm-config namespace: openebs labels: openebs.io/component-name: ndm-config data: # udev-probe is default or primary probe it should be enabled to run ndm # filterconfigs contains configs of filters. To provide a group of include # and exclude values add it as , separated string node-disk-manager.config: | probeconfigs: - key: udev-probe name: udev probe state: true - key: seachest-probe name: seachest probe state: false - key: smart-probe name: smart probe state: true filterconfigs: - key: os-disk-exclude-filter name: os disk exclude filter state: true exclude: "/,/etc/hosts,/boot" - key: vendor-filter name: vendor filter state: true include: "" exclude: "CLOUDBYT,OpenEBS" - key: path-filter name: path filter state: true include: "" exclude: "/dev/loop,/dev/fd0,/dev/sr0,/dev/ram,/dev/md,/dev/dm-,/dev/rbd,/dev/zd" --- apiVersion: apps/v1 kind: DaemonSet metadata: name: openebs-ndm namespace: openebs labels: name: openebs-ndm openebs.io/component-name: ndm openebs.io/version: 2.12.0 spec: selector: matchLabels: name: openebs-ndm openebs.io/component-name: ndm updateStrategy: type: RollingUpdate template: metadata: labels: name: openebs-ndm openebs.io/component-name: ndm openebs.io/version: 2.12.0 spec: # By default the node-disk-manager will be run on all kubernetes nodes # If you would like to limit this to only some nodes, say the nodes # that have storage attached, you could label those node and use # nodeSelector. # # e.g. label the storage nodes with - "openebs.io/nodegroup"="storage-node" # kubectl label node <node-name> "openebs.io/nodegroup"="storage-node" #nodeSelector: # "openebs.io/nodegroup": "storage-node" serviceAccountName: openebs-maya-operator hostNetwork: true # host PID is used to check status of iSCSI Service when the NDM # API service is enabled #hostPID: true containers: - name: node-disk-manager image: openebs/node-disk-manager:1.6.1 args: - -v=4 # The feature-gate is used to enable the new UUID algorithm. - --feature-gates="GPTBasedUUID" # Detect mount point and filesystem changes wihtout restart. # Uncomment the line below to enable the feature. # --feature-gates="MountChangeDetection" # The feature gate is used to start the gRPC API service. The gRPC server # starts at 9115 port by default. This feature is currently in Alpha state # - --feature-gates="APIService" # The feature gate is used to enable NDM, to create blockdevice resources # for unused partitions on the OS disk # - --feature-gates="UseOSDisk" imagePullPolicy: IfNotPresent securityContext: privileged: true volumeMounts: - name: config mountPath: /host/node-disk-manager.config subPath: node-disk-manager.config readOnly: true # make udev database available inside container - name: udev mountPath: /run/udev - name: procmount mountPath: /host/proc readOnly: true - name: devmount mountPath: /dev - name: basepath mountPath: /var/openebs/ndm - name: sparsepath mountPath: /var/openebs/sparse env: # namespace in which NDM is installed will be passed to NDM Daemonset # as environment variable - name: NAMESPACE valueFrom: fieldRef: fieldPath: metadata.namespace # pass hostname as env variable using downward API to the NDM container - name: NODE_NAME valueFrom: fieldRef: fieldPath: spec.nodeName # specify the directory where the sparse files need to be created. # if not specified, then sparse files will not be created. - name: SPARSE_FILE_DIR value: "/var/openebs/sparse" # Size(bytes) of the sparse file to be created. - name: SPARSE_FILE_SIZE value: "10737418240" # Specify the number of sparse files to be created - name: SPARSE_FILE_COUNT value: "0" livenessProbe: exec: command: - pgrep - "ndm" initialDelaySeconds: 30 periodSeconds: 60 volumes: - name: config configMap: name: openebs-ndm-config - name: udev hostPath: path: /run/udev type: Directory # mount /proc (to access mount file of process 1 of host) inside container # to read mount-point of disks and partitions - name: procmount hostPath: path: /proc type: Directory - name: devmount # the /dev directory is mounted so that we have access to the devices that # are connected at runtime of the pod. hostPath: path: /dev type: Directory - name: basepath hostPath: path: /var/openebs/ndm type: DirectoryOrCreate - name: sparsepath hostPath: path: /var/openebs/sparse --- apiVersion: apps/v1 kind: Deployment metadata: name: openebs-ndm-operator namespace: openebs labels: name: openebs-ndm-operator openebs.io/component-name: ndm-operator openebs.io/version: 2.12.0 spec: selector: matchLabels: name: openebs-ndm-operator openebs.io/component-name: ndm-operator replicas: 1 strategy: type: Recreate template: metadata: labels: name: openebs-ndm-operator openebs.io/component-name: ndm-operator openebs.io/version: 2.12.0 spec: serviceAccountName: openebs-maya-operator containers: - name: node-disk-operator image: openebs/node-disk-operator:1.6.1 imagePullPolicy: IfNotPresent env: - name: WATCH_NAMESPACE valueFrom: fieldRef: fieldPath: metadata.namespace - name: POD_NAME valueFrom: fieldRef: fieldPath: metadata.name # the service account of the ndm-operator pod - name: SERVICE_ACCOUNT valueFrom: fieldRef: fieldPath: spec.serviceAccountName - name: OPERATOR_NAME value: "node-disk-operator" - name: CLEANUP_JOB_IMAGE value: "openebs/linux-utils:2.12.0" # OPENEBS_IO_IMAGE_PULL_SECRETS environment variable is used to pass the image pull secrets # to the cleanup pod launched by NDM operator #- name: OPENEBS_IO_IMAGE_PULL_SECRETS # value: "" livenessProbe: httpGet: path: /healthz port: 8585 initialDelaySeconds: 15 periodSeconds: 20 readinessProbe: httpGet: path: /readyz port: 8585 initialDelaySeconds: 5 periodSeconds: 10 --- apiVersion: apps/v1 kind: Deployment metadata: name: openebs-admission-server namespace: openebs labels: app: admission-webhook openebs.io/component-name: admission-webhook openebs.io/version: 2.12.0 spec: replicas: 1 strategy: type: Recreate rollingUpdate: null selector: matchLabels: app: admission-webhook template: metadata: labels: app: admission-webhook openebs.io/component-name: admission-webhook openebs.io/version: 2.12.0 spec: serviceAccountName: openebs-maya-operator containers: - name: admission-webhook image: openebs/admission-server:2.12.0 imagePullPolicy: IfNotPresent args: - -alsologtostderr - -v=2 - 2>&1 env: - name: OPENEBS_NAMESPACE valueFrom: fieldRef: fieldPath: metadata.namespace - name: ADMISSION_WEBHOOK_NAME value: "openebs-admission-server" - name: ADMISSION_WEBHOOK_FAILURE_POLICY value: "Fail" # Process name used for matching is limited to the 15 characters # present in the pgrep output. # So fullname can't be used here with pgrep (>15 chars).A regular expression # Anchor `^` : matches any string that starts with `admission-serve` # `.*`: matche any string that has `admission-serve` followed by zero or more char # that matches the entire command name has to specified. livenessProbe: exec: command: - sh - -c - test `pgrep -c "^admission-serve.*"` = 1 initialDelaySeconds: 30 periodSeconds: 60 --- apiVersion: apps/v1 kind: Deployment metadata: name: openebs-localpv-provisioner namespace: openebs labels: name: openebs-localpv-provisioner openebs.io/component-name: openebs-localpv-provisioner openebs.io/version: 2.12.0 spec: selector: matchLabels: name: openebs-localpv-provisioner openebs.io/component-name: openebs-localpv-provisioner replicas: 1 strategy: type: Recreate template: metadata: labels: name: openebs-localpv-provisioner openebs.io/component-name: openebs-localpv-provisioner openebs.io/version: 2.12.0 spec: serviceAccountName: openebs-maya-operator containers: - name: openebs-provisioner-hostpath imagePullPolicy: IfNotPresent image: openebs/provisioner-localpv:2.12.0 args: - "--bd-time-out=$(BDC_BD_BIND_RETRIES)" env: # OPENEBS_IO_K8S_MASTER enables openebs provisioner to connect to K8s # based on this address. This is ignored if empty. # This is supported for openebs provisioner version 0.5.2 onwards #- name: OPENEBS_IO_K8S_MASTER # value: "http://10.128.0.12:8080" # OPENEBS_IO_KUBE_CONFIG enables openebs provisioner to connect to K8s # based on this config. This is ignored if empty. # This is supported for openebs provisioner version 0.5.2 onwards #- name: OPENEBS_IO_KUBE_CONFIG # value: "/home/ubuntu/.kube/config" # This sets the number of times the provisioner should try # with a polling interval of 5 seconds, to get the Blockdevice # Name from a BlockDeviceClaim, before the BlockDeviceClaim # is deleted. E.g. 12 * 5 seconds = 60 seconds timeout - name: BDC_BD_BIND_RETRIES value: "12" - name: NODE_NAME valueFrom: fieldRef: fieldPath: spec.nodeName - name: OPENEBS_NAMESPACE valueFrom: fieldRef: fieldPath: metadata.namespace # OPENEBS_SERVICE_ACCOUNT provides the service account of this pod as # environment variable - name: OPENEBS_SERVICE_ACCOUNT valueFrom: fieldRef: fieldPath: spec.serviceAccountName - name: OPENEBS_IO_ENABLE_ANALYTICS value: "true" - name: OPENEBS_IO_INSTALLER_TYPE value: "openebs-operator" - name: OPENEBS_IO_HELPER_IMAGE value: "openebs/linux-utils:2.12.0" - name: OPENEBS_IO_BASE_PATH value: "/var/openebs/local" # LEADER_ELECTION_ENABLED is used to enable/disable leader election. By default # leader election is enabled. #- name: LEADER_ELECTION_ENABLED # value: "true" # OPENEBS_IO_IMAGE_PULL_SECRETS environment variable is used to pass the image pull secrets # to the helper pod launched by local-pv hostpath provisioner #- name: OPENEBS_IO_IMAGE_PULL_SECRETS # value: "" # Process name used for matching is limited to the 15 characters # present in the pgrep output. # So fullname can't be used here with pgrep (>15 chars).A regular expression # that matches the entire command name has to specified. # Anchor `^` : matches any string that starts with `provisioner-loc` # `.*`: matches any string that has `provisioner-loc` followed by zero or more char livenessProbe: exec: command: - sh - -c - test `pgrep -c "^provisioner-loc.*"` = 1 initialDelaySeconds: 30 periodSeconds: 60 ---
应用新建的文件openebs-operator.yaml:
kubectl apply -f openebs-operator.yaml
查看OpenEBS的创建情况:
kubectl get pods --all-namespaces
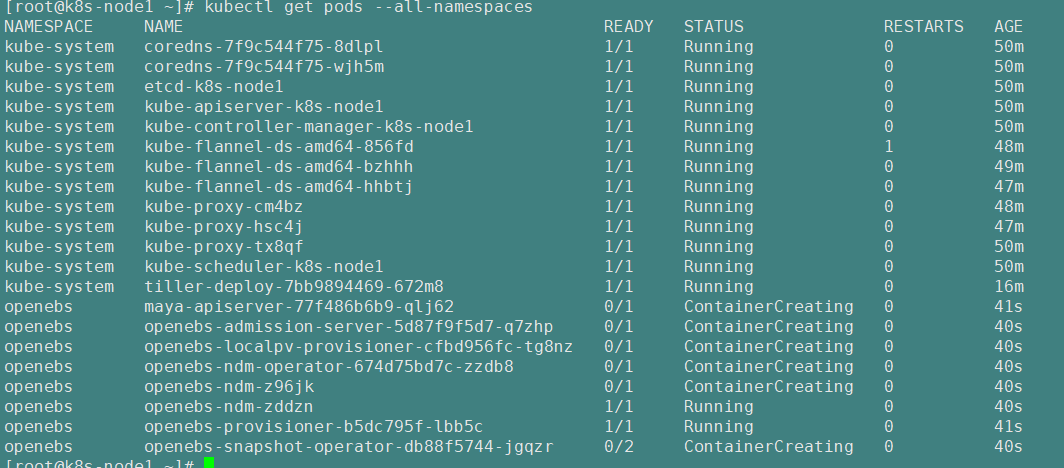
等待几分钟 等所有pod创建完即可往下进行
解决第2.2.5步报错后
- 安装 OpenEBS 后将自动创建 4 个 StorageClass,查看创建的 StorageClass:
kubectl get sc

控制台输出如下:
NAME                        PROVISIONER                                                RECLAIMPOLICY   VOLUMEBINDINGMODE      ALLOWVOLUMEEXPANSION   AGE
openebs-device              openebs.io/local                                           Delete          WaitForFirstConsumer   false                  69s
openebs-hostpath            openebs.io/local                                           Delete          WaitForFirstConsumer   false                  69s
openebs-jiva-default        openebs.io/provisioner-iscsi                               Delete          Immediate              false                  69s
openebs-snapshot-promoter   volumesnapshot.external-storage.k8s.io/snapshot-promoter   Delete          Immediate              false                  69s
- 如下将
openebs-hostpath设置为 默认的 StorageClass:
kubectl patch storageclass openebs-hostpath -p '{"metadata": {"annotations":{"storageclass.kubernetes.io/is-default-class":"true"}}}'
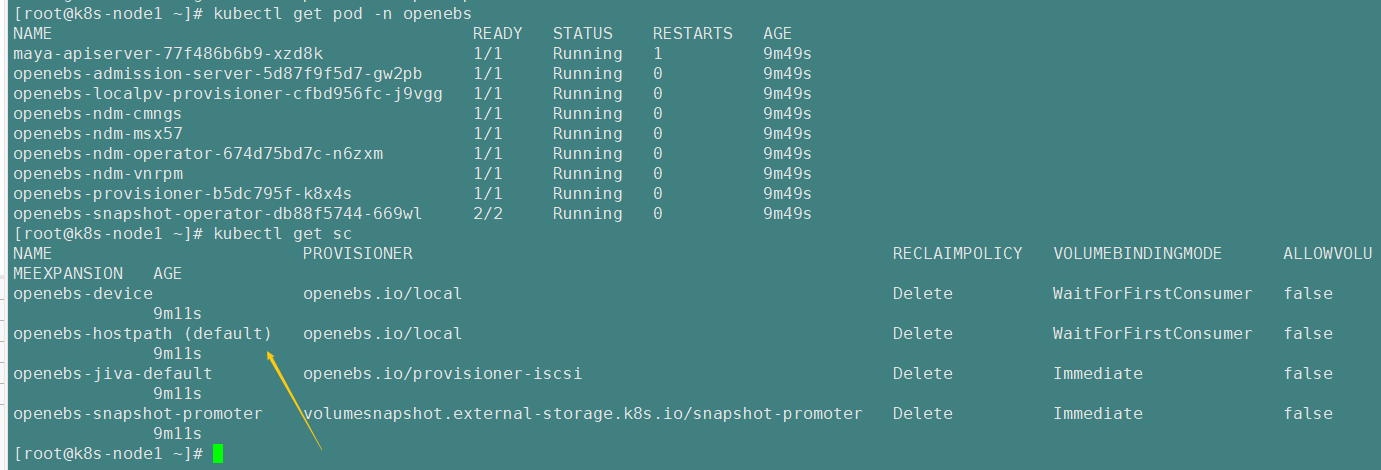
- 至此如上图,OpenEBS 的 LocalPV 已作为默认的存储类型创建成功。可以通过命令
kubectl get pod -n openebs来查看 OpenEBS 相关 Pod 的状态,若 Pod 的状态都是 running,则说明存储安装成功。
注意视频中的文档是这样的:

kubectl taint nodes k8s-node1 node-role.kubernetes.io=master:NoSchedule

p350集完成
接下来我们完整安装KubeSphere即可
官方文档的验证方式
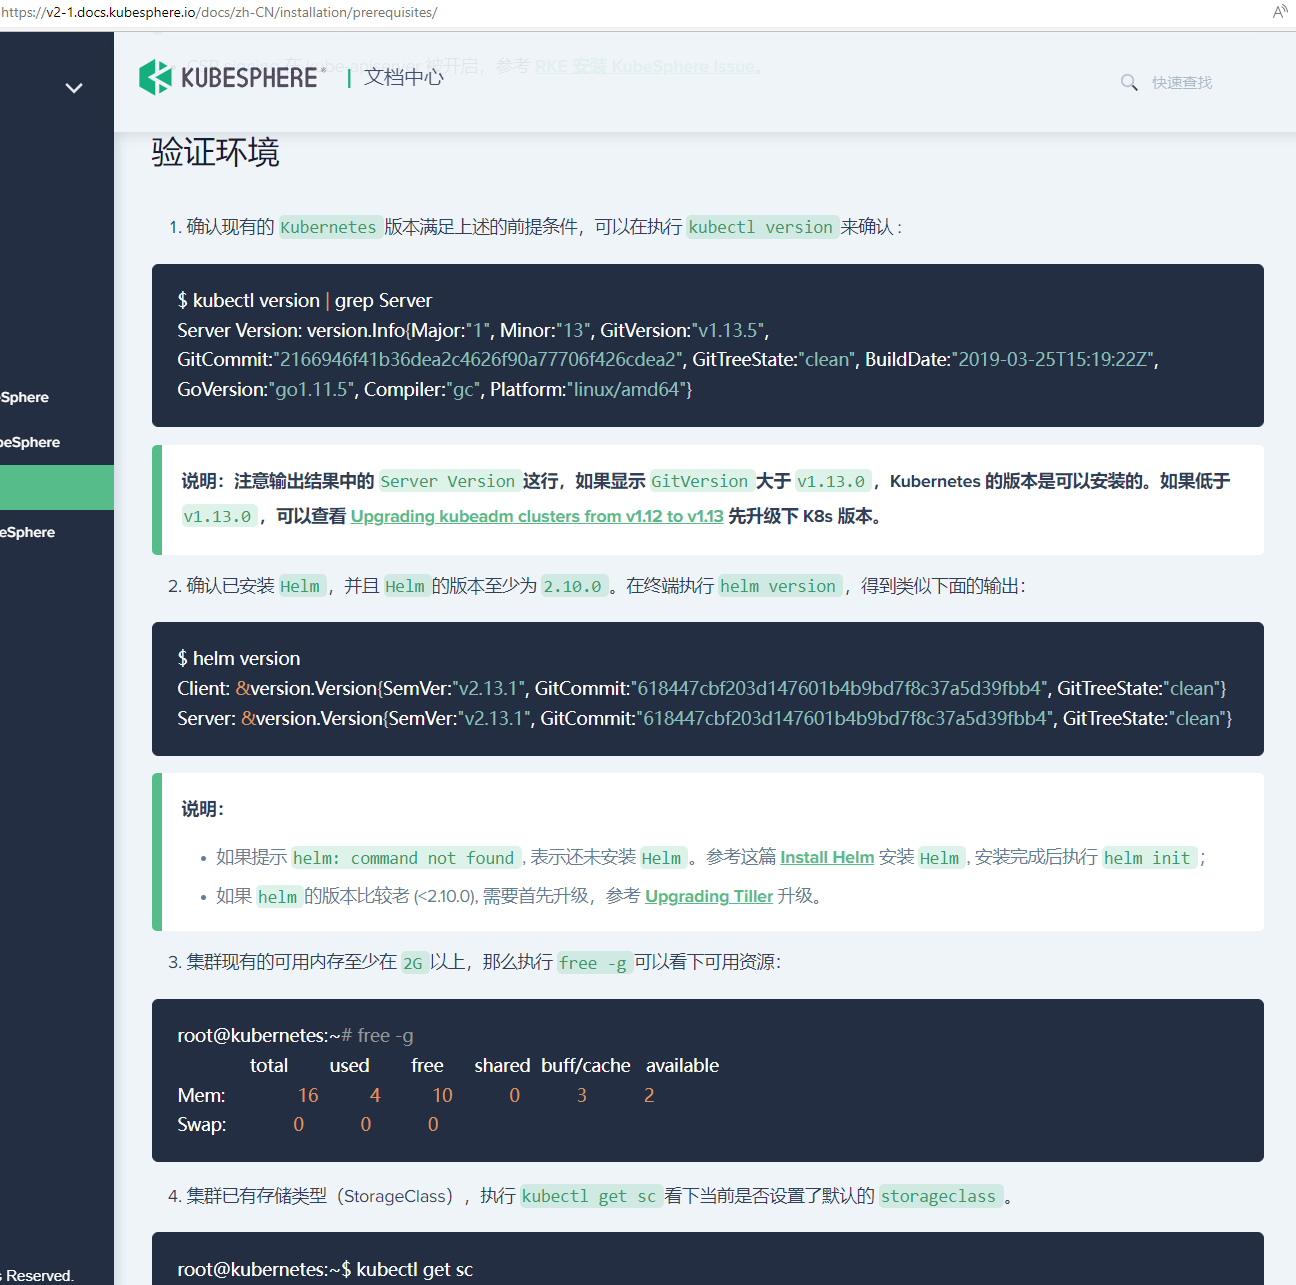
往下进行前先备份:

3)、最小化安装 kubesphere
第5次安装
kubectl apply -f https://github.com/kubesphere/ks-installer/releases/download/v3.1.1/kubesphere-installer.yaml

kubectl apply -f https://github.com/kubesphere/ks-installer/releases/download/v3.1.1/cluster-configuration.yaml
————————————————
版权声明:本文为CSDN博主「xiaomu_a」的原创文章,遵循CC 4.0 BY-SA版权协议,转载请附上原文出处链接及本声明。
原文链接:https://blog.csdn.net/RookiexiaoMu_a/article/details/119859930
第3次
#添加阿里云的仓库
helm init --client-only --stable-repo-url https://aliacs-app-catalog.oss-cn-hangzhou.aliyuncs.com/charts/

helm repo add incubator https://aliacs-app-catalog.oss-cn-hangzhou.aliyuncs.com/charts-incubator/

helm repo update

#创建服务端 使用-i指定阿里云仓库
helm init --service-account tiller --upgrade -i registry.cn-hangzhou.aliyuncs.com/google_containers/tiller:v2.16.3  --stable-repo-url https://kubernetes.oss-cn-hangzhou.aliyuncs.com/charts

#创建TLS认证服务端,参考地址:#https://github.com/gjmzj/kubeasz/blob/master/docs/guide/helm.md

helm init --service-account tiller --upgrade -i registry.cn-hangzhou.aliyuncs.com/google_containers/tiller:v2.16.3 --tiller-tls-cert /etc/kubernetes/ssl/tiller001.pem --tiller-tls-key /etc/kubernetes/ssl/tiller001-key.pem --tls-ca-cert /etc/kubernetes/ssl/ca.pem --tiller-namespace kube-system --stable-repo-url https://kubernetes.oss-cn-hangzhou.aliyuncs.com/charts
因为 Helm 的服务端 Tiller 是一个部署在 Kubernetes 中 kube-system namespace下的deployment,它会去连接 kube-api在Kubernetes里创建和删除应用。
而从Kubernetes1.6版本开始,API Server 启用了RBAC授权。目前的Tiller部署时默认没有定义授权的ServiceAccount,这会导致访问API Server时被拒绝。所以我们需要明确为Tiller部署添加授权。
# 创建 Kubernetes 的服务帐号和绑定角色

#创建serviceaccount
kubectl create serviceaccount --namespace kube-system tiller
# 输出:
# Error from server (AlreadyExists): serviceaccounts "tiller" already exists


#创建角色绑定
kubectl create clusterrolebinding tiller-cluster-rule --clusterrole=cluster-admin --serviceaccount=kube-system:tiller
# 输出
# Error from server (AlreadyExists): clusterrolebindings.rbac.authorization.k8s.io "tiller-cluster-rule" already exists


# 设置tiller帐号
#使用kubectl patch更新API对象
kubectl patch deploy --namespace kube-system tiller-deploy -p '{"spec":{"template":{"spec":{"serviceAccount":"tiller"}}}}'

#验证是否授权成功
kubectl get deploy --namespace kube-system   tiller-deploy  --output yaml|grep  serviceAccount

# 输出如下
      serviceAccount: tiller
      serviceAccountName: tiller
验证tiller是否安装成功
kubectl -n kube-system get pods|grep tiller
tiller-deploy-6d8dfbb696-4cbcz             1/1     Running   0          88s

输入命令    helm version    显示结果以下既为成功
Client: &version.Version{SemVer:"v2.16.3", GitCommit:"1ee0254c86d4ed6887327dabed7aa7da29d7eb0d", GitTreeState:"clean"}
Server: &version.Version{SemVer:"v2.16.3", GitCommit:"1ee0254c86d4ed6887327dabed7aa7da29d7eb0d", GitTreeState:"clean"}
kubectl delete namespace kubesphere-monitoring-system --force --grace-period=0 #强制删除
kubectl delete namespace kubesphere-system --force --grace-period=0
kubectl delete namespace kubesphere-controls-system --force --grace-period=0
# 最小化安装
kubectl apply -f https://github.com/kubesphere/ks-installer/releases/download/v3.0.0/kubesphere-installer.yaml

# 集群安装
kubectl apply -f https://github.com/kubesphere/ks-installer/releases/download/v3.0.0/cluster-configuration.yaml


kubectl apply -f https://github.com/kubesphere/ks-installer/releases/download/v3.1.1/kubesphere-installer.yaml

kubectl apply -f https://github.com/kubesphere/ks-installer/releases/download/v3.1.1/cluster-configuration.yaml
————————————————
版权声明:本文为CSDN博主「xiaomu_a」的原创文章,遵循CC 4.0 BY-SA版权协议,转载请附上原文出处链接及本声明。
原文链接:https://blog.csdn.net/RookiexiaoMu_a/article/details/119859930
查看滚动日志
kubectl logs -n kubesphere-system $(kubectl get pod -n kubesphere-system -l app=ks-install -o jsonpath='{.items[0].metadata.name}') -f
kubectl get pod -A
若您的集群可用的资源符合 CPU > 1 Core,可用内存 > 2 G,可以参考以下命令开启 KubeSphere 最小化安装:
kubectl apply -f \https://raw.githubusercontent.com/kubesphere/ks-installer/master/kubesphere-minimal.yaml
提示:若您的服务器提示无法访问 GitHub,可将 kubesphere-minimal.yaml 或 kubesphere-complete-setup.yaml 文件保存到本地作为本地的静态文件,再参考上述命令进行安装。
官方GitHub网址: (上面的网址已经不能访问了)
https://github.com/kubesphere/ks-installer/blob/v2.1.1/README_zh.md
kubesphere-minimal.yaml 文件地址如下:
https://github.com/kubesphere/ks-installer/blob/v2.1.1/kubesphere-minimal.yaml
具体步骤如下
vi kubesphere-mini.yaml


kubectl apply -f https://github.com/kubesphere/ks-installer/releases/download/v3.1.1/kubesphere-installer.yaml

kubectl apply -f https://github.com/kubesphere/ks-installer/releases/download/v3.1.1/cluster-configuration.yaml
在这个文件中粘贴如下:
---
apiVersion: v1
kind: Namespace
metadata:
  name: kubesphere-system

---
apiVersion: v1
data:
  ks-config.yaml: |
    ---
    persistence:
      storageClass: ""
    etcd:
      monitoring: False
      endpointIps: 192.168.0.7,192.168.0.8,192.168.0.9
      port: 2379
      tlsEnable: True
    common:
      mysqlVolumeSize: 20Gi
      minioVolumeSize: 20Gi
      etcdVolumeSize: 20Gi
      openldapVolumeSize: 2Gi
      redisVolumSize: 2Gi
    metrics_server:
      enabled: False
    console:
      enableMultiLogin: True  # enable/disable multi login
      port: 30880
    monitoring:
      prometheusReplicas: 1
      prometheusMemoryRequest: 400Mi
      prometheusVolumeSize: 20Gi
      grafana:
        enabled: False
    logging:
      enabled: False
      elasticsearchMasterReplicas: 1
      elasticsearchDataReplicas: 1
      logsidecarReplicas: 2
      elasticsearchMasterVolumeSize: 4Gi
      elasticsearchDataVolumeSize: 20Gi
      logMaxAge: 7
      elkPrefix: logstash
      containersLogMountedPath: ""
      kibana:
        enabled: False
    openpitrix:
      enabled: False
    devops:
      enabled: False
      jenkinsMemoryLim: 2Gi
      jenkinsMemoryReq: 1500Mi
      jenkinsVolumeSize: 8Gi
      jenkinsJavaOpts_Xms: 512m
      jenkinsJavaOpts_Xmx: 512m
      jenkinsJavaOpts_MaxRAM: 2g
      sonarqube:
        enabled: False
        postgresqlVolumeSize: 8Gi
    servicemesh:
      enabled: False
    notification:
      enabled: False
    alerting:
      enabled: False
kind: ConfigMap
metadata:
  name: ks-installer
  namespace: kubesphere-system

---
apiVersion: v1
kind: ServiceAccount
metadata:
  name: ks-installer
  namespace: kubesphere-system

---
apiVersion: rbac.authorization.k8s.io/v1
kind: ClusterRole
metadata:
  creationTimestamp: null
  name: ks-installer
rules:
- apiGroups:
  - ""
  resources:
  - '*'
  verbs:
  - '*'
- apiGroups:
  - apps
  resources:
  - '*'
  verbs:
  - '*'
- apiGroups:
  - extensions
  resources:
  - '*'
  verbs:
  - '*'
- apiGroups:
  - batch
  resources:
  - '*'
  verbs:
  - '*'
- apiGroups:
  - rbac.authorization.k8s.io
  resources:
  - '*'
  verbs:
  - '*'
- apiGroups:
  - apiregistration.k8s.io
  resources:
  - '*'
  verbs:
  - '*'
- apiGroups:
  - apiextensions.k8s.io
  resources:
  - '*'
  verbs:
  - '*'
- apiGroups:
  - tenant.kubesphere.io
  resources:
  - '*'
  verbs:
  - '*'
- apiGroups:
  - certificates.k8s.io
  resources:
  - '*'
  verbs:
  - '*'
- apiGroups:
  - devops.kubesphere.io
  resources:
  - '*'
  verbs:
  - '*'
- apiGroups:
  - monitoring.coreos.com
  resources:
  - '*'
  verbs:
  - '*'
- apiGroups:
  - logging.kubesphere.io
  resources:
  - '*'
  verbs:
  - '*'
- apiGroups:
  - jaegertracing.io
  resources:
  - '*'
  verbs:
  - '*'
- apiGroups:
  - storage.k8s.io
  resources:
  - '*'
  verbs:
  - '*'
- apiGroups:
  - admissionregistration.k8s.io
  resources:
  - '*'
  verbs:
  - '*'

---
kind: ClusterRoleBinding
apiVersion: rbac.authorization.k8s.io/v1
metadata:
  name: ks-installer
subjects:
- kind: ServiceAccount
  name: ks-installer
  namespace: kubesphere-system
roleRef:
  kind: ClusterRole
  name: ks-installer
  apiGroup: rbac.authorization.k8s.io

---
apiVersion: apps/v1
kind: Deployment
metadata:
  name: ks-installer
  namespace: kubesphere-system
  labels:
    app: ks-install
spec:
  replicas: 1
  selector:
    matchLabels:
      app: ks-install
  template:
    metadata:
      labels:
        app: ks-install
    spec:
      serviceAccountName: ks-installer
      containers:
      - name: installer
        image: kubesphere/ks-installer:v2.1.1
        imagePullPolicy: "Always"
应用这个kubesphere-mini.yaml 文件
kubectl apply -f kubesphere-mini.yaml
查看pods
kubectl get pods --all-namespaces

这个安装器就是负责给我们安装所有的东西
验证与访问
- 查看滚动刷新的安装日志,请耐心等待安装成功。
kubectl logs -n kubesphere-system $(kubectl get pod -n kubesphere-system -l app=ks-install -o jsonpath='{.items[0].metadata.name}') -f
查看安装日志,请耐心等待安装成功。
kubectllogs-nkubesphere-system$(kubectlgetpod-nkubesphere-system-lapp=ks-install -o jsonpath='{.items[0].metadata.name}') -f
也参考的如下文章
https://blog.51cto.com/u_12826294/5059643
kubectl logs -n kubesphere-system redis-77f4bf4455-ltcmv
redis-6fd6c6d6f9-x7z45

kubectl describe pods -n kubesphere-system redis-77f4bf4455-ltcmv

kubectl describe pods -n kubesphere-system redis-6fd6c6d6f9-x7z45

kubectl get pods -n kubesphere-system
不知为何多执行了一遍如下命令就能访问进去控制台页面了
kubectl apply -f https://github.com/kubesphere/ks-installer/releases/download/v3.1.1/cluster-configuration.yaml
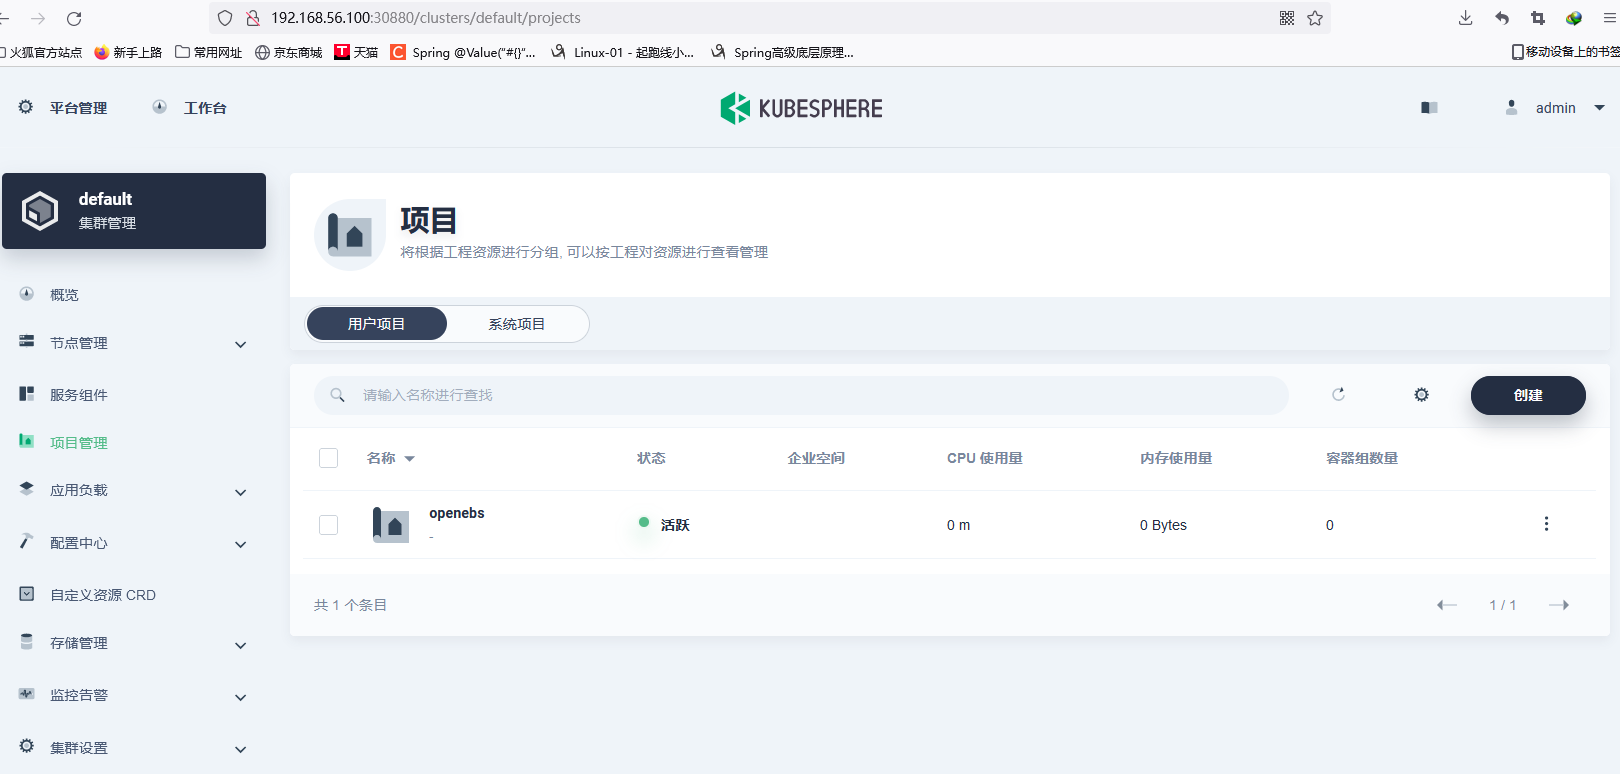
v3.1.1/cluster-configuration.yaml
https://github.com/kubesphere/ks-installer/releases/download/v3.1.1/cluster-configuration.yaml
其他参考文章
重点参考:
(92条消息) 在Kubernetes上最小化安装KubeSphere_xiaomu_a的博客-CSDN博客_kubesphere 最小化安装
Kubernetes系列之二:Kubernetes + KubeSphere 3.x部署 - 简书 (jianshu.com)
kubernetes安装KubeSphere 2.1.1,redis-psv等启动不了
https://blog.csdn.net/qq_37286668/article/details/115894231
解决Kubernetes集群没有启动成功1
https://blog.csdn.net/erhaiou2008/article/details/103779997?utm_medium=distribute.pc_relevant.none-task-blog-2defaultbaidujs_title~default-0-103779997-blog-115894231.pc_relevant_antiscanv2&spm=1001.2101.3001.4242.1&utm_relevant_index=3
手把手教程:Kubeadm 安装 k8s 后安装 kubesphere 2.1.1
https://kubesphere.com.cn/forum/d/1272-kubeadm-k8s-kubesphere-2-1-1
kubespherev2.1.1-离线安装 - 苍茫宇宙 - 博客园 (cnblogs.com)
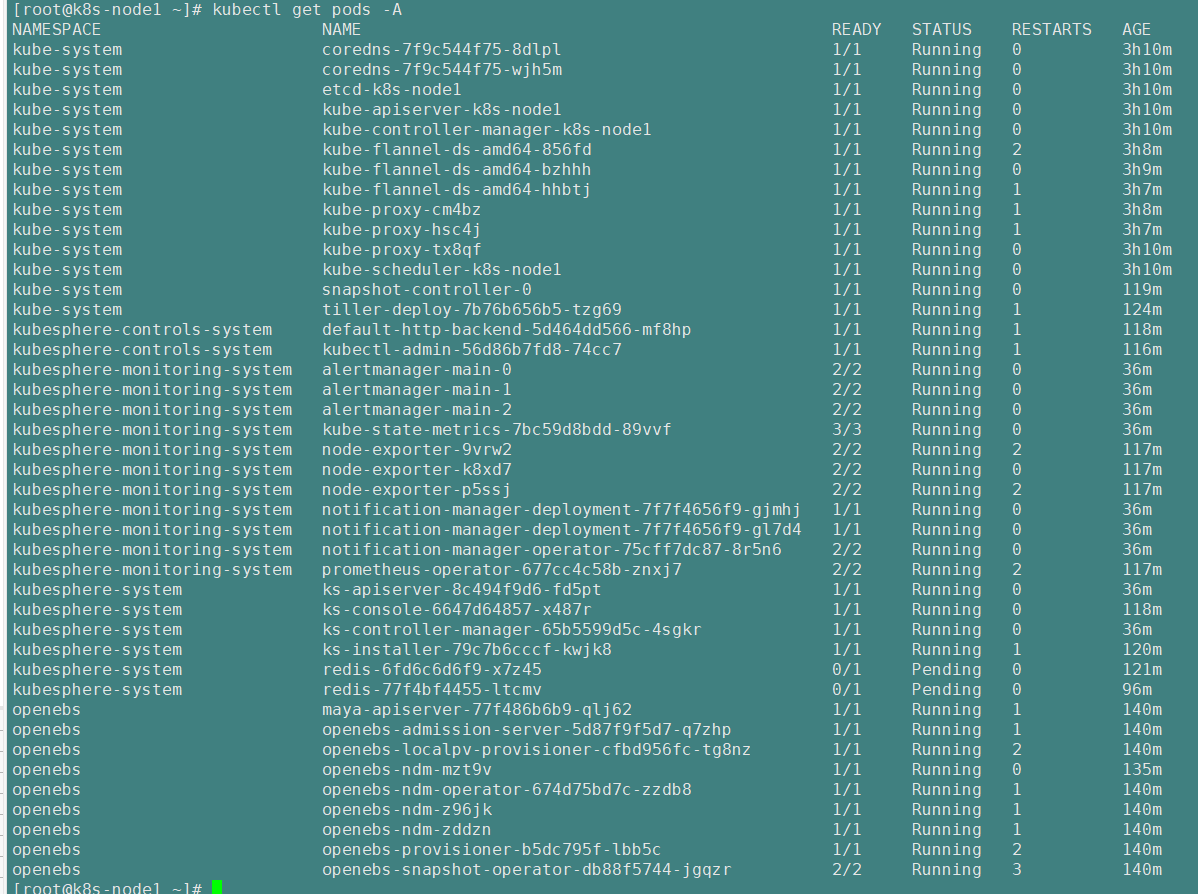
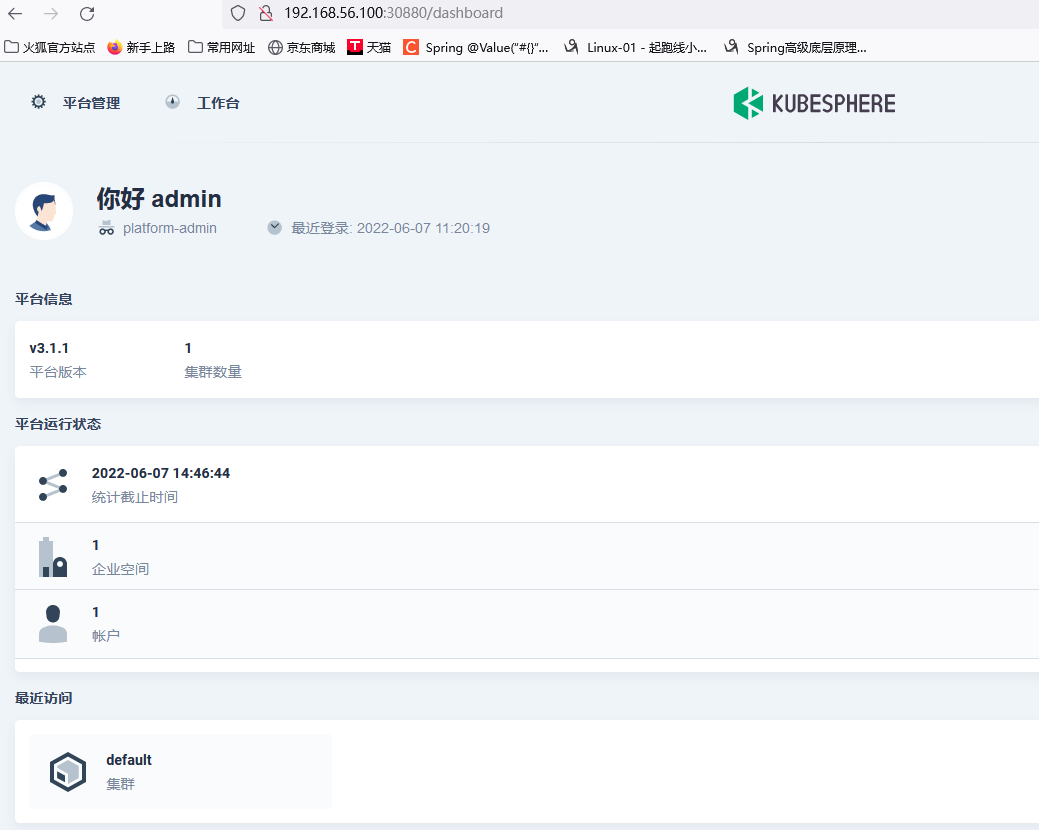
可以登录了--备份
P351、kubesphere-安装-最小化安装完成.avi==》最小化安装完成,可以登录了,赶紧备份下
各种报错,折腾许久许久。。。
4)、完整化安装
调大内存和cpu核心数
因为主节点只是调度使用,占用不高,所以暂时不用动
而应用都是部署在node2、node3节点的,所以调到12G内存 和 6核CPU

打开devops
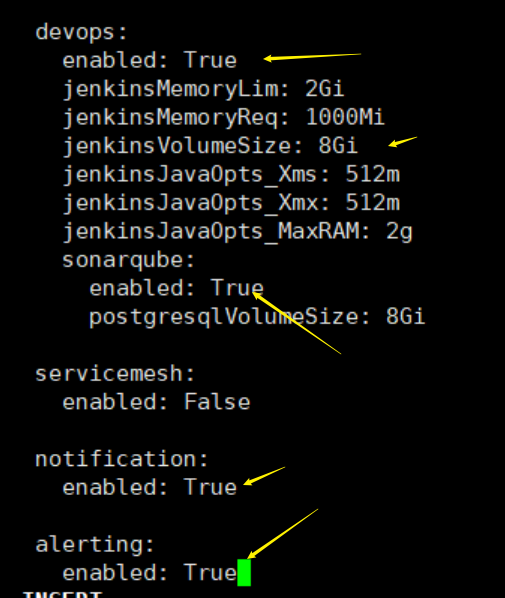
1、一条命令
kubectl apply -f
https://raw.githubusercontent.com/kubesphere/ks-installer/master/kubesphere-complete-s
etup.yaml
可以去我们的文件里面获取,上传到虚拟机,
参照 https://github.com/kubesphere/ks-installer/tree/master 修改部分配置
2、查看进度
kubectl logs -n kubesphere-system $(kubectl get pod -n kubesphere-system -l
app=ks-install -o jsonpath='{.items[0].metadata.name}') -f
3、解决问题重启 installer
kubectl delete pod ks-installer-75b8d89dff-f7r2g -n kubesphere-system
4、metrics-server 部署
p353、kubesphere-进阶-建立多租户系统
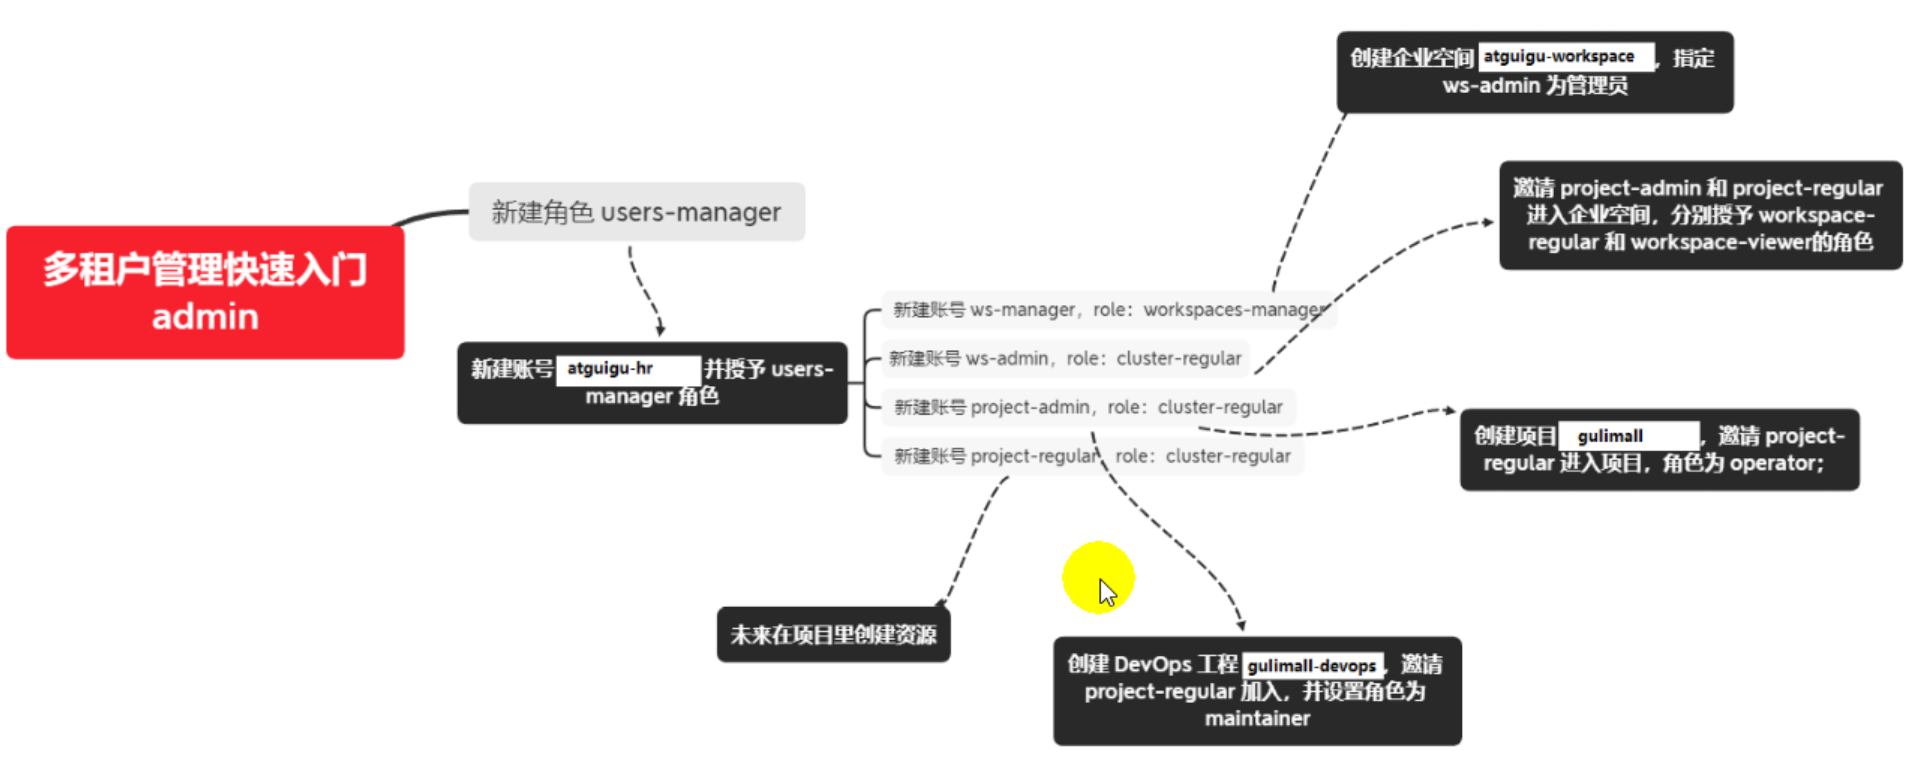
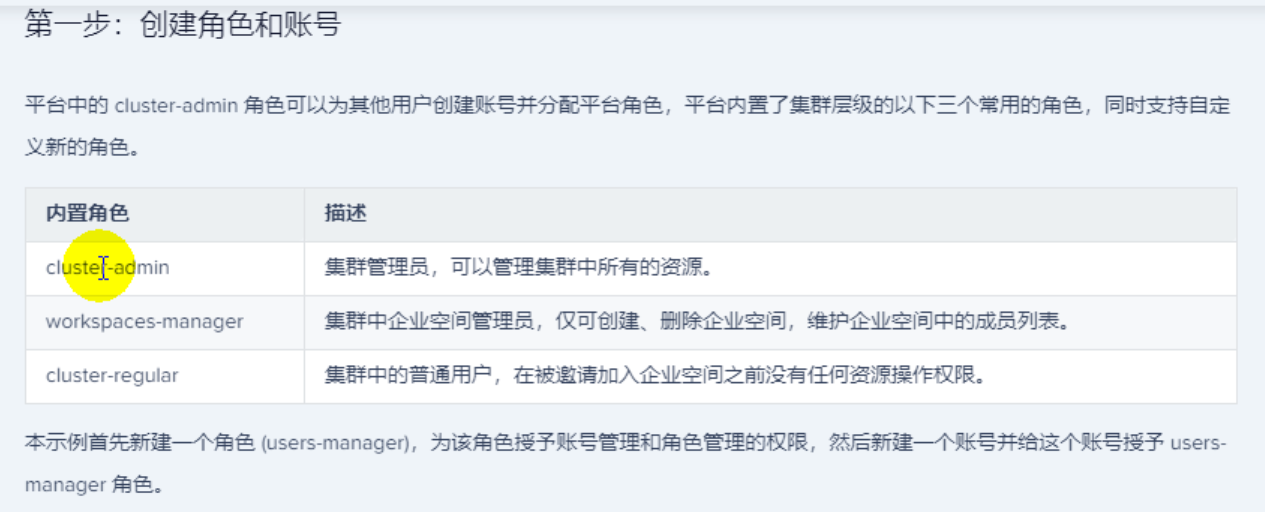
创建用户 : atguigu-hr
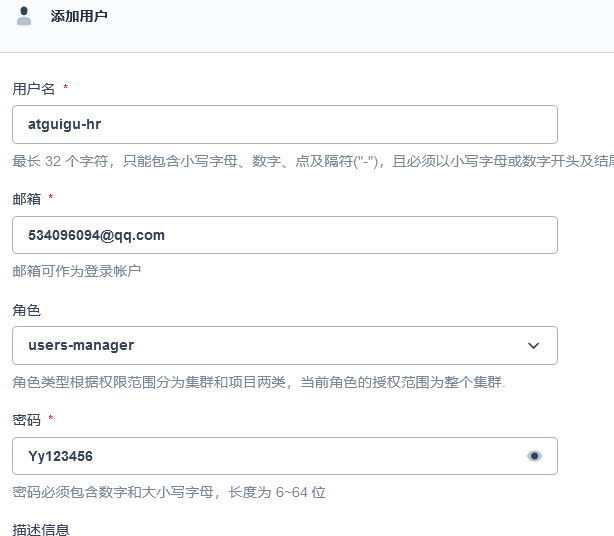
创建用户 : ws-manager1
工作空间管理员
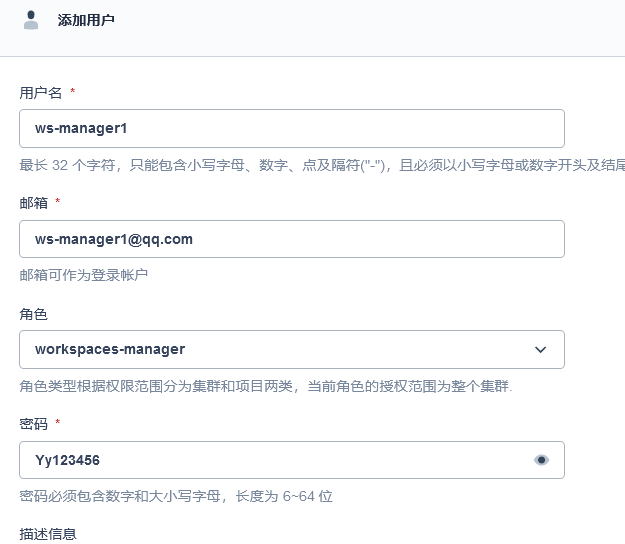
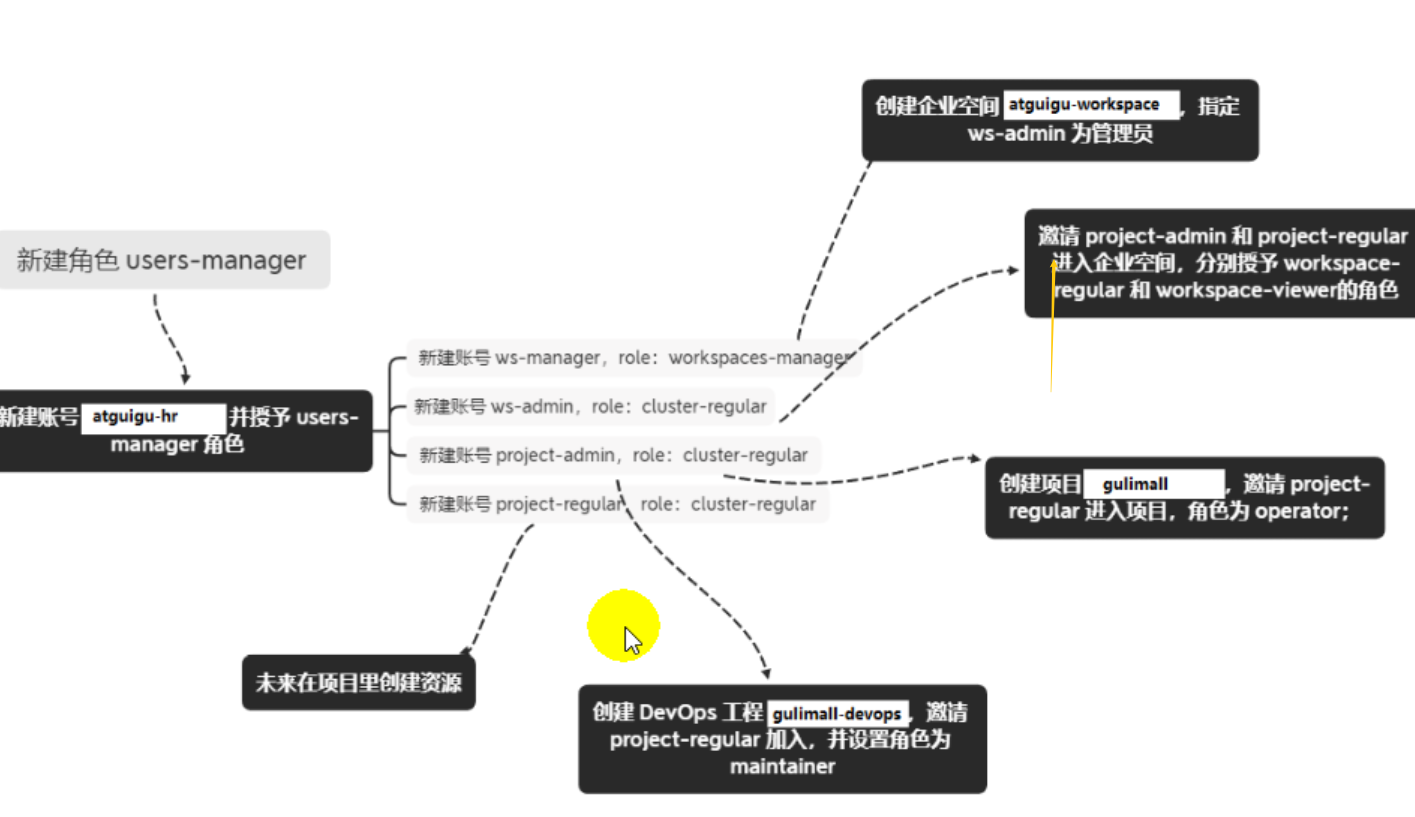
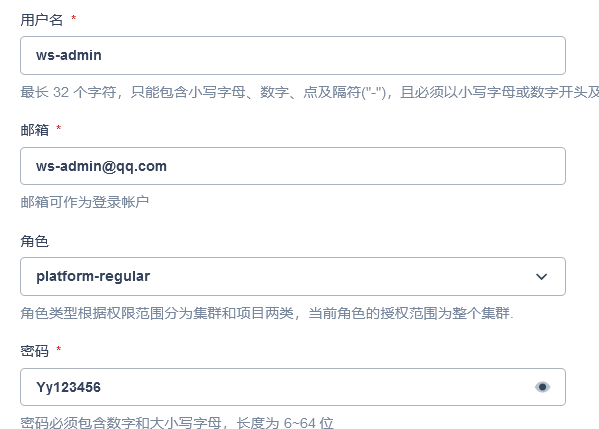
创建用户 : ws-admin
普通用户:我们目前把他定义为某个项目的开发组长的功能
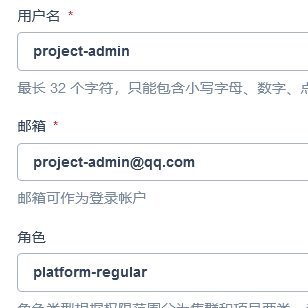
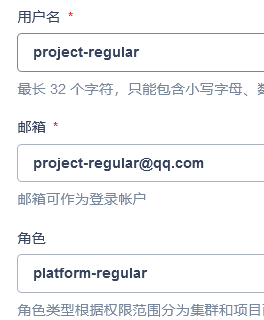
创建用户 :project-admin
创建用户 :project-regular
一一一一一一一一一一一一
四、K8S 细节
1、kubectl
1)、kubectl 文档
https://kubernetes.io/zh/docs/reference/kubectl/overview/
2)、资源类型
https://kubernetes.io/zh/docs/reference/kubectl/overview/#资源类型
3)、格式化输出
https://kubernetes.io/zh/docs/reference/kubectl/overview/#格式化输出
4)、常用操作
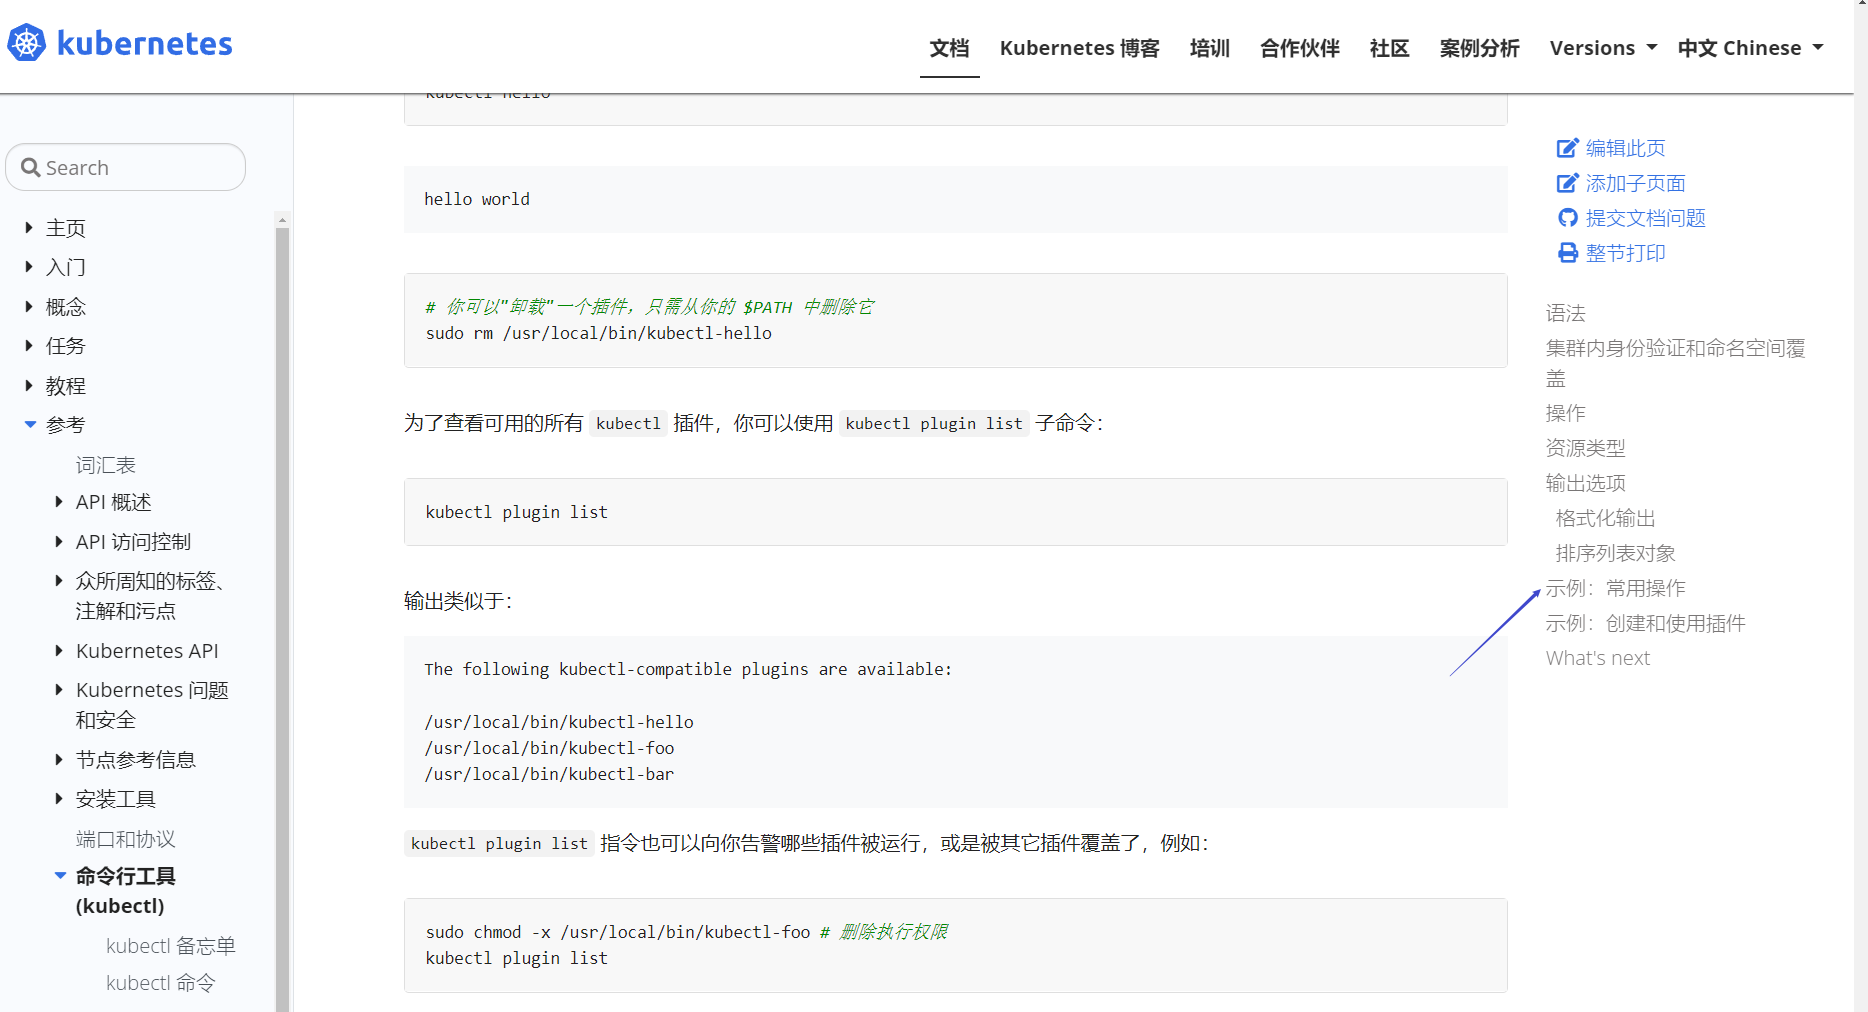
https://kubernetes.io/zh/docs/reference/kubectl/overview/#示例-常用操作
5)、命令参考
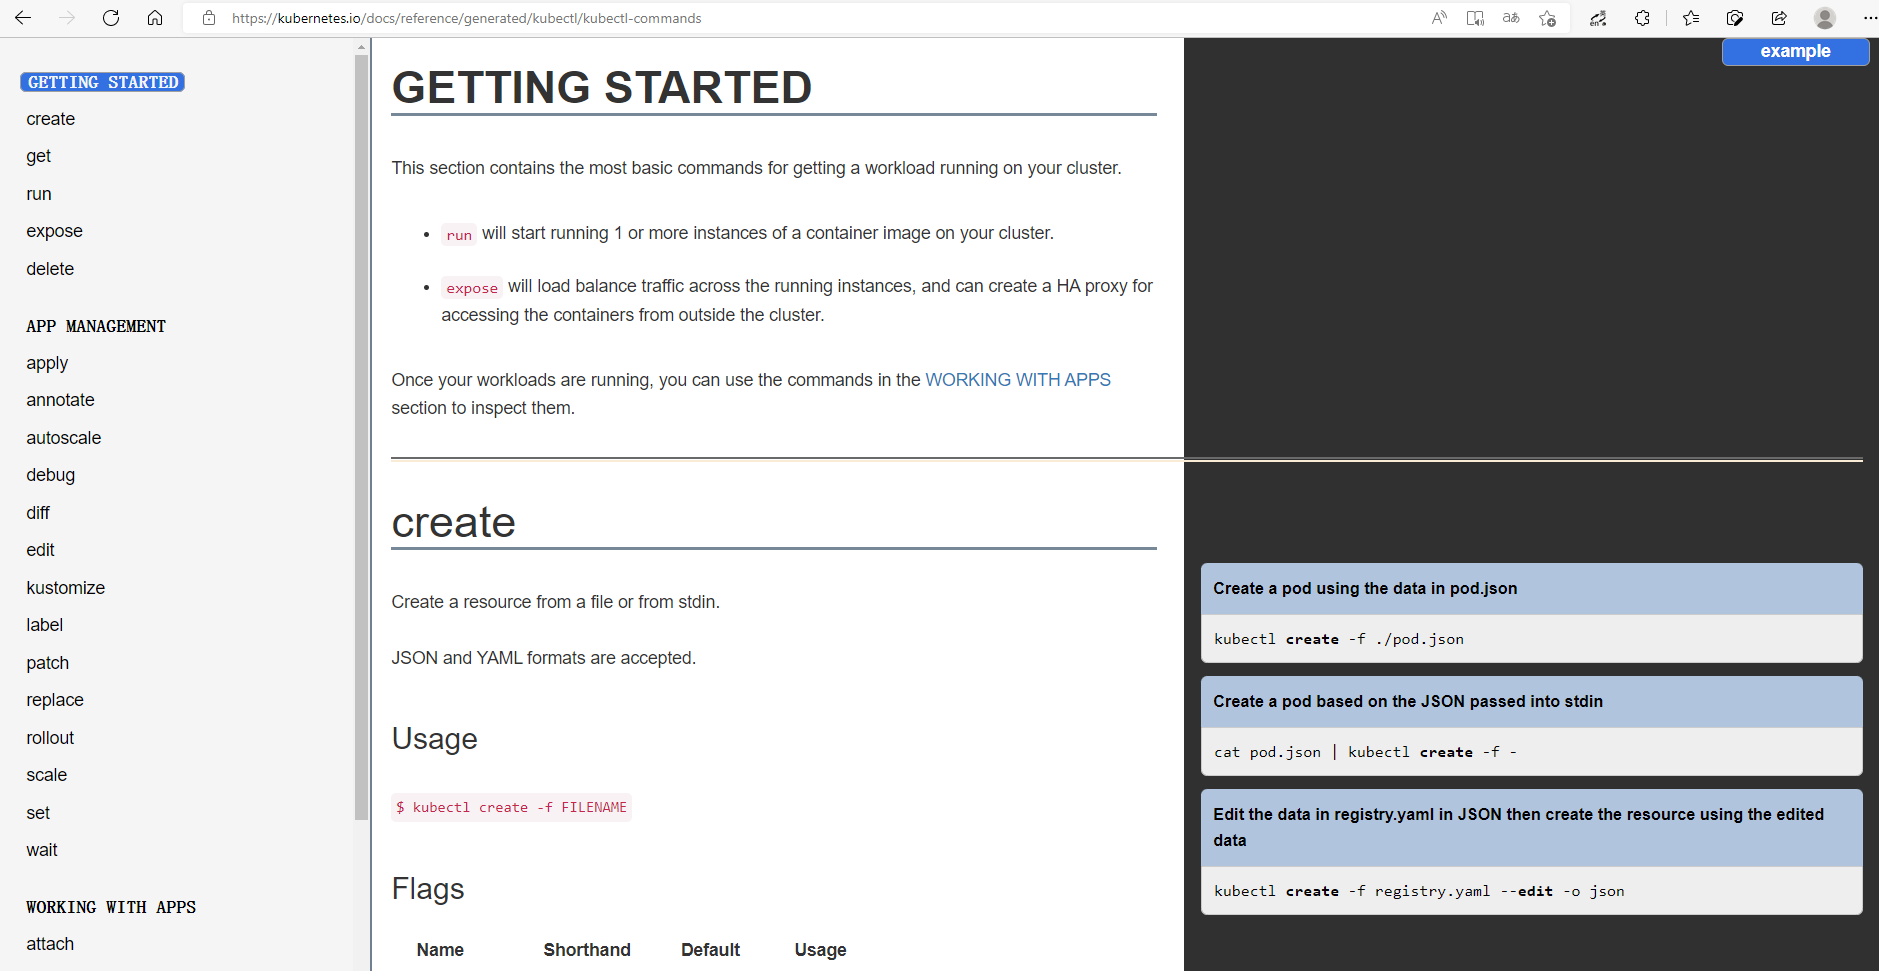
https://kubernetes.io/docs/reference/generated/kubectl/kubectl-commands
2、yaml 语法
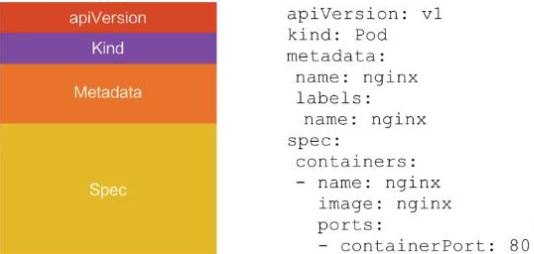
2.1)、yml 模板
2.2)、yaml 字段解析
参照官方文档
视频讲解示例截图
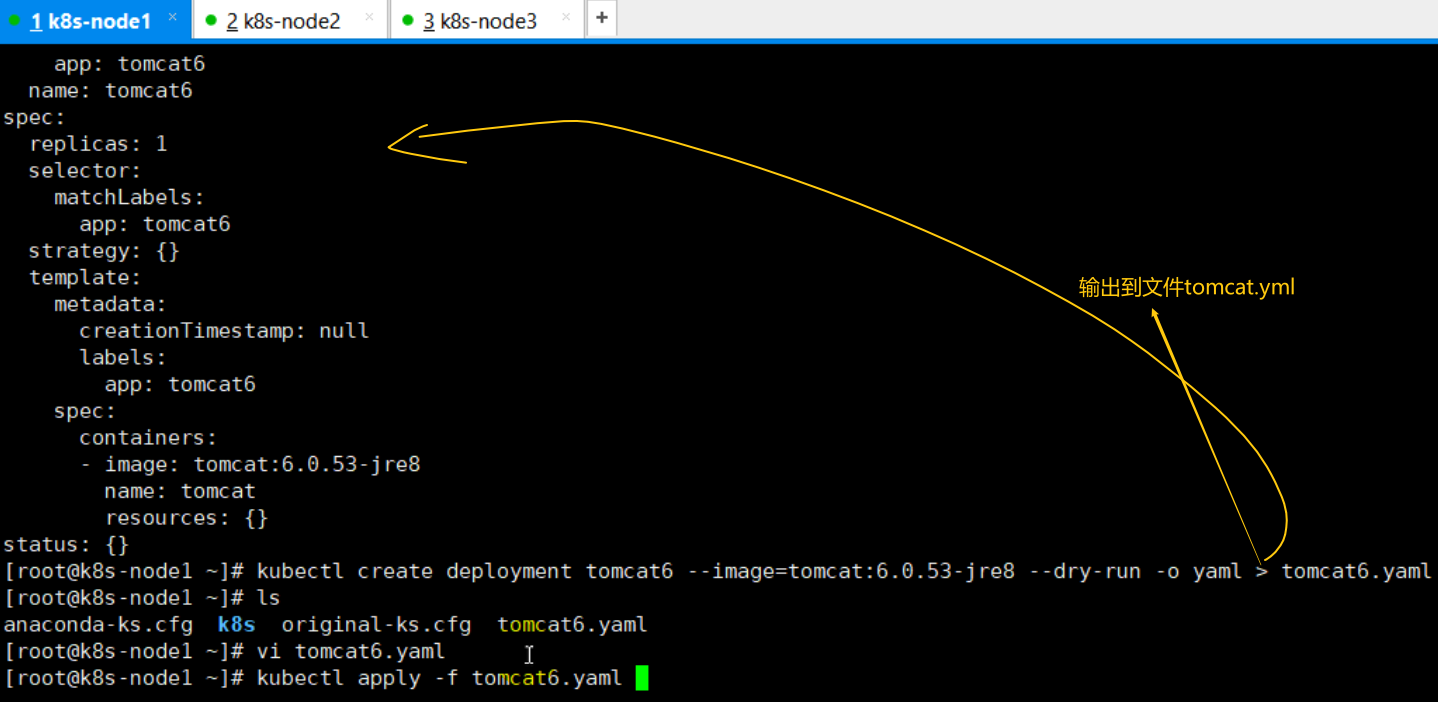
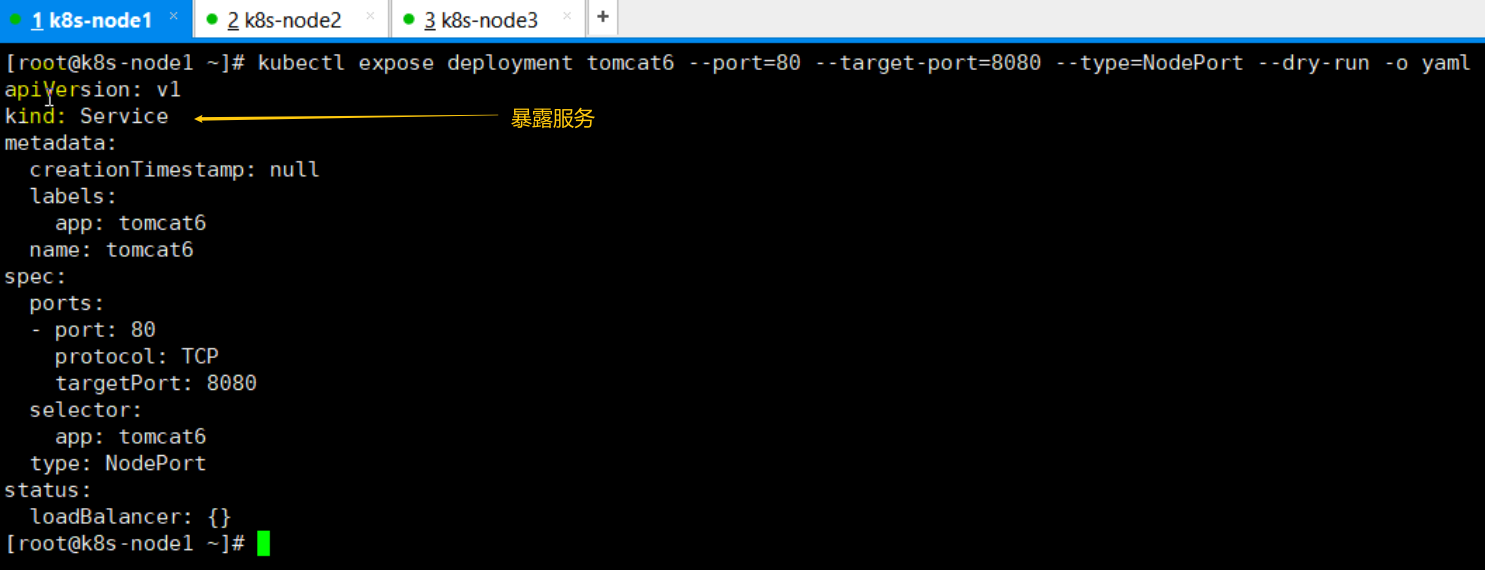
上面那一节 :” 2.9.2)、暴露 nginx “ 访问 也可以使用如下图中yml文件,其功能是和下面的命令是一模一样的
kubectl expose deployment tomcat6 --port=80 --target-port=8080 --type=NodePort
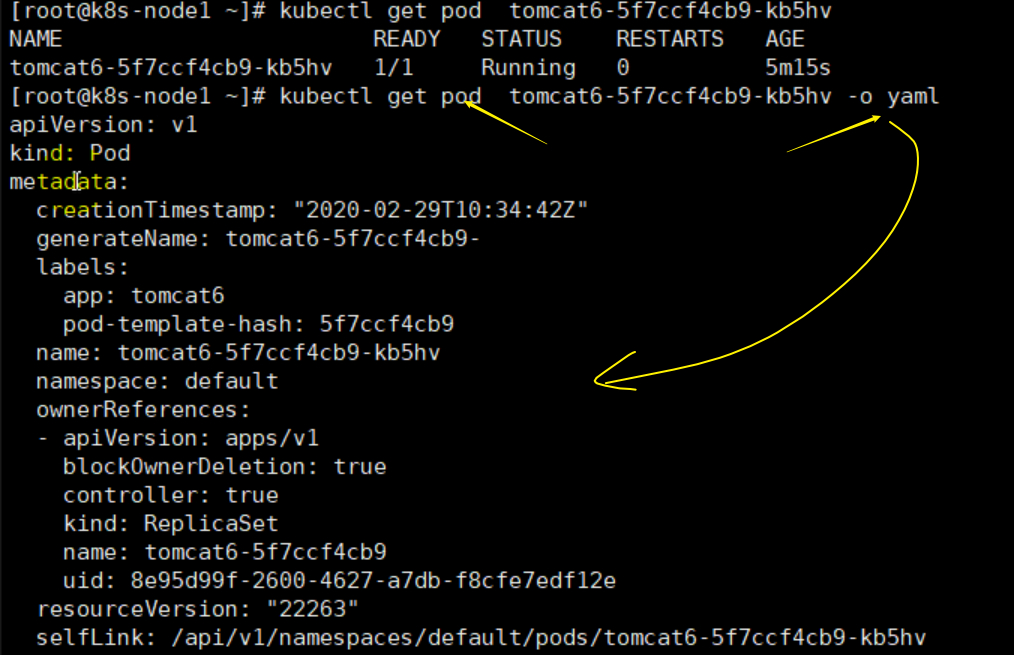
获取pod的定义信息yml
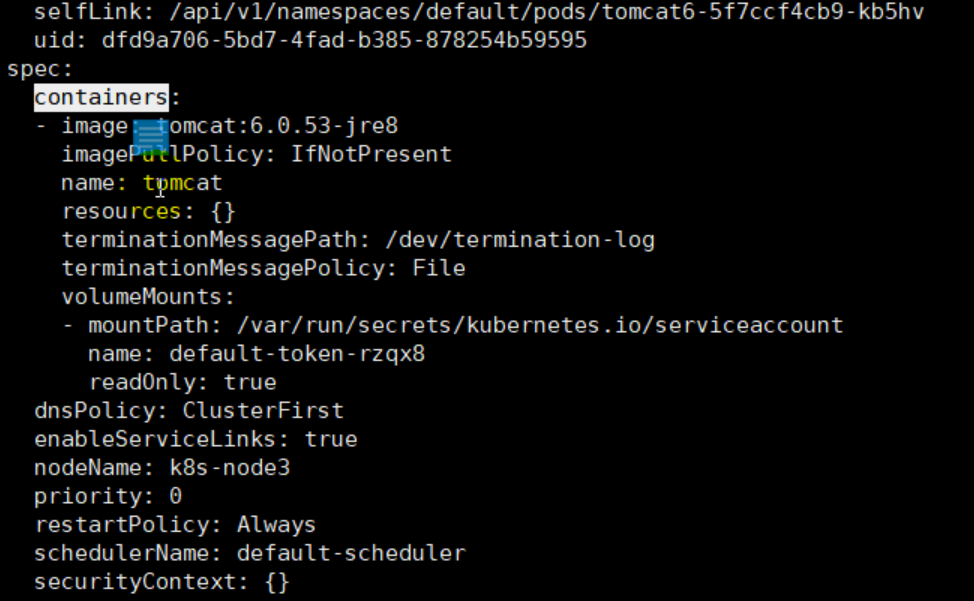
创建一个pod
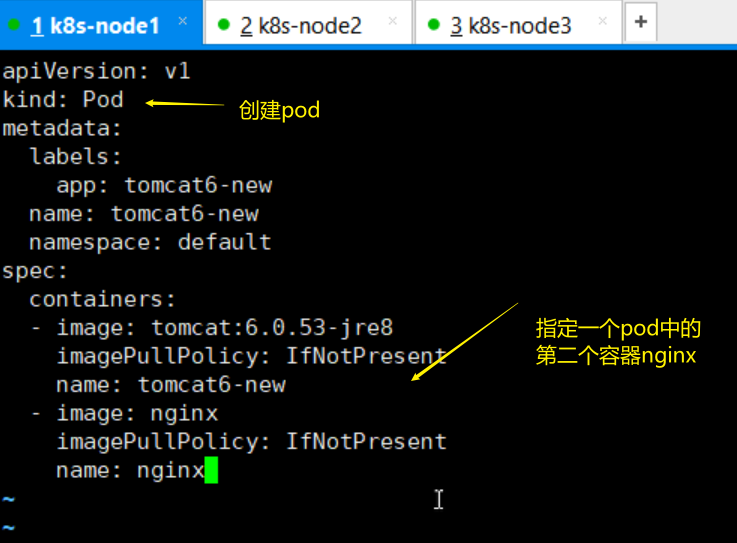
执行上面创建好的yaml

可以看到这个pod中有两个容器
接下来我们继续理解一下其他的核心概念
3、入门操作(p348)
3.1)、Pod 是什么,Controller 是什么
https://kubernetes.io/zh/docs/concepts/workloads/pods/#pods-and-controllers
Pod 和控制器
控制器可以为您创建和管理多个 Pod,管理副本和上线,并在集群范围内提供自修复能力。
例如,如果一个节点失败,控制器可以在不同的节点上调度一样的替身来自动替换 Pod。
包含一个或多个 Pod 的控制器一些示例包括:
Deployment
StatefulSet
DaemonSet
Deployment 地址
控制器通常使用您提供的 Pod 模板来创建它所负责的 Pod
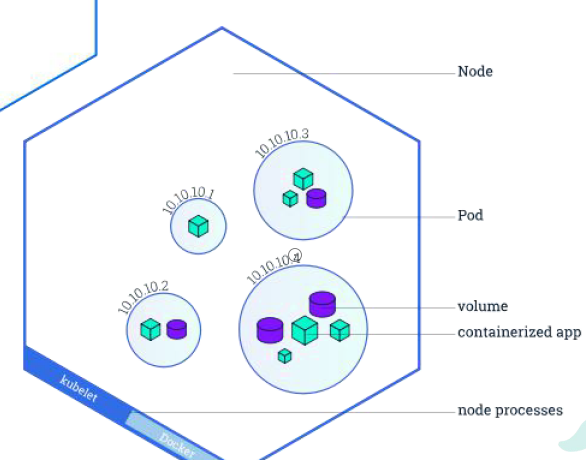
3.2)、Deployment&Service 是什么
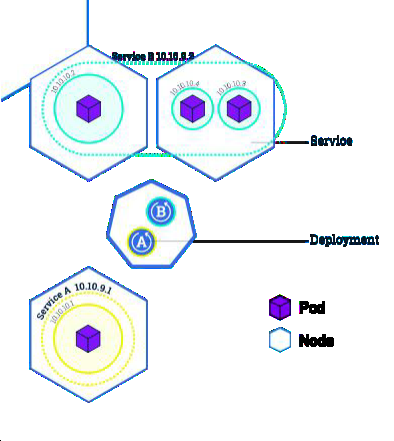
3.3)、Service 的意义
1、部署一个 nginx
kubectl create deployment nginx --image=nginx
2、暴露 nginx 访问
kubectl expose deployment nginx --port=80 --type=NodePort
service意义
统一应用访问入口;
Service 管理一组 Pod。
防止 Pod 失联(服务发现)、定义一组 Pod 的访问策略
现在 Service 我们使用 NodePort 的方式暴露,这样访问每个节点的端口,都可以访问到这个 Pod,如果节点宕机,就会出现问题。
3.4)、labels and selectors
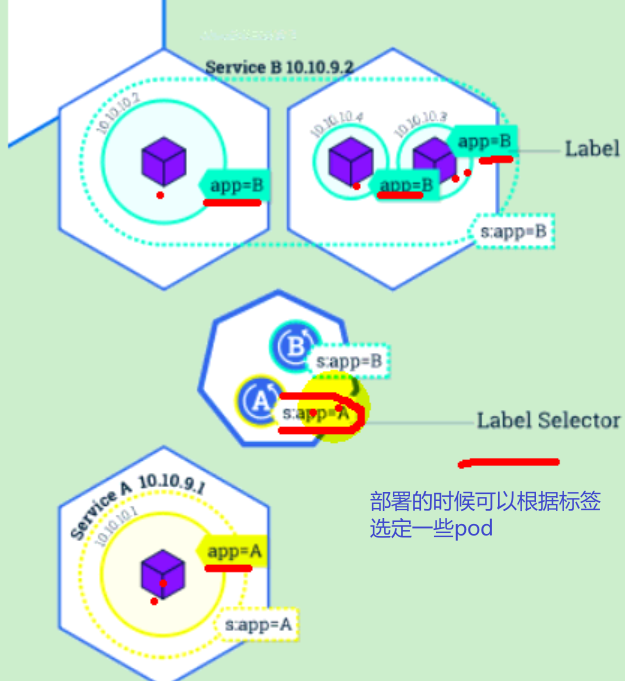
部署的时候可以根据标签选定一些pod进行部署
myps: 类似于前端的id、class等标签 然后可以使用选择器进行分组选择,
总之就是对pod进行 一下标记,或者类似于rockemq的tag,就是打个标签 进行分组
接下来我们进行一次完整的应用部署
在往下进行之前先删除以前的所有部署
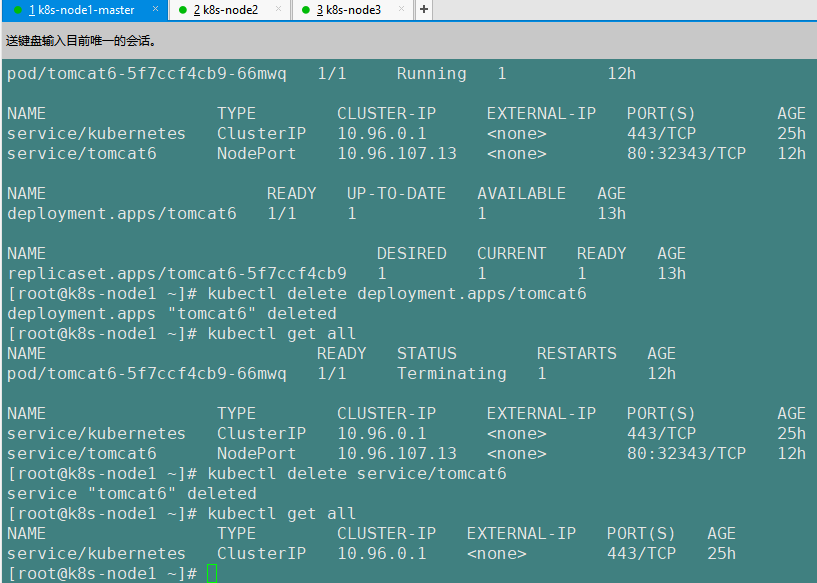
以前我们部署都是用命令行,这次我们使用yaml文件来部署
我们可以将两个yaml(一个部署tomcat、一个暴露service,两端yaml内容中间用“---”分开即可)合成一个yaml,执行如下图
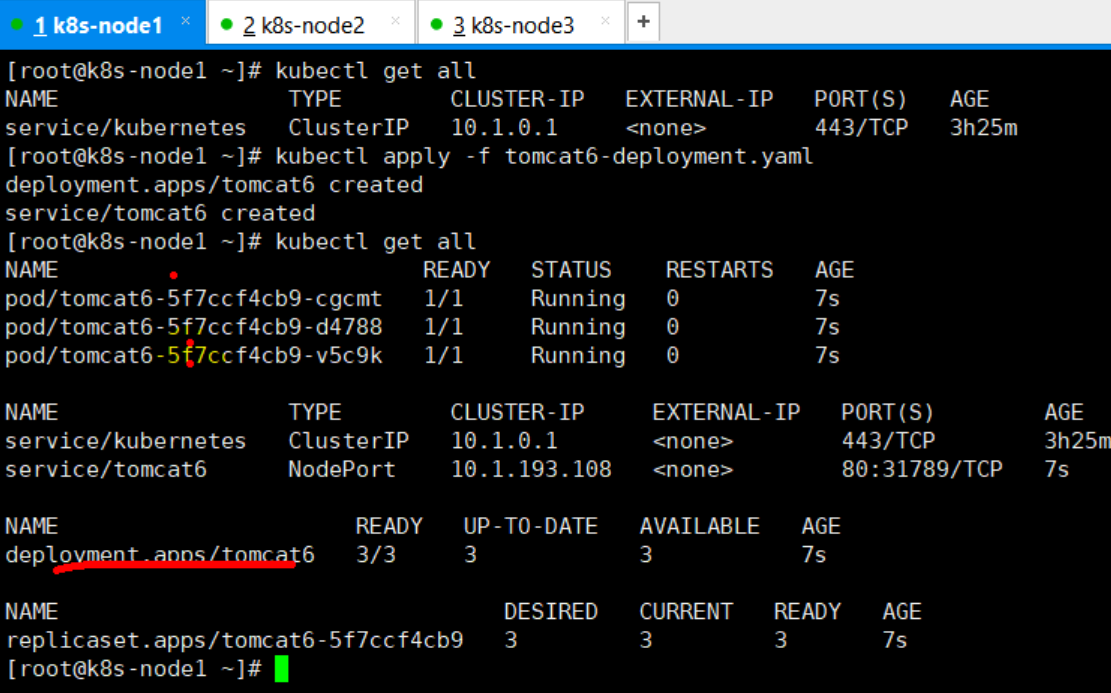
等待部署状态完成即可用浏览器访问
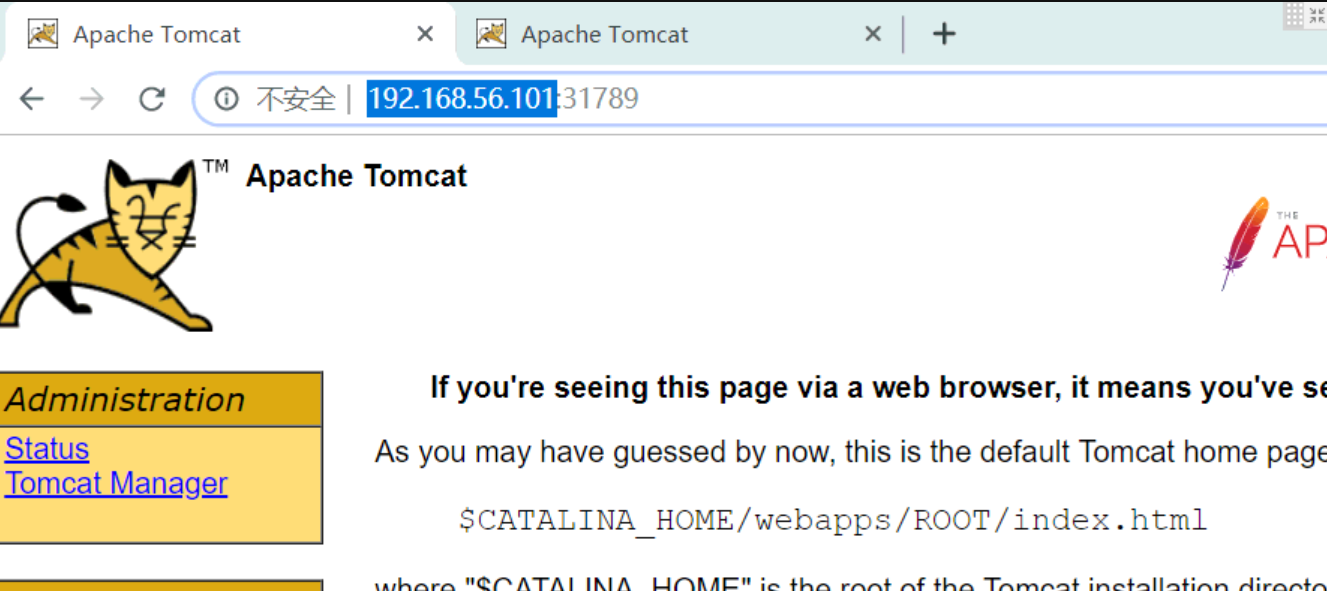
但是现在都是用ip来访问的,我们想用域名来访问,且还想域名能负载均衡到所有服务,这样就需要3.5)节的Ingress
3.5)、Ingress
官方文档 : Ingress | Kubernetes
通过 Service 发现 Pod 进行关联。基于域名访问。
通过 Ingress Controller 实现 Pod 负载均衡
支持 TCP/UDP 4 层负载均衡和 HTTP 7 层负载均衡
其实Ingress底层是用的nginx做的
可以实现类似于nginx的 将访问域名负载均衡到service
k8s文件夹里面有个ingress-controller.yaml文件,可以执行看下,也可以执行视频中写的ingress-demo.yml文件
,如下
apiVersion: apps/v1
kind: Ingress
metadata:
  name: web
spec:
  rules:
  - host: tomcat6.atguigu.com
    http:
      paths:
        - backend:
          serviceName: web
          servicePort: 80
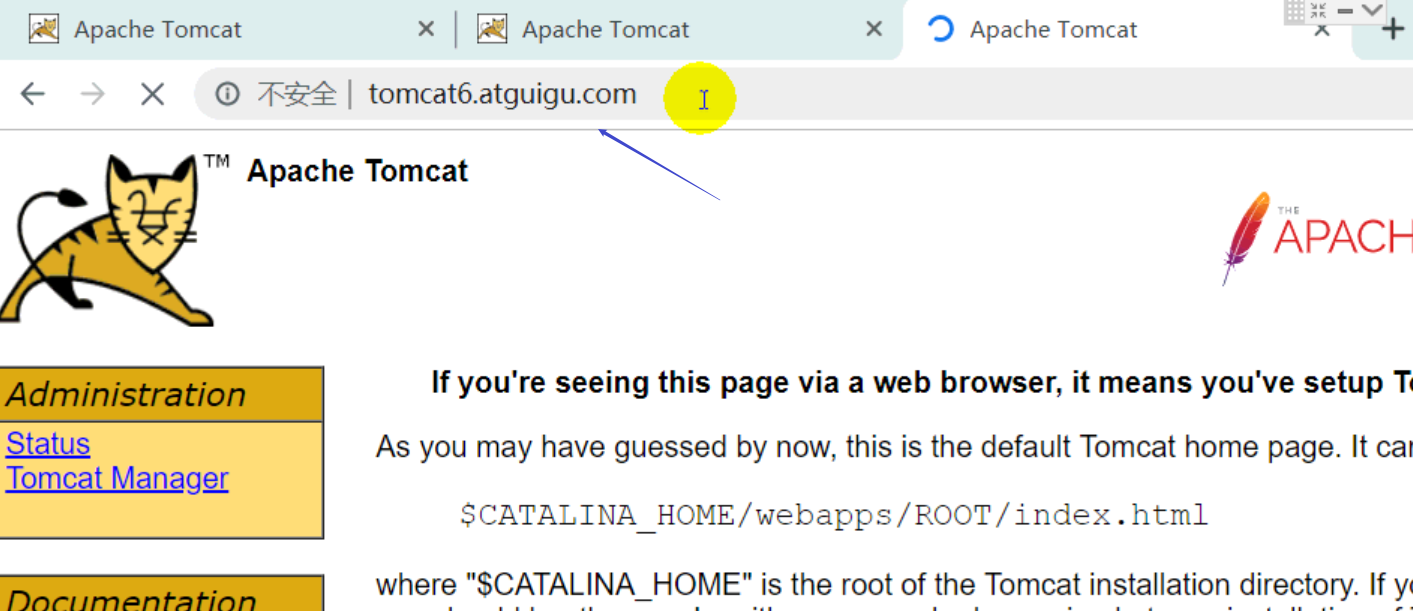
部署完成之后,即可通过域名进行访问,且如果某个node节点宕机了,也是能照样访问的
