

Django 补充知识
Django基于配置文件的编程思想
现在有一个需求是什么呢?
需要我们在调用一个接口就能够实现发送QQ消息、微信消息、邮件消息。
初步实现
notify.py:
# coding=utf-8
# File  : notify.py
# Author: Jack秦
# Date  : 2019/12/5

def send_email(content):
    print('邮件通知:%s'%content)

def send_msg(content):
    print('短信通知:%s'%content)

def send_wechat(content):
    print('微信通知:%s'%content)
start.py:
# coding=utf-8
# File  : start.py
# Author: Jack秦
# Date  : 2019/12/5

from notify import *

def send_all(content):
    send_msg(content)
    send_email(content)
    send_wechat(content)

if __name__ == '__main__':
    send_all('后天就放假了')
以后我们如果需要新增加一个功能或者去掉某个功能我们需要去功能文件中注释掉,并且还要在start启动脚本中注释,过程比较繁琐
这样确实也能实现需求,还不是特别完美,接下来介绍一种更牛逼的。
大佬实现
目录结构:
- notify/
__init__.py - notify/
email.py - notify/
msg.py - notify/
wechat.py - setting.py
- start.py
start.py:
from notify import *

send_all('后天放假')
-------------------------------------------------------------------------
setting.py:
# 定义配置:文件夹.功能模块.功能类
NOTIFY_LIST = [
    'notify.email.Email',
    'notify.msg.Msg',
    'notify.wechat.WeChat',
]
-------------------------------------------------------------------------
notify/wechat.py:
class WeChat(object):
    def __init__(self):
        # 发送微信消息前需要的前期准备
        pass

    # 利用面向对象鸭子类型特性
    def send(self,content):
        print('微信通知:%s'%content)

notify/msg.py:
class Msg(object):
    def __init__(self):
        # 发送短信消息前需要的前期准备
        pass

    # 利用面向对象鸭子类型特性
    def send(self,content):
        print('短信通知:%s'%content)


notify/email.py:
class Email(object):
    def __init__(self):
        # 发送邮件消息前需要的前期准备
        pass

    # 利用面向对象鸭子类型特性
    def send(self,content):
        print('邮件通知:%s'%content)

-------------------------------------------------------------------------
notify/__init__.py:
# 最关键的一步就在这个文件中:
import setting
import importlib

def send_all(content):
    # 对setting配置中的每个路径for循环,
    for path in setting.NOTIFY_LIST:
        # for循环出来的就是每一个 'notify.xxx.xxx' ('notify.email.Email',)
        # 对这个字符串进行切分,效果:'notify.xxx','xxx' (notify.email,Email)
        module_path,cls_name = path.rsplit('.',maxsplit=1)

        # import_module 相当于做了一件事情:对这个字符串进行切分并导入
        # from notify import email,得到一个模块对象
        md = importlib.import_module(module_path)

        # 利用反射获取类的对象
        cls = getattr(md,cls_name)

        # 类实例化并调用每个类中的send方法。
        obj = cls()
        obj.send(content)
跨站请求伪造csrf
什么是csrf?
跨站请求伪造
就是一个钓鱼网站,界面操作和真是的页面一模一样,当用户操作转账功能的时候,转账数据也会发送到真实的后台,但是其中用户输入的信息中对端账户可能会被修改掉,导致用户确实转账了,但是钱却转给了别人。
如何区分钓鱼网站和正经网站?在正经网站返回页面的时候,在form表单中偷偷塞一个特殊的字符串,后端记下该页面对应的字符串的值,等用户发post请求来的时候,我先去校验特殊的字符串是否匹配
如何去写这个特殊的字符串呢?模版语法有一个固定的写法{% csrf_token %},必须写在form表单内
浏览器查看改标签的值,并且每次都在刷新。再来演示刚刚转账的示例
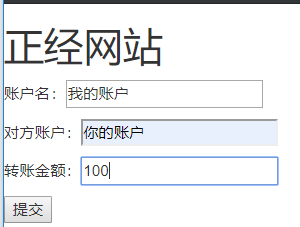
# 正常网站:

# Create your views here.
def transfer(request):
    if request.method=='POST':
        username=request.POST.get('username')
        to_username=request.POST.get('to_username')
        monery=request.POST.get('monery')
        print(username,to_username,monery)
    return render(request,'transfer.html')
<body>
<h1>正经网站</h1>
<form action="" method="post">
    <p>账户名:<input type="text" name="username"></p>
    <p>对方账户:<input type="text" name="to_username"></p>
    <p>转账金额:<input type="text" name="monery"></p>
    <input type="submit">
</form>
</body>
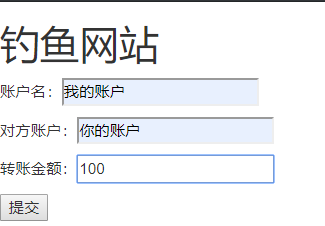
# 不正常网站
    #views:
def transfer(request):
    return render(request,'transfer.html')
<body>
<h1>钓鱼网站</h1>
<form action="http://127.0.0.1:8000/transfer/" method="post">
    <p>账户名:<input type="text" name="username"></p>
    <p>对方账户:<input type="text"></p>
    <p>转账金额:<input type="text" name=monery></p>
    <input type="text" name="to_username" value="yzn" style="display: none" >  # 定义一个隐藏标签
    <input type="submit">
</form>
</body>
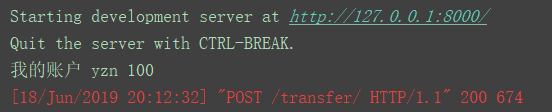
实现效果:
在正常网站前端输入信息正常打印:

在不正常的网站前端输入信息:
在正常网站后端查看打印信息:
前端如何解决
怎么解决出现这样的钓鱼网站避免后台接收到虚假网站的数据直接处理出现了csrf
可以在前端设置一个csrf_token
<form action="" method="post">
    {% csrf_token %}
    <p>账户名:<input type="text" name="username"></p>
    <p>对方账户:<input type="text" name="to_username"></p>
    <p>转账金额:<input type="text" name="monery"></p>
    <input type="submit">
</form>
查看前端页面会随机产生一个token值,页面刷新就会差生新的token值

ajax解决
能够发送post请求的方式还以ajax。
那么ajax如何解决该问题呢?
方式一:在页面上书写{% csrf_token %},然后再发送ajax请求的时候,通过标签来查找获取到随机字符串添加到发送的自定义对象data中
data:{'username':'jason','csrfmiddlewaretoken':$('input[name="csrfmiddlewaretoken"]').val()},
方式二:
在方式一的基础上,更换获取随机字符串的方式
data:{'username':'jason','csrfmiddlewaretoken':'{{ csrf_token }}'},
方式三:查看官网提供的js文件,最通用的一种方式,
自己写一个getCookie方法:
然后在需要发送ajax请求前引入js文件:
<script src="/static/setup.js"></script>
function getCookie(name) {
    var cookieValue = null;
    if (document.cookie && document.cookie !== '') {
        var cookies = document.cookie.split(';');
        for (var i = 0; i < cookies.length; i++) {
            var cookie = jQuery.trim(cookies[i]);
            // Does this cookie string begin with the name we want?
            if (cookie.substring(0, name.length + 1) === (name + '=')) {
                cookieValue = decodeURIComponent(cookie.substring(name.length + 1));
                break;
            }
        }
    }
    return cookieValue;
}
var csrftoken = getCookie('csrftoken');

function csrfSafeMethod(method) {
  // these HTTP methods do not require CSRF protection
  return (/^(GET|HEAD|OPTIONS|TRACE)$/.test(method));
}

$.ajaxSetup({
  beforeSend: function (xhr, settings) {
    if (!csrfSafeMethod(settings.type) && !this.crossDomain) {
      xhr.setRequestHeader("X-CSRFToken", csrftoken);
    }
  }
});
csrf相关的装饰器
- csrf_exempt:不校验csrf随机字符串
- csrf_protect:校验csrf随机字符串
FBV方式装饰器
from django.views.decorators.csrf import csrf_exempt,csrf_protect
@csrf_exempt # 不校验 csrf
def index(request):
    return HttpResponse('index')
from django.views.decorators.csrf import csrf_exempt,csrf_protect
@csrf_protect # 校验 csrf
def index(request):
    return HttpResponse('index')
CVB方式装饰器
# csrf_exempt这个装饰器只能给dispatch装才能生效
@method_decorator(csrf_exempt,name='dispatch')  # csrf_exempt
class MyIndex(views.View):
    def dispatch(self, request, *args, **kwargs):
        return super().dispatch(request,*args,**kwargs)
    def get(self,request):
        return render(request,'transfer.html')
    def post(self,request):
        return HttpResponse('OK')
# csrf_protect方式全都可以  跟你普通的装饰器装饰CBV一致
# @method_decorator(csrf_protect,name='post')  # 可以
class MyIndex(views.View):
    @method_decorator(csrf_protect)
    def dispatch(self, request, *args, **kwargs):
        return super().dispatch(request,*args,**kwargs)
    def get(self,request):
        return render(request,'transfer.html')
    # @method_decorator(csrf_protect)  # 可以
    def post(self,request):
        return HttpResponse('OK')
Django settings源码剖析
在django中使用配置文件:

# 建议从conf中导入配置文件 而非直接导入该项目的配置文件
from django.conf import settings
conf中的配置文件涵盖django的所有配置参数,项目的配置文件是给用户进行配置的。
导入conf中的settings,在使用相关配置参数时会先去用户配置的settings中进行查找,
找不到再去conf中的setting找,详情见如下源码分析:
# 生成LazyObject一个对象  初始化属性self._wrapped = empty
settings = LazySettings()

# 当settings使用点号查找属性时 会响应到LazySettings类的__getattr__方法(点号拦截)
def __getattr__(self, name):
     """
     Return the value of a setting and cache it in self.__dict__.
     """
     if self._wrapped is empty:
         self._setup(name)
     val = getattr(self._wrapped, name)
     self.__dict__[name] = val
     return val
#调用_setup(self, name=要查找的属性) 方法 将要查找的属性传入
    def _setup(self, name=None):
        """
        Load the settings module pointed to by the environment variable. This
        is used the first time we need any settings at all, if the user has not
        previously configured the settings manually.
        """
        # 从环境变量中将用户配置的settings文件取出来
        settings_module = os.environ.get(ENVIRONMENT_VARIABLE)
        if not settings_module:
            desc = ("setting %s" % name) if name else "settings"
            raise ImproperlyConfigured(
                "Requested %s, but settings are not configured. "
                "You must either define the environment variable %s "
                "or call settings.configure() before accessing settings."
                % (desc, ENVIRONMENT_VARIABLE))

        #实例化Setting类,将用户的配置传入
        self._wrapped = Settings(settings_module)

#Setting的__init__方法
    def __init__(self, settings_module):
        # update this dict from global settings (but only for ALL_CAPS settings)
        # global_settings就是django conf文件中的配置文件  dir()方法生成一个列表,其中的参数时该配置文件的所有变量名
        for setting in dir(global_settings):
            if setting.isupper():
                # 使用setattr为对象设值
                setattr(self, setting, getattr(global_settings, setting))

        # store the settings module in case someone later cares
        self.SETTINGS_MODULE = settings_module
        # import_module方法 拿到用户配置settings.py这个文件
        mod = importlib.import_module(self.SETTINGS_MODULE)

        tuple_settings = (
            "INSTALLED_APPS",
            "TEMPLATE_DIRS",
            "LOCALE_PATHS",
        )
        self._explicit_settings = set()
        # 循环用户配置文件 如果和conf中配置文件的key相同那么就会覆盖原先设值的值。for循环完成,setting对象设值完成,里面包含用户的配置参数和conf中的配置参数
        for setting in dir(mod):
            if setting.isupper():
                setting_value = getattr(mod, setting)

                if (setting in tuple_settings and
                        not isinstance(setting_value, (list, tuple))):
                    raise ImproperlyConfigured("The %s setting must be a list or a tuple. " % setting)
                setattr(self, setting, setting_value)
                self._explicit_settings.add(setting)
基于Django settings源码实现在自己项目使用配置文件
目录:
conf/settings.py:
NAME = '我是用户自定义的配置'
lib/conf/__init__.py:
# coding=utf-8
# File  : __init__.py
# Author: Jack秦
# Date  : 2019/12/5

import importlib
import os
from lib.conf import global_settings

class Settings(object):
    def __init__(self):
        for name in dir(global_settings):
            if name.isupper():
                setattr(self,name,getattr(global_settings,name))
            module_path = os.environ.get('login')
            md = importlib.import_module(module_path)
            for name in dir(md):
                if name.isupper():
                    k = name
                    v = getattr(md,name)
                    setattr(self,k,v)

settings = Settings()
lib/conf/__init__.py:
NAME = '我是默认全局的配置'
start.py
import os
import sys

BASE_DIR = os.path.dirname(__file__)
sys.path.append(BASE_DIR)

if __name__ == '__main__':
    os.environ.setdefault('login','conf.settings')
    from lib.conf import settings
    print(settings.NAME)
