Spring 5(三):AOP小结
概述
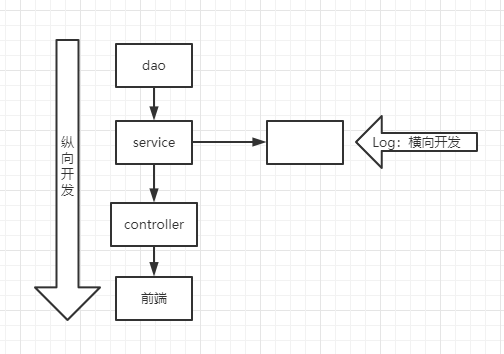
AOP:面向切面编程(方面),通过预编译方式和运行期动态代理实现程序功能的统一维护的一种技术
作用:利用AOP可以对业务逻辑的各个部分进行隔离,从而使业务逻辑各部分之间的耦合度降低
实质:在不修改源代码的情况下,在主干功能里添加新功能
例如:在登录功能里面添加一个权限判断功能

底层原理:使用 动态代理
AOP过程:
- 创建容器对象的时候,根据切入点表达式拦截的类,生成代理对象
- 如果目标对象有实现接口,使用JDK代理;如果没有接口,则使用CGLIB代理
- 从容器获取代理后的对象,在运行期植入“切面”类的方法
如果目标类没有实现接口,且class为final修饰的,则不能进行Spring AOP编程!
应用
使用Spring AOP,我们可以做到:
- Spring声明式事务管理配置
- Controller层的参数校验
- 使用Spring AOP实现MySQL数据库读写分离案例分析
- 在执行方法前,判断是否具有权限
- 对部分函数的调用进行日志记录。监控部分重要函数,若抛出指定的异常,可以以短信或邮件方式通知相关人员
- 信息过滤,页面转发等等功能
术语
-
横切关注点:跨越应用程序多个模块的方法或功能。即,与我们业务逻辑无关的,但我们需要关注的部分,如日志、安全、缓存、事务等等
-
目标:被通知的对象
-
连接点:类中可以增强的方法即为连接点
-
切入点:实际被增强的方法
-
通知(增强):实际增强的逻辑部分
例如:在登录里面加一个权限判断,这个权限判断就是通知
- 通知的类型:
- 前置通知
- 后置通知
- 环绕通知
- 异常通知
- 最终通知(类似于finally)
-
切面:把通知应用到切入点的过程,是一个动作
AOP操作
在Spring中,AOP操作是基于 AspectJ 实现的
AspectJ 不是Spring的组成部分,是一个独立的AOP框架,一般把AspectJ和Spring框架一起使用,进行AOP操作
有两种实现形式:
- xml配置文件
- 注解
准备工作
导入maven依赖
<dependency>
    <groupId>org.springframework</groupId>
    <artifactId>spring-aspects</artifactId>
    <version>5.2.14.RELEASE</version>
</dependency>
<dependency>
    <groupId>org.aspectj</groupId>
    <artifactId>aspectjweaver</artifactId>
    <version>1.9.5</version>
</dependency>
切入点表达式
作用:使程序知道对哪个类里面的哪个方法进行增强
语法结构:
execution([权限修饰符][返回类型][类全路径][方法名称]([参数列表]) )
举例:
- 对BookDao类中的add方法增强
execution(* com.yue.dao.BookDao.add(..))
- 对BookDao类中所有方法增强
execution(* com.yue.dao.BookDao.*(..))
- 对dao包中所有类,类中所有方法增强
execution(* com.yue.dao.*.*(..))
注解实现AOP
注解支持默认使用 JDK动态代理,可以在配置文件中设置
<aop:aspectj-autoproxy proxy-target-class="false"/>
- false:JDK
- true:cglib
入门
- 创建实体类 User
@Component
public class User {
    public void add() {
        System.out.println("add....");
    }
}
- 创建增强类 UserProxy,编写增强逻辑,在类上面,添加注解 @Aspect 标注为切面
@Aspect
@Component
public class UserProxy {
    //前置通知
    @Before(value = "execution(* com.yue.aop.User.add(..))")
    public void before() {
        System.out.println("before...");
    }
}
- 编写配置文件,开启注解扫描,引入context空间、aop空间名称
<?xml version="1.0" encoding="UTF-8"?>
<beans xmlns="http://www.springframework.org/schema/beans"
       xmlns:xsi="http://www.w3.org/2001/XMLSchema-instance"
       xmlns:p="http://www.springframework.org/schema/p"
       xmlns:util="http://www.springframework.org/schema/util"

       xmlns:context="http://www.springframework.org/schema/context"
       xmlns:aop="http://www.springframework.org/schema/aop"
       xsi:schemaLocation="http://www.springframework.org/schema/beans http://www.springframework.org/schema/beans/spring-beans.xsd
                           http://www.springframework.org/schema/util http://www.springframework.org/schema/util/spring-util.xsd
                           http://www.springframework.org/schema/context http://www.springframework.org/schema/context/spring-context.xsd
                           http://www.springframework.org/schema/aop http://www.springframework.org/schema/aop/spring-aop.xsd">

    <!--开启注解支持-->
    <aop:aspectj-autoproxy />
    <context:component-scan base-package="com.yue" />
</beans>
- 测试
@Test
public void testAop() {
    ApplicationContext context =
        new ClassPathXmlApplicationContext("beans.xml");
    User user = context.getBean("user", User.class);
    user.add();
}
环绕通知使用注解 @Around,该通知在方法之前、之后都通知
@Around(value = "execution(* com.yue.aop.User.add(..))")
public void around(ProceedingJoinPoint proceedingJoinPoint) throws Throwable {
    System.out.println("环绕之前....");

    //被增强的方法执行
    proceedingJoinPoint.proceed();

    System.out.println("环绕之后....");
}
最终通知:@After,在方法执行之后通知,不管有没有异常都会通知
异常通知:@AfterThrowing
后置通知(返回通知):@AfterReturning,在方法返回结果之后执行,如果有异常,不会通知
相同切入点抽取
使用注解 @Poingcut 做抽取
使用的时候,直接加方法名称即可
@Pointcut(value = "execution(* com.yue.aop.User.add(..))")
public void point() {
}

@Before(value = "point()")
public void before() {
    System.out.println("before......");
}
增强类的优先级
如果现在一个被增强类有多个增强类对同一个方法进行增强,可以设置增强类的优先级
另一个增强类:
@Component
@Aspect
@Order(1)
public class PersonProxy {

    @Before(value = "execution(* com.yue.aop.User.add(..))")
    public void before() {
        System.out.println("Person Before......");
    }

}
做法:在增强类上面添加注解 @Order(数字类型值) ,数字类型值越小,优先级越高
完全注解开发
创建一个配置类:ConfigAop
@Configuration
@ComponentScan(basePackages = {"com.yue"})
@EnableAspectJAutoProxy(proxyTargetClass = true)
public class ConfigAop {
}
自定义类实现AOP
创建两个类:增强类和被增强类
被增强类 Book
public class Book {
    public void buy() {
        System.out.println("buy.......");
    }
}
增强类 BookProxy
public class BookProxy {
    public void before() {
        System.out.println("before.....");
    }
}
在spring配置文件中创建两个类对象
<!--创建两个类的对象-->
<bean id="book" class="com.yue.pojo.Book" />
<bean id="bookProxy" class="com.yue.pojo.BookProxy" />
在spring配置文件中配置切入点
<aop:config>
    <!--配置切入点-->
    <aop:pointcut id="pointcut" expression="execution(* com.yue.pojo.Book.buy(..))"/>

    <!--配置切面-->
    <aop:aspect ref="bookProxy">
        <aop:before method="before" pointcut-ref="pointcut" />
    </aop:aspect>
</aop:config>
测试
@Test
public void testAop2() {
    ApplicationContext context =
        new ClassPathXmlApplicationContext("beans.xml");
    Book book = context.getBean("book", Book.class);
    book.buy();
}
Spring的API接口实现AOP
编写业务逻辑
UserService
public interface UserService {
    void add();
    void delete();
    void update();
    void select();
}
UserServiceImpl
public class UserServiceImpl implements UserService {
    @Override
    public void add() {
        System.out.println("add....");
    }

    @Override
    public void delete() {
        System.out.println("delete....");
    }

    @Override
    public void update() {
        System.out.println("update....");
    }

    @Override
    public void select() {
        System.out.println("select....");
    }
}
现在要实现添加日志功能, 实现以下前置通知
编写日志类 Log 继承 MethodBeforeAdvice
public class Log implements MethodBeforeAdvice {
    /**
         * @param method 要执行的目标对象的方法
         * @param objects 参数
         * @param o 目标对象
         * @throws Throwable
         */
    @Override
    public void before(Method method, Object[] objects, Object o) throws Throwable {
        System.out.println(o.getClass().getName() + "的" + method.getName() + "被执行了");
    }
}
在Spring配置文件中配置bean以及aop
<bean id="userService" class="com.yue.service.UserServiceImpl" />
<bean id="log" class="com.yue.log.Log" />
<bean id="afterLog" class="com.yue.log.AfterLog" />

<!--配置aop-->
<aop:config>
    <!--切入点:execution表达式-->
    <aop:pointcut id="pointcut" expression="execution(* com.yue.service.UserServiceImpl.*(..))"/>

    <!--执行环绕增强-->
    <aop:advisor advice-ref="log" pointcut-ref="pointcut" />
    <aop:advisor advice-ref="afterLog" pointcut-ref="pointcut" />

</aop:config>
测试
public static void main(String[] args) {
    ApplicationContext context = new ClassPathXmlApplicationContext("beans.xml");
    UserServiceImpl userService = context.getBean("userService", UserServiceImpl.class);
    userService.add();
}

