


Vue — Vue3.0快速掌握
一.使用create-vue创建项目
1.环境条件
node版本在16.0以上
2.创建vue3.0应用
npm init vue@latest //创建
npm install //下载依赖
3.项目目录和关键文件
1.vite.config.js :项目的配置文件 基于vite的配置
2.package.接送:项目包文件 核心依赖变成了Vue3.X和vite
3.main.js:入口文件 createAPP函数创建应用实例
4.app.vue:根组件 SFC单文件组件 script+template+style
- 变化一:script和template顺序调整
- 变化二:template不再要求唯一根元素
- 变化三:script添加setup表示支持组合式API
5.index.html:单页入口 提供id为app的挂载
二.组合式API
1.setup选项的写法和执行时机
- 写法:

<script>
export default {
  setup(){
    console.log('setup')
  },


}
</script>
- 执行时机:s
etup函数在组件实例初始化时执行,但是在beforeCreate钩子之前执行。这意味着在setup函数内部无法直接访问this,也就是说在setup阶段不依赖于组件实例。这样的设计有利于更好地组织和重用组件逻辑。
2.setup中写代码的特点
<script>
export default {
  setup(){
    console.log('setup')
    //setup
    //1.执行时机,比beforeCreate执行更早
    //2.setup里面没有this
    //3.数据和函数需要在setup函数中最后return 才能在模板中使用
    const msg = 'learning'
    const readMsg = ()=>{
      console.log(msg)
    }

    return {
      msg,readMsg
    }
  },
  beforeCreate(){
    console.log('beforeCreate')
  }

}
</script>
3.<script setup>语法糖
<script setup>

    const msg = 'learning'
    const readMsg = ()=>{
      console.log(msg)
    }


</script>
三、组合式API — reactive & ref
1.reactive
(1)作用:接受对象类型数据的参数传入biang返回一个响应式对象
(2)使用
<script setup>
    //reactive:接受对象类型数据的参数传入biang返回一个响应式对象

    import { reactive } from "vue";

    const state = reactive({
      count : 100
    })
    const setCount = () =>{
      state.count ++
    }
</script>

<template>


<div>
{{ state.count }} <button @click="setCount">+1</button>

</div>
</template>
2.ref
1.作用:接收简单类型或者独享类型数据传入并返回一个响应式对象
2.使用
<script setup>
    //ref:接收简单类型或者独享类型数据传入并返回一个响应式对象
    //原理:是在原有传入数据的基础上,外层包了一层对象,包成了复杂类型 在借助reactive实现响应式
    //script访问数据需要通过.value的方式获取 template中不需要
    import { ref } from "vue";
    const count = ref(0)
    console.log(count.value)

    const setCount = ()=>{
      count.value++
    }
</script>

<template>


<div>

  {{ count }}
  <button @click="setCount">+1</button>
</div>
</template>
四.组合式API — computed
1.导入computed
import { computed ,ref} from 'vue'
2.执行函数 在回调参数中return基于响应式数据做计算的值,用变量接收
<script setup>

import { computed ,ref} from 'vue'
//计算属性
const list = ref([1, 2, 3, 4, 5, 6]) //ref无论是任何数据都会返回一个响应式数据

const computedList = computed(()=>{

  return list.value.filter(item=>item>2)
})
const add = ()=>{
  list.value.push(888)
}
</script>
<template>

  <div>
      原数据{{ list }}
  </div>
  <div>

    计算后的数据{{ computedList }}
  </div>
  <div>

    <button @click="add">add</button>
  </div>
</template>
3.计算属性中不应该有“副作用”
比如异步请求、修改dom
4.避免直接修改计算属性的值
计算属性应该是只读的,特殊情况可以配置get set
五.组合式API — watch
1.作用:监听一个或者多个数据的变化,数据变化时执行回调函数;有两个参数:immediate(立即执行)deep(深度监听)。
2.监听单个数据
(1)导入watch函数
(2)执行watch函数传入要监听的响应式数据(ref对象)和回调函数
<script setup>

import { watch ,ref} from 'vue'

const count = ref(0)
const name = ref('张三')
const add = ()=>{
  count.value++
}
const change = ()=>{
  name.value = '李四'
}

//监听单个数据
watch(ref对象,(newValue,oldValue)=>{})
 watch(count,(newvalue,old)=>{
   console.log(newvalue,old)
 })


</script>
3.监听多个数据的变化
不管哪个数据变化都会触发回调
<script setup>

import { watch ,ref} from 'vue'

const count = ref(0)
const name = ref('张三')
const add = ()=>{
  count.value++
}
const change = ()=>{
  name.value = '李四'
}

//监听多个数据
//watch([ref1,ref2...],(newArrr,oldArr)=>{})
watch([count,name],(newArrr,old)=>{
  console.log(newArrr,old)
})


</script>
4.immediate
在监听器创建时立即出发回调,响应式数据变化之后继续执行回调
watch(count,(newvalue,old)=>{
  console.log(newvalue,old)
},{
  immediate : true
})
5.deep
watch(userInfo,(newvalue,old)=>{
  console.log(newvalue,old)
  // userInfo.value = {name : '22222',age:88888} //修改了对象的地址才能监视到
},{
  immediate : true,
  deep : true,
  //watch默认是浅层监视
  //const ref1 = ref(简单类型数据)  直接监视
  //const ref2 = ref(引用类型/复杂类型) 监视不到复杂类型数据内部的变化
})
6.精确监听对象的某个属性
watch( //固定写法
()=>userInfo.value.age,
(newVal,oldVal)=>{
  console.log(newVal,oldVal)
}
)
六、组合式API — 生命周期函数
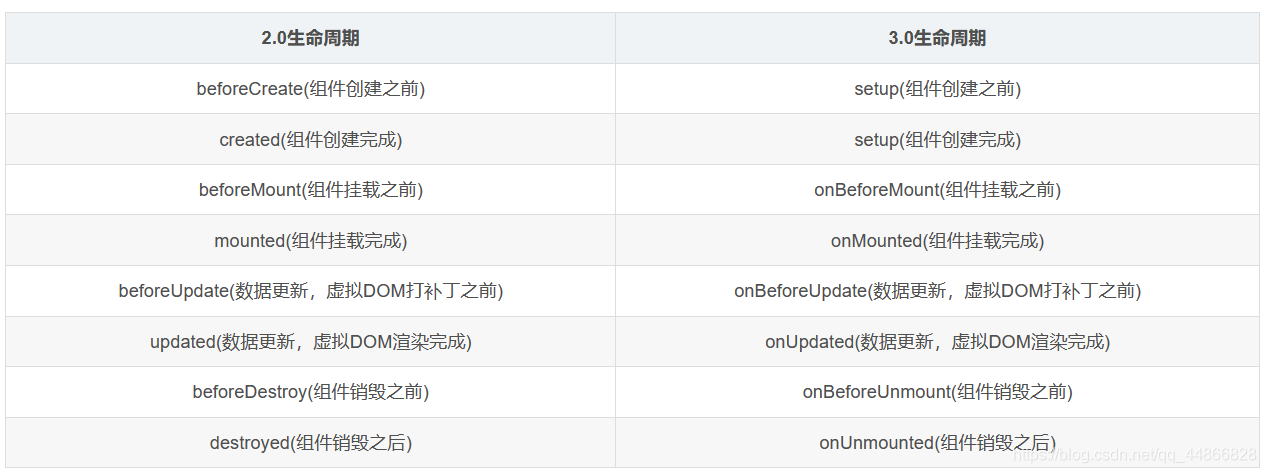
<script setup>
  import {onMounted} from 'vue'


  // beforeCreate和created 都在setup中执行
  setTimeout(() => {
    console.log('模拟发送请求')
  }, 2000);

  //如果有些代码需要再mounted中处理 ,写成函数的调用方式,可以调用多次,并按顺序执行
  onMounted(()=>{
      console.log('111111111')
  })

  onMounted(()=>{
    console.log('22222')

  })

</script>
七.组合式API— 父子通信
1.父传子
<script setup>
// 父传子
//1.给子组件添加属性的方式传值
//2.在子组件中通过prop接收
import SonCom from '@/components/SonCom.vue'
import {ref} from 'vue'

const count = ref(100)

const setCount = ()=>{
  count.value++
}

</script>
<template>
<div>
  <div>
    <h4>父组件 <button @click="setCount">+</button></h4>

  </div>
  <!-- 1.给子组件添加属性的方式传值 -->
  <SonCom msg="传递数据给子组件" :count="count"></SonCom>
</div>
</template>
<script setup>
import {defineProps} from 'vue'
//在子组件中通过prop接收
//由于写了setup,子组件无法直接配置props选项
//此处需要借助“编辑器宏”函数来接收父组件传递的数据
const props = defineProps({
    msg : String,
    count : Number
})

console.log(props)

</script>

<template>
    <div>
        <h4>子组件{{  msg}}{{ count }}</h4>
        <!-- 对于template中的数据 可以直接使用 -->
    </div>
</template>
2.子传父
<script setup>
import SonCom from '@/components/SonCom.vue'
import { ref } from 'vue'
const count = ref(100)

//子传父
//1.父组件中给子组件标签通过@绑定事件
//2.子组件内部通过emit方法触发事件
const receive = (newVal) => {
  count.value -= newVal
}
</script>
<template>
  <div>
    <!-- 1.给子组件添加属性的方式传值 -->
    <SonCom  :count="count" @sendCount="receive"></SonCom>
  </div>
</template>
<script setup>
import {defineProps,defineEmits} from 'vue'

const props = defineProps({
    count : Number
})
console.log(props)
const emit = defineEmits(['sendCount'])
const send=()=>{
    emit('sendCount',6)
}
</script>
<template>
    <div>
        <!-- 对于template中的数据 可以直接使用 -->
        <h4>子组件{{ count }}
        <button @click="send">
            send to F
        </button></h4>
    </div>
</template>
八.组合式API — 模板引用、defineExpose宏函数
通过ref标识获取真实的dom或者组件实例对象
1.调用ref生成一个ref对象
const inputRef = ref(null)
2.通过ref标识绑定ref对象到标签
<script setup>
    import GetCom from '@/components/GetCom.vue'
    import {onMounted, ref} from 'vue'
    //模板引用
    //1.调用ref函数 生成一个ref对象
    //2.通过ref标识 进行绑定
    //3.通过ref对象.value访问绑定的元素
    const inputRef = ref(null)

    onMounted(()=>{
        console.log(inputRef)
    })
    const inputFocus = ()=>{
        inputRef.value.focus()
    }


</script>
<template>
    <div>
        <input type="text" ref="inputRef">
        <button @click="inputFocus">onfocus</button>
    </div>

</template>
3.defineExpose
(1)说明:默认情况下在<script setuo>语法糖中 组件内部的属性和方法是不对外开放给父组件的,可以通过defineExpose编译宏指定可以访问的属性和方法
(2)使用:
<script setup>
    import GetCom from '@/components/GetCom.vue'
    import {onMounted, ref} from 'vue'

    const comRef = ref(null)
    const GetComDom = ()=>{
        console.log(comRef)
        comRef.value.logNum()
    }
</script>
<template>
    <div>
        <GetCom ref="comRef"></GetCom>
        <button @click="GetComDom">GetCom</button>
    </div>
</template>
<script setup>
    const num = 999

    const logNum = ()=>{
        console.log(num)
    }
    defineExpose({
        num,logNum
    })
</script>
九.组合式API — provide&inject
顶层组件向任意底层组件传递数据和方法,实现跨层级组件通信
跨层级传递数据 顶层组件通过provide传递,底层组件通过inject接收
<script setup>
import GetDom from '@/components/GetDom.vue'
import {provide,ref} from 'vue'

// 1.跨层传递普通数据
provide('color','red')
// 2.跨层传递响应式数据
const count = ref(100)
provide('count',count)
const setCount=()=>{
  count.value++
}
//3.跨层级传递函数 给子组件传递修改数据的方法
provide('changeCount',(value)=>{
  count.value = value
})

</script>
<template>
  <div>
    <h1>顶层组件 <button @click="setCount">+</button></h1>
    <div>
      <GetDom></GetDom>
    </div>
  </div>
</template>
<script setup>
import GetCom from '@/components/GetCom.vue'


</script>
<template>
    <div>
        <h1>中间组件</h1>

        <div>
            <GetCom></GetCom>
        </div>
    </div>
</template>
<script setup>
import {inject} from 'vue'

const color = inject('color')
const count = inject('count')
const changeCount = inject('changeCount')
const change =()=>{

    changeCount(400)
}
</script>
<template>
    <div>
        <h1 :style="{color:color}">底层组件{{count }}</h1>
        <button @click="change">change400</button>

    </div>
</template>
十.新特性 — defineOptions、defineModel
1.defineOptions
(1)说明:在<script setup>之前,如果要定义props,emit可以在setup平级添加属性,但是使用<script setup>后,无法添加平级属性。
(2)解决:除了defineProps和defineEmits、defineExpose编译宏,又引入了新的defineOptions宏,可以用defineOptions定义任意的选项(Vue3.3以上版本)
(3)使用:
<script setup>
    defineOptions({
        name : 'LoginIndex'
    })

</script>
<template>

    <div>

    </div>
</template>
2.defineModel


【推荐】国内首个AI IDE,深度理解中文开发场景,立即下载体验Trae
【推荐】编程新体验,更懂你的AI,立即体验豆包MarsCode编程助手
【推荐】抖音旗下AI助手豆包,你的智能百科全书,全免费不限次数
【推荐】轻量又高性能的 SSH 工具 IShell:AI 加持,快人一步
· 分享一个免费、快速、无限量使用的满血 DeepSeek R1 模型,支持深度思考和联网搜索!
· 25岁的心里话
· 基于 Docker 搭建 FRP 内网穿透开源项目(很简单哒)
· 闲置电脑爆改个人服务器(超详细) #公网映射 #Vmware虚拟网络编辑器
· ollama系列01:轻松3步本地部署deepseek,普通电脑可用