来构建个YUM仓库吧~
一,搭建本地仓库
1.有的时候你的linux系统不能联网,当然就不能很便捷的使用联网的yum源了,这时候就需要你自己会利用linux系统光盘制作一个yum源。
#1.挂载镜像
[root@carol ~]# mount /dev/cdrom /mnt

#2.备份原有仓库
[root@carol ~]# gzip /etc/yum.repos.d/*

#3.使用yum-config-manager命令添加本地仓库
[root@carol ~]# yum-config-manager --add-repo="file:///mnt"

#4.或者使用手动添加.repo文件,将仓库信息存储至该文件
[root@carol ~]# vim /etc/yum.repos.d/cdrom.repo
[cdrom]
name=This is local cdrom
baseurl=file:///mnt
enabled=1
gpgcheck=0

[]          #仓库名称
name        3仓库描述信息
baseurl     #YUM源url地址 ,可以是file:// ftp:// http://
enabled     #是否使用该YUM源(0代表禁用, 1代表激活)
gpgcheck    #是否验证软件签名(0代表禁用, 1代表激活)

#5.生成缓存
[root@carol ~]# yum makecache
[root@carol ~]# yum install  lrzsz
二,搭建企业yum仓库
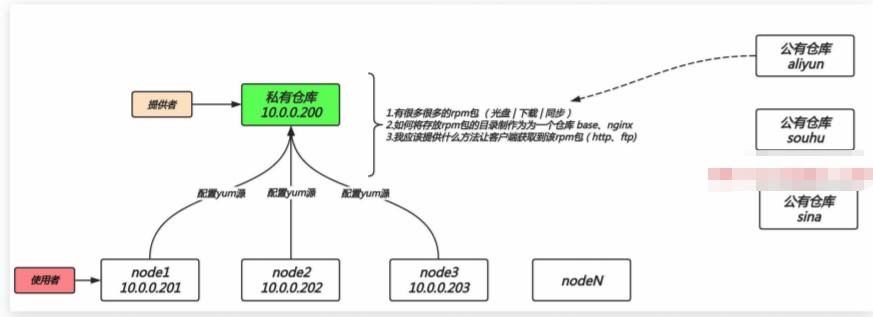
很多时候不仅仅是一台机器无法上网,而是很多机器都无法上网,但都有联网下载软件的需求,这个时候难道每台机器都挂在光盘么,这样当然是可以的,但如果这时候软件出现更新的话就是一个问题了。所以我们需要构建一个企业级的
yum仓库,位多台客户端提供服务。

- 本地光盘提供基础软件包:
Base - yum缓存提供常用软件包:
nginx、zabbix、docker
1,环境准备
| 系统 | IP | 角色 |
|---|---|---|
| centos7 | 10.0.0.99 | yum仓库服务端 |
| centos7 | 10.0.0.98 | yum仓库客户端 |
2,服务端进行yum仓库的搭建准备工作
#1.关闭防火墙、与selinux
[root@yum_server ~]# systemctl stop firewalld
[root@yum_server ~]# setenforce 0

#2.安装ftp服务,启动并加入开机启动
[root@yum_server ~]# yum -y install vsftpd
[root@yum_server ~]# systemctl start vsftpd
[root@yum_server ~]# systemctl enable vsftpd

#3.开启yum缓存功能
[root@yum_server ~]# vim /etc/yum.conf
[main] cachedir=/var/cache/yum/$basearch/$releasever
keepcache=1
[root@yum_server ~]# yum clean all

#4.提供基础base软件包
[root@yum_server ~]# mkdir /var/ftp/centos7
[root@yum_server ~]# mount /dev/cdrom /mnt
[root@yum_server ~]# cp -rp  /mnt/Packages/*.rpm /var/ftp/centos7/

#5.提供第三方源
[root@yum_server ~]# mkdir /var/ftp/ops
[root@yum_server ~]# yum -y install nginx docker

#6.复制已缓存的 Nginx docker 及依赖包 到自定义 YUM 仓库目录中
[root@yum_server_69_112 ~]# find /var/cache/yum/x86_64/7/ \
-iname "*.rpm" -exec cp -rf {} /var/ftp/ops \;

#7.安装createrepo并创建 reopdata仓库
[root@yum_server_ ~]# yum -y install createrepo
[root@yum_server_ ~]# createrepo /var/ftp/ops

#PS: 如果此仓库每次新增软件则需要重新生成一次
3,客户端配置yum源指向服务端
#1.客户端配置并使用 base 基础源
[root@yum_client ~]# gzip /etc/yum.repos.d/*
[root@yum_client ~]# vim /etc/yum.repos.d/centos7.repo
[centos7]
name=centos7_base
baseurl=ftp://10.0.0.99/centos7
gpgcheck=0

#2.客户端配置并使用 ops 源
[root@yum_client ~]# vim /etc/yum.repos.d/ops.repo
[ops]
name=local ftpserver
baseurl=ftp://10.0.0.99/ops
gpgcheck=0
三,源码包管理
- 1.什么是源码包
源码包指的是开发编写好的程序源代码,但并没有将其编译为一个能正常使用的工具。
1、部分软件官网仅提供源码包,需要自行编译并安装。
2、部分软件在新版本有一些特性还没来得及制作成rpm包时,可以自行编译软件使用其新特性
- 2.源码包的优缺点
1.可以自行修改源代码
2.可以定制需要的相关功能
3.新版软件优先更新源码
4.缺点是:相对yum安装软件会复杂很多。标准化实施困难,自动化就无法落地。
-
3.常见的软件包都可以在官网获取源码包,比如apache、nginx、mysql等。
-
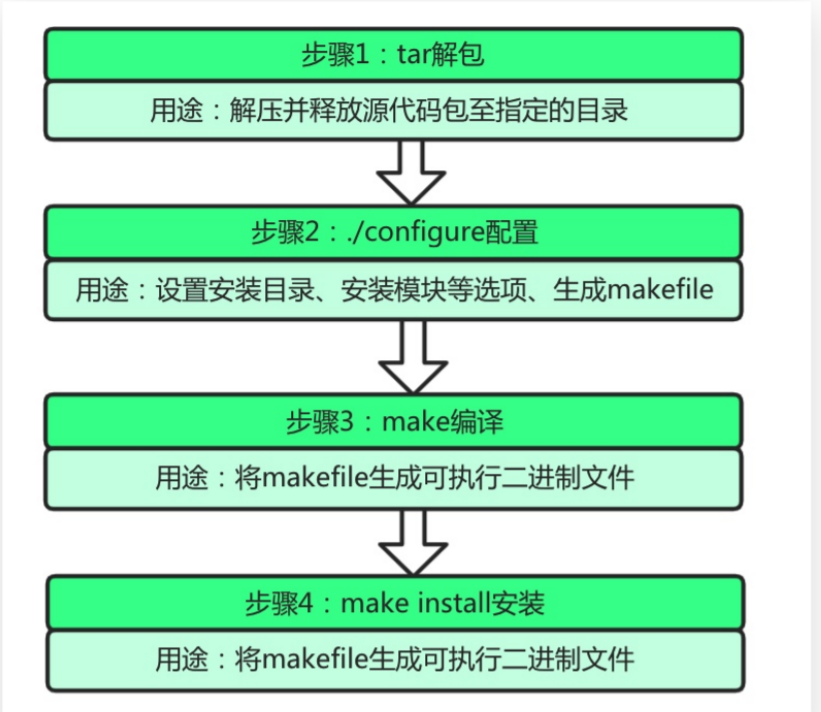
4.将源码包编译为二进制可执行文件步骤。

ps:最好拿到源码包解压后,看README。因为这个办法不一定百分百成功。
- 5.源码编译示例
下面通过编译Nginx来深入了解下源码包编译的过程.
#1.基础环境准备
[root@carol ~]# yum install -y gcc make wget

#2.下载源码包
[root@carol ~]# wget http://nginx.org/download/nginx-1.15.12.tar.gz

#3.解压源码包, 并进入相应目录
[root@carol ~]# tar xf nginx-1.15.12.tar.gz
[root@carol ~]# cd nginx-1.15.12

#4.配置相关的选项,并生成Makefile
[root@carol nginx-1.15.12]# ./configure --prefix=/soft/nginx-1.12.2

#5.将Makefile文件编译可执行二进制程序
[root@carol nginx-1.15.12]# make

#6.将二进制文件拷贝至对应的目录中
[root@carol nginx-1.15.12]# make install
源码编译报错信息处理
checking for C compiler ... not found ./configure: error: C compiler cc is not found
# yum -y install gcc gcc-c++ make


./configure: error: the HTTP rewrite module requires the PCRE library.
You can either disable the module by using --without-http_rewrite_module
option, or install the PCRE library into the system, or build the PCRE library
statically from the source with nginx by using --with-pcre=<path> option.
# yum install -y pcre-devel


./configure: error: the HTTP gzip module requires the zlib library.
You can either disable the module by using --without-
http_gzip_module option, or install the zlib library into the
system, or build the zlib library statically from the source with
nginx by using --with-zlib=<path> option.
# yum -y install zlib-devel


./configure: error: SSL modules require the OpenSSL library.
You can either do not enable the modules, or install the OpenSSL
library into the system, or build the OpenSSL library statically
from the source with nginx by using --with-openssl=<path> option.
# yum -y install openssl-devel

