Python爬虫流程&实战
Python爬虫内容简介:
- 环境搭建
- 爬虫实例简介
- Requests使用
- Python常见的库翻译成中文网址:http://python.usyiyi.cn/
爬虫的一般思路:
- 抓取网页、分析请求
- 解析网页、寻找数据
- 存储数据、多页处理
环境搭建
Python下载(windows):https://www.python.org/downloads/release/python-362/
安装:默认安装点击下一步
PyCharm工具 :http://www.jetbrains.com/pycharm/download/#section=windows
chrome浏览器:下载地址:https://www.google.cn/chrome/browser/desktop/index.html
爬虫实例
获取数据
1、urllib包
urllib是python自带的库,直接导入即可使用
urllib官方文档:https://docs.python.org/3/library/urllib.html
用urllib包获取百度首页信息:
import urllib.request
url = http://www.baidu.com/
f    = urllib.request.urlopen(url)#打开网址,返回一个类文件对象
content=f.read(100).decode('utf-8') #获取前100个字符修改编码为utf-8
print(content)
2、Requests包
requests是python的第三方库,因此需要先安装使用:pip3 install requests
安装详细介绍 :http://docs.python-requests.org/zh_CN/latest/user/install.html#install
快速上手Requests:http://docs.python-requests.org/zh_CN/latest/user/quickstart.html
使用Requests库获取百度首页信息
import requests
url = "http://cn.bing.com/"
r = requests.get(url).text  #获取网页信息
print(r)
爬虫三步走

- 爬虫第一步:使用requests抓取网页,分析请求。
1.导入requests
2.使用requests.get获取网页源码
import requests
r  = requests.get('https://book.douban.com/subject/27117553/?icn=index-editionrecommend').text
- 爬虫第二步:使用BeautifulSoup或者(lxml)解析数据和寻找数据
1.导入:from bs4 import BeautifulSoup
2.解析网页数据
3.寻找数据
4.for循环打印
from bs4 import BeautifulSoup
soup     = BeautifulSoup(r,'lxml')  #lxml参数,用来解析返回来的html数据
pattern = soup.find_all('p','comment-content') #获取所有p标签中class名字为comment-content
for item in pattern:
    print(item.string) #只打印字符串,不打印标签
- 爬虫第三步:使用第三方pandas库保存数据和多页处理 安装pandas : pip3 install pandas
1.导入pandas
2.新建list对象
3.使用data_csv写入
import pandas
comments = []
for item in pattern:
    comments.append(item.string)
df = pandas.DataFrame(comments)
df.to_csv('data.csv')
完整爬虫
import pandas
import requests
from bs4 import BeautifulSoup
url         = "https://book.douban.com/subject/27117553/?icn=index-editionrecommend"
r            =  requests.get(url).text
soup      = BeautifulSoup(r,'lxml')
pattern  = soup.find_all('p','comment-content')
for item in pattern:
    print(item.string)
comments = []
for item in pattern:
    comments.append(item.string)
df = pandas.DataFrame(comments)
df.to_csv('data.csv')  #生成data.csv
Requests库详解
Requests库是python最好的一个HTTP库,人类可以安全享用 。
官方文档介绍:http://cn.python-requests.org/zh_CN/latest/
安装Requests
这里介绍两种常用python安装第三方库的方法,建议使用第一种方法,如果第一种安装出现错误时再使用第二种方法。
第一种方法:pip安装
1、打开cmd命令,输入pip install requests 尾行出现:Successfully installed,表示安装成功
2、导入 import requests 没有报错也表示安装成功
python之pip常用命令:http://blog.csdn.net/ouyanggengcheng/article/details/72821092
第二种方法:下载包再安装
1、手动下载第三方包网址:http://www.lfd.uci.edu/~gohlke/pythonlibs/ (注意对应python版本是32位还是64位)
2、pip install 下载下来的文件全名,即可完成安装;
Requests的简单用法
Requests库的七个主要方法
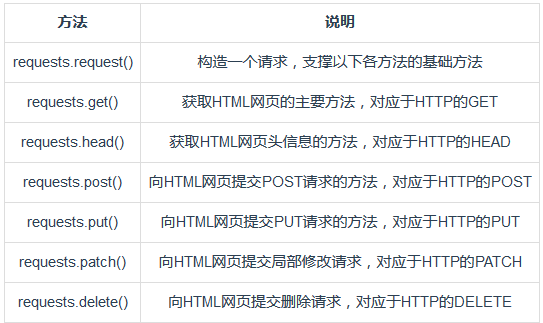
PS:常用requests.get()方法 和 requests.post()方法;
Response对象的属性:
-
r.status_code:http请求的返回状态,200表示连接成功(阅读HTTP状态码,了解各状态码含义)
-
r.text:返回对象的文本内容
- r.content:猜测返回对象的二进制形式
- r.encoding:分析返回对象的编码方式
- r.apparent_encoding:响应内容编码方式(备选编码方式)
- r.raise_for_status() #抛出异常
import requests

url = "http://cn.bing.com/"
r   = requests.get(url)
print(r.status_code) #输出200
print(r.encoding)#utf-8
print(r.apparent_encoding)#输出utf-8
爬取网页通用框架
- 定义函数
- 设置超时
- 异常处理
- 调用函数
import requests

#定义函数
def get_html_test(url):
    try:
        r   = requests.get(url,timeout=20) #设置超时时间
        r.raise_for_status() #抛出异常
        r.encoding = r.apparent_encoding
        return r.text
    except:
        return "产生异常"

if __name__ == '__main__':
   url = "https://book.douban.com/subject/1084336/comments/"
   print(get_html_test(url)) #调用函数
爬虫协议
什么是爬虫协议 :爬虫协议,也被叫做robots协议,是为了告诉网络蜘蛛哪些页面可以抓取,哪些页面不能抓取
如何查看爬虫协议:在访问网站域名后加上robots.txt即可,例如查看百度网站的爬虫协议:https://www.baidu.com/robots.txt
爬虫协议属性:
拦截所有的机器人:
User-agent: *
Disallow: /
允许所有的机器人:
User-agent: *
Disallow:
爬虫建议
- 爬取互联网公开数据
- 尽量放慢你的速度
- 尽量遵循robots协议
- 不要用于商业用途
- 不要公布爬虫程序与数据
解析神器Xpath
1.什么是Xpath
XPath即为XML路径语言(XML Path Language),它是一种用来确定XML文档中某部分位置的语言。XPath基于XML的树状结构,提供在数据结构树中找寻节点的能力。起初XPath的提出的初衷是将其作为一个通用的、介于XPointer与XSL间的语法模型。但是XPath很快的被开发者采用来当作小型查询语言。
猛点这里了解更多关于Xpath的知识
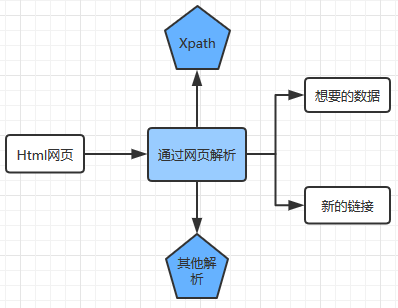
2.Xpath解析网页的流程
- 首先通过Requests库获取网页数据
- 通过网页解析,得到想要的数据或者新的链接
- 网页解析可以通过Xpath或者其它解析工具进行,Xpath是一个非常好用的网页解析工具
3.常用的网页解析

PS: 正则表达式使用比较困难,学习成本较高
BeautifulSoup性能比较慢,相对于Xpath较难,在某些特定场景下有用
Xpath使用简单,速度快(Xpath是lxml里面的一种),是抓取数据最好的选择
4.Xpath的安装
第一种方法:直接使用pip安装
在命令行输入 :pip install lxml
第二种方法:手动安装
http://www.lfd.uci.edu/~gohlke/pythonlibs/ 手动下载第三方包(注意python版本是32位还是64位)
下载完成后:命令行输入 pip install +下载文件路径和文件名
检查安装:
import lxml导入,没有返回错误说明安装成功
Xpath的使用
1.使用Xpath解析网页数据的步骤
从lxml导入etree -->解析数据,返回xml结构 --> 使用.xpath()寻找和定位数据
from  lxml import etree
import requests
url   = "https://book.douban.com/subject/1084336/comments"
html  = requests.get(url).text
x     = etree.HTML(html) #解析html数据
print(x.xpath())#使用.xpath()
2.获取Xpath的方法
第一种方法:从浏览器直接复制
from  lxml import etree
import requests
url     = "https://book.douban.com/subject/1084336/comments"
html  = requests.get(url).text
x        = etree.HTML(html) #解析html数据
print(x.xpath('//*[@id="comments"]/ul/li[1]/div[2]/p/text()'))  ##浏览器复制xpath,输出第1个短评,# 类型list中嵌套str
第二种方法:手写Xpath
- text()获取文本内容
- comment()获取注释
- 获取其它任何属性@xx :例如:@href , @src ,@value
- 获取某个标签下所有的文本(包括子标签下的文本),使用string
- starts-with 匹配字符串前面相等
- contains匹配任何位置
例子:https://book.douban.com/subject/26829016/comments/

手写获取第一条评论文本类型
from lxml import etree
import requests
url  = "https://book.douban.com/subject/26829016/comments/"
html = requests.get(url).text
x    = etree.HTML(html)
ret   =x.xpath('//div[@class="comment"]/p/text()')[0]
print(ret)  #获取第一条评论,输出为字符串
使用Xpath爬取豆瓣评书
from lxml import etree
import requests
url  = "https://book.douban.com/subject/26829016/comments/"
html = requests.get(url).text
x    = etree.HTML(html)
#从浏览器复制第一条评论的Xpath
print(x.xpath('//*[@id="comments"]/ul/li[1]/div[2]/p/text()'))
#从浏览器复制第二条评论的Xpath
print(x.xpath('//*[@id="comments"]/ul/li[2]/div[2]/p/text()'))
#从浏览器复制第三条评论Xpath
print(x.xpath('//*[@id="comments"]/ul/li[3]/div[2]/p/text()'))
#获取全部评论,删除li[]的括号,获取全部短评
print(x.xpath('//*[@id="comments"]/ul/li/div[2]/p/text()'))

#手写Xpath获取全部短评,全部评论list
print(x.xpath('//div[@class="comment"]/p/text()'))
#手写Xpath获取第一条短评,字符串
print(x.xpath('//div[@class="comment"]/p/text()')[0])
PS:浏览器复制的Xpath中,li[]括号中的数值代表对应的第几条评论,直接删除括号既可获取全部评论;
对于结构清晰的html网页,可以直接手写Xpath,更加简洁高效;
对于结构复杂的html网页,可以直接通过浏览器复制的方式获取Xpath;
例二
爬取小猪短租页面中的每条短租信息的标题、价格、经纬度、a标签中的url
from lxml import etree
import requests

url    = 'http://gz.xiaozhu.com/'
html = requests.get(url).text
x       = etree.HTML(html)

#打印短租标题
print(x.xpath('//*[@id="page_list"]/ul/li/div[2]/div/a/span/text()'))

#打印价格
print(x.xpath('//*[@id="page_list"]/ul/li/div[2]/span[1]/i/text()'))

#打印经纬度
print(x.xpath('//*[@id="page_list"]/ul/li/@latlng')) #@latlng获取属性为latlng的value

print(x.xpath('//*[@id="page_list"]/ul/li/a/@href'))#获取a标签-->href中的url
补充知识:
Xpath教程 :Xpath详细教程,掌握Xpath的基本知识
Xpath的基本使用:
阅读爬虫入门到精通-网页的解析(xpath),参考Xpath的使用方法
阅读Python爬虫利器三之Xpath语法与lxml库的用法,了解更多Xpath的使用方法示例
正则表达式
爬虫入门到精通-网页解析(正则),学习使用正则表达式匹配
BeautifulSoup
BeautifulSoup中文教程,了解使用BeautifulSoup解析网页的方法
pandas保存数据
安装:pip install pandas
numpy :(Numerical Python的简称)是高性能科学计算和数据分析的基础包
pandas :基于Numpy创建的Python包,使数据分析工作变的更加简单的高级数据结构和操作工具;
matplotlib:创建出版质量图表的绘图包
常见的导入方法:

PS:pandas、numpy和matplotlib都需要先安装 通过pip 或者下载安装的方式
pandas保存数据到Excel
先安装openpyxl第三方库:pip insatll openpyxl
import requests
from lxml import etree
import pandas   as pd
url  ="https://book.douban.com/subject/26829016/comments/hot?p=3"
html = requests.get(url).text
x    = etree.HTML(html)
file = x.xpath('//div[@class="comment"]/p/text()')
df   = pd.DataFrame(file)#DataFrame对象
df.to_excel('test1.xlsx',sheet_name='Shee1')#sheet_name='Sheet1'表示数据保存在Excel表的第一张中
pandas保存数据csv 已豆瓣短评为例
import requests
import pandas as pd
from lxml import etree
url  = "https://book.douban.com/subject/26829016/comments/"
html = requests.get(url).text

x    = etree.HTML(html)#
# print(x.xpath('//div[@class="comment"]/p/text()')[0])
file = x.xpath('//div[@class="comment"]/p/text()')
print(file)
df   = pd.DataFrame(file) #创建DataFrame对象
df.to_csv("pandan.csv")
综合练习:
- 使用csv保存数据,了解更多操作
- Python爬虫中翻页数据爬取
- 翻页抓取评论
import requests
from lxml import etree
import pandas as pd

urls =['https://book.douban.com/subject/1084336/comments/hot?p={}'.format(str(i)) for i in range(1,6)]
#通过观察url翻页规律,使用for循环得到5个链接,保存到urls列表中
print("urls等于",urls)
pinglun = [] #初始化保存短评的列表
for url in urls:
    html = requests.get(url).text
    x    = etree.HTML(html)
    file = x.xpath('//div[@class="comment"]/p/text()')
    # pinglun.append(file)#append()添加数据会查询列表嵌套列表[['ttttt',...]]
    pinglun = pinglun+file#这样添加数据只有列表

df = pd.DataFrame(pinglun)#把pinglun列表转换为pandas DataFrame
df.to_excel('pinglun.xlsx')
友情知识补充
阅读csv模块官方文档,了解使用csv模块保存数据的方法。
pandas中文文档可以查看pandas全面用法。
10分钟了解pandas基本操作。
阅读pandas读取和存储数据,学习使用pandas读取和存储数据详细操作。
浏览器抓包及headers设置
分析具体网页请求:
- 分析:使用谷歌浏览器开发者工具分析网页的请求
- 测试:测试URL请求中每个参数的作用,找出控制翻页等功能的参数
- 重复:多次重复寻找符合爬虫需要的真实请求
实战爬取知乎
import requests
import pandas as pd

url  = '''
       https://www.zhihu.com/api/v4/members/excited-vczh/followees?include
       data%5B*%5D.answer_count%2Carticles_count%2Cgender%2Cfollower_count%2Cis_followed%
       2Cis_following%2Cbadge%5B%3F(type%3Dbest_answerer)%5D.topics&offset=20&limit=20
      '''
html = requests.get(url).text
print(html)
PS:返回500 Server Error由于反爬 虫的原因,服务器返回了500错误;
该问题可以通过添加hearders请求信息解决
添加headers请求信息模拟浏览器访问
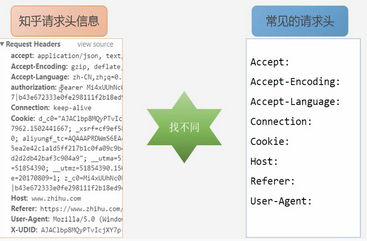
- 请求头信息承载了关于客户端浏览器、请求页面、服务器等相关的信息,用来告知服务器发起请求的客户端的具体信息
- 知乎的反爬虫机制是通过核对请求头信息实现的,所以需要在使用requests请求数据的时候加上所需的请求头
- 对比知乎的请求头信息和常见的请求头信息,发现知乎请求头多了authorization和X-UDID的信息
在爬虫在添加请求头信息且保存
import requests
import pandas as pd

headers = {
    'authorization':'Bearer Mi4xZjQtVkJnQUFBQUFBWUlJYjR0MVZEQmNBQUFCaEFsVk5zdUQtV2dBM3JFNmhFMmZxWVlKMktzVU5XYndRTzhHNUlB|1511101106|fd93cf60565ecdcb3dc2b830cf51cc7db4857770',
    'User-Agent':'Mozilla/5.0 (Windows NT 6.3; Win64; x64) AppleWebKit/537.36 (KHTML, like Gecko) Chrome/60.0.3112.101 Safari/537.36',
}
url  = '''
      https://www.zhihu.com/api/v4/members/excited-vczh/followees?
      include=data%5B*%5D.answer_count%2Carticles_count%2Cgender%
      2Cfollower_count%2Cis_followed%2Cis_following%2Cbadge%5B%3F
      (type%3Dbest_answerer)%5D.topics&offset=20&limit=20
      '''
html = requests.get(url,headers=headers).json()['data'] #关注人的信息保存在data下面,只需要这部分的数据;
print(html)
df  = pd.DataFrame.from_dict(html)
df.to_excel('user22.xlsx')
定义函数实现翻页爬取
定义一个get_user_data()函数,实现翻页爬取功能,并添加上爬取时间间隔以免爬取太频繁给服务器造成负担
import requests
import pandas as pd
import time

headers = {
    'authorization':'Bearer Mi4xZjQtVkJnQUFBQUFBWUlJYjR0MVZEQmNBQUFCaEFsVk5zdUQtV2dBM3JFNmhFMmZxWVlKMktzVU5XYndRTzhHNUlB|1511101106|fd93cf60565ecdcb3dc2b830cf51cc7db4857770',
    'User-Agent':'Mozilla/5.0 (Windows NT 6.3; Win64; x64) AppleWebKit/537.36 (KHTML, like Gecko) Chrome/60.0.3112.101 Safari/537.36',
}

user_data =[]
def get_user_data(page):
    for i in range(page):
         url  = '''
            https://www.zhihu.com/api/v4/members/excited-vczh/followees?
            include=data%5B*%5D.answer_count%2Carticles_count%2Cgender%
             2Cfollower_count%2Cis_followed%2Cis_following%2Cbadge%5B%3F
            (type%3Dbest_answerer)%5D.topics&offset={}&limit=20
             '''.format(i*20)

         html = requests.get(url,headers=headers).json()['data'] #关注人的信息保存在data下面,只需要这部分的数据;
         user_data.extend(html) #爬取的数据添加到user_data中,extend将数据添加到已存在的列表中
         print("正在爬取第{}页".format(str(i+1)))
         time.sleep(1) #设置爬取网页的时间间隔

if __name__ == '__main__':
    get_user_data(10)
    df = pd.DataFrame.from_dict(user_data)
    df.to_excel("user_20.xlsx")
补充知识
HTTP请求方法:HTTP请求方法,学习HTTP的GET和POST请求方法;
HTTP Headers:阅读HTTP响应头和请求头的信息对照表,了解请求头和响应头的概念以及美国Header所代表的具体含义
更大关于requests headers的用法,可以查阅requests的官方文档
数据入库之MongoDB
MongoDB
什么是MongoDB?
MongoDB是一个高性能、开源、无模式的文档型数据库,MongoDB将数据存储为一个文档,数据结构由键值(key==>value)组成
MongoDB相关安装
Windows的安装方法:
详细安装:https://zhuanlan.zhihu.com/p/29986675
伪造http请求头
fake-useragent第三方库,用来伪造http请求头;
详细介绍:https://pypi.python.org/pypi/fake-useragent/
安装:pip install fake-useragent
使用
from fake_useragent import UserAgent
ua = UserAgent()

ua.ie
# Mozilla/5.0 (Windows; U; MSIE 9.0; Windows NT 9.0; en-US);
ua.msie
# Mozilla/5.0 (compatible; MSIE 10.0; Macintosh; Intel Mac OS X 10_7_3; Trident/6.0)'
ua['Internet Explorer']
# Mozilla/5.0 (compatible; MSIE 8.0; Windows NT 6.1; Trident/4.0; GTB7.4; InfoPath.2; SV1; .NET CLR 3.3.69573; WOW64; en-US)
ua.opera
# Opera/9.80 (X11; Linux i686; U; ru) Presto/2.8.131 Version/11.11
ua.chrome
# Mozilla/5.0 (Windows NT 6.1) AppleWebKit/537.2 (KHTML, like Gecko) Chrome/22.0.1216.0 Safari/537.2'
ua.google
# Mozilla/5.0 (Macintosh; Intel Mac OS X 10_7_4) AppleWebKit/537.13 (KHTML, like Gecko) Chrome/24.0.1290.1 Safari/537.13
ua['google chrome']
# Mozilla/5.0 (X11; CrOS i686 2268.111.0) AppleWebKit/536.11 (KHTML, like Gecko) Chrome/20.0.1132.57 Safari/536.11
ua.firefox
# Mozilla/5.0 (Windows NT 6.2; Win64; x64; rv:16.0.1) Gecko/20121011 Firefox/16.0.1
ua.ff
# Mozilla/5.0 (X11; Ubuntu; Linux i686; rv:15.0) Gecko/20100101 Firefox/15.0.1
ua.safari
# Mozilla/5.0 (iPad; CPU OS 6_0 like Mac OS X) AppleWebKit/536.26 (KHTML, like Gecko) Version/6.0 Mobile/10A5355d Safari/8536.25

# and the best one, random via real world browser usage statistic
ua.random
使用综合例子
import  requests
import  time
from fake_useragent import UserAgent

headers = {
            'Cookie' :'user_trace_token=20171125183158-6ea3b7cc-d24a-4d5a-aa5e-262a0b94cbdc; PRE_UTM=; PRE_HOST=; PRE_SITE=; PRE_LAND=https%3A%2F%2Fwww.lagou.com%2Fjobs%2Flist_%25E7%2588%25AC%25E8%2599%25AB%3FlabelWords%3D%26fromSearch%3Dtrue%26suginput%3D; LGUID=20171125183212-e5ef5b57-d1cb-11e7-9a46-5254005c3644; X_HTTP_TOKEN=540aba6fddd8b2c7373889e8161bf460; showExpriedIndex=1; showExpriedCompanyHome=1; showExpriedMyPublish=1; hasDeliver=0; _gat=1; TG-TRACK-CODE=index_search; index_location_city=%E5%85%A8%E5%9B%BD; login=false; unick=""; _putrc=""; JSESSIONID=ABAAABAACDBAAIAE08F8614A5F0F46E99228DC06EF84A66; _gid=GA1.2.706555222.1511605972; _ga=GA1.2.541083241.1511605972; LGSID=20171125183212-e5ef592a-d1cb-11e7-9a46-5254005c3644; LGRID=20171125184810-2112c059-d1ce-11e7-9a46-5254005c3644; Hm_lvt_4233e74dff0ae5bd0a3d81c6ccf756e6=1511605971; Hm_lpvt_4233e74dff0ae5bd0a3d81c6ccf756e6=1511606931; SEARCH_ID=c75c1a068d6746c593be8420aee31444',
            'Referer':'https://www.lagou.com/jobs/list_%E7%88%AC%E8%99%AB?labelWords=&fromSearch=true&suginput=',
            # 'User-Agent':'Mozilla/5.0 (Windows NT 6.3; Win64; x64) AppleWebKit/537.36 (KHTML, like Gecko) Chrome/60.0.3112.101 Safari/537.36'
            }

def  get_job_info(page,kb):
    for i in range(page):
        i+=1
        url     = "https://www.lagou.com/jobs/positionAjax.json?needAddtionalResult=false&isSchoolJob=0"
        payload ={
            'first':'true',
            'pn':i,
            'kd':kb
        }
        ua = UserAgent()
        headers['User-Agent'] = ua.random
        res = requests.post(url,data=payload,headers=headers)
        if res.status_code == 200:
        # print(res.json()) 返回是json格式的字典
            print(res.json()['content']['positionResult']['result'])
        else:
            print("数据获取错误")
        print("正在获取:{0}行的数据".format(i))
        time.sleep(3)
if __name__ == '__main__':
    get_job_info(3,'PHP') #自定义搜索关键字
爬取数据保存到数据库中
import  requests
import  time
from  pymongo import MongoClient
from fake_useragent import UserAgent

client = MongoClient()
db      = client.lagou  #连接test数据库,没有则自动创建
my_test = db.job        #使用job集合,没有则自动创建
headers = {
            'Cookie' :'user_trace_token=20171125183158-6ea3b7cc-d24a-4d5a-aa5e-262a0b94cbdc; PRE_UTM=; PRE_HOST=; PRE_SITE=; PRE_LAND=https%3A%2F%2Fwww.lagou.com%2Fjobs%2Flist_%25E7%2588%25AC%25E8%2599%25AB%3FlabelWords%3D%26fromSearch%3Dtrue%26suginput%3D; LGUID=20171125183212-e5ef5b57-d1cb-11e7-9a46-5254005c3644; X_HTTP_TOKEN=540aba6fddd8b2c7373889e8161bf460; showExpriedIndex=1; showExpriedCompanyHome=1; showExpriedMyPublish=1; hasDeliver=0; _gat=1; TG-TRACK-CODE=index_search; index_location_city=%E5%85%A8%E5%9B%BD; login=false; unick=""; _putrc=""; JSESSIONID=ABAAABAACDBAAIAE08F8614A5F0F46E99228DC06EF84A66; _gid=GA1.2.706555222.1511605972; _ga=GA1.2.541083241.1511605972; LGSID=20171125183212-e5ef592a-d1cb-11e7-9a46-5254005c3644; LGRID=20171125184810-2112c059-d1ce-11e7-9a46-5254005c3644; Hm_lvt_4233e74dff0ae5bd0a3d81c6ccf756e6=1511605971; Hm_lpvt_4233e74dff0ae5bd0a3d81c6ccf756e6=1511606931; SEARCH_ID=c75c1a068d6746c593be8420aee31444',
            'Referer':'https://www.lagou.com/jobs/list_%E7%88%AC%E8%99%AB?labelWords=&fromSearch=true&suginput=',
            'User-Agent':'Mozilla/5.0 (Windows NT 6.3; Win64; x64) AppleWebKit/537.36 (KHTML, like Gecko) Chrome/60.0.3112.101 Safari/537.36'
            }

def  get_job_info(page,kb):
    for i in range(page):
        i+=1
        url     = "https://www.lagou.com/jobs/positionAjax.json?needAddtionalResult=false&isSchoolJob=0"
        payload ={
            'first':'true',
            'pn':i,
            'kd':kb
        }
        # ua = UserAgent()
        # headers['User-Agent'] = ua.random
        res = requests.post(url,data=payload,headers=headers)
        if res.status_code == 200:
        # print(res.json()) 返回是json格式的字典
            job_json = res.json()['content']['positionResult']['result']
            my_test.insert(job_json)
        else:
            print("数据获取错误")
        print("正在获取:{0}行的数据".format(i))
        time.sleep(3)

if __name__ == '__main__':
    get_job_info(3,'PHP') #自定义搜索关键字

 浙公网安备 33010602011771号