Python-pytest
快速入门
pytest是Python的单元测试框架和unittest框架类似,但pytest框架使用起来更简洁、效率更高。
pytest特点:
1、入门简单易上手,文档支持较好。
2、支持单元测试和功能测试。
3、支持参数化:
4、可以跳过指定用例,或对某些预期失败的case标记成失败。
5、支持重复执行失败的case。
6、有很多第三方插件,并且可以自定义扩展。
7、方便和支持集成工具进行集成。
安装
pip install pytest
验证安装:
pytest -V
pytest 6.2.2
示例:
a1.py
#!/usr/bin/env python
# -*- coding: utf-8 -*-
# author: 青城子
# datetime: 2021/10/31 17:30
# ide: PyCharm

import pytest


def test_run():
    print("第一个用例")
    assert 1


def test_run_02():
    print("第二个用例")
    assert 1


if __name__ == '__main__':
    pytest.main(["-s", "a1.py"])  # 参数-s 用例输出时day自定义用例函数中的print(),xx.py指主要执行的用例文件
终端执行命令:python a1.py
pytest执行脚本过程中,读取以test开头的函数或者以Test开头的类。
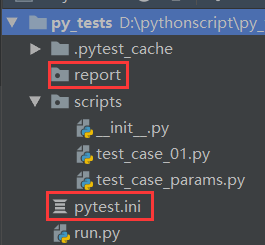
创建测试目录:
D:\py_tests\ # 我的是D盘的 py_tests 目录,所有操作都在 py_tests 目录内完成
    ├─scripts
    │  ├─test_case_dir1
    │  │  ├─test_case_02.py    # 用例脚本文件
    │  │  └─__init__.py
    │  ├─test_allure_case.py   # 脚本文件
    │  ├─test_case_01.py   # 脚本文件
    │  └─__init__.py
    ├─report
    │  ├─report.html   # pytest-html生成的用例报告
    │  ├─assets  # allure的依赖目录
    │  ├─result  # allure生成的用例数据
    │  └─allure_html   # allure生成的用例报告目录
         └─index.html  # allure生成的最终的html类型的测试报告
    ├─case_set.py
    ├─demo0.py   # 用例测试脚本文件
    ├─demo1.py   # 用例测试脚本文件
    ├─pytest.ini # 配置文件
    └─__init__.py
简单示例
scripts目录-->test_case_01.py(函数写法)
#!/usr/bin/env python
# -*- coding: utf-8 -*-
__author__ = 'tian'
__data__ = '2020/3/16 16:54'

import pytest


def test_case_01():
    print("函数01测试用例")
    assert 1  # 断言成功


def test_case_02():
    print("函数02测试用例")
    assert 0  # 断言失败


def custom_case_03():  # 该函数不会执行,pytest只执行已test_开头的用例
    print('执行用例03...')
    assert 1  # 断言成功


if __name__ == '__main__':
    pytest.main(["-s", "test_case_01.py"])  # -s,表示输出用例执行的详细结果; dmo1.py要执行.py文件。
第一个用例执行成功;第二个用例执行失败;但是第三个custom_case_03并没有执行,由此知道,pytest只识别以【test】开头的用例。
pytest.main(['-s','test_case_01.py']) -s,控制台中输出print的结果,有些情况下,pytest不会展示print的输出,所以使用-s参数来实现,test_case_01.py要执行的脚本名称。
除了上述的函数写法,还可以用类的写法:
#!/usr/bin/env python
# -*- coding: utf-8 -*-
__author__ = 'tian'
__data__ = '2020/3/16 16:54'
import pytest


class TestCase:
    def test_case01(self):
        """用例01"""
        print('执行用例01...')
        assert 0  # 断言失败

    def test_case02(self):
        """用例02"""
        print('执行了用例02')
        assert 1  # 断言成功


if __name__ == '__main__':
    pytest.main(["-s", "__file__"])
setup和teardown
在unitest中setup和teardown可用在每个用例前后执行,也可以在所有的用例集执行前后执行。
那么在pytest中,有以下几种情况:
- 模块级别,也就是整个测试脚本文件中的用例集开始前后对应:setup_module teardown_module
- 类级别,在类中的所有用例集执行前后对应:setup_class teardown_class
- 在类中也可以划分,每一个方法执行前后对应:setup_method teardwn_method
- 函数级别,在用例函数前后对应:setup_function teardown_function
模块级别的setup_module/teardown_module
import pytest


def setup_module():
    """模块级别的setup,在该脚本内所有用例集执行之前触发执行"""
    print('模块级别的setup...')


def teardown_module():
    """模块级别的teardown,在该脚本内所有用例集执行之后触发执行"""

    print('模块级别的 teardown...')


def test_cae01():
    print('函数中执行用例01.....')
    assert 0  # 断言失败


def test_case02():
    print('函数中执行用例02......')
    assert 1  # 断言成功


class TestCase:

    def test_case_01(self):
        print('类级别的测试用例01')
        assert 1

    def test_case_02(self):
        print('类级别的测试用例02')
        assert 0


if __name__ == '__main__':
    pytest.main(["-s", "demon2.py"])
执行结果:
...

模块级别的setup...
函数中用例01...
F函数中执行用例02...
类级别的测试用例01...
F类级别的测试用例02...
.模块级别的 teardown...
...
类级别的setup_class/teardown_class
import pytest


class TestCase:

    def setup_class(self):
        """类级别的setup,在该类中用例执行之前触发执行"""
        print("类级别的setup...")

    def teardown_class(self):
        """类级别的teardown,在该类中用例执行后触发执行"""
        print("类级别的teardown...")

    def test_case01(self):
        """用例01"""
        print('执行用例01...')
        assert 0  # 断言失败

    def test_case02(self):
        """用例02"""
        print('执行了用例02')
        assert 1  # 断言成功


if __name__ == '__main__':
    pytest.main(["-s", "__file__"])
执行结果:
...

类级别的setup...
执行用例01...
F执行了用例02
.类级别的teardown...

...
类中方法级别的setup_method/teardown_method
#!/usr/bin/env python
# -*- coding: utf-8 -*-
__author__ = 'tian'
__data__ = '2021/2/18 10:50'

import pytest


class TestCase:
    def setup_method(self):
        """类中方法级别的setup,类中每个方法执行前执行"""
        print('类级别方法setup...')

    def teardown_method(self):
        """类中方法级别teardown,类中每个方法执行后执行"""
        print('类级别方法teardown...')

    def test_case01(self):
        """用例01"""
        print('执行用例01...')
        assert 0  # 断言失败

    def test_case02(self):
        """用例02"""
        print('执行了用例02')
        assert 1  # 断言成功


if __name__ == '__main__':
    pytest.main(['-s', 'demo1.py'])
执行结果:
...

类级别方法setup...
执行用例01...
F类级别方法teardown...
类级别方法setup...
执行了用例02
.类级别方法teardown...

...
函数级别的setup_function/teardown_function
import pytest


def setup_function():
    """函数级别的setup,在该脚本内所有用例集执行之前触发执行"""
    print('函数级别的setup...')


def test_cae01():
    print('执行用例01.....')
    assert 0  # 断言失败


def test_case02():
    print('执行用例02......')
    assert 1  # 断言成功


def teardown_function():
    """函数级别的teardown,在该脚本内所有用例集执行之后触发执行"""
    print('函数级别的 teardown...')


if __name__ == '__main__':
    pytest.main(["-s", "demo1.py"])  # -s,表示输出用例执行的详细结果,demo1.py要执行的脚本名称
输出结果:
...

函数级别的setup...
执行用例01.....
F函数级别的 teardown...
函数级别的setup...
执行用例02......
.函数级别的 teardown...

...
综合
#!/usr/bin/env python
# -*- coding: utf-8 -*-
# author: 青城子
# datetime: 2021/10/31 17:30
# ide: PyCharm

import pytest


def setup_function():
    print("在函数执行前执行")


def teardown_function():
    print("在函数执行后执行")


def test_run_02():
    print("函数第二个用例")
    assert 0


def test_aun_01():
    print("函数第一个用例")
    assert 1


class TestCase:
    def setup_class(self):
        print("类中的setup...")

    def teardown_class(self):
        print("类级别的teardown...")

    def setup_method(self):
        print("类中方法级别的setup")

    def teardown_method(self):
        print("类中方法级别的teardown")

    def test_case_02(self):
        print("类中第二个用例")
        assert 1

    def test_cast_01(self):
        print("类中第一个用例")
        assert 1


def setup_module():
    print("模块级别的setup")


def teardown_module():
    print("模块级别的teardown")


if __name__ == '__main__':
    pytest.main(["-s", "a1.py"])  # 参数-s 用例输出时day自定义用例函数中的print(),xx.py指主要执行的用例文件
输出:
模块级别的setup
在函数执行前执行
函数第二个用例
在函数执行后执行
在函数执行前执行
函数第一个用例
在函数执行后执行
类中的setup...
类中方法级别的setup
类中第二个用例
类中方法级别的teardown
类中方法级别的setup
类中第一个用例
类中方法级别的teardown
类级别的teardown...
模块级别的teardown
小结:
- 在类中,不需要__init__方法。
- 测试类的类名必须以Test开头。
- 类中的测试方法编写规则和函数一致。
配置文件
脚本有多种运行方式,如果在PyCharm环境,可以使用右键或者点击运行按钮运行,也就是在pytest中的主函数中运行:
if __name__ == '__main__':
    pytest.main(['-s','test_case_01.py'])
可以在命令行中运行:
D:\py_tests>python test_case_01.py
这种方式和使用Python解释器执行Python脚本没有什么两样。
也可以如下这么执行:
D:\py_tests>python -s test_case_01.py
还可以通过配置文件运行
在项目的根目录下创建pytest.ini文件,在该文件中进行相关配置:
[pytest]
addopts = -s -v
testpaths = ./scripts
python_files = test_*.py
python_classes = Test*
python_functions = test_*
注意:配置文件中不能有中文
pytest.ini配置文件中各项都是什么意思呢?
首先pytest.ini文件必须位于项目的根目录,而且必须叫pytest.ini。
其它参数:
addopts 搭配相关参数,例如-s。多个参数以空格分割:
-s 在运行测试用例时,调试或打印一些内容。我们在代码中添加的print(),在运行pytest时这些内容不会显示。如果加上-s就会显示出来。
-v 让输出结果更加详细。
testpaths 配置测试用例的目录:
因为我们用例可能分布在不同的目录或文件中,那么这个scripts就是我们所有文件或者目录的顶层目录。其内的子文件或者子目录都要以test_开头,pytest才能识别到。
另外,上面这么写,是从一个总目录下寻找所有的符合条件的文件或者脚本,那么我们想要在这个总目录下执行其中某个具体的脚本文件怎么办?
[pytest]
testpaths = ./scripts/
python_files = test_case_01.py
这么写就是执行scripts目录下面的test_case_01.py这个文件。
python_classses 定义类的类名必须是Test开头
python_functions 定义函数的函数名是test_开头
实例:
scripts目录中--->test_case_01.py中:
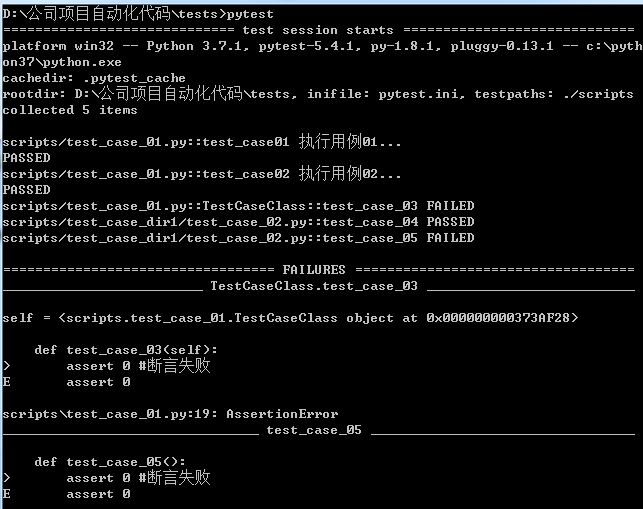
#!/usr/bin/env python
# -*- coding: utf-8 -*-
__author__ = 'tian'
__data__ = '2020/3/16 16:51'

import pytest


def test_case01():
    print('执行用例01...')
    assert 1  # 断言成功


def test_case02():
    print('执行用例02...')
    assert 1  # 断言成功


class TestCaseClass:
    def test_case_03(self):
        assert 0  # 断言失败
scripts/test_case_dir1/test_case02.py中:
#!/usr/bin/env python
# -*- coding: utf-8 -*-
__author__ = 'tian'
__data__ = '2020/3/16 16:50'

import pytest


def test_case_04():
    assert 1  # 断言


def test_case_05():
    assert 0  # 断言失败
那么,在不同的目录或者文件中,共有5个用例将被执行,而结果则是两个失败三个成功。来执行验证一下,因为有了配置文件,我们在终端中(前提是在项目的根目录),直接输入pytest即可。
后续执行相关配置都来自配置文件,如果更改,会有相应说明,终端都是直接使用pytest执行。
配置pytest.ini--->执行script目录下所有已test_开头.py文件该文件中Test开头的测试类以及已test_开头是测试函数:
[pytest]
addopts = -s -v
testpaths = ./scripts
python_files = test_*.py
python_classes = Test*
python_functions = test_*
高级用法
跳过用例
test_allure_case.py
# -*- coding: utf-8 -*-
__author__ = 'tian'
__data__ = '2020/3/16 16:50'

import pytest


def test_case_01():
    assert 1  # 断言成功


@pytest.mark.skip(condition='无条件跳过用例')
def test_case_02():
    assert 0  # 断言成功


# 1<2 就跳过用例,1>2就执行用例
@pytest.mark.skipif(condition=1 > 2, reason='如果条件为true就跳过用例')
def test_case_03():
    assert 1
跳过用例,使用@pytest.mark.skip(condition , reason) 和 @pytest.mark.skipif(condition , reason)
- condition表示跳过用例的条件
- reason表示跳过用例的原因
然后将它装饰在需要被跳过用例的函数上面。
执行结果:
@pytest.mark.skipif(condition=1 > 2, reason='如果条件为true就跳过用例')
...
scripts/test_case_01.py::test_case_01 PASSED
scripts/test_case_01.py::test_case_02 SKIPPED
scripts/test_case_01.py::test_case_03 PASSED
...
@pytest.mark.skipif(condition=1 < 2, reason='如果条件为true就跳过用例')
...
scripts/test_case_01.py::test_case_01 PASSED
scripts/test_case_01.py::test_case_02 SKIPPED
scripts/test_case_01.py::test_case_03 SKIPPED
...
此时,在输出控制台中,还无法打印reason信息,如果需要打印在配置文件中的addopts 参数 -s 变为 -rs:
[pytest]
addopts = -rs -v
testpaths = ./scripts
python_files = test_*.py
python_classes = Test*
python_functions = test_*
xfail_strict = true
标记预期失败
如果事先知道测试函数会执行失败,但又不想直接跳过,而是希望显示提示。
pytest使用 pytest.mark.xfail实现预见错误功能:
xfail(condiition,reason,[raises=None,run=True,strict=False])
需要掌握必传参数:
- condition,预期失败的条件,当条件为真的时候,预期失败
- reason,失败的原因
关于预期失败的几种情况:
预期失败,执行失败
预期失败,执行成功
预期成功,执行成功
预期成功,执行失败
scripts/新建test_case_03.py
#!/usr/bin/env python
# -*- coding: utf-8 -*-
__author__ = 'tian'
__data__ = '2020/12/8 10:28'

import pytest


class TestCase:
    @pytest.mark.xfail(1 < 2, reason='预期失败,执行失败')
    def test_case_01(self):
        """预期失败,执行也是失败的"""
        print('预期失败,执行失败')
        assert 0

    @pytest.mark.xfail(1 < 2, reason='预期失败,执行成功')
    def test_case_02(self):
        """预期失败,但实际执行结果却是成功"""
        print('预期失败,执行成功')
        assert 1

    @pytest.mark.xfail(1 > 2, reason='预期成功,执行成功')
    def test_case_03(self):
        """预期成功,实际执行结果成功"""
        print("预期成功,执行成功")
        assert 1

    @pytest.mark.xfail(1 > 2, reason='预期成功,执行失败')
    def test_case_04(self):
        """预期成功,但实际结果却失败"""
        print("预期成功,执行失败")
        assert 0

    def test_case_05(self):
        """普通的测试用例"""
        print("执行成功的普通用例")
        assert 1

    def test_case_06(self):
        """普通的用例"""
        print("执行失败的普通用例")
        assert 0
执行结果:
scripts/test_case_01.py::TestCase::test_case_01 预期失败,执行失败
XFAIL
scripts/test_case_01.py::TestCase::test_case_02 预期失败,执行成功
XPASS
scripts/test_case_01.py::TestCase::test_case_03 预期成功,执行成功
PASSED
scripts/test_case_01.py::TestCase::test_case_04 预期成功,执行失败
FAILED
scripts/test_case_01.py::TestCase::test_case_05 执行成功的普通用例
PASSED
scripts/test_case_01.py::TestCase::test_case_06 执行失败的普通用例
FAILED
pytest使用x表示预期的失败(XFALL),如果预期是失败,但实际运行测试却成功通过,pytest使用x进行标记(XPASS)。
预期失败的两种情况:
预期失败,却执行成功 --->输出XPASS,虽然执行成功,但与预期结果不一致,也要将用例标记为执行失败。
预期失败,执行失败
将预期失败,执行成功的用例标记为执行失败方法:
在pytest.ini文件中加入:xfail_strict = true
pytest.ini
[pytest]
addopts = -rs -v
testpaths = ./scripts
python_files = test_*.py
python_classes = Test*
python_functions = test_*
xfail_strict = true
这样就把上述的情况标记为执行失败了。
参数化
pytest身为强大的单元测试框架,同样支持DDT数据驱动测试的概念。也就是当对一个测试函数进行测试时,通常会给函数传递多组测试。
例如:测试账号登录,需要模拟各种千奇百怪的账号密码。
在pytest中,有更好的解决方法,就是参数化测试,即每组参数都独立执行一次测试。
使用工具就是:pytest.mark.parametrize(argnames,argvalues)。
- argnames表示参数名。
- argvalues表示列表形式的参数指。
以装饰器的形式使用:
只有一个测试的测试用例:
#!/usr/bin/env python
# -*- coding: utf-8 -*-
__author__ = 'tian'
__data__ = '2020/12/7 17:42'

import pytest

mobile_list = ['10010','10086']

@pytest.mark.parametrize('mobile',mobile_list)
def test_register(mobile):
    print("注册手机号是{0}".format(mobile))
输出:
...
scripts/test_case_01.py::test_register[10010] 注册手机号是10010
PASSED
scripts/test_case_01.py::test_register[10086] 注册手机号是10086
PASSED
...
可以看到,列表内的每个手机号,都是一条测试用例。
多个参数的测试用例
#!/usr/bin/env python
# -*- coding: utf-8 -*-
__author__ = 'tian'
__data__ = '2020/12/7 17:42'

import pytest

mobile_list = ['10010','10086']
code_list = ['x2zx','we2a']

@pytest.mark.parametrize('code',code_list)
@pytest.mark.parametrize('mobile',mobile_list)
def test_register(mobile,code):
    """通过手机号注册"""
   print('注册手机号是{0} 验证码是:{1}'.format(mobile,code))
输出结果:
...

scripts/test_case_01.py::test_register[10010-x2zx] 注册手机号是10010 验证码是:x2zx
PASSED
scripts/test_case_01.py::test_register[10010-we2a] 注册手机号是10010 验证码是:we2a
PASSED
scripts/test_case_01.py::test_register[10086-x2zx] 注册手机号是10086 验证码是:x2zx
PASSED
scripts/test_case_01.py::test_register[10086-we2a] 注册手机号是10086 验证码是:we2a
PASSED

...
每一个手机号于每一个验证码组合一起执行了,这样就执行了4次。那么如果有很多组合的话,用例数将会更多。
希望手机号与验证码一一对应组合,也就是只执行两次:
#!/usr/bin/env python
# -*- coding: utf-8 -*-
__author__ = 'tian'
__data__ = '2020/12/7 17:42'

import pytest

mobile_list = ['10010','10086']
code_list = ['x2zx','we2a']

@pytest.mark.parametrize('mobile,code',zip(mobile_list,code_list))
def test_register(mobile,code):
    """通过手机号注册"""
  print('注册手机号是{0} 验证码是:{1}'.format(mobile,code))
输出结果:
...

scripts/test_case_01.py::test_register[10010-x2zx] 注册手机号是10010 验证码是:x2zx
PASSED
scripts/test_case_01.py::test_register[10086-we2a] 注册手机号是10086 验证码是:we2a
PASSED

...
固件
固件(Fixture)是一些函数,pytest会在执行测试函数之前(或之后)加载运行,也称测试夹具。
可以利用固件做任何事情,其中最常见的可能就是数据库的初始连接和最后关闭操作。
pytest使用pytest.fixture()定义固件,下面是最简单的固件,访问主页前必须先登录:
import pytest

@pytest.fixture()
def login():
    print('登录....')

def test_index(login):
    print('主页...')
执行结果:
...
scripts/test_case_01.py::test_index 登录....
主页...
PASSED
...
固件作用域
在之前的实例中,发现fixture和setup、teardown的功能类似,但是fixture相当于setup和teardown来说更灵活。pytest通过scope参数来控制固件的使用范围,也就是作用域。
在定义固件时,通过scope参数来声明作用域:
function:函数级,每个测试函数都会执行一次固件;
class :类级别,每个测试类执行一次,所有方法都可以使用;
module:模块级,每个模块执行一次,模块内函数和方法都可使用;
sessino:会话级,一次测试只执行一次,所有被找到的函数和方法都可用;
默认作用域为:function
实例:login估计,指定作用域
import pytest

@pytest.fixture(scope='function')
def login():
    print('登录....')

def test_index(login):
    print('主页...')
固件预处理和后处理
在测试用例执行之前进行预处理,并在测试完成后进行清理。
当大量重复这类操作时,最佳实践是使用固件来自动化处理所有的预处理和后处理。
Pytest使用yield关键字将固件分为两部分,yield之前的代码属于预处理,会在测试前执行;yield之后的代码属于后处理,将在测试完成后执行。
以测试模拟数据库查询,使用固件来模拟数据库的连接和关闭:
#!/usr/bin/env python
# -*- coding: utf-8 -*-
__author__ = 'tian'
__data__ = '2020/12/7 17:42'


import pytest

@pytest.fixture()
def db():
    print('连接数据库...')
    yield
    print('关闭数据库...')


def search_user(user_id):

     d = {
         '001':'赢壮',
         '002':'赢华'
     }
     return d[user_id]


def test_case_01(db):
    print("执行了test_case_01")
    assert search_user('001') == '赢壮'


def test_case_02(db):
    print("执行了test_case_02")
    assert search_user('002') == '赢华'


if __name__ == '__main__':
    pytest.main(['-s','test_case_01.py'])
执行结果:
连接数据库..
执行了test_case_01
PASSED关闭数据库...


连接数据库...
执行了test_case_02
PASSED关闭数据库...
常用插件
pytest中还有非常多的插件供我们使用,介绍几个常用的,生成测试用例报告。
pytest测试报告插件
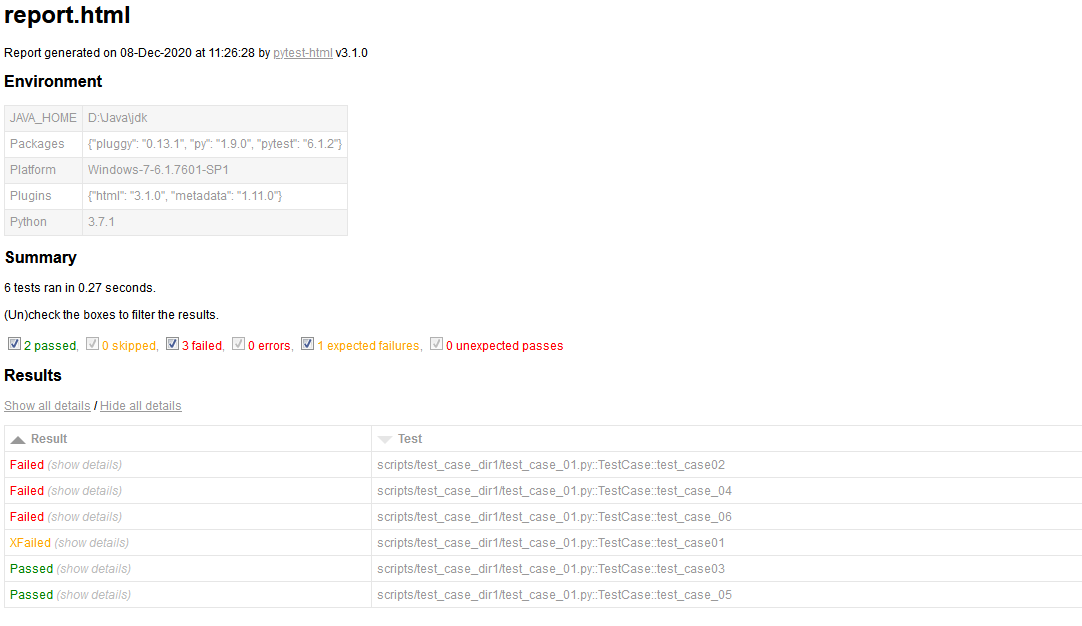
下载: pip install pytest-html
使用: .ini配置文件中添加:--html=report/report.html
创建 report目录
pytest.ini
[pytest]
addopts = -s -v --html=report/report.html
testpaths = ./scripts
python_files = test_case_params.py
python_classes = Test*
python_functions = test_*
xfail_strict=true
备注:添加完测试报告插件后,需要在cmd终端中执行测试后,自动生成测试报告。
报告样式:
allure
Allure框架是一个即灵活有轻量级的多语言测试报告工具,它不仅以web的方式展示了简洁的测试结果,而且允许参与开发过程的每个人从日常执行的测试中获取较多的有用信息。
Allure报告简化了常见缺陷的统计:失败的测试可以分为bug和被中断的测试,还可以配置日志、步骤、fixture、附件、计时、执行历史等;
Allure报告提供了一个清晰的“大图”,其中包括已覆盖的特性、缺陷聚集的位置、执行时间轴的外观以及许多其他方便的事情。
Python的pytest中allure下载
pip install allure-pytest
allure-pytest插件生成的测试报告不是html类型的,还需要使用allure工具再加工一下。还需要下载allure工具。
allure工具下载
allure工具依赖Java环境,所有需要先配置Java环境。
下载allure工具地址:https://github.com/allure-framework/allure2
下载并解压好allure工具包之后,还需要将allure包内的bin目录添加到系统的环境变量中。
如图:
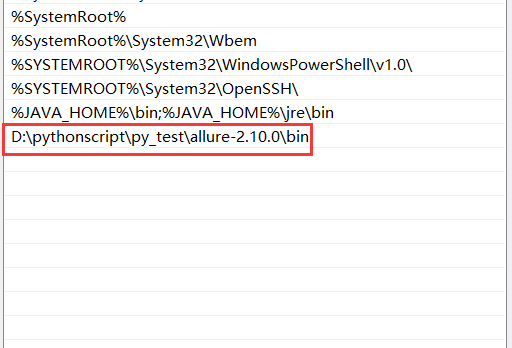
完成后打开终端测试:
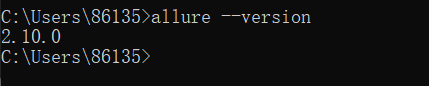
返回来版本号说明安成功。
使用
使用配置步骤:
配置pytest.ini文件
编写用例并执行
使用allure工具生成html报告
pytest.ini中配置:
[pytest]
addopts = -s -v --alluredir ./report/json_result
testpaths = ./scripts
python_files = test_*.py
python_classes = Test*
python_functions = test_*
就是--alluredir ./report/json_result 参数 ,指定生成报告时的文件目录路径:当前目录下report目录/json_result目录
import pytest

def test_case_01():
    assert 1

def test_case_02():
    assert 0

def test_case_03():
    assert 1
在终端中输入pytest正常执行测试用例,执行完毕后,在项目的根目录下面自动生成report/json_result目录/一些json文件:
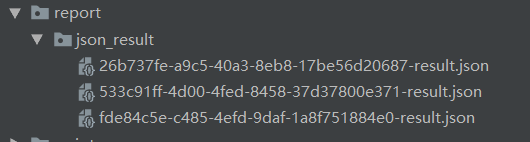
此时该目录内还没有什么HTML报告,只有一些相关的json数据。
接下来需要使用allure工具来生成HTML报告.
终端中进入项目根目录,执行下面的命令:
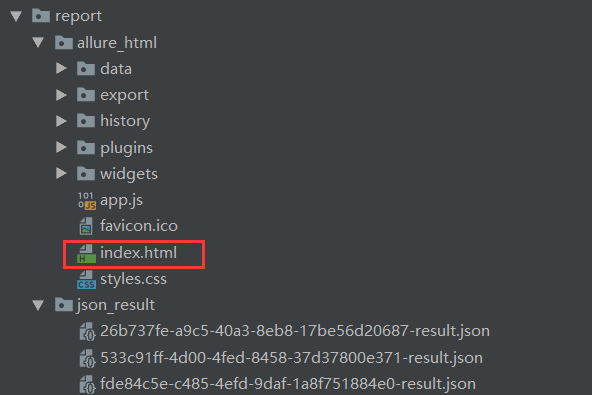
allure generate report/json_result -o report/allure_result --clean
D:\pythonscript\py_tests>allure generate report/json_result -o report/allure_result --clean
命令的意思是,根据report/json_result目录中的json数据(这些数据是运行pytest后产生的)。在report目录下新建一个allure_html目录,而这个目录内有index.html才是最终的allure版本的HTML报告;
如果重复执行,使用--clean清除之前的报告。
执行成功如下:

生成报告:
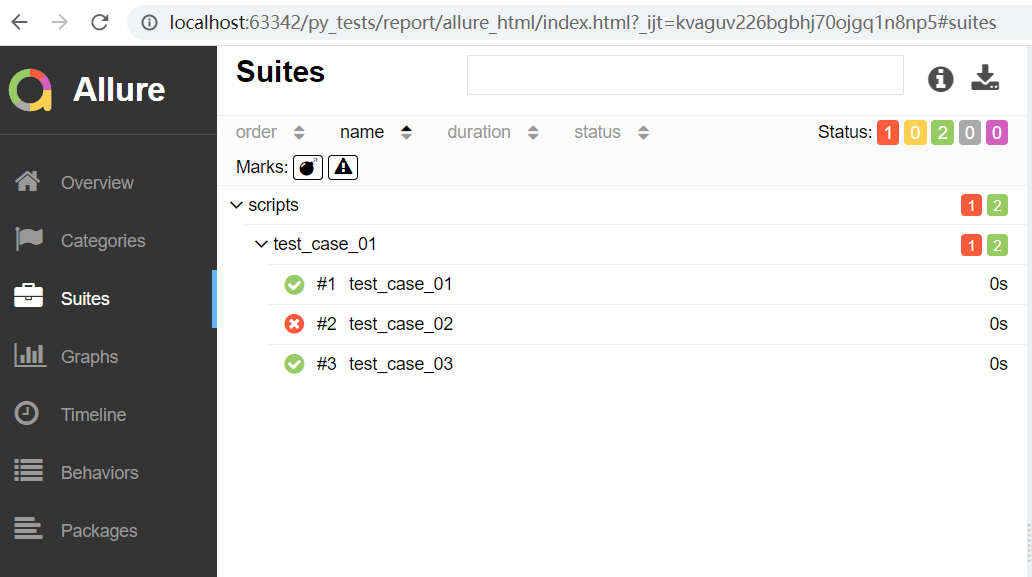
打开index.html
allure open
默认的,allure报告需要HTTP服务器来打开,一般通过pycharm来完成,另一种通过allure自带的open命令来打开。
终端中输入:allure open .\allure_html allure_html目录是allure插件生成的allure报告目录。
allure的其它用法
在使用allure生成报告的时候,在编写用例阶段,还可以有一些参数可以使用:
title 自定义用例标题,标题默认是用例名
description 测试用例的详细说明
- title,自定义用例标题,标题默认是用例名。
- description,测试用例的详细说明。
- feature和story被称为行为驱动标记,因为使用这个两个标记,通过报告可以更加清楚的掌握每个测试用例的功能和每个测试用例的测试场景。或者你可以理解为feature是模块,而story是该模块下的子模块。
allure中对bug的严重等级进行定义,使用severity来标识测试用例或者测试类的bug级别:
blocker级:中断缺陷(客户端程序无响应,无法执行下一步操作),系统无法执行,崩溃或者严重资源不足、应用模块无法启动或异常退出、无法程序、造成系统不稳定。
critical级:影响系统功能或操作,主要功能存在严重缺陷,但不会影响到系统的稳定性。
normal级:普通缺陷,指非核心业务流程产生的问题,例如:系统无法变更头像,昵称等。
minor/trivial级别:轻微缺陷(必须项无提示,或者提示不规范),例如各种影响体验,但不影响使用的内容。
dynamic 动态设置相关参数
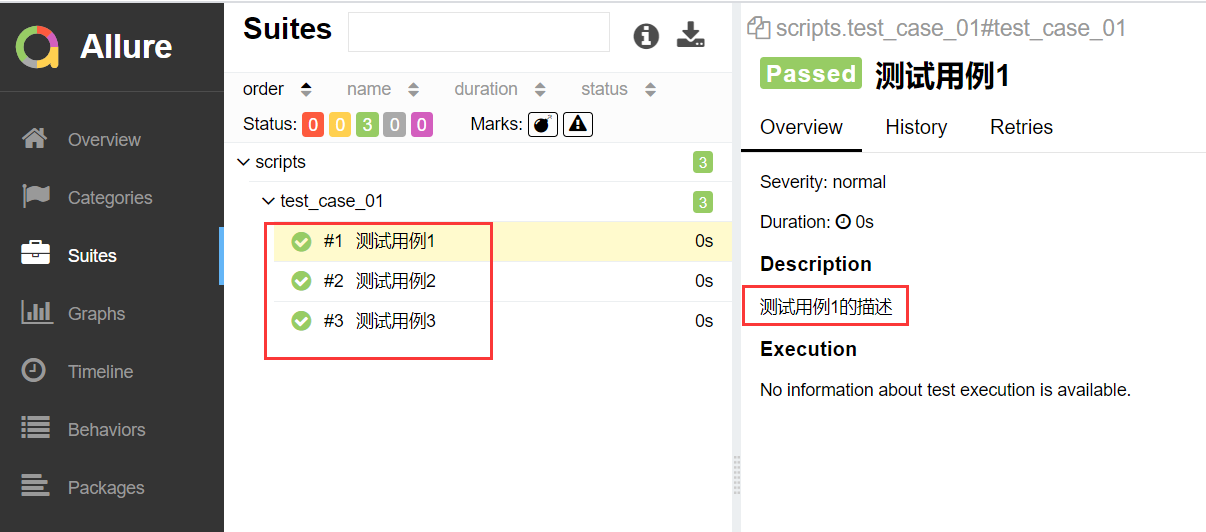
title和description
@allure.title("测试用例1")
@allure.description("测试用例1的描述")
def test_case_01():
    assert 1  # 断言成功


@allure.title("测试用例2")
@allure.description("测试用例1的描述")
def test_case_02():
    assert 1  # 断言成功


@allure.title("测试用例3")
@allure.description("测试用例3的描述")
def test_case_03():
    assert 1  # 断言成功
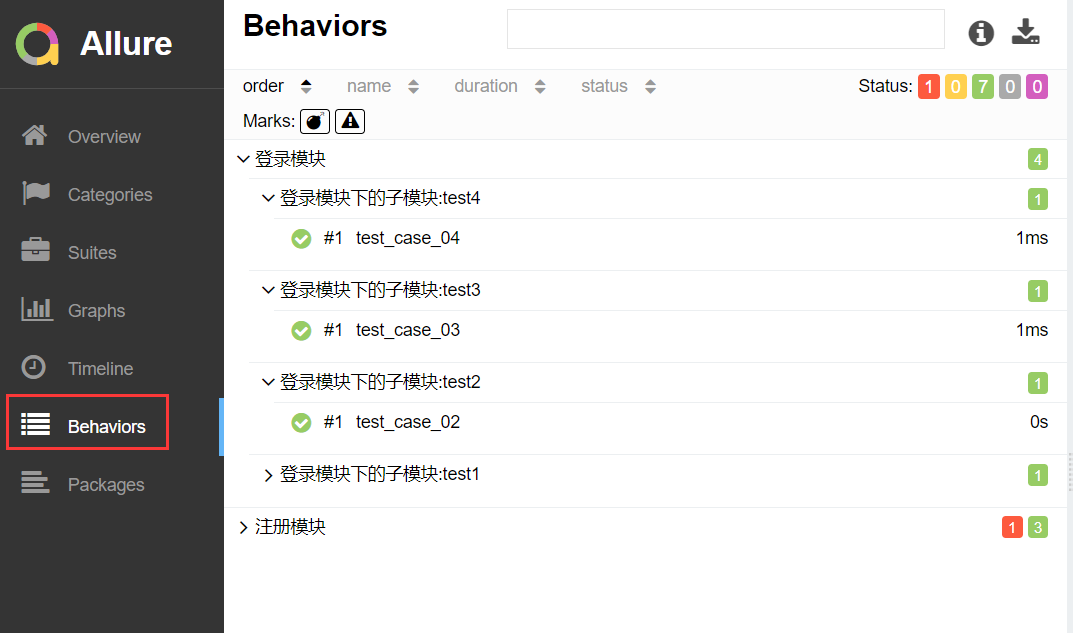
feature和story
# -*- coding: utf-8 -*-
__author__ = 'tian'
__data__ = '2020/3/16 16:50'

import allure


@allure.feature("登录模块")
class TestCaseLogin:

    @allure.story("登录模块下的子模块:test1")
    def test_case_01(self):
        assert 1

    @allure.story("登录模块下的子模块:test2")
    def test_case_02(self):
        assert 1

    @allure.story("登录模块下的子模块:test3")
    def test_case_03(self):
        assert 1

    @allure.story("登录模块下的子模块:test4")
    def test_case_04(self):
        assert 1


@allure.feature('注册模块')
class TestCaseRegister(object):
    @allure.story('注册模块下的子模块: test1')
    def test_case_01(self):
        assert 1

    @allure.story('注册模块下的子模块: test2')
    def test_case_02(self):
        assert 0

    @allure.story('注册模块下的子模块: test3')
    def test_case_03(self):
        assert 1

    @allure.story('注册模块下的子模块: test4')
    def test_case_04(self):
        assert 1
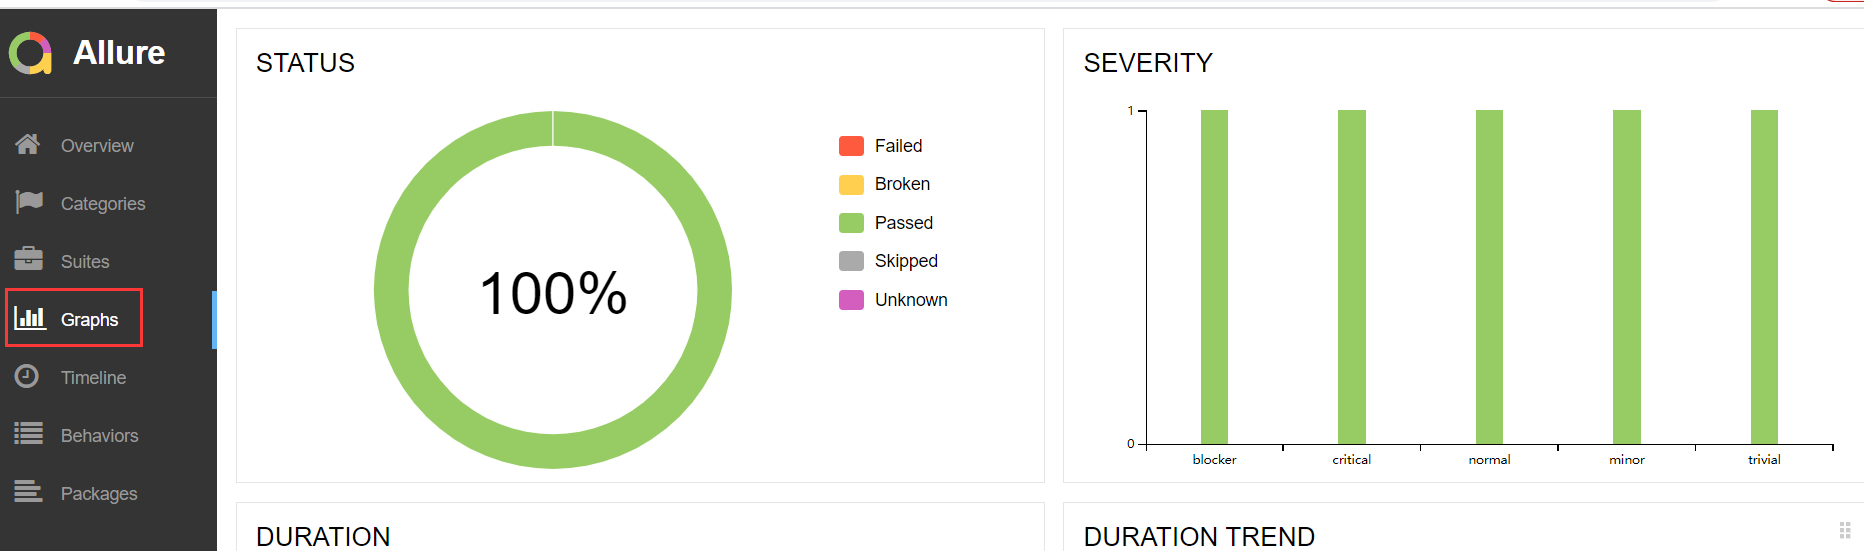
allure.severity
allure.severity用来标识测试用例或者测试类的级别,分为blocker,critical,normal,minor,trivial5个级别。
# -*- coding: utf-8 -*-
__author__ = 'tian'
__data__ = '2020/3/16 16:50'

import allure


@allure.feature("登录模块")
class TestCaseLogin:

    @allure.severity(allure.severity_level.BLOCKER)
    def test_case_01(self):
        assert 1

    @allure.severity(allure.severity_level.CRITICAL)
    def test_case_02(self):
        assert 1

    @allure.severity(allure.severity_level.MINOR)
    def test_case_03(self):
        assert 1

    @allure.severity(allure.severity_level.TRIVIAL)
    def test_case_04(self):
        assert 1

    def test_case_05(self):
        assert 1
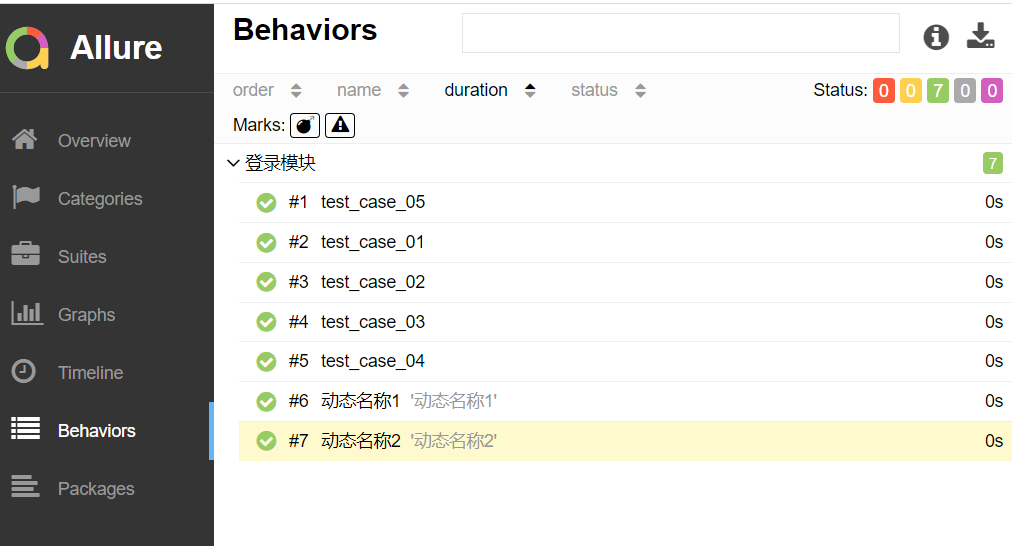
allure.dynamic
# -*- coding: utf-8 -*-
__author__ = 'tian'
__data__ = '2020/3/16 16:50'

import allure
import pytest

@allure.feature("登录模块")
class TestCaseLogin:

    @allure.severity(allure.severity_level.BLOCKER)
    def test_case_01(self):
        assert 1

    @allure.severity(allure.severity_level.CRITICAL)
    def test_case_02(self):
        assert 1

    @allure.severity(allure.severity_level.MINOR)
    def test_case_03(self):
        assert 1

    @allure.severity(allure.severity_level.TRIVIAL)
    def test_case_04(self):
        assert 1

    @pytest.mark.parametrize('name', ["动态名称1", "动态名称2"])
    def test_case_05(self, name):
        allure.dynamic.title(name)
控制用例执行顺序
依赖一个插件:
下载:pip install pytest-ordering
# -*- coding: utf-8 -*-
__author__ = 'tian'
__data__ = '2020/3/16 16:50'

import pytest


class TestCaseLogin:
    @pytest.mark.run(order=3)
    def test_case_03(self):
        print("执行用例03...")
        assert 1


@pytest.mark.run(order=2)
def test_case_01():
    print("执行用例01...")
    assert 1


@pytest.mark.run(order=1)
def test_case_02():
    print("执行了测试用例02...")
    assert 1
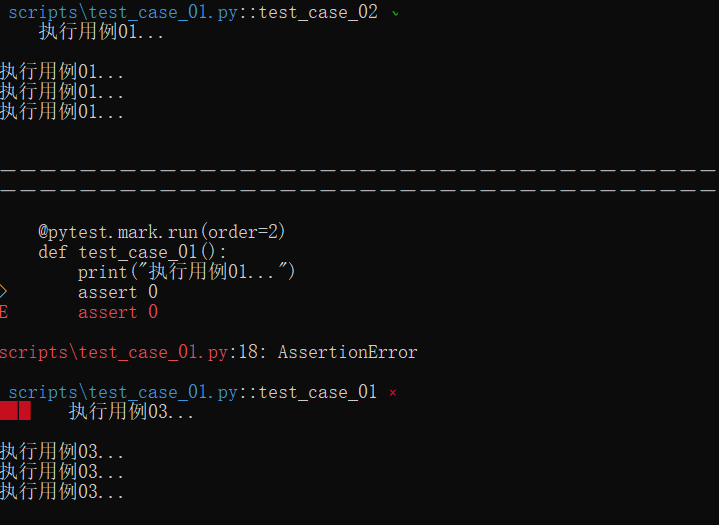
执行顺序:02-->01-->03
手动控制用例的执行顺序的方法给装饰:@pytest.mark.run(order=x) # x参数,是一个整数类型。
排序关系: 0 > 正数 > 没有参与的用例 >负数
失败重试
用例执行失败后可以重新运行
下载插件:pip install pytest-rerunfailures -i https://pypi.douban.com/simple/
使用
pytest.ini文件中,配置:
[pytest]
addopts = -s -v --alluredir ./report/json_result --reruns=3
testpaths = ./scripts
python_files = test_*.py
python_classes = Test*
python_functions = test_*
xfail_strict=true
给addopts字段新增--reruns=3字段,如果用例执行失败后,尝试执行3次。
# -*- coding: utf-8 -*-
__author__ = 'tian'
__data__ = '2020/3/16 16:50'

import pytest


class TestCaseLogin:
    @pytest.mark.run(order=3)
    def test_case_03(self): # 执行3遍
        print("执行用例03...")
        assert 0


@pytest.mark.run(order=2)
def test_case_01():  # 执行3遍
    print("执行用例01...")
    assert 0


@pytest.mark.run(order=1)
def test_case_02():
    print("执行了测试用例02...")
    assert 1
结果:
上面演示了用例执行失败了,然后重新执行多少次都没有成功。
场景2:用例执行失败,重新执行次数内通过了,那么剩余的重新执行的次数将不再执行。
# -*- coding: utf-8 -*-
__author__ = 'tian'
__data__ = '2020/3/16 16:50'

import random
import pytest


def test_case_01():
    print("执行用例01...")
    assert 1  # 断言成功


def test_case_02():
    print("执行用例02...")
    status = random.randint(0, 2)
    if status:
        assert 1  # 断言成功,无需再重复执行了
    else:
        assert 0  # 断言失败,需要重新执行


class TestCaseClass:
    def test_case_03(self):
        print("执行了测试用例03...")
        assert 1
并发执行
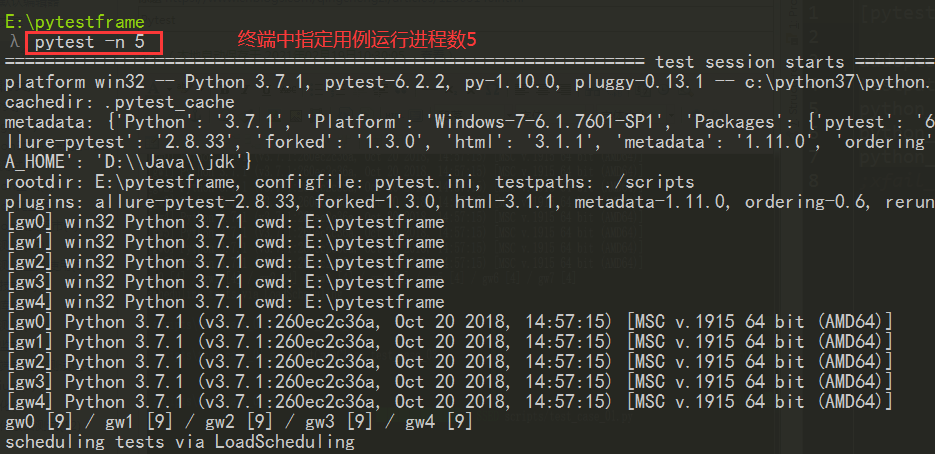
下载:pip install pytest-xdist
两种使用方法:
- 并发配置可以写到配置文件中,然后其它还是按照正常执行用例脚本即可。
- 另外一种就是在终端中指定;pytest -n auto 或者 pytest -n 5 指定用例的进程数
pytest.ini配置文件中配置:
[pytest]

addopts = -v -s --alluredir ./report/json_result -n=auto
testpaths = ./scripts
python_files = test_*.py
python_classes = Test*
python_functions = test_*
(-n=auto)自动侦测系统里的CPU数目然后多进程运行。
使用
# -*- coding: utf-8 -*-
__author__ = 'tian'
__data__ = '2020/3/16 16:50'


import pytest


def test_case_01():
    print("执行用例01...")
    assert 1  # 断言成功


@pytest.mark.skipif(condition=2 > 1, reason="跳过用例")
def test_case_02():
    print("执行用例02...")
    assert 0  # 断言失败


class TestCaseClass:
    def test_case_03(self):
        print("执行了测试用例03...")
        assert 1

    def test_case_04(self):
        print("执行了用例04...")
        assert 1
结果

终端中指定进程运行
pytest-sugar更漂亮更有用的输出
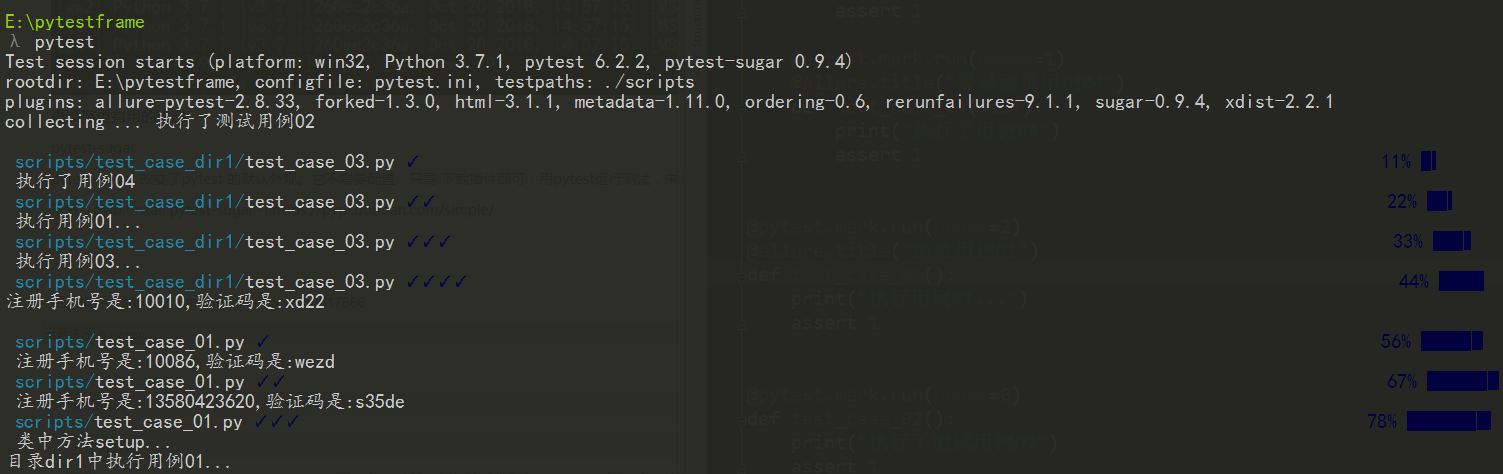
pytest-sugar 改变了pytest 的默认外观。它不需要配置,只需 下载插件即可,用pytest运行测试,来享受更漂亮、更有用的输出。
下载:pyip install pytest-sugar -i https://pypi.douban.com/simple/
pytest-cov
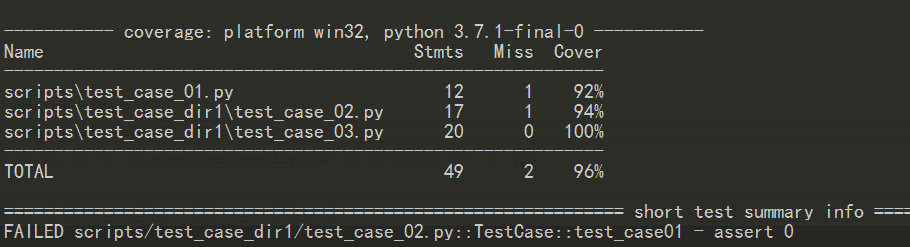
测试覆盖率,来显示哪些代码已经经过测试,哪些还没有。还包括项目的测试覆盖率。
下载:pip install pytest-cov -i https://pypi.douban.com/simple/
使用
pytest.ini中配置
[pytest]

addopts = -s --alluredir ./report/json_result --cov=./scripts
testpaths = ./scripts
python_files = test_*.py
python_classes = Test*
python_functions = test_*
配置--cov=./scripts,统计scripts目录下所有符合规则的测试脚本的覆盖率。
执行:pytest
更多插件:https://zhuanlan.zhihu.com/p/50317866
