高可用HAproxy+Nginx
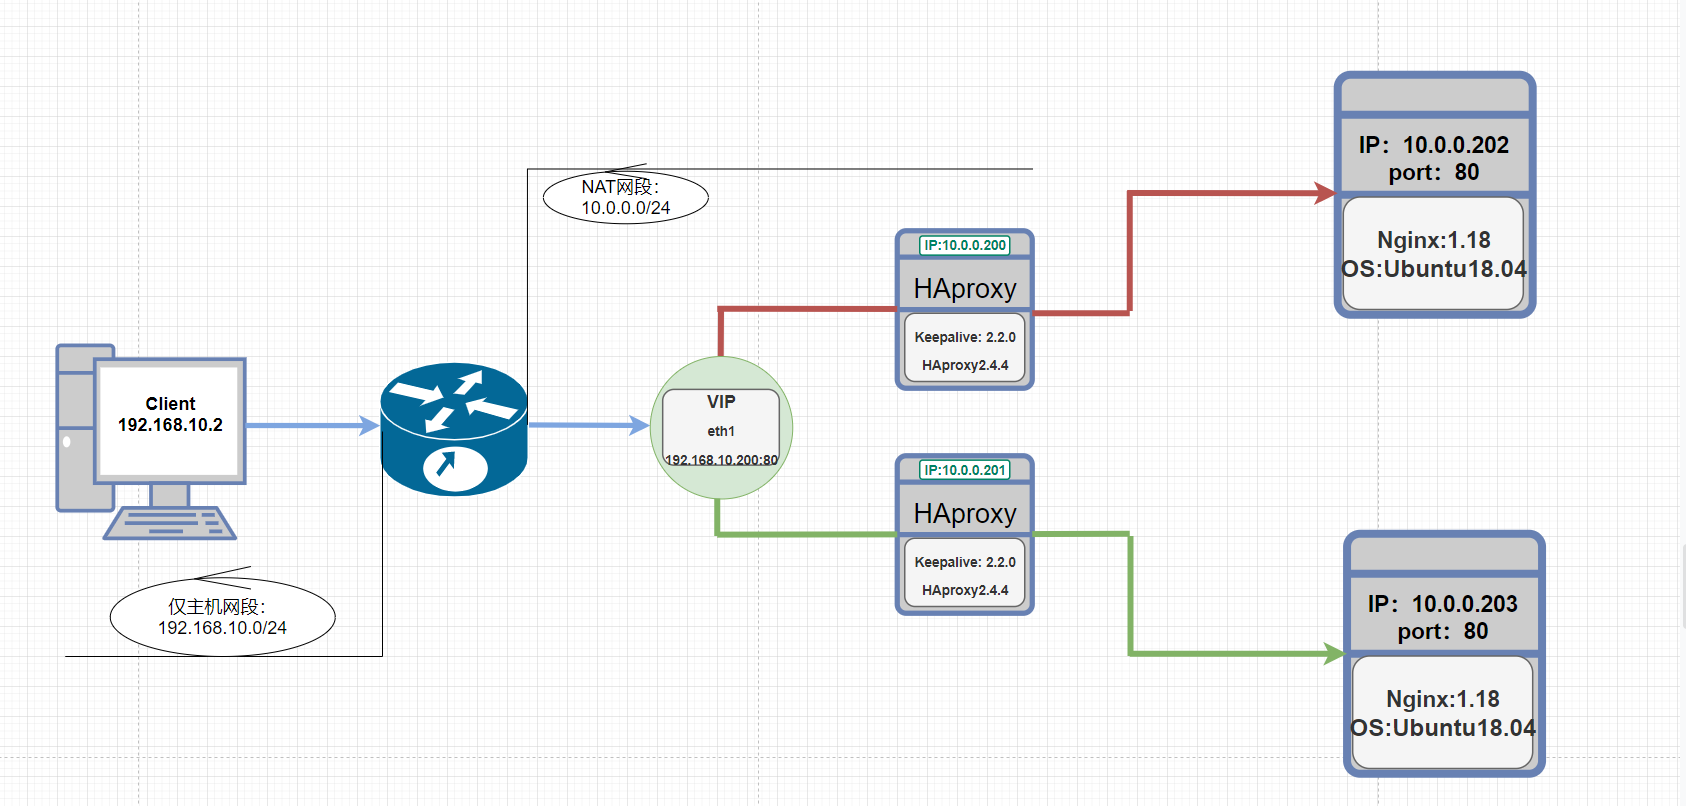
实验配置与机构图:
前述:
首先本次案例由VM虚拟机实现高可用HAproxy+Nginx,通常情况下HAproxy为总代理入口,所以HAproxy需配置两块网卡:eth1:承载对外服务的公网IP、eth0:承载内部互联的私网IP。
其次:因要模拟公私网环境需设立两个网段(仅主机和NAT网段),让Client与公网IP相同一网段模拟公网环境、HAproxy的eth0与后端服务器同一网段模拟私网环境。
最后:HAproxy是公网IP来对外提供服务,因此需将公网IP设置VIP以此来实现高可用。
注:软件安装和网络配置步骤略~
一、将HAproxy的公网IP配置成VIP、设置VRRP脚本根据HAproxy的状态实现VIP的浮动而不是Keepalive自身服务状态、
1.keepalive主配置文件
cat /etc/keepalived/keepalived.conf
! Configuration File for keepalived

global_defs {
   notification_email {
     acassen@firewall.loc
     failover@firewall.loc
     sysadmin@firewall.loc
   }
   notification_email_from Alexandre.Cassen@firewall.loc
   smtp_server 192.168.200.1
   smtp_connect_timeout 30
   router_id node1.haproxy        #自定义名称:MASTER:node1.haproxy BAKCUP:node2.haproxy
   vrrp_skip_check_adv_addr
   #vrrp_strict
   #vrrp_garp_interval 0
   #vrrp_gna_interval 0
   vrrp_mcast_group4 233.6.6.6    #组播地址
}

vrrp_script check_haproxy {       #VRRP脚本
    script "/etc/keepalived/check_haproxy.sh"
    interval 1
    weight -30
    fall 3
    rise 2
    timeout 2
}

include /etc/keepalived/conf.d/*.conf   #子配置文件目录


"keepalived.conf" 32L, 611C
<VRRP脚本>注:需增加执行权限
cat /etc/keepalived/check_haproxy.sh
#!/bin/bash
echo "show info" | socat stdio /var/lib/haproxy/haproxy.sock &>/dev/null   #通过socat工具连接套接字发送命令检查HAproxy的状态
2.创建虚拟路由器(VIP)
cat /etc/keepalived/conf.d/vip.conf
vrrp_instance VI_1 {
    state MASTER     #抢占式,备机设置为BACKUP
    interface eth0   #将虚拟路由器绑定在eth0私网网卡上,以eth0的IP作为心跳线的基点向组播地址发送健康性信息也进而实现心跳线分离。
    virtual_router_id 50   #虚拟路由ID,自定义但主备机需一致,
    priority 100           #VIP浮动的优先级:备需低于主为80
    advert_int 1
    authentication {       #主备之间的明文验证
        auth_type PASS
        auth_pass 1111
    }
    virtual_ipaddress {    #将对外提供服务的公网IP设置成VIP并绑定在eth1网卡上。
        192.168.10.200/24 dev eth1 label eth1:1
    }

#virtual_routes {          #生产中公网IP是有网关的需指向,因案例是VM虚拟机模拟eth1为仅主机网络所以故不设置。
#default via 192.168.10.1
#}

track_script {   #调用定义的VRRP脚本
  check_haproxy
}

notify_master "/etc/keepalived/notify.sh master"
notify_backup "/etc/keepalived/notify.sh backup"
notify_fault "/etc/keepalived/notify.sh fault"
}
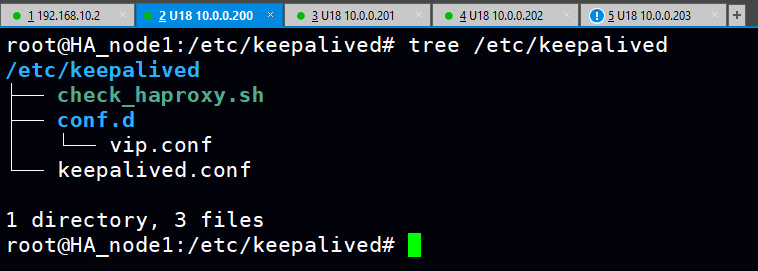
Keepalive总文件数:
3.HAproxy的主配置文件
cat /etc/haproxy/haproxy.cfg
global
        maxconn 100000
        maxsslconn 100000
        maxconnrate 1000
        spread-checks 3
        chroot /apps/haproxy
        stats socket /var/lib/haproxy/haproxy.sock mode 600 level admin   #套接字路径
        user haproxy
        group haproxy
        daemon
        nbthread 2
        cpu-map auto:1/1-2 0-1
        pidfile /var/lib/haproxy/haproxy.pid
        #log 127.0.0.1 local2 info
defaults
        option http-keep-alive
        maxconn 100000
        timeout connect 120s
        timeout client 600s
        timeout server 600s
        timeout check 2s
        #errorfile 400 /etc/haproxy/errorfiles/400.http  #根据错误状态码自定义错误页面
        #errorfile 403 /etc/haproxy/errorfiles/403.http
        #errorfile 500 /usr/local/haproxy/html/500.http
        #errorfile 502 /usr/local/haproxy/html/502.http
        #errorfile 503 /usr/local/haproxy/html/503.http

listen stats  #状态页
        mode http
        bind 10.0.0.200:9999
        stats enable
        #stats hide-version
        log global
        stats uri         /status
        stats auth        admin:123456
###################### acl setting ##############################
acl acl_deny_src src 10.0.0.0/24   #基于源地址匹配,匹配私网地址网段

###################### use acl  #################################
http-request deny if ! acl_deny_src  #调用acl并取反,将所有不是私网地址网段的连接请求拒绝掉(不允许外部访问状态页更加安全)。
4.打开子配置文件nginx.cfg(子配置文件目录需创建并在service文件中指定)
root@HA_node1:/etc/haproxy# cat /etc/haproxy/conf.d/nginx.cfg
frontend nginx  #将haproxy绑定公网VIP的80和443端口作为前端对外提供访问
    bind 192.168.10.200:80
    bind 192.168.10.200:443 ssl crt /etc/haproxy/certs/haproxy.pem   #指定pem文件的路径(需创建私钥和证书并合成)
    mode http   #因为后端集群都是七层应用因此设置为http模式
    log global  #将log纳入全局配置中定义的日志设施当中
    option forwardfor   #七层透传
    http-response del-header Server  #删除原响应报文的版本信息并重新定义
    http-response add-header Server baidu
    compression algo gzip   #进行gzip压缩,压缩指定的文件类型减少网络带宽的消耗(缺陷:CPU开销大、一般在后端设置压缩功能但麻烦)
    compression type compression type text/plain text/html text/css text/xml text/javascript application/javascript
    #http-request set-header X-forwarded-Port %[dst_port]
    #http-request add-header X-forwarded-Proto https if { ssl_fc }
    redirect scheme https if !{ ssl_fc }   #内置acl匹配所有https的连接请求再通过取反匹配所有非https的连接请求,最后通过重定向将所有非https的连接请求发送到https

########## Define acl ####################  #自定义acl
#acl acl_user_agent hdr_sub(User-Agent) -i curl wget  #匹配浏览器类型curl wget的连接请求
acl acl_static_suffix path_end -i .jpg .jpeg .png .gif .css .js .html / #匹配指定静态类型的连接请求(实现动静分离)
acl acl_static_path path_beg -i /static /images /javascript             #匹配URL路径为静态类型的连接请求(实现动静分离)
#acl acl_app path_beg -i /api           #匹配路径是动态类型的连接请求(实现动静分离),由于没有配置动态服务器因此不进行调用(注释)。

########## Use acl #######################     #调用定义的acl实现调度、控制
#http-request deny if acl_user_agent           #将所有浏览器类型是curl和wget的连接请求拒绝掉(生产中),因为测试环境需要用到curl因此不调用。
use_backend static-web if acl_static_suffix    #调度静态的连接请求到后端服务器集群当中
use_backend static-web if acl_static_path
#use_backend app_hosts if acl_app              #将匹配到的动态请求调度到动态的服务器集群中(因没有配置因此注释掉)
#default_backend static-web                    #如果不在acl匹配的连接请求,就会调度到指定的默认的后端集群中处理。
#default_backend app_hosts

#########  Backend hosts #################
backend static-web   #定义后端服务集群
    mode http        #根据业务需求设置前后端的mode,如果设置不一致或不匹配业务需求会导致无法处理请求。
    #balance roundrobin  #官方虽说调度算法可在listen、frontend、backend设置,但在前后端分离的情况下如果在frontend设置会导致无法启动HAproxy(默认调度算法为roundrobin)
    option httpchk HEAD / HTTP/1.1\r\nHost:\ 192.168.10.200   #七层检查性检查,通过HEAD方法去检查后端请求报文的状态而非主体,以此最大化的减少在频繁发起健康性检查时的网络带宽消耗问题
    server nginx1 10.0.0.202:80 weight 1 check inter 3000 fall 3 rise 5
    server nginx2 10.0.0.203:80 weight 1 check inter 3000 fall 3 rise 5
4.私钥文件、证书文件、以及私钥和证书合成的pem文件。注:pem文件需有执行权限
openssl genrsa -out haproxy.key 2048 #生成长度2048的私钥
openssl req -new -x509 -key haproxy.key -out haproxy.crt -subj "/CN=www.qinglin.com" #利用私钥文件生成证书(非交互式)
cat haproxy.key haproxy.crt > haproxy.pem  #利用私钥和证书合成pem文件
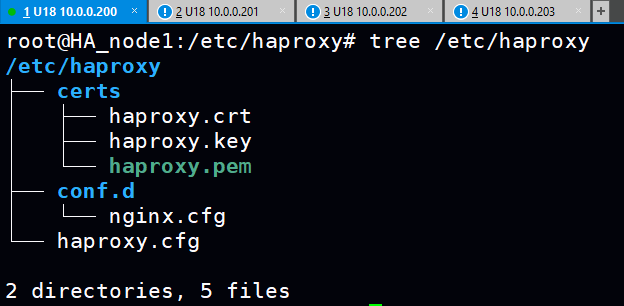
MASTER和BAKCUP总文件数:
5.两点需要注意:
1)VIP不发生脑裂的情况下只会浮动到MASTER,而备机的子配置中HAproxy绑定的是公网VIP(但此时公网VIP不存在于备机),根据某内核参数设定:应用程序无法绑定在一个本机不存在的IP上就会导致HAproxy无法启动。
Starting proxy stats: cannot bind socket (Cannot assign requested address) [10.0.0.200:9999]
解决办法:
1)sysctl -a | grep bind
net.ipv4.ip_nonlocal_bind = 0   #找到此项
2)#设为1表本地即便没有应用程序要bind的IP也允许bind。
vim /etc/sysctl.conf
net.ipv4.ip_nonlocal_bind = 1
3)sysctl -p
2)因为eth1只承载浮动的VIP,没有一个固定的IP的话默认情况下会关闭网卡,这就会导致启动Keepalive时VIP无法浮动到一个关闭的网卡上。注:需添加执行权限
解决办法:
cat /etc/rc.local
#!/bin/bash
    ifconfig eth1 up
注:MASTER和BAKCUP都需设置
6.后端Nginx配置
1)日志格式中添加在进行七层透传时对请求报文所添加首部字段
vim /apps/nginx/conf/nginx.conf
http {
include mime.types;
default_type application/octet-stream;
log_format main '$remote_addr - $remote_user [$time_local] "$request" '
'$status $body_bytes_sent "$http_referer" '
'"$http_user_agent" "$http_x_forwarded_For"'; #添加$http_x_forwarded_For首部字段
access_log logs/access.log main; #取消注释,访问日志调用定义的日志格式,不取消日志则调用默认的日志格式,导致无法获取透传的CIP
2)修改index.html文件以做测试(修改前建议备份)
echo "`hostname -I`:Nginx_1" > /apps/nginx/html/index.html
echo "`hostname -I`:Nginx_2" > /apps/nginx/html/index.html
3)重启Keepalive、HApropxy、Nginx
systemctl restart keepalived.service haproxy.service   #前端
systemctl restart nginx.service
MASTER:可以看到公网VIP已漂移到MASTER、HAproxy的状态页也成功绑定到私网的9999端口上、HAproxy也绑定了公网VIP的80和443端口。
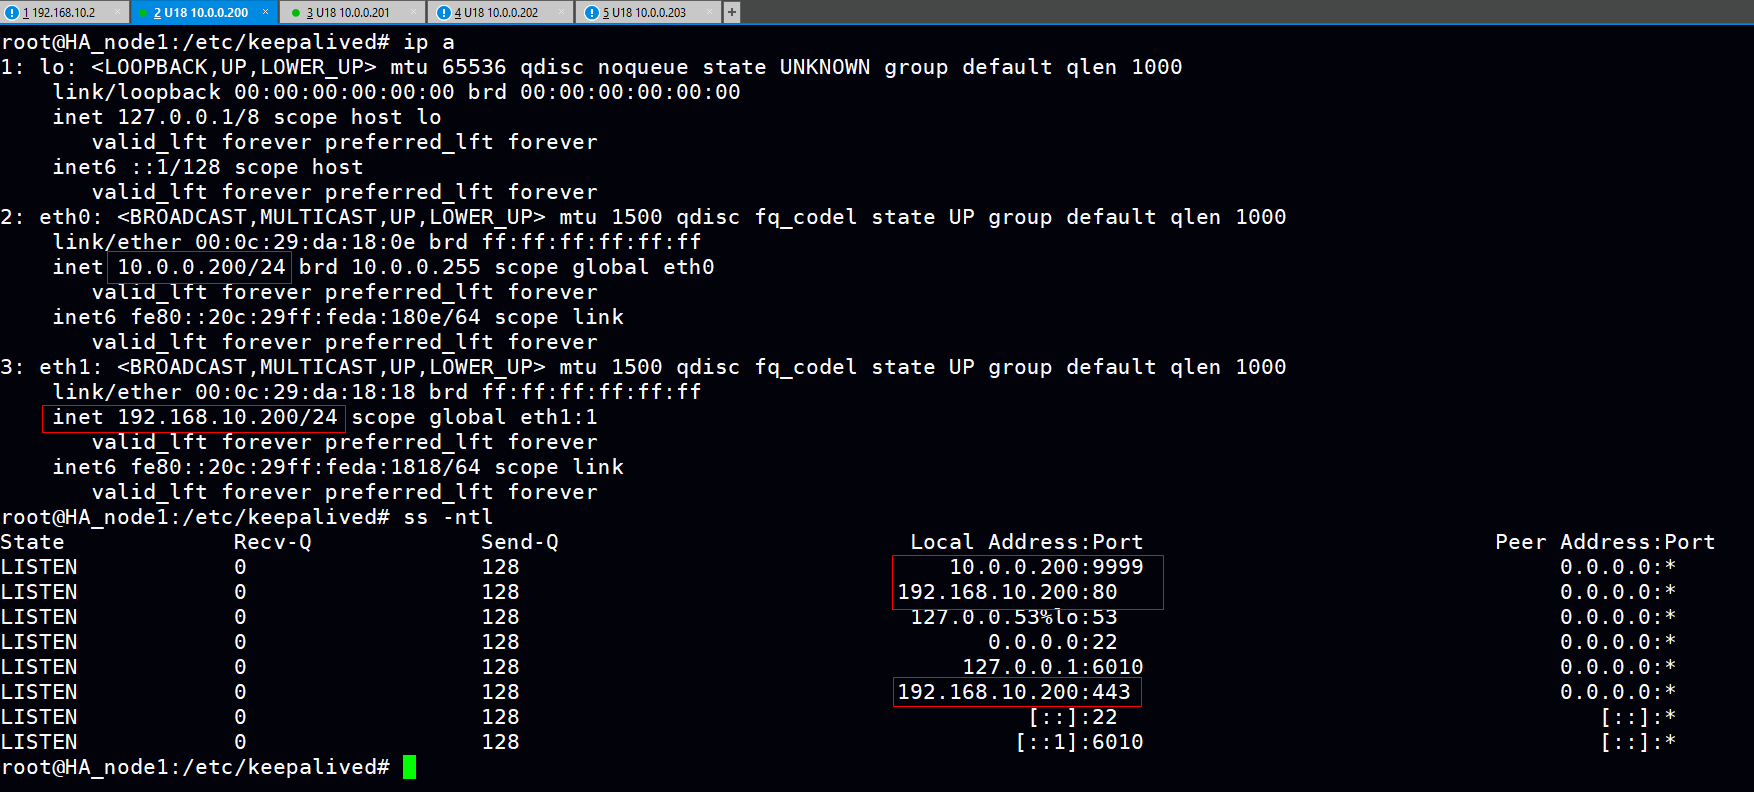
BACKUP:可以看到开启了内核参数后,即便公网VIP并未漂浮到BACKUP,HAproxy也能够将其绑定让服务启动。(状态页可以绑定备机的内网IP,这里懒得改了)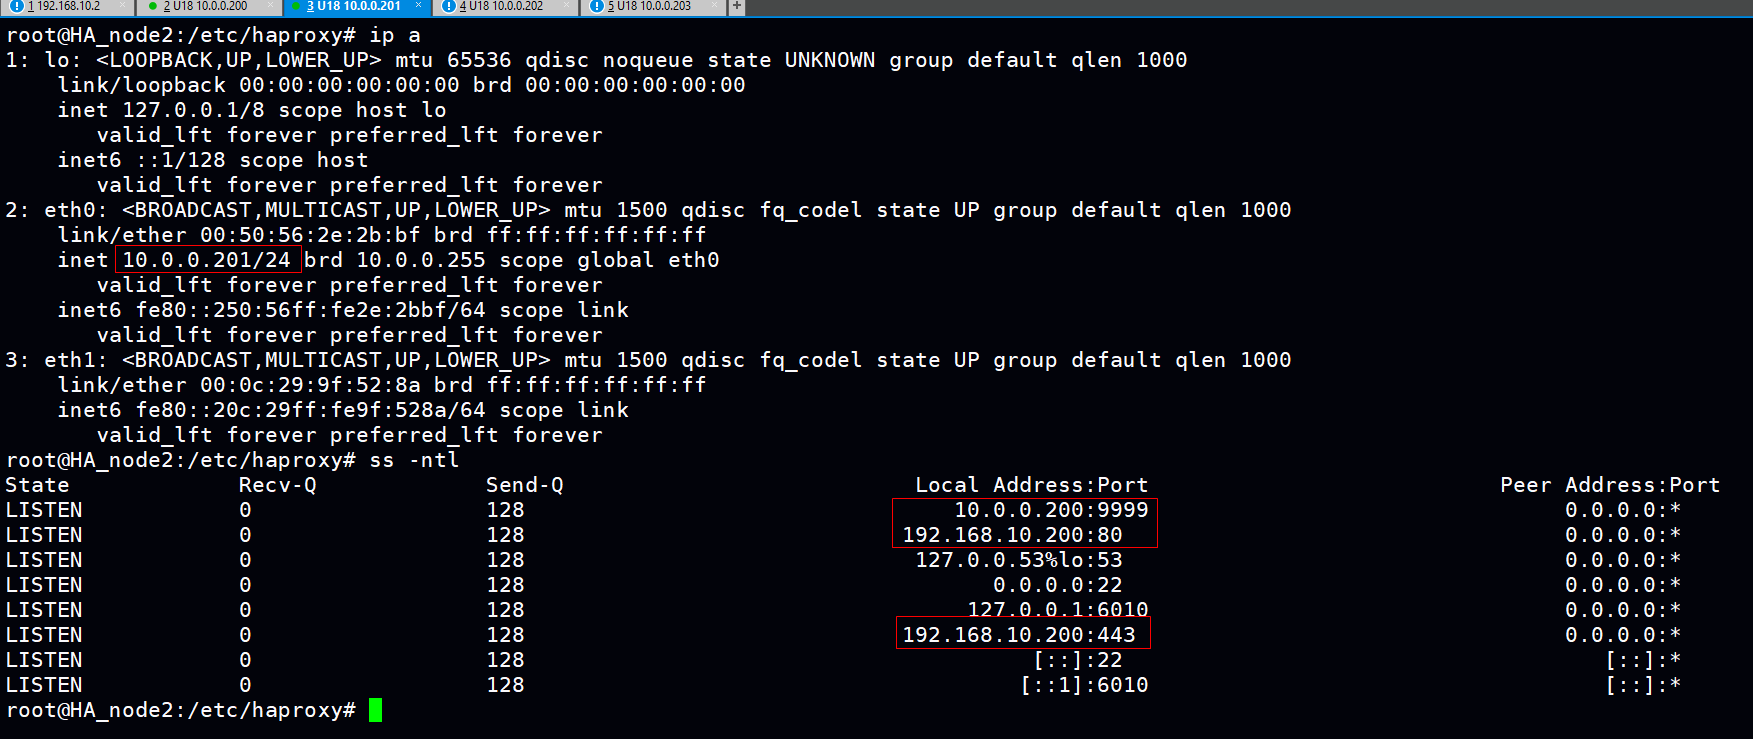
测试环节:
1.通过curl命令访问公网VIP查看调详细过程(也可以通过浏览器的开发者工具查看)
curl -iLkv http://192.168.10.200   #通过http协议进行第一次访问
* About to connect() to 192.168.10.200 port 80 (#0)
*   Trying 192.168.10.200...
* Connected to 192.168.10.200 (192.168.10.200) port 80 (#0)
> GET / HTTP/1.1
> User-Agent: curl/7.29.0
> Host: 192.168.10.200
> Accept: */*
>
< HTTP/1.1 302 Found   #可以看到进行了302跳转(代表着重定向功能生效)
HTTP/1.1 302 Found
< content-length: 0
content-length: 0
< location: https://192.168.10.200/      #http协议经过重定向后变成了https协议
location: https://192.168.10.200/
< cache-control: no-cache
cache-control: no-cache

< #重定向成https协议后连接443端口、因为这不是权威机构办法的证书因此需要ssl证书验证,curl命令的-k可以跳过验证以下是一些证书信息
* Connection #0 to host 192.168.10.200 left intact
* Issue another request to this URL: 'https://192.168.10.200/'
* Found bundle for host 192.168.10.200: 0xf10e90
* About to connect() to 192.168.10.200 port 443 (#1)
*   Trying 192.168.10.200...
* Connected to 192.168.10.200 (192.168.10.200) port 443 (#1)
* Initializing NSS with certpath: sql:/etc/pki/nssdb
* skipping SSL peer certificate verification
* SSL connection using TLS_ECDHE_RSA_WITH_AES_256_GCM_SHA384
* Server certificate:
*     subject: CN=www.qinglin.com
*     start date: Sep 29 04:37:54 2021 GMT
*     expire date: Oct 29 04:37:54 2021 GMT
*     common name: www.qinglin.com
*     issuer: CN=www.qinglin.com
> GET / HTTP/1.1
> User-Agent: curl/7.29.0
> Host: 192.168.10.200
> Accept: */*
>
< HTTP/1.1 200 OK  #访问成功
HTTP/1.1 200 OK
< date: Sat, 02 Oct 2021 16:22:54 GMT
date: Sat, 02 Oct 2021 16:22:54 GMT
< content-type: text/html
content-type: text/html
< content-length: 20
content-length: 20
< last-modified: Tue, 28 Sep 2021 01:50:03 GMT
last-modified: Tue, 28 Sep 2021 01:50:03 GMT
< etag: "615274cb-14"
etag: "615274cb-14"
< accept-ranges: bytes
accept-ranges: bytes
< server: baidu
server: baidu  #版本信息,调度器确实将版本信息修改成指定内容

<
10.0.0.202 :Nginx_1  #index.html中定义的测试信息
* Connection #1 to host 192.168.10.200 left intact


curl -iLkv http://192.168.10.200   #第二次访问
* About to connect() to 192.168.10.200 port 80 (#0)
*   Trying 192.168.10.200...
* Connected to 192.168.10.200 (192.168.10.200) port 80 (#0)
> GET / HTTP/1.1
> User-Agent: curl/7.29.0
> Host: 192.168.10.200
> Accept: */*
>
< HTTP/1.1 302 Found
HTTP/1.1 302 Found
< content-length: 0
content-length: 0
< location: https://192.168.10.200/
location: https://192.168.10.200/
< cache-control: no-cache
cache-control: no-cache

<
* Connection #0 to host 192.168.10.200 left intact
* Issue another request to this URL: 'https://192.168.10.200/'
* Found bundle for host 192.168.10.200: 0x2470e90
* About to connect() to 192.168.10.200 port 443 (#1)
*   Trying 192.168.10.200...
* Connected to 192.168.10.200 (192.168.10.200) port 443 (#1)
* Initializing NSS with certpath: sql:/etc/pki/nssdb
* skipping SSL peer certificate verification
* SSL connection using TLS_ECDHE_RSA_WITH_AES_256_GCM_SHA384
* Server certificate:
*     subject: CN=www.qinglin.com
*     start date: Sep 29 04:37:54 2021 GMT
*     expire date: Oct 29 04:37:54 2021 GMT
*     common name: www.qinglin.com
*     issuer: CN=www.qinglin.com
> GET / HTTP/1.1
> User-Agent: curl/7.29.0
> Host: 192.168.10.200
> Accept: */*
>
< HTTP/1.1 200 OK
HTTP/1.1 200 OK
< date: Sat, 02 Oct 2021 16:23:37 GMT
date: Sat, 02 Oct 2021 16:23:37 GMT
< content-type: text/html
content-type: text/html
< content-length: 20
content-length: 20
< last-modified: Tue, 28 Sep 2021 01:49:49 GMT
last-modified: Tue, 28 Sep 2021 01:49:49 GMT
< etag: "615274bd-14"
etag: "615274bd-14"
< accept-ranges: bytes
accept-ranges: bytes
< server: baidu
server: baidu

<
10.0.0.203 :Nginx_2
* Connection #1 to host 192.168.10.200 left intact
总结:多次访问的index.html(测试信息)发生了变化且比例为1:1,说明调度器的权重设置生效。注:实际进行了多次访问,此案例只贴两次访问的信息。
2.HAproxy状态页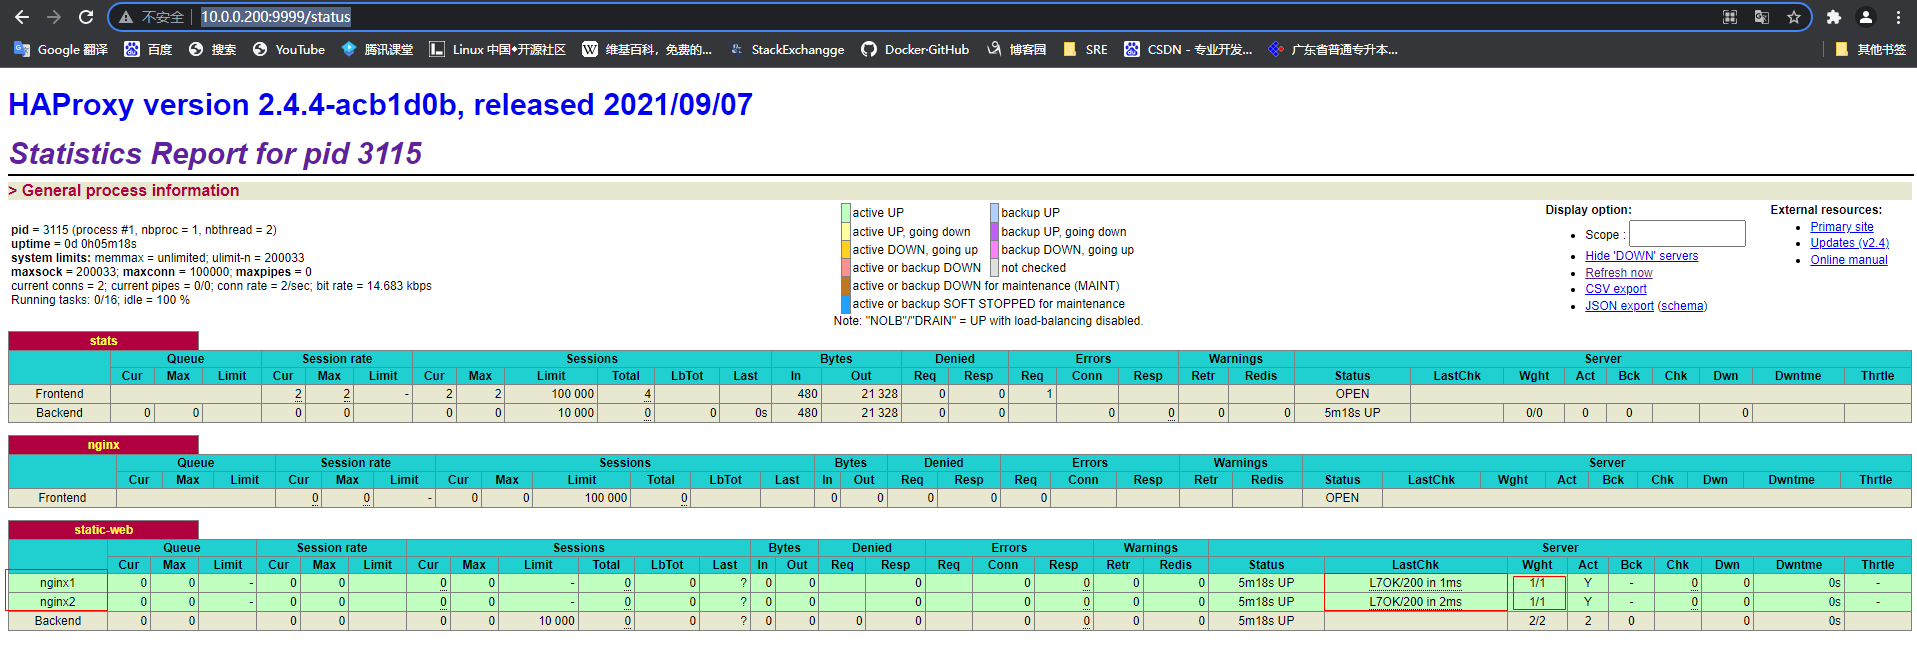
3.后端Nginx的访问日志信息
1)调度到nginx1时,成功透传Client的IP地址到RS。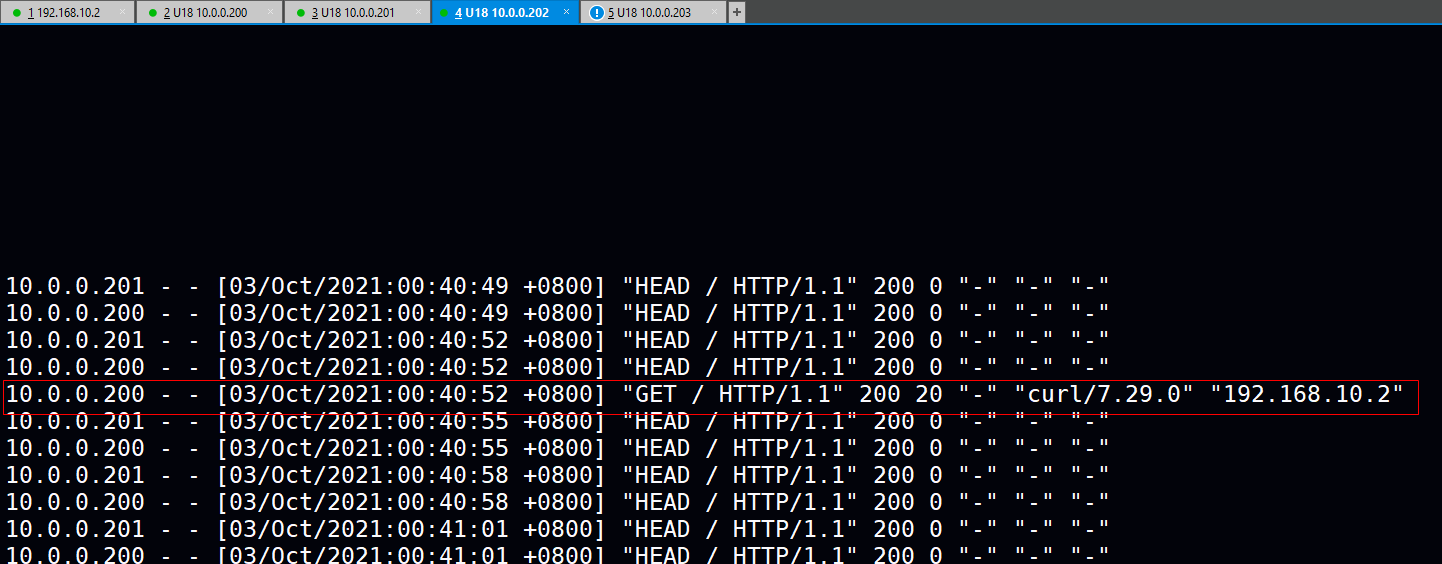
2)调度到nginx2时,成功透传Client的IP地址到RS且主备机都通过HEAD方法进行七层健康性检查。

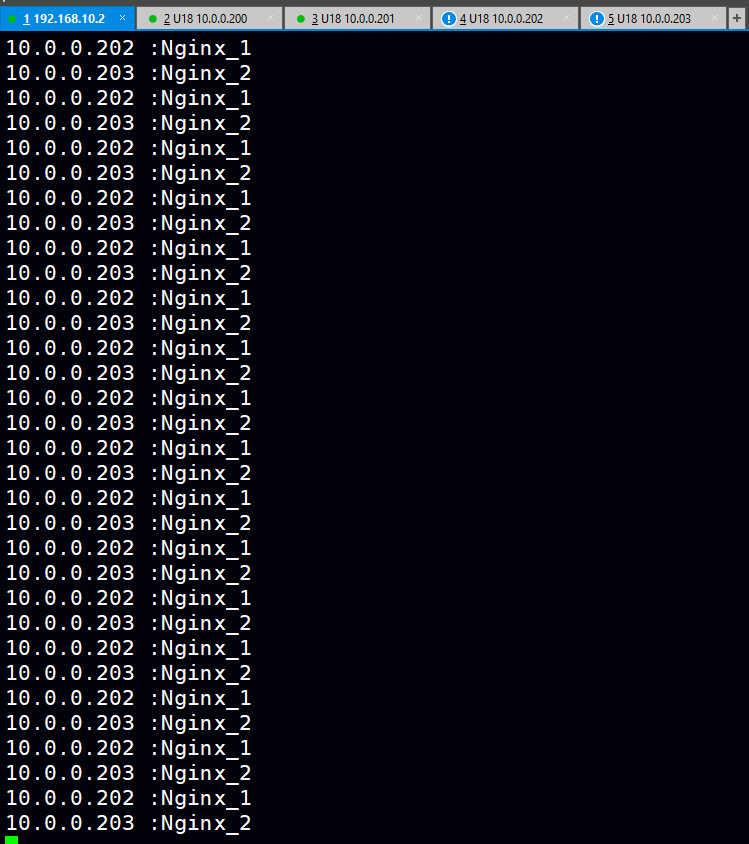
3.模拟MASTER宕机关闭HAproxy服务,Client编个轮询命令进行测试且看公网VIP在切换过程是否受其影响
1)循环测试命令
while true;do curl -iLk http://192.168.10.200;sleep 1;done
2)关闭HAproxy
systemctl stop haproxy.service
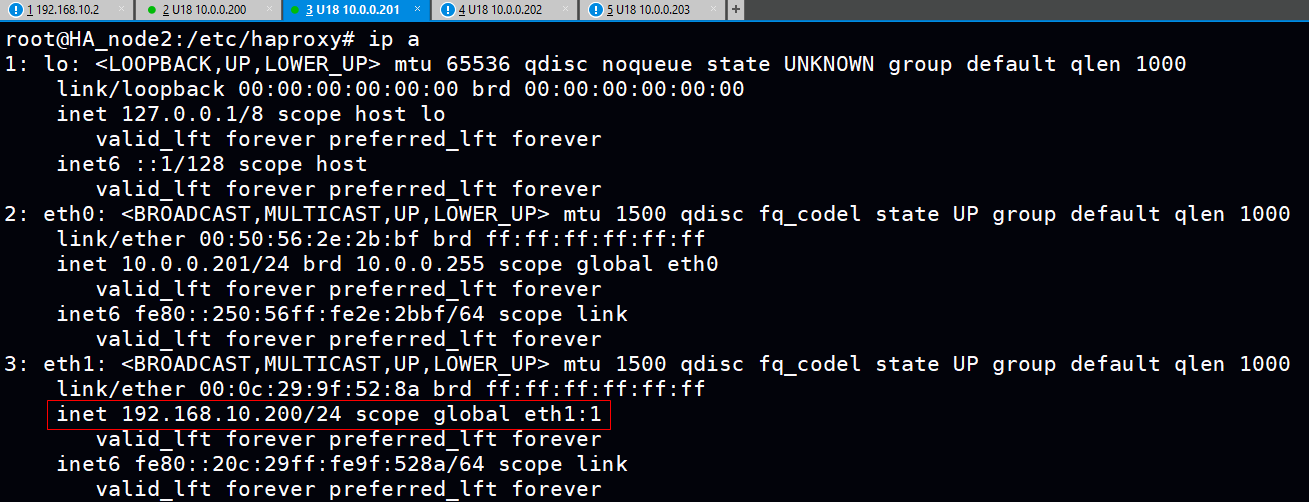
3)在出现短暂的丢包公网VIP漂浮到备机后继续提供Client访问服务。(生产中为提高用户体验可减少健康性检查fall的确定次数)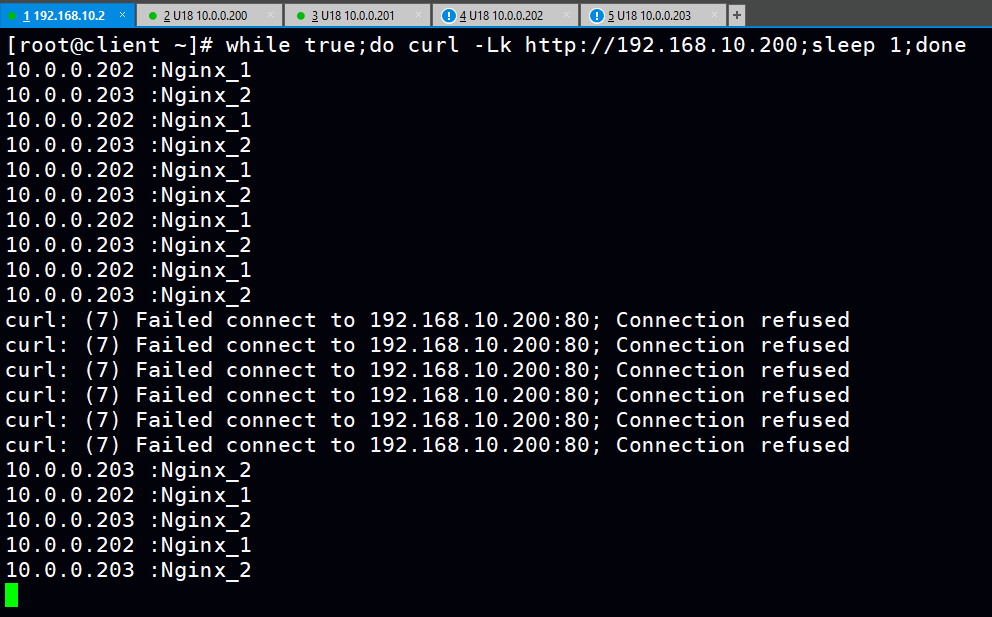
posted on 2021-10-01 20:41 1251618589 阅读(30) 评论(0) 编辑 收藏 举报


