荐 android 如何打包自定义控件(转)
荐 android 如何打包自定义控件(转)
设计自定义的控件对android开发人员来说,是家常便饭了,但是多次做项目的经验证明了一个道理,自定义的控件,可以在其他项目中,多次使用,所以接下来我们来介绍2种常用的打包方式,并讨论他们的利于病。
我们可以假设想要自定义一个改变文字显示的button(纯属假设,这样简单的功能其实也用不着自定义)
首先写好布局文件mybutton.xml
|
1
2
3
4
5
6
7
8
9
10
11
12
13
14
15
16
17
18
19
20
21
22
23
24
25
26
|
<RelativeLayout xmlns:android="http://schemas.android.com/apk/res/android" xmlns:tools="http://schemas.android.com/tools" android:layout_width="match_parent" android:layout_height="match_parent"> <ImageView android:id="@+id/imageView1" android:layout_width="100dp" android:layout_height="100dp" android:paddingBottom="5dip" android:paddingLeft="40dip" android:layout_centerVertical="true" android:paddingTop="5dip" android:src="@drawable/button" /> <TextView android:id="@+id/textView1" android:layout_width="wrap_content" android:layout_height="wrap_content" android:layout_marginLeft="8dip" android:layout_centerVertical="true" android:text="确定" android:layout_toRightOf="@id/imageView1" android:textColor="#000000" /></RelativeLayout> |
再完成控制类MyProgressBar.java
|
1
2
3
4
5
6
7
8
9
10
11
12
13
14
15
16
17
18
19
20
21
22
23
24
25
26
27
28
29
30
31
32
33
34
35
36
37
38
39
40
41
42
43
44
45
46
47
48
49
50
51
52
53
54
55
56
57
58
59
|
package com.swastika.mywidget;import android.content.Context;import android.util.AttributeSet;import android.view.LayoutInflater;import android.view.View;import android.widget.ImageView;import android.widget.LinearLayout;import android.widget.TextView;public class MyProgressBar extends LinearLayout { private ImageView imageView; private TextView textView; boolean flag = true; public MyProgressBar(Context context) { super(context); // TODO Auto-generated constructor stub } public MyProgressBar(Context context, AttributeSet attrs) { super(context, attrs); // TODO Auto-generated constructor stub LayoutInflater inflater=(LayoutInflater) context.getSystemService(Context.LAYOUT_INFLATER_SERVICE); inflater.inflate(R.layout.mybutton, this); imageView=(ImageView) findViewById(R.id.imageView1); textView=(TextView)findViewById(R.id.textView1); textView.setOnClickListener(new OnClickListener() { @Override public void onClick(View v) { // TODO Auto-generated method stub if(flag){ textView.setText("取消"); flag = false; } else { textView.setText("确定"); flag = true; } } }); } /** * 设置图片资源 */ public void setImageResource(int resId) { imageView.setImageResource(resId); } /** * 设置显示的文字 */ public void setTextViewText(String text) { textView.setText(text); } } |
这样只要引入控件com.swastika.mywidget.MyProgressBar,便可以实现功能了。下面就要介绍打包方式了。
方式一:将项目打包成jar包
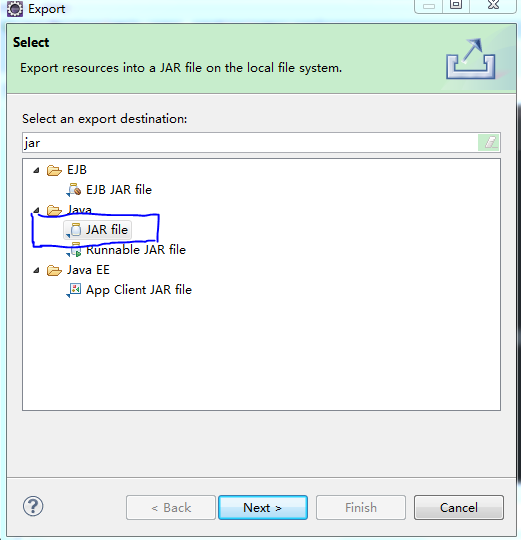
1右击项目,选择export,选择java中的jar如图
图 01
勾选出自定义控件相关文件,如图02
图02
选好后选择finish就完成了导出,
在使用的时候,将要jar包放到新的项目中的libs文件中(一般会自动引入,如果没有自动引入可以右击该包然后选择Build path,再选择add to build path就可以了),
图 03
在新项目布局文件中加入自定义控件;
布局文件main.xml
|
1
2
3
4
5
6
7
8
9
10
11
12
13
14
15
16
17
18
19
20
21
22
|
<RelativeLayout xmlns:android="http://schemas.android.com/apk/res/android" xmlns:tools="http://schemas.android.com/tools" android:layout_width="match_parent" android:layout_height="match_parent" android:paddingBottom="@dimen/activity_vertical_margin" android:paddingLeft="@dimen/activity_horizontal_margin" android:paddingRight="@dimen/activity_horizontal_margin" android:paddingTop="@dimen/activity_vertical_margin" tools:context=".MainActivity" > <TextView android:layout_width="wrap_content" android:layout_height="wrap_content" android:text="@string/hello_world" /> <com.swastika.mywidget.MyProgressBar android:id="@+id/imgBtn0" android:layout_width="wrap_content" android:layout_height="wrap_content" /></RelativeLayout> |
不过运行的时候会发生错误java.lang.RuntimeException: Unable to start activity ComponentInfo{com.example.androidtest/com.example.androidtest.MainActivity}: android.view.InflateException: Binary XML file line #16: Error inflating class com.swastika.mywidget.MyProgressBar,
原因是jar打包后放在drawable中的图片资源无法找到了,,,解决的方式就是将图片等资源文件放在assets文件夹中,再在java代码中映射出来找到资源,这就增加的工作负担,所以通常在使用自定义控件的时候不用这种方式,而是采用下面将要介绍的第二种方式,
优势:jar打包方式,可以用在不使用图片资源的项目中,封装算法等特别方便,便于其他人使用,
劣势:失去了索引,无法使用drawable中的图片资源,封装后的代码修改起来麻烦
方式二:项目作为一个library
在设计自定义控件的时候,在新建时可以选择将项目作为library(如图04),也可以之后进行设置
图 04
右击项目。选择android,再勾选出Is Library即可(如图05);
图 05
这样便可以使用drawable中的图片资源了,不过需要特别注意的是,自定义控件中的图片名称与新项目中的图片资源不能重名,需要自己检查一下(自定义控件中的默认图标ic_launcher.png需要删除掉,不然会报错,经试验xml文件可以重名)
优势:可以使用drawable中的图片资源了,现在google官网上介绍的就是这种方式,简单方便。
posted on 2014-09-19 23:38 qingchen1984 阅读(312) 评论(0) 编辑 收藏 举报


