
nginx的部署和配置
今天我们来介绍一下高性能的http服务器端软件nginx的部署与配置,具体什么是nginx,我这里就先不聊了,感兴趣的同学可以自行去了解。
1.nginx的安装
1.yum安装和源码编译的安装的不同点
目前安装nginx通常会使用两种方法,1.通过操作系统的包管理器进行安装; 2.在官方网站下载源码,编译安装。
下面我们来了解一下两者的区别。
目前在官方的版本种,有两个大方向,一个是开源免费版的nginx,另一个是商业版nginx plus,这两个版本分别有不同的官方网站,如下:
开源版官网:nginx.org
商业版官网:nginx.com
我们这里主要介绍开源版,在开源版下也细分成三个小类:"主线版本”,“稳定版本”,“历史版本”。

我们可以打开如下官方连接,查看上述各个版本的信息。
http://nginx.org/en/download.html
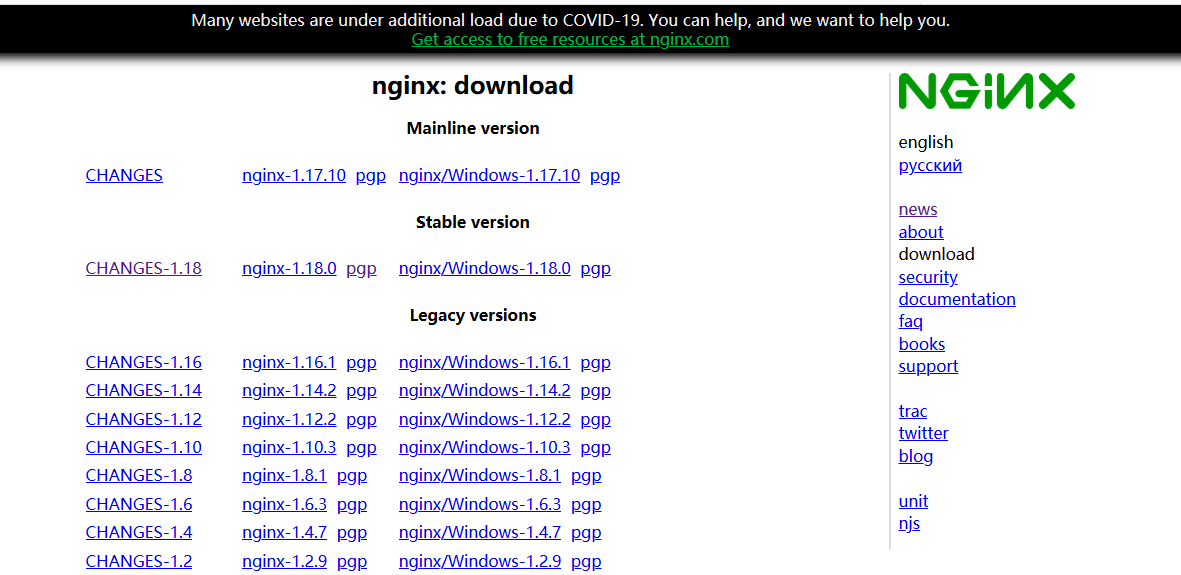
从上图我们看出,在当前时间下,nginx的最新版的版本是1.17.10,稳定版本是1.18.0 这里可能会有人奇怪1.17是最新版,1.18还是稳定版?这个就跟nginx他们自己定义有关系了,我们这里不用在这里纠结,在上面我们还看到一些历史版本的版本号。
2.yum的方式安装
目前有很多yum源可供我们进行安装nginx,比如我个人通常会使用阿里的epel源,或者使用nginx官方的yum源,此处已nginx官网的yum源为例,访问如下官网链接可以查看yum源的配置过程。
http://nginx.org/en/linux_packages.html
从上述链接中可以找到主线版和稳定版的yum源,此处,我们配置稳定版的官方yum源,配置过程如下:
首先,添加nginx官方yum源文件,此处创建的源文件为/etc/yum.repos.d/nginx.repo,文件内容如下
[root@2-no yum.repos.d]# cat nginx.repo
[nginx]
name=nginx repo
baseurl=http://nginx.org/packages/centos/$releasever/$basearch/
gpgcheck=0
enabled=1
官网源配置完成后,使用如下命令安装
[root@2-no rpm]# yum install -y nginx
完成上述配置即可成功安装nginx,很简单吧。
3.编译安装
首先,从官网下载对应的源码包,访问官网的下载页面,连接如下
http://nginx.org/en/download.html
从上述链接中找到你要下载的nginx版本,此处我下载稳定版nginx-1.18.0,并将下载后的包解压
#首先我们下载安装一些依赖包,安装哪些依赖取决于你安装了哪些模块,不同的模块依赖的包不同
[root@test-no ~]# yum install -y vim lrzsz tree screen psmisc lsof tcpdump wget ntpdate gcc gcc-c++ glibc glibc-devel pcre pcre-devel openssl openssl-devel systemd-devel net-tools iotop bc zip unzip zlib-devel bash-completion nfs-utils automake libxml2 libxml2-devel libxslt libxslt-devel perl perl-ExtUtils-Embed
[root@test-no src]# wget http://nginx.org/download/nginx-1.18.0.tar.gz
[root@test-no src]# tar -zxvf nginx-1.18.0.tar.gz
#进入解压目录,查看其内部的文件结构,如下
[root@test-no src]# cd nginx-1.18.0/
[root@test-no nginx-1.18.0]# ll
total 760
drwxr-xr-x 6 nexus mysql    326 Jun  1 11:17 auto
-rw-r--r-- 1 nexus mysql 302863 Apr 21 22:09 CHANGES       #当前版本的nginx都修复了哪些bug、做了哪些变更、新增了哪些功能,在这里,下面的.ru是俄文版
-rw-r--r-- 1 nexus mysql 462213 Apr 21 22:09 CHANGES.ru
drwxr-xr-x 2 nexus mysql    168 Jun  1 11:17 conf    #conf目录中的文件是一些nginx配置文件的模板文件,编译安装时这些文件最终会被拷贝到安装目录中
-rwxr-xr-x 1 nexus mysql   2502 Apr 21 22:09 configure     #此目录中的configure脚本文件,进行一些编译安装的相关设置
drwxr-xr-x 4 nexus mysql     72 Jun  1 11:17 contrib   #contrib目录中的vim目录中的文件可以帮助我们在使用vim编辑nginx配置文件时提供语法高亮功能。
drwxr-xr-x 2 nexus mysql     40 Jun  1 11:17 html        #html目录中的文件是一些静态页面的模板文件
-rw-r--r-- 1 nexus mysql   1397 Apr 21 22:09 LICENSE
drwxr-xr-x 2 nexus mysql     21 Jun  1 11:17 man      #man目录是帮助文档的目录
-rw-r--r-- 1 nexus mysql     49 Apr 21 22:09 README
drwxr-xr-x 9 nexus mysql     91 Jun  1 11:17 src        #src目录是源代码目录
#看看当前configure脚本中都支持哪些参数,执行如下命令,可以看到编译安装nginx时我们可以使用的配置选项
[root@test-no nginx-1.18.0]# ./configure --help
执行"./configure --help"命令后,你可以看到很多选项信息,此处就不列出这些信息了,最常用的莫过于--prefix选项了,使用--prefix选项可以指定nginx编译安装的目录,
除了一些常见的目录设置选项,你应该还会看到好多类似"--with-XXX_module "或" --without-XXX_module"的选项,这些选项是什么意思呢?说到这些选项,又要提到我们刚
才介绍的概念了,那就是"模块"的概念,我们已经知道,nginx是高度模块化的,每个模块就代表一个功能,而且刚才也提到过,只有编译安装的方式才能指定安装哪些模块,不安装
哪些模块,其实,你可以这样理解,"--with-XXX_module "选项表示指明安装对应的模块," --without-XXX_module"选项表示指明不安装对应的模块。
[root@test-no src]# mkdir -p nginx
#现在开始执行configure 脚本,并且启用一些可能会用到的常用模块,操作如下
[root@test-no nginx-1.18.0]# ./configure --prefix=/usr/local/src/nginx --with-file-aio --with-http_auth_request_module --with-http_ssl_module \
--with-http_v2_module --with-http_realip_module --with-http_addition_module --with-http_xslt_module=dynamic --with-http_geoip_module=dynamic \
--with-http_sub_module --with-http_dav_module --with-http_flv_module --with-http_mp4_module --with-http_gunzip_module --with-http_gzip_static_module \
--with-http_random_index_module --with-http_secure_link_module --with-http_degradation_module --with-http_slice_module --with-http_stub_status_module \
--with-http_perl_module=dynamic --with-pcre --with-pcre-jit --with-stream=dynamic --with-stream_ssl_module
#上面的脚本执行完之后没报错的话,就执行下面的命令进行编译安装
[root@test-no nginx-1.18.0]# make && make instal
#nginx命令简化方法
[root@test-no nginx]# echo 'export PATH=/usr/local/src/nginx/sbin:$PATH'>>/etc/profile
[root@test-no nginx]# source /etc/profile
[root@test-no nginx]# which nginx
/usr/local/src/nginx/sbin/nginx
2.nginx的相关配置
1.配置文件语法高亮配置
通过上述两种方法安装nginx以后,当你使用vim编辑器编辑nginx的配置文件时,vim编辑器是无法自动识别出nginx的相关语法的,所以,使用vim编辑器编辑nginx配置文件时,无法实现"语法高亮"功能,也就是说,默认情况下,使用vim编辑nginx配置文件时,没有彩色的语法着色,对于使用者来说,这样体验不好,nginx官方很贴心,在源码包中为我们提供了vim针对nginx的语法高亮配置文件,我们只要把这些文件拷贝到vim的对应目录中即可直接使用,方法很简单,如下
#首先我们进入到源码包解决目录下,将相应的语法文件拷贝到对应的目录中,即可完成
[root@test-no nginx-1.18.0]# cp -r contrib/vim/* /usr/share/vim/vimfiles/
无论是通过官方yum源的方式还是通过编译安装的方式,都可以使用上述方法实现nginx的语法高亮,如果你跟我一样,习惯使用阿里镜像源中的epel源安装nginx,那么你会发现,通过epel源安装nginx后,会自动完成上述vim语法文件的配置过程,不用我们手动拷贝对应的文件,对应的语法文件也是安装包自带的,也很是方便的。
2.nginx目录结构
[root@test-no ~]# cd /usr/local/src/nginx
[root@test-no nginx]# ll
total 0
drwxr-xr-x 2 root root 333 Jun  2 10:22 conf         #存放了nginx相关的配置文件
drwxr-xr-x 2 root root  40 Jun  2 09:59 html         #默认提供的web服务的"根目录"
drwxr-xr-x 2 root root   6 Jun  2 09:59 logs         #nginx日志的存放目录
drwxr-xr-x 2 root root 135 Jun  2 09:59 modules      #存放了一些模块会用到的库
drwxr-xr-x 2 root root  19 Jun  2 09:59 sbin         #存放了nginx的二进制文件,我们需要使用nginx二进制文件启动nginx
3.nginx.conf 配置文件说明
[root@test-no nginx]# cd conf/
#为了演示方便,我删除了一些没用的空行,最终,nginx.conf中真正有用的部分如下:
[root@test-no conf]# sed -i '/^[[:space:]]*#/'d nginx.conf
[root@test-no conf]# cat nginx.conf
worker_processes  1;                        ← worker 进程数量
events {                                    ←事件区块
    worker_connections  1024;               ←每个worker进程可以处理的连接数
}                                            ←事件区块结束
http {                                      ← HTTP 区块
    include       mime.types;               ←支持的媒体文件
    default_type  application/octet-stream;←默认的媒体类型
    sendfile        on;                     ←高效传输模式
    keepalive_timeout  65;                  ←超时时间
    server {                                 ← server 区块
        listen       80;                    ←端口
        server_name  localhost;             ←域名
        location / {                        ←第一个location区块
            root   html;                     ←站点目录
            index  index.html index.htm;     ←首页文件
        }                                    ←第一个location区块结束
        error_page   500 502 503 504  /50x.html;  ← 错误信息配置
        location = /50x.html {                  文件位置
            root   html;                      在哪找:路径
        }
    }                                         ← server 区块结束
}                                            ← HTTP 区块结束
从上述语法配置示例可以看出,上述示例可以分为几个逻辑部分,http部分、server部分、location部分,或者说,上述示例可以分为几个逻辑块,http块、server块、location块,聪明如你一定看出来了,每个"配置块"都是使用大括号"{ }"作为分界线的,而且,从缩进可以看出,它们是有层级关系的,http中可以配置多个server,一个server中可以配置多个location,我们知道,nginx最基础的功能就是用来提供http服务,所以,跟http有关的公共配置,可以放置在http块中,http块中又可以配置多个server,那么server代表了什么呢?我们在一台主机中安装了nginx,那么能不能让这台nginx主机同时提供多个web服务呢?答案是肯定的,每一个server就代表一个http服务,我们可以同时配置多个server,以便同时提供多个http服务,不同的server可以使用不同的配置,写入到某个server块中的配置只对对应的http服务生效,如果多个server存在共同的公用配置,则可以将共同的配置写在http块中,以便多个server共享这些配置,一个server块中又可以有一个或多个location,location又是什么意思呢?当我们访问一个网络上的资源时,都是通过url访问的,你可以把location当做url的一部分,此处,我们使用如下url作为示例:
http://www.zsythink.net/archives/1591
上述链接中的"/archives"部分就是一个location,我们可以通过location将url中的路径和服务器的某个目录建立起关联关系,此处不用纠结,在用到它时我们再来细说。
4.yum安装和编译安装后的区别
编译安装后,我们通过如下二进制文件启动nginx
/nginx安装路径/sbin/nginx
通过yum源安装nginx后,对应的二进制文件已经自动拷贝到了/usr/sbin目录中,而此目录默认已经加入到环境变量中,所以我们可以在任意目录直接执行"nginx"命令启动nginx
编译安装后,nginx相关的配置文件存放在如下路径中
/nginx安装路径/conf/
而通过yum源安装nginx后,相关的配置文件存放在如下路径中
/etc/nginx/
通过编译安装的方式安装nginx以后,默认的"server块"直接配置到了nginx.conf文件中,而通过官方yum源安装nginx后,默认的"server块"会配置在"/etc/nginx/conf.d/default.conf"文件中,换句话说就是,如果你通过官方yum源安装了nginx,那么你在/etc/nginx/nginx.conf文件中无法找到默认提供的server块,只能在/etc/nginx/conf.d/default.conf文件中找到默认的server块,这是为什么呢?其实,我们从/etc/nginx/nginx.conf文件中就能找到答案,打开/etc/nginx/nginx.conf文件,查看默认的http块的配置,你会在http块中发现如下配置指令
include /etc/nginx/conf.d/*.conf;
出现上述情况的根本原因就在于这条配置指令,include指令表示将指定的文件中的内容包含到当前位置中,举个例子,如果我在http配置块中的第三行设置了"include test.conf;"指令,那么test.conf文件中的所有内容都会替换到http配置块的第三行,换句话说就是,虽然文本内容写在test.conf文件中,但是通过include指令替换后,相当于test.conf中的文本写在了http块中的第三行。
那么,理解了include指令的作用以后,再回过头看刚才的配置,就一目了然了。
"include /etc/nginx/conf.d/*.conf;"这条指令的作用就是将"/etc/nginx/conf.d/*.conf"文件中的内容替换到当前指令所在的位置,由于使用了"*"作为通配符,所以/etc/nginx/conf.d/目录中所有以".conf"作为后缀名的文件都会被匹配到,/etc/nginx/conf.d/default.conf文件自然也会被匹配到,所以最终,http块中include指令所在位置的文本内容会被替换成/etc/nginx/conf.d/default.conf文件中的内容,而/etc/nginx/conf.d/default.conf文件中的内容恰好是默认提供的server块配置,当然,如果你在/etc/nginx/conf.d/目录中放了一些其他以".conf"结尾的文本文件,那么这些文件中的内容也会因为刚才的include指令而被包含到nginx.conf文件中。
综上所述,通过官方yum源安装nginx后,虽然/etc/nginx/nginx.conf文件中看不到默认server块的配置,但是并不代表没有提供默认的server块配置,只是通过include指令的方式,将默认server块的配置单独放置在了/etc/nginx/conf.d/default.conf文件中,最终效果与直接将server块配置写入到http块中无异。其实,即使是通过编译安装的方式安装的nginx,也可以借鉴这种配置方式,当我们配置了多个server块时,可以将各个server块分别提取出来,单独放置到一个配置文件中,然后再使用include指令引用对应的配置文件,这样就能从逻辑上将各个server块的配置隔离到不同的配置文件中,结构上更加分明,也方便我们进行配置管理,这些操作在以后都会进行实际的演示,不必着急,此时,你只要搞明白大概的原理即可。
通过官方yum安装后,如果你查看了/etc/nginx/conf.d/default.conf中提供的默认server块配置,那么你会发现,默认server块中的location块配置的root指令对应的路径是"/usr/share/nginx/html",也就是说,默认提供的server对应的文档根目录是此路径,我们需要将对应的资源放置到此目录中,即可通过默认的服务进行访问了。
如果你没有使用官方yum源,而是使用了epel源安装了nginx,那么配置文件和默认的index.html页面可能又是另外一番样子了,但是只要搞明白原理,都是可以轻松应对的。
3.常见错误及解决办法
1 .nginx软件安装过程中遇到的问题
#执行configure脚本
[root@test-no nginx-1.18.0]# ./configure --prefix=/usr/local/src/nginx --with-file-aio --with-http_auth_request_module --with-http_ssl_module \
--with-http_v2_module --with-http_realip_module --with-http_addition_module --with-http_xslt_module=dynamic --with-http_geoip_module=dynamic \
--with-http_sub_module --with-http_dav_module --with-http_flv_module --with-http_mp4_module --with-http_gunzip_module --with-http_gzip_static_module \
--with-http_random_index_module --with-http_secure_link_module --with-http_degradation_module --with-http_slice_module --with-http_stub_status_module \
--with-http_perl_module=dynamic --with-pcre --with-pcre-jit --with-stream=dynamic --with-stream_ssl_module
#这里执行完之后我们会发现类似下面的错误,这里就是上面讲的,我们要安装的模块缺少某些依赖包没装。
./configure: error: the GeoIP module requires the GeoIP library.
You can either do not enable the module or install the library.
#解决依赖后再执行一下上面的configure脚本
[root@test-no nginx-1.18.0]# yum install -y GeoIP-devel
2.nginx软件启动过程中遇到的问题
nginx软件重复启动产生的错误信息
[root@test-no ~]# nginx
nginx: [emerg] bind() to 0.0.0.0:80 failed (98: Address already in use)
nginx: [emerg] bind() to 0.0.0.0:80 failed (98: Address already in use)
nginx: [emerg] bind() to 0.0.0.0:80 failed (98: Address already in use)
nginx: [emerg] bind() to 0.0.0.0:80 failed (98: Address already in use)
nginx: [emerg] bind() to 0.0.0.0:80 failed (98: Address already in use)
nginx: [emerg] still could not bind()
解决方法:

nginx软件已经启动无需反复启动,如果需要重新启动需要停止nginx进程或者用reload方式进行重启
这里还有一个情况就是其他服务依赖的nginx占用了80端口,例如gitlab服务,这个时候我们就需要修改端口,来解决这个问题
3.启动Nginx 时如下报错"nginx:[emerg]getpwnam(“nginx”〉failed"
解答这是因为没有对应的Nginx服务用户,执行useradd nginx-s/sbin/no丨ogin-M创建 Nginx用户即可
4.nginx软件编译安装后,看不到程序目录(/application)
说明:编译安装步骤不对(配置 编译 编译安装生成/appliation)
5.nginx软件排查问题三部曲说明
a 在客户端上ping服务器端IP,检查链路是否通畅
b 在客户端上telnet服务器端IP、端口,检查链路访问是否通畅
c 在客户端上wget检测模拟页面访问是否正常
6.【注意】403状态码出现情况原因
01. 服务阻止客户端访问
02. 服务端站点目录中,没有指定首页文件信息
4.nginx软件使用命令参数
下面的nginx一般使用绝对路径,但是如果你配置了环境变量,直接nginx也可以
1.nginx 启动方法
[root@test-no ~]# nginx
2.nginx停止方法
[root@test-no ~]# nginx -s stop
使用"-s"选项除了能够发送stop信号,还能发送quit信号、reopen信号以及reload信号,那么这三种信号分别代表什么意思呢?我们一一道来
quit信号:与stop信号的作用类似,quit信号作用也是用于停止nginx服务,quit信号和stop信号的区别在于,nignx进程收到stop信号以后会立即停止服务,而收到quit信号后,不会再接收新的请求,但是会先处理完已经接受的链接请求,处理完这些请求之后再停止服务,这种停止方式被称之为"优雅的停止"。
reload信号:reload信号的作用就是在不停止服务的情况下重载配置文件,比如,nginx正在正常的提供服务,此时,管理员修改了nginx.conf文件中的配置指令,管理员希望新的配置立刻生效,但是又不希望重启nginx服务,此时就可以使用"nginx -s reload"命令重载配置文件,以便在不重启nginx的情况下载入新的配置,同时避免了因重启而造成的服务中断。
reopen信号:利用reopen信号可以使nignx进程重新打开日志文件,以便实现日志分割的效果
3.nginx重启方法(平滑重启)
[root@test-no ~]# nginx -s reload
#这个命令执行的前提是nginx是启动的,不然会报找不到pid文件
4.检查配置文件语法是否正确
[root@test-no ~]# nginx -t
nginx: the configuration file /usr/local/src/nginx/conf/nginx.conf syntax is ok
nginx: configuration file /usr/local/src/nginx/conf/nginx.conf test is successful
5.显示配置参数 -V (大写V)
[root@test-no ~]# nginx -V
nginx version: nginx/1.18.0
built by gcc 4.8.5 20150623 (Red Hat 4.8.5-39) (GCC)
built with OpenSSL 1.0.2k-fips  26 Jan 2017
TLS SNI support enabled
configure arguments: --prefix=/usr/local/src/nginx --with-file-aio --with-http_auth_request_module --with-http_ssl_module --with-http_v2_module --with-http_realip_module --with-http_addition_module --with-http_xslt_module=dynamic --with-http_geoip_module=dynamic --with-http_sub_module --with-http_dav_module --with-http_flv_module --with-http_mp4_module --with-http_gunzip_module --with-http_gzip_static_module --with-http_random_index_module --with-http_secure_link_module --with-http_degradation_module --with-http_slice_module --with-http_stub_status_module --with-http_perl_module=dynamic --with-pcre --with-pcre-jit --with-stream=dynamic --with-stream_ssl_module
6.nginx软件使用过程中深入说明
①. nginx软件语法检查方法:
nginx -t
②. nginx软件访问测试过程:
curl -v www.baidu.com
③. nginx软件编译参数查看:
nginx -V <--- 查看原有的编译参数信息
5.虚拟主机配置
1.利用nginx服务搭建文件共享服务器
通过配置 autoindex on; 参数
使用 autoindex参数,nginx能识别的直接显示,不识别的直接下载
配置完 autoindex on; 参数以后 会显示站点下的文件信息
对于nginx可以解析的资源会解析相应的内容
对于nginx不可以解析的资源会直接下载
[root@test-no ~]# cat /usr/local/src/nginx/conf/nginx.conf
worker_processes  1;
events {
    worker_connections  1024;
}
http {
    include       mime.types;
    default_type  application/octet-stream;
    sendfile        on;
    keepalive_timeout  65;
    server {
        listen       80;
        server_name  www.qingbai.com;
        location / {
            root   html/www;
 #           index  index.html index.htm;
          autoindex on;
        }
        error_page   500 502 503 504  /50x.html;
        location = /50x.html {
            root   html;
        }
    }
}
[root@test-no ~]# nginx -t
nginx: the configuration file /usr/local/src/nginx/conf/nginx.conf syntax is ok
nginx: configuration file /usr/local/src/nginx/conf/nginx.conf test is successful
[root@test-no ~]# nginx -s reload
#创建测试文件和目录
[root@test-no ~]# mkdir /usr/local/src/nginx/html/www/test1 -p
[root@test-no ~]# mkdir /usr/local/src/nginx/html/www/test2 -p
[root@test-no ~]# mkdir /usr/local/src/nginx/html/www/test3 -p
[root@test-no ~]# touch /usr/local/src/nginx/html/www/test4
接下来修改本机的hosts文件,然后访问测试

2.基于域名的虚拟主机
[root@test-no ~]# cat /usr/local/src/nginx/conf/nginx.conf
worker_processes  1;
events {
    worker_connections  1024;
}
http {
    include       mime.types;
    default_type  application/octet-stream;
    sendfile        on;
    keepalive_timeout  65;
    server {
        listen       80;
        server_name  www.test1.com;
        location / {
            root   html/test1;
      index  index.html index.htm;
        }
        error_page   500 502 503 504  /50x.html;
        location = /50x.html {
            root   html;
        }
    }
    server {
        listen       80;
        server_name  www.test2.com;
        location / {
            root   html/test2;
          index  index.html index.htm;
        }
        error_page   500 502 503 504  /50x.html;
        location = /50x.html {
            root   html;
        }
    }
    server {
        listen       80;
        server_name  www.test3.com;
        location / {
            root   html/test3;
          index  index.html index.htm;
        }
        error_page   500 502 503 504  /50x.html;
        location = /50x.html {
            root   html;
        }
    }
}
[root@test-no ~]# nginx -t
nginx: the configuration file /usr/local/src/nginx/conf/nginx.conf syntax is ok
nginx: configuration file /usr/local/src/nginx/conf/nginx.conf test is successful
创建站点目录
[root@test-no nginx]# for name in test1 test2 test3 ;do mkdir html/$name -p ;done
创建主页文件
[root@test-no nginx]# for name in test1 test2 test3 ;do echo "web01 $name" > html/$name/index.html ;done
检查主页内容信息
[root@test-no nginx]# for name in test1 test2 test3 ;do cat html/$name/index.html ;done
web01 test1
web01 test2
web01 test3
修改主机hosts文件
[root@test-no nginx]# cat /etc/hosts
127.0.0.1   localhost localhost.localdomain localhost4 localhost4.localdomain4
::1         localhost localhost.localdomain localhost6 localhost6.localdomain6
172.31.46.3 www.test1.com www.test2.com www.test3.com
测试
[root@test-no nginx]# curl www.test1.com
web01 test1
[root@test-no nginx]# curl www.test2.com
web01 test2
[root@test-no nginx]# curl www.test3.com
web01 test3
3.基于端口的虚拟主机
[root@test-no nginx]# cat /usr/local/src/nginx/conf/nginx.conf
worker_processes  1;
events {
    worker_connections  1024;
}
http {
    include       mime.types;
    default_type  application/octet-stream;
    sendfile        on;
    keepalive_timeout  65;
    server {
        listen       80;
        server_name  www.test1.com;
        location / {
            root   html/test1;
      index  index.html index.htm;
        }
        error_page   500 502 503 504  /50x.html;
        location = /50x.html {
            root   html;
        }
    }
    server {
        listen       81;
        server_name  www.test1.com;
        location / {
            root   html/test2;
          index  index.html index.htm;
        }
        error_page   500 502 503 504  /50x.html;
        location = /50x.html {
            root   html;
        }
    }
}
[root@test-no nginx]# nginx -t
nginx: the configuration file /usr/local/src/nginx/conf/nginx.conf syntax is ok
nginx: configuration file /usr/local/src/nginx/conf/nginx.conf test is successful
[root@test-no nginx]# nginx -s reload
检查端口信息
[root@test-no nginx]# netstat -lntup |grep nginx
tcp        0      0 0.0.0.0:80              0.0.0.0:*               LISTEN      10528nginx: master
tcp        0      0 0.0.0.0:81              0.0.0.0:*               LISTEN      10528nginx: master
测试访问
[root@test-no nginx]# curl www.test1.com:80
web01 test1
[root@test-no nginx]# curl www.test1.com:81
web01 test2
4.基于IP的虚拟主机
[root@test-no ~]# ip a
1: lo: <LOOPBACK,UP,LOWER_UP> mtu 65536 qdisc noqueue state UNKNOWN qlen 1
    link/loopback 00:00:00:00:00:00 brd 00:00:00:00:00:00
    inet 127.0.0.1/8 scope host lo
       valid_lft forever preferred_lft forever
    inet6 ::1/128 scope host
       valid_lft forever preferred_lft forever
2: eth0: <BROADCAST,MULTICAST,UP,LOWER_UP> mtu 1500 qdisc pfifo_fast state UP qlen 1000
    link/ether fa:16:3e:e6:3e:3e brd ff:ff:ff:ff:ff:ff
    inet 172.31.46.3/24 brd 172.31.46.255 scope global dynamic eth0
       valid_lft 27830sec preferred_lft 27830sec
    inet6 fe80::f816:3eff:fee6:3e3e/64 scope link
       valid_lft forever preferred_lft forever
#首先我们添加两个IP
[root@test-no ~]# ifconfig eth0:0 172.31.46.10 netmask 255.255.255.0 up    #eth0表示网卡名字,eth0:0中的后面那个0,
是代表第几个新增加的ip,如0,1,2,3, 172.31.46.10是新增加的ip地址,up表示立即激活
[root@test-no ~]# ifconfig eth0:1 172.31.46.11 netmask 255.255.255.0 up
[root@test-no ~]# ip a
1: lo: <LOOPBACK,UP,LOWER_UP> mtu 65536 qdisc noqueue state UNKNOWN qlen 1
    link/loopback 00:00:00:00:00:00 brd 00:00:00:00:00:00
    inet 127.0.0.1/8 scope host lo
       valid_lft forever preferred_lft forever
    inet6 ::1/128 scope host
       valid_lft forever preferred_lft forever
2: eth0: <BROADCAST,MULTICAST,UP,LOWER_UP> mtu 1500 qdisc pfifo_fast state UP qlen 1000
    link/ether fa:16:3e:e6:3e:3e brd ff:ff:ff:ff:ff:ff
    inet 172.31.46.3/24 brd 172.31.46.255 scope global dynamic eth0
       valid_lft 27669sec preferred_lft 27669sec
    inet 172.31.46.10/24 brd 172.31.46.255 scope global secondary eth0:0
       valid_lft forever preferred_lft forever
    inet 172.31.46.11/24 brd 172.31.46.255 scope global secondary eth0:1
       valid_lft forever preferred_lft forever
    inet6 fe80::f816:3eff:fee6:3e3e/64 scope link
       valid_lft forever preferred_lft forever
#注意:这个设置之后,重启会失效
不失效的方法是将上面命令加入到文件/etc/rc.d/rc.local里面
[root@test-no ~]# cat /usr/local/src/nginx/conf/nginx.conf
worker_processes  1;
events {
    worker_connections  1024;
}
http {
    include       mime.types;
    default_type  application/octet-stream;
    sendfile        on;
    keepalive_timeout  65;
    server {
        listen      172.31.46.10:80;
        server_name  www.test1.com;
        location / {
            root   html/test1;
      index  index.html index.htm;
        }
        error_page   500 502 503 504  /50x.html;
        location = /50x.html {
            root   html;
        }
    }
    server {
        listen       172.31.46.11:80;
        server_name  www.test1.com;
        location / {
            root   html/test2;
          index  index.html index.htm;
        }
        error_page   500 502 503 504  /50x.html;
        location = /50x.html {
            root   html;
        }
    }
}
[root@test-no ~]# nginx -t
nginx: the configuration file /usr/local/src/nginx/conf/nginx.conf syntax is ok
nginx: configuration file /usr/local/src/nginx/conf/nginx.conf test is successful
#重启服务,注意使用的是直接重启的方式
#只要nginx配置文件中涉及到IP地址的更改只能正真的重启才生效
[root@test-no ~]# nginx -s stop
[root@test-no ~]# nginx
[root@test-no ~]# netstat -lntup |grep ng
tcp        0      0 172.31.46.11:80         0.0.0.0:*               LISTEN      14856nginx: master
tcp        0      0 172.31.46.10:80         0.0.0.0:*               LISTEN      14856nginx: master
[root@test-no ~]# curl 172.31.46.11
web01 test2
[root@test-no ~]# curl 172.31.46.10
web01 test1
