vue-admin后台管理系统
- 简洁版: https://gitee.com/panjiachen/vue-admin-template

- 加强版: https://gitee.com/panjiachen/vue-element-admin
- npm install # 建议不要直接使用 cnpm 安装以来,会有各种诡异的 bug

- npm run dev
- build: webpack 相关,很少去动到

- src
	-layout: 放入一些组件与mixins
	- utils: request.js 是 axios二次封装
	- views: 放置的是'路由组件'
先搞定静态组件,比如登录页面的文字说明
### login.vue
......
<style lang="scss"> // 全局css
......
<style lang="scss" scoped> // 组件内部css
### Login.index.vue
......
<style lang="scss" scoped>
    $bg:#2d3a4b;
    $dark_gray:#889aa4;
    $light_gray:#eee;

    .login-container {
      ......
      background-color: $bg;
      ......
      background:url(~@/assets/1.png); // 新增两项
      background-size: 100% 100%;
- 搞定
静态组件以后,下来就是观察页面结构和JS逻辑
element-ui表单组件科普
- :model 是一个'对象',可以打包表单内的所有数据
	- 示例:
		loginForm: {
            username: 'admin',
            password: '111111'
          },

- "rules: 指定表单验证规则,是一个'对象',可以校验表单内的数据

	- 示例:
		loginRules: {
            username: [{ required: true, trigger: 'blur', validator: validateUsername }],
            password: [{ required: true, trigger: 'blur', validator: validatePassword }]
          },
- 修改原有的登录逻辑(登录成功以后存储token),换成我们熟悉的代码(使用async 和 await替换旧的写法)
### store.modules.users.js
import { login... } from '@/api/user' // 导入假请求
......
const actions = {
  // user login
  async login({ commit }, userInfo) {
    const { username, password } = userInfo
    // mock发的假请求
    var res = await login({ username: username.trim(), password: password })
    console.log(res) // {code: 20000, data: {token: 'admin-token'}}
    if(res.code == 20000){
      // 使用原有的逻辑
      commit('SET_TOKEN', res.data.token)
      setToken(res.data.token)
      return 'ok'
    }else{
      return Promise.reject(new Error('登录失败!'))
    }
    // 以下是原有的逻辑,因为以前没有 async 和 await
    // return new Promise((resolve, reject) => {
    //   login({ username: username.trim(), password: password }).then(response => {
    //     const { data } = response
    //     commit('SET_TOKEN', data.token)
    //     setToken(data.token)
    //     resolve()
    //   }).catch(error => {
    //     reject(error)
    //   })
    // })
  },
- http://39.98.123.211:8170/swagger-ui.html
### src.api.user.js
......
import request from '@/utils/request'

export function login(data) {
  return request({
    // url: '/vue-admin-template/user/login',
    url: '/admin/acl/index/login', // 根据文档,替换成真实地址
    method: 'post',
    data
  })
}

export function getInfo(token) {
  return request({
    // url: '/vue-admin-template/user/info',
    url: '/admin/acl/index/info', // 修改
    method: 'get',
    params: { token }
  })
}

export function logout() {
  return request({
    // url: '/vue-admin-template/user/logout',
	url: '/admin/acl/index/logout', // 修改
    method: 'post'
  })
}
### utils.request.js
......
service.interceptors.request.use(
  config => {
    if (store.getters.token) {
      // config.headers['X-Token'] = getToken()
      config.headers['token'] = getToken() // 修改和后端约定的token名称
    }
    ......
  },
  error => {
    ......
  }
)
......
response => {
    ......
    // 增加响应200的判断(正常响应请求,服务器有可能返回20000也有可能返回200)
    // 这种差异主要是 mock 和 真实服务器 造成的
    if (res.code !== 20000 && res.code !== 200) {
      Message({
       ......
      })
### vue.config.js
......
devServer: {
    port: port,
    open: true,
    overlay: {
      warnings: false,
      errors: true
    },
    //配置代理跨域
    proxy: {
      '/dev-api': {
        // target: 'http://39.98.123.211:8170', // 一定要加上8170端口号,否则无法登录系统
        // 以下为最新接口地址(接口错了很麻烦)
        target:"http://gmall-h5-api.atguigu.cn",
        pathRewrite: { '^/dev-api':'' },
      },
    },
  },
路由搭建
### router.index.js
......
{
    path: '/',
    component: Layout,
    redirect: '/dashboard',
    children: [{
    ......
      meta: { title: '首页', icon: 'dashboard' } // 增加文字提示
    }]
  },
- 新建
product组件(列表项),新建子列表项Attr,Sku,Spu,tradeMark,加入路由
### router.index.js
......
{	// 模仿模板的套路配置
    path: '/product', // 新增
    component: Layout,
    name:'Product',
    meta: { title: '商品管理', icon: 'el-icon-goods' },
    children: [
      // 新增4个二级路由
      {
        path: 'trademark',
        name: 'TradeMark',
        component: () => import('@/views/product/tradeMark'),
        meta: { title: '品牌管理' }
      },
      {
        path: 'attr',
        name: 'Attr',
        component: () => import('@/views/product/Attr'),
        meta: { title: '平台属性管理' }
      },
      {
        path: 'spu',
        name: 'Spu',
        component: () => import('@/views/product/Spu'),
        meta: { title: 'Spu管理' }
      },
      {
        path: 'sku',
        name: 'Sku',
        component: () => import('@/views/product/Sku'),
        meta: { title: 'Sku管理' }
      },
    ]
  },
tradeMark组件
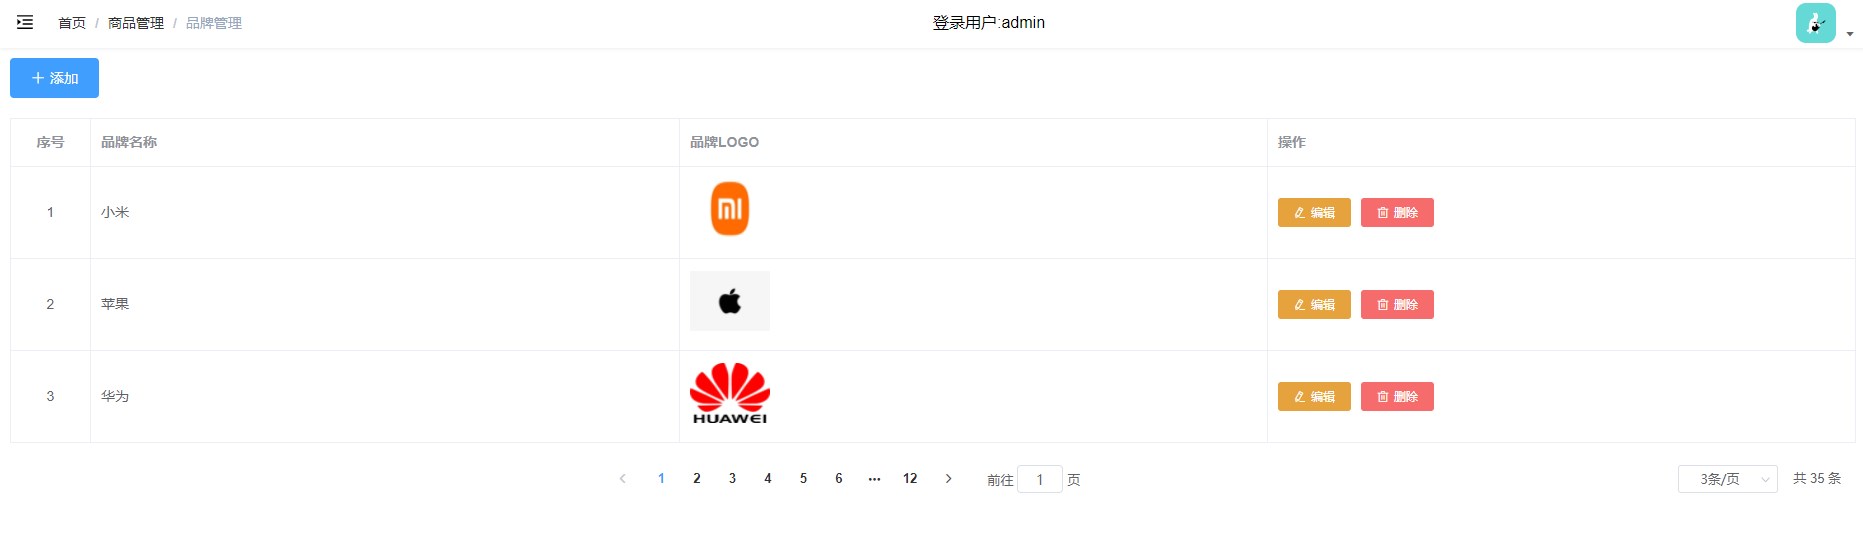
### tradeMark.index.vue
<template>
  <div>
  	<!--添加按钮-->
    <el-button type="primary" icon="el-icon-plus" style="margin: 10px 0px;">添加</el-button>

	<!--
		:data对应数据源
		:prop对应data中的key值
	-->
    <el-table style="width: 100%" border="">
      <el-table-column prop="prop" label="序号" width="80px" align="center">
      </el-table-column>
      <el-table-column prop="prop" label="品牌名称" width="width">
      </el-table-column>
      <el-table-column prop="prop" label="品牌Logo" width="width">
      </el-table-column>
      <el-table-column prop="prop" label="操作" width="width">
      </el-table-column>
    </el-table>

    <!--
      @size-change="handleSizeChange"
      @current-change="handleCurrentChange"
      page-sizes: 选择器,每页选择显示几条数据,[3,5,10]
      page-count: 页码数量,必须奇数
      layout: 组件布局
    -->
    <el-pagination
      :current-page="6"
      :page-size="3"
      :page-sizes="[3,5,10]"
      :page-count="7"
      :total="99"
      layout="prev,pager,next,jumper,->,sizes,total"
      >
    </el-pagination>
  </div>
</template>

<script>
  export default {
    name: "tradeMark",
  }
</script>

<style>
</style>
### api.index.js
import * as attr from './product/attr.js'
import * as sku from './product/sku.js'
import * as spu from './product/spu.js'
import * as trademark from './product/tradeMark.js'

export default {
  attr,
  sku,
  spu,
  trademark
}
### api.product.tradeMakr.js
......
import request from '@/utils/request'
// 获取商品品牌
export const reqTradeMarkList = (page,limit)=>request({
  url:`/admin/product/baseTrademark/${page}/${limit}`,
  method:'get'
})
### main.js
......
import API from '@/api'
Vue.prototype.$API = API
### tradeMark.index.vue

<template>
  <div>
    ......

	<!--:data用来接收数据源,border用来显示表格边框-->
    <el-table style="width: 100%" border :data="list">
      <!--
      	index: 用来生成索引列(序号列)
      	width: 指定列的宽度
      	align:指定文字的对齐方式
      -->
      <el-table-column type="index" label="序号" width="80px" align="center">
      </el-table-column>

      <!--
      	prop: ':data数据源的项'
      	label:指定列的名称
      -->
      <el-table-column prop="tmName" label="品牌名称" width="width">
      </el-table-column>

      <!--
      	直接遍历的话,是文本URL,更希望能直接显示图片,所以做了插槽处理(使用'插槽'生成我们需要的结构)
      	slot-scope: 遍历 data数据源,获取'item'和'index'
      		- 这里只能命名为 row 和 $index,不能写其他名字,会报错
      -->
      <el-table-column prop="logoUrl" label="品牌Logo" width="width">
        <template slot-scope="{row,$index}">
          <img :src="row.logoUrl" alt="" style="width: 100px;height: 100px;">
        </template>
      </el-table-column>

      <!--和上面一样的套路-->
      <el-table-column prop="prop" label="操作" width="width">
        <template slot-scope="{row,$index}">
          <el-button type="warning" icon="el-icon-edit" size="mini">修改</el-button>
          <el-button type="danger" icon="el-icon-delete" size="mini">删除</el-button>
        </template>
      </el-table-column>
    </el-table>

    <!--
      @size-change="handleSizeChange"
      @current-change="handleCurrentChange"
      page-sizes: 选择器,每页选择显示几条数据,[3,5,10]
      page-count: 页码数量,必须奇数
      layout: 组件布局

      style不要写成':style'
      @current-change: 用户点击页数,触发该事件
      @size-change: 改变每页展示的数量触发
    -->
    <el-pagination
      style="margin-top: 20px;textAlign:center"
      :current-page="page"
      :page-size="limit"
      :page-sizes="[3,5,10]"
      :page-count="7"
      :total="total"
      layout="prev,pager,next,jumper,->,sizes,total"
      @current-change="getPageList"
      @size-change="handleSizeChange"
      >
    </el-pagination>
  </div>
</template>

<script>
  export default {
    name: "tradeMark",
    data(){
      return {
        page:1, // 初始化数据
        limit:4,
        total:0,
        list:[]
      }
    },
    mounted(){
      this.getPageList(); // 获取数据
    },
    methods:{
      async getPageList(pager=1){ // 设置默认值
        this.page = pager;
        const {page,limit} = this;
        let res = await this.$API.trademark.reqTradeMarkList(page,limit)
        if(res.code == 200){
          this.total = res.data.total
          this.list = res.data.records
        }
      },
      handleSizeChange(limit){ // 接收limit
        this.limit = limit;
        this.getPageList();
      }
    }
  }
</script>
添加 功能的实现
- 先搞定静态组件,用户一点击
添加 或者 修改按钮,弹出对话框
- 用到的组件:
Dialog对话框(嵌套表单),upload上传
### tradeMark.index.vue
......
<!-- Form -->
<!-- <el-button type="text" @click="dialogFormVisible = true">打开嵌套表单的 Dialog</el-button> -->

<!--对话框入口-->
<!--
	- dialogFormVisible: 布尔值,是否展示该对话框
-->
<el-dialog title="收货地址" :visible.sync="dialogFormVisible">
	<!--缩小文本框的长度-->
	<el-form style="width:80%">
		<!--第一项-->
		<el-form-item label="品牌名称" label-width="100px">
			<el-input autocomplete="off"></el-input>
		</el-form-item>
		<!--第二项-->
		<el-form-item label="品牌LOGO" label-width="100px">
			<!--
				- action就是上传地址
				- 上传成功,触发 handleAvatarSuccess
				- 上传之前,触发 beforeAvatarUpload
			-->
			<el-upload class="avatar-uploader" action="https://jsonplaceholder.typicode.com/posts/"
				:show-file-list="false" :on-success="handleAvatarSuccess" :before-upload="beforeAvatarUpload">
				<img v-if="imageUrl" :src="imageUrl" class="avatar">
				<i v-else class="el-icon-plus avatar-uploader-icon"></i>
			</el-upload>
		</el-form-item>
	</el-form>
	<div slot="footer" class="dialog-footer">
		<el-button @click="dialogFormVisible = false">取 消</el-button>
		<el-button type="primary" @click="dialogFormVisible = false">确 定</el-button>
	</div>
</el-dialog>
......
<script>
  export default {
    name: "tradeMark",
    data(){
      return {
        ......
        dialogFormVisible:false ,// 初始化,添加 || 修改 对话框是否展示
        imageUrl:'' // 初始化上传参数
      }
    },
    ......
    methods:{
      ......
      // 添加 || 修改 展示'对话框'
      showDialog(){
        this.dialogFormVisible = true
      },
      updateTradeMark(){
        this.dialogFormVisible = true
      },
      // 上传的逻辑(先拷贝文档)
      handleAvatarSuccess(res, file) {
        this.imageUrl = URL.createObjectURL(file.raw);
      },
      beforeAvatarUpload(file) {
        const isJPG = file.type === 'image/jpeg';
        const isLt2M = file.size / 1024 / 1024 < 2;


        if (!isJPG) {
          this.$message.error('上传头像图片只能是 JPG 格式!');
        }
        if (!isLt2M) {
          this.$message.error('上传头像图片大小不能超过 2MB!');
        }
        return isJPG && isLt2M;
      }
    }
  }
</script>

<!--这里不要加scoped,会丢失部分'上传功能'样式-->
<style>
  .avatar-uploader .el-upload {
      border: 1px dashed #d9d9d9;
      border-radius: 6px;
      cursor: pointer;
      position: relative;
      overflow: hidden;
    }
    .avatar-uploader .el-upload:hover {
      border-color: #409EFF;
    }
    .avatar-uploader-icon {
      font-size: 28px;
      color: #8c939d;
      width: 178px;
      height: 178px;
      line-height: 178px;
      text-align: center;
    }
    .avatar {
      width: 178px;
      height: 178px;
      display: block;
    }
</style>
### src.api.product.tradeMark.js
......
// 依据 tradeMark.id 是否存在,分别发 新增 和 更新 请求
export const reqAddOrUpdateTradeMark = (tradeMark)=>{
  if(tradeMark.id){
    return request({url: `/admin/product/baseTrademark/update`, method: 'put',data:tradeMark})
  }
  else {
    return request({url: `/admin/product/baseTrademark/save`, method: 'post',data:tradeMark})
  }
}
### tradeMark.index.vue
<template>
  <div>
    ......
    <!-- Form -->
    <!-- <el-button type="text" @click="dialogFormVisible = true">打开嵌套表单的 Dialog</el-button> -->
    <el-dialog title="品牌" :visible.sync="dialogFormVisible">
      <!--:model:用来收集表单所有数据-->
      <el-form style="width:80%" :model="tmForm">

        <el-form-item label="品牌名称" label-width="100px">
          <!--收集品牌名称-->
          <el-input autocomplete="off" v-model="tmForm.tmName"></el-input>
        </el-form-item>

        <el-form-item label="品牌LOGO" label-width="100px">
          <!--修改action上传地址-->
          <el-upload class="avatar-uploader" action="/dev-api/admin/product/fileUpload" :show-file-list="false"
            :on-success="handleAvatarSuccess" :before-upload="beforeAvatarUpload">
            <!--是否展示图片-->
            <img v-if="tmForm.logoUrl" :src="tmForm.logoUrl" class="avatar">
            <i v-else class="el-icon-plus avatar-uploader-icon"></i>
            <div slot="tip" class="el-upload__tip">
              只能上传jpg/png文件,且不超过500kb
            </div>
          </el-upload>
        </el-form-item>

      </el-form>
      <div slot="footer" class="dialog-footer">
        <!--取消就不展示'对话框'-->
        <el-button @click="dialogFormVisible = false">取 消</el-button>
        <!--确定就发请求上传-->
        <el-button type="primary" @click="addOrUpdateTradeMark">确 定</el-button>
      </div>
    </el-dialog>

  </div>
</template>

<script>
  export default {
    name: "tradeMark",
    data() {
      return {
        page: 1,
        limit: 3,
        total: 0,
        list: [],
        dialogFormVisible: false, // 添加 || 修改 对话框是否可以使用
        imageUrl: '',
        tmForm: {
          tmName: '',
          logoUrl: ''
        }
      }
    },
    mounted() {
      this.getPageList();
    },
    methods: {
      async getPageList(pager = 1) {

        this.page = pager;
        const {
          page,
          limit
        } = this;

        let res = await this.$API.trademark.reqTradeMarkList(page, limit)

        if (res.code == 200) {
          this.total = res.data.total
          this.list = res.data.records
        }
      },
      handleSizeChange(limit) {
        this.limit = limit;
        this.getPageList();
      },
      // 添加 || 修改
      showDialog() {
        this.dialogFormVisible = true
        this.tmForm = {
          tmName: '', // 清空原来的数据
          logoUrl: ''
        }
      },
      updateTradeMark() {
        this.dialogFormVisible = true
      },
      async addOrUpdateTradeMark(){
        this.dialogFormVisible = false;
        let res = await this.$API.trademark.reqAddOrUpdateTradeMark(this.tmForm)
        // console.log(res)
        if(res.code == 200){
          this.$message(this.tmForm.id?'修改品牌成功':'添加品牌成功') // 提示消息
          this.getPageList();
        }
      },
      // 上传
      handleAvatarSuccess(res, file) {
        // this.imageUrl = URL.createObjectURL(file.raw);
        // 文件先通过'上传地址'上传成功,获取图片的url地址,后续提交给表单,提交到后端存储
        this.tmForm.logoUrl = res.data
      },
      beforeAvatarUpload(file) {
        const isJPG = file.type === 'image/jpeg'; // isJPG 存储的是一个布尔值(前面赋值的结果,和后面的'image/jpg'进行布尔值对比判断)
        const isLt2M = file.size / 1024 / 1024 < 2;

        if (!isJPG) {
          this.$message.error('上传头像图片只能是 JPG 格式!');
        }
        if (!isLt2M) {
          this.$message.error('上传头像图片大小不能超过 2MB!');
        }
        return isJPG && isLt2M;
      }
    }
  }
</script>


<style>
  ......
</style>
更新功能的实现
<template>
  <div>
   ......

      <el-table-column prop="prop" label="操作" width="width">
        <template slot-scope="{row,$index}">
          <!--传入'项'对象row,以便确定修改的是哪一个对象-->
          <el-button type="warning" icon="el-icon-edit" size="mini" @click="updateTradeMark(row)">修改</el-button>
          <el-button type="danger" icon="el-icon-delete" size="mini">删除</el-button>
        </template>
      </el-table-column>
    </el-table>

   ......

    <!-- Form -->
    <!-- <el-button type="text" @click="dialogFormVisible = true">打开嵌套表单的 Dialog</el-button> -->
    <!--动态展示title名称-->
    <el-dialog :title="tmForm.id?'修改品牌':'添加品牌'" :visible.sync="dialogFormVisible">
      <!--:model:用来收集表单所有数据-->
      <!--rules用来定义'表单校验规则'-->
      <el-form style="width:80%" :model="tmForm" :rules="rules" ref="ruleForm">

		<!--prop指明要校验的字段名称tmName-->
        <el-form-item label="品牌名称" label-width="100px" prop="tmName">
          <!--收集品牌名称-->
          <el-input autocomplete="off" v-model="tmForm.tmName"></el-input>
        </el-form-item>
		<!--prop指明要校验的字段名称logoUrl-->
        <el-form-item label="品牌LOGO" label-width="100px" prop="logoUrl">
          <!--修改action上传地址-->
          <el-upload class="avatar-uploader" action="/dev-api/admin/product/fileUpload" :show-file-list="false"
            :on-success="handleAvatarSuccess" :before-upload="beforeAvatarUpload">
            <!--是否展示图片-->
            <img v-if="tmForm.logoUrl" :src="tmForm.logoUrl" class="avatar">
            <i v-else class="el-icon-plus avatar-uploader-icon"></i>
            <div slot="tip" class="el-upload__tip">
              只能上传jpg/png文件,且不超过500kb
            </div>
          </el-upload>
        </el-form-item>


      </el-form>
      <div slot="footer" class="dialog-footer">
        <!--取消就不展示'对话框'-->
        <el-button @click="dialogFormVisible = false">取 消</el-button>
        <!--确定就发请求上传-->
        <el-button type="primary" @click="addOrUpdateTradeMark">确 定</el-button>
      </div>
    </el-dialog>

  </div>
</template>

<script>
  export default {
    name: "tradeMark",
    data() {
      // 自定义校验规则
      var validatetmName = (rule, value, callback) => {
        if (value.length<2 || value.length>10) {
          callback(new Error('品牌名称2-10位'));
        } else {
          callback();
        }
      };
      return {
       ......
        dialogFormVisible: false, // 添加 || 修改 对话框是否可以使用
      ......
        tmForm: {
          tmName: '',
          logoUrl: ''
        },
        rules: { // 添加字段校验规则
          tmName: [{
              required: true,
              message: '请输入品牌名称',
              trigger: 'blur' // 触发方式
            },
            {
              min: 2,
              max: 10,
              message: '长度在 2 到 10 个字符',
              trigger: 'change'
            },
            {
              validate: validatetmName, // 自定义校验规则
              trigger: 'change'
            }
          ],
          logoUrl: [{
            required: true,
            message: '请选择品牌图片', // 不需要 trigger
          }],
        }
      }
    },
    mounted() {
      ......
    },
    methods: {
      async getPageList(pager = 1) {
    	 .......
      },
     ......
      updateTradeMark(row) {
        this.dialogFormVisible = true
        // 用户一点,表单先填充原来的数据(不可能说,用户点击'修改',然后表单什么内容都没有)
        this.tmForm = {
          ...row
        }
      },
      addOrUpdateTradeMark() {
      	// 当全部字段通过以后,再发请求获取数据
        this.$refs.ruleForm.validate(async (success) => {
          if (success) {
            this.dialogFormVisible = false;
            let res = await this.$API.trademark.reqAddOrUpdateTradeMark(this.tmForm)
            if (res.code == 200) {
              // this.$message(this.tmForm.id?'修改品牌成功':'添加品牌成功')
              this.$message({
                type: 'success', // 修改提示信息的样式,绿色的成功样式
                message: this.tmForm.id ? '修改品牌成功' : '添加品牌成功'
              })
              // this.getPageList();
              // 是添加就跳到第一页,否则跳到当前页
              this.getPageList(this.tmForm.id ? this.page : 1);
            }
          } else {
            console.log('error submit!!');
            return false;
          }
        });
      },
      ......
    }
  }
</script>


<style>
  ......
</style>
删除功能的实现
......
<el-table-column ......>
	<template ......>
	  ......
	  <!--传row对象-->
	  <el-button type="danger" icon="el-icon-delete" size="mini" @click="deleteTradeMark(row)">删除</el-button>
	</template>
</el-table-column>

......
// 配置请求
export const reqDeleteTradeMark = (id)=>request({ url: `/admin/product/baseTrademark/remove/${id}`, method: 'delete' });

.....
deleteTradeMark(row) {
	this.$confirm('此操作将永久删除该文件, 是否继续?', '提示', { // 弹出messageBox
	  confirmButtonText: '确定',
	  cancelButtonText: '取消',
	  type: 'warning'
	}).then(async () => { // 发请求
	  let res = await this.$API.trademark.reqDeleteTradeMark(row.id)
	  if(res.code == 200){
		this.$message({
		  type: 'success',
		  message: '删除成功!'
		});
		// 页码的跳转
		this.getPageList(this.list.length>1?this.page:this.page-1);
	  }
	}).catch(() => {
	  this.$message({
		type: 'info',
		message: '已取消删除'
	  });
	});
}
商品属性
### src.components.CategorySelect.index.vue
<template>
  <div
    我是 CategorySelect 的内容
  </div>
</template>

<script>
  export default {
    name:'CategorySelect'
  }

</script>

### main.js
......
import CategorySelect from '@/components/CategorySelect'
Vue.component(CategorySelect.name,CategorySelect)


### Attr.index.vue
<template>
  <div>
  	<!--card就是卡片,使用卡片组件-->
  	<!--设置间距-->
    <el-card style="margin: 20px 0px;">
      <CategorySelect></CategorySelect>
    </el-card>

    <!--两个卡片-->
    <el-card></el-card>
  </div>
</template>
### CategorySelect.index.vue
<template>
  <div>
    <el-form :inline="true" class="demo-form-inline">
      <el-form-item label="一级分类" >
        <el-select  placeholder="请选择" value="">
          <el-option label="区域一" value="shanghai"></el-option>
          <el-option label="区域二" value="beijing"></el-option>
        </el-select>
      </el-form-item>

      <el-form-item label="二级分类" >
        <el-select  placeholder="请选择" value="">
          <el-option label="区域一" value="shanghai"></el-option>
          <el-option label="区域二" value="beijing"></el-option>
        </el-select>
      </el-form-item>

      <el-form-item label="三级分类">
        <el-select  placeholder="请选择" value="">
          <el-option label="区域一" value="shanghai"></el-option>
          <el-option label="区域二" value="beijing"></el-option>
        </el-select>

      </el-form-item>
    </el-form>
  </div>
</template>
### product.attr.js
import request from '@/utils/request';
// 一级分类
export const reqCategory1List = ()=>request({url:'/admin/product/getCategory1',method:'get'})
// 二级分类(带上'一级分类id')
export const reqCategory2List = (category1Id)=>request({url:`/admin/product/getCategory2/${category1Id}`,method:'get'})
// 三级分类(带上'二级分类id')
export const reqCategory3List = (category2Id)=>request({url:`/admin/product/getCategory3/${category2Id}`,method:'get'})
### components.CategorySelect.index.vue
<template>
  <div>
  	<!--:model收集所有的表单数据-->
    <el-form :inline="true" class="demo-form-inline" :model="cForm">
      <el-form-item label="一级分类" >
      	<!--v-model双向绑定,用户点击了哪一项,自动修改data;绑定change事件(其实是'自定义事件')-->
        <el-select  placeholder="请选择" v-model="cForm.category1Id" @change="handler1">
          <!--渲染数据-->
          <el-option v-for="(c1,index) in list1" :key="c1.id" :label="c1.name" :value="c1.id"></el-option>
        </el-select>
      </el-form-item>

      <!--以下套路和上面一样-->
      <el-form-item label="二级分类" >
        <el-select  placeholder="请选择" v-model="cForm.category2Id" @change="handler2">
          <el-option v-for="(c2,index) in list2" :key="c2.id" :label="c2.name" :value="c2.id"></el-option>

        </el-select>
      </el-form-item>

      <el-form-item label="三级分类">
        <el-select  placeholder="请选择" v-model="cForm.category3Id" @change="handler3">
          <el-option v-for="(c3,index) in list3" :key="c3.id" :label="c3.name" :value="c3.id"></el-option>

        </el-select>

      </el-form-item>
    </el-form>
  </div>
</template>

<script>
  export default {
    name:'CategorySelect',
    data(){
      return {
        list1:[], // 收集一级/二级/三级分类数据
        list2:[],
        list3:[],
        cForm:{ // 收集表单数据
          category1Id:'',
          category2Id:'',
          category3Id:'',
        }
      }
    },
    mounted(){
      // 发请求获取第一级数据
      this.getCategory1List()
    },
    methods:{
      async getCategory1List(){
        let res = await this.$API.attr.reqCategory1List()
        if(res.code == 200){
          this.list1 = res.data // 赋值
        }
      },
      async handler1(){
        const {category1Id} = this.cForm
        this.list2 = [] // 清空原来的数据,避免数据残留
        this.list3 = []
        this.cForm.category2Id = ''
        this.cForm.category3Id = ''
        let res = await this.$API.attr.reqCategory2List(category1Id)
        if(res.code == 200){
          this.list2 = res.data
        }
      },
      async handler2(){
        const {category2Id} = this.cForm
        this.list3 = []
        this.cForm.category3Id = ''
        let res = await this.$API.attr.reqCategory3List(category2Id)
        if(res.code == 200){
          this.list3 = res.data
        }
      },
      handler3(){
		// 预留
      }
    }
  }
</script>
- 父组件
Attr需要接收子组件CategorySelect的数据,子传父,我们使用自定义事件来实现
### Attr.index.vue
<template>
  <div>
    ......
      <!--绑定自定义事件-->
      <CategorySelect @getCategoryId="getCategoryId"></CategorySelect>
    ......
</template>

<script>
    export default {
      name:'Attr',
      data(){
        return {
          category1Id:'', // 初始化数据
          category2Id:'',
          category3Id:'',
        }
      },
      methods:{
        getCategoryId({categoryId,level}){ // 解构'对象参数'
          if(level == 1){
            this.category1Id = categoryId
            this.category2Id = ''
            this.category3Id = ''
          }else if(level == 2){
            this.category2Id = categoryId
            this.category3Id = ''
          }else{
            this.category3Id = categoryId
            this.getAttrList() // 发请求获取数据
          }

        },
        getAttrList(){
          console.log('发请求了') // 测试
        }
      }
    }
</script>


### CategorySelect.index.vue
......
methods:{
  async getCategory1List(){
	......
  },
  async handler1(){
	......
	// 触发自定义事件,level表示目录的'层级'
	this.$emit('getCategoryId',{categoryId:category1Id,level:1})
	let res = ......
  },
  async handler2(){
	......
	// 同样的套路
	this.$emit('getCategoryId',{categoryId:category2Id,level:2})
	let res = ......
  },
  handler3(){
	......
	// 同样的套路
	this.$emit('getCategoryId',{categoryId:category3Id,level:3})
  }
}
获取所有分类数据
### attr.js
.......
export const reqGetCategoryList = (category1Id, category2Id, category3Id)=>request({url:`/admin/product/attrInfoList/${category1Id}/${category2Id}/${category3Id}`,method:'get'})
### Attr.index.vue
<template>
  <div>
    ......
    <el-card>
      <!--新增按钮-->
      <el-button type="primary" icon="el-icon-plus">添加属性</el-button>
      <!--data数据源-->
      <el-table style="width: 100%" border :data="attrList">
        <el-table-column type="index" label="序号" width="80px" align="center">
        </el-table-column>
        <el-table-column prop="attrName" label="属性名称" width="150px">
        </el-table-column>
        <el-table-column prop="prop" label="属性值列表" width="width">
          <template slot-scope="{ row, $index }">
            <!--插入标签组件-->
            <el-tag type="success"
            v-for="(attrValue,index) in row.attrValueList"
            :key="attrValue.id"
            style="margin:0 20px">{{attrValue.valueName}}</el-tag>
          </template>
        </el-table-column>
        <el-table-column prop="prop" label="操作" width="250">
          <!--插入两个按钮-->
          <template slot-scope="{ row, $index }">
            <el-button type="warning" icon="el-icon-edit" size="mini">修改</el-button>
            <el-button type="danger" icon="el-icon-delete" size="mini">删除</el-button>
          </template>
        </el-table-column>
      </el-table>

    </el-card>
  </div>
</template>
......
<script>
    export default {
      name:'Attr',
      data(){
        return {
         ......
          attrList:[] // 收集后端返回的分类数据
        }
      },
      methods:{
        getCategoryId({categoryId,level}){
          ......
          }

        },
        async getAttrList(){
          const {category1Id,category2Id,category3Id} = this;
          let res = await this.$API.attr.reqGetCategoryList(category1Id,category2Id,category3Id)
          if(res.code == 200){
            this.attrList = res.data
          }
        }
      }
    }
</script>
添加属性
- 当用户点击
添加按钮,table应该被隐藏,而显示添加的表单
### Attr.index.vue
<template>
  <div>
   ......

    <el-card>
      <!--整个结构用div包裹起来,赋值v-show-->
      <div v-show="isShowTable">
        <!--收到category3Id,按钮才可以点击,并隐藏table-->
        ......
      </div>

	  <!--和table取反,两个只能显示一个-->
      <div v-show="!isShowTable">
		<!--行内表单-->
        <el-form :inline="true" ref="form" label-width="80px">
          <el-form-item label="属性名" >
            <el-input placeholder="请输入属性名"></el-input>
          </el-form-item>
        </el-form>

        <!--两个按钮-->
        <el-button type="primary" icon="el-icon-plus">添加属性值</el-button>
        <el-button @click="isShowTable=true">取消</el-button>

		<!--table-->
        <el-table style="width: 100%;margin: 20px 0px;" border >
          <el-table-column type="index" label="序号" width="80px" align="center">
          </el-table-column>
          <el-table-column prop="prop" label="属性值名称" width="width">
          </el-table-column>
          <el-table-column prop="prop" label="操作" width="250">
          </el-table-column>
        </el-table>
        <!--两个按钮-->
        <el-button type="primary">保存</el-button>
        <el-button @click="isShowTable=true">取消</el-button>
      </div>
  .......
</template>
......
<script>
    export default {
      name:'Attr',
      data(){
        return {
          ......
          isShowTable:true // 控制table的展示与隐藏
        }
      },
### api.product.attr.js
......
export const reqAddAttr = (data)=>request({url:'/admin/product/saveAttrInfo',method:'post',data})
### Attr.index.vue
......
<div v-show="!isShowTable">
		<!--model数据源-->
        <el-form :inline="true" ref="form" label-width="80px" :model="attrInfo">
          <el-form-item label="属性名" >
          	<!--收集用户数据-->
            <el-input placeholder="请输入属性名" v-model="attrInfo.attrName"></el-input>
          </el-form-item>
        </el-form>
        <!--触发事件 并设置无值时,按钮不可点击-->
        <el-button type="primary" icon="el-icon-plus" @click="addAttrValue" :disabled="!attrInfo.attrName">添加属性值</el-button>
        <el-button @click="isShowTable=true">取消</el-button>

        <el-table style="width: 100%;margin: 20px 0px;" border >
          <el-table-column type="index" label="序号" width="80px" align="center">
          </el-table-column>
          <el-table-column prop="prop" label="属性值名称" width="width">
          </el-table-column>
          <el-table-column prop="prop" label="操作" width="250">
          </el-table-column>
        </el-table>
        <el-button type="primary">保存</el-button>
        <el-button @click="isShowTable=true">取消</el-button>

      </div>

 ......
 <script>
    export default {
      name:'Attr',
      data(){
        return {
         ......
          attrInfo:{ // 初始化数据
            attrName:'',
            attrValueList:[
            ],
            categoryId:0, // 三级分类id
            categoryLevel:3 // 三级分类标识
          }
        }
      },
      methods:{
        ......
        addAttrValue(){
          this.attrInfo.attrValueList.push({ // 往list差入多个值
            attrId:undefined, // 值由后端决定
            valueName:''
          })
        }
      }
    }
</script>
修改属性(区别于修改属性值)
<template>
  <div>
    <!--三级联动-->
    <el-card style="margin: 20px 0px;">
      ......
    </el-card>

    <!--三级联动以后,渲染的数据-->
    <el-card>
      <!--整个结构用div包裹起来,赋值v-show-->
      <div v-show="isShowTable">
        <!--收到category3Id,按钮才可以点击,并隐藏table-->
        <el-button type="primary" icon="el-icon-plus" :disabled="!category3Id" @click="addAttr">添加属性</el-button>

        <el-table style="width: 100%" border :data="attrList">

          <el-table-column type="index" label="序号" width="80px" align="center">
          </el-table-column>

          <el-table-column prop="attrName" label="属性名称" width="150px">
          </el-table-column>

          <el-table-column prop="prop" label="属性值列表" width="width">
            <template slot-scope="{ row, $index }">
              <el-tag type="success"
              v-for="(attrValue,index) in row.attrValueList"
              :key="attrValue.id"
              style="margin:0 20px">{{attrValue.valueName}}</el-tag>
            </template>
          </el-table-column>

          <el-table-column prop="prop" label="操作" width="250">
            <template slot-scope="{ row, $index }">
              <!--updateAttr(row)-->
              <el-button type="warning" icon="el-icon-edit" size="mini" @click="updateAttr(row)">修改</el-button>
              <el-button type="danger" icon="el-icon-delete" size="mini">删除</el-button>
            </template>
          </el-table-column>

        </el-table>
      </div>

      <!--添加/修改属性值 结构-->
      <div v-show="!isShowTable">
	    <!--收集attrInfo-->
        <el-form :inline="true" ref="form" label-width="80px" :model="attrInfo">
          <el-form-item label="属性名" >
            <el-input placeholder="请输入属性名" v-model="attrInfo.attrName"></el-input>
          </el-form-item>
        </el-form>

        <el-button type="primary" icon="el-icon-plus" @click="addAttrValue" :disabled="!attrInfo.attrName">添加属性值</el-button>
        <el-button @click="isShowTable=true">取消</el-button>

		<!--数据源: attrInfo.attrValueList-->
        <el-table style="width: 100%;margin: 20px 0px;" border :data="attrInfo.attrValueList">
          <el-table-column type="index" label="序号" width="80px" align="center">
          </el-table-column>

          <el-table-column prop="prop" label="属性值名称" width="width">
            <template slot-scope="{ row, $index }">
              <!-- 这里结构需要用到span与input进行来回的切换 -->
              <!--支持enter键和鼠标的形式-->
              <el-input v-model="row.valueName" placeholder="请输入属性值名称" size="mini" v-if="row.flag" @blur="toLook(row)" @keyup.native.enter="toLook(row)"></el-input>
              <!--取反-->
              <span style="display: block" v-else @click="row.flag=true">{{ row.valueName }}</span>
            </template>
          </el-table-column>

          <el-table-column prop="prop" label="操作" width="250">
            <template slot-scope="{ row, $index }">
              <el-button
                type="warning"
                icon="el-icon-edit"
                size="mini">修改</el-button>

              <el-button
                type="danger"
                icon="el-icon-delete"
                size="mini">删除</el-button>
            </template>
          </el-table-column>

        </el-table>

        <el-button type="primary">保存</el-button>
        <el-button @click="isShowTable=true">取消</el-button>

      </div>

    </el-card>
  </div>
</template>

<script>
    import cloneDeep from 'lodash/cloneDeep';

    export default {
      name:'Attr',
      data(){
        return {
          category1Id:'',
          category2Id:'',
          category3Id:'',

          flag:true,

          attrList:[],
          isShowTable:true ,// 控制table的展示与隐藏

          attrInfo:{
            attrName:'',
            attrValueList:[
            ],
            categoryId:0, // 三级分类id
            categoryLevel:3 // 三级分类标识
          }
        }
      },
      methods:{
        getCategoryId({categoryId,level}){
          if(level == 1){
            this.category1Id = categoryId
            this.category2Id = ''
            this.category3Id = ''
          }else if(level == 2){
            this.category2Id = categoryId
            this.category3Id = ''
          }else{
            this.category3Id = categoryId
            this.getAttrList()
          }

        },
        async getAttrList(){
          const {category1Id,category2Id,category3Id} = this;
          let res = await this.$API.attr.reqGetCategoryList(category1Id,category2Id,category3Id)
          if(res.code == 200){
            this.attrList = res.data
          }
        },
        addAttrValue(){
          this.attrInfo.attrValueList.push({
            attrId:this.attrInfo.id,
            valueName:'',
            flag:true
          })
        },
        addAttr(){
          this.isShowTable=false
          // 清空数据,并收集 category3Id
          this.attrInfo = {
            attrName:'',
            attrValueList:[
            ],
            categoryId:this.category3Id, // 三级分类id
            categoryLevel:3 // 三级分类标识
          }
        },
        updateAttr(row){
          this.isShowTable = false;
          // 由于数据结构的原因,这里不能使用'浅拷贝',得使用'深拷贝'
          // this.attrInfo = {...row}
          this.attrInfo = cloneDeep(row);
          this.attrInfo.attrValueList.forEach(item=>{
            // 确保flag是'响应式'属性,且触发视图的更新
            this.$set(item,'flag',false)
          })
        },
        toLook(row){
          // 不允许空值
          if(row.valueName.trim() == ''){
            this.$message('请输入一个正常的属性值')
            return
          }
          // 检查属性值是否重复
          var isRepeat = this.attrInfo.attrValueList.some((item)=>{
            if(row !== item){
              return row.valueName == item.valueName
            }
          })
          if(isRepeat){
            this.$message('请不要输入重复的值')
            return
          }
          row.flag = false;
        }
      }
    }
</script>
自动获取焦点 功能实现
......
<el-table-column prop="prop" label="属性值名称" width="width">
	<template slot-scope="{ row, $index }">
	  <!--动态ref,以便获取各个input元素-->
	  <el-input :ref="$index" v-model="row.valueName" placeholder="请输入属性值名称" size="mini" v-if="row.flag" @blur="toLook(row)" @keyup.native.enter="toLook(row)"></el-input>
	  <!--toEdit需传row和index-->
	  <span style="display: block" v-else @click="toEdit(row,$index)">{{ row.valueName }}</span>
	</template>
</el-table-column>
......
toEdit(row,index){
  row.flag=true; // 显示input框
  this.$nextTick(()=>{ // 结构的切换是耗时操作,所以需要用到nextTick
	this.$refs[index].focus() // 获取鼠标
  })
}
- 当用户点击
添加属性值的时候,input框也应该自动获取焦点
......
addAttrValue(){
  this.attrInfo.attrValueList.push({
	......
  });
  // 添加的肯定是数组最后一个元素,所以获取最后一个input元素,然后获取焦点即可
  this.$nextTick(()=>{
	this.$refs[this.attrInfo.attrValueList.length - 1].focus()
  })
},
删除属性值 功能的实现
- 该功能无需发请求,只是数组元素的添加/删除而已
- 引入
Popconfirm 气泡确认框组件
......
<el-table-column prop="prop" label="操作" width="250">
	<template slot-scope="{ row, $index }">

	  <!--动态展示title信息,当用户点击'确定'触发逻辑(需传入index)-->
	  <el-popconfirm :title="`确定删除${row.valueName}吗?`" @onConfirm="deleteAttrValue($index)">
		<el-button slot="reference" type="danger" icon="el-icon-delete" size="mini">删除</el-button>
	  </el-popconfirm>

	  <!--修改原先的结构-->
	  <!-- <el-button
		type="warning"
		icon="el-icon-edit"
		size="mini">修改</el-button> -->

		<!-- @click="updateAttr(row)">修改</el-button> -->
	  <!-- <el-button
		type="danger"
		icon="el-icon-delete"
		size="mini">删除</el-button> -->

	</template>
</el-table-column>
......
deleteAttrValue(index){
  // 根据index,删除数组元素
  this.attrInfo.attrValueList.splice(index,1)
}
保存 功能的实现
保存和新增的逻辑很类似,在后端是同一个接口,修改之前的接口名称
### api.product.attr.js
......
export const reqAddOrUpdateAttr = (data)=>request({url:'/admin/product/saveAttrInfo',method:'post',data})
### Attr.index.vue
......
<!--绑定逻辑-->
<el-button type="primary" @click="addOrUpdateAttr">保存</el-button>
......
async addOrUpdateAttr(){
  <!--过滤掉'空项',并且删去'flag'值-->
  this.attrInfo.attrValueList = this.attrInfo.attrValueList.filter(item=>{
	if(item.valueName != ''){
	  delete item.flag;
	  return true
	}
  })
  try{
  	// 发起'新增'请求,这里不需要变量接收返回结果
	await this.$API.attr.reqAddOrUpdateAttr(this.attrInfo)
	this.isShowTable = true
	this.$message({type:'success',message:'保存成功'})
	this.getAttrList()
  }catch(error){
	this.$message('保存失败')
  }
}
- 当用户点击
添加属性时,三级联动组件和保存按钮,应该不可用
### Attr.index.vue
......
<el-card style="margin: 20px 0px;">
  <!--通过show传值-->
  <CategorySelect @getCategoryId="getCategoryId" :show="!isShowTable"></CategorySelect>
</el-card>
......
<!--通过判断数组的长度,来决定'按钮'是否可以被点击-->
<el-button type="primary" @click="addOrUpdateAttr" :disabled="attrInfo.attrValueList.length<1">保存</el-button>

### CategorySelect.index.vue
<template>
  <div>
    <el-form :inline="true" class="demo-form-inline" :model="cForm">

      <el-form-item label="一级分类" >
        <!--把show传给'disabled',下面的分类一样的写法-->
        <el-select  placeholder="请选择" v-model="cForm.category1Id" @change="handler1" :disabled="show">
          ......
        </el-select>
      </el-form-item>

      <el-form-item label="二级分类" >
        <el-select  placeholder="请选择" v-model="cForm.category2Id" @change="handler2" :disabled="show">
          ......
        </el-select>
      </el-form-item>

      <el-form-item label="三级分类">
        <el-select  placeholder="请选择" v-model="cForm.category3Id" @change="handler3" :disabled="show">
          ......
        </el-select>
      </el-form-item>

    </el-form>
  </div>
</template>

<script>
  export default {
    name:'CategorySelect',
    props:['show'],// 接收
    data(){
      return {
        ......
    },
    ......
  }
</script>


 浙公网安备 33010602011771号