C#中的自定义控件
一般在开发Winform项目中,visual studio提供的控件基本能满足我们的需求。但是,往往在一些情况下,系统提供的控件并不能刚好满足需求,如果完全使用以提供好的控件,也可以完成效果需求,但是可能会造成臃肿和控制的不方便。因此,在项目中开发一些灵活的自定义控件是很有必要的。你可以根据业务需要,量身打造你想要的控件。一般来说,自定义控件可以分成三种类型。
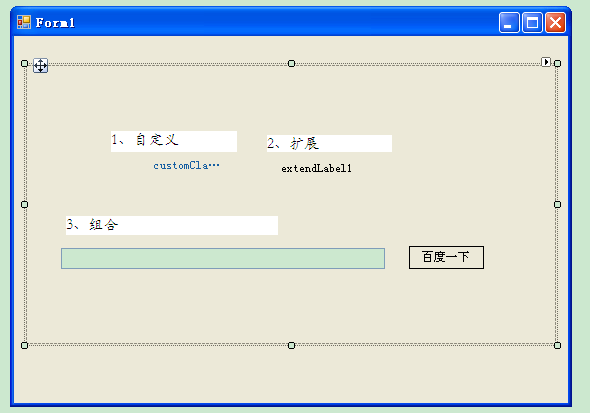
1、自定义控件,这是完全需要自己设计,开发的新的控件,一般继承自Control,重写OnPaint方法;还要自己写添加事件、处理消息等等。这样的控件,对应你的业务可以达到很好的效果,功能最灵活。同时对开发人员要求也最高,一般要了解图形绘制GDI+以及API的一些知识。比如,我们需要一个类似Label的控件,但是不需要Label那么多的属性和方法。那么就自己开发一个类似Label的自定义控件。
如下代码:直接继承自Control,其它代码会自动生成好。
    [ToolboxItem(true)]
    public partial class CustomClassifyLabelItem : Control
    {
        private Color mColorOut = Color.FromArgb(255, 137, 37);

        private StringFormat format;

        private Color textColor;

        private Font strFormat = new Font("宋体", 9F, FontStyle.Regular, GraphicsUnit.Point, ((byte)(134)));

        public StringFormat Format
        {
            get
            {
                if (format == null)
                {
                    format = new StringFormat();

                    format.Alignment = StringAlignment.Center;

                    format.LineAlignment = StringAlignment.Center;

                    format.FormatFlags = StringFormatFlags.NoWrap;

                    format.Trimming = StringTrimming.EllipsisCharacter;
                }

                return format;
            }
        }

        public Color TextColor
        {
            get
            {
                {
                    textColor = Color.FromArgb(22, 95, 162);
                }

                return textColor;
            }
        }

        public CustomClassifyLabelItem()
        {
            InitializeComponent();

            this.MouseEnter += new EventHandler(UCSelectClassifyItem_MouseEnter);

            this.MouseLeave += new EventHandler(UCSelectClassifyItem_MouseLeave);
        }

        void UCSelectClassifyItem_MouseLeave(object sender, EventArgs e)
        {
            strFormat = new Font("宋体", 9F, FontStyle.Regular, GraphicsUnit.Point, ((byte)(134)));

            Invalidate();
        }

        void UCSelectClassifyItem_MouseEnter(object sender, EventArgs e)
        {
            strFormat = new Font("宋体", 12F, FontStyle.Regular, GraphicsUnit.Point, ((byte)(134)));

            Invalidate();
        }

        protected override void OnPaint(PaintEventArgs pe)
        {
            base.OnPaint(pe);

            Graphics graphics = pe.Graphics;

            using (SolidBrush b = new SolidBrush(TextColor))
            {
                graphics.DrawString(this.Text, strFormat, b, new Rectangle(0, 0, this.Width, this.Height), Format);
            }

            graphics.Dispose();
        }
    }
重新定义事件和属性,重写OnPaint方法。写好后就如同Label一样使用。当然这个只是简单的例子,它的性能和方便性肯定没有Label好的。
效果如下。
鼠标进入控件,

鼠标离开控件

2、扩展控件
当然,没有必要所有控件都要完全自己写,毕竟完全写控件不现实,系统提供的那些控件可以满足需要,而且使用方便,那么利用继承的特性,可以扩展它的功能,也能达到灵活使用的目的。比如下面代码,简单扩展了一个Label,当鼠标进入时显示下划线,离开时显示正常。
 1     public class ExtendLabel:Label
 2     {
 3         protected override void OnMouseEnter(System.EventArgs e)
 4         {
 5             base.OnMouseEnter(e);
 6
 7             this.Font = new Font("宋体", 10F, FontStyle.Underline);
 8         }
 9
10         protected override void OnMouseLeave(System.EventArgs e)
11         {
12             base.OnMouseLeave(e);
13
14             this.Font = new Font("宋体", 10F, FontStyle.Regular);
15         }
16     }
效果
鼠标进入,

鼠标离开,

3、组合控件
这种方式,是比较简单的,就是将你写好的,或者系统自带的,都放在UserControl上,然后在加上一些事件、属性,使它们成为一个整体。
比如,下面就是直接放了一个textbox和一个button,放在了一个UserControl上,就成了一个控件。


这些控件生成好后,就能在工具栏看到,并拖动到容器中使用。


