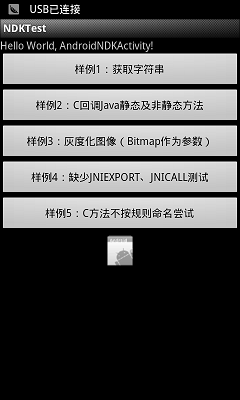
Android NDK Sample
基础样例
1)C部分
1.1)TestJni.h
/*
 * TestJni.h
 *
 *  Created on: 2011-12-20
 *      Author: Join
 */

#ifndef TESTJNI_H_
#define TESTJNI_H_

#include <jni.h>
#include <stdio.h>
#include <stdlib.h>
#include <android/log.h>
#include <android/bitmap.h>

// 测试回调Java
#include "CallJava.h"

#define LOG_TAG "JNI_DEBUG"
#define  LOGI(...)  __android_log_print(ANDROID_LOG_INFO, LOG_TAG, __VA_ARGS__)
#define  LOGE(...)  __android_log_print(ANDROID_LOG_ERROR, LOG_TAG, __VA_ARGS__)

// JNI调用函数必须要用C编译器编译
// C++不加extern "C",调用会有异常
#ifdef __cplusplus
extern "C" {
#endif

/*
 * 说明:
 * 1、JNIEXPORT、JNICALL:jni的宏,在android的jni中不必须
 * 2、jstring:返回值类型(对应java的jni基本类型)
 * 3、C方法名:Java_pacakege_class_method
 * 4、JNIEnv*、jobject:jni必要参数(分别表示jni环境、java对象)
 */
// 样例1:获取字符串
JNIEXPORT jstring JNICALL Java_org_join_ndk_jni_TestJni_getStr(JNIEnv*,
        jobject);
// 样例2:C回调Java静态及非静态方法
JNIEXPORT jstring JNICALL Java_org_join_ndk_jni_TestJni_callJava(JNIEnv*,
        jobject, int, int, int, int);
// 样例3:灰度化图像(Bitmap作为参数)(注:android-8才提供Bitmap.h)
JNIEXPORT void JNICALL Java_org_join_ndk_jni_TestJni_convertToGray(JNIEnv*,
        jobject, jobject);

// 样例4:缺少JNIEXPORT、JNICALL测试
jintArray Java_org_join_ndk_jni_TestJni_getIntArray(JNIEnv*, jobject);

// 样例5:C方法不按规则命名尝试
jint getInt(JNIEnv*, jobject);

#ifdef __cplusplus
}
#endif

// C++调用C
//extern "C" {
//#include "ImageUtil.h"
//}

//标准头文件为何有如下结构?
//#ifdef __cplusplus
//extern "C" {
//#endif
//...
//#ifdef __cplusplus
//}
//#endif

#endif /* TESTJNI_H_ */
1.2)TestJni.cpp
/*
 * TestJni.cpp
 *
 *  Created on: 2011-12-20
 *      Author: Join
 */

#include "TestJni.h"

// 样例1:获取字符串
JNIEXPORT jstring JNICALL Java_org_join_ndk_jni_TestJni_getStr(JNIEnv *env,
        jobject obj) {
    return env->NewStringUTF("I'm from C!");
}

int min(int x, int y) {
    return (x <= y) ? x : y;
}

// 样例2:C回调Java静态及非静态方法
JNIEXPORT jstring JNICALL Java_org_join_ndk_jni_TestJni_callJava(JNIEnv *env,
        jobject obj, int add_x, int add_y, int sub_x, int sub_y) {
    char str[128]; // 字符数组
    int result_add = add(env, add_x, add_y); // 回调Java静态方法求和
    LOGE("==[%d+%d=%d]==", add_x, add_y, result_add);
    int result_sub = sub(env, sub_x, sub_y); // 回调Java非静态方法求差
    LOGE("==[%d-%d=%d]==", sub_x, sub_y, result_sub);
    // 将比较得的整数转成字符串
    sprintf(str, "Hello, I'm Join! min=%d", min(result_add, result_sub));
    return env->NewStringUTF(str);
}

typedef struct {
    uint8_t red;
    uint8_t green;
    uint8_t blue;
    uint8_t alpha;
} argb;

// 样例3:灰度化图像(Bitmap作为参数)(注:android-8才提供Bitmap.h)
/**
 * bitmap:ARGB_8888,32位ARGB位图
 */
JNIEXPORT void JNICALL Java_org_join_ndk_jni_TestJni_convertToGray(JNIEnv * env,
        jobject obj, jobject bitmap) {
    AndroidBitmapInfo info;
    void* pixels;
    int ret;

    LOGI("convertToGray");
    if ((ret = AndroidBitmap_getInfo(env, bitmap, &info)) < 0) {
        LOGE("AndroidBitmap_getInfo() failed ! error=%d", ret);
        return;
    }

    LOGI(
            "color image :: width is %d; height is %d; stride is %d; format is %d;flags is %d", info.width, info.height, info.stride, info.format, info.flags);
    if (info.format != ANDROID_BITMAP_FORMAT_RGBA_8888) {
        LOGE("Bitmap format is not RGBA_8888 !");
        return;
    }

    if ((ret = AndroidBitmap_lockPixels(env, bitmap, &pixels)) < 0) {
        LOGE("AndroidBitmap_lockPixels() failed ! error=%d", ret);
    }

    // modify pixels with image processing algorithm

    int x, y;
    uint8_t gray;
    for (y = 0; y < info.height; y++) {
        argb * line = (argb *) pixels;
        for (x = 0; x < info.width; x++) {
            gray = 0.3 * line[x].red + 0.59 * line[x].green
                    + 0.11 * line[x].blue;
            line[x].red = line[x].green = line[x].blue = gray;
            // line[x].alpha = 0xff; // 完全不透明
        }

        pixels = (char *) pixels + info.stride;
    }

    LOGI("unlocking pixels");
    AndroidBitmap_unlockPixels(env, bitmap);

}

// 样例4:缺少JNIEXPORT、JNICALL测试
jintArray Java_org_join_ndk_jni_TestJni_getIntArray(JNIEnv *env, jobject obj) {
    int array[] = { 12, 34 }; // 新建一个int[]
    jintArray result = env->NewIntArray(2); // 新建一个jintArray
    env->SetIntArrayRegion(result, 0, 2, array); // 将int[]存入result
    return result;
}

// 样例5:C方法不按规则命名尝试
jint getInt(JNIEnv *env, jobject obj) {
    return 256;
}
1.3)回调相关
参照Java JNI简单实现一文,讲了些jni注意点的吧?
2)Java部分
2.1)TestJni
public class TestJni {

    /** TAG标识 */
    private static final String TAG = "TestJni";

    /**
     * 载入动态库
     */
    static {
        System.loadLibrary("TestJni");
    }

    /** 样例1:获取字符串 */
    public static native String getStr();

    /** C回调Java方法(静态) */
    public static int add(int x, int y) {
        Log.e(TAG, "==Java静态add方法==");
        return x + y;
    }

    /** C回调Java方法(非静态) */
    public int sub(int x, int y) {
        Log.e(TAG, "==Java非静态sub方法==");
        return x - y;
    }

    /** 样例2:C回调Java静态及非静态方法 */
    public static native String callJava(int add_x, int add_y, int sub_x,
            int sub_y);

    /** 样例3:灰度化图像(Bitmap作为参数)(注:android-8才提供Bitmap.h) */
    public static native void convertToGray(Bitmap bitmap);

    /** 样例4:缺少JNIEXPORT、JNICALL测试 */
    public static native int[] getIntArray();

    /** 样例5:C方法不按规则命名尝试 */
    public static native int getInt();

}
2.2)AndroidNDKActivity
public class AndroidNDKActivity extends Activity implements
        View.OnClickListener {

    /** 标签 */
    private TextView text;

    /** 按钮 */
    private Button btn1, btn2, btn3, btn4, btn5;

    /** 图像 */
    private ImageView imageView;

    @Override
    public void onCreate(Bundle savedInstanceState) {
        super.onCreate(savedInstanceState);
        setContentView(R.layout.main);

        /* 初始化话各组件 */
        text = (TextView) findViewById(R.id.text);
        btn1 = (Button) findViewById(R.id.btn1);
        btn1.setOnClickListener(this);
        btn2 = (Button) findViewById(R.id.btn2);
        btn2.setOnClickListener(this);
        btn3 = (Button) findViewById(R.id.btn3);
        btn3.setOnClickListener(this);
        btn4 = (Button) findViewById(R.id.btn4);
        btn4.setOnClickListener(this);
        btn5 = (Button) findViewById(R.id.btn5);
        btn5.setOnClickListener(this);
        imageView = (ImageView) findViewById(R.id.imageView);
    }

    @Override
    public void onClick(View v) {
        switch (v.getId()) {
        case R.id.btn1:
            // 样例1:获取字符串
            text.setText(TestJni.getStr());
            break;
        case R.id.btn2:
            // 样例2:C回调Java静态及非静态方法
            text.setText(TestJni.callJava(2, 5, 8, 3));
            break;
        case R.id.btn3:
            // 获得Bitmap资源(32位)
            // BitmapFactory.Options options = new BitmapFactory.Options();
            // options.inPreferredConfig = Bitmap.Config.ARGB_8888;
            // Bitmap bitmap = BitmapFactory.decodeResource(getResources(),
            // R.drawable.ic_launcher, options);
            Bitmap bitmap = BitmapFactory.decodeResource(getResources(),
                    R.drawable.ic_launcher);
            // 样例3:灰度化图像(Bitmap作为参数)
            TestJni.convertToGray(bitmap);
            imageView.setImageBitmap(bitmap);
            break;
        case R.id.btn4:
            // 样例4:缺少JNIEXPORT、JNICALL测试
            int[] array = TestJni.getIntArray();
            int len = array.length;
            StringBuffer sb = new StringBuffer();
            for (int i = 0; i < len - 1; i++) {
                sb.append(array[i]);
                sb.append(",");
            }
            sb.append(array[len - 1]);
            text.setText(sb.toString());
            break;
        case R.id.btn5:
            // 样例5:C方法不按规则命名尝试
            try {
                int value = TestJni.getInt();
                text.setText(String.valueOf(value));
            } catch (UnsatisfiedLinkError e) {
                text.setText("UnsatisfiedLinkError!");
                e.printStackTrace();
            }
            break;
        }
    }
}
三、后记
整理的基础样例工程,嘿嘿!
注意:
1)需要2.2系统才可,用了Bitmap.h。
2)样例5(不按命名规则的那个),用jni对方法进行注册,不按要求写方法名也是可以的。
3)灰度化是用的标准公式:Gray = R*0.299 + G*0.587 + B*0.114(考虑效率的话,有移位公式)
4)在android-ndk-r6\platforms\android-8\arch-arm\usr\lib目录下是NDK提供的可调用库。(有OpenGL ES^^)
Reprinted from http://vaero.blog.51cto.com/4350852/782787


