Flume学习笔记
- 什么是Flume?
Flume是Cloudera提供的一个高可用的,高可靠的,分布式海量日志采集,聚合的传输软件
2. Flume架构

3.Flume的运行机制
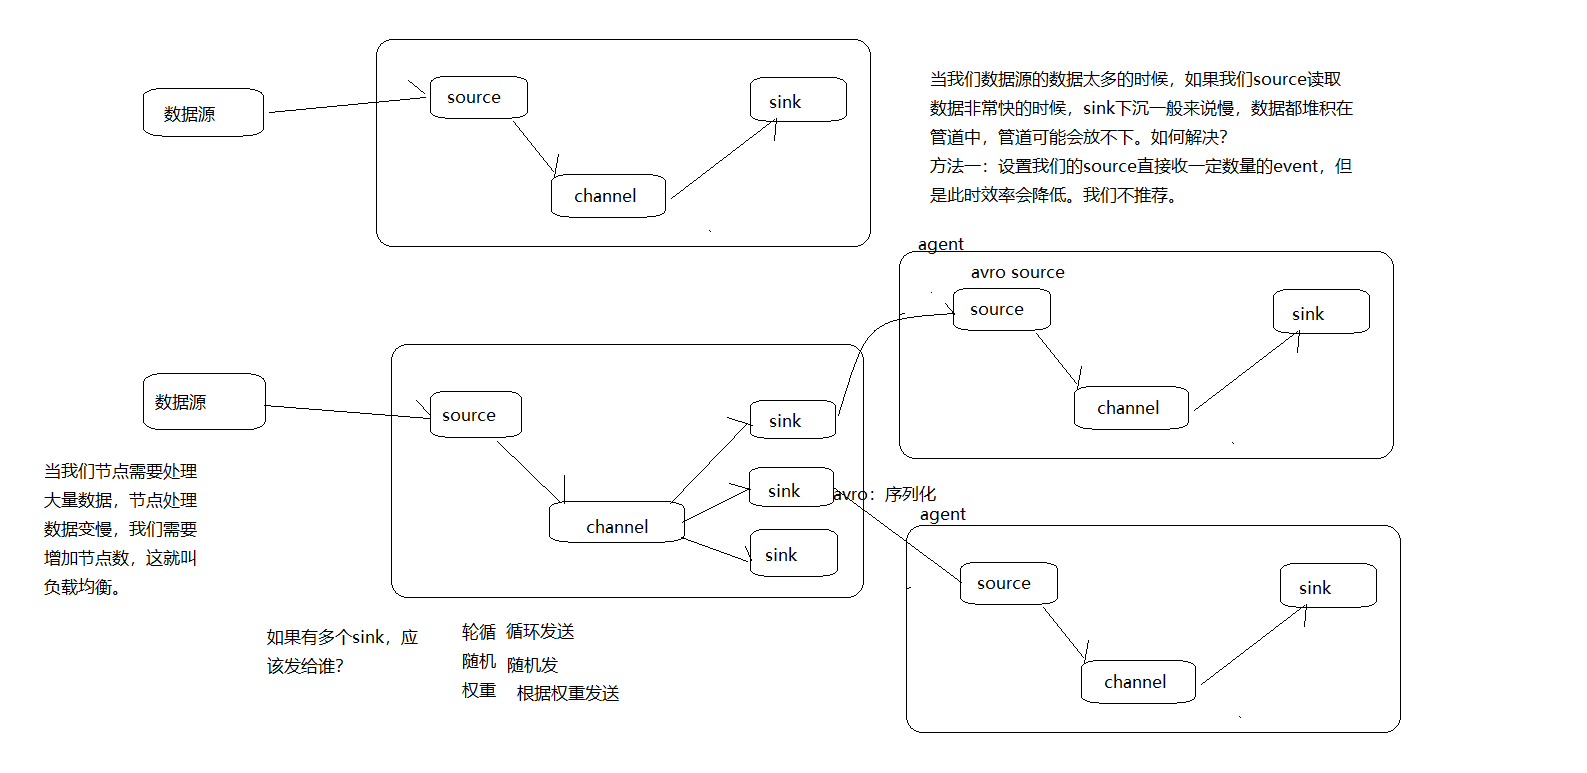
Flume的核心角色是agent,本身是一个java进程,一般运行在日志收集节点,每个agent有以下三个组件
-
- source:采集源数据,跟数据源对接,获取数据。
- sink:下沉地,将采集的数据送往目的地,一般是下一个agent或者是直接存储到一个文件系统
- channle:传递数据管道,起到缓冲作用。】
- 在整个过程中流动的是event,它是flume内部传输数据最基本的单位,event将传输的数据进行封装,其中包括event header,event body,event信息,event信息就是flume收集到的日志记录。
4. 采集目录到hdfs
根据需求,在服务器下面的某个目录下会不断的产生新数据,我们需要收集这些新产生数据,然后上传到hdfs。
采集源source:spooldir
下沉目标sink:hdfs sink
传递通道channel:可用file channel 也可以用内存channel
# 三大组件的名字
a1.sources = r1
a1.sinks = k1
a1.channels = c1

# Describe/configure the source
##注意:不能往监控目中重复丢同名文件
a1.sources.r1.type = spooldir
#文件的来源
a1.sources.r1.spoolDir = /root/logs
a1.sources.r1.fileHeader = true

# Describe the sink
a1.sinks.k1.type = hdfs
#下沉到哪里
a1.sinks.k1.hdfs.path = /flume/events/%y-%m-%d/%H%M/
#文件前缀
a1.sinks.k1.hdfs.filePrefix = events-
#每隔十分钟产生一个文件夹(时间上的舍弃)
a1.sinks.k1.hdfs.round = true
a1.sinks.k1.hdfs.roundValue = 10
a1.sinks.k1.hdfs.roundUnit = minute
#间隔多久将临时文件滚动
a1.sinks.k1.hdfs.rollInterval = 3
#当文件达到该大小滚动文件
a1.sinks.k1.hdfs.rollSize = 20
#当event事件数量达到5时滚动
a1.sinks.k1.hdfs.rollCount = 5
#批量写入hdfs个数
a1.sinks.k1.hdfs.batchSize = 1
a1.sinks.k1.hdfs.useLocalTimeStamp = true
#生成的文件类型,默认是Sequencefile,可用DataStream,则为普通文本
a1.sinks.k1.hdfs.fileType = DataStream

# Use a channel which buffers events in memory
a1.channels.c1.type = memory
a1.channels.c1.capacity = 1000
a1.channels.c1.transactionCapacity = 100

# Bind the source and sink to the channel
a1.sources.r1.channels = c1
a1.sinks.k1.channel = c1
5. 采集文件到hdfs
当服务器有一个log日志文件不断有新数据写入,我们需要把这个新写入的数据采集到hdfs中。
-
-
下沉目标, 即sink ----hdfs文件系统: hdfs sink
-
source 和 sink 之间的传递通道---channel, 可以file channel 也可以使用内存 channel
6.Flume的负载均衡
agent1.channels = c1
agent1.sources = r1
agent1.sinks = k1 k2

#设置组
agent1.sinkgroups = g1

#set channel
agent1.channels.c1.type = memory
agent1.channels.c1.capacity = 1000
agent1.channels.c1.transactionCapacity = 100

agent1.sources.r1.channels = c1
agent1.sources.r1.type = exec
agent1.sources.r1.command = tail -F /export/flumedata/123.log

# set sink1
agent1.sinks.k1.channel = c1
agent1.sinks.k1.type = avro
agent1.sinks.k1.hostname = node02
agent1.sinks.k1.port = 52020

# set sink2
agent1.sinks.k2.channel = c1
agent1.sinks.k2.type = avro
#下一个source的主机名
agent1.sinks.k2.hostname = node03
agent1.sinks.k2.port = 52020

#set sink group
agent1.sinkgroups.g1.sinks = k1 k2

#负载均衡的配置
agent1.sinkgroups.g1.processor.type = load_balance
# 是否开启黑名单机制
agent1.sinkgroups.g1.processor.backoff = true

#支持random
agent1.sinkgroups.g1.processor.selector = round_robin
#设置超时时间(单位是毫秒),成指数倍增长
agent1.sinkgroups.g1.processor.selector.maxTimeOut=10000
开启命令
bin/flume-ng agent -c conf -f conf/exec-avro.conf -n agent1 -Dflume.root.logger=INFO,console
7. Flume的failover
具体流程和load balance一样,但内部原理完全不同,对其他每个节点设置优先值,当优先级最高的机器挂掉,另外一台比它低优先级的会开始代替它的工作,当宕机恢复后,他会恢复原来的优先级继续原来的工作,代替它工作这台继续作为备份。
a1.sinkgroups = g1
a1.sinkgroups.g1.sinks = k1 k2 k3
a1.sinkgroups.g1.processor.type = failover
a1.sinkgroups.g1.processor.priority.k1 = 5  #优先级值, 绝对值越大表示优先级越高
a1.sinkgroups.g1.processor.priority.k2 = 7
a1.sinkgroups.g1.processor.priority.k3 = 6
a1.sinkgroups.g1.processor.maxpenalty = 20000  #失败的Sink的最大回退期(millis)
8. 拦截器
/source/logs/access/20160101/**
/source/logs/nginx/20160101/**
/source/logs/web/20160101/**

# Name the components on this agent
a1.sources = r1 r2 r3
a1.sinks = k1
a1.channels = c1

# Describe/configure the source
a1.sources.r1.type = exec
a1.sources.r1.command = tail -F /root/data/access.log
a1.sources.r1.interceptors = i1
a1.sources.r1.interceptors.i1.type = static
##  static拦截器的功能就是往采集到的数据的header中插入自##     己定义的key-value对
a1.sources.r1.interceptors.i1.key = type
a1.sources.r1.interceptors.i1.value = access

a1.sources.r2.type = exec
a1.sources.r2.command = tail -F /root/data/nginx.log
a1.sources.r2.interceptors = i2
a1.sources.r2.interceptors.i2.type = static
a1.sources.r2.interceptors.i2.key = type
a1.sources.r2.interceptors.i2.value = nginx

a1.sources.r3.type = exec
a1.sources.r3.command = tail -F /root/data/web.log
a1.sources.r3.interceptors = i3
a1.sources.r3.interceptors.i3.type = static
a1.sources.r3.interceptors.i3.key = type
a1.sources.r3.interceptors.i3.value = web

# Describe the sink
a1.sinks.k1.type = avro
a1.sinks.k1.hostname = 192.168.200.101
a1.sinks.k1.port = 41414

# Use a channel which buffers events in memory
a1.channels.c1.type = memory
a1.channels.c1.capacity = 20000
a1.channels.c1.transactionCapacity = 10000

# Bind the source and sink to the channel
a1.sources.r1.channels = c1
a1.sources.r2.channels = c1
a1.sources.r3.channels = c1
a1.sinks.k1.channel = c1
#定义agent名, source、channel、sink的名称
a1.sources = r1
a1.sinks = k1
a1.channels = c1

#定义source
a1.sources.r1.type = avro
a1.sources.r1.bind = 192.168.72.143
a1.sources.r1.port =41414

#添加时间拦截器
a1.sources.r1.interceptors = i1
a1.sources.r1.interceptors.i1.type = org.apache.flume.interceptor.TimestampInterceptor$Builder

#定义channels
a1.channels.c1.type = memory
a1.channels.c1.capacity = 20000
a1.channels.c1.transactionCapacity = 10000

#定义sink
a1.sinks.k1.type = hdfs
a1.sinks.k1.hdfs.path=hdfs://192.168.72.141:8020/source/logs/%{type}/%Y%m%d
a1.sinks.k1.hdfs.filePrefix =events
a1.sinks.k1.hdfs.fileType = DataStream
a1.sinks.k1.hdfs.writeFormat = Text
#时间类型
a1.sinks.k1.hdfs.useLocalTimeStamp = true
#生成的文件不按条数生成
a1.sinks.k1.hdfs.rollCount = 0
#生成的文件按时间生成
a1.sinks.k1.hdfs.rollInterval = 30
#生成的文件按大小生成
a1.sinks.k1.hdfs.rollSize  = 10485760
#批量写入hdfs的个数
a1.sinks.k1.hdfs.batchSize = 10000
#flume操作hdfs的线程数(包括新建,写入等)
a1.sinks.k1.hdfs.threadsPoolSize=10
#操作hdfs超时时间
a1.sinks.k1.hdfs.callTimeout=30000

#组装source、channel、sink
a1.sources.r1.channels = c1
a1.sinks.k1.channel = c1
在flume安装目录下执行 :
bin/flume-ng agent -c conf -f conf/avro_source_hdfs_sink.conf -name a1 -Dflume.root.logger=DEBUG,console

在flume安装目录下执行 :
bin/flume-ng agent -c conf -f conf/exec_source_avro_sink.conf -name a1 -Dflume.root.logger=DEBUG,console

while true; do echo "access access ....">> /export/flumedata/access.log;sleep 1;done
while true; do echo "web web ....">> /export/flumedata/web.log;sleep 1;done
while true; do echo "nginx nginx ....">> /export/flumedata/nginx.log;sleep 1;done
9. 自定义拦截器
https://www.jianshu.com/p/ce5d5ab8e6e9

 浙公网安备 33010602011771号