springboot配置swagger2
springboot+spring security配置swagger2
这里springboot整合springsecurity就不说了,上篇文章就有:https://www.cnblogs.com/qiantao/p/14605154.html
springboot版本:2.3.7、swagger2版本:2.9.2
1、pom.xml文件中添加相关依赖
<!-- SpringSecurity 安 全 框 架 -->
<dependency>
    <groupId>org.springframework.boot</groupId>
    <artifactId>spring-boot-starter-security</artifactId>
</dependency>
<!-- swagger2 接 口 文 档 -->
<dependency>
    <groupId>io.springfox</groupId>
    <artifactId>springfox-swagger2</artifactId>
    <version>2.9.2</version>
</dependency>
<!-- swagger2 UI -->
<dependency>
    <groupId>io.springfox</groupId>
    <artifactId>springfox-swagger-ui</artifactId>
    <version>2.9.2</version>
</dependency>
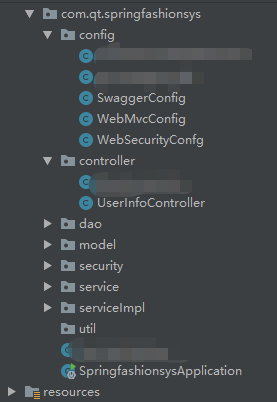
2、目录

3、SwaggerConfig配置类
/**
 * @Author qt
 * @Date 2021/4/8
 * @Description Swagger2接口配置
 */
@Configuration
@EnableSwagger2// 该注解开启Swagger2的自动配置
public class SwaggerConfig {

    @Bean
    public Docket createRestApi() {
        return new Docket(DocumentationType.SWAGGER_2)
                .pathMapping("/")
                .select()
                //api扫描的Controller包名
          .apis(RequestHandlerSelectors.basePackage("com.qt.springfashionsys.controller"))
                .paths(PathSelectors.any())
                .build()
                .apiInfo(apiInfo());
    }

    private ApiInfo apiInfo() {
        return new ApiInfoBuilder()
                .title("API接口文档")//标题
                .description("服装管理系统")//描述
                .termsOfServiceUrl("qt个人demo")//服务的团队
                .contact(new Contact("qt", "blog.csdn.net", "xxxxxxxx@163.com"))//作者的信息
                .license("The Apache License")//授权信息
                .licenseUrl("http://www.baidu.com")//授权的url
                .version("1.0.0")//版本号
                .build();
    }
}
4、swagger在Controller接口中添加文档说明
 /**
 * @Author qt
 * @Date 2021/3/25
 * @Description
 */
@Api(value = "服装管理业务接口", tags = { "服装管理业务接口" }, hidden = true)
@Controller
@RequestMapping("/user")
public class UserInfoController {
    private Logger logger = LoggerFactory.getLogger(getClass());
    @Resource
    private UserInfoService userInfoService;

     /**
      * 根据用户名获取用户信息
      * @param username 用户名
      * @return 用户信息
      */
    @ApiOperation(value = "XXX接口描述")
    @ApiImplicitParams({
        @ApiImplicitParam(name = "username", defaultValue = "user", value = "用户名", required = true, dataType = "String", paramType = "query")
    })
    @GetMapping("/getUserInfo")
    @ResponseBody
    public User getUserInfo(@RequestParam String username){
        return userInfoService.getUserInfoByUsername(username);
    }
}
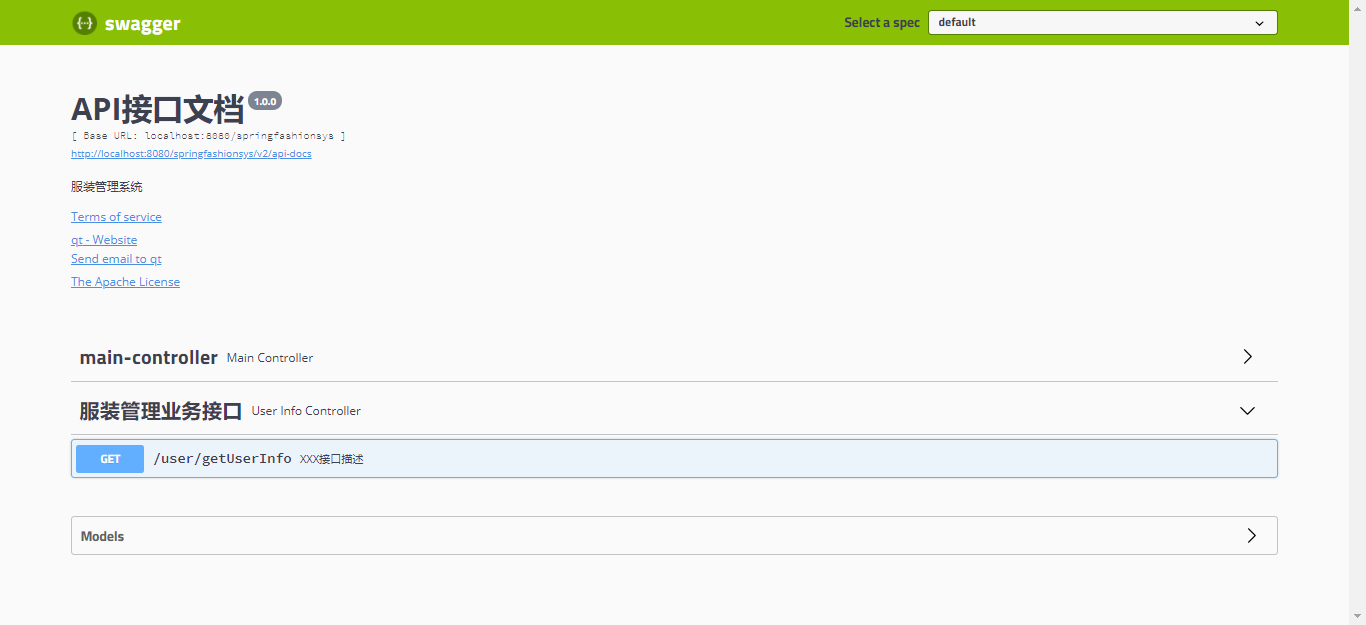
5、启动项目,访问 localhost:8080/springfashionsys/swagger-ui.html 页面直接跳转到如下页面

接口文档页面:

6、配置不拦截swagger
如果项目加了过滤器或拦截了swagger就无法访问到,可能会报404,也可能报下图错误,所以需要配置不拦截swagger,这里项目中整合了security可能有些不同,相关文件位置可以看我上篇文章springboot整合springsecurity。

6.1 在WebSecurityConfg配置类中添加:
@Override
public void configure(WebSecurity web) throws Exception {
    web.ignoring()
            //配置静态文件不需要认证
            .antMatchers("/static/**")
            //配置swagger2不需要认证
            .antMatchers("/v2/api-docs",
                         "/configuration/security",
                         "swagger/**",
                         "/swagger-resources",
                         "/swagger-resources/**",
                         "/swagger-ui.html",
                         "/swagger-ui.html/*",
                         "/webjars/**");
}
6.2 WebMvcConfig配置类:
/**
 * @Author qt
 * @Date 2021/3/19
 * @Description
 */
@Configuration
public class WebMvcConfig extends WebMvcConfigurationSupport {

    /**
     * 配置静态资源
     * @param registry
     */
    @Override
    protected void addResourceHandlers(ResourceHandlerRegistry registry) {
        //配置静态文件不需要认证,解决静态资源被拦截的问题
        registry.addResourceHandler("/static/**").addResourceLocations("classpath:/static/");
        //配置swagger2不需要认证
        registry.addResourceHandler("/swagger-ui.html")
                .addResourceLocations("classpath:/META-INF/resources/");
        registry.addResourceHandler("/webjars/**")
                .addResourceLocations("classpath:/META-INF/resources/webjars/");
        super.addResourceHandlers(registry);
    }
}
demo地址:http://www.qnto.top/springfashionsys/swagger-ui.html
总结:实践是检验真理的唯一标准。


