使用Nginx+Lua(openresty)实现自定义WAF
1. Nginx+lua介绍
Nginx作为一款面向性能设计的HTTP服务器,相较于Apache、lighttpd具有占有内存少,稳定性高等优势。其流行度越来越高,应用也越来越广泛,常见的应用有:web服务器、反向代理服务器以及电子邮件(IMAP/POP3)代理服务器,高并发大流量站点常用来做接入层的负载均衡,还有非常常见的用法是作为日志采集服务器等。
Nginx整体采用模块化设计,有丰富的模块库和第三方模块库,配置灵活。注意的是:nginx的模块是静态的,添加和删除模块都要对nginx进行重新编译,这一点与Apache的动态模块完全不同
虽然 Nginx有如此强大的性能以及众多的三方模块支持,但每次重新编译以及寻找三方模块对生产环境来说还是不可接受的,幸运的是,Nginx 它是支持客户自己 Lua 脚本编程扩展相应的功能的,而且可以热加载,这就给生产环境带来了无限可能。比如我现在想要直接用Nginx + redis 做反爬虫和频率限制,Nginx + Kafka 做日志的实时流处理等等。
Nginx:基于HTTP的负载均衡和反向代理服务器,Nginx工作在网络的7层,所以它可以针对http应用本身来做分流策略,比如针对域名、URL、目录结构等,相比之下LVS(基于IP的负载均衡和反向代理技术,工作在网络4层之上仅作分发之用,负载均衡性能最强,对内存和cpu、IO资源消耗比较低)并不具备这样的功能,能够很好地支持虚拟主机,可配置性很强,大约能支持3~5万条并发连接。
Lua 是一个简洁、轻量、可扩展的脚本语言,也是号称性能最高的脚本语言,用在很多需要性能的地方,比如:游戏脚本,nginx,wireshark的脚本,当你把他的源码下下来编译后,你会发现解释器居然不到200k,非常变态。。。很多应用程序使用Lua作为自己的嵌入式脚本语言,以此来实现可配置性、可扩展性。
Nginx-Lua模块的执行顺序参考:https://www.cnblogs.com/JohnABC/p/6206622.html
https://blog.csdn.net/njys1/article/details/81413746
1.1 Nginx + Lua部署
创建nginx运行的普通用户
groupadd -f nginx
useradd -g nginx nginx
下载nginx安装包和依赖包
yum install gcc  gcc-c++ autoconf automake make -y #默认有的话无须安装
yum install -y  zlib zlib-devel openssl openssl-devel  #依赖(支持Nginx服务访问,以https方式访问)pere-devel下载源码安装
yum -y install GeoIP GeoIP-devel GeoIP-data #编译安装geo ip模块时会用到,不需要就不安装
wget -q http://nginx.org/download/nginx-1.15.8.tar.gz #下载nginx软件包
wget https://nchc.dl.sourceforge.net/project/pcre/pcre/8.42/pcre-8.42.tar.gz #下载最新的pcre依赖
先不解压,等安装完LUAJIT在安装nginx,加载模块
下载当前最新的luajit和ngx_devel_kit(NDK)、lua-nginx-module
ngx_devel_kit(NDK)模块是一个拓展nginx服务器核心功能的模块,第三方模块开发可以基于它来快速实现。NDK提供函数和宏处理一些基本任务,减轻第三方模块开发的代码量。
ngx_lua_module 是一个nginx http模块,它把 lua 解析器内嵌到 nginx,用来解析并执行lua 语言编写的网页后台脚本,特性很牛叉,可自行百度查看
wget http://luajit.org/download/LuaJIT-2.0.5.tar.gz #下载当前稳定版本
wget https://github.com/simpl/ngx_devel_kit/archive/v0.3.0.tar.gz
wget https://github.com/chaoslawful/lua-nginx-module/archive/v0.10.10.zip
解压NDK和lua-nginx-module
tar zxvf v0.3.0.tar.gz -C /usr/local   #解压后为ngx_devel_kit-0.3.0
unzip -q v0.10.10.zip -d /usr/local  #解压后为lua-nginx-module-0.10.10
安装LuaJIT Luajit是Lua即时编译器。
tar zxvf LuaJIT-2.0.5.tar.gz -C /usr/local
cd LuaJIT-2.0.5
make && make install
安装nginx并加载模块
tar zxf nginx-1.15.8.tar.gz
tar zxvf pcre-8.41.tar.gz -C /usr/local
cd nginx-1.15.8
export LUAJIT_LIB=/usr/local/lib
export LUAJIT_INC=/usr/local/include/luajit-2.0
./configure --user=nginx --group=nginx --prefix=/usr/local/nginx-1.15.8/ --with-pcre=/usr/local/pcre-8.42/ --with-http_stub_status_module --with-http_sub_module --with-http_gzip_static_module --with-http_geoip_module --without-mail_pop3_module --without-mail_imap_module --without-mail_smtp_module  --add-module=/usr/local/ngx_devel_kit-0.3.0/ --add-module=/usr/local/lua-nginx-module-0.10.10/
make -j2 && make install
ln -s /usr/local/nginx-1.15.8 /usr/local/nginx
ln -s /usr/local/lib/libluajit-5.1.so.2 /lib64/libluajit-5.1.so.2
ln -s /usr/local/nginx-1.12.2/sbin/nginx /usr/local/sbin/
nginx #启动
如果不创建符号链接,可能出现以下异常: error while loading shared libraries: libluajit-5.1.so.2: cannot open shared object file: No such file or directory
如果需要geo ip模块的话在nginx.conf加入
http {

    geoip_country /usr/local/nginx/conf/GeoIP.dat;
    geoip_city /usr/local/nginx/conf/GeoLiteCity.dat;
    server_tokens off;
    sendfile on;
    tcp_nopush on;
    tcp_nodelay on;
     .......
     .......
}
测试安装完成效果,修改nginx.conf增加第一个配置
cd /usr/local/nginx/conf
egrep -v "^$|#" nginx.conf_2019-03-13  >nginx.conf  #精简化配置
  location /hello {
                default_type 'text/plain';
                content_by_lua 'ngx.say("hello,lua!!!")';
        }

nginx -t
nginx -s reload
然后访问http://10.10.16.245/hello 如果出现hello,lua。表示安装完成。

注意:也可以直接部署春哥的开源项目:https://github.com/openresty。
更多使用 Lua 扩展 Nginx 功能请参考:https://my.oschina.net/leejun2005/blog/494248
https://github.com/iresty/nginx-lua-module-zh-wiki #这里着重介绍openresty的使用。
1.2 针对UA进行防护测试
禁止user-agent使用wget或ab压测,使用Nginx可以在应用层进行针对请求头部的UA进行过滤和指定动作(返回403)普通写法:
server {
        listen       80;
        server_name  localhost;
      ##### 禁止使用wget或ab压测 #####
        set $block_user_agent 0;
        if ($http_user_agent ~ "Wget|ApacheBench") {
        set $block_user_agent 1;
       }
       if ($block_user_agent = 1) {
        return 403;
      }
.....
.....
}
终端使用wget和ab进行测试: 可以直接安装apache的工具包httpd-tools,包含压测工具ab: yum install httpd-tools
wget 10.10.16.245 #测试是否返回403
ab -n1 -c1 http://10.10.16.245/  #测试结果Non-2xx responses:1 不是200的请求1个,返回403
ab -n100 -c1 http://10.10.16.245/ #cc一下1s请求100次:
1.3 拒绝访问特定后缀的文件
自己备份的文件,禁止被download,针对请求的URL进行过滤匹配和指定动作(返回404)
location ~* "\.(sql|bak|inc|old|sh|zip|tgz|gz|tar)$"{

     return 404;

}
1.4 防SQL注入
传统的网络防火墙墙只能够进行四层(OSI七层模型中的传输层)的防护,那么像SQL注入、XSS、网页挂马等安全问题却无法识别和解决,因为这些攻击是七层的(OSI 七层模型中的应用层)。针对请求的参数进行过滤匹配和指定动作(返回403),我们的url参数中是不可能有select的。
#==Block SQL Injections

set $block_sql_injections 0;

if ($query_string ~ "union.*select.*\("){

   set $block_sql_injections1;

}

if ( $block_sql_injections = 1){

   return 403;

}
像以上的规则可以写一些,但是原生态的Nginx的一些安全防护功能还是有限,参考了一下赵班长的waf,通过自定义waf,实现一些基本的安全防护功能。以上所有的防护都可以通过以下openresty配合搭建waf来完成。
2. Openresty介绍
OpenResty(又称:ngx_openresty) 是一个基于NGINX的可伸缩的Web平台,由中国人章亦春发起,提供了很多高质量的第三方模块。360,UPYUN,阿里云,新浪,腾讯网,去哪儿网,酷狗音乐等都是 OpenResty 的深度用户。
OpenResty® 是一个基于 Nginx与 Lua的高性能 Web平台,其内部集成了大量精良的 Lua 库、第三方模块以及大多数的依赖项。用于方便地搭建能够处理超高并发、扩展性极高的动态 Web 应用、Web 服务和动态网关。
OpenResty® 通过汇聚各种设计精良的 Nginx 模块(主要由 OpenResty 团队自主开发),从而将 Nginx 有效地变成一个强大的通用 Web 应用平台。这样,Web 开发人员和系统工程师可以使用 Lua 脚本语言调动 Nginx 支持的各种 C 以及 Lua 模块,快速构造出足以胜任 10K 乃至 1000K 以上单机并发连接的高性能 Web 应用系统。
OpenResty® 的目标是让你的Web服务直接跑在 Nginx 服务内部,充分利用 Nginx 的非阻塞 I/O 模型,不仅仅对 HTTP 客户端请求,甚至于对远程后端诸如 MySQL、PostgreSQL、Memcached 以及 Redis 等都进行一致的高性能响应。
参考博客地址:
http://openresty.org/cn/ #openresty中文社区
https://blog.csdn.net/yhclt/article/details/79309237 #详细介绍openresty
https://github.com/unixhot/waf #使用Nginx+Lua(openresty)搭建WAF
2.1 openresty部署
安装过OpenResty后,Nginx模块的配置跟上面讲的Nginx配置一致。不同的是OpenResty内置了一个ngx_lua模块,可以通过这个模块在Nginx中集成lua,完成一些原生Nginx不能完成的工作。
下载安装包和依赖包,建议在新的机器上操作:
#下载官网提供最新包 http://openresty.org/cn/download.html
创建nginx运行的普通用户
groupadd -f nginx
useradd -g nginx nginx
yum install gcc  gcc-c++ -y #默认有的话无须安装
yum install -y readline-devel pcre-devel openssl-devel #依赖(支持Nginx服务访问,以https方式访问)pere-devel 下载源码包
cd /usr/local/src
wget https://nchc.dl.sourceforge.net/project/pcre/pcre/8.42/pcre-8.42.tar.gz #下载最新的pcre依赖
tar xf pcre-8.42.tar.gz -C /usr/local
下载并编译安装openresty
wget "https://openresty.org/download/openresty-1.15.8.2.tar.gz"
tar zxf openresty-1.15.8.2.tar.gz
cd openresty-1.15.8.2
安装luajit:Luajit是Lua即时编译器。这里openresty已经自带了安装包,只需要重新编译一下就可以。
cd bundle/LuaJIT-2.1-20180420/  #进入乱LUAJIT编译安装目录
make clean && make && make install
ln -sf luajit-2.1.0-beta3 /usr/local/bin/luajit
下载ngx_cache_purge模块,该模块用于清理nginx缓存,注意解压目录。
cd /usr/local/src
wget https://github.com/FRiCKLE/ngx_cache_purge/archive/2.3.tar.gz
tar xf 2.3.tar.gz -C openresty-1.15.8.2/bundle/
下载nginx_upstream_check_module模块,该模块用于ustream健康检查,注意解压目录。
cd /usr/local/src
wget https://github.com/yaoweibin/nginx_upstream_check_module/archive/v0.3.0.tar.gz
tar xf v0.3.0.tar.gz -C openresty-1.15.8.2/bundle/
安装openresty:openresty版本号和标识隐藏(修改):隐藏版本号可以提高安全性。这只需要后面在nginx.conf配置里加上这个就可以了:server_tokens off;
隐藏openresty标识--修改源码:/usr/local/src/openresty-1.15.8.2/bundle/nginx-1.15.8/src/core/nginx.h   14行将openresty改为nginx:#define NGINX_VER          "nginx/" NGINX_VERSION ".2"
修改错误页的底部Footer:/usr/local/src/openresty-1.15.8.2/bundle/nginx-1.15.8/src/http/ngx_http_special_response.c  36行将openresty改为nginx: "<hr><center>nginx</center>" CRLF
HTTP ResponseHeader:/usr/local/src/openresty-1.15.8.2/bundle/nginx-1.15.8/src/http/ngx_http_header_filter_module.c  49行将"Server: openresty"改为“"Server: nginx"”
开始编译安装:编译参数根据自己需求再添加
cd openresty-1.15.8.2/
./configure \
--user=nginx --group=nginx \
--prefix=/usr/local/openresty-1.15.8.2 \
--with-luajit \
--with-http_stub_status_module \
--with-http_gzip_static_module \
--without-mail_pop3_module \
--without-mail_imap_module \
--without-mail_smtp_module \
--with-pcre=/usr/local/pcre-8.42 \
--with-pcre-jit \
--with-http_realip_module \
--add-module=./bundle/ngx_cache_purge-2.3/ \
--add-module=./bundle/nginx_upstream_check_module-0.3.0/ \
--without-http_empty_gif_module \
--with-poll_module  \
--with-http_ssl_module \
--with-threads \
--with-file-aio \
--with-poll_module \
--with-http_gunzip_module \
--with-http_auth_request_module \
--with-http_secure_link_module -j2
gmake && gmake install
ln -s /usr/local/openresty-1.15.8.2 /usr/local/openresty
ln -s /usr/local/openresty/nginx/sbin/nginx /usr/local/sbin/
cp nginx.conf nginx.conf_`date +%F`
egrep -v "^$|#" nginx.conf_2019-03-13  >nginx.conf  #精简化配置
2.2 测试openresty安装
nginx如何嵌入 lua 脚本。方法就是在nginx的配置文件nginx.conf 中使用content_by_lua或者cotent_by_lua_block指令:
vim /usr/local/openresty/nginx/conf/nginx.conf
server {
    location /hello {
            default_type text/html;
            content_by_lua_block {
                ngx.say("HelloWorld")
            }
        }
}

lua代码文件:我们把lua代码放在nginx配置中会随着lua的代码的增加导致配置文件太长不好维护,因此我们应该把lua代码移到外部文件中存储。
###test ngx_lua
        location /lua {
        default_type 'text/html';
        content_by_lua_file conf/lua/test.lua; #相对于nginx安装目录
        }
#此处conf/lua/test.lua也可以使用绝对路径/usr/local/openresty/nginx/conf/lua/test.lua。
nginx -s reload
curl http://192.168.56.11/lua
hello lua,this is a test!

至此openresty的基本环境没有任何问题。
3.WAF部署
Web应用防护系统(也称为:网站应用级入侵防御系统。英文:Web Application Firewall,简称: WAF)。利用国际上公认的一种说法:Web应用防火墙是通过执行一系列针对HTTP/HTTPS的安全策略来专门为Web应用提供保护的一款产品。详细介绍请百度百科。
WAF实现 WAF一句话描述,就是解析HTTP请求(协议解析模块),规则检测(规则模块),做不同的防御动作(动作模块),并将防御过程(日志模块)记录下来。所以本文中的WAF的实现由五个模块(配置模块、协议解析模块、规则模块、动作模块、错误处理模块)组成。
这里的waf部署完成,实现了一些基本可以满足需求的功能:实现的功能列表如下
- 支持IP白名单和黑名单功能,直接将黑名单的IP访问拒绝。
- 支持URL白名单,将不需要过滤的URL进行定义。
- 支持User-Agent的过滤,匹配自定义规则中的条目,然后进行处理(返回403)。
- 支持CC攻击防护,单个URL指定时间的访问次数,超过设定值,直接返回403。
- 支持Cookie过滤,匹配自定义规则中的条目,然后进行处理(返回403)。
- 支持URL过滤,匹配自定义规则中的条目,如果用户请求的URL包含这些,返回403。
- 支持URL参数过滤,原理同上。
- 支持日志记录,将所有拒绝的操作,记录到日志中去。
- 日志记录为JSON格式,便于日志分析,例如使用ELKStack进行攻击日志收集、存储、搜索和展示。
3.1 部署和测试
这里直接部署:
cd /usr/local/src
git clone https://github.com/unixhot/waf.git
cp -a ./waf/waf /usr/local/openresty/nginx/conf/
修改Nginx的配置文件,http模块加入以下配置。注意路径,同时WAF日志默认存放在/tmp/日期_waf.log
 ##### WAF #####
    lua_shared_dict limit 50m; #设置lua共享字典50M,cc的时候使用
    lua_package_path "/usr/local/openresty/nginx/conf/waf/?.lua"; #lua依赖路径
    init_by_lua_file "/usr/local/openresty/nginx/conf/waf/init.lua"; #初始化脚本
    access_by_lua_file "/usr/local/openresty/nginx/conf/waf/access.lua";  #防御main脚本
 ##### WAF #####
手动测试防护是否生效:
/usr/local/openresty/nginx/sbin/nginx –t
/usr/local/openresty/nginx/sbin/nginx
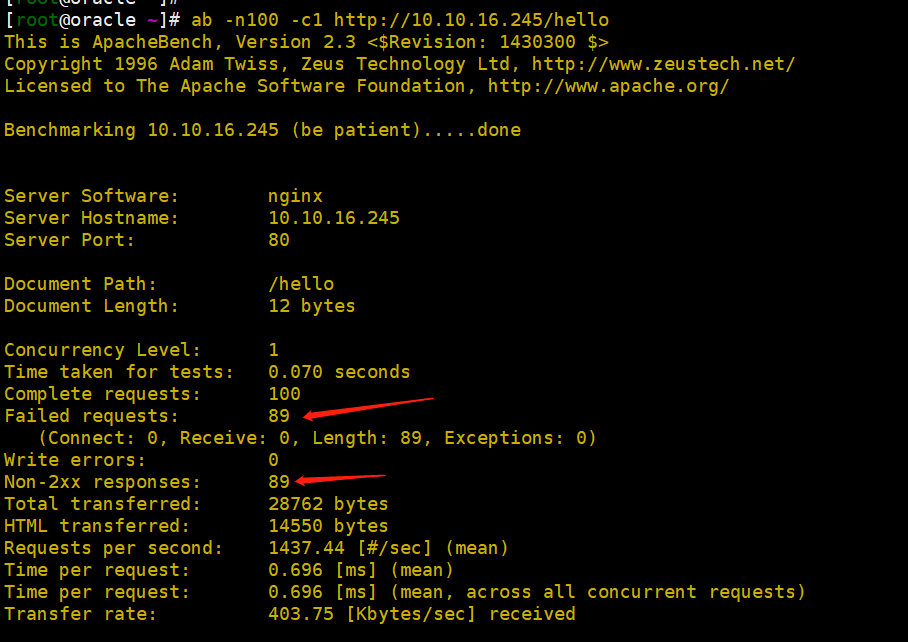
cc一下1s请求100次:ab -n100 -c1 http://10.10.16.245/hello #结果:成功的只有11个
nginx当出现403时返回一个友好的界面:


server {
        listen       80;
        server_name  localhost;
        location / {
            root   html;
            index  index.html index.htm;
        }
       ####test openresty
        location /hello {
            default_type text/html;
            content_by_lua_block {
                ngx.say("Hello World")
            }
        }
       error_page 403 ./403.html;
       # error_page   500 502 503 504  /50x.html;
       # location = /50x.html {
       #     root   html;
       # }
    }
config.lua配置:cat config.lua
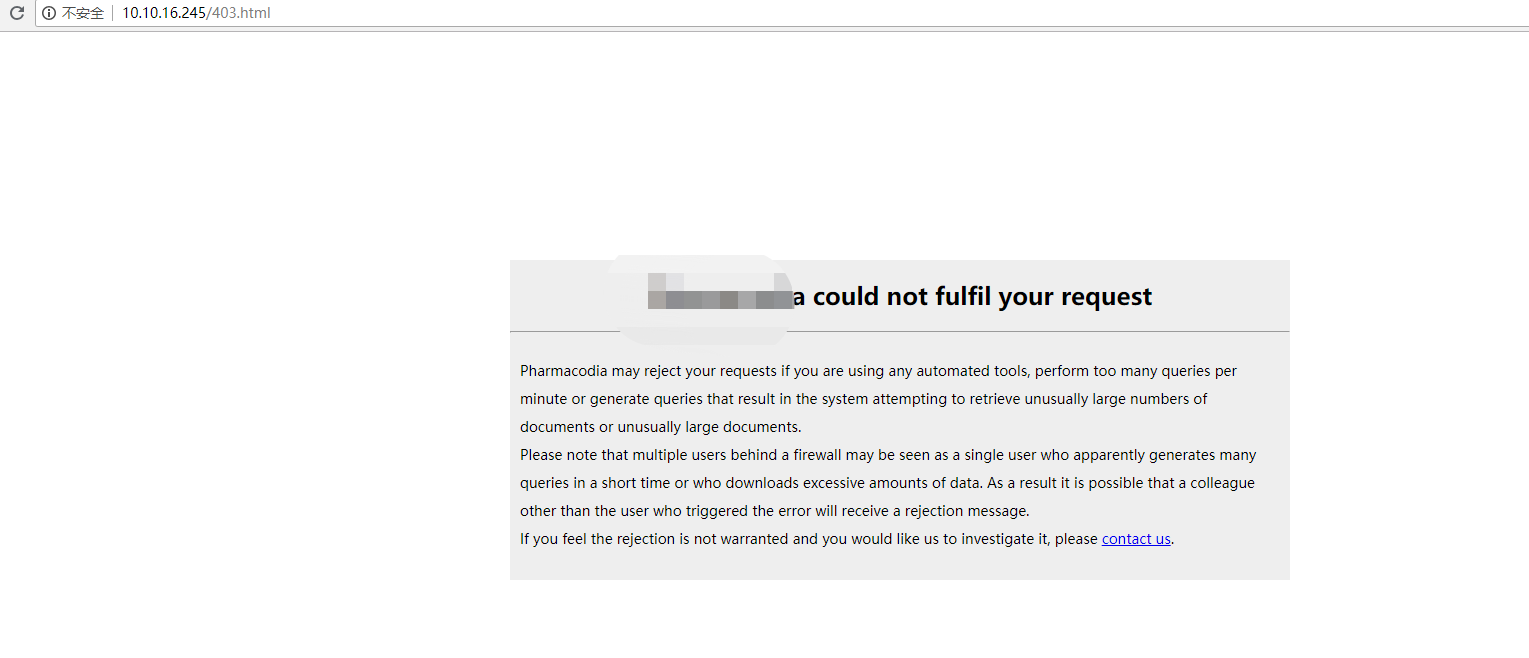
--配置模块 控制开关在这里可以开启或关闭
--WAF config file,enable = "on",disable = "off"

--waf status
config_waf_enable = "on"
--log dir
config_log_dir = "/tmp"
--rule setting
config_rule_dir = "/usr/local/openresty/nginx/conf/waf/rule-config"
--enable/disable white url
config_white_url_check = "on"
--enable/disable white ip
config_white_ip_check = "on"
--enable/disable block ip
config_black_ip_check = "on"
--enable/disable url filtering
config_url_check = "on"
--enalbe/disable url args filtering
config_url_args_check = "on"
--enable/disable user agent filtering
config_user_agent_check = "on"
--enable/disable cookie deny filtering
config_cookie_check = "on"
--enable/disable cc filtering
config_cc_check = "on"
--cc rate the xxx of xxx seconds 1个ip访问一个url60s之内只能访问10次
config_cc_rate = "10/60"
--enable/disable post filtering
config_post_check = "on"
--config waf output redirect/html  --两种输出方式,输出html或跳转其他页面
config_waf_output = "redirect"  --此处可以把html换成redirect
--if config_waf_output ,setting url
config_waf_redirect_url = "http://10.10.16.245/403.html"
config_output_html=[[
<html xmlns="http://www.w3.org/1999/xhtml">
<head>
        <meta http-equiv="Content-Type" content="text/html; charset=utf-8" />
        <meta http-equiv="X-UA-Compatible" content="IE=edge,chrome=1" />
        <meta name="renderer" content="webkit|ie-comp|ie-stand">
        <title>Access forbidden - Pharmacodia</title>
</head>
<style type="text/css">
.main{
    text-align: center;
    width: 780px;
    height: 320px;
    margin: auto;
    position: absolute;
    top: 0;
    left: 0;
    right: 0;
    bottom: 200;
    background-color: #eee;
}
.maintxt{
    padding: 10px;
    text-align:left;
    font-size:14px;
    line-height:200%
}
</style>

<div class="main">
    <h2>Pharmacodia could not fulfil your request</h2>
    <hr />
    <p class="maintxt">
    Pharmacodia may reject your requests if you are using any automated tools, perform too many queries per minute or generate queries that result in the system attempting to retrieve unusually large numbers of documents or unusually large documents.<br />
    Please note that multiple users behind a firewall may be seen as a single user who apparently generates many queries in a short time or who downloads excessive amounts of data. As a result it is possible that a colleague other than the user who triggered the error will receive a rejection message.<br />
    If you feel the rejection is not warranted and you would like us to investigate it, please <a href="https://www.pharmacodia.com//web/productBasicInfoShowController/aboutUs_contact_map">contact us</a>.
    </p>
</div>

</html>
]]
浏览器狂刷10次,看看效果:
3.2 init.lua完善
默认init.lua里req_data值设的是"-",这里需要手动改一下,可以记录用户浏览某个页面:log_record('White_IP',ngx.var_request_uri,ngx.var.uri,"_"),改完效果:

项目链接地址:https://pan.baidu.com/s/1R2XGs754Vq8yiC5NH5krZQ 提取码: qa36
3.3 对ip流量进行控制
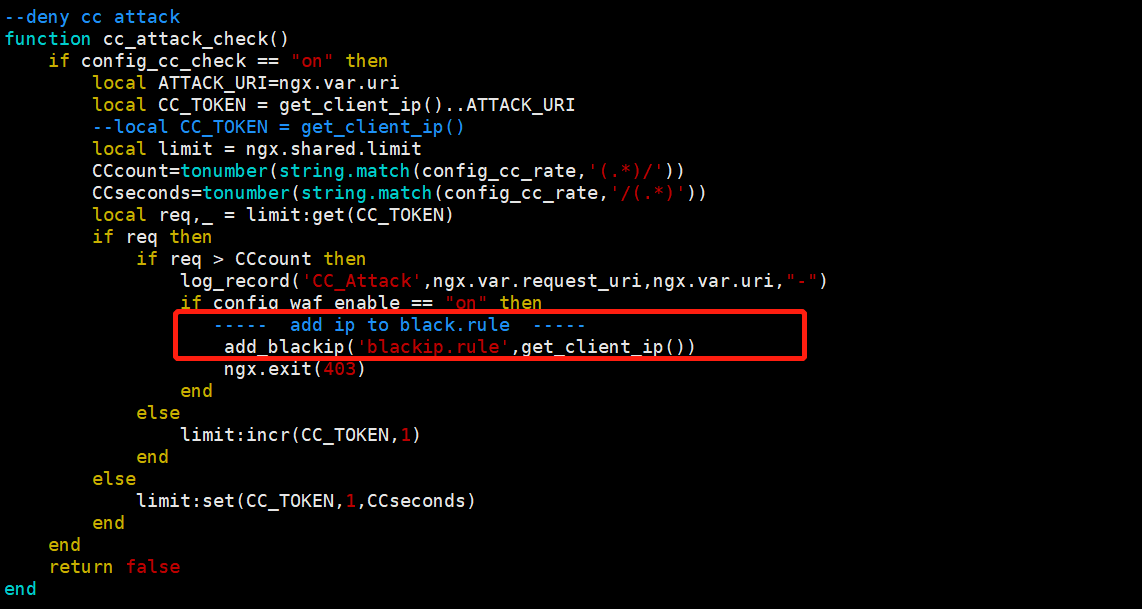
可以针对ip进行控制,如只封一个url的话,没有从根本上解决如何识别一次会话的问题。可以lib.lua 中增加一个add_blackip函数
--- Add black ip ---
function add_blackip(rulefilename,ip)
    local io = require 'io'
    local RULE_PATH = config_rule_dir
    local RULE_FILE = io.open(RULE_PATH..'/'..rulefilename,"a")
    if RULE_FILE == nil then
        return
    end
    RULE_FILE:write(ip.."\n")
    RULE_FILE:flush()
    RULE_FILE:close()
end
修改 init.lua cc_attack_check()函数,增加下面红色部分的调用;
客户端模拟,CC1s请求100次:
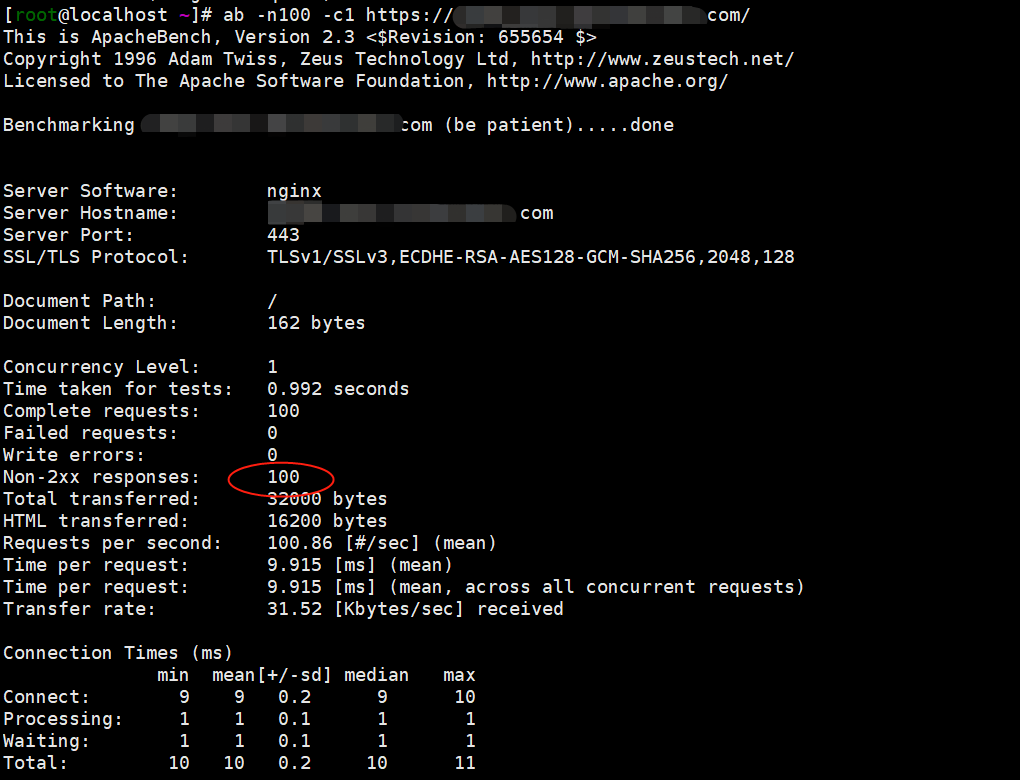
可发现不成功,再来访问以下:会直接返回403

现在我们查看以下刚才添加的执行将用户ip直接加入黑名单是否成功:

可以做一个定时,定时清空或转移blackip.rule文本内容;(这个暂时不用lua实现,可用shell方式)
#!/bin/bash
blackip_file="/usr/local/openresty/nginx/conf/waf/rule-config/blackip.rule"
Num="`grep -v "^$" $blackip_file|wc -l`"
if [ $Num -ge 1 ];then
        echo "`date +%F-%H:%M:%S`" >>/tmp/blackip.log
        echo "--------------------------------"  >>/tmp/blackip.log
    for i in `cat $blackip_file`
    do
        #/usr/bin/python /opt/ip_where.py $i >>/tmp/blackip.log
         echo -e "Black_iplist:      $i" >>/tmp/blackip.log
    done
        echo "--------------------------------"  >>/tmp/blackip.log
        echo  > $blackip_file
        cat /tmp/blackip.log |awk -F ":" '/Black_iplist/{print $2}'|sort|uniq -c|sort -nr >/opt/ip_sort.txt #去重排序
        cat /opt/ip_sort.txt|awk '{print $2}' >/opt/ip.txt #拿到所有ip
else
    exit
fi
使用python脚本获取各ip归属地来源:
#!/usr/bin/env python
# -*- coding: utf-8 -*-
import urllib
import json
import sys
#淘宝ip库接口
url = "http://ip.taobao.com/service/getIpInfo.php?ip="
def ip_find(ip):
    data = urllib.urlopen(url + ip).read()
    datadict=json.loads(data)
    for oneinfo in datadict:
        if "code" == oneinfo:
            if datadict[oneinfo] == 0:
                return datadict["data"]["country"] + datadict["data"]["region"] + datadict["data"]["city"] + "\t" + datadict["data"]["isp"]

if __name__ ==  "__main__":
    ip=sys.argv[1]
    name=ip_find(ip)
    print sys.argv[1],name

将shell加入定时任务,每五分钟执行一次,自动解封。


 浙公网安备 33010602011771号