Elasticsearch学习笔记
1. ES核心概念
elasticsearch是面向文档,关系型数据库和elasticsearch客观的对比!一切都是json

-
物理设计:elasticsearch在后台把每个索引划分成多个分片。每个分片可以在集群中的不同服务器间迁移
-
逻辑设计:一个索引类型中,包含多个文档,当我们索引一篇文档时,可以通过这样的一个顺序找到它:索引->类型->文档id,通过这个组合我们就能索引到某个具体的文档。注意:ID不必是整数,实际上它是一个字符串
文档
文档就是我们的一条条的记录,之前说elasticsearch是面向文档的,那么就意味着索引和搜索数据的最小单位是文档, elasticsearch中,文档有几个重要属性:
-
自我包含, 一篇文档同时包含字段和对应的值,也就是同时包含
key:value -
可以是层次型的,一个文档中包含自文档,复杂的逻辑实体就是这么来的! 就是一个json对象! fastjson进行自动转换!
-
灵活的结构,文档不依赖预先定义的模式,我们知道关系型数据库中,要提前定义字段才能使用,在elasticsearch中,对于字段是非常灵活的,有时候,我们可以忽略该字段,或者动态的添加一个新的字段。
类型
-
类型是文档的逻辑容器,就像关系型数据库一样,表格是行的容器。
-
类型中对于字段的定义称为映射,比如name映射为字符串类型。
-
我们说文档是无模式的 ,它们不需要拥有映射中所定义的所有字段,比如新增一个字段,那么elasticsearch是怎么做的呢?
-
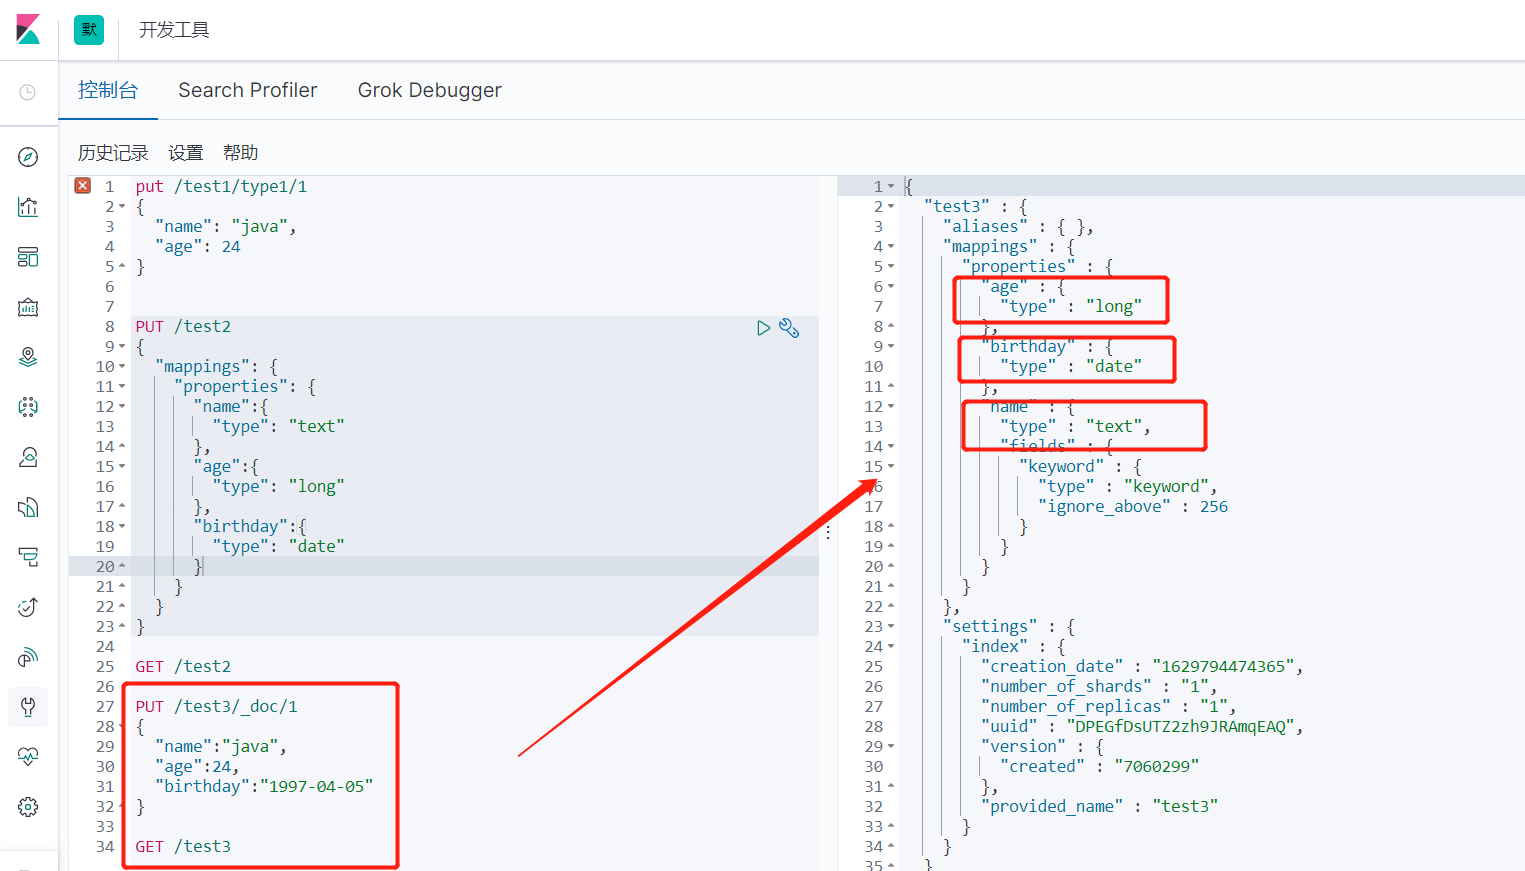
elasticsearch会自动的将新字段加入映射,但是这个字段的不确定它是什么类型, elasticsearch就开始猜,如果这个值是18 ,那么elasticsearch会认为它是整形。但是elasticsearch也可能猜不对 ,所以最安全的方式就是提前定义好所需要的映射,这点跟关系型数据库殊途同归了,先定义好字段,然后再使用
索引
-
索引可以理解为就是数据库!
-
索引是映射类型的容器, elasticsearch中的索引是一个非常大的文档集合,存储了映射类型的字段和其他设置,然后它们被存储到了各个分片上了。
倒排索引
elasticsearch使用的是一种称为倒排索引的结构,采用Lucene倒排索引作为底层。这种结构适用于快速的全文搜索,一个索引由文档中所有不重复的列表构成,对于每一个词,都有一个包含它的文档列表。
我们通过博客标签来搜索博客文章。那么倒排索引列表就是这样的一个结构:

如果要搜索含有python标签的文章,那相对于查找所有原始数据而言,查找倒排索引后的数据将会快的多。只需要查看标签这一栏,然后获取相关的文章ID即可。完全过滤掉无关的所有数据,提高效率!
在elasticsearch中,索引(库)这个词被频繁使用,这就是术语的使用。在elasticsearch中 ,索引被分为多个分片,每份分片是一个Lucene的索引。所以一个elasticsearch索引是由多 个Lucene索引组成的。别问为什么,谁让elasticsearch使用Lucene作为底层呢!如无特指,说起索引都是指elasticsearch的索引。
2. ik分词器
什么是IK分词器:
-
把一句话分词
-
如果使用中文:推荐IK分词器
-
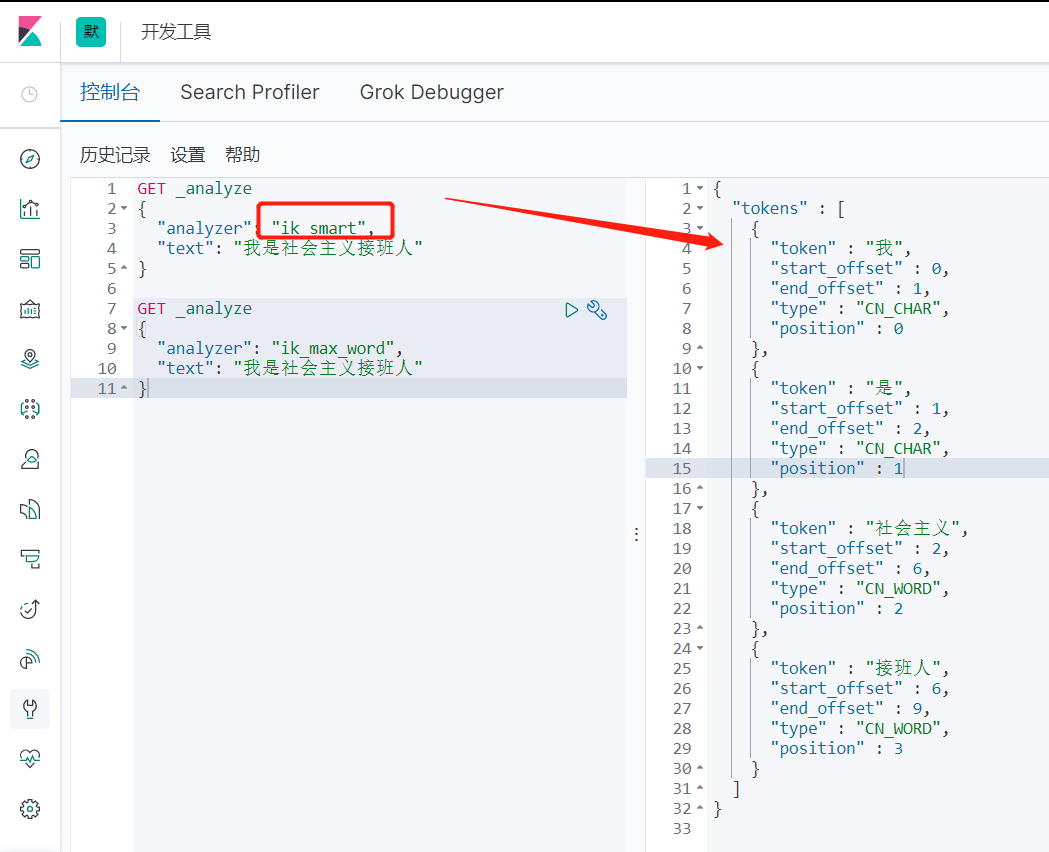
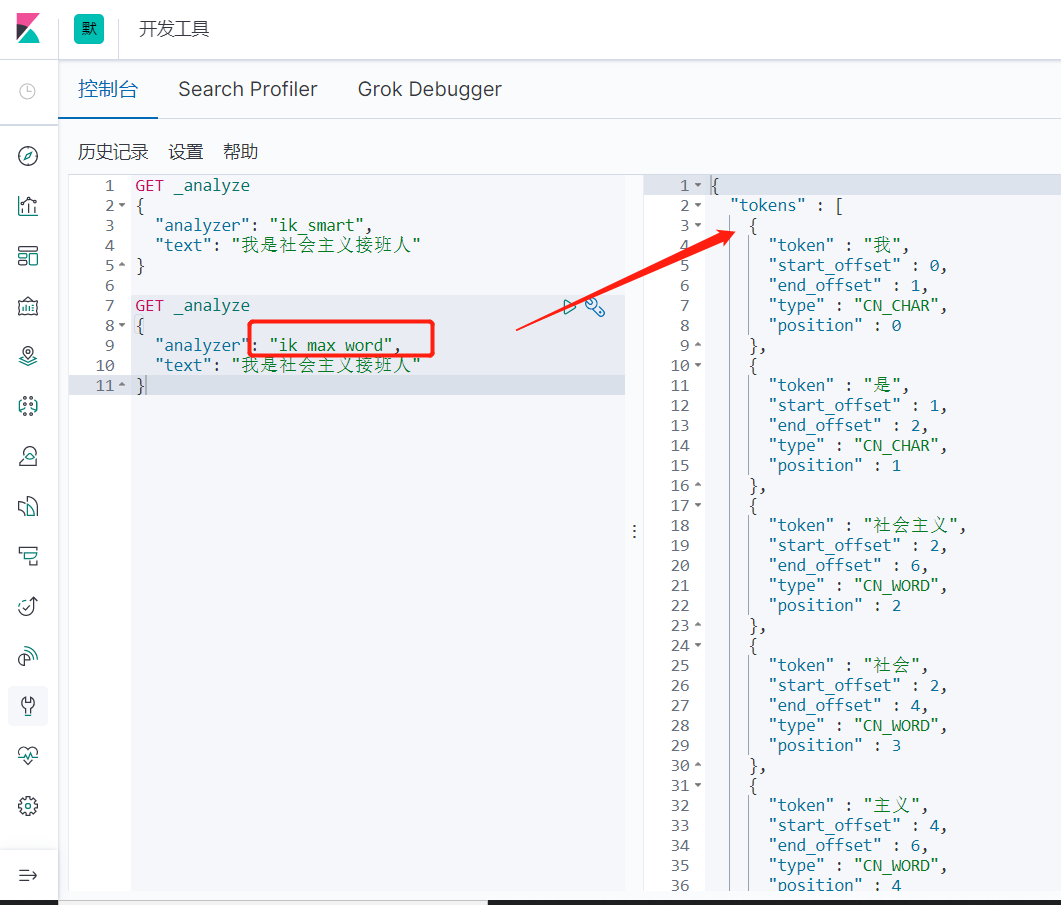
两个分词算法:ik_smart(最少切分),ik_max_word(最细粒度划分)
ik_smart测试
GET _analyze
{
  "analyzer": "ik_smart",
  "text": "我是社会主义接班人"
}

//输出
{
  "tokens" : [
    {
      "token" : "我",
      "start_offset" : 0,
      "end_offset" : 1,
      "type" : "CN_CHAR",
      "position" : 0
    },
    {
      "token" : "是",
      "start_offset" : 1,
      "end_offset" : 2,
      "type" : "CN_CHAR",
      "position" : 1
    },
    {
      "token" : "社会主义",
      "start_offset" : 2,
      "end_offset" : 6,
      "type" : "CN_WORD",
      "position" : 2
    },
    {
      "token" : "接班人",
      "start_offset" : 6,
      "end_offset" : 9,
      "type" : "CN_WORD",
      "position" : 3
    }
  ]
}
ik_max_word测试
GET _analyze
{
  "analyzer": "ik_max_word",
  "text": "我是社会主义接班人"
}
//输出
{
  "tokens" : [
    {
      "token" : "我",
      "start_offset" : 0,
      "end_offset" : 1,
      "type" : "CN_CHAR",
      "position" : 0
    },
    {
      "token" : "是",
      "start_offset" : 1,
      "end_offset" : 2,
      "type" : "CN_CHAR",
      "position" : 1
    },
    {
      "token" : "社会主义",
      "start_offset" : 2,
      "end_offset" : 6,
      "type" : "CN_WORD",
      "position" : 2
    },
    {
      "token" : "社会",
      "start_offset" : 2,
      "end_offset" : 4,
      "type" : "CN_WORD",
      "position" : 3
    },
    {
      "token" : "主义",
      "start_offset" : 4,
      "end_offset" : 6,
      "type" : "CN_WORD",
      "position" : 4
    },
    {
      "token" : "接班人",
      "start_offset" : 6,
      "end_offset" : 9,
      "type" : "CN_WORD",
      "position" : 5
    },
    {
      "token" : "接班",
      "start_offset" : 6,
      "end_offset" : 8,
      "type" : "CN_WORD",
      "position" : 6
    },
    {
      "token" : "人",
      "start_offset" : 8,
      "end_offset" : 9,
      "type" : "CN_CHAR",
      "position" : 7
    }
  ]
}
3. 命令模式的使用
3.1 Rest风格说明
| method | url地址 | 描述 |
|---|---|---|
| PUT | localhost:9200/索引名称/类型名称/文档id | 创建文档(指定文档id) |
| POST | localhost:9200/索引名称/类型名称 | 创建文档(随机文档id) |
| POST | localhost:9200/索引名称/类型名称/文档id/_update | 修改文档 |
| DELETE | localhost:9200/索引名称/类型名称/文档id | 删除文档 |
| GET | localhost:9200/索引名称/类型名称/文档id | 通过文档id查询文档 |
| POST | localhost:9200/索引名称/类型名称/_search | 查询所有的数据 |
基础测试
1、创建一个索引


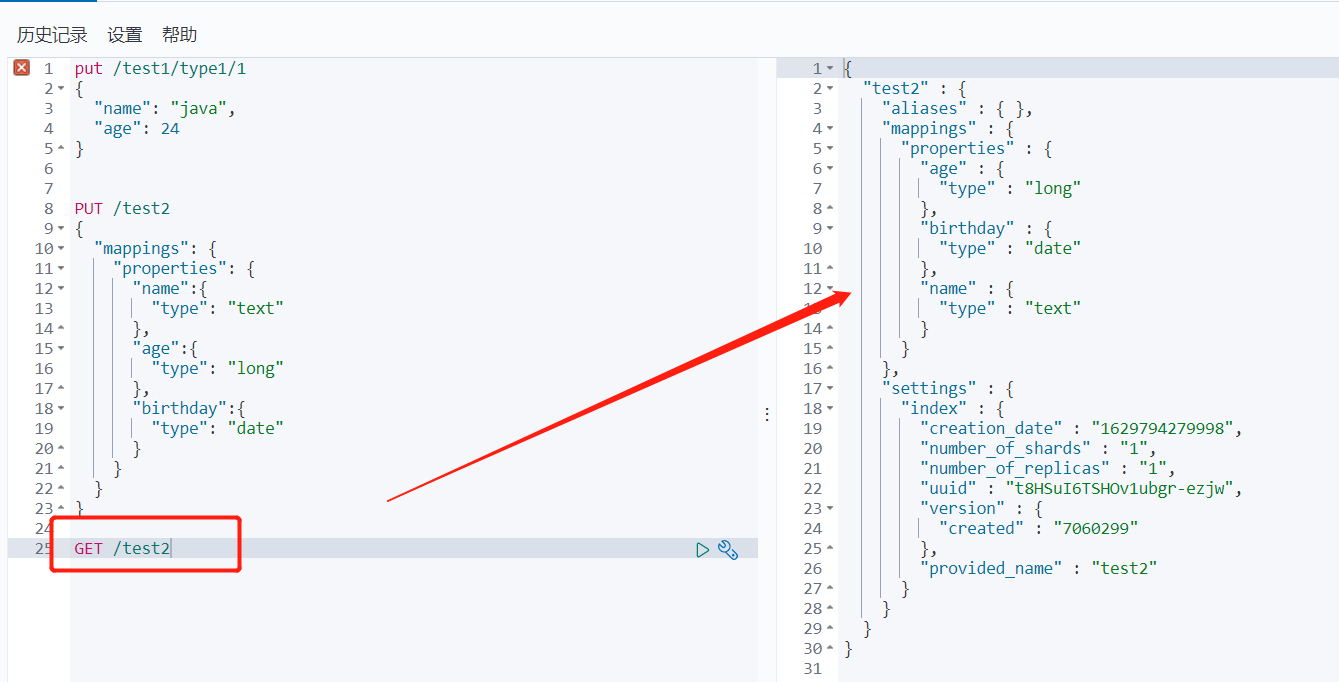
2、指定字段的类型
PUT /test2
{
  "mappings": {
    "properties": {
      "name":{
        "type": "text"
      },
      "age":{
        "type": "long"
      },
      "birthday":{
        "type": "date"
      }
    }
  }
}

GET /test2
3、如果自己不设置文档字段类型,那么es会自动给默认类型
3.2 cat命令
# 获取健康值
GET _cat/health
#  获取所有的信息
GET _cat/indices?v
3.3 修改删除索引
1、修改我们可以还是用原来的PUT的命令,根据id来修改
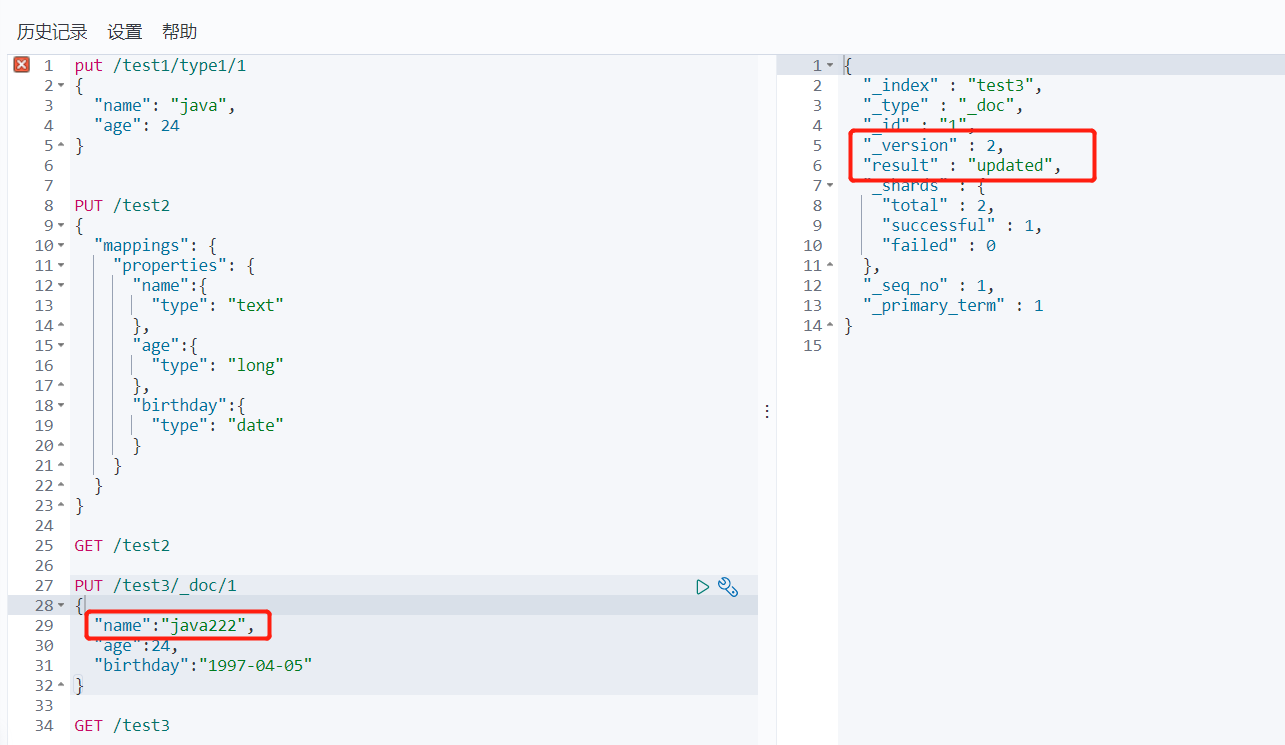
2、还有一种update方法 这种不设置某些值 数据不会丢失
POST /test3/_doc/1/_update
{
  "doc":{
    "name":"java333"
  }
}

//下面两种都是会将不修改的值清空的

POST /test3/_doc/1
{
    "name":"java333"
}

POST /test3/_doc/1
{
  "doc":{
    "name":"java333"
  }
}
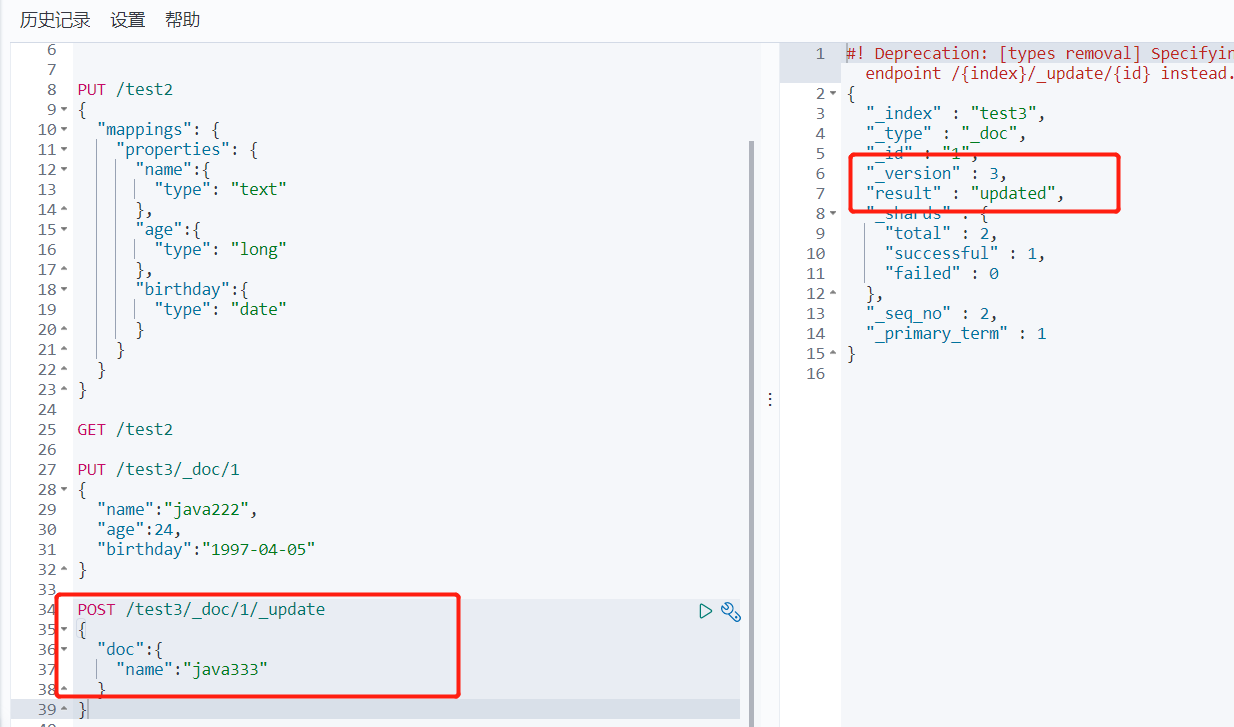
3、删除索引 DELETE /test3/_doc/1
3.4 关于文档的基本操作
3.4.1 基本操作(简单的查询)
put /ujs/user/1
{
  "name": "张三学java",
  "age": 23,
  "desc": "一顿操作猛如虎,一看工资2500",
  "tags": ["码农", "技术宅", "直男"]
}

put /ujs/user/2
{
  "name": "张三",
  "age": 28,
  "desc": "法外狂徒",
  "tags": ["旅游", "渣男", "交友"]
}

put /ujs/user/3
{
  "name": "李四",
  "age": 30,
  "desc": "不知道怎么描述",
  "tags": ["旅游", "靓女", "唱歌"]
}

GET ujs/user/1

GET ujs/user/_search?q=name:张三
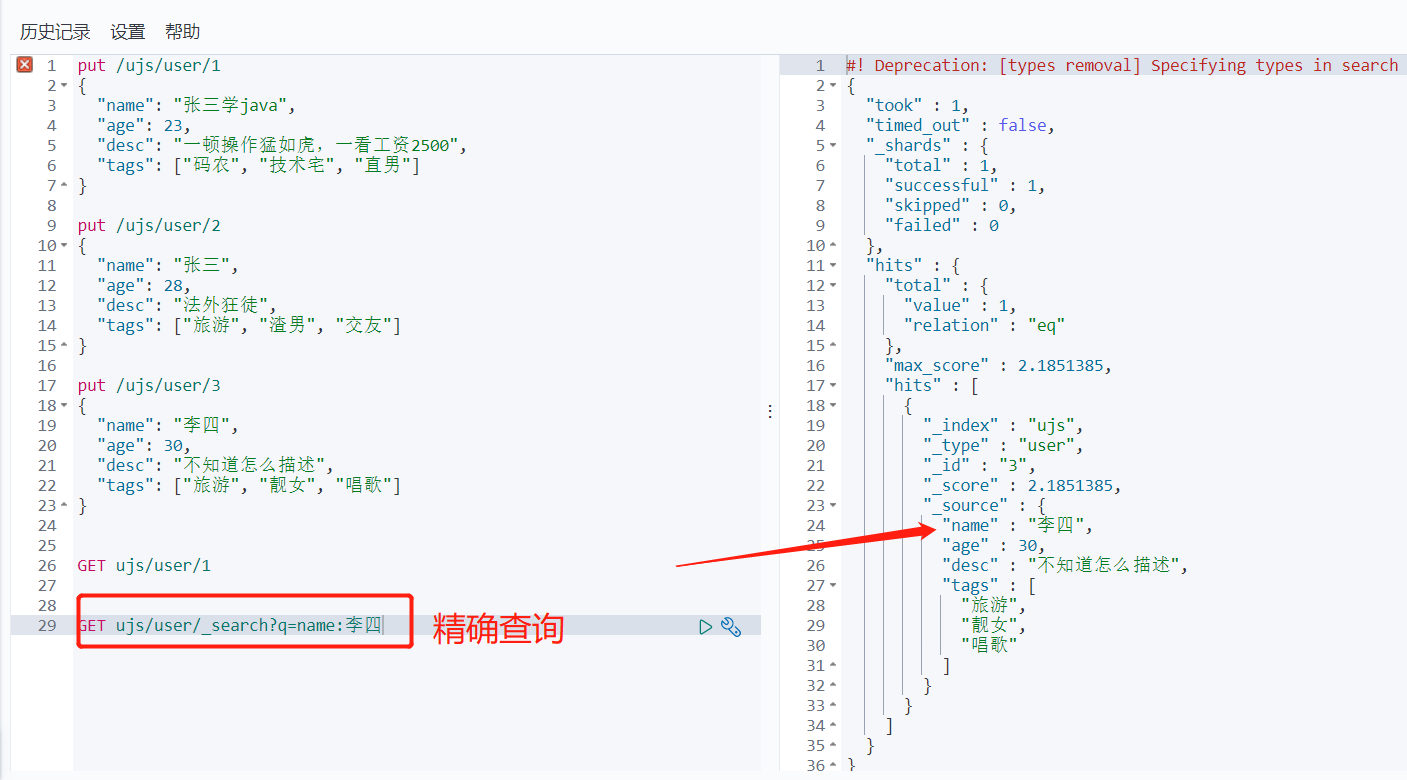
3.4.2 复杂操作(排序、分页、高亮、模糊查询、标准查询!)
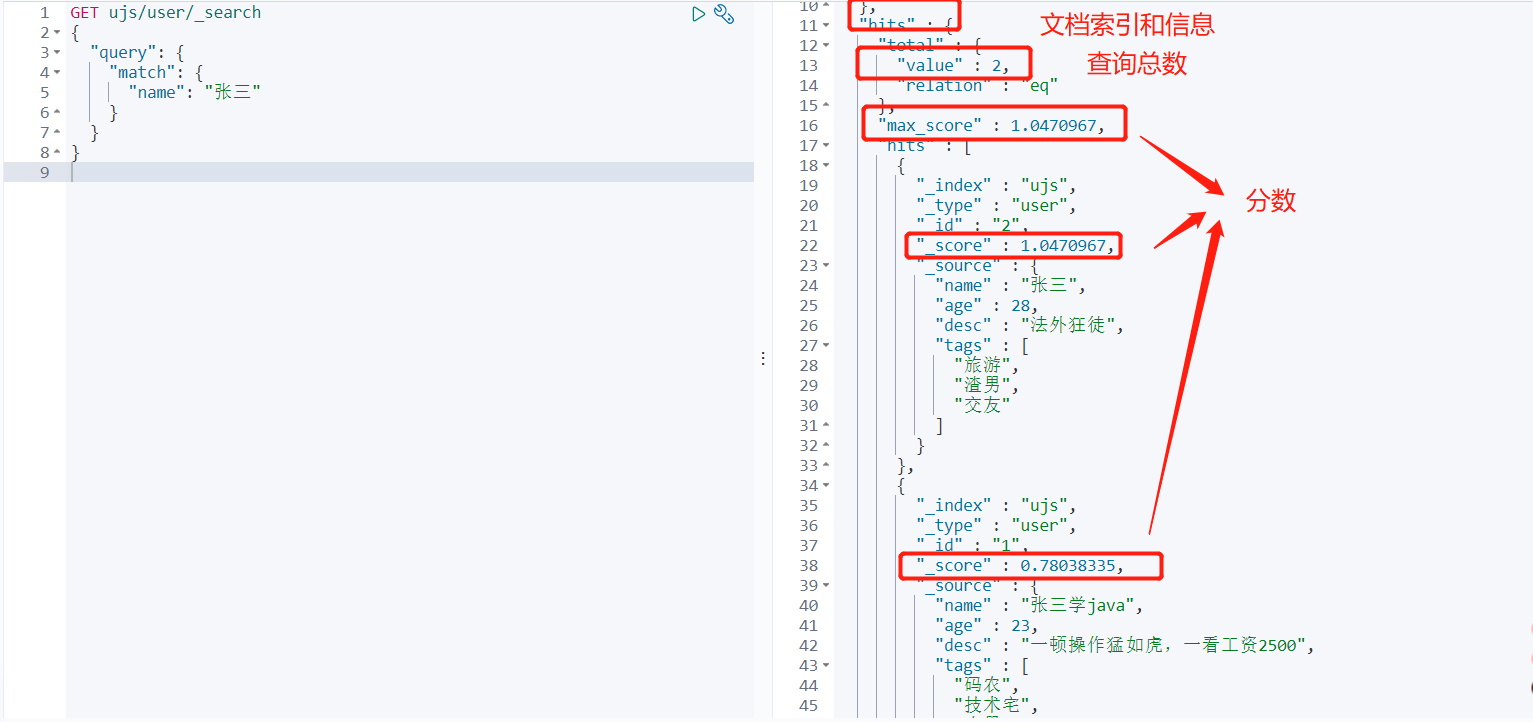
模糊查询
# 模糊查询
GET ujs/user/_search
{
  "query": {
    "match": {
      "name": "张三"
    }
  }
}

# 对查询结果进行字段过滤
GET ujs/user/_search
{
  "query": {
    "match": {
      "name": "张三"
    }
  },
  "_source": ["name", "desc"]
}

# 排序
GET ujs/user/_search
{
  "query": {
    "match": {
      "name": "张三"
    }
  },
  "sort":[{
    "age": "asc"
  }]
}

# 分页
GET ujs/user/_search
{
  "query": {
    "match": {
      "name": "张三"
    }
  },
  "sort":[{
    "age": "asc"
  }],
  "from": 0,
  "size": 2
}
布尔值条件查询
# 多条件查询 must 相当于and
GET ujs/user/_search
{
  "query": {
    "bool": {
      "must": [
        {"match": {
          "name": "张三"
        }},
        {"match": {
          "age": 23
        }}
      ]
    }
  }
}

# 多条件查询 should 相当于or
GET ujs/user/_search
{
  "query": {
    "bool": {
      "should": [
        {"match": {
          "name": "张三"
        }},
        {"match": {
          "age": 25
        }}
      ]
    }
  }
}

# 多条件查询 must_not 相当于 not
GET ujs/user/_search
{
  "query": {
    "bool": {
      "must_not": [
        {"match": {
          "age": 25
        }}
      ]
    }
  }
}

# 过滤查询1 age > 24
GET ujs/user/_search
{
  "query": {
    "bool": {
      "must": [
        {"match": {
          "name": "张三"
        }}
      ],
      "filter": [
        {"range": {
          "age": {
            "gt": 24
          }
        }}
      ]
    }
  }
}

# 过滤器2  22<age<30
GET ujs/user/_search
{
  "query": {
    "bool": {
      "must": [
        {"match": {
          "name": "张三"
        }}
      ],
      "filter": [
        {"range": {
          "age": {
            "lt": 30,
            "gt": 22
          }
        }}
      ]
    }
  }
}
-
gt大于
-
gte大于等于
-
lte小于
-
lte小于等于
多条件查询
GET ujs/user/_search
{
  "query": {
    "match": {
      "tags": "技术 男"
    }
  }
}
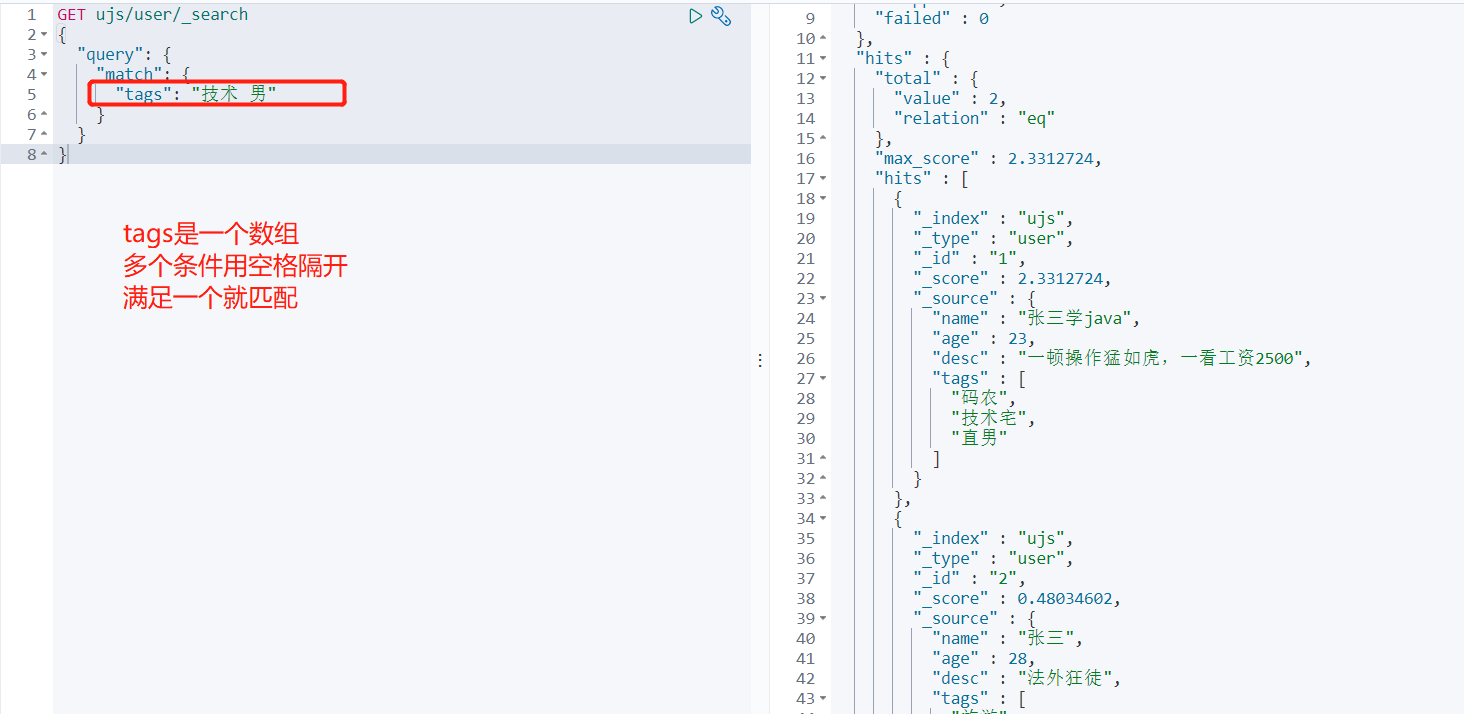
精确查找
term查询是直接通过倒排索引指定的词条进程精确查找的
-
term,直接查询精确的
-
match,会使用分词器解析!(先分析文档,然后通过分析的文档进行查询)
# 定义类型
PUT test_db
{
  "mappings": {
    "properties": {
      "name": {
        "type": "text"
      },
      "desc": {
        "type": "keyword"
      }
    }
  }
}


PUT /test_db/_doc/1
{
  "name": "小qi说Java Name",
  "desc": "小qi说Java Desc"
}

PUT /test_db/_doc/2
{
  "name": "小qi说Java Name",
  "desc": "小qi说Java Desc 2"
}

# 按照keyword类型精准匹配
GET test_db/_search
{
  "query": {
    "term": {
      "desc": "小qi说Java Desc"
    }
  }
}
# 结果:
{
  "took" : 0,
  "timed_out" : false,
  "_shards" : {
    "total" : 1,
    "successful" : 1,
    "skipped" : 0,
    "failed" : 0
  },
  "hits" : {
    "total" : {
      "value" : 1,
      "relation" : "eq"
    },
    "max_score" : 0.6931471,
    "hits" : [
      {
        "_index" : "test_db",
        "_type" : "_doc",
        "_id" : "1",
        "_score" : 0.6931471,
        "_source" : {
          "name" : "小qi说Java Name",
          "desc" : "小qi说Java Desc"
        }
      }
    ]
  }
}

# 按照text类型匹配
GET test_db/_search
{
  "query": {
    "term": {
      "name": "小"
    }
  }
}

# 结果:
{
  "took" : 0,
  "timed_out" : false,
  "_shards" : {
    "total" : 1,
    "successful" : 1,
    "skipped" : 0,
    "failed" : 0
  },
  "hits" : {
    "total" : {
      "value" : 2,
      "relation" : "eq"
    },
    "max_score" : 0.18232156,
    "hits" : [
      {
        "_index" : "test_db",
        "_type" : "_doc",
        "_id" : "1",
        "_score" : 0.18232156,
        "_source" : {
          "name" : "小qi说Java Name",
          "desc" : "小qi说Java Desc"
        }
      },
      {
        "_index" : "test_db",
        "_type" : "_doc",
        "_id" : "2",
        "_score" : 0.18232156,
        "_source" : {
          "name" : "小qi说Java Name",
          "desc" : "小qi说Java Desc 2"
        }
      }
    ]
  }
}
多个值匹配精确查询
PUT /test_db/_doc/3
{
  "t1": "22",
  "t2": "2020-09-10"
}

PUT /test_db/_doc/4
{
  "t1": "33",
  "t2": "2020-09-11"
}

GET test_db/_search
{
  "query": {
    "bool": {
      "should": [
        {
          "term": {
            "t1": "22"
          }
        },
         {
          "term": {
            "t1": "33"
          }
        }
      ]
    }
  }
}
高亮查询
GET ujs/user/_search
{
  "query": {
    "match": {
      "name": "张三"
    }
  },
  "highlight": {
    "pre_tags": "<p class='key' style='color:red'>",
    "post_tags": "</p>",
    "fields": {
      "name": {}
    }
  }
}

# 结果显示:
{
  "took" : 48,
  "timed_out" : false,
  "_shards" : {
    "total" : 1,
    "successful" : 1,
    "skipped" : 0,
    "failed" : 0
  },
  "hits" : {
    "total" : {
      "value" : 2,
      "relation" : "eq"
    },
    "max_score" : 1.0470967,
    "hits" : [
      {
        "_index" : "ujs",
        "_type" : "user",
        "_id" : "2",
        "_score" : 1.0470967,
        "_source" : {
          "name" : "张三",
          "age" : 28,
          "desc" : "法外狂徒",
          "tags" : [
            "旅游",
            "渣男",
            "交友"
          ]
        },
        "highlight" : {
          "name" : [
            "<p class='key' style='color:red'>张</p><p class='key' style='color:red'>三</p>"
          ]
        }
      },
      {
        "_index" : "ujs",
        "_type" : "user",
        "_id" : "1",
        "_score" : 0.78038335,
        "_source" : {
          "name" : "张三学java",
          "age" : 23,
          "desc" : "一顿操作猛如虎,一看工资2500",
          "tags" : [
            "码农",
            "技术宅",
            "直男"
          ]
        },
        "highlight" : {
          "name" : [
            "<p class='key' style='color:red'>张</p><p class='key' style='color:red'>三</p>学java"
          ]
        }
      }
    ]
  }
}
4. springboot集成
4.1 引入依赖包
创建一个springboot的项目 同时勾选上springboot-web的包以及Nosql的elasticsearch的包
如果没有就手动引入
<!--es客户端-->
<dependency>
    <groupId>org.elasticsearch.client</groupId>
    <artifactId>elasticsearch-rest-high-level-client</artifactId>
    <version>7.6.2</version>
</dependency>

<!--springboot的elasticsearch服务-->
<dependency>
    <groupId>org.springframework.boot</groupId>
    <artifactId>spring-boot-starter-data-elasticsearch</artifactId>
</dependency>
注意下spring-boot的parent包内的依赖的es的版本是不是你对应的版本
不是的话就在pom文件下写个properties的版本
<!--这边配置下自己对应的版本-->
<properties>
    <java.version>1.8</java.version>
    <elasticsearch.version>7.6.2</elasticsearch.version>
</properties>
4.2 注入RestHighLevelClient 客户端
import org.apache.http.HttpHost;
import org.elasticsearch.client.RestClient;
import org.elasticsearch.client.RestHighLevelClient;
import org.springframework.context.annotation.Bean;
import org.springframework.context.annotation.Configuration;

@Configuration
public class ElasticSearchClientConfig {
    @Bean
    public RestHighLevelClient restHighLevelClient(){
        RestHighLevelClient client = new RestHighLevelClient(
                RestClient.builder(new HttpHost("127.0.0.1",9200,"http"))
        );
        return client;
    }
}
4.3 索引的增、删、是否存在
@Autowired
@Qualifier(value = "restHighLevelClient")
private RestHighLevelClient client;


// 创建索引
@Test
void testCreateIndex() throws IOException {
    // 1. 创建索引请求
    CreateIndexRequest request = new CreateIndexRequest("qc_index");
    // 2. 客户端执行请求, IndicesClient,请求后获得响应
    CreateIndexResponse createIndexResponse = client.indices().create(request, RequestOptions.DEFAULT);
    System.out.println(createIndexResponse);
}

// 测试索引存在
@Test
void testExistsIndex() throws IOException {
    GetIndexRequest request = new GetIndexRequest("qc_index");
    boolean exists = client.indices().exists(request, RequestOptions.DEFAULT);
    System.out.println(exists);
}

// 删除索引
@Test
void testDeleteIndex() throws IOException {
    DeleteIndexRequest request = new DeleteIndexRequest("qc_index");
    AcknowledgedResponse acknowledgedResponse = client.indices().delete(request, RequestOptions.DEFAULT);
    System.out.println(acknowledgedResponse.isAcknowledged());
}
4.4 文档的操作
//测试添加文档
@Test
void testAddDocument() throws IOException {
    User user = new User("qc",24);
    IndexRequest request = new IndexRequest("qc_index");
    request.id("1");
    //设置超时时间
    request.timeout("1s");
    //将数据放到json字符串
    request.source(JSON.toJSONString(user), XContentType.JSON);
    //发送请求
    IndexResponse response = client.index(request,RequestOptions.DEFAULT);
    System.out.println("添加文档-------"+response.toString());
    System.out.println("添加文档-------"+response.status());
//      结果
//      添加文档-------IndexResponse[index=qc_index,type=_doc,id=1,version=1,result=created,seqNo=0,primaryTerm=1,shards={"total":2,"successful":1,"failed":0}]
//      添加文档-------CREATED

}

//测试文档是否存在
@Test
void testExistDocument() throws IOException {
    //测试文档的 没有index
    GetRequest request= new GetRequest("qc_index","1");
    //没有indices()了
    boolean exist = client.exists(request, RequestOptions.DEFAULT);
    System.out.println("测试文档是否存在-----"+exist);
}

//测试获取文档
@Test
void testGetDocument() throws IOException {
    GetRequest request= new GetRequest("qc_index","1");
    GetResponse response = client.get(request, RequestOptions.DEFAULT);
    System.out.println("测试获取文档-----"+response.getSourceAsString());
    System.out.println("测试获取文档-----"+response);

//      结果
//      测试获取文档-----{"age":24,"name":"qc"}
//      测试获取文档-----{"_index":"qc_index","_type":"_doc","_id":"1","_version":1,"_seq_no":0,"_primary_term":1,"found":true,"_source":{"age":24,"name":"qc"}}

}

//测试修改文档
@Test
void testUpdateDocument() throws IOException {
    User user = new User("qc222", 25);
    //修改是id为1的
    UpdateRequest request= new UpdateRequest("qc_index","1");
    request.timeout("1s");
    request.doc(JSON.toJSONString(user),XContentType.JSON);

    UpdateResponse response = client.update(request, RequestOptions.DEFAULT);
    System.out.println("测试修改文档-----"+response);
    System.out.println("测试修改文档-----"+response.status());
}

//测试删除文档
@Test
void testDeleteDocument() throws IOException {
    DeleteRequest request= new DeleteRequest("qc_index","1");
    request.timeout("1s");
    DeleteResponse response = client.delete(request, RequestOptions.DEFAULT);
    System.out.println("测试删除文档------"+response.status());
}

//测试批量添加文档
@Test
void testBulkAddDocument() throws IOException {
    ArrayList<User> userlist=new ArrayList<User>();
    userlist.add(new User("qc1",15));
    userlist.add(new User("qc2",26));
    userlist.add(new User("qc3",30));
    userlist.add(new User("qc4",45));
    userlist.add(new User("qc5",55));
    userlist.add(new User("qc6",60));

    //批量操作的Request
    BulkRequest request = new BulkRequest();
    request.timeout("1s");

    //批量处理请求
    for (int i = 0; i < userlist.size(); i++) {
        request.add(
                new IndexRequest("qc_index")
                        .id(""+(i+1))
                        .source(JSON.toJSONString(userlist.get(i)),XContentType.JSON)
        );
    }
    BulkResponse response = client.bulk(request, RequestOptions.DEFAULT);
    //response.hasFailures()是否是失败的
    System.out.println("测试批量添加文档-----"+response.hasFailures());

//      结果:false为成功 true为失败
//      测试批量添加文档-----false
}

//测试查询文档
@Test
void testSearchDocument() throws IOException {
    SearchRequest request = new SearchRequest("qc_index");
    //构建搜索条件
    SearchSourceBuilder sourceBuilder = new SearchSourceBuilder();
    //设置了高亮
    sourceBuilder.highlighter();
    //term name为qc1的
    TermQueryBuilder termQueryBuilder = QueryBuilders.termQuery("name", "qc1");
    sourceBuilder.query(termQueryBuilder);
    sourceBuilder.timeout(new TimeValue(60, TimeUnit.SECONDS));

    request.source(sourceBuilder);
    SearchResponse response = client.search(request, RequestOptions.DEFAULT);

    System.out.println("测试查询文档-----" + JSON.toJSONString(response.getHits()));
    System.out.println("=====================");
    for (SearchHit documentFields : response.getHits().getHits()) {
        System.out.println("测试查询文档--遍历参数--" + documentFields.getSourceAsMap());
    }
}

