odoo12视图知识整理
odoo后端视图
tree视图
基本结构
<record id="stock_transaction_type_tree" model="ir.ui.view">
    <field name="name">stock_transaction_type_tree</field>
    <field name="model">stock.transaction.type</field>
    <field name="priority">10</field>
    <field name="arch" type="xml">
        <tree>
            <field name="name"/>
            <field name="description"/>
            <field name="code"/>
        </tree>
    </field>
</record>
tree标签属性
- default_order:视图展示的排序定义。
<tree default_order = “序列1 名称描述,序列2 名称描述,序列3 名称描述” >- 例子:按创建时间倒序排序default_order=“create_date desc”
- editable:tree视图默认点击一条记录会调转到对应的from视图,如果不想在from视图编辑只在tree视图编辑的话使用
editable="top"或者editable="bottom"就行。 - create,edit,delete:这三个属性对应视图的创建、编辑、删除权限、默认值是1,如果不想该视图记录被删除设置
delete="0"就行。 - limit:tree视图记录展示的行数限制,默认应该是80。
- decoration-{$name}:常用来根据某个字段的值来来判断、然后改变对应行的字体颜色,进行明细的标记。
- $name的值可以是
font-weight: bold、font-style: italic或者是bootstrap中的辅助类:danger, info, muted, primary, success or warning等。 - 例1:在tree标签中添加如下属性
decoration-info="usage=='view'" decoration-danger="usage=='internal'"后,当记录的usage字段为view时字体颜色会为蓝色;当为internal时字体颜色会为红色。 - 例2:
decoration-danger="date_end and date_end<current_date"当date_end存在且date_end日期小于当前日期的话字体为红色。这里补充一下,xml中由于<和>有特殊含义所以不等式运算用如下符号替换:<:小于<e;:小于等于>:大于>e;:大于等于
- 例3:状态字段state属于done或者cancel时:
decoration-muted="state in ('done','cancel')"
- $name的值可以是
tree视图中的标签
- field、button:这两个标签都是通用的,后面一起详细介绍。
- control:官网说是为当前视图定义自定义控件。这个标签必须要写在被one2many字段包裹的tree视图定义上。单独在tree视图上中添加是没意义的。
- 标签使用位置:

这块给create标签的string属性赋值为Add a product修改掉原来"添加行"的字符串,就是下面截图这:
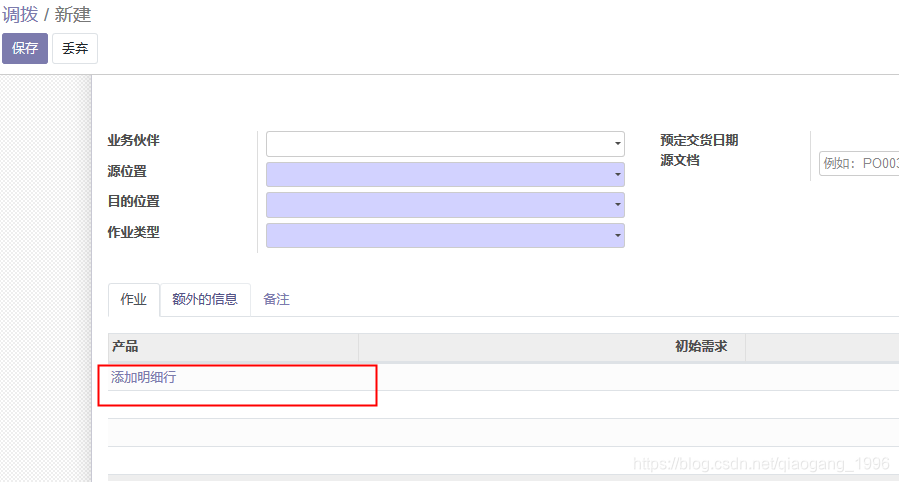
control标签好像就是定义这块动作的,下面的示例中应该是会显示多个链接到对应动作的字符串吧。 - 看了下源码中的使用例子:
tree视图中的标签大概就是这些了吧<control> <create string="Add a product"/> <create string="Configure a product" context="{'open_product_configurator': True}" groups="product.group_product_variant"/> <create string="Add a section" context="{'default_display_type': 'line_section'}"/> <create string="Add a note" context="{'default_display_type': 'line_note'}"/> </control>
- 标签使用位置:
field、button标签
field标签属性
- name:要呈现的表的字段名
- class:要在生成的元素上设置的HTML类,常用如下:
- oe_read_only:仅在只读模式下显示该元素
- oe_edit_only:仅在编辑模式下显示该元素
- oe_no_button:用于many2one字段,避免在导航栏中显示导航按钮
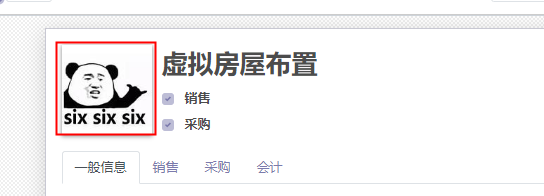
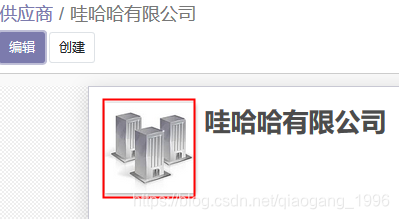
- oe_avatar:用于图像字段就是binary字段和
widget="image"一起使用,显示90*90的图片。一般在<div class="oe_titile">之前添加,页面显示示例如下:
- groups:权限组设置,值是对应的权限组的xmlid,添加后只能该用户组的用户能看见该元素,用于页面组件的权限控制。
- nolabel:field标签转化为html标签是自带label标签的,标签的值就是字段的string值,如果只想显示字段的值的话,可以将改属性值设为1,
nolabel="1" - readonly:设置为1,该字段只读不能 编辑。
- required:设置为1,该字段必填。
- placeholder:设置显示在input输入框中的提示信息
- help:鼠标悬停在字段上后显示的帮助信息
- invisible:隐藏字段。
- password:将输入信息显示为**的加密形式
- filename:对于binary字段而言,值是用来显示文件名称的字段名。
- force_save:对页面上的只读字段使用,当使用onchange方法改变了该字段的值要将force_save属性设置为1否则改字段不会保存。
- attrs:对字段状态的动态控制。
attrs="{'invisible': domian, 'required': domain,'readonly':domain}",domain代表domain条件语句,一个简单的使用示例:attrs="{'invisible': [('use_questions', '=', False)]}",当use_questions字段为False时隐藏字段。 - widget:用于渲染字段的小部件名。其实每个类型的字段都有一个默认的widget,他们在web模块的/web/static/src/js/fields路径文件中的js文件定义。
- options:值的话就是json格式的字符串,一般都是用来给widget小部件传递参数的。
- domain:many2one字段下拉选项的过滤,属性值就是domain语句。只适用于关系字段。
- context:只用于关系字段,设置上下文,如设置
context="{'a':True}",然后在关系字段对应model的一些方法中可以获得改context,例如name_get()方法,通过self.env.context可以拿到这里设置的值:{'a':True}然后进行一些处理。 - mode:还没用到过,看官网说是设置one2many渲染显示的视图,one2many默认是tree视图的样式显示的,可以设置成tree,form,kanban或 graph,不清楚设置成form有什么用,one2many不是个记录集嘛form只能显示一条记录有什么用?没试验过。
button标签属性
- icon:用于显示按钮的图标。
- 使用的是Font Awesome 图标,查找到想要的图标代码,给icon赋值即可。
- string:按钮的文本
- type:按钮的类型,有object、action两种。
- object类型,按钮的name属性值是要调用的model中的方法名,将使用当前行的记录ID和当前上下文来调用该方法。
- action类型,一般是给按钮绑定上定义的action record,name属性值为对应的action record 的xmlid,只不过要通过
%(xmlid)d将xmlid进行转化。- 示例:
<button type="action" name="%(auth_ldap.action_ldap_installer)d" string="LDAP Server" icon="fa-arrow-right" class="btn-link"/>
- 示例:
- args:object类型的按钮,给调用的后台方法传递参数的,是json类型的参数。
- attrs:和上面field中对应的属性作用一样。
- states:当表中有定义工作流字段state时才有用,例:
states="confirm、done"当状态为confirm或者done时才显示该按钮。 - confirm:在点击按钮时会弹出confirm属性值中的提示信息。
- context:给按钮调用动作传递上下文。示例:
<button name="%(delivery.action_delivery_carrier_form)d" icon="fa-arrow-right" type="action" string="DHL Delivery Methods" class="btn-link" context="{'search_default_delivery_type': 'dhl'}"/>,这块应该是给delivery.action_delivery_carrier_form弹窗动作的search视图传递默认筛选条件,serach_default_…。
form视图基本结构
页面对应:
代码大致代码结构如下:
<record id="purchase_order_form" model="ir.ui.view">
    <field name="name">purchase.order.form</field>
    <field name="model">purchase.order</field>
    <field name="arch" type="xml">
        <form string="Purchase Order">
        <header>
            <button name="action_rfq_send" states="draft" string="Send by Email" type="object" context="{'send_rfq':True}" class="oe_highlight"/>
            ...
            <field name="state" widget="statusbar" statusbar_visible="draft,sent,purchase" readonly="1"/>
        </header>
        <sheet>
            <div class="oe_button_box" name="button_box">
                <button type="object"  name="action_view_invoice"
                    class="oe_stat_button"
                    icon="fa-pencil-square-o" attrs="{'invisible':['|', ('invoice_count', '=', 0), ('state', 'in', ('draft','sent','to approve'))]}">
                    ....
                </button>
            </div>
            <div class="oe_title">
                <h1>
                    <field name="name" readonly="1"/>
                </h1>
            </div>
            <group>
                <group>
                    <field name="currency_id" groups="base.group_multi_currency" force_save="1"/>
                    ...
                </group>
                <group>
                    <field name="date_order"/>
                    ...
                </group>
            </group>
            <notebook>
                <page string="Products">
                    <field name="order_line" attrs="{'readonly': [('state', 'in', ('done', 'cancel'))]}">
                         <tree string="Purchase Order Lines" editable="bottom">
                            <field name="currency_id"/>
                            ...
                        </tree>
                        <form string="Purchase Order Line">
                            ...
                        </form>
                    </field>
                </page>
                <page string="Other Information" name="purchase_delivery_invoice">
                    ...
                </page>
            </notebook>
        </sheet>
        <div class="oe_chatter">
            <field name="message_follower_ids" widget="mail_followers"/>
            <field name="activity_ids" widget="mail_activity"/>
            <field name="message_ids" widget="mail_thread"/>
        </div>
        </form>
    </field>
</record>
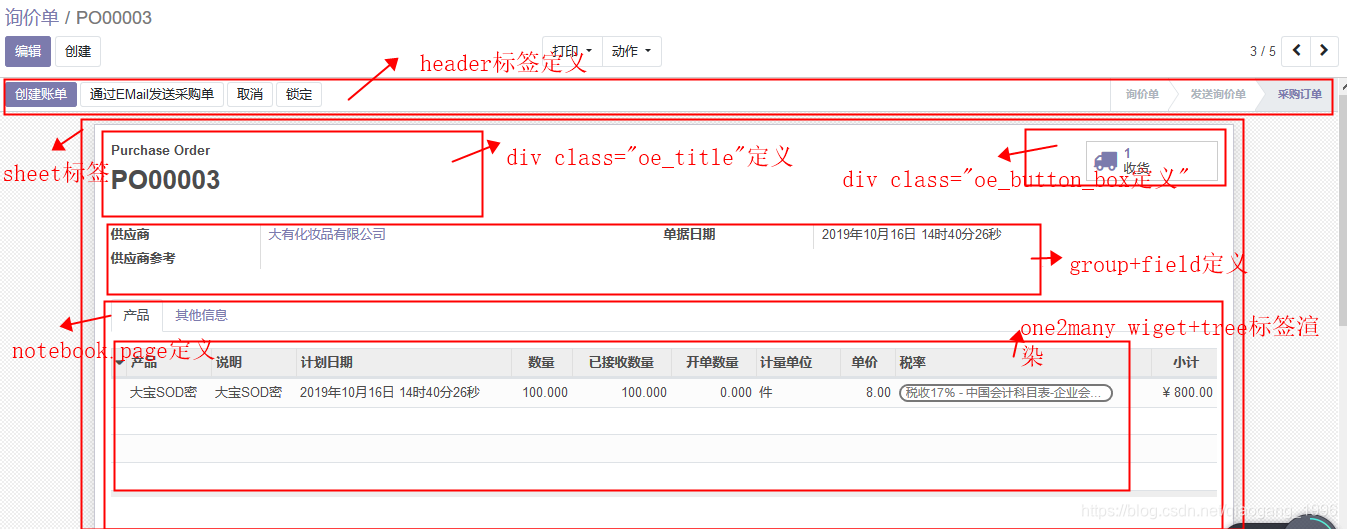
在上面的页面中我已经标注出了对应代码块都是渲染哪一块页面的,odoo的form表单视图布局基本就是这样。
header部分:
header部分就是form表单上面的哪一行按钮控件,使用工作流wiget控件widget="statusbar"后,右边就会有状态变更的显示,左边就是对应单据状态能够执行的按钮。

询价单对应header部分代码:
<header>
    <button name="action_rfq_send" states="draft" string="Send by Email" type="object" context="{'send_rfq':True}" class="oe_highlight"/>
    <button name="print_quotation" string="Print RFQ" type="object" states="draft" class="oe_highlight" groups="base.group_user"/>
    <button name="button_confirm" type="object" states="sent" string="Confirm Order" class="oe_highlight" id="bid_confirm"/>
    <button name="button_approve" type="object" states='to approve' string="Approve Order" class="oe_highlight" groups="purchase.group_purchase_manager"/>
    <button name="action_view_invoice" string="Create Bill" type="object" class="oe_highlight" context="{'create_bill':True}" attrs="{'invisible': ['|', ('state', 'not in', ('purchase', 'done')), ('invoice_status', 'in', ('no', 'invoiced'))]}"/>
    <button name="action_rfq_send" states="sent" string="Re-Send by Email" type="object" context="{'send_rfq':True}"/>
    <button name="print_quotation" string="Print RFQ" type="object" states="sent" groups="base.group_user"/>
    <button name="button_confirm" type="object" states="draft" string="Confirm Order" id="draft_confirm"/>
    <button name="action_rfq_send" states="purchase" string="Send PO by Email" type="object" context="{'send_rfq':False}"/>
    <button name="action_view_invoice" string="Create Bill" type="object" context="{'create_bill':True}" attrs="{'invisible': ['|', '|', ('state', 'not in', ('purchase', 'done')), ('invoice_status', 'not in', ('no', 'invoiced')), ('order_line', '=', [])]}"/>
    <button name="button_draft" states="cancel" string="Set to Draft" type="object" />
    <button name="button_cancel" states="draft,to approve,sent,purchase" string="Cancel" type="object" />
    <button name="button_done" type="object" string="Lock" states="purchase"/>
    <button name="button_unlock" type="object" string="Unlock" states="done" groups="purchase.group_purchase_manager"/>
    <field name="state" widget="statusbar" statusbar_visible="draft,sent,purchase" readonly="1"/>
</header>
其实就是定义了一堆按钮,最后通过state状态字段并使用statusbar wiget渲染出了右边的状态栏部分。
div .oe_button_box部分:
定义表单右上角的按钮盒子,每个按钮时个带图标的矩形,如下图:

在这个div里面添加按钮都会显示在右上角上图部分。
<div class="oe_button_box" name="button_box">
    <button type="object"  name="action_view_invoice"
        class="oe_stat_button"
        icon="fa-pencil-square-o">
    </button>
</div>
代码中图标icon来自Font Awesome集。
div .oe_title
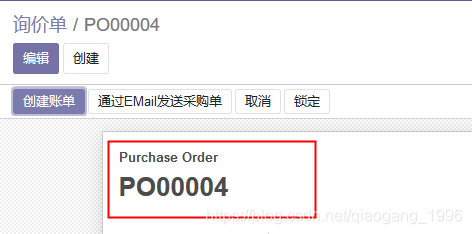
表单的标题部分,就是左上角那块:
<div class="oe_title">
    <h1>
    	<span class="o_form_label">Purchase Order </span>
        <field name="name" readonly="1"/>
    </h1>
</div>
有时候会看到左上角还会有图片,这是在<div class="oe_title">行之前添加了一个图片字段:<field name="icon_image" widget="image" class="oe_avatar">
主体信息部分
主要用group和field的组合进行信息显示
notebook和page
页面渲染位置:
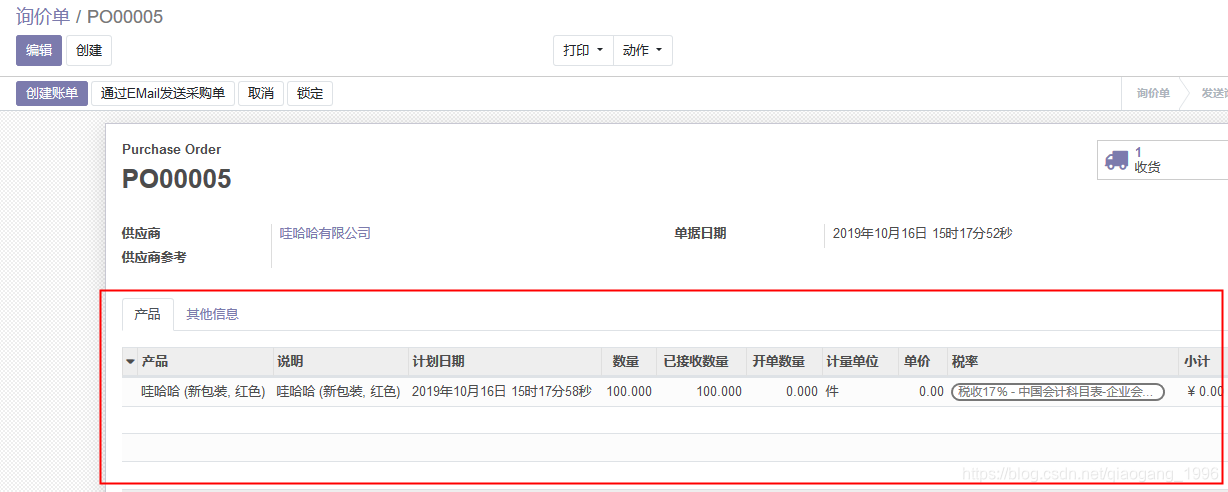
产品、其他信息就2个page。
一般是在page里面写一个对应的one2many字段,然后在字段包裹的标签里面写关联表的tree视图。
div .oe_chatter
这部分需要对应的model继承了’mail.thread’, ‘mail.activity.mixin’, 'portal.mixin’等模块才可以使用。
对应页面部分就是表单底部这些信息:

对应代码:
<div class="oe_chatter">
    <field name="message_follower_ids" widget="mail_followers"/>
    <field name="activity_ids" widget="mail_activity"/>
    <field name="message_ids" widget="mail_thread"/>
</div>
视图中上下文context的使用
指定many2one字段对应弹出的form视图
给字段添加如下属性:
context="{'form_view_ref': 'module.form_view_id'}"
module:指视图文件所在的模块名
form_view_id:要指定的form视图的id
本文来自博客园,作者:乔木长歌,转载请注明原文链接:https://www.cnblogs.com/qgdtq/p/15338958.html

