
Spring学习笔记1
一、Spring介绍
Spring 是一个开源框架,是为了解决企业应用程序开发复杂性而创建的。框架的主要优势之一就是其分层架构,分层架构允许您选择使用哪一个组件,同时为 J2EE 应用程序开发提供集成的框架。
简单来说,Spring是一个分层的JavaSE/EE full-stack(一站式)轻量级开源框架
spring有两个核心模块:
1.控制反转 (Inversion Of Control)(IOC)容器
(或者叫做依赖注入dependency injection(DI ))
2.Spring 面向切面编程(AOP)
spring 框架是一个分层架构,由 7 个定义良好的模块组成。Spring 模块构建在核心容器之上,核心容器定义了创建、配置和管理 bean 对象的方式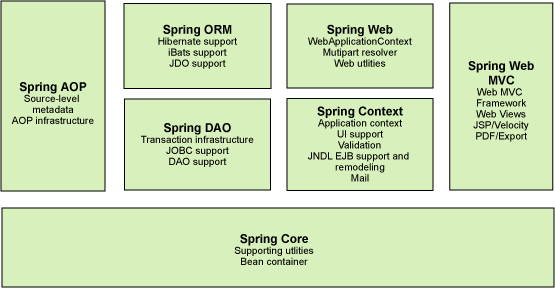
spring在项目中的地位
二、Spring使用
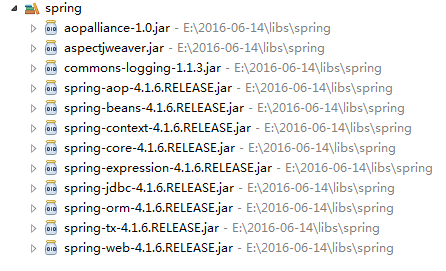
1、导入jar包
2、配置文件
在根目录下新建一个xml配置文件,名字没有限制,一般为spring.xml(和SpringMVC可使用同一个配置文件)
<?xml version="1.0" encoding="UTF-8"?>
<beans xmlns="http://www.springframework.org/schema/beans"
    xmlns:xsi="http://www.w3.org/2001/XMLSchema-instance" xmlns:context="http://www.springframework.org/schema/context"
    xmlns:tx="http://www.springframework.org/schema/tx" xmlns:aop="http://www.springframework.org/schema/aop"
    xmlns:mvc="http://www.springframework.org/schema/mvc"
    xsi:schemaLocation="http://www.springframework.org/schema/beans
        http://www.springframework.org/schema/beans/spring-beans.xsd
        http://www.springframework.org/schema/context
        http://www.springframework.org/schema/context/spring-context.xsd
        http://www.springframework.org/schema/aop
        http://www.springframework.org/schema/aop/spring-aop.xsd
        http://www.springframework.org/schema/tx
        http://www.springframework.org/schema/tx/spring-tx.xsd
        http://www.springframework.org/schema/mvc
        http://www.springframework.org/schema/mvc/spring-mvc.xsd">


    <!-- 把需要管理的bean配置在 DI IOC 依赖注入/控制反转 (这个类的控制权就交由spring管壁,统一管理    反转权利)-->

    <!-- <bean name="udao" class="dao.impl.UserDaoImpl"></bean>
    <bean name="udao2" class="dao.impl.UserDaoImpl"></bean>
    Caused by: org.springframework.beans.factory.NoUniqueBeanDefinitionException:
    No qualifying bean of type [dao.UserDao] is defined: expected single matching bean but found 2: udao,udao2


    <bean name="uservice" class="service.impl.UserServiceImpl"  autowire="byType">
        配置属性值,非简单类型用ref引用 ,简单类型(基本数据类型)用value赋值
        <property name="ud" ref="udao"></property>
        如果不 手动实例化,,提供了自动方式1byName 2byType
        <property name="aaa" value="999"></property>
        <property name="score">
            <array>
                <value>99</value>
                <value>88.5</value>
                <value>77</value>
                <value>66</value>
            </array>
        </property>
        <property name="animals">
            <list>
                <value>东北虎</value>
                <value>北极熊</value>
                <value>南极企鹅</value>
            </list>
        </property>
        <property name="people">
            <set>
                <value>张三</value>
                <value>李四</value>
                <value>王五</value>
            </set>
        </property>
        <property name="weather">
            <map>
                <entry key="郑州" value="多云" />
                <entry key="北京" value="晴" />
                <entry key="上海" value="暴雨" />
            </map>
        </property>
        <property name="properties">
            <props>
                <prop key="a">100</prop>
                <prop key="b">200</prop>
                <prop key="c">300</prop>
            </props>
        </property>


    </bean>
 -->
    <!-- 之前类与类之间的交互,需要通过在对方类中new对象的方式实现 -->
    <!-- 现在类与类之间的交互,把类交给spring,把控制权完全交给spring -->


<!-- 注解方式完成dao层和service层的自动注入 -->
<context:component-scan base-package="com.zy"></context:component-scan>

</beans>
3、生成对象
UserDaoImpl
package com.zy.dao.impl;
import org.springframework.stereotype.Component;
import com.zy.dao.UserDao;

@Component  //这个注解就相当于在spring.xml配置了该bean
public class UserDaoImpl implements UserDao{
    //1探究spring怎么管理bean

    @Override
    public void login(String name, String pwd) {

        System.out.println("用户名:"+name+"密码:"+pwd);
    }


}
UserServiceImpl
package com.zy.service.impl;
import java.util.List;
import java.util.Map;
import java.util.Properties;
import java.util.Set;
import org.springframework.beans.factory.annotation.Autowired;
import org.springframework.stereotype.Component;
import com.zy.dao.UserDao;
import com.zy.dao.impl.UserDaoImpl;
import com.zy.service.UserService;

@Component  //把该类纳入spring管理
public class UserServiceImpl implements UserService{
    //service层要调用dao层,需要创建dao层对象,调用dao层方法
//    UserDao ud = new UserDaoImpl();//不要自己动手实例化对象---会通过spring实现

    @Autowired  //通过spring自动实例化该对象  先按byName再按byType
    UserDao ud;
    //若不给getter  setter会报
    // Bean property 'ud' is not writable or has an invalid setter method
    public UserDao getUd() {
        return ud;
    }
    public void setUd(UserDao ud) {
        this.ud = ud;
    }

    String aaa;
    public String getAaa() {
        return aaa;
    }
    public void setAaa(String aaa) {
        this.aaa = aaa;
    }
    //-----------------------集合属性---数组------------------------
    private double[] score;
    public double[] getScore() {
        return score;
    }
    public void setScore(double[] score) {
        this.score = score;
    }


    //-----------------------集合属性---List------------------------
    private List<String> animals;
    public List<String> getAnimals() {
        return animals;
    }
    public void setAnimals(List<String> animals) {
        this.animals = animals;
    }


    //-----------------------集合属性---Set------------------------
    private Set<String> people;
    public Set<String> getPeople() {
        return people;
    }
    public void setPeople(Set<String> people) {
        this.people = people;
    }


    //-----------------------集合属性---Map------------------------
    private Map<String, String> weather;
    public Map<String, String> getWeather() {
        return weather;
    }
    public void setWeather(Map<String, String> weather) {
        this.weather = weather;
    }


    //-----------------------集合属性---Properties------------------------
    private Properties properties;// 集合     键a=100  值b=200,现在基本被Map取代了
    public Properties getProperties() {
        return properties;
    }
    public void setProperties(Properties properties) {
        this.properties = properties;
    }


    @Override
    public void login(String name, String pwd) {

        ud.login(name, pwd);

    }

}
4、对象属性赋值,单例/原型模式
上面2中xml
DI_Scope
scope:
1).singleton单例模式(默认)
一个bean标签只会生成一个对象,每次在ClassPathXmlApplicationContext中通过getBean方法获取的时候都是同一个对象
2).prototype原型模式
一个bean标签只会生成多个对象,每次在ClassPathXmlApplicationContext中通过getBean方法获取的时候都是同一新的对象
三、注解方式(二中的3)
自动注入(给某个类中的属性实例化对象)
<bean autowire="byType"></bean>
按类型在spring所有的bean中找合适的bean去实例化对象
注意:如果再bean集合中发现两个及以上可用的bean就会报错
<bean autowire="byName"></bean>
按名字在spring所有的bean中找与属性同名的bean去实例化对象
<!-- 注解方式完成dao层和service层的自动注入 -->
<context:component-scan base-package="com.zy"></context:component-scan>

类上使用
|
@Component //这个注解就相当于在spring.xml中配置了该bean---把该类纳入spring管理 |
属性上使用
|
@Autowired //通过spirng自动实例化该对象 UserDao ud; |
类上 控制对象的单例/原型模式
|
@Scope("prototype") @Scope("singleton") 默认 |
package test;

import org.junit.Test;
import org.springframework.context.support.ClassPathXmlApplicationContext;

import com.zy.service.impl.UserServiceImpl;

public class MyTest2 {
    @Test
    public void show(){
        ClassPathXmlApplicationContext cxc = new ClassPathXmlApplicationContext("spring.xml");
        UserServiceImpl bean = cxc.getBean("userServiceImpl", UserServiceImpl.class);
        //注解方式默认名称为类名首字母小写
        bean.login("小白", "123456");
    }

}
//总结下,如果三层中,service调用dao层对象,controller调用service对象
采用spring的控制反转/依赖注入 实现三层中的对象实例化
Ioc最大的好处,把控制权交于spring,利于项目的解耦

