Atlas学习手记(22):使用行为增强用户界面(二):Floating Behavior
前面在AtlasControlToolkit中说过,DragPanel封装了Sys.UI.FloatingBehavior,我们已经知道了如何使用服务器端的Extender来实现拖动效果,本文介绍一下直接使用FloatingBehavior来实现Drag&Drop效果。
主要内容
1.Floating Behavior简介
2.完整示例
一.Floating Behavior简介
前面在AtlasControlToolkit中说过,DragPanel封装了Sys.UI.FloatingBehavior,我们已经知道了如何使用服务器端的Extender来实现拖动效果,本文介绍一下直接使用FloatingBehavior来实现Drag&Drop效果。
FloatingBehavior的实现是在Atlas的脚本库AtlasUIDragDrop中,所以在使用时需要引用该脚本库,简单的FloatingBehavior的定义如下:
 <control id="DescriptionDrag" cssClass="floatwindow">
 <behaviors>
 <floatingBehavior handle="DescriptionDrag">
 </floatingBehavior>
 </behaviors>
 </control>
二.完整示例
看一个完整的示例,新建Atlas Web Site后,在ScriptManager中需要引入AtlasUIDragDrop脚本库,这一点要切记。
 <atlas:ScriptManager runat="server" ID="ScriptManager1">
 <Scripts>
 <atlas:ScriptReference ScriptName="AtlasUIDragDrop" />
 </Scripts>
 </atlas:ScriptManager>
在ASPX页面中添加要拖动的面板,用Div来实现:
 <div>
<div>
 <h3 style="text-decoration: underline">
 Floating Behavior Example</h3>
 <div id="DescriptionDrag" style="width: 200px; height: 200px;">
 <div id="Handle" class="draghandle">
 Drag by clicking on this element</div>
 <div style="text-align: center; font-weight: bold;">
 Word (n)</div>
 A sound or a combination of sounds.
 </div>
 <div style="width: 200px; height: 200px;">
 </div>
 </div>
用到的相关CSS样式如下:
 <style type="text/css">
 .draghandle {
 BORDER-RIGHT: black 1px solid;
 BORDER-TOP: black 1px solid;
 FONT-WEIGHT: bold; FONT-SIZE: 12pt;
 BORDER-LEFT: black 1px solid;
 WIDTH: 100%; CURSOR: move;
 COLOR: black; BORDER-BOTTOM:
 black 1px solid;
 BACKGROUND-COLOR: #0000dd;
 TEXT-ALIGN: center
 }
}
 .floatwindow {
 BORDER-RIGHT: black 1px solid;
 PADDING-RIGHT: 4px;
 BORDER-TOP: black 1px solid;
 PADDING-LEFT: 4px; FONT-SIZE: 14pt;
 PADDING-BOTTOM: 4px;
 BORDER-LEFT: black 1px solid;
 PADDING-TOP: 4px;
 BORDER-BOTTOM: black 1px solid;
 BACKGROUND-COLOR: #eeeeee
 }
}
 </style>
添加Atlas脚本如下,在FloatingBehavior中通过handle指定要拖动的面板ID:
 <script type="text/xml-script">
 <page xmlns:script="http://schemas.microsoft.com/xml-script/2005">
 <components>
 <control id="DescriptionDrag" cssClass="floatwindow">
 <behaviors>
 <floatingBehavior handle="DescriptionDrag">
 </floatingBehavior>
 </behaviors>
 </control>
 </components>
 </page>
 </script>
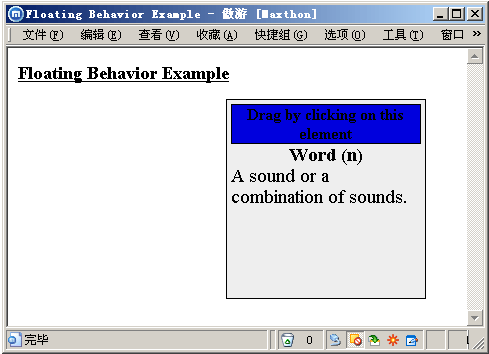
运行后如下:

拖动后:


 .draghandle


【推荐】国内首个AI IDE,深度理解中文开发场景,立即下载体验Trae
【推荐】编程新体验,更懂你的AI,立即体验豆包MarsCode编程助手
【推荐】抖音旗下AI助手豆包,你的智能百科全书,全免费不限次数
【推荐】轻量又高性能的 SSH 工具 IShell:AI 加持,快人一步
· .NET Core 中如何实现缓存的预热?
· 从 HTTP 原因短语缺失研究 HTTP/2 和 HTTP/3 的设计差异
· AI与.NET技术实操系列:向量存储与相似性搜索在 .NET 中的实现
· 基于Microsoft.Extensions.AI核心库实现RAG应用
· Linux系列:如何用heaptrack跟踪.NET程序的非托管内存泄露
· TypeScript + Deepseek 打造卜卦网站:技术与玄学的结合
· 阿里巴巴 QwQ-32B真的超越了 DeepSeek R-1吗?
· 【译】Visual Studio 中新的强大生产力特性
· 10年+ .NET Coder 心语 ── 封装的思维:从隐藏、稳定开始理解其本质意义
· 【设计模式】告别冗长if-else语句:使用策略模式优化代码结构