
NodeJS 开发 c++ 扩展模块
2020-05-06 16:52 清晨、午后 阅读(989) 评论(0) 编辑 收藏 举报1. 环境安装
a. 安装 nodejs (https://blog.csdn.net/yt_php/article/details/90105880)
b. cnpm install -g node-gyp // cnpm 的安装 npm install -g cnpm --registry=https://registry.npm.taobao.org
2. binding.gyp 文件编写
该文件不能注释,下列注释为例说明,实际编译需要取消

{
  "targets": [
    {
      "target_name": "js_login",
      "sources": [ "js_login.cpp" ],
      'conditions': [
      [
          'OS=="win"',
          {
              'include_dirs': [],
              'sources':[],
              'msvs_settings':  {},
              'link_settings':
              {
                  'libraries':
                  [
                    '../login.lib'  // 工程文件为起点的相对路径,工程文件在 node-gyp configure 后会生成
                  ]
              }
          }

      ],
      [
          'OS=="linux"',
          {
              'ldflags':["-Wl,-rpath,'$$ORIGIN'"],
              'cflags!':['-Wignored-attributes'],
              'cflags':['-lrt'],
              'cflags_cc': ['-frtti', '-fPIC', '-fexceptions', '-lrt'],
              'link_settings':
              {
                'libraries':
                 [
                     '-llogin'
                 ],
                'library_dirs':
                [
                    '/home/vrv3/work/electron/ddm_7/logindll',  // 库搜索路径
                ],
              }
          }
      ]
    ]
    }
  ]
}
3. js_login.cpp 编写
#include <stdio.h>
#include <stdlib.h>
#include <node.h>
#include "./logindll/src/login.h"

using v8::FunctionCallbackInfo;
using v8::Isolate;
using v8::Local;
using v8::Object;
using v8::String;
using v8::Value;

void login(const FunctionCallbackInfo<Value>& args) {
  Isolate* isolate = args.GetIsolate();

  Local<String> account = Local<String>::Cast(args[0]);
  String::Utf8Value utfaccount(account);

  Local<String> pwd = Local<String>::Cast(args[1]);
   String::Utf8Value utfpwd(pwd);


  int result = login(std::string(*utfaccount), std::string(*utfpwd), "", 1); // 调用DLL,该方法由库提供
  char buf[10] = {'\0'};
  sprintf(buf, "%d", result);
  Local<String> value = String::NewFromUtf8(isolate, buf);
  args.GetReturnValue().Set(value);
}

void init(Local<Object> exports) {
  NODE_SET_METHOD(exports, "login", login);
}

NODE_MODULE(LOGIN, init)
4. 编译
sudo node-gyp configure build
5. 测试
test.js 文件
const FaceRecognition = require('./build/Release/js_login');  // js_login 指的是 js_login.node 文件,sudo node-gyp configure build 时会编译出该文件
console.log(FaceRecognition.login("vvv", "123456"));
执行 node test.js 即可运行该测试文件
6.问题及解决过程
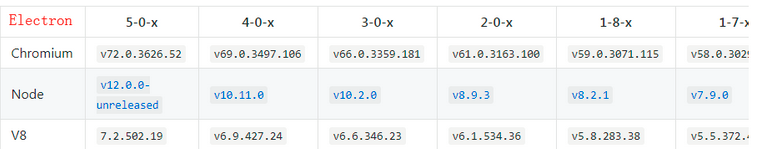
NODE_MOUDLE_VERSION不一致问题(node 10.11.0 electron 4.x 可以匹配)
NODE_MODULE_VERSION 指 node.js 的 ABI 版本号,是一个整数,用来确定编译 node.js 的 C++ 库的版本,该版本号与 Electron 版本是强匹配的,指定 Electron 版本号的编译方法如下
sudo node-gyp rebuild --target=4.0.1 --arch=x64 --dist-url=https://atom.io/download/electron // --arch 参数去支持编译成不同位数的addon, ia32表示32位,x64表示64位。
该操作涉及到文件下载,下载的文件在如下路径,如果下载失败,可以拷贝可用的文件(electron 版本)到该目录
C:\Users\vrv\AppData\Local\node-gyp\Cache

electron-rebuild 好像也可以解决该问题
.node 文件require时候显示Error: The specified module could not be found
第一:你要确定你的.node 是好的,然后你可以继续下一步了
第二:你的.node发现不了可能是因为缺少了依赖关系,简单点说,就是缺少了.dll
第三:下载 Dependency Walker,这个软件可以帮你确定一下缺少什么.dll,下载地址:http://www.dependencywalker.com/
第四:下载完Dependency Walker 直接打开.node 文件,将提示缺少的重要.dll 放在.node 同一级的目录下,当然你也可以不用下软件,直接把重要的.dll放在.node目录下就可以了。
第五:运行,就不会报错了。
注意64与32版本
NodeJS C++ Addons基础:
https://hongchh.github.io/2018/NodeJS-Cpp-Addons%E5%9F%BA%E7%A1%80/
参考链接:
https://nodejs.org/api/addons.html
https://v8docs.nodesource.com/node-11.14/
----------------------------------------------------------


【推荐】国内首个AI IDE,深度理解中文开发场景,立即下载体验Trae
【推荐】编程新体验,更懂你的AI,立即体验豆包MarsCode编程助手
【推荐】抖音旗下AI助手豆包,你的智能百科全书,全免费不限次数
【推荐】轻量又高性能的 SSH 工具 IShell:AI 加持,快人一步
· 如何编写易于单元测试的代码
· 10年+ .NET Coder 心语,封装的思维:从隐藏、稳定开始理解其本质意义
· .NET Core 中如何实现缓存的预热?
· 从 HTTP 原因短语缺失研究 HTTP/2 和 HTTP/3 的设计差异
· AI与.NET技术实操系列:向量存储与相似性搜索在 .NET 中的实现
· 10年+ .NET Coder 心语 ── 封装的思维:从隐藏、稳定开始理解其本质意义
· 地球OL攻略 —— 某应届生求职总结
· 提示词工程——AI应用必不可少的技术
· Open-Sora 2.0 重磅开源!
· 周边上新:园子的第一款马克杯温暖上架