一个只有99行代码的JS流程框架(二)
欢迎大家关注腾讯云技术社区-博客园官方主页,我们将持续在博客园为大家推荐技术精品文章哦~
张镇圳,腾讯Web前端高级工程师,对内部系统前端建设有多年经验,喜欢钻研捣鼓各种前端组件和框架。
导语
前面写了一篇文章,叫《一个只有99行代码的JS流程框架》,虽然该框架基本已经能实现一个流程正常的逻辑流转,但是在分模块应用下还是缺少一定的能力,无法将一个页面中的不同模块很好的连接在一起,于是对之前的框架进行了升级,新增了子流程的概念。
子流程
什么是子流程?在这个升级后的框架里(当然代码已经不止99行了,不要在乎标题),每个步骤不但可以是一个function,还可以引用另一个流程,这个被引用的流程就叫子流程。先看个简单的例子:
flowJS({
    init:function(){
        this.setNext('步骤A').setNext('步骤B').setNext('步骤C');
        this.next();
    },
    '步骤A':function(){
        this.next();
    },
    '步骤B':{
    init:function(){
        this.setNext('子步骤B1').setNext('子步骤B2').setNext('子步骤B3');
        this.next();
        },
        '子步骤B1':function(){
        this.next();
        },
        '子步骤B2':function(){
            this.next();
        },
        '子步骤B3':function(){
        this.parent.next();
    }
    },
    '步骤C':function(){
        console.log('执行 步骤C');
    console.log('当前流程运行的轨迹:');
    console.log(flowJS.trace);
    }
});
上面这个例子中,步骤B对应的对象就是子流程。
还可以有另一种写法,也是对分模块应用的更好的实现:
/*定义子流程*/
flowJS('子流程B', {
    init:function(){
        this.setNext('子步骤B1').setNext('子步骤B2').setNext('子步骤B3');
        this.next();
    },
    '子步骤B1':function(){
        this.next();
    },
    '子步骤B2':function(){
        this.next();
    },
    '子步骤B3':function(){
        this.parent.next();
    }
});
/*父流程*/
flowJS({
    init:function(){
        this.setNext('步骤A').setNext('步骤B').setNext('步骤C');
        this.next();
    },
    '步骤A':function(){
        this.next();
    },
    '步骤B':'子流程B',
    '步骤C':function(){
        console.log('执行 步骤C');
    console.log('当前流程运行的轨迹:');
    console.log(flowJS.trace);
    }
});
可以看到,父流程的 步骤B 引用了前面定义的 子流程B,这样对于一些公共的流程逻辑就可以单独抽取出去作为子流程,被其他父流程引用。而子流程与父流程的交互,我们可以在代码中通过 this.parent 来实现。
在子流程的每一步中都可以获取 this.parent,得到的是当前子流程对应的步骤,这个步骤跟其他步骤一样也具有同样的API(详见上一篇文章《一个只有99行代码的JS流程框架》对步骤API的介绍)。
另外,需要说明的一点:这次的升级,并没有对流程步骤的API做改变,仅仅是引入了子流程的使用方式,其实就是定义子流程,然后引用子流程,接着就是父流程和子流程之间的交互。
同样,按照规矩,贴上code(例子的序号接上前篇文章的序号,从10开始)
最简单的子流程使用方法
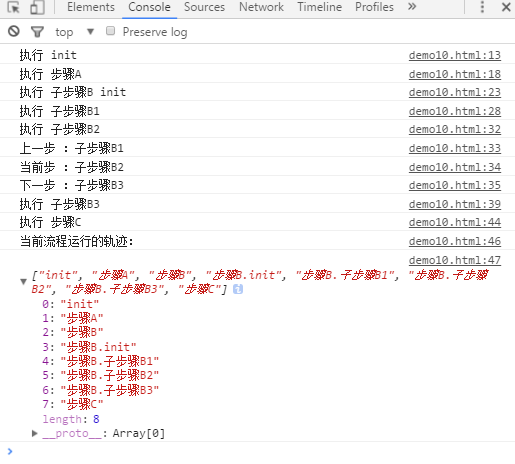
flowJS({
    init:function(){
    console.log('执行 init');
        this.setNext('步骤A').setNext('步骤B').setNext('步骤C');
        this.next();
    },
    '步骤A':function(){
        console.log('执行 步骤A');
        this.next();
    },
    '步骤B':{
    init:function(){
        console.log('执行 子步骤B init');
        this.setNext('子步骤B1').setNext('子步骤B2').setNext('子步骤B3');
        this.next();
        },
        '子步骤B1':function(){
            console.log('执行 子步骤B1');
            this.next();
        },
        '子步骤B2':function(){
            console.log('执行 子步骤B2');
            console.log('上一步 :'+this.getPrev()); //打印:子步骤B1
            console.log('当前步 :'+this.getCurr()); //打印:子步骤B2
        console.log('下一步 :'+this.getNext()); //打印:子步骤B3
        this.next();
        },
        '子步骤B3':function(){
            console.log('执行 子步骤B3');
            this.parent.next();
        }
    },
    '步骤C':function(){
        console.log('执行 步骤C');
    console.log('当前流程运行的轨迹:');
    console.log(flowJS.trace);
    }
});
执行结果:
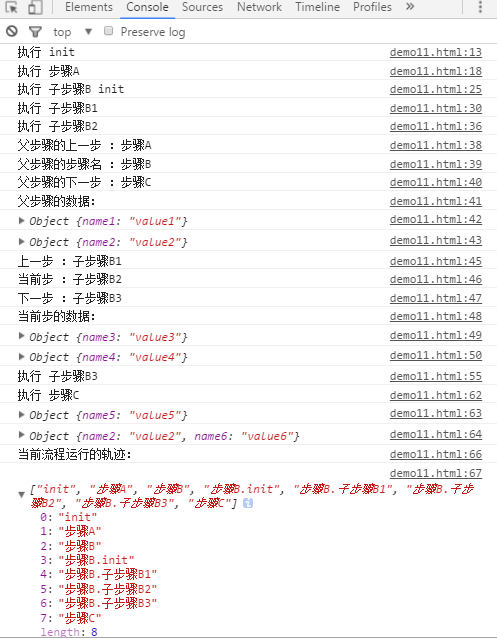
子流程和父流程 通过 this.parent 进行交互
flowJS({
    init:function(){
    console.log('执行 init');
        this.setNext('步骤A').setNext('步骤B').setNext('步骤C');
        this.next();
    },
    '步骤A':function(){
        console.log('执行 步骤A');
    this.nextData({name1:'value1'});
    this.flowData({name2:'value2'});
        this.next();
    },
    '步骤B':{
    init:function(){
        console.log('执行 子步骤B init');
        this.setNext('子步骤B1').setNext('子步骤B2').setNext('子步骤B3');
        this.next();
    },
    '子步骤B1':function(){
        console.log('执行 子步骤B1');
        this.nextData({name3:'value3'});
        this.flowData({name4:'value4'});
        this.next();
    },
    '子步骤B2':function(){
        console.log('执行 子步骤B2');
        console.log('父步骤的上一步 :'+this.parent.getPrev());//打印:步骤A
        console.log('父步骤的步骤名 :'+this.parent.getCurr());//打印:步骤B
        console.log('父步骤的下一步 :'+this.parent.getNext());//打印:步骤C
        console.log('父步骤的数据:');
        console.log(this.parent.stepData());//打印:Object {name1: "value1"}
        console.log(this.parent.flowData());//打印:Object {name2: "value2"}
        console.log('上一步 :'+this.getPrev());//打印:子步骤B1
        console.log('当前步 :'+this.getCurr());//打印:子步骤B2
        console.log('下一步 :'+this.getNext());//打印:子步骤B3
        console.log('当前步的数据:');
        console.log(this.stepData());//打印:Object {name3: "value3"}
        console.log(this.flowData());//打印:Object {name4: "value4"}
        this.next();
    },
    '子步骤B3':function(){
        console.log('执行 子步骤B3');
        this.parent.nextData({name5:'value5'});
        this.parent.flowData({name6:'value6'});
        this.parent.next();
    }
    },
    '步骤C':function(){
        console.log('执行 步骤C');
    console.log(this.stepData());//打印:Object {name5: "value5"}
    console.log(this.flowData());//打印:Object {name2: "value2", name6: "value6"}
    console.log('当前流程运行的轨迹:');
    console.log(flowJS.trace);
    }
});
执行结果:
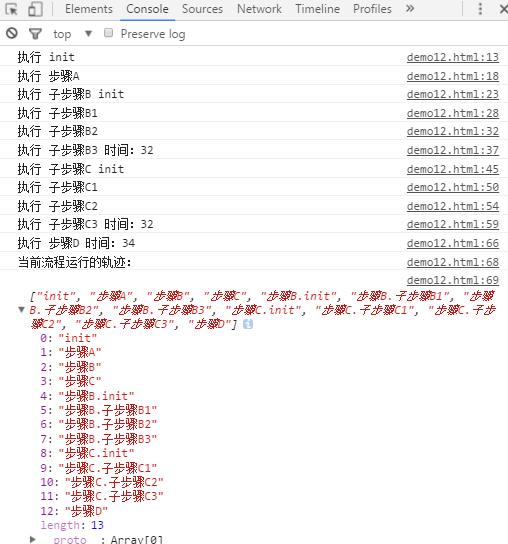
多个子流程并行执行
flowJS({
    init:function(){
    console.log('执行 init');
        this.setNext('步骤A').setNext(['步骤B', '步骤C']).setNext('步骤D');
        this.next();
    },
    '步骤A':function(){
        console.log('执行 步骤A');
        this.next();
    },
    '步骤B':{
    init:function(){
        console.log('执行 子步骤B init');
        this.setNext('子步骤B1').setNext('子步骤B2').setNext('子步骤B3');
        this.next();
        },
        '子步骤B1':function(){
        console.log('执行 子步骤B1');
        this.next();
    },
    '子步骤B2':function(){
        console.log('执行 子步骤B2');
        this.next();
    },
    '子步骤B3':function(){
        var self = this;
            //这里打印的时间和 子步骤C3 的时间一样
        console.log('执行 子步骤B3 时间:' + new Date().getSeconds());
        setTimeout(function(){
            self.parent.next();
        }, 2000);
    }
    },
    '步骤C':{
    init:function(){
        console.log('执行 子步骤C init');
        this.setNext('子步骤C1').setNext('子步骤C2').setNext('子步骤C3');
        this.next();
    },
        '子步骤C1':function(){
        console.log('执行 子步骤C1');
        this.next();
    },
    '子步骤C2':function(){
        console.log('执行 子步骤C2');
        this.next();
    },
    '子步骤C3':function(){
        var self = this;
            //这里打印的时间和 子步骤B3 的时间一样
        console.log('执行 子步骤C3 时间:' + new Date().getSeconds());
        setTimeout(function(){
            self.parent.next();
        }, 2000);
    }
    },
    '步骤D':function(){
        //这里打印的时间比上面的子流程的时间晚2秒,因为两个子流程是并行执行的
        console.log('执行 步骤D 时间:' + new Date().getSeconds());
    console.log('当前流程运行的轨迹:');
    console.log(flowJS.trace);
    }
});
执行结果:
定义子流程和引用子流程
flowJS('子流程A', {
    init:function(){
        this.next('子步骤A1');
    },
    '子步骤A1':function(){
        console.log('执行 子步骤A1');
        console.log('当前步骤:'+this.getCurr());//打印:子步骤A1
        console.log('父步骤:'+this.parent.getCurr());//打印:步骤A
        this.parent.next();
    }
});
flowJS('子流程B', {
    init:function(){
        console.log('执行 子步骤B init');
        this.setNext('子步骤B1').setNext('子步骤B2').setNext('子步骤B3');
        this.next();
    },
    '子步骤B1':function(){
        console.log('执行 子步骤B1');
        this.next();
    },
    '子步骤B2':function(){
        console.log('执行 子步骤B2');
        this.next();
    },
    '子步骤B3':function(){
        console.log('执行 子步骤B3');
        console.log('当前步骤:'+this.getCurr());//打印:子步骤B3
        console.log('父步骤:'+this.parent.getCurr());//打印:步骤B
        this.parent.next();
    }
});
flowJS('子流程C', {
    init:function(){
        console.log('执行 子步骤C init');
        this.setNext('子步骤C1').setNext('子步骤C2').setNext('子步骤C3');
        this.next();
    },
    '子步骤C1':function(){
        console.log('执行 子步骤C1');
        this.next();
    },
    '子步骤C2':function(){
        console.log('执行 子步骤C2');
        this.next();
    },
    '子步骤C3':function(){
        console.log('执行 子步骤C3');
        console.log('当前步骤:'+this.getCurr());//打印:子步骤C3
        console.log('父步骤:'+this.parent.getCurr());//打印:步骤C
        this.parent.next();
    }
});
flowJS({
    init:function(){
    console.log('执行 init');
        this.setNext('步骤A').setNext(['步骤B', '步骤C']).setNext('步骤D');
        this.next();
    },
    '步骤A':'子流程A',
    '步骤B':'子流程B',
    '步骤C':'子流程C',
    '步骤D':function(){
    console.log('当前流程运行的轨迹:');
    console.log(flowJS.trace);
    }
});
执行结果:
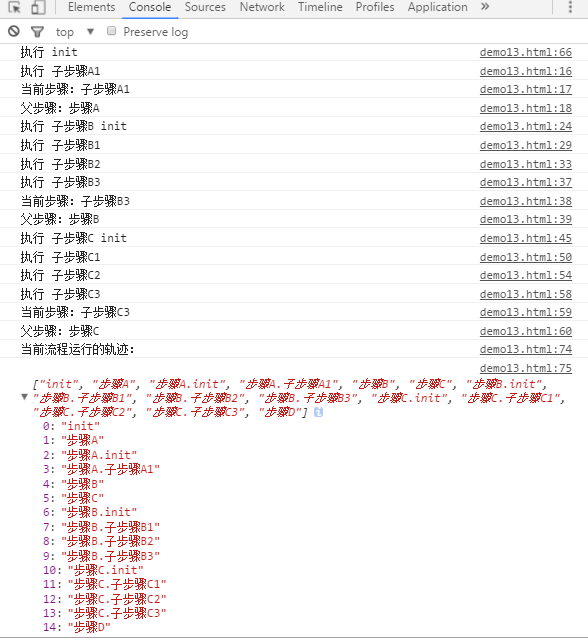
从上面几个例子可以看到,子流程和父流程之间的信息交互非常简单,其实就是通过this.parent来获取到父步骤,通过父步骤来获取和传递数据,因此也能让这个流程框架拥有更大能力来适应更多的应用场景。
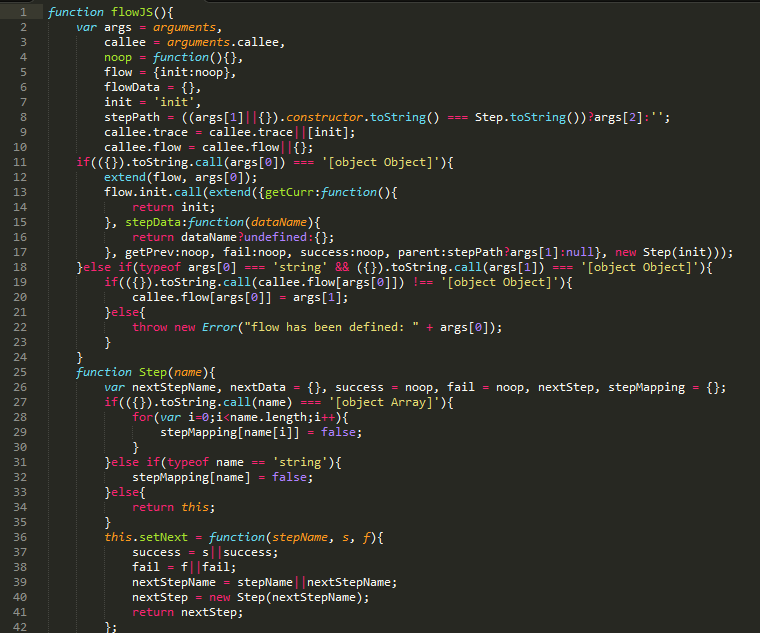
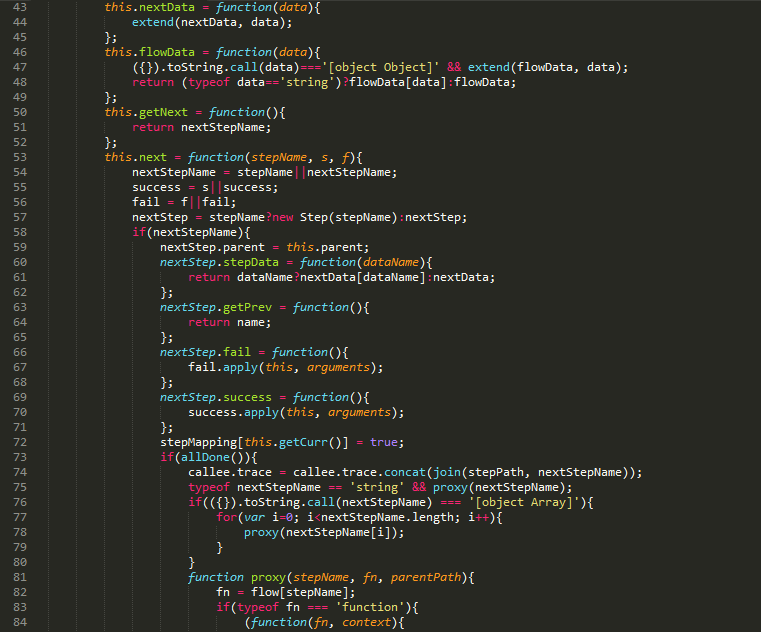
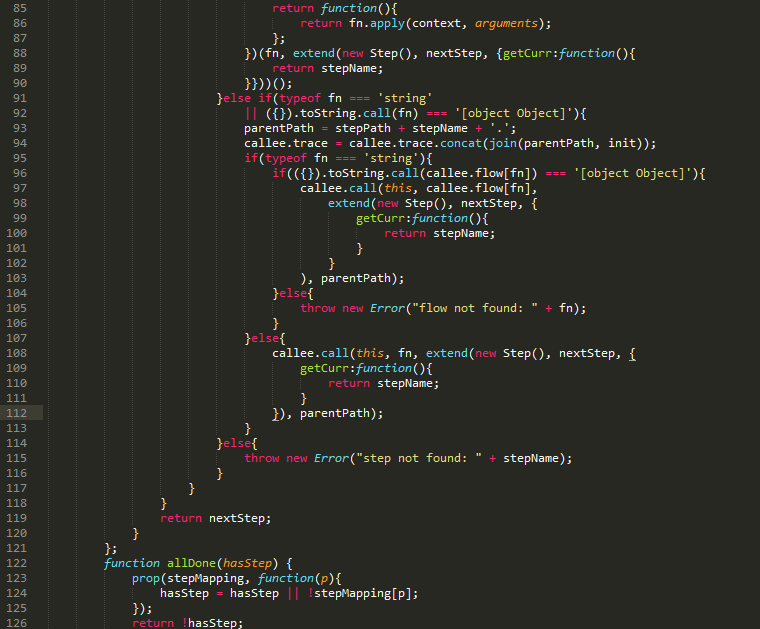
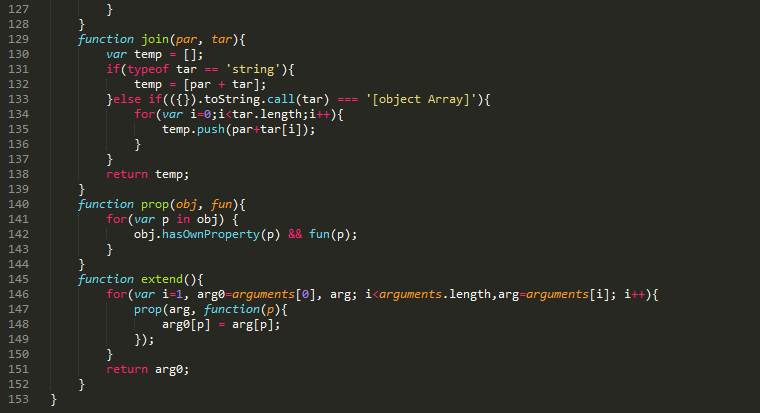
为了方便交流学习,上面例子完整代码可通过附件下载,最后同样贴上框架源码:

相关阅读
一个只有99行代码的JS流程框架 (一)
JavaScriptCore全面解析 (上篇)
JavaScriptCore全面解析 (下篇)
此文已由作者授权腾讯云技术社区发布,转载请注明文章出处
原文链接:https://www.qcloud.com/community/article/318172
获取更多腾讯海量技术实践干货,欢迎大家前往腾讯云技术社区

 浙公网安备 33010602011771号