spring自学历程

spring几大核心功能
1.IOC/DI(控制反转/依赖注入)
IOC是什么?IOC完成的事情是原先程序员主动通过new实例化对象的事情,转交给spring负责
IOC最大的作用是:解耦,程序员不需要管理对象,解除了对象管理和程序员之间的耦合
2.AOP(面向切面编程)
3.声明式事务
spring框架重要的概念:容器(container):spring当作一个容器
Spring 框架采用分层架构,根据不同的功能被划分成了多个模块,这些模块大体可分为 Data Access/Integration、Web、AOP、Aspects、Messaging、Instrumentation、Core Container 和 Test(见上图)
详细见:http://c.biancheng.net/view/4242.html
spring创建对象的三种方式
1.通过构造方法创建
1.1 在applicationContext.xml中设置哪个构造方法创建对象
<!-- 无参实例 -->
<bean id="pro" class="com.spring.po.People"></bean>
<!-- 有参实例 -->
<bean id="pro2" class="com.spring.po.People">
<!-- ref:引用另一个bean value:基本数据类型或String等 -->
<constructor-arg index="0" name="id" type="int" value="2"></constructor-arg>
<constructor-arg index="1" name="name" type="String" value="有参构造实例"></constructor-arg>
</bean>
1.2 如果设定的条件匹配多个构造方法,则执行最后的构造方法
1.3 index:参数的索引,从0开始,name:参数名,type:类型(区分关键字和封装类,例 int和integer)
2.实例工厂
2.1 工厂设计模式:帮助创建类对象,一个工厂可以生产多个对象
2.2 实例工厂:需要先创建工厂,才能生产对象,然后在xml中配置工厂对象和需要创建的对象
package com.spring.po;

public class PeopleFactory {
    public People newInstance(){
        return new People(3,"实例工厂");
    }
}
     <!-- 实例工厂实现实例 -->
     <bean id="factory" class="com.spring.po.PeopleFactory"></bean>
     <bean id="pro3" factory-bean="factory" factory-method="newInstance"></bean>
3.静态工厂:编写一个静态工厂,在方法上添加static
package com.spring.po;

public class PeopleStaticFactory {
    public static People newInstance(){
        return new People(4, "静态");
    }

}
<!-- 静态工厂实例实例 -->
<bean id="pro4" class="com.spring.po.PeopleStaticFactory" factory-method="newInstance"></bean>
具体案例
IDE:myeclipse2017
jar包:spring4个基础jar包(本案例使用5.2版本)+Commons-logging的jar包
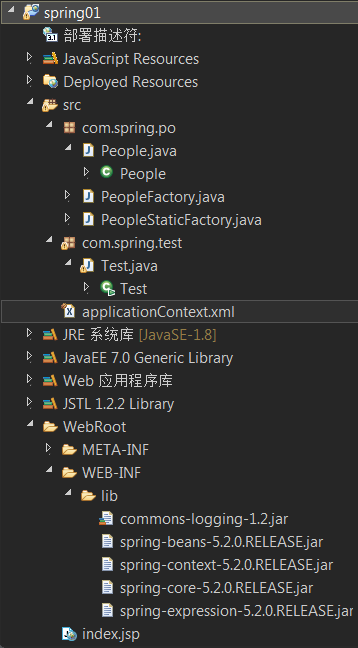
新建项目spring01,项目结构图如下
applicationContext.xml
<?xml version="1.0" encoding="UTF-8"?>
<beans xmlns="http://www.springframework.org/schema/beans"
    xmlns:xsi="http://www.w3.org/2001/XMLSchema-instance"
    xsi:schemaLocation="http://www.springframework.org/schema/beans
        https://www.springframework.org/schema/beans/spring-beans.xsd">
        <!--
            id:表示对象标识
            class:创建哪个类的对象
         -->
      <!-- 无参实例 -->
     <bean id="pro" class="com.spring.po.People"></bean>
     <!-- 有参实例 -->
     <bean id="pro2" class="com.spring.po.People">
         <!-- ref:引用另一个bean        value:基本数据类型或String等 -->
         <constructor-arg index="0" name="id" type="int" value="2"></constructor-arg>
         <constructor-arg index="1" name="name" type="String" value="有参构造实例"></constructor-arg>
     </bean>

     <!-- 实例工厂实现实例 -->
     <bean id="factory" class="com.spring.po.PeopleFactory"></bean>
     <bean id="pro3" factory-bean="factory" factory-method="newInstance"></bean>

     <!-- 静态工厂实例实例 -->
     <bean id="pro4" class="com.spring.po.PeopleStaticFactory" factory-method="newInstance"></bean>
</beans>
com.spring.po包
People.java
package com.spring.po;

public class People {
    private int id;
    private String name;
    public int getId() {
        return id;
    }
    public void setId(int id) {
        this.id = id;
    }
    public String getName() {
        return name;
    }
    public void setName(String name) {
        this.name = name;
    }
    @Override
    public String toString() {
        return "People [id=" + id + ", name=" + name + "]";
    }


    public People() {
        super();
    }
    public People(int id,String name){
        this.id=id;
        this.name=name;
        System.out.println("有参构造函数");
    }
}
PeopleFactory.java
package com.spring.po;

public class PeopleFactory {
    public People newInstance(){
        return new People(3,"实例工厂");
    }
}
PeopleStaticFactory.java
package com.spring.po;

public class PeopleStaticFactory {
    public static People newInstance(){
        return new People(4, "静态");
    }

}
com.spring.test包
Test.java
package com.spring.test;

import org.springframework.context.ApplicationContext;
import org.springframework.context.support.ClassPathXmlApplicationContext;

import com.spring.po.People;

public class Test {
    public static void main(String[] args) {
        ApplicationContext ac=new ClassPathXmlApplicationContext("applicationContext.xml");
        People people= ac.getBean("pro",People.class);
        people.setId(1);
        people.setName("测试");

        People people2=ac.getBean("pro2",People.class);

        People people3=ac.getBean("pro3",People.class);

        People people4=ac.getBean("pro4",People.class);

        System.out.println(people);
        System.out.println(people2);
        System.out.println(people3);
        System.out.println(people4);
    }
}
运行结果如下

使用spring简化mybatis
IDE:myeclipse2017
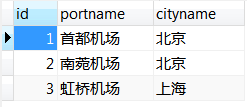
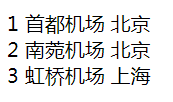
数据库的airport表数据
项目具体代码在后面
1.导入mybatis所有jar包和spring基本jar包,spring-idbc,spring-tx,spring-aop,spring-web
2.编写spring配置文件applicationContext.xml
3.编写代码
3.1 正常编写po(实体类)
3.2 编写Mapper包下时必须使用接口绑定方案或注解方案(必须有接口)
3.3 正常编写service接口和service实现类(impl)
3.3.1 需要在service实现类中声明Mapper接口对象,并生成get/set方法
3.4 spring无法管理servlet
案例
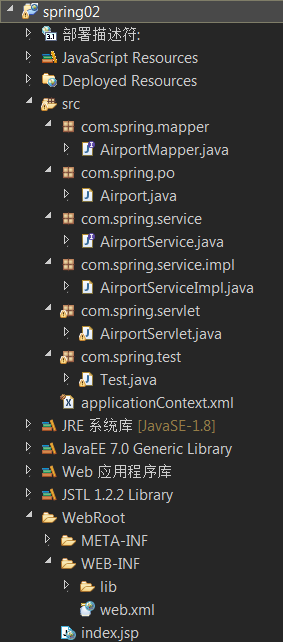
结构图
applicationContext.xml
<?xml version="1.0" encoding="UTF-8"?>
<beans xmlns="http://www.springframework.org/schema/beans"
    xmlns:xsi="http://www.w3.org/2001/XMLSchema-instance"
    xsi:schemaLocation="http://www.springframework.org/schema/beans
        https://www.springframework.org/schema/beans/spring-beans.xsd">
    <!-- 数据源封装类,获取数据库连接  -->
    <bean id="dataSouce" class="org.springframework.jdbc.datasource.DriverManagerDataSource">
        <property name="driverClassName" value="com.mysql.jdbc.Driver"></property>
        <property name="url" value="jdbc:mysql://localhost:3306/test?serverTimezone=UTC"></property>
        <property name="username" value="root"></property>
        <property name="password" value="123456"></property>
    </bean>
    <!-- 创建SqlSessionFactory对象 -->
    <bean id="factory" class="org.mybatis.spring.SqlSessionFactoryBean">
        <!-- 数据库连接信息,来源于dataSouce -->
        <property name="dataSource" ref="dataSouce"></property>
    </bean>
    <!-- 扫描器相当于mybatis.xml中的Mapper下的backage标签 ,扫描com.spring.mapper后会给对应的接口创建对象-->
    <bean class="org.mybatis.spring.mapper.MapperScannerConfigurer">
        <!-- 要扫描的包 -->
        <property name="basePackage" value="com.spring.mapper"></property>
        <!-- 和Factory产生关系 -->
        <property name="sqlSessionFactory" ref="factory"></property>
    </bean>
    <!-- 由spring管理service -->
    <bean id="airportService" class="com.spring.service.impl.AirportServiceImpl">
        <property name="airportMapper" ref="airportMapper"></property>
    </bean>
</beans>
com.spring.po包
Airport.java
package com.spring.po;

public class Airport {
    private int id;
    private String portName;
    private String cityName;
    public int getId() {
        return id;
    }
    public void setId(int id) {
        this.id = id;
    }
    public String getPortName() {
        return portName;
    }
    public void setPortName(String portName) {
        this.portName = portName;
    }
    public String getCityName() {
        return cityName;
    }
    public void setCityName(String cityName) {
        this.cityName = cityName;
    }

    @Override
    public String toString() {
        return "Airport [id=" + id + ", portName=" + portName + ", cityName=" + cityName + "]";
    }


}
com.spring.mapper包
AirportMapper.java
package com.spring.mapper;

import java.util.List;

import org.apache.ibatis.annotations.Select;

import com.spring.po.Airport;

public interface AirportMapper {
    @Select("select * from airport")
    List<Airport> selAll();
}
com.spring.service包
AirportService.java
package com.spring.service;

import java.util.List;

import com.spring.po.Airport;

public interface AirportService {
    List<Airport> show();
}
com.spring.service.impl包
AirportServiceImpl.java
package com.spring.service.impl;

import java.util.List;

import com.spring.mapper.AirportMapper;
import com.spring.po.Airport;
import com.spring.service.AirportService;

public class AirportServiceImpl implements AirportService{
    private AirportMapper airportMapper;


    public AirportMapper getAirportMapper() {
        return airportMapper;
    }


    public void setAirportMapper(AirportMapper airportMapper) {
        this.airportMapper = airportMapper;
    }


    @Override
    public List<Airport> show() {
        return airportMapper.selAll();
    }

}
com.spring.test包
Test.java
可以测试运行test
package com.spring.test;

import java.util.List;

import org.springframework.context.ApplicationContext;
import org.springframework.context.support.ClassPathXmlApplicationContext;

import com.spring.po.Airport;
import com.spring.service.impl.AirportServiceImpl;

public class Test {
    public static void main(String[] args) {
        ApplicationContext ac=new ClassPathXmlApplicationContext("applicationContext.xml");
//        String [] names=ac.getBeanDefinitionNames();
//        for (String string : names) {
//            System.out.println(string);
//        }

        AirportServiceImpl bean= ac.getBean("airportService",AirportServiceImpl.class);
        List<Airport> list=bean.show();
//        System.out.println(list);
        for (Airport airport : list) {
            System.out.println(airport);
        }
    }
}
com.spring.servlet包
AirportServlet.java
package com.spring.servlet;

import java.io.IOException;

import javax.servlet.ServletException;
import javax.servlet.annotation.WebServlet;
import javax.servlet.http.HttpServlet;
import javax.servlet.http.HttpServletRequest;
import javax.servlet.http.HttpServletResponse;

import org.springframework.web.context.WebApplicationContext;
import org.springframework.web.context.support.WebApplicationContextUtils;

import com.spring.service.AirportService;
import com.spring.service.impl.AirportServiceImpl;

@WebServlet("/airport")
public class AirportServlet extends HttpServlet {
    private AirportService airportService;


    @Override
    public void init() throws ServletException {
        //对service实例化
        WebApplicationContext ac=WebApplicationContextUtils.getRequiredWebApplicationContext(getServletContext());
        airportService=ac.getBean("airportService",AirportServiceImpl.class);
    }


    @Override
    protected void service(HttpServletRequest req, HttpServletResponse resp) throws ServletException, IOException {
        req.setAttribute("list", airportService.show());
        req.getRequestDispatcher("index.jsp").forward(req, resp);
    }


}
web.xml
<?xml version="1.0" encoding="UTF-8"?>
<web-app xmlns:xsi="http://www.w3.org/2001/XMLSchema-instance"
    xmlns="http://xmlns.jcp.org/xml/ns/javaee"
    xsi:schemaLocation="http://xmlns.jcp.org/xml/ns/javaee http://xmlns.jcp.org/xml/ns/javaee/web-app_3_1.xsd"
    version="3.1">
    <!-- 上下文参数 -->
    <context-param>
        <param-name>contextConfigLocation</param-name>
        <!-- spring配置文件 -->
        <param-value>classpath:applicationContext.xml</param-value>
    </context-param>
    <!--封装了一个监听器,帮助加载spring的配置文件  -->
    <listener>
        <listener-class>org.springframework.web.context.ContextLoaderListener</listener-class>
    </listener>
</web-app>
index.jsp
<%@ page language="java" import="java.util.*" pageEncoding="utf-8"%>

<%@ taglib prefix="c" uri="http://java.sun.com/jsp/jstl/core" %>
<!DOCTYPE HTML PUBLIC "-//W3C//DTD HTML 4.01 Transitional//EN">
<html>
  <head>

    <title>spring简化mybatis</title>
  </head>

  <body>
      <c:forEach items="${list }" var="as" >
          ${as.id }    ${as.portName }    ${as.cityName }<br/>
      </c:forEach>
  </body>
</html>
运行结果如下
AOP初使用
前置通知和后置通知
新建项目,结构图如下

applicationContext.xml
* 号:通配符,匹配任意方法名,任意类名,任意一级包名
如果希望匹配任意方法参数,使用 (..)
<?xml version="1.0" encoding="UTF-8"?>
<beans xmlns="http://www.springframework.org/schema/beans"
    xmlns:xsi="http://www.w3.org/2001/XMLSchema-instance"
    xmlns:aop="http://www.springframework.org/schema/aop"
    xsi:schemaLocation="http://www.springframework.org/schema/beans
        https://www.springframework.org/schema/beans/spring-beans.xsd
        http://www.springframework.org/schema/aop
        http://www.springframework.org/schema/aop/spring-aop.xsd">
     <!-- 配置通知类对象,在切面中引入 -->
    <bean id="mybefore" class="com.spring.advice.MyBeforeAdvice"></bean>
    <bean id="myafter" class="com.spring.advice.MyAfterAdvice"></bean>
    <!-- 配置切面 -->
    <aop:config>
        <!-- 配置切点 -->
        <aop:pointcut expression="execution(* com.spring.test.Demo.demo2())" id="mypoint"/>
        <!-- 通知 -->
        <aop:advisor advice-ref="mybefore" pointcut-ref="mypoint"/>
        <aop:advisor advice-ref="myafter" pointcut-ref="mypoint"/>
    </aop:config>
    <!-- 配置Demo类,测试使用 -->
    <bean id="demo" class="com.spring.test.Demo"></bean>
</beans>
com.spring.advice包
MyAfterAdvice.java
arg0:切点方法返回值
arg1:切点方法对象
arg2:切点方法参数
arg3:切点方法所在类对象
package com.spring.advice;

import java.lang.reflect.Method;

import org.springframework.aop.AfterReturningAdvice;

public class MyAfterAdvice implements AfterReturningAdvice{

    @Override
    public void afterReturning(Object arg0, Method arg1, Object[] arg2, Object arg3) throws Throwable {
        System.out.println("执行后置通知");

    }

}
MyBeforeAdvice.java
arg0:切点方法对象Method
arg1:切点方法参数
arg2:切点在哪个对象中
package com.spring.advice;

import java.lang.reflect.Method;

import org.springframework.aop.MethodBeforeAdvice;

public class MyBeforeAdvice implements MethodBeforeAdvice {

    @Override
    public void before(Method arg0, Object[] arg1, Object arg2) throws Throwable {
        System.out.println("执行前置通知");

    }

}
com.spring.test包
Demo.java
package com.spring.test;

public class Demo {
    public void demo1(){
        System.out.println("demo1");
    }

    public void demo2(){
        System.out.println("demo2");
    }

    public void demo3(){
        System.out.println("demo3");
    }
}
Test.java
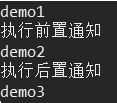
package com.spring.test;

import org.springframework.context.ApplicationContext;
import org.springframework.context.support.ClassPathXmlApplicationContext;

public class Test {
    public static void main(String[] args) {
//        Demo demo=new Demo();
//        demo.demo1();
//        demo.demo2();
//        demo.demo3();

        ApplicationContext ac=new ClassPathXmlApplicationContext("applicationContext.xml");
        Demo demo=ac.getBean("demo",Demo.class);
        demo.demo1();
        demo.demo2();
        demo.demo3();
    }
}
结果如下
异常通知(Aspectj方式)
新建类,写任意名称的方法
package com.spring.advice;

public class MyThrowAdvice {
    public void  myexception(Exception e){
        System.out.println("执行异常通知,异常message:"+e.getMessage());
    }
}
在spring配置文件中配置
<aop:cnfig>中的ref属性表示:方法在哪个类中
<aop:after-throwing>表示异常通知
method:当触发这个通知,调用哪个方法
throuing:异常对象名,若使用throwing,则值必须和通知中的方法参数名相同(可以不在通知中声明异常对象,throwing可省略)
    <bean id="mythrow" class="com.spring.advice.MyThrowAdvice"></bean>
    <aop:config>
        <aop:aspect ref="mythrow">
            <aop:pointcut expression="execution(* com.spring.test.Demo.demo1())" id="mypoint"/>
            <aop:after-throwing method="myexception" pointcut-ref="mypoint" throwing="e"/>
        </aop:aspect>
    </aop:config>
    <bean id="demo" class="com.spring.test.Demo"></bean>
demo1()方法
    public void demo1() throws Exception{
        int num=5/0;
        System.out.println("demo1");
    }
Test类main
        ApplicationContext ac=new ClassPathXmlApplicationContext("applicationContext.xml");
        Demo demo=ac.getBean("demo",Demo.class);
        try {
            demo.demo1();
        } catch (Exception e) {

        }
结果如下

环绕通知
把前置通知和后置通知都写到一个通知中,组成了环绕通知
新建类,实现MethodInterceptor
package com.spring.advice;

import org.aopalliance.intercept.MethodInterceptor;
import org.aopalliance.intercept.MethodInvocation;

public class MyArround implements MethodInterceptor {

    @Override
    public Object invoke(MethodInvocation arg0) throws Throwable {
        System.out.println("环绕-前置");
        Object result=arg0.proceed();
        System.out.print("环绕-后置");
        return result;
    }


}
xml配置文件
    <!-- 环绕通知 -->
    <bean id="myarround" class="com.spring.advice.MyArround"/>
    <aop:config>
        <aop:pointcut expression="execution(* com.spring.test.Demo.demo2())" id="mypoint"/>
        <aop:advisor advice-ref="myarround" pointcut-ref="mypoint"/>
    </aop:config>

    <!-- 配置Demo类,测试使用 -->
    <bean id="demo" class="com.spring.test.Demo"></bean>
main()方法
    public static void main(String[] args) {
//        Demo demo=new Demo();
//        demo.demo1();
//        demo.demo2();
//        demo.demo3();

        ApplicationContext ac=new ClassPathXmlApplicationContext("applicationContext.xml");
        Demo demo=ac.getBean("demo",Demo.class);
        /*try {
            demo.demo1();
        } catch (Exception e) {

        }*/
        demo.demo2();
//        demo.demo3();
    }
结果如下

自定义通知
新建类,MyAdvice.java
package com.spring.advice;

import org.aspectj.lang.ProceedingJoinPoint;

public class MyAdvice {
    public void mybefore(){
        System.out.println("前置通知");
    }

    public void myafter(){
        System.out.println("后置通知1");
    }

    public void myaftering(){
        System.out.println("后置通知2");
    }

    public void mythrow(){
        System.out.println("异常通知");
    }

    public Object myarround(ProceedingJoinPoint p) throws Throwable{
        System.out.println("执行环绕");
        System.out.println("执行环绕前置");
        Object result=p.proceed();
        System.out.println("环绕后置");
        return result;
    }
}
xml配置文件
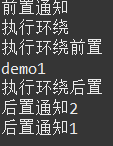
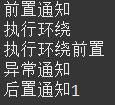
    <bean id="myadvice" class="com.spring.advice.MyAdvice"></bean>
    <aop:config>
        <aop:aspect ref="myadvice">
            <aop:pointcut expression="execution(* com.spring.test.Demo.demo1())" id="mypoint"/>
            <!-- 前置通知 -->
            <aop:before method="mybefore" pointcut-ref="mypoint"/>
            <!-- 后置通知:alter有异常,依旧执行 -->
            <aop:after method="myafter" pointcut-ref="mypoint"/>
            <!-- 后置通知:alter-returning有异常,不执行 -->
            <aop:after-returning method="myaftering" pointcut-ref="mypoint"/>
            <!-- 异常通知 -->
            <aop:after-throwing method="mythrow" pointcut-ref="mypoint"/>
            <!-- 环绕通知 -->
            <aop:around method="myarround" pointcut-ref="mypoint"/>
        </aop:aspect>
    </aop:config>

    <!-- 配置Demo类,测试使用 -->
    <bean id="demo" class="com.spring.test.Demo"></bean>
demo类
public void demo1() throws Exception{
        int num=5/0;
        System.out.println("demo1");
    }
可注释num=5/0,来显示不同结果
自动注入
在spring配置文件中对象名和ref="id",id名相同可以使用自动注入,不配置<property/>
2种配置方法
在<bean>中通过autowire="" 配置,只对这个<bean>生效
在<beans>中通过default-autowire="“ 配置,表示当前文件中所有<bean>都是全局配置内容
autowire="",可取值
default:默认值,根据全局default-autowire="“值,默认全局和局部都没有配置情况下,相当”no“
no:不自动注入
byName:通过名称自动注入,在spring容器中找类的id
byType:根据类型注入(使用byType,则在spring容器不可以出现相同类型的<bean>)
constructor:根据构造方法注入
提供对应参数的构造方法(构造方法参数中包含注入对象那个)
底层使用byName,构造方法参数名和其他<bean>的id相同
练习
新建项目,项目结构图如下

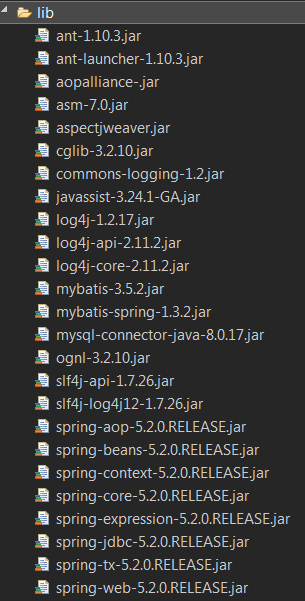
lib
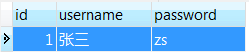
数据库
web.xml
<?xml version="1.0" encoding="UTF-8"?>
<web-app xmlns:xsi="http://www.w3.org/2001/XMLSchema-instance"
    xmlns="http://xmlns.jcp.org/xml/ns/javaee"
    xsi:schemaLocation="http://xmlns.jcp.org/xml/ns/javaee http://xmlns.jcp.org/xml/ns/javaee/web-app_3_1.xsd"
    version="3.1">
    <context-param>
        <param-name>contextConfigLocation</param-name>
        <param-value>classpath:applicationContext.xml</param-value>
    </context-param>
    <listener>
        <listener-class>org.springframework.web.context.ContextLoaderListener</listener-class>
    </listener>
</web-app>
log4j.properties
# Global logging configuration
log4j.rootLogger=INFO,stdout,R
# MyBatis logging configuration...
log4j.logger.com.mybatis=DEBUG
# Console output...
log4j.appender.stdout=org.apache.log4j.ConsoleAppender
log4j.appender.stdout.layout=org.apache.log4j.PatternLayout
log4j.appender.stdout.layout.ConversionPattern=%5p [%t] - %m%n

log4j.appender.R=org.apache.log4j.DailyRollingFileAppender
log4j.appender.R.File=D\:\\temp\\logs\\qc.log
log4j.appender.R.layout=org.apache.log4j.PatternLayout
1log4j.appender.R.layout.ConversionPattern=%5p [%t] - %m%n
applicationContext.xml
<?xml version="1.0" encoding="UTF-8"?>
<beans xmlns="http://www.springframework.org/schema/beans"
xmlns:xsi="http://www.w3.org/2001/XMLSchema-instance"
xmlns:aop="http://www.springframework.org/schema/aop"
xsi:schemaLocation="http://www.springframework.org/schema/beans
https://www.springframework.org/schema/beans/spring-beans.xsd
http://www.springframework.org/schema/aop
https://www.springframework.org/schema/aop/spring-aop.xsd"
default-autowire="byName">
<!-- 数据源封装类,获取数据库连接 -->
<bean id="dataSource" class="org.springframework.jdbc.datasource.DriverManagerDataSource">
<property name="driverClassName" value="com.mysql.jdbc.Driver"></property>
<property name="url" value="jdbc:mysql://localhost:3306/test?serverTimezone=UTC"></property>
<property name="username" value="root"></property>
<property name="password" value="123456"></property>
</bean>
<!-- 创建SqlSessionFactory对象 -->
<bean id="factory" class="org.mybatis.spring.SqlSessionFactoryBean">
<!-- 数据库连接信息,来源于dataSouce -->
<!-- <property name="dataSource" ref="dataSource"></property> -->
<!-- 起别名 -->
<property name="typeAliasesPackage" value="com.spring.po"></property>
</bean>
<!-- 扫描器相当于mybatis.xml中的Mapper下的backage标签 ,扫描com.spring.mapper后会给对应的接口创建对象-->
<bean class="org.mybatis.spring.mapper.MapperScannerConfigurer">
<!-- 要扫描的包 -->
<property name="basePackage" value="com.spring.mapper"></property>
<!-- 和Factory产生关系 -->
<property name="sqlSessionFactory" ref="factory"></property>
</bean>
<!-- 由spring管理service -->
<bean id="usersService" class="com.spring.service.impl.UsersServiceImpl">
<!-- <property name="usersMapper" ref="usersMapper"></property> -->
</bean>
<bean id="mybefore" class="com.spring.advice.MyBefore"></bean>
<bean id="myAfter" class="com.spring.advice.MyAfter"></bean>
<!-- aop -->
<aop:aspectj-autoproxy proxy-target-class="true"></aop:aspectj-autoproxy>
<aop:config>
<aop:pointcut expression="execution(* com.spring.service.impl.UsersServiceImpl.login(..))" id="mypoint"/>
<aop:advisor advice-ref="mybefore" pointcut-ref="mypoint"/>
<aop:advisor advice-ref="myAfter" pointcut-ref="mypoint"/>
</aop:config>
</beans>
com.spring.po包
Users.java
package com.spring.po;

public class Users {
    private int id;
    private String username;
    private String password;
    public int getId() {
        return id;
    }
    public void setId(int id) {
        this.id = id;
    }
    public String getUsername() {
        return username;
    }
    public void setUsername(String username) {
        this.username = username;
    }
    public String getPassword() {
        return password;
    }
    public void setPassword(String password) {
        this.password = password;
    }


}
com.spring.mapper包
UsersMapper.java
package com.spring.mapper;

import com.spring.po.Users;

public interface UsersMapper {
    Users selByUsers(Users users);
}
UsersMapper.xml
<?xml version="1.0" encoding="UTF-8"?>
<!DOCTYPE mapper
PUBLIC "-//mybatis.org//DTD Mapper 3.0//EN"
"http://mybatis.org/dtd/mybatis-3-mapper.dtd">
<mapper namespace="com.spring.mapper.UsersMapper">
    <select id="selByUsers" parameterType="users" resultType="users">
        select * from users where username=#{username} and password=#{password}
    </select>
</mapper>
com.spring.service包
UsersService.java
package com.spring.service;

import com.spring.po.Users;

public interface UsersService {
    Users login(Users users);
}
com.spring.service.impl包
package com.spring.service.impl;

import com.spring.mapper.UsersMapper;
import com.spring.po.Users;
import com.spring.service.UsersService;

public class UsersServiceImpl implements UsersService {
    private UsersMapper usersMapper;


    public UsersMapper getUsersMapper() {
        return usersMapper;
    }


    public void setUsersMapper(UsersMapper usersMapper) {
        this.usersMapper = usersMapper;
    }


    @Override
    public Users login(Users users) {
        return usersMapper.selByUsers(users);
    }

}
com.spring.servlet包
LoginServlet.java
package com.spring.servlet;

import java.io.IOException;

import javax.servlet.ServletException;
import javax.servlet.annotation.WebServlet;
import javax.servlet.http.HttpServlet;
import javax.servlet.http.HttpServletRequest;
import javax.servlet.http.HttpServletResponse;

import org.springframework.web.context.WebApplicationContext;
import org.springframework.web.context.support.WebApplicationContextUtils;

import com.spring.po.Users;
import com.spring.service.UsersService;
import com.spring.service.impl.UsersServiceImpl;

@WebServlet("/login")
public class LoginServlet extends HttpServlet {
    private UsersService usersService;

    @Override
    public void init() throws ServletException {
        WebApplicationContext wac=WebApplicationContextUtils.getRequiredWebApplicationContext(getServletContext());
        usersService=wac.getBean("usersService",UsersServiceImpl.class);
    }

    @Override
    protected void service(HttpServletRequest req, HttpServletResponse resp) throws ServletException, IOException {
        req.setCharacterEncoding("utf-8");
        Users users=new Users();
        users.setUsername(req.getParameter("username"));
        users.setPassword(req.getParameter("password"));
        Users user=usersService.login(users);
        if(user!=null){
            resp.sendRedirect("main.jsp");
        }
        else {
            resp.sendRedirect("login.jsp");
        }
    }


}
com.spring.test包
Test 测试用的
    package com.spring.test;

import org.springframework.context.ApplicationContext;
import org.springframework.context.support.ClassPathXmlApplicationContext;

public class Test {
    public static void main(String[] args) {
        ApplicationContext ac=new ClassPathXmlApplicationContext("applicationContext.xml");
        String [] names=ac.getBeanDefinitionNames();
        for (String string : names) {
            System.out.println(string);
        }
    }
}
com.spring.advice包
MyAfter.java
package com.spring.advice;

import java.lang.reflect.Method;

import org.apache.log4j.Logger;
import org.springframework.aop.AfterReturningAdvice;

import com.spring.po.Users;

public class MyAfter implements AfterReturningAdvice {

    @Override
    public void afterReturning(Object arg0, Method arg1, Object[] arg2, Object arg3) throws Throwable {
        Logger logger=Logger.getLogger(MyAfter.class);
        Users users=(Users)arg2[0];
        if(arg0!=null){
            logger.info(users.getUsername()+"登录成功!");
        }else {
            logger.info(users.getUsername()+"登录失败!");
        }

    }

}
MyBefore.java
package com.spring.advice;

import java.lang.reflect.Method;
import java.util.Date;

import org.apache.log4j.Logger;
import org.springframework.aop.MethodBeforeAdvice;

import com.spring.po.Users;

public class MyBefore implements MethodBeforeAdvice  {

    @Override
    public void before(Method arg0, Object[] arg1, Object arg2) throws Throwable {
        Users users=(Users)arg1[0];
        Logger logger=Logger.getLogger(MyBefore.class);
        logger.info(users.getUsername()+"在"+new Date().toLocaleString()+"进行登录");
    }

}
login.jsp
<%@ page language="java" import="java.util.*" pageEncoding="utf-8"%>

<!DOCTYPE HTML PUBLIC "-//W3C//DTD HTML 4.01 Transitional//EN">
<html>
  <head>
    <title>My JSP 'login.jsp' starting page</title>
  </head>

  <body>
  <form action="login" method="post">
      用户名:<input type="text" name="username"><br>
      密码:<input type="password" name="password"><br/>
      <input type="submit" value="登录">
  </form>
  </body>
</html>
运行
spring中加载properties文件
1.在src下新建xxx.properties文件
2.在spring配置文件中引入xmlns:context,在下面添加,如果需要加载多个配置文件,用逗号分隔
<context:property-placeholder location="classpath:xxx.properties"/>
3.添加了属性文件,并且在<beans>中开启自动注入,需要注意的地方
3.1 SqlSessionFactoryBean的id不能叫做sqlSessionFactory
3.2 修改扫描器(MapperScannerConfigurer),把原来ref引用替换value赋值,自动注入只能影响ref,不会影响value赋值
    <bean class="org.mybatis.spring.mapper.MapperScannerConfigurer">
        <!-- 要扫描的包 -->
        <property name="basePackage" value="com.spring.mapper"></property>
        <!-- 和Factory产生关系 -->
        <property name="sqlSessionFactoryBeanName" value="factory"></property>
    </bean>
4.在被spring管理的类通过@Value("${key}")取出properties中的内容
4.1添加注解扫描
<context:component-scan base-package="com.spring.service.impl"></context:component-scan>
4.2在类中添加
key和变量名可以不相同
变量类型任意,只要保证key对应的value能转换成这个类型就可以
示例
在上个项目中src下添加db.properties和second.properties
second.properties
my.demo=hello
my.demo1=123
db.properties
jdbc.driverClassName=com.mysql.jdbc.Driver
jdbc.url=jdbc:mysql://localhost:3306/test?serverTimezone=UTC
jdbc.username=root
jdbc.pwd=123456
修改UsersServiceImpl.java
package com.spring.service.impl;

import org.springframework.beans.factory.annotation.Value;

import com.spring.mapper.UsersMapper;
import com.spring.po.Users;
import com.spring.service.UsersService;

public class UsersServiceImpl implements UsersService {
    @Value("${my.demo}")
    private String test;

    @Value("${my.demo1}")
    private String test1;

    private UsersMapper usersMapper;

    public UsersMapper getUsersMapper() {
        return usersMapper;
    }

    public void setUsersMapper(UsersMapper usersMapper) {
        this.usersMapper = usersMapper;
    }

    @Override
    public Users login(Users users) {
        System.out.println("输出:"+test+"    "+test1);

        return usersMapper.selByUsers(users);
    }

}
修改applicationContext.xml
<?xml version="1.0" encoding="UTF-8"?>
<beans xmlns="http://www.springframework.org/schema/beans"
    xmlns:xsi="http://www.w3.org/2001/XMLSchema-instance"
    xmlns:aop="http://www.springframework.org/schema/aop"
    xmlns:context="http://www.springframework.org/schema/context"
    xsi:schemaLocation="http://www.springframework.org/schema/beans
        https://www.springframework.org/schema/beans/spring-beans.xsd
        http://www.springframework.org/schema/aop
        https://www.springframework.org/schema/aop/spring-aop.xsd
        http://www.springframework.org/schema/context
        https://www.springframework.org/schema/context/spring-context.xsd"
        default-autowire="byName">
    <context:property-placeholder location="classpath:db.properties,classpath:second.properties"/>
    <context:component-scan base-package="com.spring.service.impl"></context:component-scan>
    <!-- 数据源封装类,获取数据库连接  -->
    <bean id="dataSource" class="org.springframework.jdbc.datasource.DriverManagerDataSource">
        <property name="driverClassName" value="${jdbc.driverClassName}"></property>
        <property name="url" value="${jdbc.url}"></property>
        <property name="username" value="${jdbc.username}"></property>
        <property name="password" value="${jdbc.pwd}"></property>
    </bean>
    <!-- 创建SqlSessionFactory对象 -->
    <bean id="factory" class="org.mybatis.spring.SqlSessionFactoryBean">
        <!-- 数据库连接信息,来源于dataSouce -->
         <!-- <property name="dataSource" ref="dataSource"></property> -->
        <!-- 起别名 -->
        <property name="typeAliasesPackage" value="com.spring.po"></property>
    </bean>
    <!-- 扫描器相当于mybatis.xml中的Mapper下的backage标签 ,扫描com.spring.mapper后会给对应的接口创建对象-->
    <bean class="org.mybatis.spring.mapper.MapperScannerConfigurer">
        <!-- 要扫描的包 -->
        <property name="basePackage" value="com.spring.mapper"></property>
        <!-- 和Factory产生关系 -->
        <!-- <property name="sqlSessionFactory" ref="factory"></property> -->
        <property name="sqlSessionFactoryBeanName" value="factory"></property>
    </bean>
    <!-- 由spring管理service -->
    <bean id="usersService" class="com.spring.service.impl.UsersServiceImpl">
        <!-- <property name="usersMapper" ref="usersMapper"></property>  -->
    </bean>

    <bean id="mybefore" class="com.spring.advice.MyBefore"></bean>
    <bean id="myAfter" class="com.spring.advice.MyAfter"></bean>
    <!-- aop -->
    <aop:aspectj-autoproxy proxy-target-class="true"></aop:aspectj-autoproxy>
    <aop:config>
        <aop:pointcut expression="execution(* com.spring.service.impl.UsersServiceImpl.login(..))" id="mypoint"/>
        <aop:advisor advice-ref="mybefore" pointcut-ref="mypoint"/>
        <aop:advisor advice-ref="myAfter" pointcut-ref="mypoint"/>
    </aop:config>
</beans>
运行登录,控制台结果如下

scope属性
1.<bean>的属性
2.作用:控制对象有效范围(单例,多例)
3.<bean>标签对应的对象默认是单例的,无论获取多少次,都是一个对象
4.scope可取值
singleton 默认值,单例
prototype 多例,每次获取重新实例化
request 每次请求重新实例化
session 每次会话对象内,对象内是单例的
application 在application对象内是单例的
spring中常用的两种事务配置方式以及事务的传播性,隔离性
参考https://www.cnblogs.com/dj66194/p/7654555.html,感谢“还有梦”
spring中常用注解
1.@Component:创建类对象,相当于配置<bean>
2.@Service:与Component功能相同,写在serviceImpl类上
3.@Repository:与Component功能相同,写在数据访问层类上
4.@Controller:与Component功能相同,写在控制器类上
5.@Resource:不需要写对象的get/set,java中的注解,默认按照byName注入,如果没有名称对象,则按照byType注入,建议把对象名称和spring容器中对象名相同
6.@Autowired:不需要写对象的get/set,spring注解,默认按照byType注入
7.@Value():获取properties文件内容
8.@Pointcut():定义切点
9.@ASpect():定义切面类
10.@Before():前置通知
11.@Alter:后置通知
12.@AlterReturning:后置通知,切点须正确执行
13.@AlterThrowing:异常通知
14.@Around:环绕通知

 浙公网安备 33010602011771号