

SpringCloudConfig简单使用
动态修改配置文件信息,避免每次改动都需要发版的问题
SpringCloudConfig是一个分布式的配置管理方案,包含了server端和client两个部分,同时我们需要创建个git仓库,这个仓库就是放配置文件的信息,如下图所示

在我们完成了如图所示的操作后,现在开始创建服务端
1 2 3 4 5 6 7 8 9 10 11 12 13 14 15 16 17 18 19 20 21 22 23 24 25 26 27 28 29 30 31 32 33 34 35 36 37 38 39 40 41 42 43 44 45 46 47 48 49 50 51 52 53 54 55 56 57 58 59 60 61 62 | <?xml version="1.0" encoding="UTF-8"?><project xmlns="http://maven.apache.org/POM/4.0.0" xmlns:xsi="http://www.w3.org/2001/XMLSchema-instance" xsi:schemaLocation="http://maven.apache.org/POM/4.0.0 http://maven.apache.org/xsd/maven-4.0.0.xsd"> <modelVersion>4.0.0</modelVersion> <groupId>com.config</groupId> <artifactId>config-service</artifactId> <version>1.0-SNAPSHOT</version> <parent> <groupId>org.springframework.boot</groupId> <artifactId>spring-boot-starter-parent</artifactId> <version>2.2.1.RELEASE</version> <relativePath/> </parent> <dependencyManagement> <dependencies> <dependency> <groupId>org.springframework.cloud</groupId> <artifactId>spring-cloud-dependencies</artifactId> <version>Hoxton.SR3</version> <type>pom</type> <scope>import</scope> </dependency> <dependency> <groupId>com.alibaba.cloud</groupId> <artifactId>spring-cloud-alibaba-dependencies</artifactId> <version>2.1.0.RELEASE</version> <type>pom</type> <scope>import</scope> </dependency> </dependencies> </dependencyManagement> <dependencies> <!--客户端--> <dependency> <groupId>org.springframework.cloud</groupId> <artifactId>spring-cloud-starter-netflix-eureka-client</artifactId> </dependency> <!--config配置中⼼服务端--> <dependency> <groupId>org.springframework.cloud</groupId> <artifactId>spring-cloud-config-server</artifactId> </dependency> </dependencies> <build> <plugins> <plugin> <groupId>org.springframework.boot</groupId> <artifactId>spring-boot-maven-plugin</artifactId> </plugin> </plugins> <finalName>config</finalName> </build></project> |
1 2 3 4 5 6 7 8 9 10 11 12 13 14 15 16 17 18 19 20 | server.port=9006logging.level.com.config=debuglogging.level.web=debugspring.devtools.add-properties=falseeureka.client.service-url.defaultZone=http://xx:8762/eurekaeureka.instance.prefer-ip-address=truespring.application.name=lagou-service-autodeliverspring.cloud.config.server.git.uri=https://xx.com/xx/xx.gitspring.cloud.config.server.git.username=xxspring.cloud.config.server.git.password=xxspring.cloud.config.server.git.search-paths=-lagou-config-repospring.cloud.config.server.label=mastermanagement.endpoints.web.exposure.include=*management.endpoint.health.show-details=always |
1 2 3 4 5 6 7 8 9 10 11 12 13 14 15 16 17 18 19 20 21 22 23 24 25 26 | package com.config;import org.springframework.boot.SpringApplication;import org.springframework.boot.autoconfigure.SpringBootApplication;import org.springframework.cloud.client.discovery.EnableDiscoveryClient;import org.springframework.cloud.config.server.EnableConfigServer;/** * @Description: * @Author: Yourheart * @Create: 2022/10/21 17:29 */@SpringBootApplication/** * 开启配置服务器功能 */@EnableConfigServer/** * 开启服务发现 */@EnableDiscoveryClientpublic class ConfigApplication { public static void main(String[] args) { SpringApplication.run(ConfigApplication.class,args); }} |
到这里服务端的就创建完成了,下面开始客户端的
1 2 3 4 5 6 7 8 9 10 11 12 13 14 15 16 17 18 19 20 21 22 23 24 25 26 27 28 29 30 31 32 33 34 35 36 37 38 39 40 41 42 43 44 45 46 47 48 49 50 51 52 53 54 55 56 57 58 59 60 61 62 63 64 65 66 67 68 69 70 71 72 73 | <?xml version="1.0" encoding="UTF-8"?><project xmlns="http://maven.apache.org/POM/4.0.0" xmlns:xsi="http://www.w3.org/2001/XMLSchema-instance" xsi:schemaLocation="http://maven.apache.org/POM/4.0.0 https://maven.apache.org/xsd/maven-4.0.0.xsd"> <modelVersion>4.0.0</modelVersion> <parent> <groupId>org.springframework.boot</groupId> <artifactId>spring-boot-starter-parent</artifactId> <version>2.2.1.RELEASE</version> <relativePath/> </parent> <groupId>com.java</groupId> <artifactId>pingan</artifactId> <version>0.0.1-SNAPSHOT</version> <name>pingan</name> <description>Demo project for Spring Boot</description> <properties> <java.version>1.8</java.version> <skipTests>true</skipTests> </properties> <dependencyManagement> <dependencies> <dependency> <groupId>org.springframework.cloud</groupId> <artifactId>spring-cloud-dependencies</artifactId> <version>Hoxton.SR3</version> <type>pom</type> <scope>import</scope> </dependency> <dependency> <groupId>com.alibaba.cloud</groupId> <artifactId>spring-cloud-alibaba-dependencies</artifactId> <version>2.1.0.RELEASE</version> <type>pom</type> <scope>import</scope> </dependency> </dependencies> </dependencyManagement> <dependencies> <!--客户端--> <dependency> <groupId>org.springframework.cloud</groupId> <artifactId>spring-cloud-starter-netflix-eureka-client</artifactId> </dependency> <!--tomcat容器--> <dependency> <groupId>org.springframework.boot</groupId> <artifactId>spring-boot-starter-web</artifactId> </dependency> <!--Config 客户端依赖--> <dependency> <groupId>org.springframework.cloud</groupId> <artifactId>spring-cloud-config-client</artifactId> </dependency> </dependencies> <build> <plugins> <plugin> <groupId>org.springframework.boot</groupId> <artifactId>spring-boot-maven-plugin</artifactId> </plugin> </plugins> <finalName>xx</finalName> </build></project> |
1 2 3 4 5 6 7 8 9 10 11 12 13 14 15 16 17 18 19 20 | package com.java;import org.springframework.boot.SpringApplication;import org.springframework.boot.autoconfigure.SpringBootApplication;import org.springframework.cloud.client.discovery.EnableDiscoveryClient;/** * @Description: * @Author: Yourheart * @Create: 2022/10/22 20:59 */@SpringBootApplication@EnableDiscoveryClientpublic class LagouResumeApplication { public static void main(String[] args) { SpringApplication.run(LagouResumeApplication.class,args); }} |
1 2 3 4 5 6 7 8 9 10 | server.port=8001spring.cloud.config.name=local-servicespring.cloud.config.profile=test#分支名称spring.cloud.config.label=master#配置中心地址spring.cloud.config.uri=http://127.0.0.1:9006management.endpoints.web.exposure.include=* |
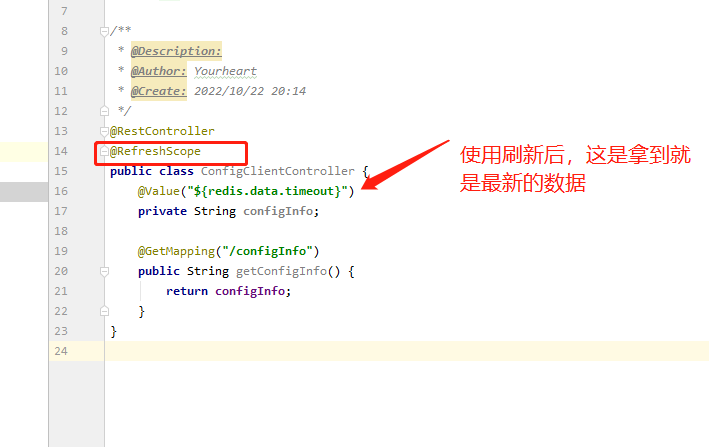
如果我们git修改的文件生效,需要使用@RefreshScope,使用方式如下图所示
刷新地址http://localhost:8080/actuator/refresh
以上完成是手动刷新配置信息


【推荐】国内首个AI IDE,深度理解中文开发场景,立即下载体验Trae
【推荐】编程新体验,更懂你的AI,立即体验豆包MarsCode编程助手
【推荐】抖音旗下AI助手豆包,你的智能百科全书,全免费不限次数
【推荐】轻量又高性能的 SSH 工具 IShell:AI 加持,快人一步
· TypeScript + Deepseek 打造卜卦网站:技术与玄学的结合
· Manus的开源复刻OpenManus初探
· AI 智能体引爆开源社区「GitHub 热点速览」
· C#/.NET/.NET Core技术前沿周刊 | 第 29 期(2025年3.1-3.9)
· 从HTTP原因短语缺失研究HTTP/2和HTTP/3的设计差异