mysql安装及配置
MySQL
1.安装 & 配置 & 启动
1.1 win系统
第1步:下载安装
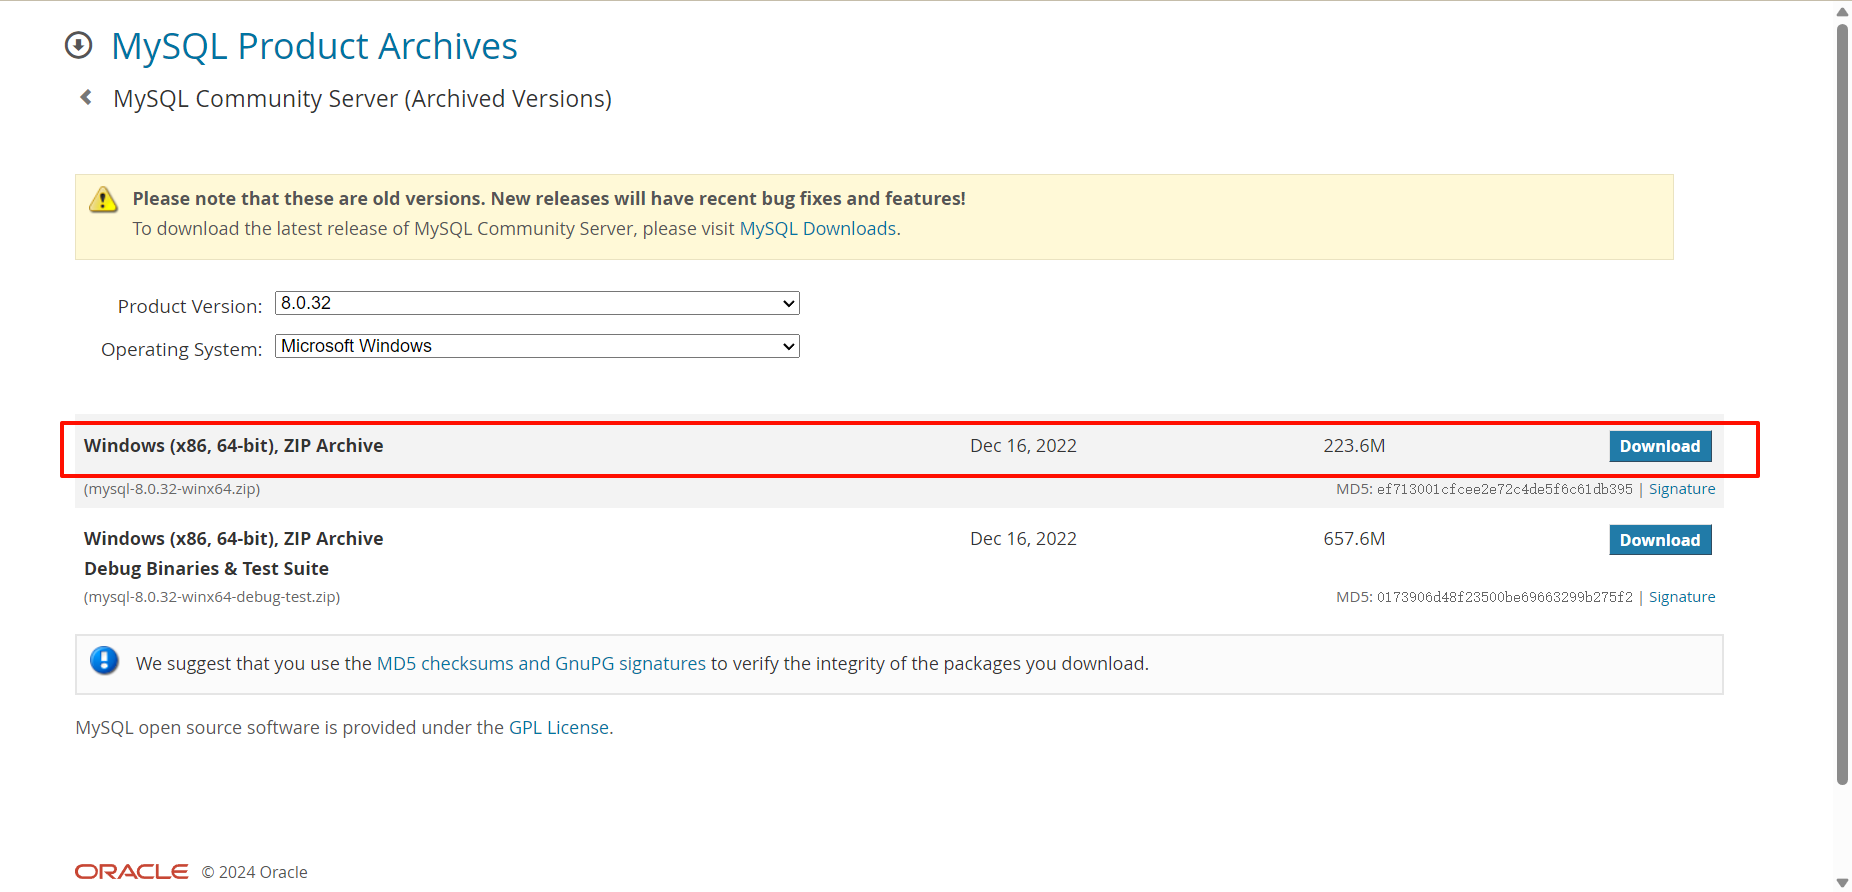
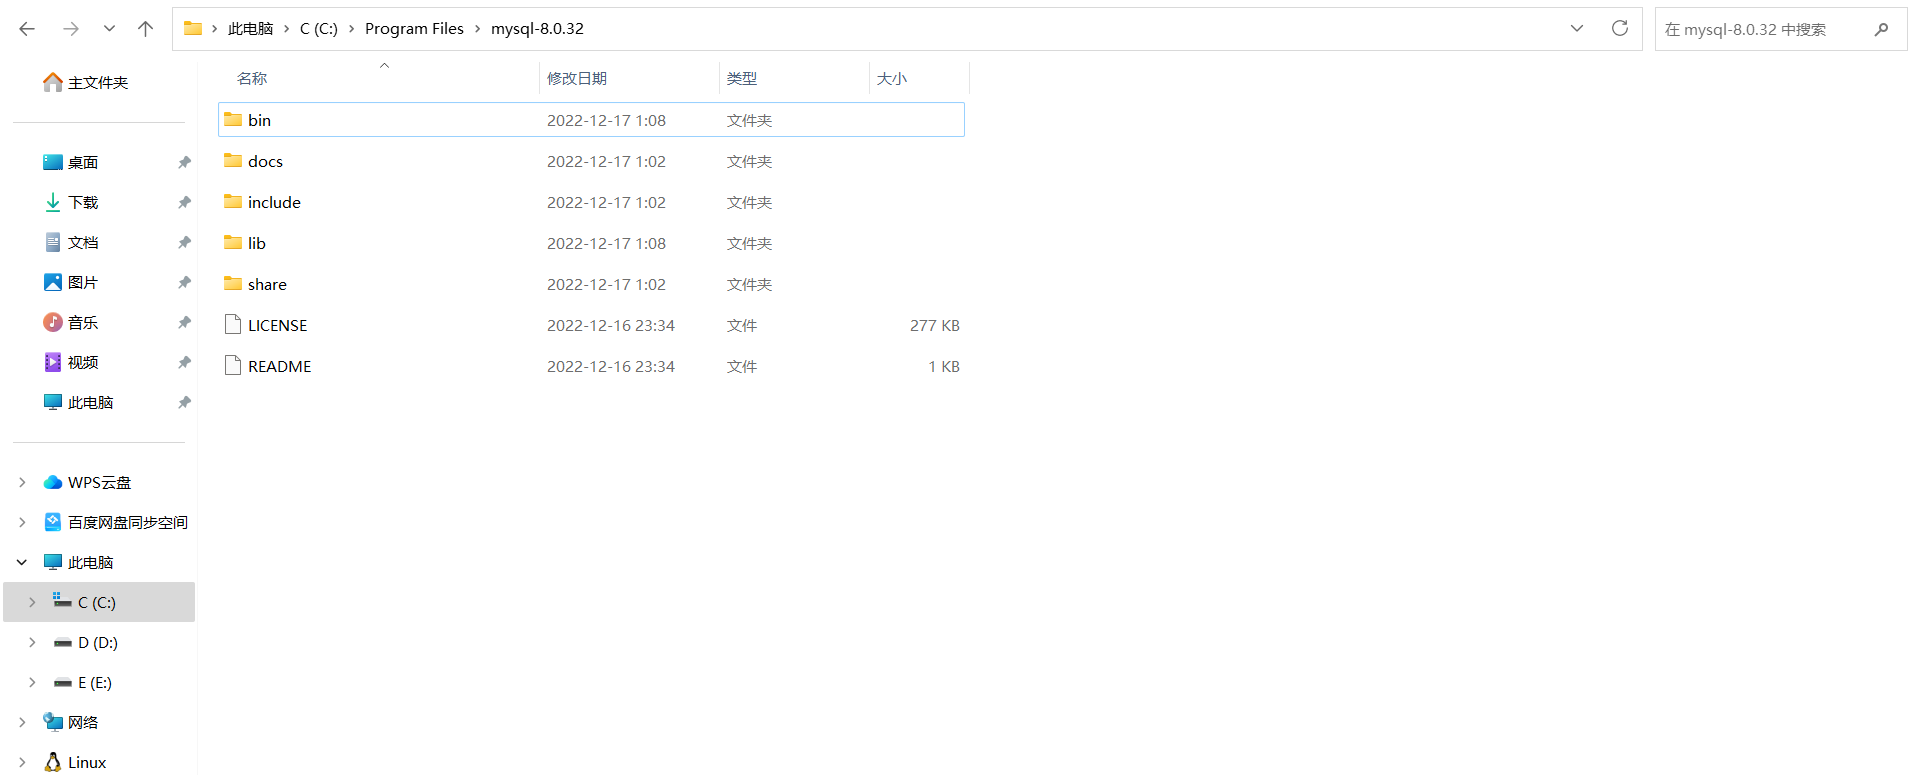
第2步:解压至任意文件夹
建议解压至软件安装目录【我一般习惯安装到C盘根目录,方便查找】
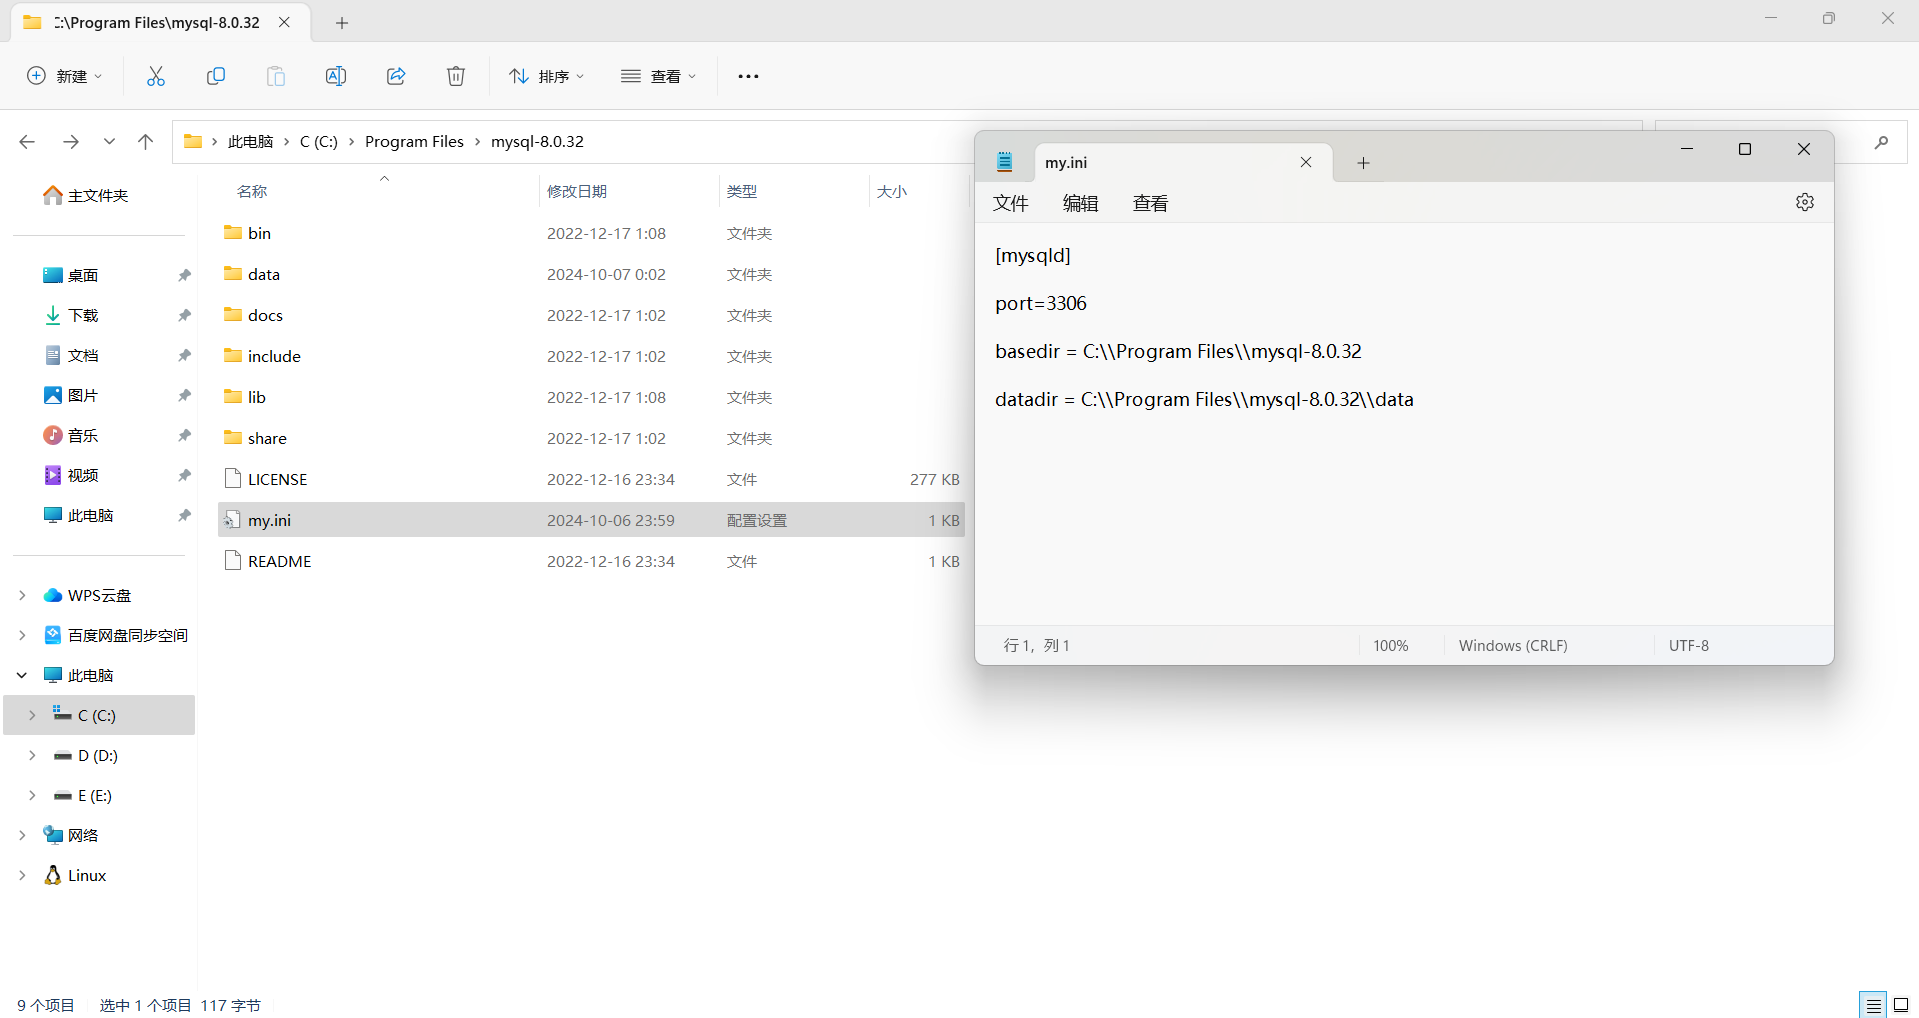
第3步:创建配置文件
在MySQL的安装目录下创建 my.ini 的文件,作为MySQL的配置文件。
[mysqld]

port=3306 【根据自己需求进行配置】

basedir = C:\\Program Files\\mysql-8.0.32【根据自己路径进行配置】

datadir = C:\\Program Files\\mysql-8.0.32\\data  【根据自己路径进行配置,没有data文件也这么写】
MySQL的配置文件可以放在很多的目录,下图是配置文件的优先级:
# 路径根据自己的来写
>>> C:\Users\Administrator>"C:\Program Files\mysql-8.0.32\bin\mysqld.exe" --help --verbose
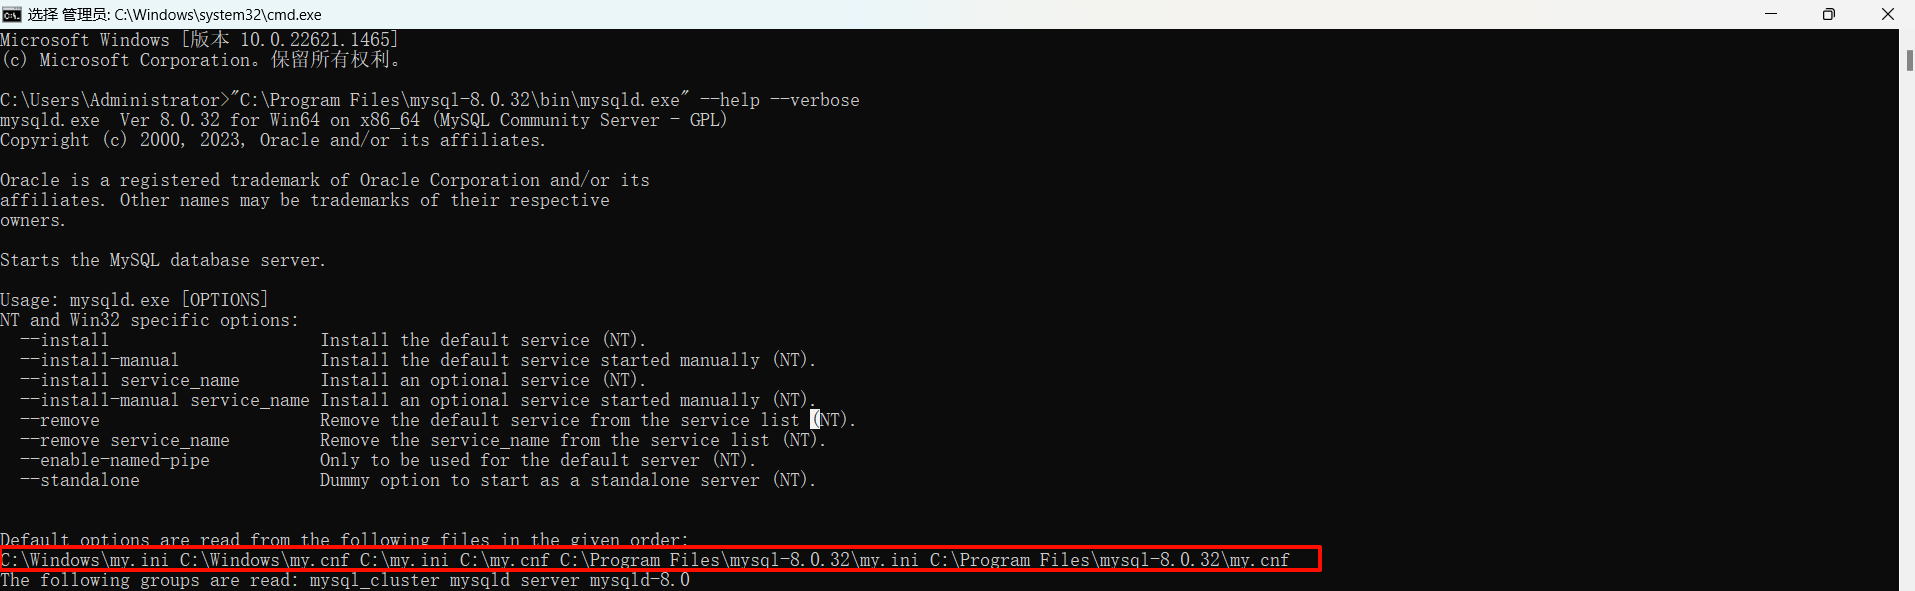
注意:
- 建议大家还是把配置文件放在MySQL安装目录下,这样以后电脑上想要安装多个版本的MySQL时,配置文件可以相互独立不影响。
- 如果你电脑的上述其他目录存在MySQL配置文件,建议删除,否则可能会影响MySQL的启动。
第4步:初始化
>>> "C:\Program Files\mysql-8.0.32\bin\mysqld.exe" --initialize-insecure
解释:加引号("")是因为Program后面是空格,如果不加""会把前半部分当做一个命令
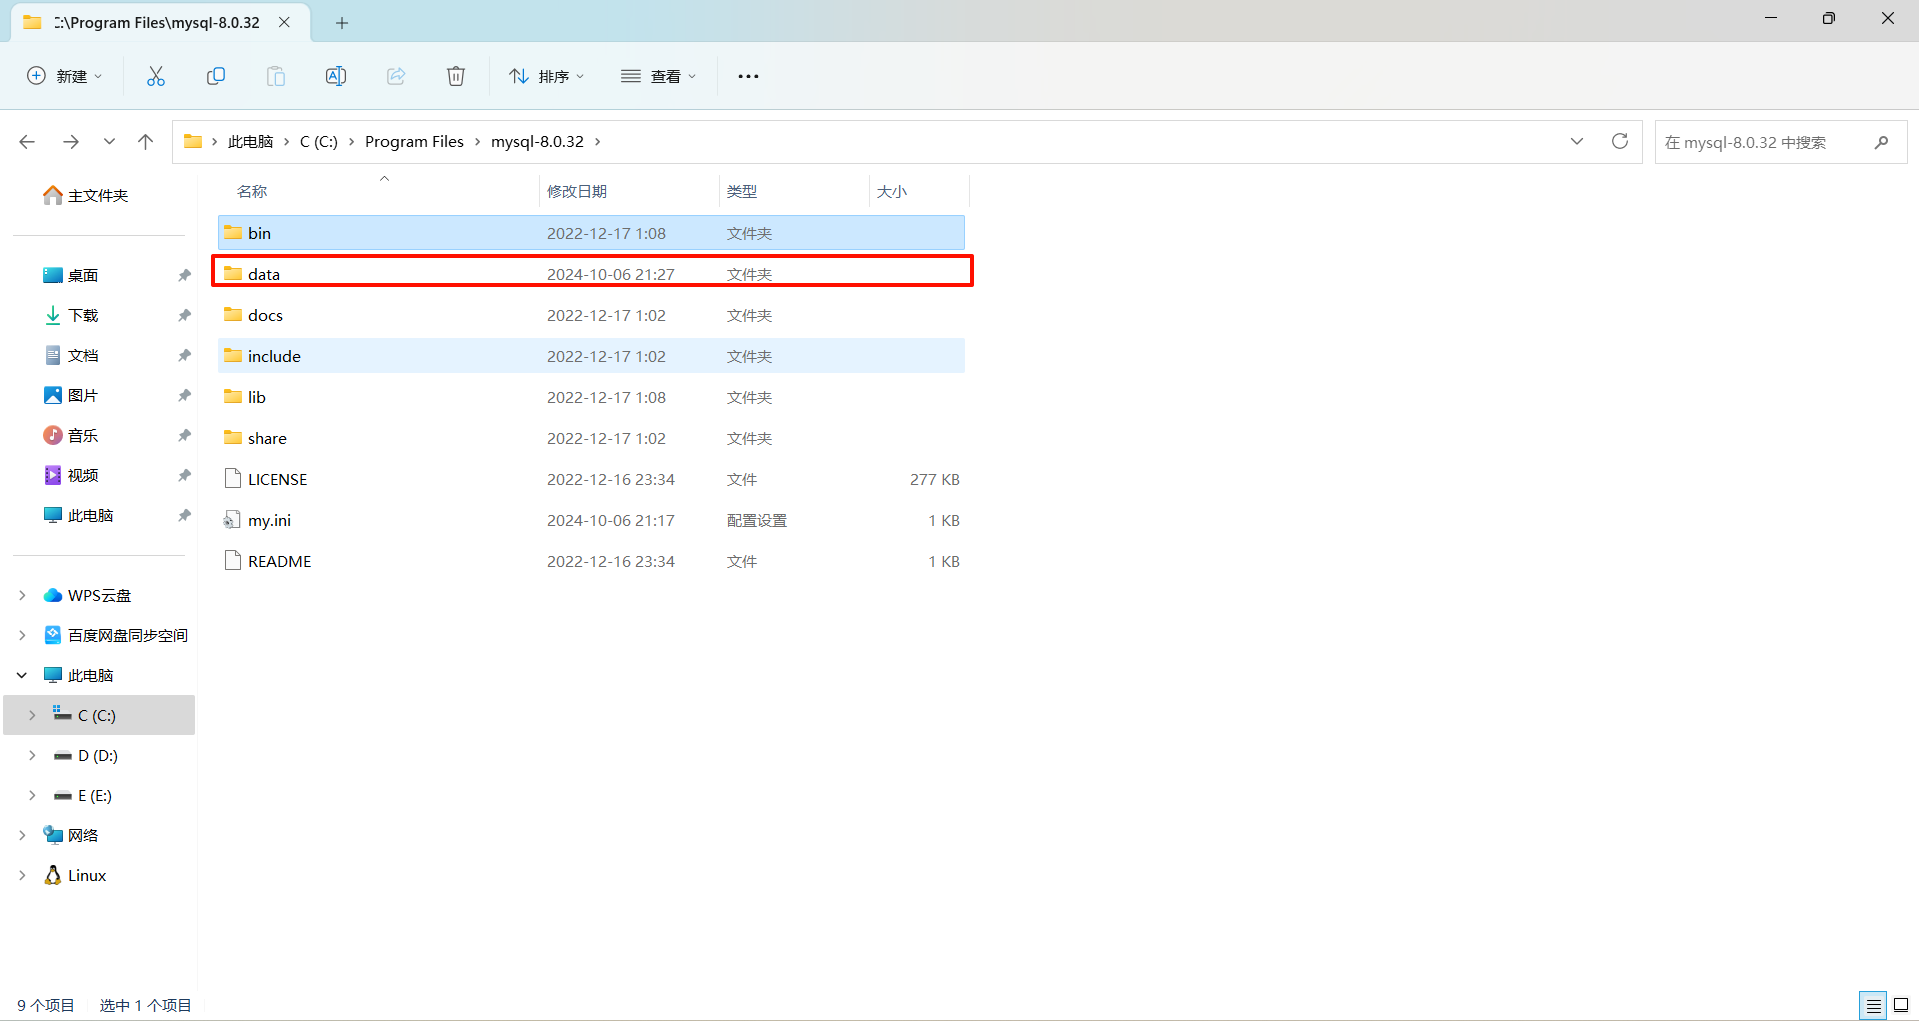
初始化命令在执行时,会自动读取配置文件并执行初始化,此过程主要会做两件事:
- 自动创建data目录,以后我们的数据都会存放在这个目录。
- 同时创建建必备一些的数据,例如默认账户 root (无密码),用于登录MySQL并通过指令操作MySQL。
发现创建了一个data文件夹
第5步:启动
启动MySQL常见的有两种方式:
-
临时启动
>>> "C:\Program Files\mysql-8.0.32\bin\mysqld.exe"注意:此时程序会挂起,内部就是可以接收客户端发来的MySQL指令,关闭窗口或Ctrl+c 就可以停止运行。
这种启动方式每次开机或想要开启都需要手动执行一遍命令比较麻烦。
-
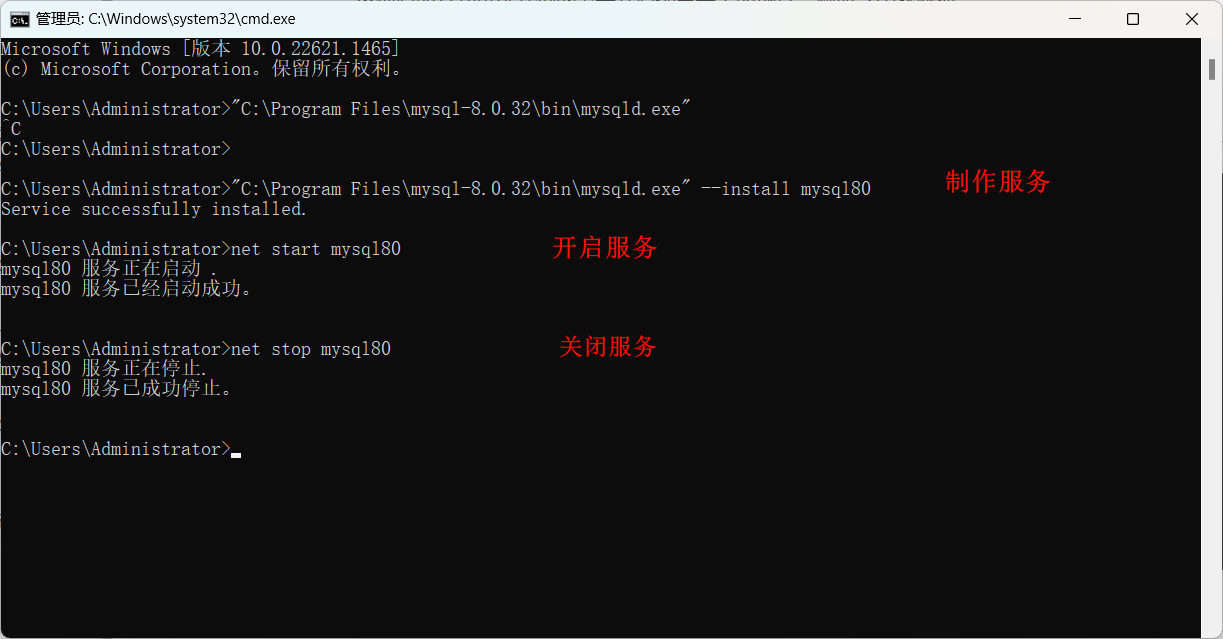
制作windows服务,基于windows服务管理。
>>> "C:\Program Files\mysql-8.0.32\bin\mysqld.exe" --install mysql80![]()
创建好服务之后,可以通过命令 启动和关闭服务,例如:
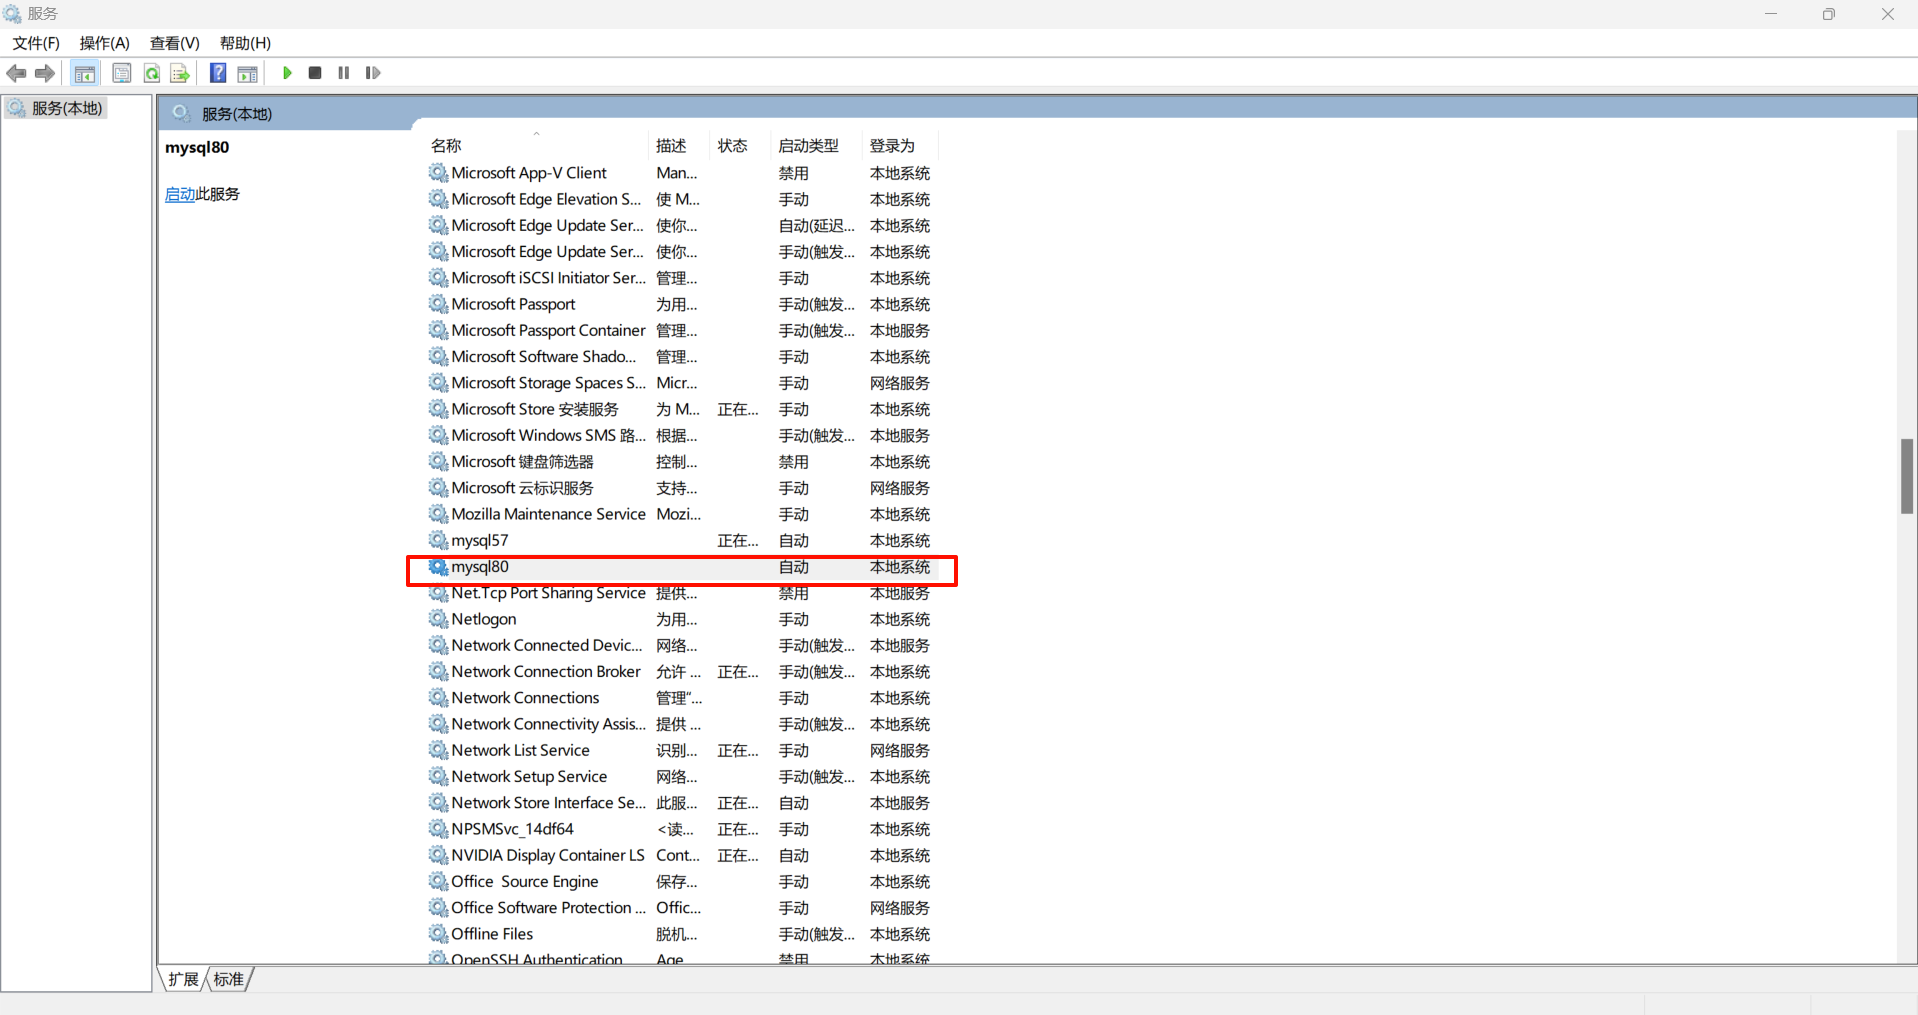
>>> net start mysql80
>>> net stop mysql80
也可以在window的服务管理中点击按钮启动和关闭服务。例如:
![]()
![]()
以后不再想要使用window服务了,也可以将制作的这个MySQL服务删除。
>>> "C:\Program Files\mysql-8.0.32\bin\mysqld.exe" --remove mysql80

第6步:测试连接MySQL
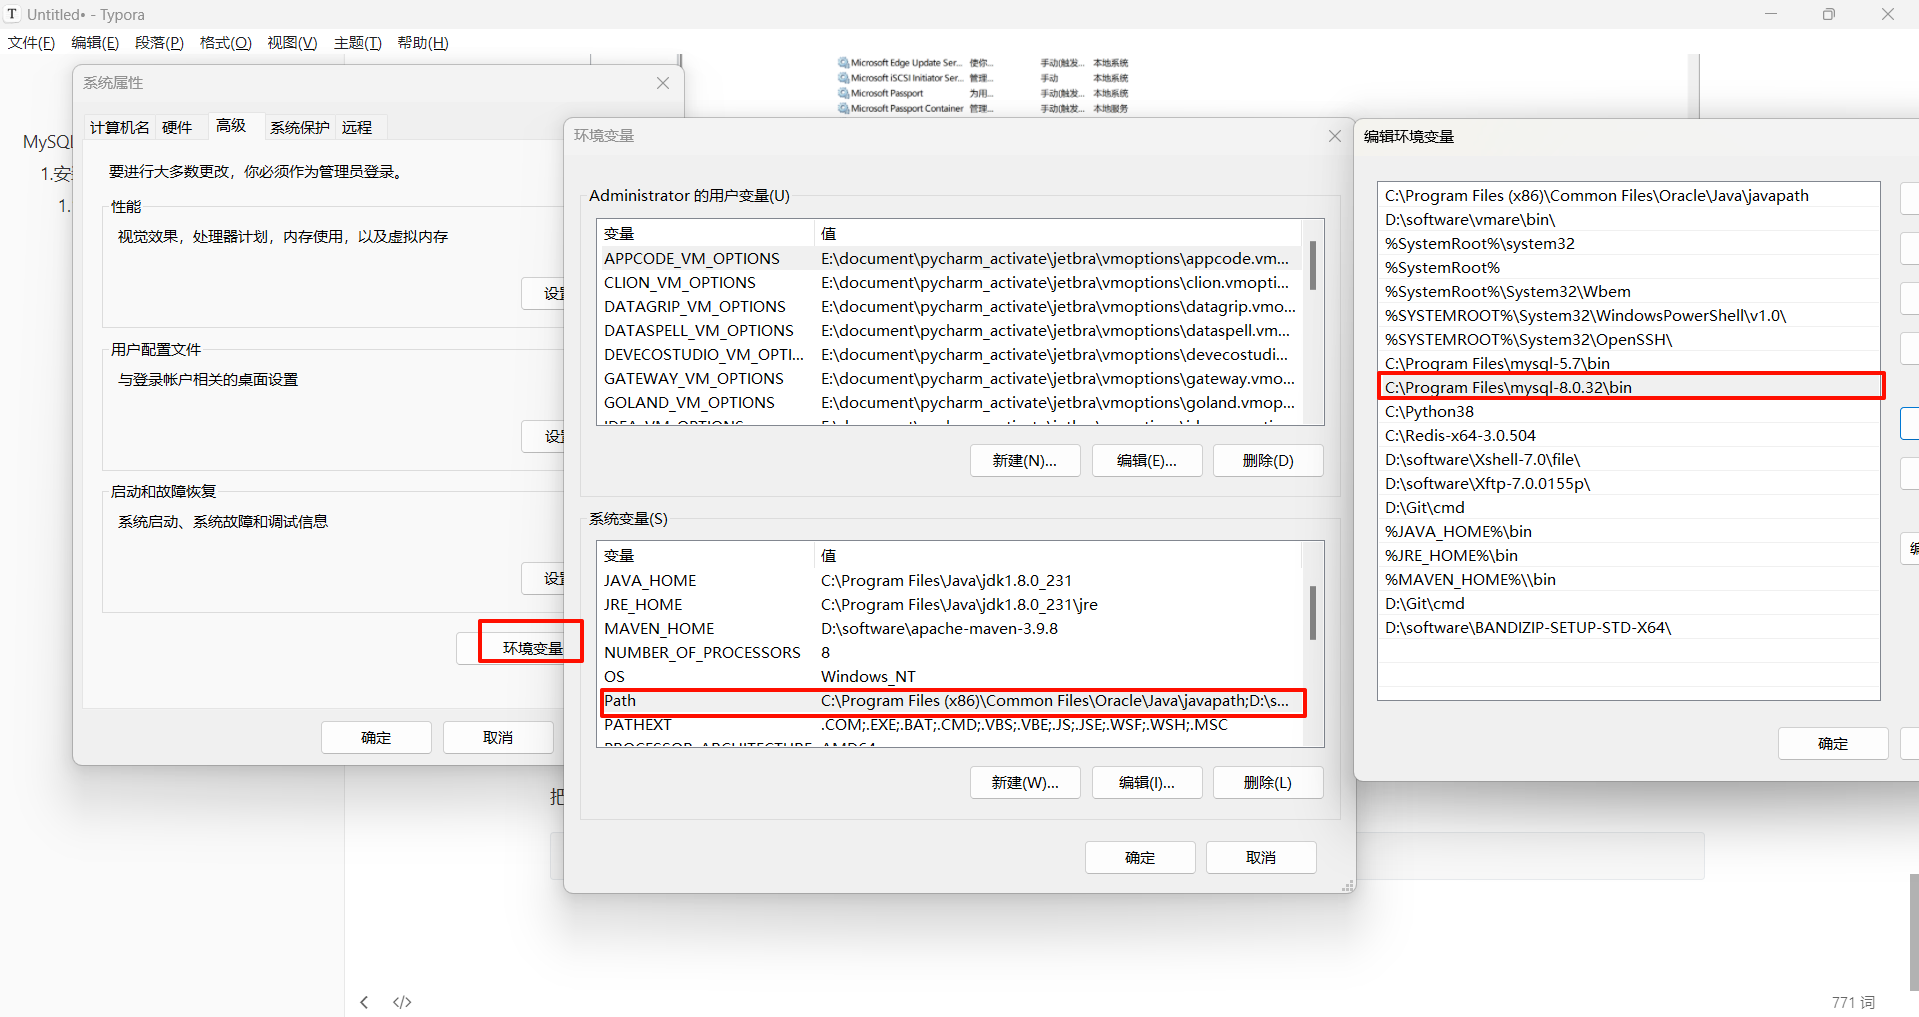
-
把bin目录加入环境变量
![]()
-
每次在运行时执行命令
mysql -u root -p -P3306
上述过程如果操作完成之后,证明你的安装和启动过程就搞定了。
1.2 linux系统
centos7.6 + mysql8.0.28
安装准备
把可能遗留的mariadb卸载掉,然后在下载libaio-devel依赖库,防止后续出现报错。
cd /opt/
yum install -y libncurses*
yum install -y libaio-devel
yum remove -y mariabd-libs
yum install wget -y
第1步:下载
方式1:下载到本地之后,然后再上传到服务器中。官网下载地址:https://dev.mysql.com/downloads/mysql/
方式2:命令行下载
cd /opt/
wget https://dev.mysql.com/get/Downloads/MySQL-8.0/mysql-8.0.33-linux-glibc2.12-x86_64.tar.xz
ll

[root@VM-16-12-centos opt]# wget https://dev.mysql.com/get/Downloads/MySQL-8.0/mysql-8.0.33-linux-glibc2.12-x86_64.tar.xz
[root@VM-16-12-centos opt]# ll
-rw-r--r--. 1 root root 614964216 Jun  9 17:56 mysql-8.0.33-linux-glibc2.12-x86_64.tar.xz
第2步:解压至指定目录
-
创建用户
useradd mysql -
创建数据存储的目录并给权限
cd /opt/ mkdir -p /data/mysql8/3306/data chown -R mysql.mysql /data/mysql8 -
解压缩安装包
cd /opt/
tar xf mysql-8.0.33-linux-glibc2.12-x86_64.tar.xz
ll
现在解压后的安装包所在的目录就是
/opt下的mysql-8.0.33-linux-glibc2.12-x86_64中。
第3步:配置文件
-
将安装包所在目录做一个软连接到
/usr/local/mysqlcd /opt/ ln -s /opt/mysql-8.0.33-linux-glibc2.12-x86_64 /usr/local/mysql ls -ltr /usr/local/mysql -
将
/usr/local/mysql添加到环境变量cd /opt/ echo "export PATH=/usr/local/mysql/bin:\$PATH" >> /etc/profile source /etc/profile mysql -V注意,如果输入
mysql -V没有返回版本号,则尝试删除软连接并且重新建立软连接的动作。 -
创建MySQL配置文件
vim /etc/my.cnf配置文件内容如下:
cat >/etc/my.cnf<<EOF

[mysqld]
user=mysql
port=3306
server_id=51
basedir=/usr/local/mysql
datadir=/data/mysql8/3306/data
socket=/tmp/mysql.sock

# 服务端字符集
character-set-server=utf8mb4
collation-server=utf8mb4_unicode_ci
init_connect='SET NAMES utf8mb4;'

[mysql]
# 客户端字符集
default-character-set=utf8mb4
socket=/tmp/mysql.sock

EOF
第4步:初始化
-
初始化
cd /opt/
mysqld --initialize-insecure --user=mysql --basedir=/usr/local/mysql --datadir=/data/mysql8/3306/data


[root@VM-16-12-centos opt]# vim /etc/my.cnf
[root@VM-16-12-centos opt]# mysqld --initialize-insecure --user=mysql --basedir=/usr/local/mysql --datadir=/data/mysql8/3306/data
2024-10-11T15:16:20.881239Z 0 [System] [MY-013169] [Server] /opt/mysql-8.0.33-linux-glibc2.12-x86_64/bin/mysqld (mysqld 8.0.33) initializing of server in progress as process 12906
2024-10-11T15:16:20.897126Z 1 [System] [MY-013576] [InnoDB] InnoDB initialization has started.
2024-10-11T15:16:22.243256Z 1 [System] [MY-013577] [InnoDB] InnoDB initialization has ended.
2024-10-11T15:16:24.284648Z 6 [Warning] [MY-010453] [Server] root@localhost is created with an empty password ! Please consider switching off the --initialize-insecure option.
初始化过程中没有
ERROR级别的错误,就说明初始化成功了。
第5步:启动
目前可以在任意目录下执行如下命令启动MySQL服务
mysqld &


[root@VM-16-12-centos opt]# mysqld &
[1] 13184
[root@VM-16-12-centos opt]# 2024-10-11T15:17:11.479121Z 0 [System] [MY-010116] [Server] /opt/mysql-8.0.33-linux-glibc2.12-x86_64/bin/mysqld (mysqld 8.0.33) starting as process 13184
2024-10-11T15:17:11.497315Z 1 [System] [MY-013576] [InnoDB] InnoDB initialization has started.
2024-10-11T15:17:11.806241Z 1 [System] [MY-013577] [InnoDB] InnoDB initialization has ended.
2024-10-11T15:17:12.320480Z 0 [Warning] [MY-010068] [Server] CA certificate ca.pem is self signed.
2024-10-11T15:17:12.320533Z 0 [System] [MY-013602] [Server] Channel mysql_main configured to support TLS. Encrypted connections are now supported for this channel.
2024-10-11T15:17:12.377043Z 0 [System] [MY-011323] [Server] X Plugin ready for connections. Bind-address: '::' port: 33060, socket: /tmp/mysqlx.sock
2024-10-11T15:17:12.377090Z 0 [System] [MY-010931] [Server] /opt/mysql-8.0.33-linux-glibc2.12-x86_64/bin/mysqld: ready for connections. Version: '8.0.33'  socket: '/tmp/mysql.sock'  port: 3306  MySQL Community Server - GPL.


[root@VM-16-12-centos opt]# mysql
Welcome to the MySQL monitor.  Commands end with ; or \g.
Your MySQL connection id is 9
Server version: 8.0.33 MySQL Community Server - GPL

Copyright (c) 2000, 2023, Oracle and/or its affiliates.

Oracle is a registered trademark of Oracle Corporation and/or its
affiliates. Other names may be trademarks of their respective
owners.

Type 'help;' or '\h' for help. Type '\c' to clear the current input statement.

mysql> show databases;
+--------------------+
| Database           |
+--------------------+
| information_schema |
| mysql              |
| performance_schema |
| sys                |
+--------------------+
4 rows in set (0.00 sec)

mysql> exit()
    -> ^C
mysql> exit
Bye
[root@VM-16-12-centos opt]#
启动成功 -> 说明安装过程都没问题。
但是该启动方式不方便,下面是更方便启动、重启、关闭MySQL服务的方式
MySQL服务几种启动方式【启动】
mysql.server
方式一:mysql安装成功后,安装目录中的support-files目录会有个mysql.server脚本文件,我们通过该文件来启动MySQL。
ls /usr/local/mysql/support-files
/usr/local/mysql/support-files/mysql.server stop
/usr/local/mysql/support-files/mysql.server start
/usr/local/mysql/support-files/mysql.server restart
/usr/local/mysql/support-files/mysql.server status


[root@VM-16-12-centos opt]# ls /usr/local/mysql/support-files
mysqld_multi.server  mysql-log-rotate  mysql.server

[root@VM-16-12-centos opt]# /usr/local/mysql/support-files/mysql.server stop
Shutting down MySQL2024-10-11T15:27:55.561708Z 0 [System] [MY-013172] [Server] Received SHUTDOWN from user <via user signal>. Shutting down mysqld (Version: 8.0.33).
..2024-10-11T15:27:57.570079Z 0 [Warning] [MY-010909] [Server] /opt/mysql-8.0.33-linux-glibc2.12-x86_64/bin/mysqld: Forcing close of thread 8  user: 'root'.
..2024-10-11T15:27:58.634128Z 0 [System] [MY-010910] [Server] /opt/mysql-8.0.33-linux-glibc2.12-x86_64/bin/mysqld: Shutdown complete (mysqld 8.0.33)  MySQL Community Server - GPL.
 SUCCESS!
[1]+  Done                    mysqld

[root@VM-16-12-centos opt]# /usr/local/mysql/support-files/mysql.server start
Starting MySQL.Logging to '/data/mysql8/3306/data/VM-16-12-centos.err'.
. SUCCESS!

[root@VM-16-12-centos opt]# /usr/local/mysql/support-files/mysql.server status
 SUCCESS! MySQL running (16975)
方式二:制作service脚本来启动MySQL服务
cp /usr/local/mysql/support-files/mysql.server /etc/init.d/mysqld
service mysqld start
service mysqld stop
service mysqld restart
service mysqld status

[root@VM-16-12-centos opt]# service mysqld stop
Shutting down MySQL. SUCCESS!
[root@VM-16-12-centos opt]# service mysqld start
Starting MySQL.. SUCCESS!
[root@VM-16-12-centos opt]# service mysqld status
 SUCCESS! MySQL running (19716)
方式三:通过systemctl来管理MySQL服务
cp /usr/local/mysql/support-files/mysql.server /etc/init.d/mysqld
systemctl enable mysqld
systemctl restart mysqld
systemctl status mysqld
systemctl daemon-reload

# 注意:该命令执行过就不用执行了
	cp /usr/local/mysql/support-files/mysql.server /etc/init.d/mysqld

# 下面这三条命令必须执行
systemctl enable mysqld
systemctl restart mysqld
systemctl status mysqld


[root@VM-16-12-centos opt]# systemctl enable mysqld
mysqld.service is not a native service, redirecting to /sbin/chkconfig.
Executing /sbin/chkconfig mysqld on

[root@VM-16-12-centos opt]# systemctl restart mysqld
[root@VM-16-12-centos opt]# systemctl status mysqld
● mysqld.service - LSB: start and stop MySQL
   Loaded: loaded (/etc/rc.d/init.d/mysqld; bad; vendor preset: disabled)
   Active: active (running) since Fri 2024-10-11 23:40:46 CST; 22s ago
     Docs: man:systemd-sysv-generator(8)
  Process: 21222 ExecStart=/etc/rc.d/init.d/mysqld start (code=exited, status=0/SUCCESS)
   CGroup: /system.slice/mysqld.service
           ├─21233 /bin/sh /usr/local/mysql/bin/mysqld_safe --datadir=/data/mysql8/3306/data --pid-file=/data/mysql8/3306/data/VM-16-12-centos.pid
           └─21413 /usr/local/mysql/bin/mysqld --basedir=/usr/local/mysql --datadir=/data/mysql8/3306/data --plugin-dir=/usr/local/mysql/lib/plugin --user=mysql --log-error=VM-16-12-ce...

Oct 11 23:40:44 VM-16-12-centos systemd[1]: Starting LSB: start and stop MySQL...
Oct 11 23:40:46 VM-16-12-centos mysqld[21222]: Starting MySQL.. SUCCESS!
Oct 11 23:40:46 VM-16-12-centos systemd[1]: Started LSB: start and stop MySQL.
[root@VM-16-12-centos opt]#
用户管理相关
初始化成功之后,MySQL默认创建了一个本地用户root用户,且该用户是无密码的,所以我们要为这个用户添加密码。
而且这个root用户通常只能管理员登录到服务器中才能使用的,大家要给应用程序单独创建一个普通权限的用户。
注意:mysql5.xx版本和mysql.xx版本修改密码有所不同,搜的时候带上版本
接下来就两件事
-
为root用户添加密码
# 为root账号添加密码。localhost表示只允许本地连接,不支持navicat等远程工具的连接 alter user root@"localhost" identified with mysql_native_password by "123"; -
通过该用户来管理其它用户和权限
# 创建一个普通用户。%表示既支持本地也支持远程工具的连接
# create user 用户名@'%' identified with mysql_native_password by "密码";
create user gaotao@'%' identified with mysql_native_password by "123";

# 给用户授权
# grant all/select/delete/update on 库.表 to gaotao@"%"; 给某个用户对某个库中的某表赋予xx权限
grant all on *.* to gaotao@"%";

 浙公网安备 33010602011771号