shiro框架学习以及整合spring
一、Shiro框架简单介绍
Apache Shiro是Java的一个安全框架,旨在简化身份验证和授权。Shiro在JavaSE和JavaEE项目中都可以使用。它主要用来处理身份认证,授权,企业会话管理和加密等。Shiro的具体功能点如下:
(1)身份认证/登录,验证用户是不是拥有相应的身份;
(2)授权,即权限验证,验证某个已认证的用户是否拥有某个权限;即判断用户是否能做事情,常见的如:验证某个用户是否拥有某个角色。或者细粒度的验证某个用户对某个资源是否具有某个权限;
(3)会话管理,即用户登录后就是一次会话,在没有退出之前,它的所有信息都在会话中;会话可以是普通JavaSE环境的,也可以是如Web环境的;
(4)加密,保护数据的安全性,如密码加密存储到数据库,而不是明文存储;
(5)Web支持,可以非常容易的集成到Web环境;
Caching:缓存,比如用户登录后,其用户信息、拥有的角色/权限不必每次去查,这样可以提高效率;
(6)shiro支持多线程应用的并发验证,即如在一个线程中开启另一个线程,能把权限自动传播过去;
(7)提供测试支持;
(8)允许一个用户假装为另一个用户(如果他们允许)的身份进行访问;
(9)记住我,这个是非常常见的功能,即一次登录后,下次再来的话不用登录了。
Shiro的主要框架图:
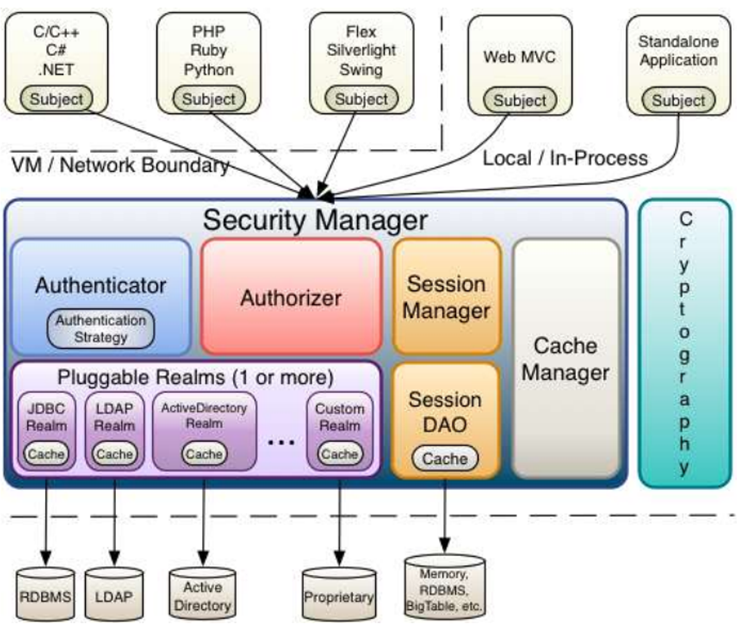
对一些其中的方法的简单说明:
Subject
Subject即主体,外部应用与subject进行交互,subject记录了当前操作用户,将用户的概念理解为当前操作的主体,可能是一个通过浏览器请求的用户,也可能是一个运行的程序。 Subject在shiro中是一个接口,接口中定义了很多认证授相关的方法,外部程序通过subject进行认证授,而subject是通过SecurityManager安全管理器进行认证授权
Authenticator
Authenticator即认证器,对用户身份进行认证,Authenticator是一个接口,shiro提供ModularRealmAuthenticator实现类,通过ModularRealmAuthenticator基本上可以满足大多数需求,也可以自定义认证器。
Authorizer
Authorizer即授权器,用户通过认证器认证通过,在访问功能时需要通过授权器判断用户是否有此功能的操作权限。
realm
Realm即领域,相当于datasource数据源,securityManager进行安全认证需要通过Realm获取用户权限数据,比如:如果用户身份数据在数据库那么realm就需要从数据库获取用户身份信息。
注意:不要把realm理解成只是从数据源取数据,在realm中还有认证授权校验的相关的代码。
sessionManager
sessionManager即会话管理,shiro框架定义了一套会话管理,它不依赖web容器的session,所以shiro可以使用在非web应用上,也可以将分布式应用的会话集中在一点管理,此特性可使它实现单点登录。
SessionDAO
SessionDAO即会话dao,是对session会话操作的一套接口,比如要将session存储到数据库,可以通过jdbc将会话存储到数据库。
CacheManager
CacheManager即缓存管理,将用户权限数据存储在缓存,这样可以提高性能。
Cryptography
Cryptography即密码管理,shiro提供了一套加密/解密的组件,方便开发。比如提供常用的散列、加/解密等功能。
二、shiro认证与授权的在Web中实现
第一步:添加jar包

第二步:配置web.xml
    <!-- shiro的filter -->
    <!-- shiro过虑器,DelegatingFilterProxy通过代理模式将spring容器中的bean和filter关联起来 -->
    <filter>
        <filter-name>shiroFilter</filter-name>
        <filter-class>org.springframework.web.filter.DelegatingFilterProxy</filter-class>
        <!-- 设置true由servlet容器控制filter的生命周期 -->
        <init-param>
            <param-name>targetFilterLifecycle</param-name>
            <param-value>true</param-value>
        </init-param>
        <!-- 设置spring容器filter的bean id,如果不设置则找与filter-name一致的bean-->
        <init-param>
            <param-name>targetBeanName</param-name>
            <param-value>shiroFilter</param-value>
        </init-param>
    </filter>
    <filter-mapping>
        <filter-name>shiroFilter</filter-name>
        <url-pattern>/*</url-pattern>
    </filter-mapping>
第三步:配置spring-shiro.xml
<beans xmlns="http://www.springframework.org/schema/beans"
    xmlns:xsi="http://www.w3.org/2001/XMLSchema-instance" xmlns:mvc="http://www.springframework.org/schema/mvc"
    xmlns:context="http://www.springframework.org/schema/context"
    xmlns:aop="http://www.springframework.org/schema/aop" xmlns:tx="http://www.springframework.org/schema/tx"
    xsi:schemaLocation="http://www.springframework.org/schema/beans
        http://www.springframework.org/schema/beans/spring-beans-3.2.xsd
        http://www.springframework.org/schema/mvc
        http://www.springframework.org/schema/mvc/spring-mvc-3.2.xsd
        http://www.springframework.org/schema/context
        http://www.springframework.org/schema/context/spring-context-3.2.xsd
        http://www.springframework.org/schema/aop
        http://www.springframework.org/schema/aop/spring-aop-3.2.xsd
        http://www.springframework.org/schema/tx
        http://www.springframework.org/schema/tx/spring-tx-3.2.xsd ">

<!-- web.xml中shiro的filter对应的bean -->
<!-- Shiro 的Web过滤器 -->
    <bean id="shiroFilter" class="org.apache.shiro.spring.web.ShiroFilterFactoryBean">
        <property name="securityManager" ref="securityManager" />
        <!-- loginUrl认证提交地址,如果没有认证将会请求此地址进行认证,请求此地址将由formAuthenticationFilter进行表单认证 -->
        <property name="loginUrl" value="/login.action" />
        <!-- 认证成功统一跳转到first.action,建议不配置,shiro认证成功自动到上一个请求路径 -->
        <property name="successUrl" value="/first.action"/>
        <!-- 通过unauthorizedUrl指定没有权限操作时跳转页面-->
        <property name="unauthorizedUrl" value="/refuse.jsp" />
        <!-- 自定义filter配置 -->
        <property name="filters">
            <map>
                <!-- 将自定义 的FormAuthenticationFilter注入shiroFilter中-->
                <entry key="authc" value-ref="formAuthenticationFilter" />
            </map>
        </property>

        <!-- 过虑器链定义,从上向下顺序执行,一般将/**放在最下边 -->
        <property name="filterChainDefinitions">
            <value>
                <!-- 对静态资源设置匿名访问 -->
                /images/** = anon
                /js/** = anon
                /styles/** = anon
                <!-- 验证码,可匿名访问 -->
                /validatecode.jsp = anon

                <!-- 请求 logout.action地址,shiro去清除session-->
                /logout.action = logout
                <!--商品查询需要商品查询权限 ,取消url拦截配置,使用注解授权方式 -->
                <!-- /items/queryItems.action = perms[item:query]
                /items/editItems.action = perms[item:edit] -->
                <!-- 配置记住我或认证通过可以访问的地址 -->
                /index.jsp  = user
                /first.action = user
                /welcome.jsp = user
                <!-- /** = authc 所有url都必须认证通过才可以访问-->
                /** = authc
                <!-- /** = anon所有url都可以匿名访问 -->

            </value>
        </property>
    </bean>

<!-- securityManager安全管理器 -->
<bean id="securityManager" class="org.apache.shiro.web.mgt.DefaultWebSecurityManager">
        <property name="realm" ref="customRealm" />
        <!-- 注入缓存管理器 -->
        <property name="cacheManager" ref="cacheManager"/>
        <!-- 注入session管理器 -->
        <property name="sessionManager" ref="sessionManager" />
        <!-- 记住我 -->
        <property name="rememberMeManager" ref="rememberMeManager"/>

    </bean>

<!-- realm -->
<bean id="customRealm" class="cn.itcast.ssm.shiro.CustomRealm">
    <!-- 将凭证匹配器设置到realm中,realm按照凭证匹配器的要求进行散列 -->
    <property name="credentialsMatcher" ref="credentialsMatcher"/>
</bean>

<!-- 凭证匹配器 -->
<bean id="credentialsMatcher"
    class="org.apache.shiro.authc.credential.HashedCredentialsMatcher">
    <property name="hashAlgorithmName" value="md5" />
    <property name="hashIterations" value="1" />
</bean>

<!-- 缓存管理器 -->
<bean id="cacheManager" class="org.apache.shiro.cache.ehcache.EhCacheManager">
        <property name="cacheManagerConfigFile" value="classpath:shiro-ehcache.xml"/>
    </bean>

<!-- 会话管理器 -->
    <bean id="sessionManager" class="org.apache.shiro.web.session.mgt.DefaultWebSessionManager">
        <!-- session的失效时长,单位毫秒 -->
        <property name="globalSessionTimeout" value="600000"/>
        <!-- 删除失效的session -->
        <property name="deleteInvalidSessions" value="true"/>
    </bean>

<!-- 自定义form认证过虑器 -->
<!-- 基于Form表单的身份验证过滤器,不配置将也会注册此过虑器,表单中的用户账号、密码及loginurl将采用默认值,建议配置 -->
    <bean id="formAuthenticationFilter"
    class="cn.itcast.ssm.shiro.CustomFormAuthenticationFilter ">
        <!-- 表单中账号的input名称 -->
        <property name="usernameParam" value="username" />
        <!-- 表单中密码的input名称 -->
        <property name="passwordParam" value="password" />
        <!-- 记住我input的名称 -->
        <property name="rememberMeParam" value="rememberMe"/>
 </bean>

<!-- rememberMeManager管理器,写cookie,取出cookie生成用户信息 -->
    <bean id="rememberMeManager" class="org.apache.shiro.web.mgt.CookieRememberMeManager">
        <property name="cookie" ref="rememberMeCookie" />
    </bean>
    <!-- 记住我cookie -->
    <bean id="rememberMeCookie" class="org.apache.shiro.web.servlet.SimpleCookie">
        <!-- rememberMe是cookie的名字 -->
        <constructor-arg value="rememberMe" />
        <!-- 记住我cookie生效时间30天 -->
        <property name="maxAge" value="2592000" />
    </bean>


</beans>
securityManager: 这个属性是必须的。
loginUrl: 没有登录的用户请求需要登录的页面时自动跳转到登录页面,不是必须的属性,不输入地址的话会自动寻找项目web项目的根目录下的”/login.jsp”页面。
successUrl: 登录成功默认跳转页面,不配置则跳转至”/”。如果登陆前点击的一个需要登录的页面,则在登录自动跳转到那个需要登录的页面。不跳转到此。
unauthorizedUrl: 没有权限默认跳转的页面。
Shiro中默认的过滤器:
| 过滤器名称 | 过滤器类 | 描述 |
| anon | org.apache.shiro.web.filter.authc.AnonymousFilter | 匿名过滤器 |
| authc | org.apache.shiro.web.filter.authc.FormAuthenticationFilter | 如果继续操作,需要做对应的表单验证否则不能通过 |
| authcBasic | org.apache.shiro.web.filter.authc.BasicHttpAuthenticationFilter | 基本http验证过滤,如果不通过,跳转屋登录页面 |
| logout | org.apache.shiro.web.filter.authc.LogoutFilter | 登录退出过滤器 |
| noSessionCreation | org.apache.shiro.web.filter.session.NoSessionCreationFilter | 没有session创建过滤器 |
| perms | org.apache.shiro.web.filter.authz.PermissionsAuthorizationFilter | 权限过滤器 |
| port | org.apache.shiro.web.filter.authz.PortFilter | 端口过滤器,可以设置是否是指定端口如果不是跳转到登录页面 |
| rest | org.apache.shiro.web.filter.authz.HttpMethodPermissionFilter | http方法过滤器,可以指定如post不能进行访问等 |
| roles | org.apache.shiro.web.filter.authz.RolesAuthorizationFilter | 角色过滤器,判断当前用户是否指定角色 |
| ssl | org.apache.shiro.web.filter.authz.SslFilter | 请求需要通过ssl,如果不是跳转回登录页 |
| user | org.apache.shiro.web.filter.authc.UserFilter | 如果访问一个已知用户,比如记住我功能,走这个过滤器 |
第四步:自定义Realm 继承AuthorizingRealm 重写 AuthorizationInfo(授权) 和 AuthenticationInfo(认证)
public class CustomRealm extends AuthorizingRealm {

    //注入service
    @Autowired
    private SysService sysService;

    // 设置realm的名称
    @Override
    public void setName(String name) {
        super.setName("customRealm");
    }

    // 用于认证
    //没有连接数据库的方法
    /*@Override
    protected AuthenticationInfo doGetAuthenticationInfo(
            AuthenticationToken token) throws AuthenticationException {

        // token是用户输入的用户名和密码
        // 第一步从token中取出用户名
        String userCode = (String) token.getPrincipal();

        // 第二步:根据用户输入的userCode从数据库查询
        // ....


        // 如果查询不到返回null
        //数据库中用户账号是zhangsansan
        if(!userCode.equals("zhangsansan")){//
            return null;
        }


        // 模拟从数据库查询到密码
        String password = "111111";

        // 如果查询到返回认证信息AuthenticationInfo

        //activeUser就是用户身份信息
        ActiveUser activeUser = new ActiveUser();

        activeUser.setUserid("zhangsan");
        activeUser.setUsercode("zhangsan");
        activeUser.setUsername("张三");
        //..

        //根据用户id取出菜单
        //通过service取出菜单
        List<SysPermission> menus  = null;
        try {
            menus = sysService.findMenuListByUserId("zhangsan");
        } catch (Exception e) {
            // TODO Auto-generated catch block
            e.printStackTrace();
        }
        //将用户菜单 设置到activeUser
        activeUser.setMenus(menus);


        //将activeUser设置simpleAuthenticationInfo
        SimpleAuthenticationInfo simpleAuthenticationInfo = new SimpleAuthenticationInfo(
                activeUser, password, this.getName());

        return simpleAuthenticationInfo;
    }*/

    //realm的认证方法,从数据库查询用户信息
    @Override
    protected AuthenticationInfo doGetAuthenticationInfo(
            AuthenticationToken token) throws AuthenticationException {

        // token是用户输入的用户名和密码
        // 第一步从token中取出用户名
        String userCode = (String) token.getPrincipal();

        // 第二步:根据用户输入的userCode从数据库查询
        SysUser sysUser = null;
        try {
            sysUser = sysService.findSysUserByUserCode(userCode);
        } catch (Exception e1) {
            // TODO Auto-generated catch block
            e1.printStackTrace();
        }

        // 如果查询不到返回null
        if(sysUser==null){//
            return null;
        }
        // 从数据库查询到密码
        String password = sysUser.getPassword();

        //盐
        String salt = sysUser.getSalt();

        // 如果查询到返回认证信息AuthenticationInfo

        //activeUser就是用户身份信息
        ActiveUser activeUser = new ActiveUser();

        activeUser.setUserid(sysUser.getId());
        activeUser.setUsercode(sysUser.getUsercode());
        activeUser.setUsername(sysUser.getUsername());
        //..

        //根据用户id取出菜单
        List<SysPermission> menus  = null;
        try {
            //通过service取出菜单
            menus = sysService.findMenuListByUserId(sysUser.getId());
        } catch (Exception e) {
            // TODO Auto-generated catch block
            e.printStackTrace();
        }
        //将用户菜单 设置到activeUser
        activeUser.setMenus(menus);

        //将activeUser设置simpleAuthenticationInfo
        SimpleAuthenticationInfo simpleAuthenticationInfo = new SimpleAuthenticationInfo(
                activeUser, password,ByteSource.Util.bytes(salt), this.getName());

        return simpleAuthenticationInfo;
    }


    // 用于授权
    @Override
    protected AuthorizationInfo doGetAuthorizationInfo(
            PrincipalCollection principals) {

        //从 principals获取主身份信息
        //将getPrimaryPrincipal方法返回值转为真实身份类型(在上边的doGetAuthenticationInfo认证通过填充到SimpleAuthenticationInfo中身份类型),
        ActiveUser activeUser =  (ActiveUser) principals.getPrimaryPrincipal();

        //根据身份信息获取权限信息
        //从数据库获取到权限数据
        List<SysPermission> permissionList = null;
        try {
            permissionList = sysService.findPermissionListByUserId(activeUser.getUserid());
        } catch (Exception e) {
            // TODO Auto-generated catch block
            e.printStackTrace();
        }
        //单独定一个集合对象
        List<String> permissions = new ArrayList<String>();
        if(permissionList!=null){
            for(SysPermission sysPermission:permissionList){
                //将数据库中的权限标签 符放入集合
                permissions.add(sysPermission.getPercode());
            }
        }


    /*    List<String> permissions = new ArrayList<String>();
        permissions.add("user:create");//用户的创建
        permissions.add("item:query");//商品查询权限
        permissions.add("item:add");//商品添加权限
        permissions.add("item:edit");//商品修改权限
*/        //....

        //查到权限数据,返回授权信息(要包括 上边的permissions)
        SimpleAuthorizationInfo simpleAuthorizationInfo = new SimpleAuthorizationInfo();
        //将上边查询到授权信息填充到simpleAuthorizationInfo对象中
        simpleAuthorizationInfo.addStringPermissions(permissions);

        return simpleAuthorizationInfo;
    }

    //清除缓存
    public void clearCached() {
        PrincipalCollection principals = SecurityUtils.getSubject().getPrincipals();
        super.clearCache(principals);
    }


}
第五步:自定义formAuthenticationFilter进行表单验证,目的是在验证用户信息之前先进行验证码验证
package cn.itcast.ssm.shiro;

import javax.servlet.ServletRequest;
import javax.servlet.ServletResponse;
import javax.servlet.http.HttpServletRequest;
import javax.servlet.http.HttpSession;

import org.apache.shiro.web.filter.authc.FormAuthenticationFilter;

/**
 *
 * <p>Title: CustomFormAuthenticationFilter</p>
 * <p>Description:自定义FormAuthenticationFilter,认证之前实现 验证码校验 </p>
 * <p>Company: www.itcast.com</p>
 * @author
 * @date    2015-3-25下午4:53:15
 * @version 1.0
 */
public class CustomFormAuthenticationFilter extends FormAuthenticationFilter {

    //原FormAuthenticationFilter的认证方法
    @Override
    protected boolean onAccessDenied(ServletRequest request,
            ServletResponse response) throws Exception {
        //在这里进行验证码的校验

        //从session获取正确验证码
        HttpServletRequest httpServletRequest = (HttpServletRequest) request;
        HttpSession session =httpServletRequest.getSession();
        //取出session的验证码(正确的验证码)
        String validateCode = (String) session.getAttribute("validateCode");

        //取出页面的验证码
        //输入的验证和session中的验证进行对比
        String randomcode = httpServletRequest.getParameter("randomcode");
        if(randomcode!=null && validateCode!=null && !randomcode.equals(validateCode)){
            //如果校验失败,将验证码错误失败信息,通过shiroLoginFailure设置到request中
            httpServletRequest.setAttribute("shiroLoginFailure", "randomCodeError");
            //拒绝访问,不再校验账号和密码
            return true;
        }
        return super.onAccessDenied(request, response);
    }


}
第六步:登录页面login.jsp
<!DOCTYPE HTML PUBLIC "-//W3C//DTD HTML 4.01 Transitional//EN"> <%@ page contentType="text/html; charset=UTF-8"%> <%@ include file="/WEB-INF/jsp/tag.jsp"%> <html> <head> <TITLE>药品采购平台</TITLE> <meta http-equiv="pragma" content="no-cache"> <meta http-equiv="cache-control" content="no-cache"> <meta http-equiv="content-type" content="text/html; charset=UTF-8"> <LINK rel="stylesheet" type="text/css" href="${baseurl}styles/style.css"> <LINK rel="stylesheet" type="text/css" href="${baseurl}styles/login.css"> <LINK rel="stylesheet" type="text/css" href="${baseurl}js/easyui/themes/default/easyui.css"> <LINK rel="stylesheet" type="text/css" href="${baseurl}js/easyui/themes/icon.css"> <STYLE type="text/css"> .btnalink { cursor: hand; display: block; width: 80px; height: 29px; float: left; margin: 12px 28px 12px auto; line-height: 30px; background: url('${baseurl}images/login/btnbg.jpg') no-repeat; font-size: 14px; color: #fff; font-weight: bold; text-decoration: none; } </STYLE> <%@ include file="/WEB-INF/jsp/common_js.jsp"%> <script type="text/javascript"> //登录提示方法 function loginsubmit() { $("#loginform").submit(); } </SCRIPT> </HEAD> <BODY style="background: #f6fdff url(${baseurl}images/login/bg1.jpg) repeat-x;"> <FORM id="loginform" name="loginform" action="${baseurl}login.action" method="post"> <DIV class="logincon"> <DIV class="title"> <IMG alt="" src="${baseurl}images/login/logo.png"> </DIV> <DIV class="cen_con"> <IMG alt="" src="${baseurl}images/login/bg2.png"> </DIV> <DIV class="tab_con"> <input type="password" style="display:none;" /> <TABLE class="tab" border="0" cellSpacing="6" cellPadding="8"> <TBODY> <TR> <TD>用户名:</TD> <TD colSpan="2"><input type="text" id="usercode" name="username" style="WIDTH: 130px" /></TD> </TR> <TR> <TD>密 码:</TD> <TD><input type="password" id="pwd" name="password" style="WIDTH: 130px" /> </TD> </TR> <TR> <TD>验证码:</TD> <TD><input id="randomcode" name="randomcode" size="8" /> <img id="randomcode_img" src="${baseurl}validatecode.jsp" alt="" width="56" height="20" align='absMiddle' /> <a href=javascript:randomcode_refresh()>刷新</a></TD> </TR> <tr> <TD></TD> <td><input type="checkbox" name="rememberMe" />自动登陆</td> </tr> <TR> <TD colSpan="2" align="center"><input type="button" class="btnalink" onclick="()" value="登 录" /> <input type="reset" class="btnalink" value="重 置" /></TD> </TR> </TBODY> </TABLE> </DIV> </DIV> </FORM> </BODY> </HTML>
第七步:登录方法login
package cn.itcast.ssm.controller;

import javax.servlet.http.HttpServletRequest;
import javax.servlet.http.HttpSession;

import org.apache.shiro.authc.IncorrectCredentialsException;
import org.apache.shiro.authc.UnknownAccountException;
import org.springframework.beans.factory.annotation.Autowired;
import org.springframework.stereotype.Controller;
import org.springframework.web.bind.annotation.RequestMapping;

import cn.itcast.ssm.exception.CustomException;
import cn.itcast.ssm.service.SysService;

/**
 *
 * <p>Title: LoginController</p>
 * <p>Description: 登陆和退出</p>
 * <p>Company: www.itcast.com</p>
 * @author
 * @date    2015-3-22下午4:43:26
 * @version 1.0
 */
@Controller
public class LoginController {

    @Autowired
    private SysService sysService;


    //用户登陆提交方法
    /**
     *
     * <p>Title: login</p>
     * <p>Description: </p>
     * @param session
     * @param randomcode 输入的验证码
     * @param usercode 用户账号
     * @param password 用户密码
     * @return
     * @throws Exception
     */
    /*@RequestMapping("/login")
    public String login(HttpSession session, String randomcode,String usercode,String password)throws Exception{

        //校验验证码,防止恶性攻击
        //从session获取正确验证码
        String validateCode = (String) session.getAttribute("validateCode");

        //输入的验证和session中的验证进行对比
        if(!randomcode.equals(validateCode)){
            //抛出异常
            throw new CustomException("验证码输入错误");
        }

        //调用service校验用户账号和密码的正确性
        ActiveUser activeUser = sysService.authenticat(usercode, password);

        //如果service校验通过,将用户身份记录到session
        session.setAttribute("activeUser", activeUser);
        //重定向到商品查询页面
        return "redirect:/first.action";
    }*/

    //登陆提交地址,和applicationContext-shiro.xml中配置的loginurl一致
    @RequestMapping("login")
    public String login(HttpServletRequest request)throws Exception{

        //如果登陆失败从request中获取认证异常信息,shiroLoginFailure就是shiro异常类的全限定名
        String exceptionClassName = (String) request.getAttribute("shiroLoginFailure");
        //根据shiro返回的异常类路径判断,抛出指定异常信息
        if(exceptionClassName!=null){
            if (UnknownAccountException.class.getName().equals(exceptionClassName)) {
                //最终会抛给异常处理器
                throw new CustomException("账号不存在");
            } else if (IncorrectCredentialsException.class.getName().equals(
                    exceptionClassName)) {
                throw new CustomException("用户名/密码错误");
            } else if("randomCodeError".equals(exceptionClassName)){
                throw new CustomException("验证码错误 ");
            }else {
                throw new Exception();//最终在异常处理器生成未知错误
            }
        }
        //此方法不处理登陆成功(认证成功),shiro认证成功会自动跳转到上一个请求路径
        //登陆失败还到login页面
        return "login";
    }

/*    //用户退出
    @RequestMapping("/logout")
    public String logout(HttpSession session)throws Exception{

        //session失效
        session.invalidate();
        //重定向到商品查询页面
        return "redirect:/first.action";

    }*/


}
第八步:系统首页方法first.action
package cn.itcast.ssm.controller;

import org.apache.shiro.SecurityUtils;
import org.apache.shiro.subject.Subject;
import org.springframework.stereotype.Controller;
import org.springframework.ui.Model;
import org.springframework.web.bind.annotation.RequestMapping;

import cn.itcast.ssm.po.ActiveUser;


@Controller
public class FirstAction {
    //系统首页
    @RequestMapping("/first")
    public String first(Model model)throws Exception{

        //从shiro的session中取activeUser
        Subject subject = SecurityUtils.getSubject();
        //取身份信息
        ActiveUser activeUser = (ActiveUser) subject.getPrincipal();
        //通过model传到页面
        model.addAttribute("activeUser", activeUser);

        return "/first";
    }

    //欢迎页面
    @RequestMapping("/welcome")
    public String welcome(Model model)throws Exception{

        return "/welcome";

    }
}
第九步:系统首页及权限页面first.jsp
<!DOCTYPE HTML PUBLIC "-//W3C//DTD HTML 4.01 Transitional//EN"> <%@ page contentType="text/html; charset=UTF-8"%> <%@ include file="/WEB-INF/jsp/tag.jsp"%> <html> <head> <title>药品采购平台</title> <meta http-equiv="pragma" content="no-cache"> <meta http-equiv="cache-control" content="no-cache"> <LINK rel="stylesheet" type="text/css" href="${baseurl}js/easyui/styles/default.css"> <%@ include file="/WEB-INF/jsp/common_css.jsp"%> <%@ include file="/WEB-INF/jsp/common_js.jsp"%> <SCRIPT type="text/javascript"> var tabOnSelect = function(title) { //根据标题获取tab对象 var currTab = $('#tabs').tabs('getTab', title); var iframe = $(currTab.panel('options').content);//获取标签的内容 var src = iframe.attr('src');//获取iframe的src //当重新选中tab时将ifram的内容重新加载一遍,目的是获取当前页面的最新内容 if (src) $('#tabs').tabs('update', { tab : currTab, options : { content : createFrame(src)//ifram内容 } }); }; var _menus; $(function() {//预加载方法 //通过ajax请求菜单 /* $.ajax({ url : '${baseurl}menu.json', type : 'POST', dataType : 'json', success : function(data) { _menus = data; initMenu(_menus);//解析json数据,将菜单生成 }, error : function(msg) { alert('菜单加载异常!'); } }); */ //tabClose(); //tabCloseEven(); $('#tabs').tabs('add', { title : '欢迎使用', content : createFrame('${baseurl}welcome.jsp') }).tabs({ //当重新选中tab时将ifram的内容重新加载一遍 onSelect : tabOnSelect }); //修改密码 $('#modifypwd').click(menuclick); }); //退出系统方法 function logout() { _confirm('您确定要退出本系统吗?',null, function(){ location.href = '${baseurl}logout.action'; } ) } //帮助 function showhelp(){ window.open('${baseurl}help/help.html','帮助文档'); } </SCRIPT> <META name="GENERATOR" content="MSHTML 9.00.8112.16540"> </HEAD> <BODY style="overflow-y: hidden;" class="easyui-layout" scroll="no" > <DIV style='background: url("images/layout-browser-hd-bg.gif") repeat-x center 50% rgb(127, 153, 190); height: 30px; color: rgb(255, 255, 255); line-height: 20px; overflow: hidden; font-family: Verdana, 微软雅黑, 黑体;' border="false" split="true" region="north"> <SPAN style="padding-right: 20px; float: right;" class="head"> 欢迎当前用户:${activeUser.username} <A href=javascript:showhelp()>使用帮助</A> <A title='修改密码' ref='modifypwd' href="#" rel='${baseurl}user/updatepwd.action' icon='icon-null' id="modifypwd" >修改密码</A> <A id="loginOut" href=javascript:logout()>退出系统</A> </SPAN> <SPAN style="padding-left: 10px; font-size: 16px;"><IMG align="absmiddle" src="images/blocks.gif" width="20" height="20"> 医药集中采购系统</SPAN> <SPAN style="padding-left: 15px;" id="News"></SPAN> </DIV> <DIV style="background: rgb(210, 224, 242); height: 30px;" split="false" region="south"> <DIV class="footer"> 系统版本号:${version_number} 发布日期:${version_date} </DIV> </DIV> <DIV style="width: 180px;" id="west" title="导航菜单" split="true" region="west" hide="true"> <DIV id="nav" class="easyui-accordion" border="false" fit="true"> <c:if test="${activeUser.menus!=null }"> <ul> <c:forEach items="${activeUser.menus }" var="menu"> <li><div> <a title="${menu.name }" ref="1_1" href="#" rel="${baseurl }/${menu.url }" icon="icon-log"><span class="icon icon-log"> </span><span class="nav"><a href=javascript:addTab('${menu.name }','${baseurl }/${menu.url }')>${menu.name }</a></span></a> </div></li> </c:forEach> </ul> </c:if> <%-- <ul> <li><div> <a title="创建采购单" ref="1_1" href="#" rel="${baseurl} items/queryItems.action" icon="icon-log"><span class="icon icon-log"> </span><span class="nav"><a href=javascript:addTab('创建采购单','${baseurl}items/queryItems.action')>商品查询</a></span></a> </div></li> <li><div> <a title="提交采购单" ref="1_1" href="#" rel="/purchasing/order/orderList.action?type=1" icon="icon-log"><span class="icon icon-log"> </span><span class="nav">提交采购单</span></a> </div></li> <li><div> <a title="部门经理审核" ref="1_1" href="#" rel="/purchasing/order/orderList.action?type=2" icon="icon-log"><span class="icon icon-log"> </span><span class="nav">部门经理审核</span></a> </div></li> <li><div> <a title="总经理审核" ref="1_1" href="#" rel="/purchasing/order/orderList.action?type=3" icon="icon-log"><span class="icon icon-log"> </span><span class="nav">总经理审核</span></a> </div></li> </ul> --%> </DIV> </DIV> <DIV style="background: rgb(238, 238, 238); overflow-y: hidden;" id="mainPanle" region="center"> <DIV id="tabs" class="easyui-tabs" border="false" fit="true"></DIV> </DIV> </BODY> </HTML>
附 验证码jsp
validatecode.jsp
<%@ page language="java" contentType="text/html; charset=UTF-8"
    pageEncoding="UTF-8"%>
<%@ page import="java.util.Random"%>
<%@ page import="java.io.OutputStream"%>
<%@ page import="java.awt.Color"%>
<%@ page import="java.awt.Font"%>
<%@ page import="java.awt.Graphics"%>
<%@ page import="java.awt.image.BufferedImage"%>
<%@ page import="javax.imageio.ImageIO"%>
<%
    int width = 60;
    int height = 32;
    //create the image
    BufferedImage image = new BufferedImage(width, height, BufferedImage.TYPE_INT_RGB);
    Graphics g = image.getGraphics();
    // set the background color
    g.setColor(new Color(0xDCDCDC));
    g.fillRect(0, 0, width, height);
    // draw the border
    g.setColor(Color.black);
    g.drawRect(0, 0, width - 1, height - 1);
    // create a random instance to generate the codes
    Random rdm = new Random();
    String hash1 = Integer.toHexString(rdm.nextInt());
    System.out.print(hash1);
    // make some confusion
    for (int i = 0; i < 50; i++) {
        int x = rdm.nextInt(width);
        int y = rdm.nextInt(height);
        g.drawOval(x, y, 0, 0);
    }
    // generate a random code
    String capstr = hash1.substring(0, 4);
    //将生成的验证码存入session
    session.setAttribute("validateCode", capstr);
    g.setColor(new Color(0, 100, 0));
    g.setFont(new Font("Candara", Font.BOLD, 24));
    g.drawString(capstr, 8, 24);
    g.dispose();
    //输出图片
    response.setContentType("image/jpeg");
    out.clear();
    out = pageContext.pushBody();
    OutputStream strm = response.getOutputStream();
    ImageIO.write(image, "jpeg", strm);
    strm.close();
%>

 浙公网安备 33010602011771号