5、django实现第三方登录一Gitee码云
在Django中集成Redis
安装
1. 安装django_redis
pip install django_redis
2. 配置settings.py
CACHES = {
    'default': {
        'BACKEND': 'django_redis.cache.RedisCache',
        'LOCATION': 'redis://127.0.0.1:6379/1',
        "OPTIONS": {
            "CLIENT_CLASS": "django_redis.client.DefaultClient",
        },
    },
}
USER_AGENTS_CACHE = 'default'
3. 启动redis-server
sudo redis-server /etc/redis/redis.conf
- 用
top命令检查是否成功开启redis
用Django操作Redis
-
开启
Django shellpython3 manage.py shell -
执行语句
from django.core.cache import cache
cache.keys('*') # 查找关键字,支持正则
cache.set('sdz', 1, 5) # 表示设置'yxc'为1,5秒后到期,None为不过期
cache.get('sdz') # 查找值
cache.delete('sdz') # 删除关键字
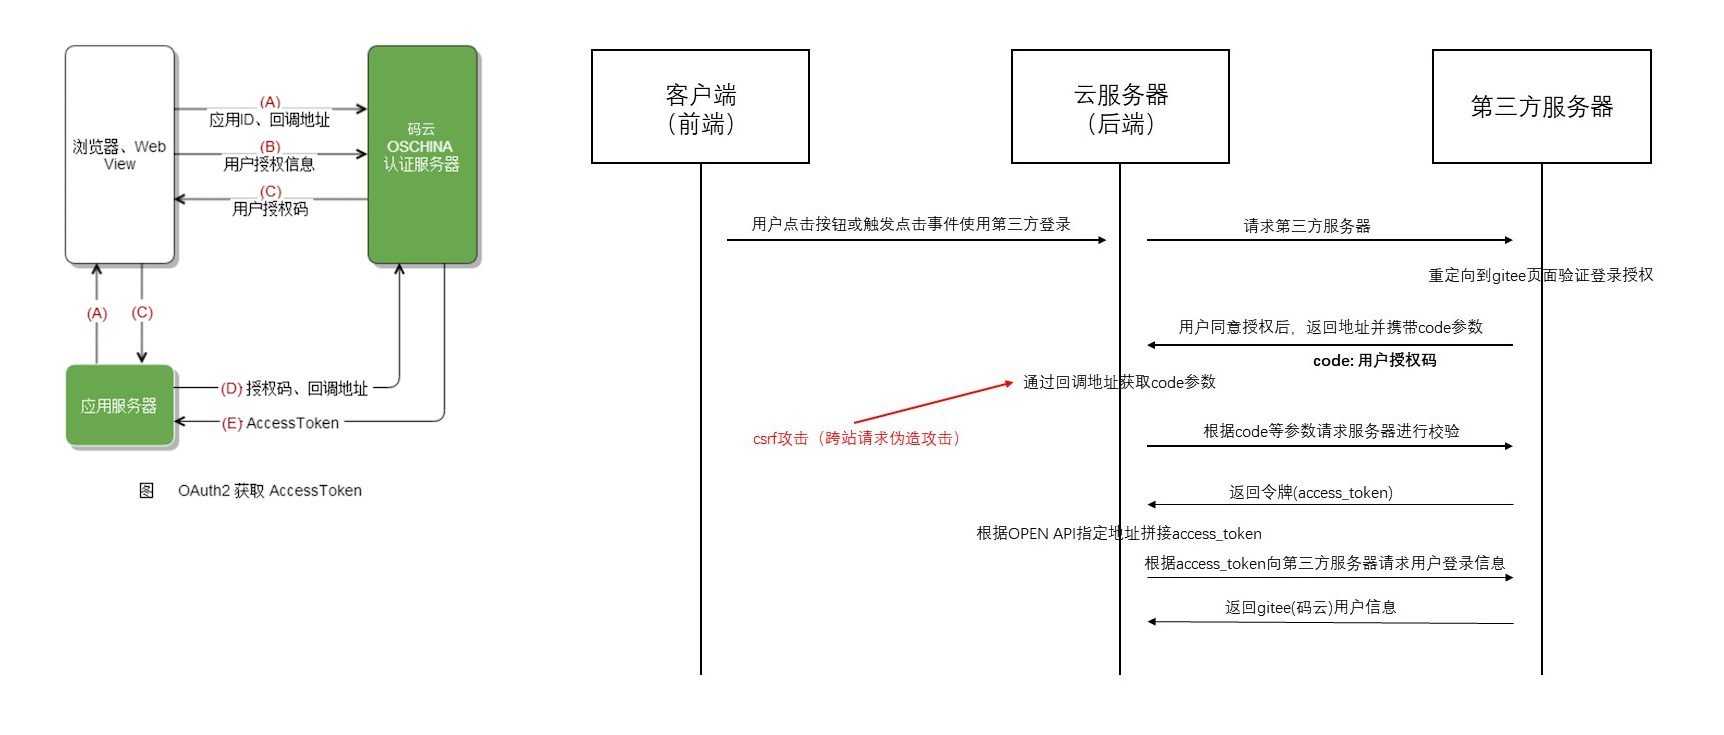
Gitee
- 步骤参考流程:gitee
OAuth2文档: https://gitee.com/api/v5/oauth_doc#/list-item-1

OAuth2 认证基本流程
配置
我的配置:
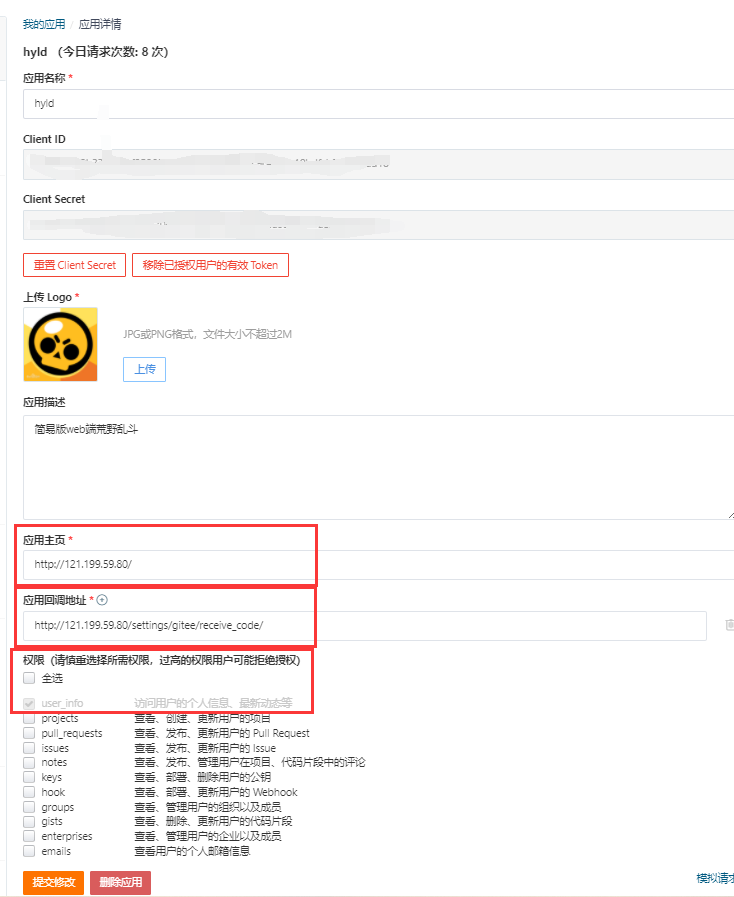
ClientId以及Client Secret的主要作用是通过拼接得到请求地址,将地址重定向至授权登录页面。
OAuth2 获取AccessToken——授权码模式
授权码(authorization code)方式,指的是第三方应用先申请一个授权码,然后再用该码获取令牌。
第一步 更新数据库的信息
game/models/player/player.py
openid = models.CharField(default="", max_length=50, blank=True, null=True)
命令行输入
#更新数据库的两条命令。
python3 manage.py makemigrations
python3 manage.py migrate
第二步 申请授权码code
码云的请求地址:
https://gitee.com/oauth/authorize?client_id={client_id}&redirect_uri={redirect_uri}&response_type=code请求方式:
GET参数说明:
参数 是否必须 说明 client id 是 码云应用的唯一id,可以在gitee编辑应用的界面里看到 redirect uri 是 回调地址,就是创建应用时填写的回调地址 response_type 是 请求类型,表示要求返回授权码(code) state 否 与第三方面军的暗号。用于判断请求和回调的一致性,授权成功后后原样返回。该参数可用于防止 csrf攻击(跨站请求伪造攻击),建议第三方带上该参数,可设置为简单的随机数返回说明:
用户同意授权后会重定向到
redirect_uri,返回参数为code和state。链接格式如下:redirect_uri?code=CODE&state=STATE。
如果用户拒绝授权,根据后台逻辑进行判断,通常两种情况重定向和不发生冲向。返回链接格式如下:https://app260.acapp.acwing.com.cn/game/settings/oauth/gitee/receive_code/?error=access_denied&error_description=用户或服务器拒绝了请求&state=49300298
前端代码
gitee_login() {// 申请gitee第三方登录
        $.ajax({
            url: "http://121.199.59.80/settings/gitee/apply_code/", type: "GET", success: function (resp) {
                if (resp.result === "success") {
                    window.location.replace(resp.apply_code_url);
                }
            }
        });
    }
django 代码
game/views/settings/gitee/apply_code.py
from django.http import JsonResponse
from urllib.parse import quote
from random import randint
from django.core.cache import cache


def get_state():
    res = ""
    for i in range(8):
        res += str(randint(0, 9))
    return res


# 申请code, 返回重定向的apply_code_uri

def apply_code(request):
    client_id = "eb9490128b337c39bf959602929507dfda596a1c9c42a9c19bdfcb511e49ad18"
    redirect_uri = quote("http://121.199.59.80/settings/gitee/receive_code/")
    state = get_state()

    cache.set(state, True, 7200) #有效期是2小时。

    apply_code_url = "https://gitee.com/oauth/authorize/"
    return JsonResponse({
        'result': "success",
        'apply_code_url': apply_code_url + "?client_id=%s&redirect_uri=%s&response_type=code&state=%s" % (client_id, redirect_uri, state)
    })
第三步 申请授权令牌access_token
码云请求地址:
https://gitee.com/oauth/token?grant_type=authorization_code&code={code}&client_id={client_id}&redirect_uri={redirect_uri}&client_secret={client_secret}请求方式:
POST参数说明:
参数 是否必须 说明 grant_type 是 grant_type 参数的值是 authorization_code code 是 code 参数是上一步拿到的授权码 client_id 是 看下方 redirect_uri 是 redirect_uri 参数是令牌颁发后的回调网址。 client_secret 是 client_id参数和client_secret参数用来让 第三方平台 确认 我们的服务器 的身份(client_secret参数是保密的,因此只能在后端发请求) 返回说明
返回参数
access_token授权令牌,有效期1天,后端通过access_token访问 Open API 使用用户数据。
申请成功示例:{ 'access_token': '456a1d2d90b915750bec8562168a8', 'token_type': 'bearer', 'expires_in': 86400, 'refresh_token': 'ba8404d006ff744d445d4a0482ad88996b91c72d2ef0b7ef06550bd8e54bfc', 'scope': 'user_info', 'created_at': 16388549 }
第四步 申请用户信息
首先学会使用Open API。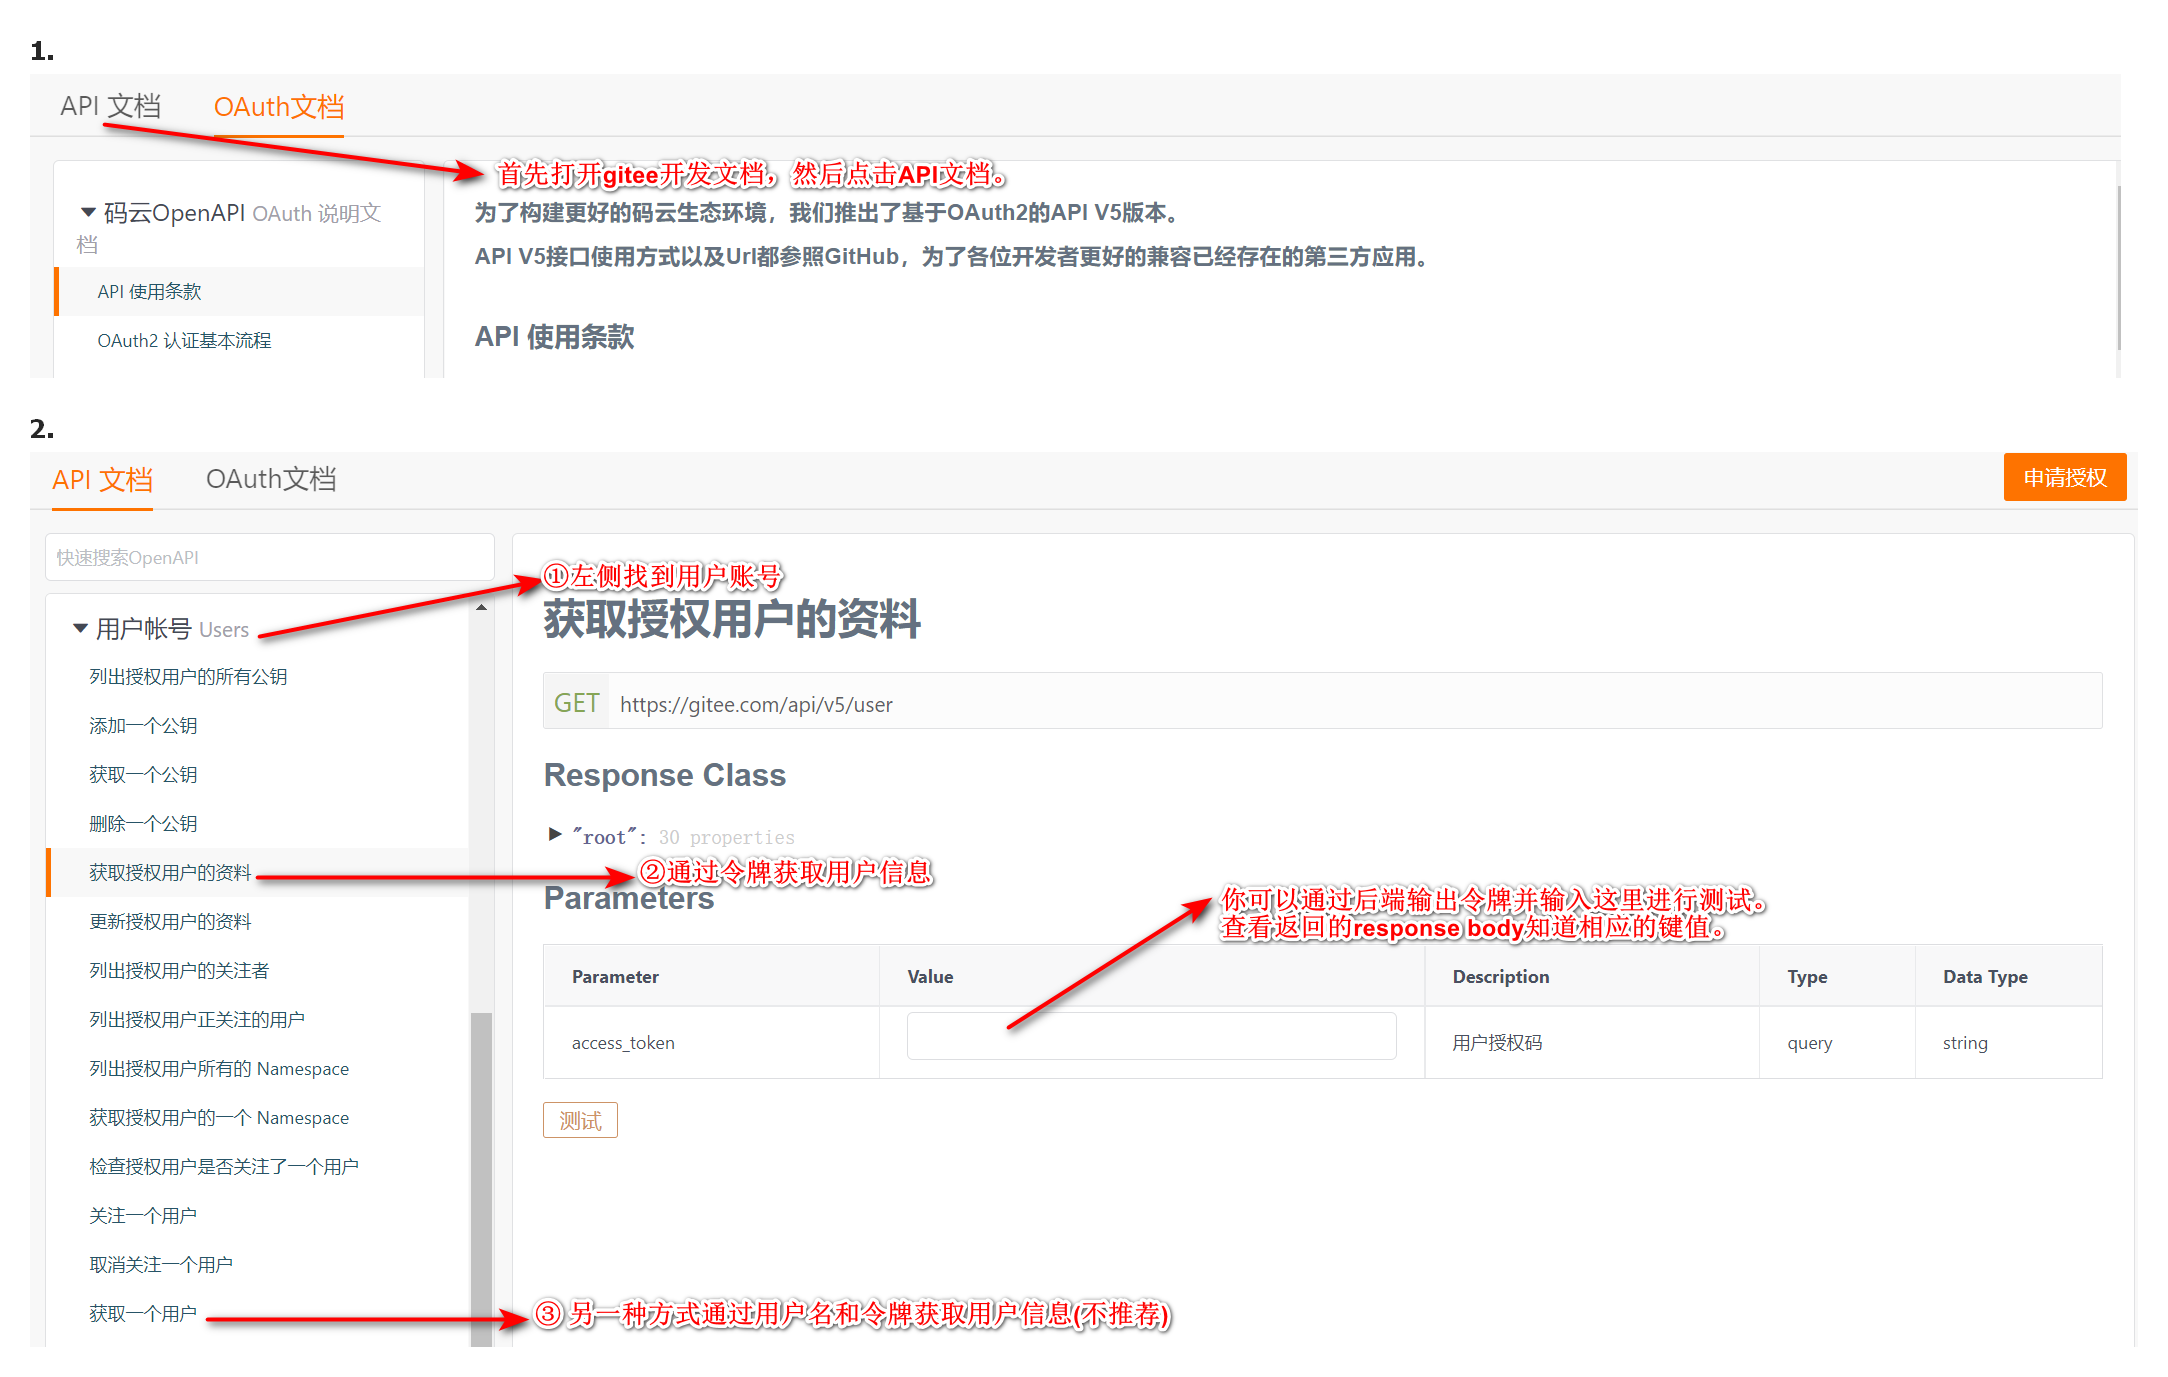
- 码云的请求地址:
https://gitee.com/api/v5/user/?access_token={access_token} - 请求方式: GET
返回说明
#这里列出来一些常用的名称。因为json格式:名称/值 进行存储
{
    "id":   #gitee
    "login": "" #登录时用户名
    "name": "" #登录后的用户名
    "avatar_url": "" #头像
    "email": null #邮箱
}
代码
game/views/settings/gitee/receive_code.py
功能:作为回调地址对应的函数。用于处理第三方平台传递的参数、获取令牌、以及获取参数的处理逻辑。
from django.shortcuts import redirect
from django.core.cache import cache
import requests
from django.contrib.auth.models import User
from game.models.player.player import Player
from urllib.parse import quote
from django.contrib.auth import login
from random import randint


def receive_code(request):
    data = request.GET
    code = data.get('code', '')
    state = data.get('state', '')

    # 如果请求失败,code拿不到值,就用空字符串代替,故用户拒绝后也能重定向到回调地址处。
    if not cache.has_key(state) or code == '':
        return redirect("index")

    cache.delete(state)

    request_access_token_url = "https://gitee.com/oauth/token/"
    params = {
        'grant_type': "authorization_code",
        'code': code,
        'client_id': "eb9490128b337c39bf959602929507dfda596a1c9c42a9c19bdfcb511e49ad18",
        'redirect_uri': "http://121.199.59.80/settings/gitee/receive_code/",
        'client_secret': "df661de109a6805d3c1afe20641e74ed1f0222bd5eba9996cbffae8e0c9b56a2"
    }
    access_token_res = requests.post(request_access_token_url, params=params).json()
    access_token = access_token_res['access_token']
    get_userinfo_url = "https://gitee.com/api/v5/user/"
    params = {
        'access_token': access_token,
    }

    message = requests.get(get_userinfo_url, params=params)
    userinfo_res = message.json()

    id = userinfo_res.get('id')
    username = userinfo_res.get('name')
    photo = userinfo_res.get('avatar_url')

    # 这里判断用户之前是否授权注册过,防止数据冗余
    players = Player.objects.filter(openid=id)
    if players.exists():
        # 每次授权并将头像更新一遍。
        Player.objects.filter(openid=id).update(photo=photo)
        login(request, players[0].user)
        return redirect("index")

    while User.objects.filter(username=username).exists():
        username += str(randint(0, 9))

    user = User.objects.create(username=username)
    Player.objects.create(user=user, photo=photo, openid=id)

    login(request, user)

    return redirect("index")
因为上述拿到了Acwing的免费域名,补充一下Acwing的第三方登录
Acwing
原理流程
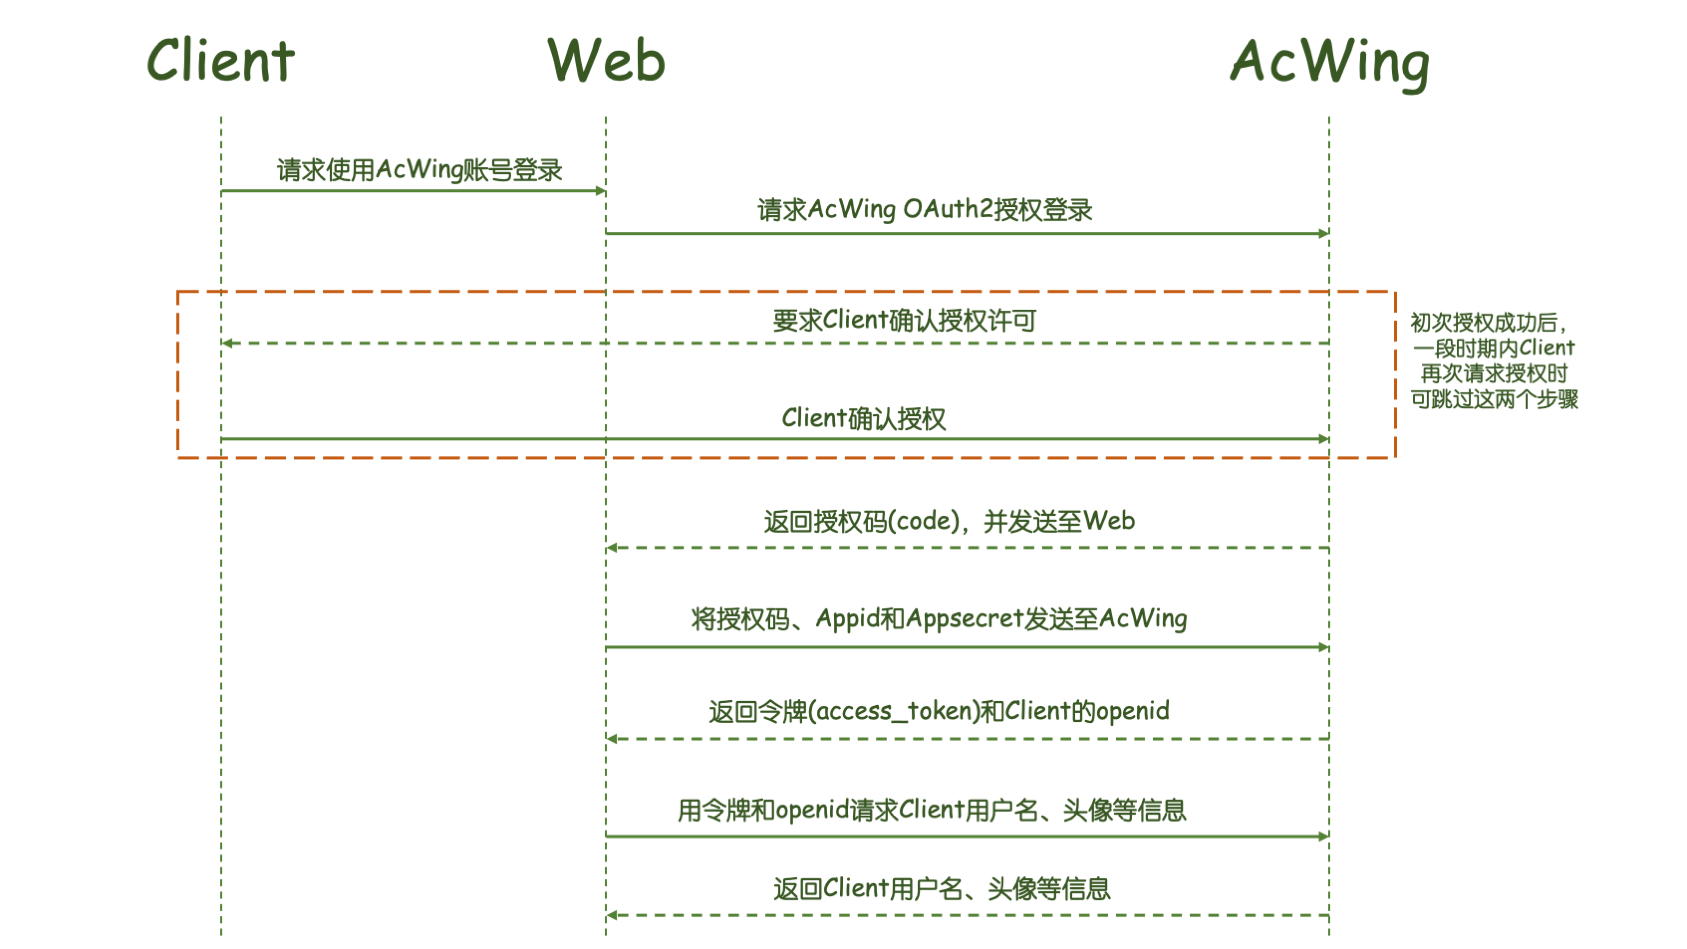
第一步 申请授权码code
请求地址:https://www.acwing.com/third_party/api/oauth2/web/authorize/
参考示例:
请求方法:GET
https://www.acwing.com/third_party/api/oauth2/web/authorize/?appid=APPID&redirect_uri=REDIRECT_URI&scope=SCOPE&state=STATE
参数说明
| 参数 | 是否 必须 | 说明 |
|---|---|---|
| appid | 是 | 应用的唯一id,可以在AcWing编辑AcApp的界面里看到 |
| redirect_uri | 是 | 接收授权码的地址。需要用urllib.parse.quote对链接进行处理 |
| scope | 是 | 申请授权的范围。目前只需填userinfo |
| state | 否 | 用于判断请求和回调的一致性,授权成功后后原样返回。该参数可用于防止csrf攻击(跨站请求伪造攻击),建议第三方带上该参数,可设置为简单的随机数 |
用户同意授权后会重定向到redirect_uri,返回参数为code和state。链接格式如下:
redirect_uri?code=CODE&state=STATE
如果用户拒绝授权,则不会发生重定向。
第二步 申请授权令牌access_token和用户的openid
请求地址:https://www.acwing.com/third_party/api/oauth2/access_token/
参考示例:
请求方法:GET
https://www.acwing.com/third_party/api/oauth2/access_token/?appid=APPID&secret=APPSECRET&code=CODE
参数说明
| 参数 | 是否必须 | 说明 |
|---|---|---|
| appid | 是 | 应用的唯一id,可以在AcWing编辑AcApp的界面里看到 |
| secret | 是 | 应用的秘钥,可以在AcWing编辑AcApp的界面里看到 |
| code | 是 | 第一步中获取的授权码 |
返回说明
申请成功示例:
{
    "access_token": "ACCESS_TOKEN",
    "expires_in": 7200,
    "refresh_token": "REFRESH_TOKEN",
    "openid": "OPENID",
    "scope": "SCOPE",
}
申请失败示例:
{
    "errcode": 40001,
    "errmsg": "code expired",  # 授权码过期
}
返回参数说明
| 参数 | 说明 |
|---|---|
| access_token | 授权令牌,有效期2小时 |
| expires_in | 授权令牌还有多久过期,单位(秒) |
| refresh_token | 用于刷新access_token的令牌,有效期30天 |
| openid | 用户的id。每个AcWing用户在每个acapp中授权的openid是唯一的,可用于 识别用户。 |
| scope | 用户授权的范围。目前范围为userinfo,包括用户名、头像 |
刷新access_token的有效期
access_token的有效期为2小时,时间较短。refresh_token的有效期为30天,可用于刷新access_token。刷新结果有两种:
- 如果
access_token已过期,则生成一个新的access_token。 - 如果
access_token未过期,则将当前的access_token的有效期延长为2小时。
参考示例:
请求方法:GET
https://www.acwing.com/third_party/api/oauth2/refresh_token/?appid=APPID&refresh_token=REFRESH_TOKEN
返回结果的格式与申请access_token相同。
第三步 申请用户信息
请求地址:https://www.acwing.com/third_party/api/meta/identity/getinfo/
参考示例:
请求方法:GET
https://www.acwing.com/third_party/api/meta/identity/getinfo/?access_token=ACCESS_TOKEN&openid=OPENID
参数说明
| 参数 | 是否必须 | 说明 |
|---|---|---|
| access_token | 是 | 第二步中获取的授权令牌 |
| openid | 是 | 第二步中获取的用户openid |
返回说明
申请成功示例:
{
    'username': "USERNAME",
    'photo': "https:cdn.acwing.com/xxxxx"
}
申请失败示例:
{
    'errcode': "40004",
    'errmsg': "access_token expired"  # 授权令牌过期
}
代码编写
后端
Player类增加属性openid
vi game/models/player/player.py
openid = models.CharField(default="", max_length=50, blank=True, null=True)
更新数据库:
python3 manage.py makemigrations
python3 manage.py migrate
代码框架
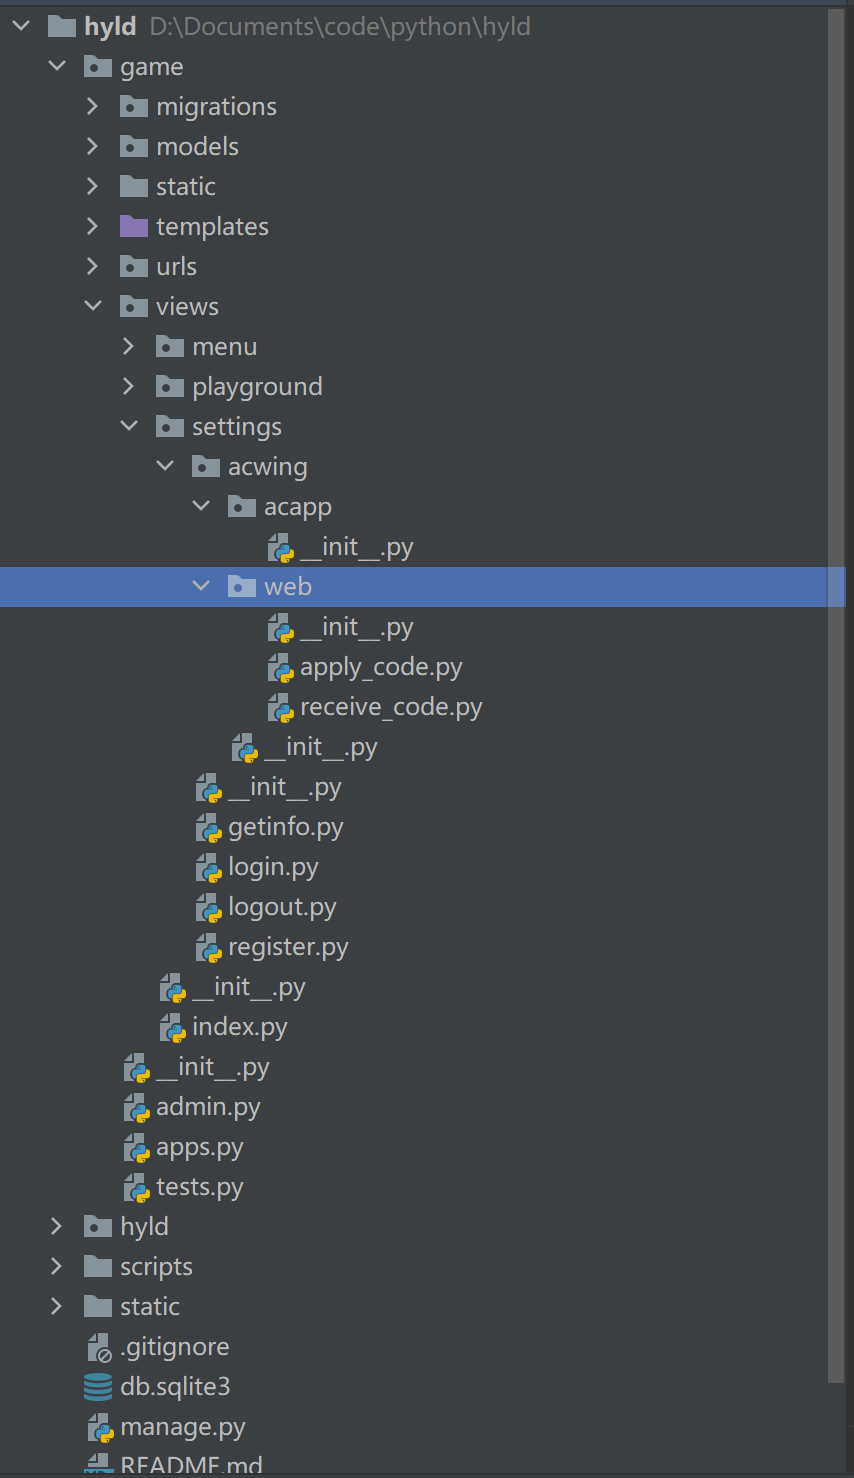
创建game/urls/settings/acwing文件夹,以及web、acapp子文件夹
apply_code.py文件,用于申请code
from django.http import JsonResponse
from urllib.parse import quote
from random import randint
from django.core.cache import cache


def get_state():
    res = ""
    for i in range(8):
        res += str(randint(0, 9))
    return res


# 申请code, 返回重定向的apply_code_uri
def apply_code(request):
    app_id = "820"
    # quote(url):可以将中文转换为URL编码格式。
    redirect_uri = quote("https://app820.acapp.acwing.com.cn/settings/acwing/web/receive_code/")
    scope = "userinfo"
    state = get_state()

    cache.set(state, True, 7200)  # 有效期2个小时
    apply_code_url = "https://www.acwing.com/third_party/api/oauth2/web/authorize/"
    return JsonResponse({
        'result': "success",
        'apply_code_url': apply_code_url + "?appid=%s&redirect_uri=%s&scope=%s&state=%s" % (
            app_id, redirect_uri, scope, state)
    })
receive_code.py文件,用于接收code
from django.shortcuts import redirect
from django.core.cache import cache
import requests
from django.contrib.auth.models import User
from game.models.player.player import Player
from django.contrib.auth import login
from random import randint


def receive_code(request):
    data = request.GET
    code = data.get("code")
    state = data.get("state")

    if not cache.has_key(state):
        return redirect("index")
    cache.delete(state)

    apply_access_token_url = "https://www.acwing.com/third_party/api/oauth2/access_token/"
    params = {
        'appid': "820",
        'secret': "***",
        'code': code
    }
    access_token_res = requests.get(apply_access_token_url, params=params).json()
    access_token = access_token_res['access_token']
    openid = access_token_res['openid']
    player = Player.objects.filter(openid=openid)
    if player.exists():
        login(request, player[0].user)
        return redirect("index")

    get_userinfo_url = "https://www.acwing.com/third_party/api/meta/identity/getinfo/"
    params = {
        "access_token": access_token,
        "openid": openid
    }
    userinfo_res = requests.get(get_userinfo_url, params=params).json()
    username = userinfo_res["username"]
    photo = userinfo_res['photo']

    while User.objects.filter(username=username).exists():
        username += str(randint(0, 9))

    user = User.objects.create(username=username)
    player = Player.objects.create(user=user, photo=photo, openid=openid)

    login(request, user)

    return redirect("index")
第三方的用户名和当前网站中已有的用户名可能重复。
解决方法:在名字后面加上数字。加数字不需要按顺序加,因为重名多时,从前向后一个一个判断,就会导致时间复杂度增加。这里存在一种高效的方式。如果用户名存在,就在后面加上一位,知道不存在位置。
while User.objects.filter(username=username).exists():
    username += str(randint(0, 9))
建立路由文件game/urls/settings/acwing/ index.py ,设置acwing路由
from django.urls import path
from game.views.settings.acwing.web.apply_code import apply_code
from game.views.settings.acwing.web.receive_code import receive_code

urlpatterns = [
    path("web/apply_code/", apply_code, name="settings_acwing_web_apply_code"),
    path("web/receive_code/", receive_code, name="settings_acwing_web_receive_code"),
]
更新 game/urls/settings/index.py 中的路由
from django.urls import path, include
from game.views.settings.getinfo import getinfo
from game.views.settings.login import signin
from game.views.settings.logout import signout
from game.views.settings.register import register

urlpatterns = [
    path("getinfo/", getinfo, name="settings_getinfo"),
    path("login/", signin, name="settings_login"),
    path("logout/", signout, name="settings_logout"),
    path("register/", register, name="settings_register"),
    path("acwing/", include("game.urls.settings.acwing.index"))
]
前端
更改前端 game/static/js/src/settings/zbase.js,实现acwing_login函数
this.$login_submit.click(function() {
    outer.login_on_remote();
});

this.$acwing_login.click(function (){
    outer.acwing_login();
})
acwing_login() {// 申请acwing第三方登录
    $.ajax({
        url: "https://app820.acapp.acwing.com.cn/settings/acwing/web/apply_code/",
        type: "GET",
        success: function (resp) {
            console.log(resp)
            if (resp.result === "success") {
                window.location.replace(resp.apply_code_url);
            }
        }
    });
}

