python写入excel(xlswriter)--生成图表
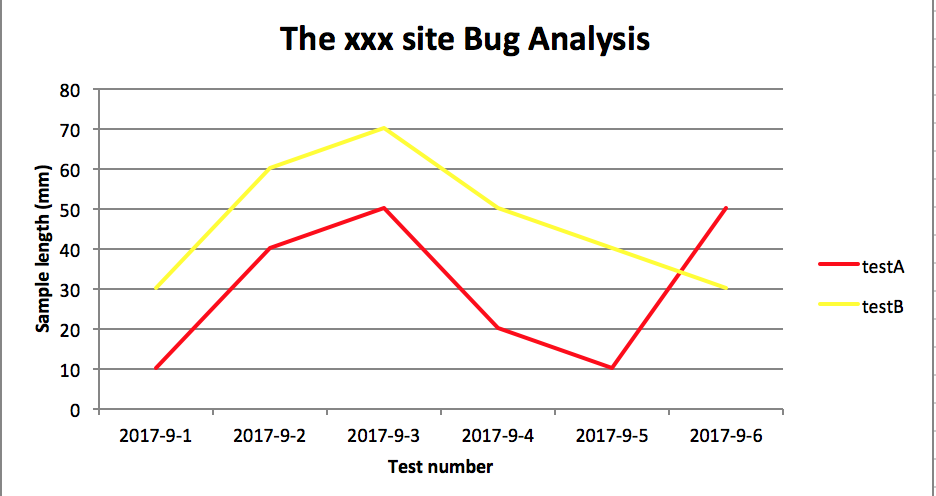
一、折线图:
# -*- coding:utf-8 -*-

import xlsxwriter

# 创建一个excel
workbook = xlsxwriter.Workbook("chart_line.xlsx")
# 创建一个sheet
worksheet = workbook.add_worksheet()
# worksheet = workbook.add_worksheet("bug_analysis")

# 自定义样式,加粗
bold = workbook.add_format({'bold': 1})

# --------1、准备数据并写入excel---------------
# 向excel中写入数据,建立图标时要用到
headings = ['Number', 'testA', 'testB']
data = [
    ['2017-9-1', '2017-9-2', '2017-9-3', '2017-9-4', '2017-9-5', '2017-9-6'],
    [10, 40, 50, 20, 10, 50],
    [30, 60, 70, 50, 40, 30],
]

# 写入表头
worksheet.write_row('A1', headings, bold)

# 写入数据
worksheet.write_column('A2', data[0])
worksheet.write_column('B2', data[1])
worksheet.write_column('C2', data[2])

# --------2、生成图表并插入到excel---------------
# 创建一个柱状图(line chart)
chart_col = workbook.add_chart({'type': 'line'})

# 配置第一个系列数据
chart_col.add_series({
    # 这里的sheet1是默认的值,因为我们在新建sheet时没有指定sheet名
    # 如果我们新建sheet时设置了sheet名,这里就要设置成相应的值
    'name': '=Sheet1!$B$1',
    'categories': '=Sheet1!$A$2:$A$7',
    'values':   '=Sheet1!$B$2:$B$7',
    'line': {'color': 'red'},
})

# 配置第二个系列数据
chart_col.add_series({
    'name': '=Sheet1!$C$1',
    'categories':  '=Sheet1!$A$2:$A$7',
    'values':   '=Sheet1!$C$2:$C$7',
    'line': {'color': 'yellow'},
})

# 配置第二个系列数据(用了另一种语法)
# chart_col.add_series({
#     'name': ['Sheet1', 0, 2],
#     'categories': ['Sheet1', 1, 0, 6, 0],
#     'values': ['Sheet1', 1, 2, 6, 2],
#     'line': {'color': 'yellow'},
# })

# 设置图表的title 和 x,y轴信息
chart_col.set_title({'name': 'The xxx site Bug Analysis'})
chart_col.set_x_axis({'name': 'Test number'})
chart_col.set_y_axis({'name':  'Sample length (mm)'})

# 设置图表的风格
chart_col.set_style(1)

# 把图表插入到worksheet并设置偏移
worksheet.insert_chart('A10', chart_col, {'x_offset': 25, 'y_offset': 10})

workbook.close()
效果图:

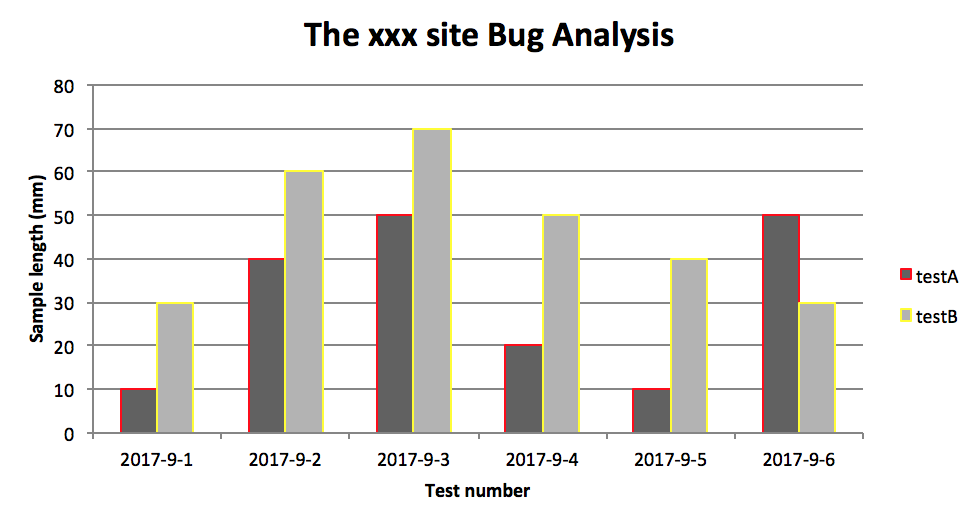
二、柱状图:
# -*- coding:utf-8 -*-

import xlsxwriter

# 创建一个excel
workbook = xlsxwriter.Workbook("chart_column.xlsx")
# 创建一个sheet
worksheet = workbook.add_worksheet()
# worksheet = workbook.add_worksheet("bug_analysis")

# 自定义样式,加粗
bold = workbook.add_format({'bold': 1})

# --------1、准备数据并写入excel---------------
# 向excel中写入数据,建立图标时要用到
headings = ['Number', 'testA', 'testB']
data = [
    ['2017-9-1', '2017-9-2', '2017-9-3', '2017-9-4', '2017-9-5', '2017-9-6'],
    [10, 40, 50, 20, 10, 50],
    [30, 60, 70, 50, 40, 30],
]

# 写入表头
worksheet.write_row('A1', headings, bold)

# 写入数据
worksheet.write_column('A2', data[0])
worksheet.write_column('B2', data[1])
worksheet.write_column('C2', data[2])

# --------2、生成图表并插入到excel---------------
# 创建一个柱状图(column chart)
chart_col = workbook.add_chart({'type': 'column'})

# 配置第一个系列数据
chart_col.add_series({
    # 这里的sheet1是默认的值,因为我们在新建sheet时没有指定sheet名
    # 如果我们新建sheet时设置了sheet名,这里就要设置成相应的值
    'name': '=Sheet1!$B$1',
    'categories': '=Sheet1!$A$2:$A$7',
    'values':   '=Sheet1!$B$2:$B$7',
    'line': {'color': 'red'},
})

# 配置第二个系列数据(用了另一种语法)
chart_col.add_series({
    'name': '=Sheet1!$C$1',
    'categories':  '=Sheet1!$A$2:$A$7',
    'values':   '=Sheet1!$C$2:$C$7',
    'line': {'color': 'yellow'},
})

# 配置第二个系列数据(用了另一种语法)
# chart_col.add_series({
#     'name': ['Sheet1', 0, 2],
#     'categories': ['Sheet1', 1, 0, 6, 0],
#     'values': ['Sheet1', 1, 2, 6, 2],
#     'line': {'color': 'yellow'},
# })

# 设置图表的title 和 x,y轴信息
chart_col.set_title({'name': 'The xxx site Bug Analysis'})
chart_col.set_x_axis({'name': 'Test number'})
chart_col.set_y_axis({'name':  'Sample length (mm)'})

# 设置图表的风格
chart_col.set_style(1)

# 把图表插入到worksheet以及偏移
worksheet.insert_chart('A10', chart_col, {'x_offset': 25, 'y_offset': 10})

workbook.close()
效果图:

PS:
其实前面两个图只变动一点:把 line 个性为 column
chart_col = workbook.add_chart({'type': 'column'})
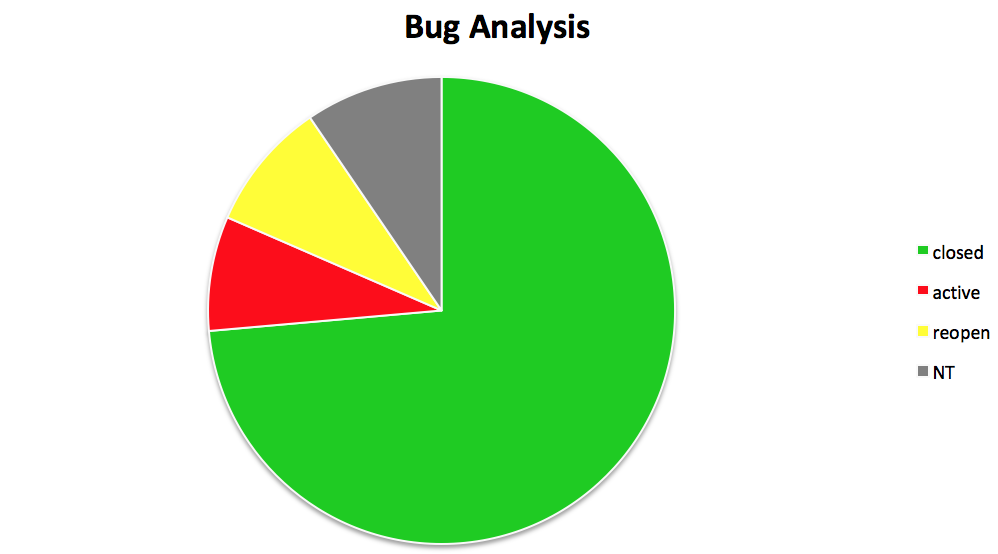
三、饼图:
# -*- coding:utf-8 -*-

import xlsxwriter

# 创建一个excel
workbook = xlsxwriter.Workbook("chart_pie.xlsx")
# 创建一个sheet
worksheet = workbook.add_worksheet()

# 自定义样式,加粗
bold = workbook.add_format({'bold': 1})

# --------1、准备数据并写入excel---------------
# 向excel中写入数据,建立图标时要用到
data = [
    ['closed', 'active', 'reopen', 'NT'],
    [1012, 109, 123, 131],
]

# 写入数据
worksheet.write_row('A1', data[0], bold)
worksheet.write_row('A2', data[1])

# --------2、生成图表并插入到excel---------------
# 创建一个柱状图(pie chart)
chart_col = workbook.add_chart({'type': 'pie'})

# 配置第一个系列数据
chart_col.add_series({
    'name': 'Bug Analysis',
    'categories': '=Sheet1!$A$1:$D$1',
    'values': '=Sheet1!$A$2:$D$2',
    'points': [
        {'fill': {'color': '#00CD00'}},
        {'fill': {'color': 'red'}},
        {'fill': {'color': 'yellow'}},
        {'fill': {'color': 'gray'}},
    ],

})

# 设置图表的title 和 x,y轴信息
chart_col.set_title({'name': 'Bug Analysis'})

# 设置图表的风格
chart_col.set_style(10)

# 把图表插入到worksheet以及偏移
worksheet.insert_chart('B10', chart_col, {'x_offset': 25, 'y_offset': 10})
workbook.close()
效果图:

参考资料:
http://xlsxwriter.readthedocs.io/chart_examples.html
http://xlsxwriter.readthedocs.io/chart.html
作者:Glen.He
出处:http://www.cnblogs.com/puresoul/
本文版权归作者和博客园共有,欢迎转载,但未经作者同意必须保留此段声明,且在文章页面明显位置给出原文连接,否则保留追究法律责任的权利。


【推荐】国内首个AI IDE,深度理解中文开发场景,立即下载体验Trae
【推荐】编程新体验,更懂你的AI,立即体验豆包MarsCode编程助手
【推荐】抖音旗下AI助手豆包,你的智能百科全书,全免费不限次数
【推荐】轻量又高性能的 SSH 工具 IShell:AI 加持,快人一步
· 10年+ .NET Coder 心语,封装的思维:从隐藏、稳定开始理解其本质意义
· .NET Core 中如何实现缓存的预热?
· 从 HTTP 原因短语缺失研究 HTTP/2 和 HTTP/3 的设计差异
· AI与.NET技术实操系列:向量存储与相似性搜索在 .NET 中的实现
· 基于Microsoft.Extensions.AI核心库实现RAG应用
· 10年+ .NET Coder 心语 ── 封装的思维:从隐藏、稳定开始理解其本质意义
· 地球OL攻略 —— 某应届生求职总结
· 提示词工程——AI应用必不可少的技术
· Open-Sora 2.0 重磅开源!
· 周边上新:园子的第一款马克杯温暖上架
2015-09-14 ANT批量执行Jmeter脚本