基于ceph-deploy部署ceph 16.2.x 单节点mon和mgr环境
ceph的部署方法和要求
部署方式
ceph-ansible:https://github.com/ceph/ceph-ansible #python
ceph-salt:https://github.com/ceph/ceph-salt #python
ceph-container:https://github.com/ceph/ceph-container #shell
ceph-chef:https://github.com/ceph/ceph-chef #Ruby
cephadm: https://docs.ceph.com/en/latest/cephadm/ #ceph 官方在 ceph 15 版本加入的ceph 部署工具
ceph-deploy:https://github.com/ceph/ceph-deploy #python
是一个 ceph 官方维护的基于 ceph-deploy 命令行部署 ceph 集群的工具,基于 ssh 执行可以 sudo 权限的 shell 命令以及一些 python 脚本 实现 ceph 集群的部署和管理维护。
Ceph-deploy 只用于部署和管理 ceph 集群,客户端需要访问 ceph,需要部署客户端工具。
服务器准备:
构建可靠的、低成本的、可扩展的、 与业务紧密结合使用的高性能分布式存储系统
Ceph分布式存储集群规划原则/目标:
- 较低的 TCO (Total Cost of Ownership,总拥有成本):
使用廉价的 X86 服务器。
- 较高的 IOPS (Input/Output Operations Per Second,每秒可完成的读写次数):
- 使用 SSD/PCI-E SSD/NVMe 硬盘提高存储集群数据以提高读写性能。
- 较大的存储空间:
使用单块 2T/4T 或更大容量的磁盘,提高单台服务器的总空间,节省服务器总数,降低机柜使用量。
- 较快的网络吞吐
使用 10G、40G、100G 或更快的光纤网络
- 更好的数据冗余:
数据可以以三副本机制分别保存到不同的主机,宕机 2 台也不会丢失数据。
服务器硬件选型
http://docs.ceph.org.cn/start/hardware-recommendations/ #官方硬件推荐
1、monitor、mgr、radosgw:
4C 8G~16G(小型,专用虚拟机)、8C 16G~32G(中型,专用虚拟机)、16C ~32C 32G~64G(大型/超大型,专用物理机)
2、MDS(相对配置更高一个等级)
8C 8G~16G(小型,专用虚拟机)、16C 16G~32G(中型,专用虚拟机)、32C ~64C 64G~96G(大型、超大型,物理机)
3、OSD 节点 CPU:
每个 OSD 进程至少有一个 CPU 核心或以上,比如服务器一共 2 颗 CPU 每个 12 核心 24线程,那么服务器总计有 48 核心 CPU,这样最多最多最多可以放 48 块磁盘。(物理 CPU 数量 乘以 每颗 CPU 核心) / OSD 磁盘数量 = X/每 OSD CPU 核心 >= 1 核心 CPU 比如:(2 颗*每颗 24 核心) / 24 OSD 磁盘数量= 2/每 OSD CPU 核心 >= 1 核心 CPU
4、OSD 节点内存:
OSD 硬盘空间在 2T 或以内的时候每个硬盘 2G 内存,4T 的空间每个 OSD 磁盘 4G 内存,即大约每 1T 的磁盘空间(最少)分配 1G 的内存空间做数据读写缓存。
(总内存/OSD 磁盘总空间)= X > 1G
内存比如: (总内存 128G/36T 磁盘总空间 )= 3G/每 T > 1G 内存
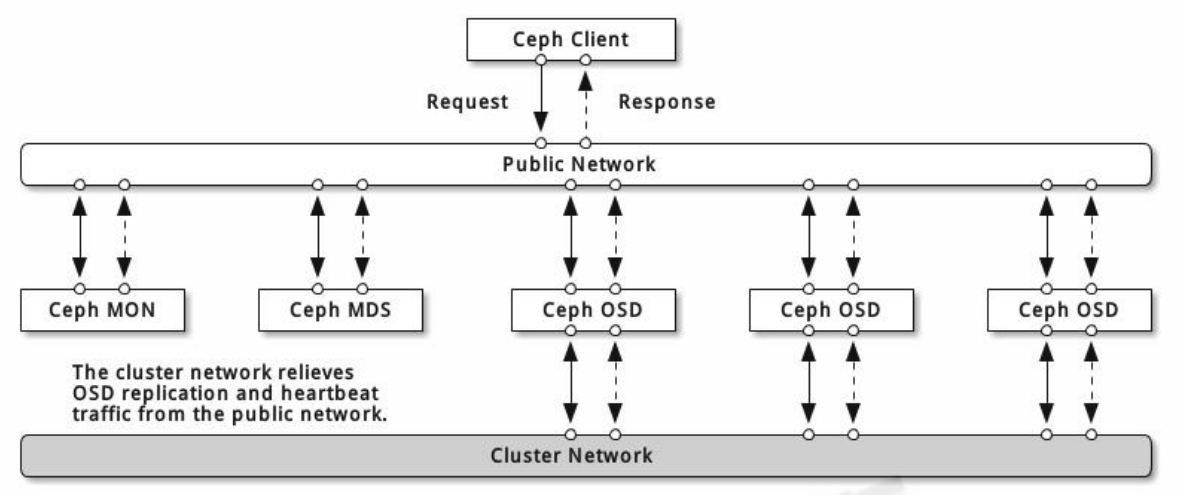
服务器和网络环境
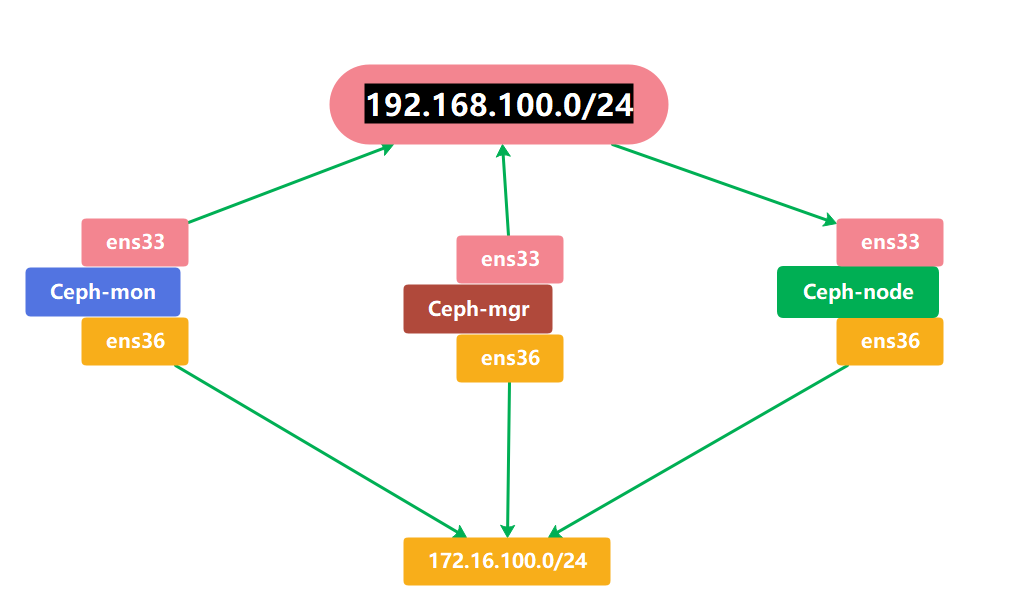
1.四台服务器作为 ceph 集群 OSD 存储服务器,每台服务器支持两个网络,public 网络针对客户端访问,cluster 网络用于集群管理及数据同步,每台三块或以上的磁盘
192.168.100.31-192.168.100.34
172.16.100.31-172.16.100.34
各存储服务器磁盘划分:(每块硬盘100G)
/dev/sdb /dev/sdc /dev/sdd /dev/sde /dev/sdf
2.三台服务器作为 ceph 集群 Mon 监视服务器,每台服务器可以和 ceph 集群的 cluster 网络通信。
192.168.100.35-192.168.100.37
172.16.100.35-172.16.100.37
3.两个 ceph-mgr 管理服务器,可以和 ceph 集群的 cluster 网络通信
192.168.100.38-192.168.100.39
172.16.100.38-172.16.100.39
4.一个服务器用于部署 ceph 集群即安装 Ceph-deploy,也可以和 ceph-mgr 等复用。
192.168.100.40
172.16.100.40
5.创建一个普通用户,能够通过 sudo 执行特权命令,配置主机名解析,ceph 集群部署过程中需要对各主机配置不同的主机名,另外如果是 centos 系统则需要关闭各服务器的防火墙和 selinux。
6.网络环境:
http://docs.ceph.org.cn/rados/configuration/network-config-ref/
ceph-deploy 部署 ceph 集群
http://docs.ceph.org.cn/install/manual-deployment/ #简要部署过程
版本历史:
https://docs.ceph.com/en/latest/releases/index.html
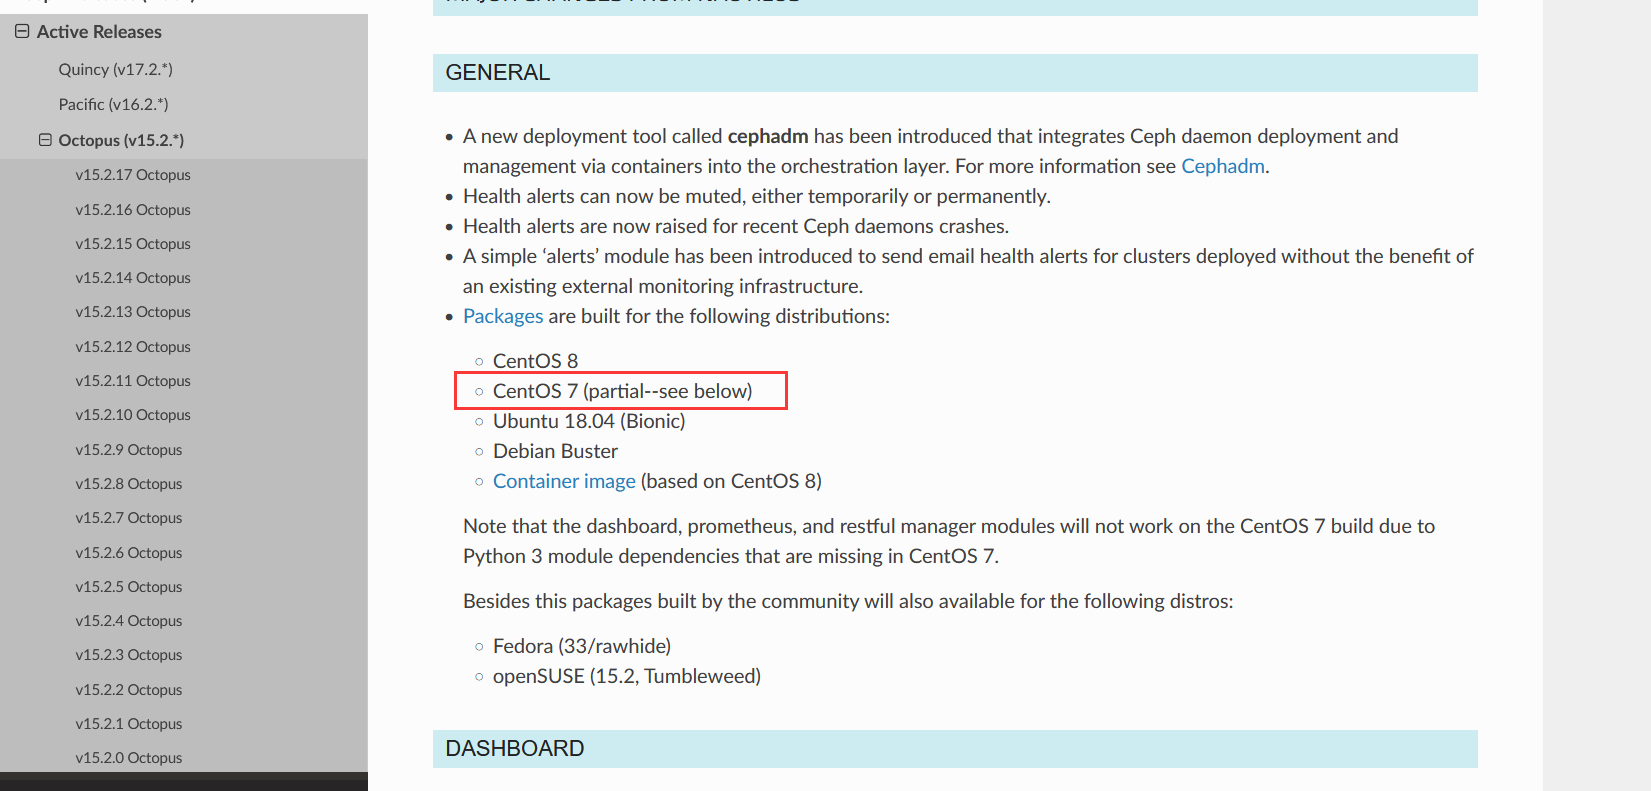
https://docs.ceph.com/en/latest/releases/octopus/ #ceph 15 即 octopus 版本支持的系统:
系统环境初始化
时间同步(各服务器时间必须一致)
关闭 selinux 和防火墙(如果是 Centos)
配置主机域名解析或通过 DNS 解析
部署 RADOS 集群
https://mirrors.aliyun.com/ceph/ #阿里云镜像仓库
http://mirrors.163.com/ceph/ #网易镜像仓库
https://mirrors.tuna.tsinghua.edu.cn/ceph/ #清华大学镜像源
仓库准备
Centos
Centos仅能部署14.x版本的ceph
ceph yum 仓库:
yum install https://mirrors.aliyun.com/ceph/rpm-octopus/el7/noarch/ceph-release-1-1.el7.noarch.rpm -y
yum install epel-release -y
ubuntu
所有节点执行
添加ceph仓库gpg key
#支持 https 镜像仓库源:
apt install -y apt-transport-https ca-certificates curl software-properties-common
#导入 key:
wget -q -O- 'https://mirrors.tuna.tsinghua.edu.cn/ceph/keys/release.asc' | sudo apt-key add -
添加ceph仓库地址
官网示例:
对于早期的Ceph版本,将{release-name}替换为Ceph版本的名称
使用lsb_release -sc以获取系统代号名称,并在以下命令中替换{codename}。
apt-add-repository 'deb https://download.ceph.com/debian-{release-name}/ {codename} main'

#例如ubuntu 20.04安装ceph 17.x quincy版本
apt-add-repository 'deb https://download.ceph.com/debian-quincy/ focal main'
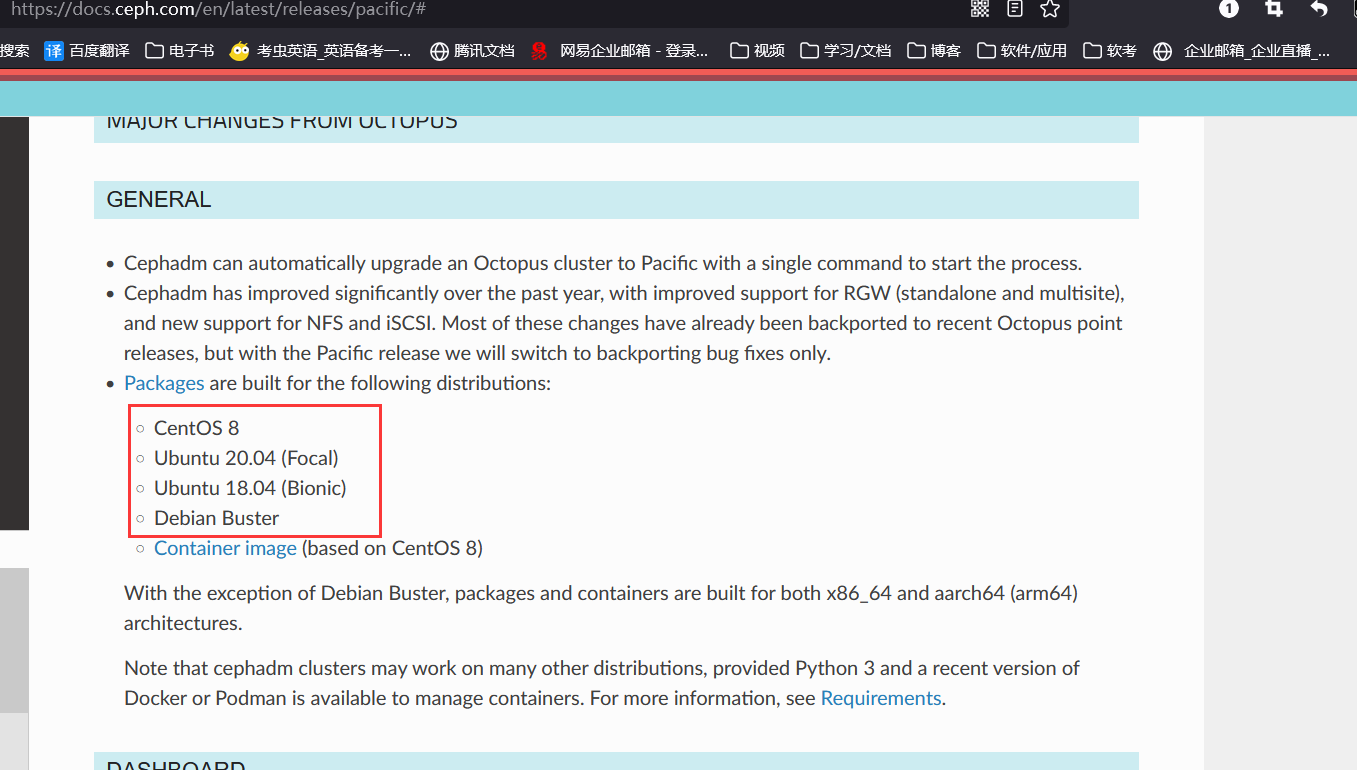
ubuntu 18.04安装ceph16.x Pacific版本
https://docs.ceph.com/en/latest/releases/pacific/#
apt-add-repository 'deb https://mirrors.tuna.tsinghua.edu.cn/ceph/debian-pacific/ bionic main'
#或者
echo 'deb https://mirrors.tuna.tsinghua.edu.cn/ceph/debian-pacific/ bionic main' >> /etc/apt/sources.list
更新apt仓库
root@ceph-deploy:~# apt update
Hit:1 http://mirrors.tuna.tsinghua.edu.cn/ubuntu bionic InRelease
Hit:2 http://mirrors.tuna.tsinghua.edu.cn/ubuntu bionic-updates InRelease
Hit:3 http://mirrors.tuna.tsinghua.edu.cn/ubuntu bionic-backports InRelease
Hit:4 http://mirrors.tuna.tsinghua.edu.cn/ubuntu bionic-security InRelease
Hit:5 https://mirrors.tuna.tsinghua.edu.cn/ceph/debian-pacific bionic InRelease
Reading package lists... Done
Building dependency tree
Reading state information... Done
218 packages can be upgraded. Run 'apt list --upgradable' to see them.
创建 ceph 集群部署用户 cephadmin
推荐使用指定的普通用户部署和运行 ceph 集群,普通用户只要能以非交互方式执行 sudo命令执行一些特权命令即可,新版的 ceph-deploy 可以指定包含 root 的在内只要可以执行 sudo 命令的用户,不过仍然推荐使用普通用户,ceph 集群安装完成后会自动创建ceph 用户(ceph 集群默认会使用 ceph 用户运行各服务进程,如 ceph-osd 等),因此推荐使用除了ceph 之外的比如 cephuser、cephadmin 这样的普通用户去部署和管理ceph集群。
cephadmin 仅用于通过 ceph-deploy 部署和管理 ceph 集群的时候使用,比如首次初始化集群和部署集群、添加节点、删除节点等,ceph 集群在 node 节点、mgr 等节点会使用ceph 用户启动服务进程。
在包含 ceph-deploy 节点的存储node节点、mon 节点和 mgr 节点等创建 cephadmin 用户
ubuntu:
groupadd -r -g 2022 cephadmin && useradd -r -m -s /bin/bash -u 2022 -g 2022 cephadmin && echo cephadmin:123456 | chpasswdcentos
groupadd cephadmin -g 2022 && useradd -u 2022 -g 2022 ceph && echo "123456" | passwd --stdin cephadmin
各节点允许 cephadmin 用户以 sudo 执行特权命令
root@ceph-deploy:~# vim /etc/sudoers
root    ALL=(ALL:ALL) ALL
cephadmin ALL=(ALL) NOPASSWD: ALL

#或者
echo "cephadmin ALL=(ALL) NOPASSWD: ALL" >> /etc/sudoers
配置ceph-deploy免秘钥登录
在 ceph-deploy 节点配置秘钥分发,允许 cephadmin 用户以非交互的方式登录到各 ceph node/mon/mgr 节点进行集群部署及管理操作,即在 ceph-deploy 节点生成秘钥对,然后分发公钥到各被管理节点:
root@ceph-deploy:~# su - cephadmin
cephadmin@ceph-deploy:~$ ssh-keygen
cephadmin@ceph-deploy:~$ for n in {31..40};do ssh-copy-id cephadmin@172.16.100.$n;done
配置主机名解析
所有ceph节点服务器都配置一样的域名解析hosts文件
cephadmin@ceph-deploy:~$ sudo vim /etc/hosts
172.16.100.40 ceph-deploy.example.local ceph-deploy
172.16.100.31 ceph-node1.example.local ceph-node1
172.16.100.32 ceph-node2.example.local ceph-node2
172.16.100.33 ceph-node3.example.local ceph-node3
172.16.100.34 ceph-node4.example.local ceph-node4
172.16.100.35 ceph-mon1.example.local ceph-mon1
172.16.100.36 ceph-mon2.example.local ceph-mon2
172.16.100.37 ceph-mon3.example.local ceph-mon3
172.16.100.38 ceph-mgr1.example.local ceph-mgr1
172.16.100.39 ceph-mgr2.example.local ceph-mgr2
集群节点安装python2
所有节点都需要安装python2的环境,用来支持ceph-deploy节点使用python2来管理调度每个节点
apt install python-pip
配置pip加速
root@ceph-node1:~# mkdir .pip
root@ceph-node1:~# vim .pip/pip.conf
[global]
index-url = https://mirrors.aliyun.com/pypi/simple/

[install]
trusted-host=mirrors.aliyun.com
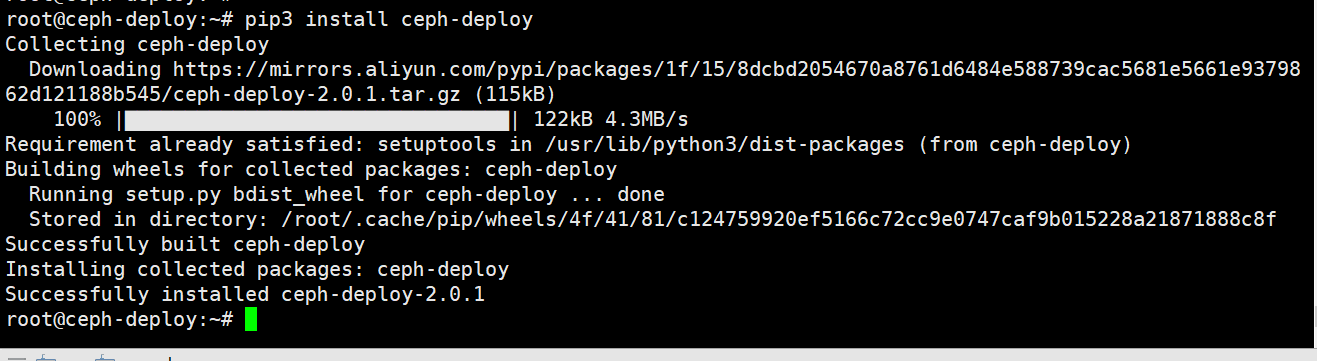
安装ceph-deploy 部署工具
在 ceph-deploy 部署服务器安装部署工具 ceph-deploy,ceph-deploy是依赖于python2.7,因此需要提前安装。
由于ceph-deploy2.0版本已经在apt仓库中移除,因此需要手动在github上下载
github项目地址:https://github.com/ceph/ceph-deploy
PIP下载方法:https://docs.ceph.com/projects/ceph-deploy/en/latest/
Deb下载方法:https://mirrors.tuna.tsinghua.edu.cn/ceph/debian-16.2.9/pool/main/c/ceph-deploy/
安装pip:
root@ceph-deploy:~# apt install python-pip
配置pip加速
root@ceph-deploy:~# mkdir .pip
root@ceph-deploy:~# vim .pip/pip.conf
[global]
index-url = https://mirrors.aliyun.com/pypi/simple/

[install]
trusted-host=mirrors.aliyun.com
使用pip安装ceph-deploy
root@ceph-deploy:~# pip2 install ceph-deploy
安装完成
http://docs.ceph.org.cn/man/8/ceph-deploy/#id3
cephadmin@ceph-deploy:~/ceph-cluster$ ceph-deploy --help
usage: ceph-deploy [-h] [-v | -q] [--version] [--username USERNAME]
                   [--overwrite-conf] [--ceph-conf CEPH_CONF]
                   COMMAND ...

Easy Ceph deployment

    -^-
   /   \
   |O o|  ceph-deploy v2.0.1
   ).-.(
  '/|||\`
  | '|` |
    '|`

Full documentation can be found at: http://ceph.com/ceph-deploy/docs

optional arguments:
  -h, --help            show this help message and exit
  -v, --verbose         be more verbose
  -q, --quiet           be less verbose
  --version             the current installed version of ceph-deploy
  --username USERNAME   the username to connect to the remote host
  --overwrite-conf      overwrite an existing conf file on remote host (if
                        present)
  --ceph-conf CEPH_CONF
                        use (or reuse) a given ceph.conf file

commands:
  COMMAND               description
    new                开始部署一个新的 ceph 存储集群,并生成 CLUSTER.conf 集群配置文件和 keyring认证文件。

    install            在远程主机上安装 ceph 相关的软件包, 可以通过--release 指定安装的版本。
    mds                管理 MDS 守护程序(Ceph Metadata Server,ceph 源数据服务器)。
    mgr                管理 MGR 守护程序(ceph-mgr,Ceph Manager DaemonCeph 管理器守护程序)。
    mon                管理 MON 守护程序(ceph-mon,ceph 监视器)。
    rgw                管理 RGW 守护程序(RADOSGW,对象存储网关)。
    gatherkeys         从指定获取提供新节点的验证 keys,这些 keys 会在添加新的 MON/OSD/MD加入的时候使用。
    disk               管理远程主机磁盘。
    osd                在远程主机准备数据磁盘,即将指定远程主机的指定磁盘添加到 ceph 集群作为 osd使用。
    admin              推送 ceph 集群配置文件和 client.admin 认证文件到远程主机。

    config             将 ceph.conf 配置文件推送到远程主机或从远程主机拷贝。
    repo               远程主机仓库管理。
    purge              删除远端主机的安装包和所有数据。

    purgedata          从/var/lib/ceph 删除 ceph 数据,会删除/etc/ceph 下的内容。

    uninstall          从远端主机删除安装包。
    calamari           安装并配置一个 calamari web 节点,calamari 是一个 web 监控平台。
                       repository with Calamari packages is already
                       configured. Refer to the docs for examples
                       (http://ceph.com/ceph-deploy/docs/conf.html)
    forgetkeys         从本地主机删除所有的验证 keyring, 包括 client.admin, monitor, bootstrap 等认证文件。
    pkg                管理远端主机的安装包。

See 'ceph-deploy <command> --help' for help on a specific command
初始化 mon 节点
1、切换到cephadmin普通用户下操作
root@ceph-deploy:~# su - cephadmin
2、创建ceph集群初始化目录
在cephadmin用户目录下创建文件夹,保存当前集群的初始化配置信息
cephadmin@ceph-deploy:~$ mkdir ceph-cluster
cephadmin@ceph-deploy:~$ cd ceph-cluster/
各节点服务器需要单独安装 Python2:
sudo apt install python2.7 -y
sudo ln -s /usr/bin/python2.7 /usr/bin/python2
3、在部署节点初始化 mon 节点
ceph-deploy new命令参数说明
--cluster-network 指定ceph集群管理网络
--public-network 指定ceph后端存储业务网络
ceph-mon1.example.local 指定mon1节点的域名\主机名
cephadmin@ceph-deploy:~/ceph-cluster$ ceph-deploy new --cluster-network 172.16.100.0/24 --public-network 192.168.100.0/24 ceph-mon1.example.local
[ceph_deploy.conf][DEBUG ] found configuration file at: /home/cephadmin/.cephdeploy.conf
[ceph_deploy.cli][INFO  ] Invoked (2.0.1): /usr/local/bin/ceph-deploy new --cluster-network 172.16.100.0/24 --public-network 192.168.100.0/24 ceph-mon1.example.local
[ceph_deploy.cli][INFO  ] ceph-deploy options:
[ceph_deploy.cli][INFO  ]  verbose                       : False
[ceph_deploy.cli][INFO  ]  quiet                         : False
[ceph_deploy.cli][INFO  ]  username                      : None
[ceph_deploy.cli][INFO  ]  overwrite_conf                : False
[ceph_deploy.cli][INFO  ]  ceph_conf                     : None
[ceph_deploy.cli][INFO  ]  cluster                       : ceph
[ceph_deploy.cli][INFO  ]  mon                           : ['ceph-mon1.example.local']
[ceph_deploy.cli][INFO  ]  ssh_copykey                   : True
[ceph_deploy.cli][INFO  ]  fsid                          : None
[ceph_deploy.cli][INFO  ]  cluster_network               : 172.16.100.0/24
[ceph_deploy.cli][INFO  ]  public_network                : 192.168.100.0/24
[ceph_deploy.cli][INFO  ]  cd_conf                       : <ceph_deploy.conf.cephdeploy.Conf object at 0x7f0eeb33f2b0>
[ceph_deploy.cli][INFO  ]  default_release               : False
[ceph_deploy.cli][INFO  ]  func                          : <function new at 0x7f0eeb324400>
[ceph_deploy.new][DEBUG ] Creating new cluster named ceph
[ceph_deploy.new][INFO  ] making sure passwordless SSH succeeds
[ceph-mon1.example.local][DEBUG ] connected to host: ceph-deploy
[ceph-mon1.example.local][INFO  ] Running command: ssh -CT -o BatchMode=yes ceph-mon1.example.local
[ceph_deploy.new][WARNIN] could not connect via SSH
[ceph_deploy.new][INFO  ] will connect again with password prompt
The authenticity of host 'ceph-mon1.example.local (172.16.100.35)' can't be established.
ECDSA key fingerprint is SHA256:T0GHaJiIzPaG+6KQF+KR2VZpAQWe7tX0iu8j/qADvlQ.
Are you sure you want to continue connecting (yes/no)? yes      #<<<-------输入yes
Warning: Permanently added 'ceph-mon1.example.local' (ECDSA) to the list of known hosts.
[ceph-mon1.example.local][DEBUG ] connected to host: ceph-mon1.example.local
[ceph_deploy.new][INFO  ] adding public keys to authorized_keys
[ceph-mon1.example.local][DEBUG ] connection detected need for sudo
[ceph-mon1.example.local][DEBUG ] connected to host: ceph-mon1.example.local
[ceph-mon1.example.local][INFO  ] Running command: sudo /bin/ip link show
[ceph-mon1.example.local][INFO  ] Running command: sudo /bin/ip addr show
[ceph-mon1.example.local][DEBUG ] IP addresses found: ['172.16.100.35', '192.168.100.35']
[ceph_deploy.new][DEBUG ] Resolving host ceph-mon1.example.local
[ceph_deploy.new][DEBUG ] Monitor ceph-mon1 at 192.168.100.35
[ceph_deploy.new][DEBUG ] Monitor initial members are ['ceph-mon1']
[ceph_deploy.new][DEBUG ] Monitor addrs are ['192.168.100.35']
[ceph_deploy.new][DEBUG ] Creating a random mon key...
[ceph_deploy.new][DEBUG ] Writing monitor keyring to ceph.mon.keyring...
[ceph_deploy.new][DEBUG ] Writing initial config to ceph.conf...
验证生成的ceph相关配置文件
cephadmin@ceph-deploy:~/ceph-cluster$ ll
total 12
drwxrwxr-x 2 cephadmin cephadmin   75 Oct 22 10:05 ./
drwxr-xr-x 6 cephadmin cephadmin  178 Oct 21 08:40 ../
-rw-rw-r-- 1 cephadmin cephadmin  269 Oct 22 10:01 ceph.conf     #自动生成的配置文件
-rw-rw-r-- 1 cephadmin cephadmin 3640 Oct 22 10:01 ceph-deploy-ceph.log    #初始化日志
-rw------- 1 cephadmin cephadmin   73 Oct 22 10:01 ceph.mon.keyring    #用于 ceph mon 节点内部通讯认证的秘钥环文件
 ceph.conf配置
cephadmin@ceph-deploy:~/ceph-cluster$ cat ceph.conf
[global]
fsid = 5372c074-edf7-45dd-b635-16422165c17c     #ceph 的集群 ID
public_network = 192.168.100.0/24
cluster_network = 172.16.100.0/24
mon_initial_members = ceph-mon1		#可以用逗号做分割添加多个 mon 节点
mon_host = 192.168.100.35
auth_cluster_required = cephx
auth_service_required = cephx
auth_client_required = cephxs
安装 mon 服务
在各 mon 节点按照组件 ceph-mon,并通初始化 mon 节点,mon 节点 HA 还可以后期横向扩容。
Ubuntu安装ceph-mon:
root@ceph-mon1:~# apt-cache madison ceph-mon
  ceph-mon | 16.2.10-1bionic | https://mirrors.tuna.tsinghua.edu.cn/ceph/debian-pacific bionic/main amd64 Packages
  ceph-mon | 12.2.13-0ubuntu0.18.04.10 | http://mirrors.tuna.tsinghua.edu.cn/ubuntu bionic-updates/main amd64 Packages
  ceph-mon | 12.2.13-0ubuntu0.18.04.10 | http://mirrors.tuna.tsinghua.edu.cn/ubuntu bionic-security/main amd64 Packages
  ceph-mon | 12.2.4-0ubuntu1 | http://mirrors.tuna.tsinghua.edu.cn/ubuntu bionic/main amd64 Packages

root@ceph-mon1:~# apt install ceph-mon
centos安装ceph-mon
[root@ceph-mon1 ~]# yum install ceph-mon -yceph集群添加ceph-mon服务
在ceph-deploy节点集群目录下执行创建ceph-mon服务
cephadmin@ceph-deploy:~/ceph-cluster$ pwd
/home/cephadmin/ceph-cluster
cephadmin@ceph-deploy:~/ceph-cluster$ ceph-deploy mon create-initial


[ceph_deploy.conf][DEBUG ] found configuration file at: /home/cephadmin/.cephdeploy.conf
[ceph_deploy.cli][INFO  ] Invoked (2.0.1): /usr/local/bin/ceph-deploy mon create-initial
[ceph_deploy.cli][INFO  ] ceph-deploy options:
[ceph_deploy.cli][INFO  ]  verbose                       : False
[ceph_deploy.cli][INFO  ]  quiet                         : False
[ceph_deploy.cli][INFO  ]  username                      : None
[ceph_deploy.cli][INFO  ]  overwrite_conf                : False
[ceph_deploy.cli][INFO  ]  ceph_conf                     : None
[ceph_deploy.cli][INFO  ]  cluster                       : ceph
[ceph_deploy.cli][INFO  ]  subcommand                    : create-initial
[ceph_deploy.cli][INFO  ]  cd_conf                       : <ceph_deploy.conf.cephdeploy.Conf object at 0x7f05da046358>
[ceph_deploy.cli][INFO  ]  default_release               : False
[ceph_deploy.cli][INFO  ]  func                          : <function mon at 0x7f05da6aeae8>
[ceph_deploy.cli][INFO  ]  keyrings                      : None
[ceph_deploy.mon][DEBUG ] Deploying mon, cluster ceph hosts ceph-mon1
[ceph_deploy.mon][DEBUG ] detecting platform for host ceph-mon1 ...
The authenticity of host 'ceph-mon1 (172.16.100.35)' can't be established.
ECDSA key fingerprint is SHA256:T0GHaJiIzPaG+6KQF+KR2VZpAQWe7tX0iu8j/qADvlQ.
Are you sure you want to continue connecting (yes/no)? yes     #<----输入yes
Warning: Permanently added 'ceph-mon1' (ECDSA) to the list of known hosts.
[ceph-mon1][DEBUG ] connection detected need for sudo
[ceph-mon1][DEBUG ] connected to host: ceph-mon1
[ceph_deploy.mon][INFO  ] distro info: Ubuntu 18.04 bionic
[ceph-mon1][DEBUG ] determining if provided host has same hostname in remote
[ceph-mon1][DEBUG ] deploying mon to ceph-mon1
[ceph-mon1][DEBUG ] remote hostname: ceph-mon1
[ceph-mon1][DEBUG ] checking for done path: /var/lib/ceph/mon/ceph-ceph-mon1/done
[ceph-mon1][DEBUG ] done path does not exist: /var/lib/ceph/mon/ceph-ceph-mon1/done
[ceph-mon1][INFO  ] creating keyring file: /var/lib/ceph/tmp/ceph-ceph-mon1.mon.keyring
[ceph-mon1][INFO  ] Running command: sudo ceph-mon --cluster ceph --mkfs -i ceph-mon1 --keyring /var/lib/ceph/tmp/ceph-ceph-mon1.mon.keyring --setuser 64045 --setgroup 64045
[ceph-mon1][INFO  ] unlinking keyring file /var/lib/ceph/tmp/ceph-ceph-mon1.mon.keyring
[ceph-mon1][INFO  ] Running command: sudo systemctl enable ceph.target
[ceph-mon1][INFO  ] Running command: sudo systemctl enable ceph-mon@ceph-mon1
[ceph-mon1][WARNIN] Created symlink /etc/systemd/system/ceph-mon.target.wants/ceph-mon@ceph-mon1.service → /lib/systemd/system/ceph-mon@.service.
[ceph-mon1][INFO  ] Running command: sudo systemctl start ceph-mon@ceph-mon1
[ceph-mon1][INFO  ] Running command: sudo ceph --cluster=ceph --admin-daemon /var/run/ceph/ceph-mon.ceph-mon1.asok mon_status
[ceph-mon1][DEBUG ] ********************************************************************************
[ceph-mon1][DEBUG ] status for monitor: mon.ceph-mon1
[ceph-mon1][DEBUG ] {
[ceph-mon1][DEBUG ]   "election_epoch": 3,
[ceph-mon1][DEBUG ]   "extra_probe_peers": [],
[ceph-mon1][DEBUG ]   "feature_map": {
[ceph-mon1][DEBUG ]     "mon": [
[ceph-mon1][DEBUG ]       {
[ceph-mon1][DEBUG ]         "features": "0x3f01cfb9fffdffff",
[ceph-mon1][DEBUG ]         "num": 1,
[ceph-mon1][DEBUG ]         "release": "luminous"
[ceph-mon1][DEBUG ]       }
[ceph-mon1][DEBUG ]     ]
[ceph-mon1][DEBUG ]   },
[ceph-mon1][DEBUG ]   "features": {
[ceph-mon1][DEBUG ]     "quorum_con": "4540138297136906239",
[ceph-mon1][DEBUG ]     "quorum_mon": [
[ceph-mon1][DEBUG ]       "kraken",
[ceph-mon1][DEBUG ]       "luminous",
[ceph-mon1][DEBUG ]       "mimic",
[ceph-mon1][DEBUG ]       "osdmap-prune",
[ceph-mon1][DEBUG ]       "nautilus",
[ceph-mon1][DEBUG ]       "octopus",
[ceph-mon1][DEBUG ]       "pacific",
[ceph-mon1][DEBUG ]       "elector-pinging"
[ceph-mon1][DEBUG ]     ],
[ceph-mon1][DEBUG ]     "required_con": "2449958747317026820",
[ceph-mon1][DEBUG ]     "required_mon": [
[ceph-mon1][DEBUG ]       "kraken",
[ceph-mon1][DEBUG ]       "luminous",
[ceph-mon1][DEBUG ]       "mimic",
[ceph-mon1][DEBUG ]       "osdmap-prune",
[ceph-mon1][DEBUG ]       "nautilus",
[ceph-mon1][DEBUG ]       "octopus",
[ceph-mon1][DEBUG ]       "pacific",
[ceph-mon1][DEBUG ]       "elector-pinging"
[ceph-mon1][DEBUG ]     ]
[ceph-mon1][DEBUG ]   },
[ceph-mon1][DEBUG ]   "monmap": {
[ceph-mon1][DEBUG ]     "created": "2022-10-22T07:30:07.716415Z",
[ceph-mon1][DEBUG ]     "disallowed_leaders: ": "",
[ceph-mon1][DEBUG ]     "election_strategy": 1,
[ceph-mon1][DEBUG ]     "epoch": 1,
[ceph-mon1][DEBUG ]     "features": {
[ceph-mon1][DEBUG ]       "optional": [],
[ceph-mon1][DEBUG ]       "persistent": [
[ceph-mon1][DEBUG ]         "kraken",
[ceph-mon1][DEBUG ]         "luminous",
[ceph-mon1][DEBUG ]         "mimic",
[ceph-mon1][DEBUG ]         "osdmap-prune",
[ceph-mon1][DEBUG ]         "nautilus",
[ceph-mon1][DEBUG ]         "octopus",
[ceph-mon1][DEBUG ]         "pacific",
[ceph-mon1][DEBUG ]         "elector-pinging"
[ceph-mon1][DEBUG ]       ]
[ceph-mon1][DEBUG ]     },
[ceph-mon1][DEBUG ]     "fsid": "5372c074-edf7-45dd-b635-16422165c17c",
[ceph-mon1][DEBUG ]     "min_mon_release": 16,
[ceph-mon1][DEBUG ]     "min_mon_release_name": "pacific",
[ceph-mon1][DEBUG ]     "modified": "2022-10-22T07:30:07.716415Z",
[ceph-mon1][DEBUG ]     "mons": [
[ceph-mon1][DEBUG ]       {
[ceph-mon1][DEBUG ]         "addr": "192.168.100.35:6789/0",
[ceph-mon1][DEBUG ]         "crush_location": "{}",
[ceph-mon1][DEBUG ]         "name": "ceph-mon1",
[ceph-mon1][DEBUG ]         "priority": 0,
[ceph-mon1][DEBUG ]         "public_addr": "192.168.100.35:6789/0",
[ceph-mon1][DEBUG ]         "public_addrs": {
[ceph-mon1][DEBUG ]           "addrvec": [
[ceph-mon1][DEBUG ]             {
[ceph-mon1][DEBUG ]               "addr": "192.168.100.35:3300",
[ceph-mon1][DEBUG ]               "nonce": 0,
[ceph-mon1][DEBUG ]               "type": "v2"
[ceph-mon1][DEBUG ]             },
[ceph-mon1][DEBUG ]             {
[ceph-mon1][DEBUG ]               "addr": "192.168.100.35:6789",
[ceph-mon1][DEBUG ]               "nonce": 0,
[ceph-mon1][DEBUG ]               "type": "v1"
[ceph-mon1][DEBUG ]             }
[ceph-mon1][DEBUG ]           ]
[ceph-mon1][DEBUG ]         },
[ceph-mon1][DEBUG ]         "rank": 0,
[ceph-mon1][DEBUG ]         "weight": 0
[ceph-mon1][DEBUG ]       }
[ceph-mon1][DEBUG ]     ],
[ceph-mon1][DEBUG ]     "stretch_mode": false,
[ceph-mon1][DEBUG ]     "tiebreaker_mon": ""
[ceph-mon1][DEBUG ]   },
[ceph-mon1][DEBUG ]   "name": "ceph-mon1",
[ceph-mon1][DEBUG ]   "outside_quorum": [],
[ceph-mon1][DEBUG ]   "quorum": [
[ceph-mon1][DEBUG ]     0
[ceph-mon1][DEBUG ]   ],
[ceph-mon1][DEBUG ]   "quorum_age": 2,
[ceph-mon1][DEBUG ]   "rank": 0,
[ceph-mon1][DEBUG ]   "state": "leader",
[ceph-mon1][DEBUG ]   "stretch_mode": false,
[ceph-mon1][DEBUG ]   "sync_provider": []
[ceph-mon1][DEBUG ] }
[ceph-mon1][DEBUG ] ********************************************************************************
[ceph-mon1][INFO  ] monitor: mon.ceph-mon1 is running
[ceph-mon1][INFO  ] Running command: sudo ceph --cluster=ceph --admin-daemon /var/run/ceph/ceph-mon.ceph-mon1.asok mon_status
[ceph_deploy.mon][INFO  ] processing monitor mon.ceph-mon1
[ceph-mon1][DEBUG ] connection detected need for sudo
[ceph-mon1][DEBUG ] connected to host: ceph-mon1
[ceph-mon1][INFO  ] Running command: sudo ceph --cluster=ceph --admin-daemon /var/run/ceph/ceph-mon.ceph-mon1.asok mon_status
[ceph_deploy.mon][INFO  ] mon.ceph-mon1 monitor has reached quorum!
[ceph_deploy.mon][INFO  ] all initial monitors are running and have formed quorum
[ceph_deploy.mon][INFO  ] Running gatherkeys...
[ceph_deploy.gatherkeys][INFO  ] Storing keys in temp directory /tmp/tmpsi8x0dkq
[ceph-mon1][DEBUG ] connection detected need for sudo
[ceph-mon1][DEBUG ] connected to host: ceph-mon1
[ceph-mon1][INFO  ] Running command: sudo /usr/bin/ceph --connect-timeout=25 --cluster=ceph --admin-daemon=/var/run/ceph/ceph-mon.ceph-mon1.asok mon_status
[ceph-mon1][INFO  ] Running command: sudo /usr/bin/ceph --connect-timeout=25 --cluster=ceph --name mon. --keyring=/var/lib/ceph/mon/ceph-ceph-mon1/keyring auth get client.admin
[ceph-mon1][INFO  ] Running command: sudo /usr/bin/ceph --connect-timeout=25 --cluster=ceph --name mon. --keyring=/var/lib/ceph/mon/ceph-ceph-mon1/keyring auth get client.bootstrap-mds
[ceph-mon1][INFO  ] Running command: sudo /usr/bin/ceph --connect-timeout=25 --cluster=ceph --name mon. --keyring=/var/lib/ceph/mon/ceph-ceph-mon1/keyring auth get client.bootstrap-mgr
[ceph-mon1][INFO  ] Running command: sudo /usr/bin/ceph --connect-timeout=25 --cluster=ceph --name mon. --keyring=/var/lib/ceph/mon/ceph-ceph-mon1/keyring auth get client.bootstrap-osd
[ceph-mon1][INFO  ] Running command: sudo /usr/bin/ceph --connect-timeout=25 --cluster=ceph --name mon. --keyring=/var/lib/ceph/mon/ceph-ceph-mon1/keyring auth get client.bootstrap-rgw
[ceph_deploy.gatherkeys][INFO  ] Storing ceph.client.admin.keyring
[ceph_deploy.gatherkeys][INFO  ] Storing ceph.bootstrap-mds.keyring
[ceph_deploy.gatherkeys][INFO  ] Storing ceph.bootstrap-mgr.keyring
[ceph_deploy.gatherkeys][INFO  ] keyring 'ceph.mon.keyring' already exists
[ceph_deploy.gatherkeys][INFO  ] Storing ceph.bootstrap-osd.keyring
[ceph_deploy.gatherkeys][INFO  ] Storing ceph.bootstrap-rgw.keyring
[ceph_deploy.gatherkeys][INFO  ] Destroy temp directory /tmp/tmpsi8x0dkq
验证 mon 节点
验证在 mon 定节点已经自动安装并启动了 ceph-mon 服务,并且后期在 ceph-deploy 节点初始化目录会生成一些 bootstrap ceph mds/mgr/osd/rgw 等服务的 keyring 认证文件,这些初始化文件拥有对 ceph 集群的最高权限,所以一定要保存好。
mon节点检查服务
root@ceph-mon1:~# ps -ef|grep ceph-mon
ceph       1523      1  0 15:30 ?        00:00:00 /usr/bin/ceph-mon -f --cluster ceph --id ceph-mon1 --setuser ceph --setgroup ceph
root       2160   2144  0 15:32 pts/0    00:00:00 grep --color=auto ceph-mon
部署 ceph-mgr 节点
ceph 的 Luminious 及以上版本有 manager 节点,早期的版本没有
mgr 节点需要读取 ceph 的配置文件,即/etc/ceph 目录中的配置文件
cephadmin@ceph-deploy:~/ceph-cluster$ pwd
/home/cephadmin/ceph-cluster
[cephadmin@ceph-deploy ceph-cluster]$ ceph-deploy mgr --help
1、手动在mgr节点部署ceph-mgr
可以在mgr节点先安装ceph-mgr,ceph-deploy初始化mgr就能节省一些时间
root@ceph-mgr1:~# apt-cache madison ceph-mgr
  ceph-mgr | 16.2.10-1bionic | https://mirrors.tuna.tsinghua.edu.cn/ceph/debian-pacific bionic/main amd64 Packages
  ceph-mgr | 12.2.13-0ubuntu0.18.04.10 | http://mirrors.tuna.tsinghua.edu.cn/ubuntu bionic-updates/main amd64 Packages
  ceph-mgr | 12.2.13-0ubuntu0.18.04.10 | http://mirrors.tuna.tsinghua.edu.cn/ubuntu bionic-security/main amd64 Packages
  ceph-mgr | 12.2.4-0ubuntu1 | http://mirrors.tuna.tsinghua.edu.cn/ubuntu bionic/main amd64 Packages

root@ceph-mgr1:~# apt install ceph-mgr
2、初始化ceph-mgr
在ceph-deploy节点执行
cephadmin@ceph-deploy:~/ceph-cluster$ ceph-deploy mgr create ceph-mgr1
3、验证 ceph-mgr 节点
登录到mgr1节点,查看ceph-mgr进程
root@ceph-mgr1:~# ps -ef|grep ceph-mgr
ceph      12836      1  3 17:15 ?        00:00:04 /usr/bin/ceph-mgr -f --cluster ceph --id ceph-mgr1 --setuser ceph --setgroup ceph
root      13104   1143  0 17:17 pts/0    00:00:00 grep --color=auto ceph-mgr
分发 admin 秘钥
在ceph-deploy 节点把配置文件和 admin 密钥拷贝至 Ceph 集群需要执行 ceph 管理命令的节点,从而不需要后期通过 ceph 命令对 ceph 集群进行管理配置的时候每次都需要指定ceph-mon 节点地址和 ceph.client.admin.keyring 文件,另外各 ceph-mon 节点也需要同步ceph 的集群配置文件与认证文件。
在ceph-deploy 节点管理集群就需要安装ceph-common组件包含了ceph相关命令
cephadmin@ceph-deploy:~/ceph-cluster$ sudo apt install ceph-common
推送admin秘钥到本机部署节点
cephadmin@ceph-deploy:~/ceph-cluster$ ceph-deploy admin ceph-deploy
推送mon节点
cephadmin@ceph-deploy:~/ceph-cluster$ ceph-deploy admin ceph-mon1
将admin秘钥推送到node节点
cephadmin@ceph-deploy:~/ceph-cluster$ ceph-deploy admin ceph-node1 ceph-node2 ceph-node3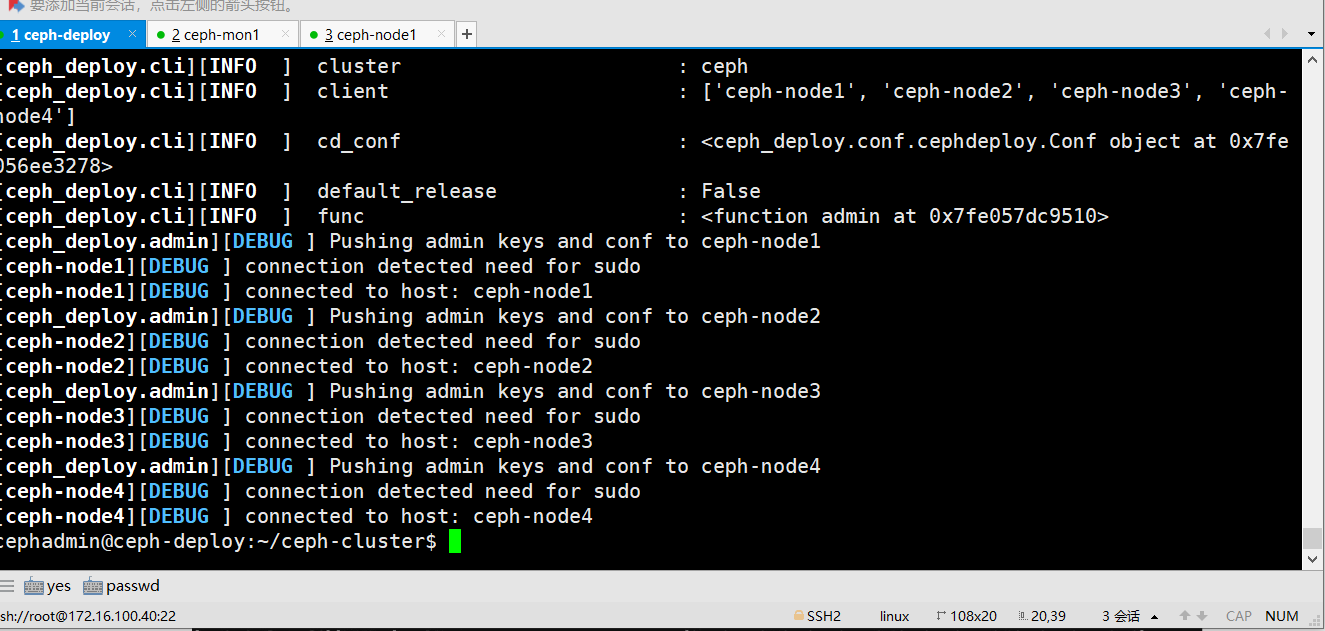
ceph 节点验证秘钥
到 node 节点验证 key 文件
root@ceph-node1:~# ll /etc/ceph/
total 24
drwxr-xr-x  2 root root   89 Oct 22 16:19 ./
drwxr-xr-x 90 root root 8192 Oct 22 16:03 ../
-rw-------  1 root root  151 Oct 22 16:19 ceph.client.admin.keyring    #admin key
-rw-r--r--  1 root root  269 Oct 22 16:19 ceph.conf
-rw-r--r--  1 root root   92 Jul 22 01:38 rbdmap
-rw-------  1 root root    0 Oct 22 16:19 tmpfjuuh4lh
认证文件的属主和属组为了安全考虑,默认设置为了 root 用户和 root 组,如果需要 cephadmin 用户也能执行 ceph 命令,那么就需要对 cephadmin 用户进行授权
所有节点执行
root@ceph-node1:~# setfacl -m u:cephadmin:rw /etc/ceph/ceph.client.admin.keyring
查看ceph集群状态
cephadmin@ceph-deploy:~/ceph-cluster$ ceph -s
  cluster:
    id:     5372c074-edf7-45dd-b635-16422165c17c
    health: HEALTH_WARN
            mon is allowing insecure global_id reclaim   #需要禁用非安全模式通信
            OSD count 0 < osd_pool_default_size 3    #集群的 OSD 数量小于 3

  services:
    mon: 1 daemons, quorum ceph-mon1 (age 110m)
    mgr: ceph-mgr1(active, since 4m)
    osd: 0 osds: 0 up, 0 in

  data:
    pools:   0 pools, 0 pgs
    objects: 0 objects, 0 B
    usage:   0 B used, 0 B / 0 B avail
    pgs:
禁用mon非安全模式通信
cephadmin@ceph-deploy:~/ceph-cluster$ ceph config set mon auth_allow_insecure_global_id_reclaim false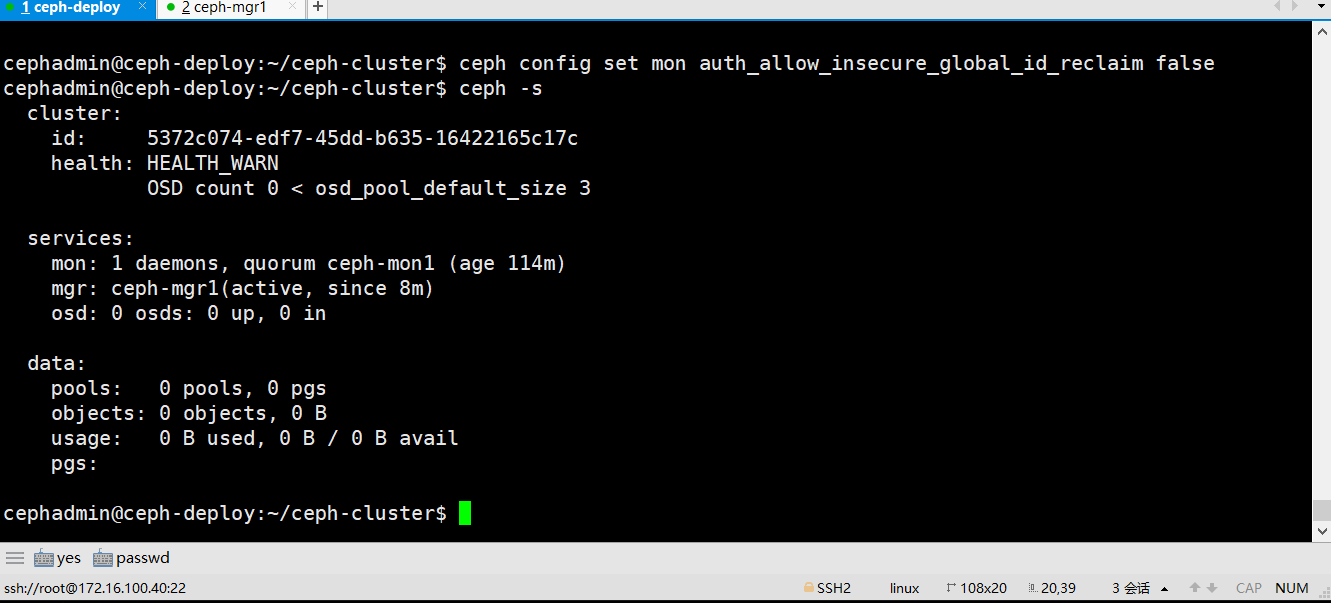
本文来自博客园,作者:PunchLinux,转载请注明原文链接:https://www.cnblogs.com/punchlinux/p/17053624.html

 浙公网安备 33010602011771号