[WPF] WPF项目架构设计
分享基于.NET 4.5的WFP项目架构设计。
一、项目结构
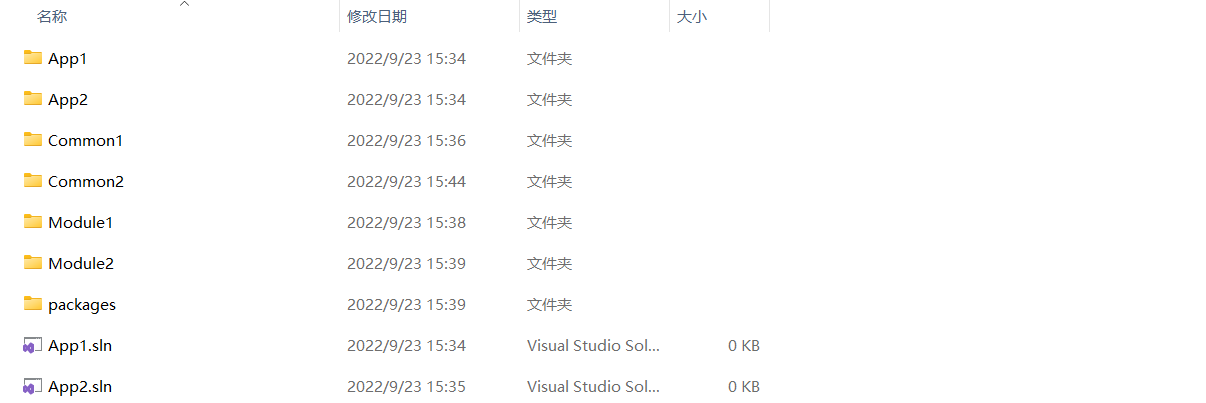
我们的代码不可能集中在一个项目,缺少共用性,当一个git仓库存在多个项目时,我希望项目结构如下所示:

- App1、App2文件夹是项目主程序,但是它们的解决方案文件放在根目录,分别是App1.sln和App2.sln,这样的好处是被引用的公共项目的Nuget包都放在根目录的packages里面,如果解决方案分别放在App1、App2里面,则Nuget包分别在不同文件夹,那么当你给App1引用的项目1添加Nuget包时,项目1.project文件会使用相对项目1所在文件的路径,如果项目1同时被App2所引用,项目1的Nuget包依然指向App1,总之,Nuget多了一份,而且引用还很乱,所以最好把解决方案文件放在一起;
- Common1、Common2指公共项目,比如基础库,WPF UI库,附件程序等,这些项目可能被主程序共同引用,所有不要单独放在App1文件夹;
- Module1、Module2是模块化项目,它们可能是App1里的一个模块,也可能是App1、App2共有的模块,模块化后面会讲到;
二、UI库、基础库
这里建议将UI库和基础库放在一起,作为一个核心代码库,如果分开的话,UI库必然会引用基础库,这样基础库就没办法再引用UI库了,依赖注入可以解决双向引用的问题,但是这里我们会将依赖注入代码放在基础库,所以最好还是将这两个库放在一起。
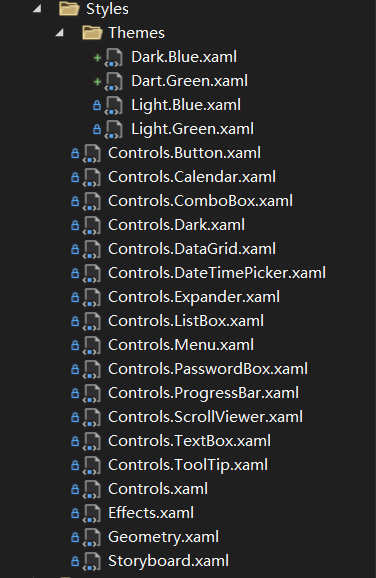
下面是基本控件样式,文件结构如下所示:

- Themes文件夹是主题色,定义哪些颜色后面会讨论;
- Control.XXX是特定控件的样式,如果把所有样式写在一起会很乱,当然,日历控件模板里面的按钮样式,还是写在一起比较好;
- Effects是阴影资源;
- Geometry是矢量图标资源;
- Storyboard是动画资源;
下面看看主题资源都有哪些:
<!--字体-->
<FontFamily x:Key="Font">Microsoft YaHei UI,微软雅黑,Times New Roman,Courier New,宋体</FontFamily>

<!--主题色-->
<SolidColorBrush x:Key="Brushes.Background" Color="#FFFFFF" options:Freeze="True" />
<SolidColorBrush x:Key="Brushes.Foreground" Color="#333333" options:Freeze="True" />
<SolidColorBrush x:Key="Brushes.Themes" Color="#0090FF" options:Freeze="True" />
<SolidColorBrush x:Key="Brushes.Themes.Highlight" Color="#0078D4" options:Freeze="True" />
<SolidColorBrush x:Key="Brushes.Themes.Foreground" Color="#FFFFFF" options:Freeze="True" />

<!--遮罩-->
<SolidColorBrush x:Key="Brushes.Mask" Color="#99000000" options:Freeze="True" />

<!--输入框-->
<Thickness x:Key="InputBox.Padding">10 5</Thickness>
<CornerRadius x:Key="InputBox.CornerRadius">4</CornerRadius>
<SolidColorBrush x:Key="Brushes.InputBox.Background" Color="#ffffff" options:Freeze="True" />
<SolidColorBrush x:Key="Brushes.InputBox.Background.Hover" Color="#ffffff" options:Freeze="True" />
<SolidColorBrush x:Key="Brushes.InputBox.Background.Focus" Color="#ffffff" options:Freeze="True" />
<SolidColorBrush x:Key="Brushes.InputBox.Background.Disabled" Color="#f1f1f1" options:Freeze="True" />
<SolidColorBrush x:Key="Brushes.InputBox.BorderBrush" Color="#c7ccd2" options:Freeze="True" />
<SolidColorBrush x:Key="Brushes.InputBox.BorderBrush.Hover" Color="#6facff" options:Freeze="True" />
<SolidColorBrush x:Key="Brushes.InputBox.BorderBrush.Focus" Color="#6facff" options:Freeze="True" />
<SolidColorBrush x:Key="Brushes.InputBox.BorderBrush.Disabled" Color="#c7ccd2" options:Freeze="True" />
<SolidColorBrush x:Key="Brushes.InputBox.Foreground" Color="#333" options:Freeze="True" />
<SolidColorBrush x:Key="Brushes.InputBox.Watermark.Foreground" Color="#a6a6a6" options:Freeze="True" />

<!--下拉框-->
<sys:Double x:Key="ComboBox.Icon.Width">14</sys:Double>
<sys:Double x:Key="ComboBoxItem.MinHeight">36</sys:Double>
<sys:Double x:Key="ComboBox.Popup.VerticalOffset">0</sys:Double>
<Thickness x:Key="ComboBox.Icon.Margin">10 0</Thickness>
<Thickness x:Key="ComboBox.Popup.BorderThickness">0</Thickness>
<CornerRadius x:Key="ComboBox.Popup.CornerRadius">4</CornerRadius>
<SolidColorBrush x:Key="Brushes.ComboBox.Icon.Fill" Color="#a5a9ae" options:Freeze="True" />
<SolidColorBrush x:Key="Brushes.ComboBox.Icon.Fill.Hover" Color="#a5a9ae" options:Freeze="True" />
<SolidColorBrush x:Key="Brushes.ComboBoxItem.Background" Color="Transparent" options:Freeze="True" />
<SolidColorBrush x:Key="Brushes.ComboBoxItem.Background.Hover" Color="#f3f3f3" options:Freeze="True" />
<SolidColorBrush x:Key="Brushes.ComboBoxItem.Background.Select" Color="#f3f3f3" options:Freeze="True" />
<SolidColorBrush x:Key="Brushes.ComboBoxItem.Foreground" Color="#333" options:Freeze="True" />
<SolidColorBrush x:Key="Brushes.ComboBoxItem.Foreground.Hover" Color="#333" options:Freeze="True" />
<SolidColorBrush x:Key="Brushes.ComboBoxItem.Foreground.Select" Color="#333" options:Freeze="True" />
<SolidColorBrush x:Key="Brushes.ComboBox.Popup.Background" Color="White" options:Freeze="True" />
<SolidColorBrush x:Key="Brushes.ComboBox.Popup.BorderBrush" Color="Transparent" options:Freeze="True" />

<!--列表-->
<Thickness x:Key="TabelCell.Padding">12 4</Thickness>
<SolidColorBrush x:Key="Brushes.TabelHeader.Foreground" Color="#333" options:Freeze="True" />
<SolidColorBrush x:Key="Brushes.TabelCell.Foreground" Color="#5c5c5c" options:Freeze="True" />
<SolidColorBrush x:Key="Brushes.ListItem.Background1" Color="#f5f6f7" options:Freeze="True" />
<SolidColorBrush x:Key="Brushes.ListItem.Background2" Color="White" options:Freeze="True" />
<SolidColorBrush x:Key="Brushes.ListItem.Background.Hover" Color="#ebf5ff" options:Freeze="True" />
<SolidColorBrush x:Key="Brushes.ListItem.Background.Select" Color="#cdeafd" options:Freeze="True" />
<SolidColorBrush x:Key="Brushes.ListItem.Line" Color="#e3e3e3" options:Freeze="True" />

<!--文字-->
<SolidColorBrush x:Key="Brushes.Foreground.Label" Color="#6f6f6f" options:Freeze="True" />
<SolidColorBrush x:Key="Brushes.Foreground.Warning" Color="#ff8f0a" options:Freeze="True" />
<SolidColorBrush x:Key="Brushes.Foreground.Danger" Color="#ed1414" options:Freeze="True" />
<SolidColorBrush x:Key="Brushes.Foreground.Link" Color="#2d8cf0" options:Freeze="True" />
<SolidColorBrush x:Key="Brushes.Foreground.Link.Hover" Color="#63afff" options:Freeze="True" />
<SolidColorBrush x:Key="Brushes.Foreground.Link.Disabled" Color="#999" options:Freeze="True" />
<SolidColorBrush x:Key="Brushes.Foreground.Link.Split" Color="#999" options:Freeze="True" />
上面定义了很多控件相关的资源,比如输入框和下拉框的边框颜色肯定是一样的,所以共有一个资源,当有切换主题色的需求时,或某个页面使用另一个主题时,使用动态资源DynamicResource,引入暗色主题资源即可。
三、MVVM、IOC、消息发布-订阅、模块化
这里放在一起是因为直接借鉴了Prism.Wpf,但Prism.Wpf最新稳定版最低支持是.NET4.6,无法在.NET4.5使用,所幸源码并不复杂,我们把需要的代码抄下来就可以了,一方面去掉了用不到的功能,比如Region Navigation,甚至ViewModelLocator也是不用的,另一方面还可以根据需求修改源码,比如支持泛型的DelegateCommand,支持异步的AsyncDelegateCommand。
MVVM的话,我习惯ViewModelFirst,就是根据ViewModel自动查询View,这样做的好处是在适配多种分辨率时,可以动态的查找View,相反,如果你使用new View()的话,动态创建适当分辨率的View很麻烦,后面讲多分辨率适配时会细说。
IOC就按推荐使用Unity库,IOC就注册和使用,用什么库应该都差不多,重要的是把IOC容器这个全局对象放基础库。
消息发布-订阅直接抄自Prism.Wpf,但是修改了源码,添加了继承自EventArgs的RoutePubSubEventArgs,它有个Handled属性,就像路由事件一样,如果已处理就不会往下传递了,消息发布-订阅在模块之间传递消息,真的能降低很大的耦合度。
模块化也是必要的,也是直接抄Prism.Wpf,模块化真的是很好的代码习惯,至少你不会把多个模块的代码写在一起,虽然明知道很多模块只有一个项目使用,但谁知道后面会不会多个项目使用呢,万一微软的跨平台成功了呢,你写的模块化代码是不是就能很好地迁移?
四、多分辨率适配
该方案仅适合单个屏幕且全屏(或最大化)显示的应用,思路就是根据ViewModel动态加载当前分辨率最适合的View,假设当前分辨率是1920x1080,则创建App.ViewModels.ShellViewModel匹配的View是App.View._1920x1080.ShellView,倘若不存在,则查找邻近分辨率的View,最后再查找App.View.ShellView(自适应所有分辨率),核心代码如下:
protected override FrameworkElement CreateView()
{
    var type = this.GetType();

    // 按命名规则获取View的类型
    var name_space = type.Namespace.Replace("ViewModel", "View");
    var name = type.Name.Replace("ViewModel", "View");

    // 按最优分辨率查找
    Type view_type = null;

    foreach (var screen in Screens)
    {
        var fullName = $"{name_space}.{screen.Key}.{name}";

        view_type = type.Assembly.DefinedTypes.FirstOrDefault(q => q.FullName == fullName);

        if (view_type != null)
            break;
    }

    if (view_type == null)
    {
        var fullName = $"{name_space}.{name}";
        view_type = type.Assembly.DefinedTypes.FirstOrDefault(q => q.FullName == fullName);

        if (view_type == null)
            throw new Exception(type.FullName + "对应的View未找到!");
    }

    return Activator.CreateInstance(view_type) as FrameworkElement;
}
最后还需要ViewBox进行拉伸,拉伸的严重程度取决于当前分辨率与支持的分辨率的差异,假设分辨率一样,则几乎是没有拉伸的;ViewBox需要放在窗口的最外层,实例代码如下:
<Window x:Class="AppAnalyser.Views.MainWindow"
        xmlns="http://schemas.microsoft.com/winfx/2006/xaml/presentation"
        xmlns:d="http://schemas.microsoft.com/expression/blend/2008"
        xmlns:x="http://schemas.microsoft.com/winfx/2006/xaml"
        xmlns:mc="http://schemas.openxmlformats.org/markup-compatibility/2006"
        mc:Ignorable="d"
        d:DesignHeight="1080" d:DesignWidth="1920"
        x:Name="window">
    <Viewbox x:Name="viewBox" Stretch="Fill">
        <Grid x:Name="layerPanel" Width="1920" Height="1080" />
    </Viewbox>
</Window>
这样一来,页面就不需要担心页面大小是多少了,直接按1920的设计图实现就行;假设你的应用是最大化显示的,则layerPanel的高度减去任务栏高度即可,每种分辨率的任务栏高度最好是个固定值,因为后面还要计算,这里固定40单位;
最后适配了N种分辨率并不意味着View要写N遍,可以用下面偷懒的办法:
namespace App.Views._1280x720
{
    public class HomeView : _1920x1080.HomeView
    {
        public HomeView()
        {
            LayoutTransform = new ScaleTransform(1280d / 1920d, 680d / 1040d);
        }
    }
}
这里是减去任务栏高度之后的缩放,注意要使用LayoutTransform。
五、应对弹窗的层级架构
相信大多数新人弹窗都喜欢用模态的Window,Loading也用Window,遮罩也用Window,而且还喜欢用全屏的Window,虽然简单粗暴,但是体验是很不好的,下面一步步地优化吧。
从简单的开始吧,Loading应该作为一个用户控件加载到类似Grid的面板中,这样既轻巧又可以实现一个局部Loading,在做多Tab页的应用时尤为适用;
同理,遮罩也应该作为用户控件加载到Grid中,这样可以实现局部的遮罩,当一个窗口有多个子窗口时,遮罩还是那一个,只是全部子窗口消失时才隐藏遮罩,相比全屏窗口的遮罩,这样的好处是遮罩只有恰当的一层,不会因为多个遮罩而黑麻麻的一片,当然这样的遮罩不止是有弹窗才显示,有时Loading也需要显示遮罩,或者是其他用户控件"弹"出来,如何使遮罩兼容用户控件和真正的弹窗,我使用IMaskHost、IMaskHolder和IMaskHolderHandler等接口处理,接口的定义如下:
/// <summary>
/// 遮罩容器
/// </summary>
public interface IMaskHost
{
    void ShowMask<T>(T t) where T : IMaskHolder;

    void DismissMask<T>(T t) where T : IMaskHolder;

    IMaskHolder[] MaskHolders { get; }
}
/// <summary>
/// 遮罩持有者
/// </summary>
public interface IMaskHolder
{
    IMaskHolderHandler MaskHolderHandler { get; }
}
/// <summary>
/// 遮罩持有者处理器
/// </summary>
public interface IMaskHolderHandler
{
    bool IsActiveMaskHolder { get; set; }
    WeakDelegate<Action<bool>> PreviewSetActiveMaskHolder { get; set; }
    WeakDelegate<Action<bool>> IsActiveMaskHolderChanged { get; set; }

    Window OwnerWindow { get; set; }
    WeakDelegate<Action<Window, Window>> OwnerWindowChanged { get; set; }
}
为了方便代码管理,这里使用了统一的遮罩处理器MaskHolderHandler,有点效仿CefSharp的IHandler吧,具体实现就不说了。
接下来介绍如何用异步的方式实现模态窗效果的非模态窗口,演示代码如下:
public virtual Task<bool?> ShowAsync(CancellationToken token)
{
    base.Show(layerPanel);

    if (token.CanBeCanceled)
        token.Register((() => Close(null)););

    _tcs = new TaskCompletionSource<bool?>();
    return _tcs.Task;
}

public async void Close(bool? ret = null)
{
    base.Close();

    if (_tcs != null && !_tcs.Task.IsCompleted)
        _tcs.TrySetResult(ret);
}
原理就是使用TaskCompletionSource返回一个Task,同理这种方式不止适用于Window,用户控件的"弹窗"也是这么实现的。
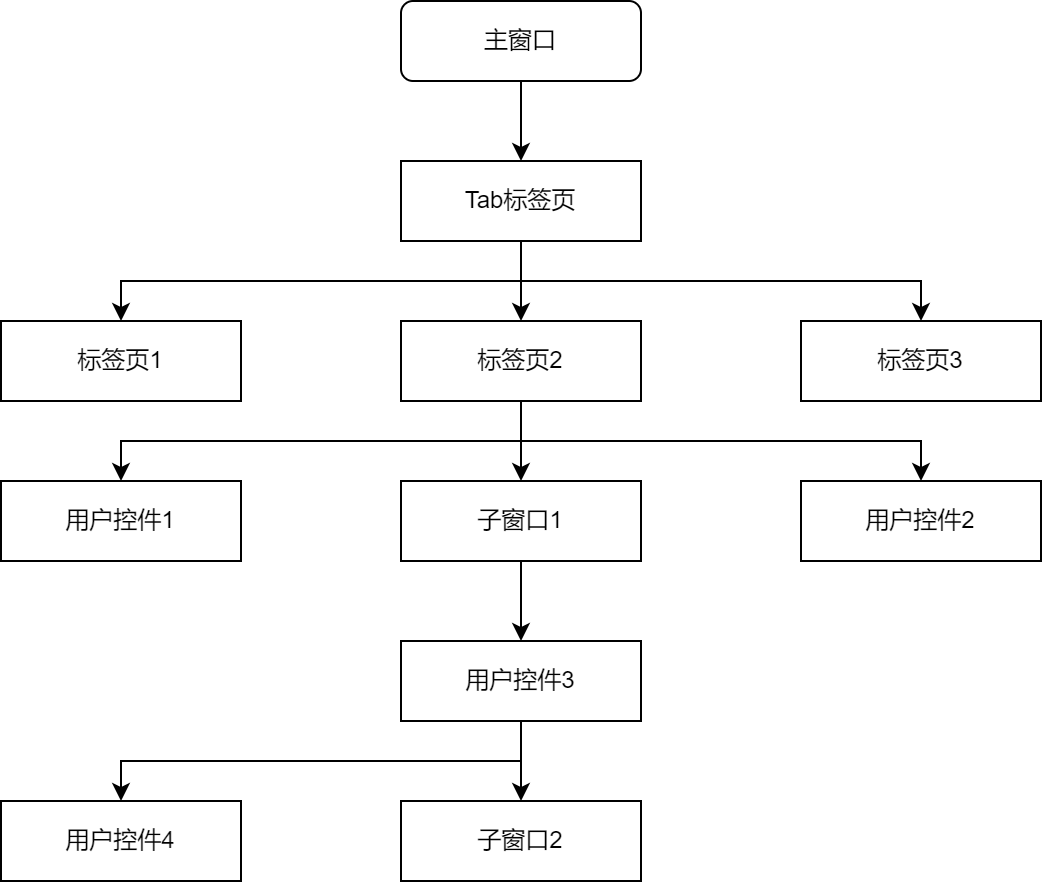
到目前为止,介绍了用非模态弹窗实现模态窗效果,用户控件形式的"弹窗",以及遮罩的实现,那么把这些串起来就可以实现下面的层级架构:

各控件之间的关系一定会符合上图的树状图关系结构,实现的层级架构实现如下功能:
- 假设标签页1子节点和标签页2一样,则点击标签页1时,前置标签页1的子窗口1->用户控件3->子窗口2;
- 在标签页2添加用户控件2时,用户控件2在用户控件1之上,并且隐藏子窗口1,在移除用户控件2之后,显示子窗口1;
- 子窗口1的父窗口是主窗口,当标签页2窗口化时,子窗口1的父窗口变更为标签页2所在新窗口;
- 关闭子窗口1时,关闭子窗口2;
- 当子窗口2最小化或隐藏时,用户控件3显示遮罩,点击遮罩前置显示子窗口2;
- 当标签页2是选中项时,即可在标签页3弹窗子窗口也会立即隐藏;
要实现上述功能,需要确定主线,上图的主线为:主窗口->Tab标签页->标签页2->子窗口1->用户控件3->子窗口2,当选中标签页2时,依次前置后续节点,最终看到子窗口2在最前面;当主线设置为主窗口->Tab标签页->标签页2->用户控件1时,子窗口1和子窗口2自动隐藏;IMaskHost和IMaskHolder正是为此设计。
当这里,重要项便说完了,有兴趣看的就继续看下去吧。
六、程序异常处理
异常分为UI线程和非UI线程,使用下面方式捕获并打印这些异常:
public App()
{
    DispatcherUnhandledException += OnDispatcherUnhandledException;
    AppDomain.CurrentDomain.UnhandledException += OnUnhandledException;
    TaskScheduler.UnobservedTaskException += OnUnobservedTaskException;
}

private void OnDispatcherUnhandledException(object sender, DispatcherUnhandledExceptionEventArgs e)
{
    ILog.Error(e.Exception);
    e.Handled = true;   //把 Handled 属性设为true,表示此异常已处理,程序可以继续运行,不会强制退出
}

private void OnUnobservedTaskException(object sender, UnobservedTaskExceptionEventArgs e)
{
    ILog.Error(e.Exception);
    e.SetObserved();    //设置该异常已察觉(这样处理后就不会引起程序崩溃)
}

private void OnUnhandledException(object sender, UnhandledExceptionEventArgs e)
{
    if (e.ExceptionObject is Exception ex)
        ILog.Error(ex);
}
可以发现UI线程异常和Task异常都可以标志为已处理,防止程序退出,防止AppDomain.CurrentDomain.UnhandledException闪退的方式是修改App.config,如下修改即可:
<runtime>
    <legacyUnhandledExceptionPolicy enabled="1" />
</runtime>
最后如何将异常信息转换为优美文本提示给用户看,毕竟总提示用户xx操作失败,却不给点具体提示吧,可以对特定的异常进行翻译,代码如下:
/// <summary>
/// 错误提示
/// </summary>
public interface IErrorTips
{
    string this[int code, params object[] args] { get; }
    string Error(Exception ex);
    string FtpError(Exception ex);
    string HttpError(Exception ex, string requestName);
}

public class ErrorTips : IErrorTips
{
    public string this[int code, params object[] args]
    {
        get
        {
            // ...异常编码表
        }
    }

    public string Error(Exception ex)
    {
        if (ex is DbException)
            return this[103102];
        if (ex is TaskCanceledException)
            return null;
        if (ex is ZipException)
            return this[103104];
        if (ex is UnzipException)
            return this[103105];

        return this[103100];
    }

    public string FtpError(Exception ex)
    {
        if (ex is WebException || ex is SocketException || ex is SshConnectionException)
            return this[100102];
        if (ex is SecurityException)
            return this[100101];
        if (ex is InvalidOperationException)
            return this[100103];

        return Error(ex);
    }

    public string HttpError(Exception ex, string requestName)
    {
        if (ex is HttpRequestException || ex is WebException)
            return this[100100, requestName];
        if (ex is SocketException && ex.InnerException is IOException)
            return this[100105];
        if (ex is HttpRequestTimeoutException)
            return this[100106];

        return Error(ex);
    }
}
七、保留系统动画的透明窗口
相信Windows 11之后,大家实现的动画都难以操作系统动画,特别是透明的窗体被剥夺了动画等特性,如何实现保留系统动画的透明窗口?请查看必读博客:保留系统动画的透明窗口
八、子进程处理数据
使用子进程的有很多好处,例如处理大内存文件避免主程序内存不足,32位程序与64位子进程交互,执行无法立即结束的操作(杀掉进程可立即退出),子进程不需要单独创建一个项目,只需要IpcProcess32和IpcProcess64两个控制台进程即可,公共的DLL生成为Any Cpu,这样既可以被32程序引用又可以被64程序引用,这里发现了没有?我们可以根据平台动态启动32位程序还是64位,我指是主程序。
进程的通信使用最高效的Ipc通信,更多篇章请查看:IpcChannel双向通信,参考MAF的AddInProcess开发插件,服务断开重新打开及服务生存周期管理
<!--字体-->
<FontFamily x:Key="Font">Microsoft YaHei UI,微软雅黑,Times New Roman,Courier New,宋体</FontFamily>
<!--主题色-->
<SolidColorBrush x:Key="Brushes.Background" Color="#FFFFFF" options:Freeze="True" />
<SolidColorBrush x:Key="Brushes.Foreground" Color="#333333" options:Freeze="True" />
<SolidColorBrush x:Key="Brushes.Themes" Color="#0090FF" options:Freeze="True" />
<SolidColorBrush x:Key="Brushes.Themes.Highlight" Color="#0078D4" options:Freeze="True" />
<SolidColorBrush x:Key="Brushes.Themes.Foreground" Color="#FFFFFF" options:Freeze="True" />
<!--遮罩-->
<SolidColorBrush x:Key="Brushes.Mask" Color="#99000000" options:Freeze="True" />
<!--输入框-->
<Thickness x:Key="InputBox.Padding">10 5</Thickness>
<CornerRadius x:Key="InputBox.CornerRadius">4</CornerRadius>
<SolidColorBrush x:Key="Brushes.InputBox.Background" Color="#ffffff" options:Freeze="True" />
<SolidColorBrush x:Key="Brushes.InputBox.Background.Hover" Color="#ffffff" options:Freeze="True" />
<SolidColorBrush x:Key="Brushes.InputBox.Background.Focus" Color="#ffffff" options:Freeze="True" />
<SolidColorBrush x:Key="Brushes.InputBox.Background.Disabled" Color="#f1f1f1" options:Freeze="True" />
<SolidColorBrush x:Key="Brushes.InputBox.BorderBrush" Color="#c7ccd2" options:Freeze="True" />
<SolidColorBrush x:Key="Brushes.InputBox.BorderBrush.Hover" Color="#6facff" options:Freeze="True" />
<SolidColorBrush x:Key="Brushes.InputBox.BorderBrush.Focus" Color="#6facff" options:Freeze="True" />
<SolidColorBrush x:Key="Brushes.InputBox.BorderBrush.Disabled" Color="#c7ccd2" options:Freeze="True" />
<SolidColorBrush x:Key="Brushes.InputBox.Foreground" Color="#333" options:Freeze="True" />
<SolidColorBrush x:Key="Brushes.InputBox.Watermark.Foreground" Color="#a6a6a6" options:Freeze="True" />
<!--下拉框-->
<sys:Double x:Key="ComboBox.Icon.Width">14</sys:Double>
<sys:Double x:Key="ComboBoxItem.MinHeight">36</sys:Double>
<sys:Double x:Key="ComboBox.Popup.VerticalOffset">0</sys:Double>
<Thickness x:Key="ComboBox.Icon.Margin">10 0</Thickness>
<Thickness x:Key="ComboBox.Popup.BorderThickness">0</Thickness>
<CornerRadius x:Key="ComboBox.Popup.CornerRadius">4</CornerRadius>
<SolidColorBrush x:Key="Brushes.ComboBox.Icon.Fill" Color="#a5a9ae" options:Freeze="True" />
<SolidColorBrush x:Key="Brushes.ComboBox.Icon.Fill.Hover" Color="#a5a9ae" options:Freeze="True" />
<SolidColorBrush x:Key="Brushes.ComboBoxItem.Background" Color="Transparent" options:Freeze="True" />
<SolidColorBrush x:Key="Brushes.ComboBoxItem.Background.Hover" Color="#f3f3f3" options:Freeze="True" />
<SolidColorBrush x:Key="Brushes.ComboBoxItem.Background.Select" Color="#f3f3f3" options:Freeze="True" />
<SolidColorBrush x:Key="Brushes.ComboBoxItem.Foreground" Color="#333" options:Freeze="True" />
<SolidColorBrush x:Key="Brushes.ComboBoxItem.Foreground.Hover" Color="#333" options:Freeze="True" />
<SolidColorBrush x:Key="Brushes.ComboBoxItem.Foreground.Select" Color="#333" options:Freeze="True" />
<SolidColorBrush x:Key="Brushes.ComboBox.Popup.Background" Color="White" options:Freeze="True" />
<SolidColorBrush x:Key="Brushes.ComboBox.Popup.BorderBrush" Color="Transparent" options:Freeze="True" />
<!--列表-->
<Thickness x:Key="TabelCell.Padding">12 4</Thickness>
<SolidColorBrush x:Key="Brushes.TabelHeader.Foreground" Color="#333" options:Freeze="True" />
<SolidColorBrush x:Key="Brushes.TabelCell.Foreground" Color="#5c5c5c" options:Freeze="True" />
<SolidColorBrush x:Key="Brushes.ListItem.Background1" Color="#f5f6f7" options:Freeze="True" />
<SolidColorBrush x:Key="Brushes.ListItem.Background2" Color="White" options:Freeze="True" />
<SolidColorBrush x:Key="Brushes.ListItem.Background.Hover" Color="#ebf5ff" options:Freeze="True" />
<SolidColorBrush x:Key="Brushes.ListItem.Background.Select" Color="#cdeafd" options:Freeze="True" />
<SolidColorBrush x:Key="Brushes.ListItem.Line" Color="#e3e3e3" options:Freeze="True" />
<!--文字-->
<SolidColorBrush x:Key="Brushes.Foreground.Label" Color="#6f6f6f" options:Freeze="True" />
<SolidColorBrush x:Key="Brushes.Foreground.Warning" Color="#ff8f0a" options:Freeze="True" />
<SolidColorBrush x:Key="Brushes.Foreground.Danger" Color="#ed1414" options:Freeze="True" />
<SolidColorBrush x:Key="Brushes.Foreground.Link" Color="#2d8cf0" options:Freeze="True" />
<SolidColorBrush x:Key="Brushes.Foreground.Link.Hover" Color="#63afff" options:Freeze="True" />
<SolidColorBrush x:Key="Brushes.Foreground.Link.Disabled" Color="#999" options:Freeze="True" />
<SolidColorBrush x:Key="Brushes.Foreground.Link.Split" Color="#999" options:Freeze="True" />


 浙公网安备 33010602011771号