taro中自定义tabbar实现中间图标凸出效果
遇到的一个需求是在tabbar上有一个凸起的小图标, 但是微信自带的tabbar是没有这个效果的, 无奈,只能使用自定义tabbar,查找了多方文档后发现大多是原生小程序实现, 关于taro文档的少之又少, 所以记录下来,方便下次查看。
该实现方式是借鉴了官方demo以及一位大佬关于原生小程序自定义tabbar的文章
官方demo传送门:自定义tabbar 文章传送门:点击此处
关于taro实现方式,我放在了github上:https://github.com/puerilexy/tabbarDemo
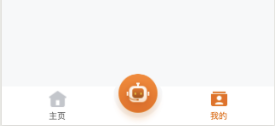
效果展示:(可以看到下面凸出的智能机器人图标)
第一步: 在app.js中的tabbar字段下指定custom: true,即为启用自定义tabbar
config = {
    pages: [
      'pages/index/index',
      'pages/user/user',
      'pages/intellect/intellect'
    ],
    window: {
      backgroundColor: '#f4f4f4',
      backgroundTextStyle: 'light',
      navigationBarBackgroundColor: '#fff',
      navigationBarTitleText: 'WeChat',
      navigationBarTextStyle: 'black'
    },
    tabBar: {
      color: '#666',
      selectedColor: '#ed6c00',
      backgroundColor: '#fafafa',
      borderStyle: 'black',
      custom: true,
      list: [{
        pagePath: 'pages/index/index',
        iconPath: 'assets/home.png',
        selectedIconPath: 'assets/home-active.png',
        text: '主页'
      }, {
        pagePath: 'pages/user/user',
        iconPath: 'assets/user.png',
        selectedIconPath: 'assets/user-active.png',
        text: '我的'
      }]
    }
  }
第二步:在src目录下新建custom-tab-bar文件夹(注意此文件夹和pages文件目录同级)
├── src
    ├── custom-tab-bar
        ├── index.js
        ├── index.scss
    ├── pages
        ├── index
        ├── user
        ├── intellect
在custom-tab-bar下的index文件中代码如下:
import Taro, {
  Component
} from '@tarojs/taro'
import {
  CoverView, CoverImage
} from '@tarojs/components'
import Intellect from '../assets/intellect.png'
import './index.scss'

class customTabBar extends Component {

  state = {
    selected: 0,
    color: '#666',
    selectedColor: '#ed6c00',
    list: [{
        pagePath: '/pages/index/index',
        iconPath: '/assets/home.png',
        selectedIconPath: '/assets/home-active.png',
        text: '主页'
      },
      {
        pagePath: '/pages/user/user',
        iconPath: '/assets/user.png',
        selectedIconPath: '/assets/user-active.png',
        text: '我的'
      }
    ]
  }

  switchTab = (item) => {
    const url = item.pagePath
    Taro.switchTab({
      url
    })
  }

  jumpIntellect = () => {
    Taro.navigateTo({url: '/pages/intellect/intellect'})
  }

  componentDidMount() {
    this.setState({
      selected: this.props.ind
    })
  }

  // 自定义 tabBar的页面
  render() {
    return (
      <CoverView className='tab-bar'>
        <CoverView className='tab-bar-wrap'>
          {
            this.state.list.map((item, index) => {
              return <CoverView className='tab-bar-wrap-item'
                onClick={this.switchTab.bind(this, item)}
                data-path={item.pagePath}
                key={item.text}
              >
                <CoverImage className='tab-bar-wrap-item-icon' src={this.state.selected === index ? item.selectedIconPath : item.iconPath} />
                <CoverView className='tab-bar-wrap-item-btn'
                  style={{color: this.state.selected === index ? this.state.selectedColor : this.state.color}}
                >{item.text}
                </CoverView>
              </CoverView>
            })
          }
        </CoverView>
        <CoverImage className='intellect-icon' src={Intellect} onClick={this.jumpIntellect} />
      </CoverView>
    )
  }
}
export default customTabBar
注意: 这里是我在华为手机测试中出现自定义的tabbar会跟随页面滚动而滚动, 在我选择了cover-view组件后解决了这一问题
另外如果中间的图标跳转为二级页面,则不需要配置在tabbar字段下。
第三步:分别在index合user文件中获取自定义tabbar组件实例,更新选中态(注意:原生小程序中可直接通过this.getTabBar直接获取,在taro中需要通过this.$scope.getTabBar来获取组件实例)
// index.js
componentDidShow () {
  if (typeof this.$scope.getTabBar === 'function' && this.$scope.getTabBar()) {
      this.$scope.getTabBar().$component.setState({
        selected: 0
      })
    }
}


// user.js
componentDidShow () {
  if (typeof this.$scope.getTabBar === 'function' && this.$scope.getTabBar()) {
      this.$scope.getTabBar().$component.setState({
        selected: 1
      })
    }
}
到此,在微信小程序中自定义凸出图标的tabbar就完成了。


