两种OpenXML创建Excel单元格的方式比较
2011-11-20 11:48 ps_zw 阅读(2063) 评论(0) 收藏 举报先给两种使用OpenXML创建Excel单元格的代码
第一种:
private Cell CreateTextCell(int columnIndex, int rowIndex, object cellValue, Nullable<uint> styleIndex)
{
     Cell cell = new Cell();//创建单元格

     cell.DataType = CellValues.InlineString;//设置单元格的数据类型

     cell.CellReference = GetCellReference(columnIndex) + rowIndex;
	//设置单元格的坐标,如A1

     if (styleIndex.HasValue)
          cell.StyleIndex = styleIndex.Value;
	//存在单元格格式则应用改格式

     InlineString inlineString = new InlineString();

     Text txt = new Text();
     txt.Text = cellValue.ToString();
     inlineString.AppendChild(txt);

     cell.AppendChild(inlineString);//设置单元格显示的值

     return cell;
}
第二种:
private Cell CreateValueCell(int columnIndex, int rowIndex, object cellValue, Nullable<uint> styleIndex)
{
    Cell cell = new Cell();
    cell.CellReference = GetCellReference(columnIndex) + rowIndex;

     //有格式则应用格式
     if (styleIndex.HasValue)
           cell.StyleIndex = styleIndex.Value;

    //使用CellValue对象设置单元格的值
    CellValue value = new CellValue();
    value.Text = cellValue.ToString();
   //赋值,仅这一步还不行,还得要下面一步

     cell.AppendChild(value); //将值应用的到单元格

     return cell;
}
private string GetCellReference(int colIndex)
{
     int dividend = colIndex;
     string columnName = String.Empty;
     int modifier;

     while (dividend > 0)
     {
         modifier = (dividend - 1) % 26;
         columnName = Convert.ToChar(65 + modifier).ToString() + columnName;
         dividend = (int)((dividend - modifier) / 26);
     }

     return columnName;
}
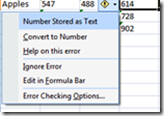
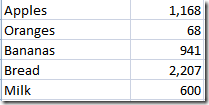
可以看出在使用第一种打开Excel会出现一黄色感叹号,点开会提示您应用格式。第二种创建方式会根据传入的数据类型自行决定对齐方式。
作者:ps_zw
本文版权归作者和博客园共有,欢迎转载,但未经作者同意必须保留此段声明,且在文章页面明显位置给出原文连接,否则保留追究法律责任的权利.


 浙公网安备 33010602011771号