消息队列的使用<二>:ActiveMQ的基本使用(Java)
首发时间:2019-05-16
ActiveMQ
介绍
- ActiveMQ是Apache旗下的一款开源的消息队列(消息中间件MOM,Message Oriented Middleware)
- 它完全支持JMS,支持JMS1.1和J2EE 1.4 规范。
- 支持多种网络协议。
- 兼容多种语言(C,C++,Java,Python,PHP)
- 可以方便地与spring进行整合开发。
- (其他的一些说的太多可能也不是很懂,以后想了解再自己了解吧,毕竟这里只是个小博文。)
下载、安装和初次运行
1.下载:从ActiveMQ官网下载ActiveMQ,地址:http://activemq.apache.org/download.html

2.安装:下载下来的是一个压缩包,解压即安装,直接解压到一个目录即可;
3.初次运行:(在启动ActiveMQ前,请先要已经安装和配置好JDK)在windows版本的activemq中在activeMQ/bin下面有两个目录,为win32,win64,根据自己的系统位数进入不同的目录,然后直接双击目录下的activemq.bat (在linux中为: ./activemq start)
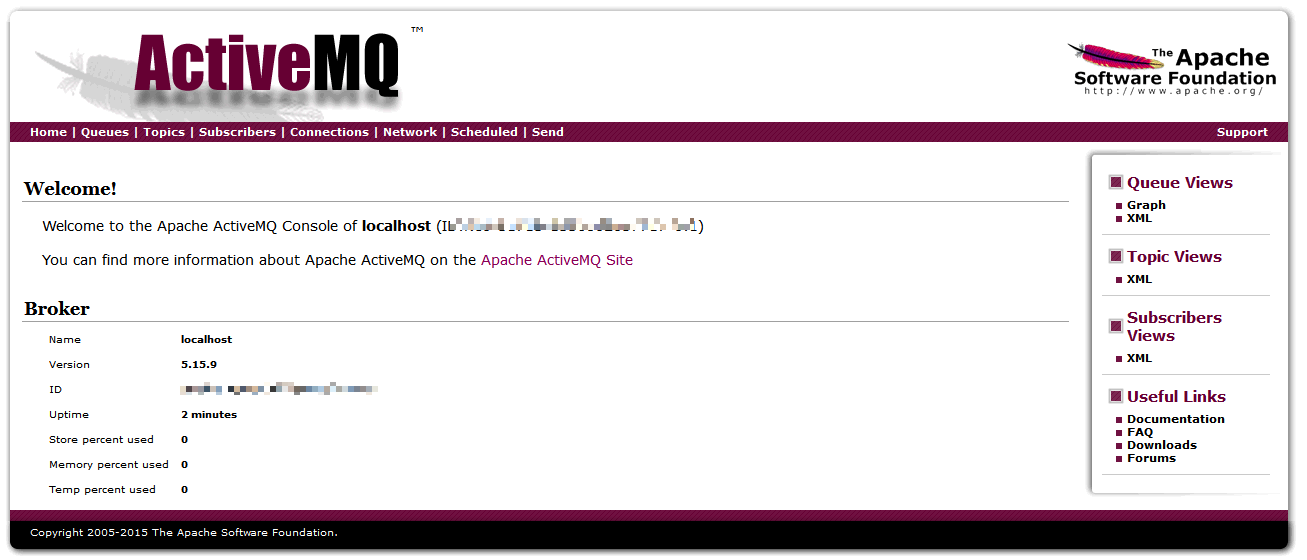
4.检测是否启动:ActiveMQ默认使用61616端口提供JMS服务,使用8161端口提供管理控制台服务,我们可以直接访问activemq的管理控制台网页来确定是否已经开始服务:localhost:8161/admin,默认的用户名和密码都是admin,输入后将进入如下的界面:
5.关闭ActiveMQ:windosw中直接ctrl+c关闭cmd窗口(在linux中: ./activemq stop)
Java上初次使用activeMQ
这里以PTP模型的生产者和消费者的消息传递为例。
1.首先导入依赖包,以maven为例:
        <dependency>
            <groupId>org.apache.activemq</groupId>
            <artifactId>activemq-all</artifactId>
            <version>5.15.9</version>
        </dependency>
2.生产者发送消息(以PTP方式为例):【这里是符合上面的“JMS应用开发基本步骤”的】
import org.apache.activemq.ActiveMQConnectionFactory;
import javax.jms.*;
public class Producer {

    public static void main(String[] args) throws JMSException {
        //1.创建connectionfacoty,参数是activemq的服务地址,前缀tcp代表是tcp连接
        ConnectionFactory connectionFactory = new ActiveMQConnectionFactory("tcp://localhost:61616");
        //2.使用ConnectionFactory创建connnect,并启动connnect
        Connection connection = connectionFactory.createConnection();
        connection.start();
        //3.使用Connection创建session,第一个参数是是否使用事务,第二个参数是确认机制
        Session session = connection.createSession(Boolean.TRUE,Session.AUTO_ACKNOWLEDGE);
        //4.创建目的地(这里以PTP为例,所以目的地是一个Queue),参数是Queue的名字
        Destination destination = session.createQueue("tempqueue");
        //5.创建生产者,第一个参数是目的地,此时创建的生产者要与目的地进行绑定。
        MessageProducer producer = session.createProducer(destination);
        //6.使用session创建消息,这里使用TEXT类型的消息
        TextMessage textMessage = session.createTextMessage("hello world!");
        //7.生产者发送消息
        producer.send(textMessage);
        //8.提交事务
        session.commit();
        //9.关闭资源
        session.close();
        connection.close();
    }
}
3.消费者接收消息(以PTP方式为例):
import org.apache.activemq.ActiveMQConnectionFactory;
import javax.jms.*;
public class Consumer {
    public static void main(String[] args) throws JMSException {
        //1.创建connectionfacoty
        ConnectionFactory connectionFactory = new ActiveMQConnectionFactory("tcp://localhost:61616");
        //2.创建connnect,并启动connnect
        Connection connection = connectionFactory.createConnection();
        connection.start();
        //3.创建session,第一个参数是是否使用事务,第二个参数是确认机制
        Session session = connection.createSession(Boolean.TRUE,Session.AUTO_ACKNOWLEDGE);
        //4.创建目的地【消费者与生产者的目的地相同才能进行消息传递】
        Destination destination = session.createQueue("tempqueue");
        //5.创建消费者,第一个参数是目的地,此时创建的消费者要与目的地进行绑定。
        MessageConsumer consumer = session.createConsumer(destination);
        //6.使用消费者接受消息消息
        TextMessage message = (TextMessage) consumer.receive();
        System.out.println(message.getText());
        //8.提交事务
        session.commit();
        //9.关闭资源
        session.close();
        connection.close();
    }
}
上述代码解析:
1.前半部分代码都是一样的,都是创建ConnectionFactory,Connection,Session
2.然后创建目的地Destination,这个目的地就是要把消息存储到哪里和从哪里取消息。
3.如果是生产者,那么由Session来创建生产者,创建的时候传入一个目的地,来与生产者绑定,生产者调用send发送的消息都会存储到目的地中。生产者发送的消息需要使用Session来创建,调用createXXXMessage来创建消息,创建什么类型的消息取决于使用什么方法来创建。
4.如果是消费者,那么由Session来创建消费者,创建的时候传入一个消费者,来与消费者绑定,消费者调用receive时会从目的地中获取消息。获取到的结果是一个XXXMessage,通常需要转成对应类型的Message,然后再调用对应的获取消息体的方法来获取消息体。例如TextMessage类型的消息要获取消息体需要调用getText()。
5.如果使用了事务,那么需要session.commit()
6.最后关闭所有资源
设置请求属性:
设置标准属性:使用消息调用setJMS开头的方法。【要注意的是为了避免发生过期的消息,任何直接通过编程方式来调用setJMSExpiration()方法都会被忽略。 】
设置自定义属性:使用消息调用setXXXProperty的方法。

接受属性:

可靠性机制
在上面的概念学习中你应该了解到,如果不使用事务来进行消息确定,那么需要手动使用消息来调用acknowledge来确认消息。【而且这时候是在会话层进行确认,所以在这个会话中只要一条消息进行了确认,其他消息也会被确认(即使他收了两条消息只确认了一条)】
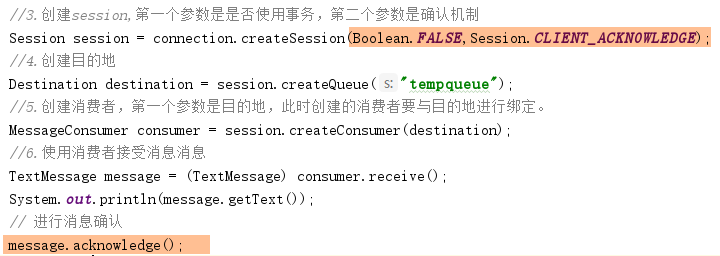
当使用了事务的时候,代码中就不要使用acknowledge了,会影响消息的确认。
事务
在上面的概念学习有提到了事务,事务可以使一系列操作共同成功或失败。下面来演示一下事务的使用。
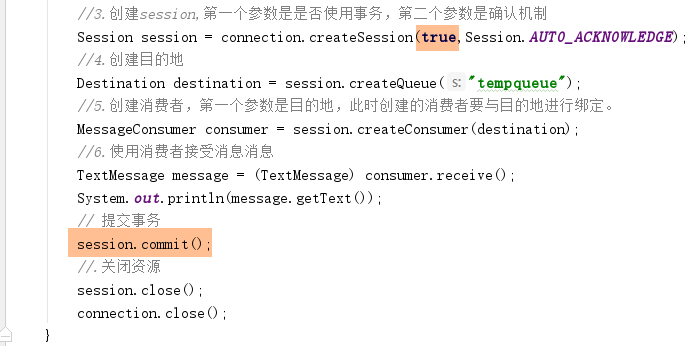
1.首先,在创建Session的时候第一个参数是是否使用事务,要使用事务需要赋值TRUE。
2.提交事务使用session.commit(),回滚是session.rollback()
3.对于生产者,事务是确保消息发送的一致性;对于消费者,事务是确保消息消费的一致性,
4.对于事务的测试可以使用单步运行来测试,在发消息处打断点,测试未commit时消费者是否能取到消息。

消息消费方式
在上面的概念学习中有谈到消费者消费消息的两种方式,一种是堵塞的receive,一种是监听器。监听器与receive最大的区别是如果没有,那么监听器不会等,而receive会等。所以监听器适用于不希望堵塞程度运行的场景。
receive
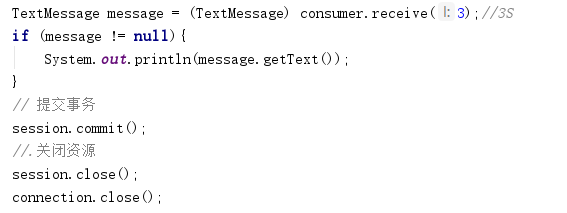
上面的代码都是使用堵塞的receive来接收的,你应该可以留意到当运行了消费者后,没有取到消息的时候会一直堵塞在那里。receive也可以设置阻塞时间,时间到了就不再等了。
监听器:
public class Consumer {
    public static void main(String[] args) throws JMSException {
        ConnectionFactory connectionFactory = new ActiveMQConnectionFactory("tcp://localhost:61616");
        Connection connection = connectionFactory.createConnection();
        connection.start();
        Session session = connection.createSession(true, Session.AUTO_ACKNOWLEDGE);
        Destination destination = session.createQueue("tempqueue2");
        MessageConsumer consumer = session.createConsumer(destination);
        consumer.setMessageListener(new MessageListener() {
            @Override
            public void onMessage(Message message) {
                TextMessage msg = (TextMessage) message;
                try {
                    System.out.println("..."+msg.getText());
                } catch (JMSException e) {
                    e.printStackTrace();
                }
            }
        });
        session.commit();
        session.close();
        connection.close();
    }
}
消息类型
在上面有介绍到消息体有不同的类型,TextMessage,MapMessage等。
不同的消息类似影响存储到消息队列的消息的格式,也影响取消息的方式,取消息的方式要与消息类型对应。
TextMessage:数据类型类似于字符串。使用getText()来获取数据。


MapMessage:数据类型类似于Map。使用getXXX(key)来获取数据。


发布/订阅模式
上面主要讲的都是PTP模式,下面来讲一下发布/订阅模式。在上面的概念学习中,有涉及到多消费者广播、持久化订阅,下面将演示这些概念的实际使用。
非持久订阅
先演示非持久订阅的,由于非持久订阅只能发送给在线的消费者,所以先运行消费者(多个)。【非持久订阅的消息接收与PTP一样可以使用receive】

然后创建生产者发生消息:

注意:在非持久化订阅中,通常要使消费者持续receive,所以通常使用while循环来接受消息。
Message message = consumer.receive();
while(message!=null){
   TextMessage txtMsg = (TextMessage)message;
   sysout(textmsg.getText());
   message = consumer.receive();
}
持久化订阅
要进行持久化订阅,首先要将生产者的发送模式改成持久化模式,这个设置要在connection.start()之前
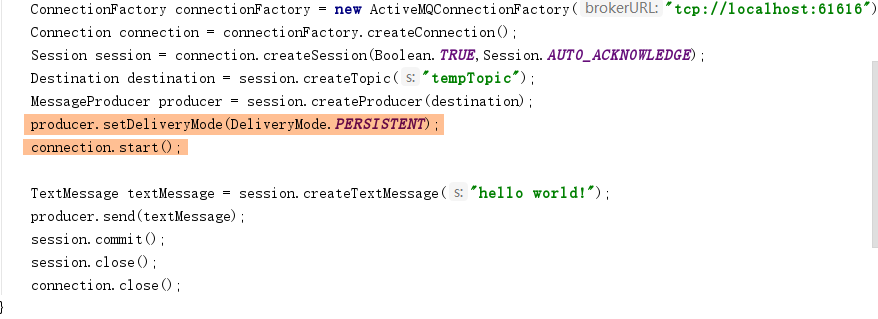
然后消费者要创建持久订阅器,而且要在消息发送之前先运行一次把持久化订阅器注册到消息队列上。
【注意:需要在连接上设置消费者ID,用来识别消费者,持久化订阅器识别消费者依靠消费者ID,如果不设置,那么下一次“上线”的时候,由于消费者ID会变化,导致订阅器无法与消费者进行关联】
public class Consumer {
    public static void main(String[] args) throws JMSException {
        //1.创建connectionfacoty
        ConnectionFactory connectionFactory = new ActiveMQConnectionFactory("tcp://localhost:61616");
        //2.创建connnect,并启动connnect
        Connection connection = connectionFactory.createConnection();
        connection.setClientID("001");

        //3.创建session,第一个参数是是否使用事务,第二个参数是确认机制
        Session session = connection.createSession(true,Session.AUTO_ACKNOWLEDGE);
        Destination destination = session.createTopic("tempTopic");
        TopicSubscriber s1 = session.createDurableSubscriber((Topic) destination, "s1");
        connection.start();
        Message msg = s1.receive();
        while (msg!=null){
            TextMessage txtmsg = (TextMessage) msg;
            System.out.println(txtmsg.getText());
            session.commit(); // 由于此时使用了while,所以要在里面commit
            msg= s1.receive();
        }
        session.close();
        connection.close();
    }
}
Broker
Broker是ActiveMQ服务器实例。
在使用独立的ActiveMQ程序的时候,有时候会创建不同需求的服务器实例,通常来说都是使用某个配置文件进行创建。
而也是可以通过代码内建一个Broker的,内建的Broker比较小巧,适用于一些希望把Broker整合到项目中的场景。
1.通过BrokerService创建:

上述代码报错java.lang.NoClassDefFoundError:com/fasterxml/jackson/databind/ObjectMapper时可能缺乏以下依赖包:
        <dependency>
            <groupId>com.fasterxml.jackson.core</groupId>
            <artifactId>jackson-databind</artifactId>
            <version>2.9.5</version>
        </dependency>
2.通过BrokerFactory创建:

使用BrokerFactory创建时需要一个配置文件,这个配置文件的路径要被传入到BrokerFactory中,在上面的代码中就是properties:broker.properties,配置文件里面是这个Broker的参数。
下面是broker.properties的一个例子:
useJms=true
persistent=false
brokerName=FactoryBroker
对于能配置什么,可以参考使用BrokerService创建Broker时的setXXX。
整合spring开发
现在很多的项目都使用到了Spring,所以这里也讲一下与Spring的整合。
首先理一下,ActiveMQ有什么可以交给Spring来管理的?可以说可以交给Spring管理的只有Destination,ConnectionFactory,Connection和Broker,只有这几个实例的复用性比较强,这几个的管理会在JmsTemplate使用中展示。
如果你学过Hibernate之类的框架,你应该知道Spring对Hibernate提供HibernateTemplate来整合,HibernateTemplate封装了Hibernate的一些方法,简化了使用,在使用HibernateTemplate的时候,dao层的类需要继承HibernateDaoSupport,然后同时需要在类中注入Connection,这样HibernateTemplate才可以正常工作。JmsTemplate类似于HibernateTemplate,不过它是面向JMS的。
使用JmsTemplate
1.首先要编写Spring配置文件:
<?xml version="1.0" encoding="UTF-8"?>
<beans xmlns="http://www.springframework.org/schema/beans"
       xmlns:xsi="http://www.w3.org/2001/XMLSchema-instance"
       xsi:schemaLocation="http://www.springframework.org/schema/beans http://www.springframework.org/schema/beans/spring-beans.xsd">
    <!--管理destination-->
    <bean id="destinationQueue" class="org.apache.activemq.command.ActiveMQQueue">
        <constructor-arg name="name" value="spring-queue"/> <!-- 目的地名称 -->
    </bean>
    <bean id="destinationTopic" class="org.apache.activemq.command.ActiveMQTopic">
        <constructor-arg name="name" value="spring-topic"/> <!-- 目的地名称 -->
    </bean>

    <!--管理connectionFactory-->
    <bean id="jmsFactory" class="org.apache.activemq.pool.PooledConnectionFactory">
        <property name="connectionFactory">
            <bean class="org.apache.activemq.ActiveMQConnectionFactory">
                <property name="brokerURL">
                    <value>tcp://localhost:61616</value>
                </property>
            </bean>
        </property>
        <property name="maxConnections" value="100"></property>
    </bean>

    <!--管理JmsTemplate-->
    <bean id="jmsTemplate" class="org.springframework.jms.core.JmsTemplate">
        <property name="connectionFactory" ref="jmsFactory"></property>
        <property name="defaultDestination" ref="destinationQueue"></property>
        <property name="messageConverter">
            <bean class="org.springframework.jms.support.converter.SimpleMessageConverter"></bean>
        </property>
    </bean>

</beans>
2.然后创建测试类:
import org.junit.Test;
import org.junit.runner.RunWith;
import org.springframework.beans.factory.annotation.Autowired;
import org.springframework.jms.core.JmsTemplate;
import org.springframework.jms.core.MessageCreator;
import org.springframework.test.context.ContextConfiguration;
import org.springframework.test.context.junit4.SpringJUnit4ClassRunner;

import javax.annotation.Resource;
import javax.jms.*;

@RunWith(SpringJUnit4ClassRunner.class) //使用junit4进行测试
@ContextConfiguration(locations={"classpath:applicationContext.xml"}) //加载配置文件
public class JmsTemplateDemo {
    @Autowired
    private JmsTemplate jmsTemplate;
    @Resource(name="destinationQueue")
    private Destination destinationQueue;
    //发送
    @Test
    public  void send() throws JMSException {
        String msg = "hello world!";
        jmsTemplate.send(destinationQueue, new MessageCreator() {
            @Override
            public Message createMessage(Session session) throws JMSException {
                return session.createTextMessage(msg);
            }
        });

    }
    //接收
    @Test
    public  void recv() throws JMSException {
        TextMessage message = (TextMessage) jmsTemplate.receive(destinationQueue);
        System.out.println(message.getText());
    }
}
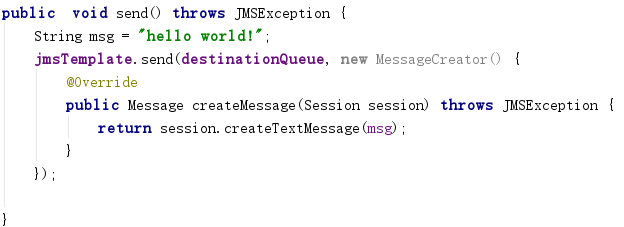
在上面的代码中可以使用jmsTemplate.send来发送消息,使用jmsTemplate.receive来接收消息。对于消息确认和事务管理则不需要关心,JmsTemplate会自己处理的。
监听器
在上面的JmsTemplate接收消息中使用了receive来接收消息,Spring还支持使用监听器来接收消息,配置监听器,来达到一有消息就执行某些操作,这样就省去了消费者的代码。
1.首先,需要需要在spring配置文件中配置DefaultMessageListenerContainer【还有其他几种监听器】:
    <!--配置DefaultMessageListenerContainer -->
    <bean id="jmsContainer" class="org.springframework.jms.listener.DefaultMessageListenerContainer">
        <property name="connectionFactory" ref="jmsFactory"></property>
        <!--监听器 -->
        <property name="messageListener" ref="myMessageListener"></property>
        <!--监听哪个目的地 -->
        <property name="destination" ref="destinationQueue"></property>
     </bean>

    <!--配置监听器-->
    <bean id="myMessageListener" class="withspring.MyMessageListener">
    </bean>
2.然后,定义一个监听器:
import javax.jms.JMSException;
import javax.jms.Message;
import javax.jms.MessageListener;
import javax.jms.TextMessage;

public class MyMessageListener implements MessageListener {
    @Override
    public void onMessage(Message message) {
        if (message instanceof TextMessage) {
            try {
                TextMessage txtMsg = (TextMessage) message;
                String msg = txtMsg.getText();
                System.out.println("recv:"+ msg);
            } catch (JMSException e) {
                throw new RuntimeException(e);
            }
        } else {
            throw new IllegalArgumentException("消息类型错误!");
        }
    }
}
3.最后,运行随便在这个项目中的一个发送消息的测试方法。
使用spring集合Broker
1.通过BrokerService:
    <?xml version="1.0" encoding="UTF-8"?>
    <beans xmlns="http://www.springframework.org/schema/beans"
           xmlns:xsi="http://www.w3.org/2001/XMLSchema-instance"
           xsi:schemaLocation="http://www.springframework.org/schema/beans http://www.springframework.org/schema/beans/spring-beans.xsd">

        <bean id="broker" class="org.apache.activemq.broker.BrokerService" init-method="start" destroy-method="stop">
            <property name="brokerName" value="SpringBroker"/>
            <property name="persistent" value="false"/>
            <property name="transportConnectorURIs">
                <list>
                    <value>tcp://localhost:61616</value>
                </list>
            </property>
        </bean>
    </beans>
【还可以通过BrokerFactory或BrokerFactoryBean来创建,这里省略】
【当然,上面的是比较简单的,没有进行权限管理,你也登录不了管理页,想要确定是否创建成功可以监听接口也可以进行生产和消费消息】
后续可扩展内容
这里只是一篇小博客,写不了太多东西。如果想要了解更精细,可以去买书来看。 下面写一下后续可扩展学习的内容,学不学由个人考虑。
* 传输协议【上面介绍了tcp://localhost:61616,其实还可以允许非TCP的连接】 * 消息存储持久化【消息是怎么进行存储的】 * KahaDB * AMQ * JDBC * 内存存储 * 部署与集群 * 优化


 浙公网安备 33010602011771号