Websocket练手
1. Websocket的优势:
那图说话:
区别是http协议只能通过客户端触发,服务端响应
WebSocket 特性:长连接, 可以弥补: 服务端主动推动消息到客户端。
2. pom需要增加:
     <dependency>
            <groupId>org.springframework.boot</groupId>
            <artifactId>spring-boot-starter-websocket</artifactId>
        </dependency>
3. 开启websocket支持
@Configuration
public class WebSocketConfig {
@Bean
public ServerEndpointExporter serverEndpointExporter() {
return new ServerEndpointExporter();
}
}
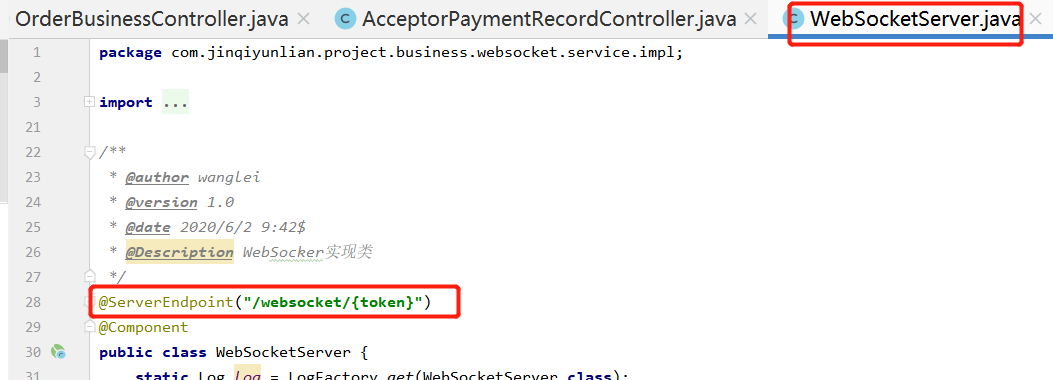
4. 实现webscocket的功能区:
@ServerEndpoint("/websocket/{token}")
@Component
public class WebSocketServer {
    static Log log= LogFactory.get(WebSocketServer.class);
    /**静态变量,用来记录当前在线连接数。应该把它设计成线程安全的。*/
    private static int onlineCount = 0;
    /**concurrent包的线程安全Set,用来存放每个客户端对应的MyWebSocket对象。*/
    private static ConcurrentHashMap<String,WebSocketServer> webSocketMap = new ConcurrentHashMap<>();
    /**与某个客户端的连接会话,需要通过它来给客户端发送数据*/
    private Session session;
    /**接收userId*/
    private String userName = null;

    private static TokenService tokenService;

    public static void setTokenService(TokenService tokenService) {
        WebSocketServer.tokenService = tokenService;
    }

    /**
     * 连接建立成功调用的方法*/
    @OnOpen
    public void onOpen(Session session,@PathParam("token") String token) {
        LoginUser loginUser = tokenService.getUserInfoByToken(token);
        SysUser user = loginUser.getUser();
        String userName = user.getUserName();
        this.userName = userName;

        this.session = session;
        if(webSocketMap.containsKey(userName)){
            webSocketMap.remove(userName);
            webSocketMap.put(userName,this);
            //加入set中
        }else{
            webSocketMap.put(userName,this);
            //加入set中
            addOnlineCount();
            //在线数加1
        }

        log.info("用户连接:"+userName+",当前在线人数为:" + getOnlineCount());

        try {
            sendMessage("连接成功");

        } catch (IOException e) {
            log.error("用户:"+userName+",网络异常!!!!!!");
        }
    }

    /**
     * 连接关闭调用的方法
     */
    @OnClose
    public void onClose() {
        if(webSocketMap.containsKey(userName)){
            webSocketMap.remove(userName);
            //从set中删除
            subOnlineCount();
        }
        log.info("用户退出:"+userName+",当前在线人数为:" + getOnlineCount());
    }

    /**
     * 收到客户端消息后调用的方法
     *
     * @param message 客户端发送过来的消息*/
    @OnMessage
    public void onMessage(String message, Session session) throws IOException {
        log.info("用户消息:"+userName+",报文:"+ message);
        handleComingMsg(message);
    }

    private void handleComingMsg(String message) {
        //可以群发消息
        //消息保存到数据库、redis
        if(StringUtils.isNotBlank(message)){
            try {
                //解析发送的报文
                JSONObject jsonObject = JSON.parseObject(message);
                //追加发送人(防止串改)
                jsonObject.put("fromUserId",this.userName);
                String toUserId=jsonObject.getString("toUserId");
                //传送给对应toUserId用户的websocket
                if(StringUtils.isNotBlank(toUserId)&&webSocketMap.containsKey(toUserId)){
                    webSocketMap.get(toUserId).sendMessage(jsonObject.toJSONString());
                }else{
                    log.error("请求的userId:"+toUserId+"不在该服务器上");
                    //否则不在这个服务器上,发送到mysql或者redis
                }
                webSocketMap.get(this.userName).sendMessage(message);
            }catch (Exception e){
                e.printStackTrace();
            }
        }
    }

    /**
     *
     * @param session
     * @param error
     */
    @OnError
    public void onError(Session session, Throwable error) {
        log.error("用户错误:"+this.userName+",原因:"+error.getMessage());
        error.printStackTrace();
    }
    /**
     * 实现服务器主动推送
     */
    public void sendMessage(String message) throws IOException {
        this.session.getBasicRemote().sendText(message);//主推同步,异步调用getAsyncRemote().sendText()

    }


    /**
     * 发送自定义消息
     * */
    public static void sendInfo(String message,@PathParam("userId") String userId) {
        log.info("发送消息到:"+userId+",报文:"+message);
        if(StringUtils.isNotBlank(userId)&&webSocketMap.containsKey(userId)){
            try {
                webSocketMap.get(userId).sendMessage(message);
            } catch (IOException e) {
                log.error("[SOCKETSERVICE-sendInfo]: response:{}", e.getStackTrace());
            }
        }else{
            log.error("用户"+userId+",不在线!");
        }
    }

    /**
     * 发送自定义消息
     * */
    public static void pushMsgForUser(String message, String userName){
        log.info("发送消息到:"+userName+",报文:"+message);
        if(StringUtils.isNotBlank(userName)&&webSocketMap.containsKey(userName)){
            try {
                webSocketMap.get(userName).sendMessage(message);
            } catch (IOException e) {
                log.error("[SOCKETSERVICE-pushMsgForUser]: response:{}", e.getStackTrace());
            }
        }else{
            log.error("用户"+userName+",不在线!");
        }
    }

    public static synchronized int getOnlineCount() {
        return onlineCount;
    }

    public static synchronized void addOnlineCount() {
        WebSocketServer.onlineCount++;
    }

    public static synchronized void subOnlineCount() {
        WebSocketServer.onlineCount--;
    }
}
5. 因为WebSocketServer类不能通过注入@Autowired.
所以暂时的解决思路是:
@SpringBootApplication
public class WebSocketApplication {
    public static void main(String[] args) {
        ApplicationContext applicationContext = SpringApplication.run(WebSocketApplication.class, args);
        // 获取Spring IOC容器中的Service并注入
        TokenService tokenService = applicationContext.getBean(TokenService.class);
        WebSocketServer.setTokenService(tokenService);
    }
}
6. 前端的事例:
init: function() {
      if (typeof WebSocket === 'undefined') {
        alert('您的浏览器不支持socket');
      } else {
        if (this.socket !== '' && this.socket !== undefined) {
          this.socket.close();
          this.close();
        }

        // 实例化socket
        // this.path = 'ws://localhost:8089/demo/websocket/' + this.senderId;
        this.path = 'ws://localhost:8080/websocket/' + uid;
        console.log(this.path);
        this.socket = new WebSocket(this.path);
        // 监听socket连接
        this.socket.onopen = this.open;
        // 监听socket错误信息
        this.socket.onerror = this.error;
        // 监听socket消息
        this.socket.onmessage = this.getMessage;
      }
    },
    open: function() {
      console.log('socket连接成功');
      this.msgSuccess('socket连接成功');
    },
    error: function() {
      console.log('连接错误');
    },
    getMessage: function(msg) {
      if (msg.data) {
        msg = msg.data;
      }
      this.returnMsg += '<br/>' + msg;
    },
    send: function(params) {this.socket.send('{"toUserId":"' + this.uid + '","contentText":"' + this.receiverContent + '"}');
    },
    close: function() {
      console.log('socket已经关闭');
    },
    inputName() {
      this.receiverContent = this.receiverId + '你好!!';
    }
增加心跳来应对,nginx的socket连接超时时间60s的短板:
在onMessage的回调方法里面操作:

startHeartbeat() {
      window.clearTimeout(this.timer);
      this.timer = setTimeout(() => {
        // 这里发送一个心跳,后端收到后,返回一个心跳消息,
        if (this.websock.readyState === 1) {
          // 如果连接正常
          const t = { t: new Date().getTime() };
          console.log('send:' + JSON.stringify(t));
          this.websock.send(JSON.stringify(t));
        } else {
          // 否则重连
          console.log('重新连接');
          this.initWebSocket(true);
        }
      }, 1000 * 30);
    }
心跳的设置思路: 先清除定时,然后在三十秒之后,执行socket.send,发送心跳数据到后端:
const t = { t: new Date().getTime() };
          console.log('send:' + JSON.stringify(t));
          this.websock.send(JSON.stringify(t));
后端监听到message,给前台推送一个消息:
onMessage:
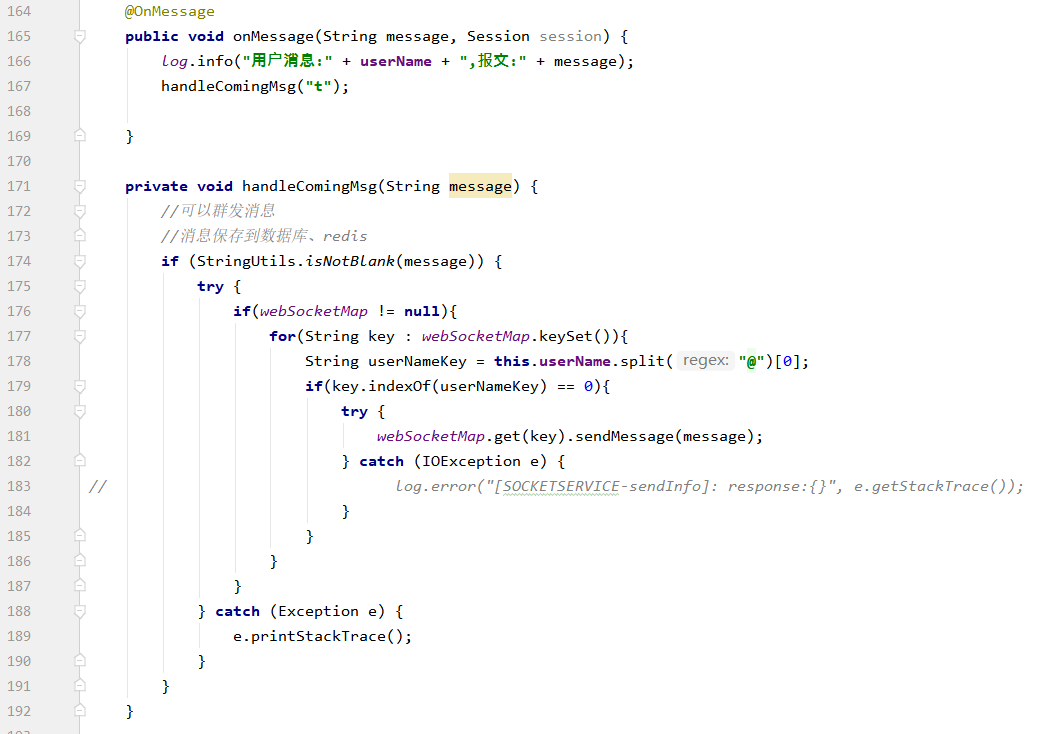
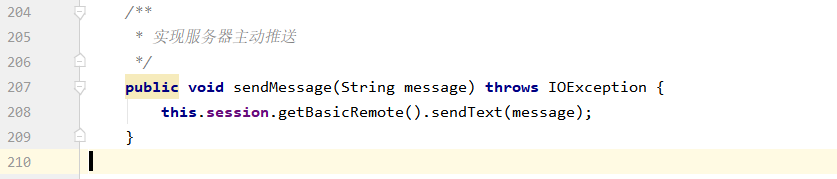
sendMessage:
nginx相关的配置:

发送websocket连接, 使用endpoint 是/websocket/${token}:
在nginx上的配置如下:
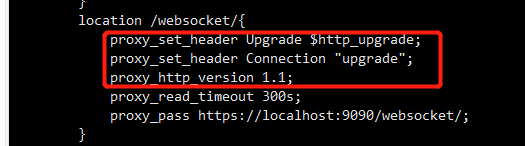
proxy_pass: 对应的是真实请求的真实服务器的地址以及端口。
proxy_read_timeout: socket连接超时时间
可以通过调大此值来解决socket老是断开的问题。但是对nginx的性能有影响。
server {
listen 80;
server_name xxx.com;
rewrite ^/(.*) https://$server_name$request_uri? permanent;
}
代理服务器:监听到域名xxx.com的端口80下,有发送的请求,然后执行rewire:
rewire相关的说明: https://www.cnblogs.com/crazymagic/p/11034300.html

 浙公网安备 33010602011771号