从零开始游戏开发——3.5 纹理基础
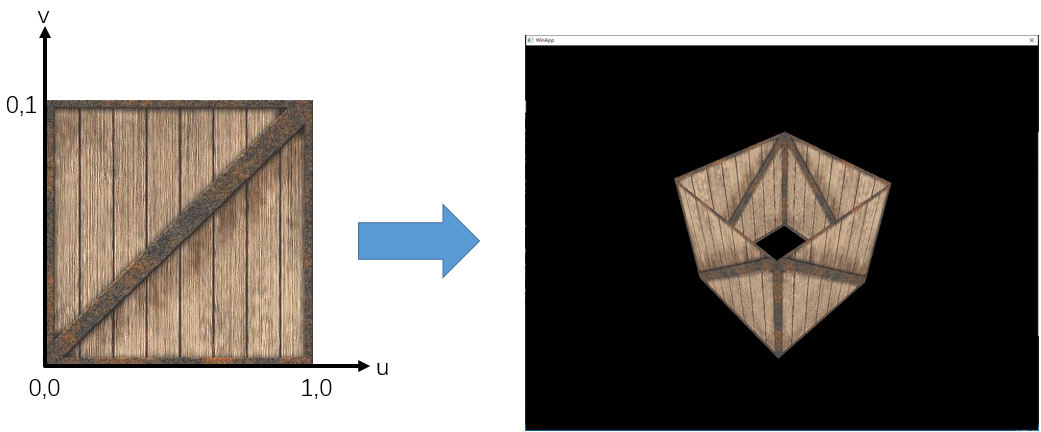
之前的小节,我们显示了使用木箱子外观的三角形,纹理可以极大丰富物体的表现,在这节中,我们将介绍一张图像是如何做为纹理进行显示的,最终实现下图效果:

首先,我们拥有一张.tga格式的图片,tga文件头结构如下:
 1 #pragma pack(1)
 2 typedef struct
 3 {
 4     char identsize;                   // Size of ID field that follows header (0)
 5     char colorMapType;               // 0 = None, 1 = paletted
 6     char imageType;                   // 0 = none, 1 = indexed, 2 = rgb, 3 = grey, +8=rle
 7     unsigned short colorMapStart;  // First colour map entry
 8     unsigned short colorMapLength; // Number of colors
 9     unsigned char colorMapBits;       // bits per palette entry
10     unsigned short xstart;           // image x origin
11     unsigned short ystart;           // image y origin
12     unsigned short width;           // width in pixels
13     unsigned short height;           // height in pixels
14     char bits;                       // bits per pixel (8 16, 24, 32)
15     char descriptor;               // image descriptor
16 } TGAHEADER;
17 #pragma pack(pop)
第1行和第17行的作用将头结构按1字节内存对齐,然后进行文件读取,获取到图像的颜色数据:
 1 bool CTGAImage::Load(const char *filename)
 2 {
 3     FILE *pFile;  // File pointer
 4     short sDepth; // Pixel depth;
 5
 6     // Attempt to open the file
 7     pFile = fopen(filename, "rb");
 8     if (pFile == NULL)
 9     {
10         printf("Openfile %s failed\n", filename);
11         return false;
12     }
13     // Read in header (binary)
14     fread(&_TgaHeader, 18 /* sizeof(TGAHEADER)*/, 1, pFile);
15
16     // Get width, height, and depth of texture
17     _Width = _TgaHeader.width;
18     _Height = _TgaHeader.height;
19     sDepth = _TgaHeader.bits / 8;
20
21     // Put some validity checks here. Very simply, I only understand
22     // or care about 8, 24, or 32 bit targa's.
23     if (_TgaHeader.bits != 8 && _TgaHeader.bits != 24 && _TgaHeader.bits != 32)
24     {
25         return false;
26     }
27     // Calculate size of image buffer
28     _ImageSize = _TgaHeader.width * _TgaHeader.height * sDepth;
29
30     // Allocate memory and check for success
31     _pData = (unsigned char *)malloc(_ImageSize * sizeof(unsigned char));
32     if (_pData == NULL)
33     {
34         return false;
35     }
36     // Read in the bits
37     // Check for read error. This should catch RLE or other
38     // weird formats that I don't want to recognize
39     if (fread(_pData, _ImageSize, 1, pFile) != 1)
40     {
41         free(_pData);
42         _pData = NULL;
43         return false;
44     }
45
46     // Set OpenGL format expected
47     switch (sDepth)
48     {
49 #ifndef OPENGL_ES
50     case 3: // Most likely case
51         _Format = BGR;
52         break;
53 #endif
54     case 4:
55         _Format = BGRA;
56         break;
57     case 1:
58         _Format = LUMINANCE;
59         break;
60     default: // RGB
61                 // If on the iPhone, TGA's are BGR, and the iPhone does not
62                 // support BGR without alpha, but it does support RGB,
63                 // so a simple swizzle of the red and blue bytes will suffice.
64                 // For faster iPhone loads however, save your TGA's with an Alpha!
65 #ifdef OPENGL_ES
66         for (int i = 0; i < lImageSize; i += 3)
67         {
68             GLbyte temp = pBits[i];
69             pBits[i] = pBits[i + 2];
70             pBits[i + 2] = temp;
71         }
72 #endif
73         break;
74     }
75
76     // Done with File
77     fclose(pFile);
78
79     return false;
80 }
上面的代码读取8位、16位和32位图像的头信息并进行赋值,然后获取实现的颜色数据地址,根据头信息中的位数,获得图像的模式,由于iPhone不支持BRG格式,这里对gles下的使用作了RGB的转换。现在已经有用于显示的图像的颜色数据,现在定义一个用于软件渲染的纹理类如下,类中Image类包含了一张图像的头信息和颜色数据,在模型初始化的阶段,将这张纹理做为渲染器的输入数据进行传递,同时顶点数据需要传入纹理坐标。
1 class CSoftTexture2D : public ITexture
2 {
3 public:
4     CSoftTexture2D(const char *fullName);
5     Color GetPixel(const Vector2f &uv) const;
6     Color GetPixel(int x, int y) const;
7 private:
8     IImage *_Image;
9 };
在渲染过程中的片断着色器处理阶段,通过使用插值计算得到当前片断的uv值,就可以对纹理数据进行采样了,我们的Shader代码如下:
 1 typedef map<string, vector<float>> UniformMap;
 2
 3 static void VertexShader(const void *globalUniforms, const void *uniforms, const void *datas, unsigned char *out)
 4 {
 5     UniformMap globalU = *((UniformMap *)globalUniforms);
 6     UniformMap u = *((UniformMap *)uniforms);
 7     Matrix4x4f mvpMat4(u["mvpMat"].data());
 8
 9     const Vector3f &inPosition = *(Vector3f *)(datas);
10     const Vector2f &inUV = *(Vector2f *)(&inPosition + 1);
11
12     Vector4f &outPosition = *(Vector4f *)out;
13     Vector2f &outUV = *(Vector2f *)(&outPosition + 1);
14     outPosition = mvpMat4 * Vector4f(inPosition.x, inPosition.y, inPosition.z, 1.0f);
15     outUV = inUV;
16 }
17
18 REGISTER_VPROGRAM(VertexShader);
19
20 static Color FragmentShader(const void *globalUniforms, const void *uniforms, ISampler **samplers, const void *datas)
21 {
22     Vector2f &inUV = V2F_UV(datas);
23
24     ISampler *sampler1 = samplers[0];
25     Color albedo = sampler1->Sample(inUV);
26     return albedo;
27 }
28
29 REGISTER_FPROGRAM(FragmentShader);
在FragmentShader代码中,第25行使用采样器进行采样,在不考虑多重采样等情况下 ,对于BGR格式的图像最简单的采样代码如下,这样,模型上就可以显示出带纹理的外观了。
int width = _Image->GetWidth();
int height = _Image->GetHeight();
if (x >= 0 && x < width && y >=0 && y < height)
{
    unsigned char *data = (unsigned char*)_Image->GetData();
    unsigned char *addr = data + width * y * 3 + x * 3;
    float inv = 1.f / 255.f;
    return Color(1.f, *(addr + 2) * inv, *(addr + 1) * inv, (*addr) *inv );
}
上面过程介绍了一张图像从加载到显示的过程,展示了纹理的简单应用,然后纹理的作用远不止如此,上面介绍的的是一张2D纹理的使用,在游戏中,纹理还有1D纹理、3D纹理、Cube纹理。1D纹理在卡通渲染中明暗过滤处理比较常见,3D纹理则相当于2D纹理叠在了一起,在体积渲染和一些drawcall合批优化中可以看到相关应用,Cube纹理则可以在天空盒、环境映射中看到它的身影。
通常对一张纹理进行采样,其Wrap Mode通常有Repeat、Clamp、Mirror几种,Wrap Mode是指当纹理坐标是Normalized即0~1时,uv超出这个范围的处理,下图是几种模式的效果图:

上面的例子中,我们没有处理纹理过滤的情况,由于纹理坐标与屏幕分辨率无关,纹理尺寸与模型尺寸的对应需要纹理过滤来处理这种适应关系,通常用到的有Nearest——取最邻近的像素值和Linear——获取附近像素加权平均值,同时当一个模型距离摄像机很远时,可以对纹理使用Mipmap来避免远处的闪烁现象,一张32*32的纹理其Mipmap级别从0到5分别为32*32、16*16、8*8、4*4、2*2、1*1。如果一张纹理启用了Mipmap其占用内存大小约增加1/3,推导如下:
设S = 1/4 + 1/16 + ... + 1/(4^n) 为增加的内存大小,
1 + 1/4 + 1/16 + ... + 1/(4^(n-1)) == 4S 为总占用内存大小,
4S - S = 3S = 1 - 1/(4^n)
n趋向于无穷大时,3S = 1,因此S = 1/3。
本节介绍了纹理的基础知识,后面介绍完光照后,将继续介绍凹凸映射、环境映射等高级技术,总之,游戏开发很多渲染表现都需要用到纹理相关技术。
本文来自博客园,作者:毅安,转载请注明原文链接:https://www.cnblogs.com/primarycode/p/16793765.html,文章内容同步更新微信公众号:“游戏开发实战”或“GamePrimaryCode”


