【从零开始学习YOLOv3】6. 模型构建中的YOLOLayer
前言:上次讲了YOLOv3中的模型构建,从头到尾理了一遍从cfg读取到模型整个构建的过程。其中模型构建中最重要的YOLOLayer还没有梳理,本文将从代码的角度理解YOLOLayer的构建与实现。
1. Grid创建
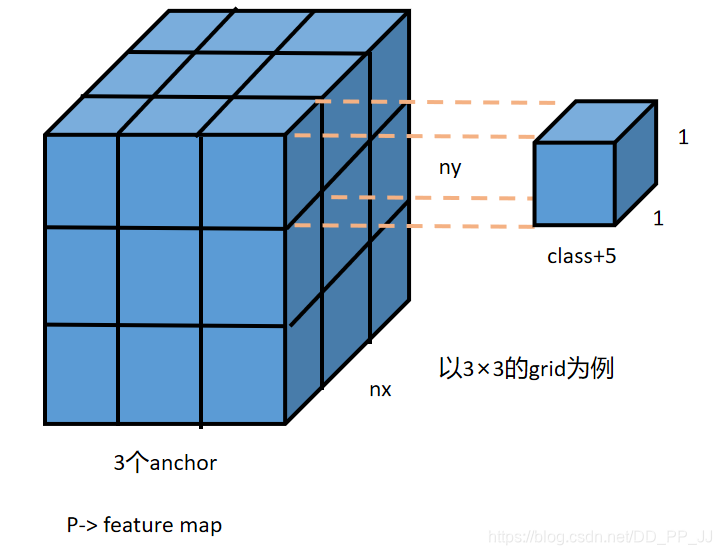
YOLOv3是一个单阶段的目标检测器,将目标划分为不同的grid,每个grid分配3个anchor作为先验框来进行匹配。首先读一下代码中关于grid创建的部分。
首先了解一下pytorch中的API:torch.mershgrid
举一个简单的例子就比较清楚了:
Python 3.7.3 (default, Apr 24 2019, 15:29:51) [MSC v.1915 64 bit (AMD64)] :: Anaconda, Inc. on win32
Type "help", "copyright", "credits" or "license" for more information.
>>> import torch
>>> a = torch.arange(3)
>>> b = torch.arange(5)
>>> x,y = torch.meshgrid(a,b)
>>> a
tensor([0, 1, 2])
>>> b
tensor([0, 1, 2, 3, 4])
>>> x
tensor([[0, 0, 0, 0, 0],
        [1, 1, 1, 1, 1],
        [2, 2, 2, 2, 2]])
>>> y
tensor([[0, 1, 2, 3, 4],
        [0, 1, 2, 3, 4],
        [0, 1, 2, 3, 4]])
>>>
单纯看输入输出,可能不是很明白,列举一个例子:
>>> for i in range(3):
...     for j in range(4):
...         print("(", x[i,j], "," ,y[i,j],")")
...
( tensor(0) , tensor(0) )
( tensor(0) , tensor(1) )
( tensor(0) , tensor(2) )
( tensor(0) , tensor(3) )
( tensor(1) , tensor(0) )
( tensor(1) , tensor(1) )
( tensor(1) , tensor(2) )
( tensor(1) , tensor(3) )
( tensor(2) , tensor(0) )
( tensor(2) , tensor(1) )
( tensor(2) , tensor(2) )
( tensor(2) , tensor(3) )

>>> torch.stack((x,y),2)
tensor([[[0, 0],
         [0, 1],
         [0, 2],
         [0, 3],
         [0, 4]],

        [[1, 0],
         [1, 1],
         [1, 2],
         [1, 3],
         [1, 4]],

        [[2, 0],
         [2, 1],
         [2, 2],
         [2, 3],
         [2, 4]]])
>>>
现在就比较清楚了,划分了3×4的网格,通过遍历得到的x和y就能遍历全部格子。
下面是yolov3中提供的代码(需要注意的是这是针对某一层YOLOLayer,而不是所有的YOLOLayer):
def create_grids(self,
                 img_size=416,
                 ng=(13, 13),
                 device='cpu',
                 type=torch.float32):
    nx, ny = ng  # 网格尺寸
    self.img_size = max(img_size)
    #下采样倍数为32
    self.stride = self.img_size / max(ng)

    # 划分网格,构建相对左上角的偏移量
    yv, xv = torch.meshgrid([torch.arange(ny), torch.arange(nx)])
    # 通过以上例子很容易理解
    self.grid_xy = torch.stack((xv, yv), 2).to(device).type(type).view(
        (1, 1, ny, nx, 2))

    # 处理anchor,将其除以下采样倍数
    self.anchor_vec = self.anchors.to(device) / self.stride
    self.anchor_wh = self.anchor_vec.view(1, self.na, 1, 1,
                                          2).to(device).type(type)
    self.ng = torch.Tensor(ng).to(device)
    self.nx = nx
    self.ny = ny
2. YOLOLayer
在之前的文章中讲过,YOLO层前一层卷积层的filter个数具有特殊的要求,计算方法为:
如下图所示:

训练过程:
YOLOLayer的作用就是对上一个卷积层得到的张量进行处理,具体可以看training过程涉及的代码(暂时不关心ONNX部分的代码):
class YOLOLayer(nn.Module):
    def __init__(self, anchors, nc, img_size, yolo_index, arc):
        super(YOLOLayer, self).__init__()

        self.anchors = torch.Tensor(anchors)
        self.na = len(anchors)  # 该YOLOLayer分配给每个grid的anchor的个数
        self.nc = nc  # 类别个数
        self.no = nc + 5  # 每个格子对应输出的维度 class + 5 中5代表x,y,w,h,conf
        self.nx = 0  # 初始化x方向上的格子数量
        self.ny = 0  # 初始化y方向上的格子数量
        self.arc = arc

        if ONNX_EXPORT:  # grids must be computed in __init__
            stride = [32, 16, 8][yolo_index]  # stride of this layer
            nx = int(img_size[1] / stride)  # number x grid points
            ny = int(img_size[0] / stride)  # number y grid points
            create_grids(self, img_size, (nx, ny))

    def forward(self, p, img_size, var=None):
        '''
        onnx代表开放式神经网络交换
        pytorch中的模型都可以导出或转换为标准ONNX格式
        在模型采用ONNX格式后,即可在各种平台和设备上运行
        在这里ONNX代表规范化的推理过程
        '''
        if ONNX_EXPORT:
            bs = 1  # batch size
        else:
            bs, _, ny, nx = p.shape  # bs, 255, 13, 13
            if (self.nx, self.ny) != (nx, ny):
                create_grids(self, img_size, (nx, ny), p.device, p.dtype)

        # p.view(bs, 255, 13, 13) -- > (bs, 3, 13, 13, 85)
        # (bs, anchors, grid, grid, classes + xywh)
        p = p.view(bs, self.na, self.no, self.ny,
                   self.nx).permute(0, 1, 3, 4, 2).contiguous()

        if self.training:
            return p
在理解以上代码的时候,需要理解每一个通道所代表的意义,原先的P是由上一层卷积得到的feature map, 形状为(以80个类别、输入416、下采样32倍为例):【batch size, anchor×(80+5), 13, 13】,在训练的过程中,将feature map通过张量操作转化的形状为:【batch size, anchor, 13, 13, 85】。
测试过程:
# p的形状目前为:【bs, anchor_num, gridx,gridy,xywhc+class】
else:  # 测试推理过程
   # s = 1.5  # scale_xy  (pxy = pxy * s - (s - 1) / 2)
   io = p.clone()  # 测试过程输出就是io
   io[..., :2] = torch.sigmoid(io[..., :2]) + self.grid_xy  # xy
   # grid_xy是左上角再加上偏移量io[...:2]代表xy偏移
   io[..., 2:4] = torch.exp(
       io[..., 2:4]) * self.anchor_wh  # wh yolo method
   # io[..., 2:4] = ((torch.sigmoid(io[..., 2:4]) * 2) ** 3) * self.anchor_wh
   # wh power method
   io[..., :4] *= self.stride

   if 'default' in self.arc:  # seperate obj and cls
       torch.sigmoid_(io[..., 4])
   elif 'BCE' in self.arc:  # unified BCE (80 classes)
       torch.sigmoid_(io[..., 5:])
       io[..., 4] = 1
   elif 'CE' in self.arc:  # unified CE (1 background + 80 classes)
       io[..., 4:] = F.softmax(io[..., 4:], dim=4)
       io[..., 4] = 1

   if self.nc == 1:
       io[..., 5] = 1
       # single-class model https://github.com/ultralytics/yolov3/issues/235

   # reshape from [1, 3, 13, 13, 85] to [1, 507, 85]
   return io.view(bs, -1, self.no), p
理解以上内容是需要对应以下公式:
xy部分:
代表的是格子的左上角坐标;代表的是网络预测的结果;代表sigmoid激活函数。对应代码理解:
io[..., :2] = torch.sigmoid(io[..., :2]) + self.grid_xy  # xy
# grid_xy是左上角再加上偏移量io[...:2]代表xy偏移
wh部分:
代表的是anchor先验框在feature map上对应的大小。代表的是网络学习得到的缩放系数。对应代码理解:
# wh yolo method
io[..., 2:4] = torch.exp(io[..., 2:4]) * self.anchor_wh
class部分:
在类别部分,提供了几种方法,根据arc参数来进行不同模式的选择。以CE(crossEntropy)为例:
#io: (bs, anchors, grid, grid, xywh+classes)
io[..., 4:] = F.softmax(io[..., 4:], dim=4)# 使用softmax
io[..., 4] = 1
3. 参考资料
pytorch的官方API


【推荐】国内首个AI IDE,深度理解中文开发场景,立即下载体验Trae
【推荐】编程新体验,更懂你的AI,立即体验豆包MarsCode编程助手
【推荐】抖音旗下AI助手豆包,你的智能百科全书,全免费不限次数
【推荐】轻量又高性能的 SSH 工具 IShell:AI 加持,快人一步
· AI与.NET技术实操系列:基于图像分类模型对图像进行分类
· go语言实现终端里的倒计时
· 如何编写易于单元测试的代码
· 10年+ .NET Coder 心语,封装的思维:从隐藏、稳定开始理解其本质意义
· .NET Core 中如何实现缓存的预热?
· 分享一个免费、快速、无限量使用的满血 DeepSeek R1 模型,支持深度思考和联网搜索!
· 25岁的心里话
· 基于 Docker 搭建 FRP 内网穿透开源项目(很简单哒)
· ollama系列01:轻松3步本地部署deepseek,普通电脑可用
· 闲置电脑爆改个人服务器(超详细) #公网映射 #Vmware虚拟网络编辑器