docker+k8s基础篇一
Docker+K8s基础篇(一)
- docker的介绍
- A:为什么是docker
- B:k8s介绍
- docker的使用
- A:docker的安装
- B:docker的常用命令
- C:docker容器的启动和操作
- docker镜像的基础管理
- A:docker镜像的基础概念
- B:docker镜像的生成途径
- C:镜像的导入和导出
- 容器的虚拟化网络
- A:容器虚拟化网络基础
- B:docker的网络形式
- C:docker网络的相关操作
- docker的存储卷
- A:docker的存储卷介绍
- B:docker的网络形式
- C:docker网络的相关操作
- dockerfile详解
- A:dockerfile基础
- B:dockerfile的语法格式
- C:dockerfile的指令详解
- docker的私有registy
- A:docker的私有registy介绍
- B:docker的私有registy安装和简单使用
- C:Harbor安装和简单使用
-
portainer的安装和使用
- A:portainer的安装
♣一:docker的介绍
A:为什么是docker
随着互联网的用户基数变大,可用于快速调配的系统资源环境变得尤为重要,在早些年,互联网公司都基于虚拟化技术来完成生产及开发环境的快速搭建,随着互联网的发展越来越快,虚拟化的技术已经不能很好满足需求。
主机级虚拟化的两种形类型:
1:直接在硬件上安装虚拟化软件,再在上面安装操作系统。
2:在宿主机之上安装虚拟化软件进行虚拟化,虚拟机和宿主机操作系统可以完全不一样。例如:VMware
这些传统的虚拟化技术最根本的本质就是要安装一个操作系统的内核,内核提供了用户空间,再在用户空间里面跑进程,这些进程就需要单独去安装,例如tomcat等,底层的内核只是提供的资源的分派和调度。
这种形态下的虚拟化环境虽然能满足我们的要求,但是不够便捷,如果是想单纯跑一个web服务,我们需要安装操作系统,安装web服务,然后配置才能提供服务,如果是新环境,你还得考虑版本兼容性等问题,是不是要装新版的web服务等。而且是类型2虚拟化的,在还没有提供web服务的之前,已经完成了两级的调度和资源分派,第一层的宿主机和第二层的虚拟机,在这其中的资源浪费也是不言而喻的。
既然基础层面上的繁琐和资源消耗,那么从原理上来说最方便的就是去掉一层内核,但是去掉内核就会用户空间就成了问题,因为用户空间是为了跑真正提供服务的进程所存在的,例如我要100台nginx服务器都监听8080端口,那么就需要100台虚拟机,一台虚拟机上是不能同时监听两个nginx的8080端口的,100台虚拟机的主要目的就是环境隔离,环境隔离了,即使其中50台nginx机器出了问题,那么我删掉虚拟机就好了,不会影响我宿主机。
内核空间又内核提供,服务进程由用户空间提供,n台虚拟机所需要实现的其实是用户空间的隔离,我们需要解决的第一个难点就是在一个内核空间之上开盘N个相互隔离的用户空间,让服务进程之间不会相互影响。这些相互隔离的用户空间就像一个大盒子里面装的小盒子一样,这种技术就叫容器技术。
容器技术最早是出现在FreeBSD上,叫jail,其主要的目的就是把进程之间相互隔离,并且限制这些散列的容器所消耗的资源得到控制。
进程相互隔离是做到了,但是底层的资源是有限的,当出现某一个进程占用资源已经到达容器的边界,是不是就因为内存溢出等问题而让服务挂掉了,显然是不合理的,此时就需要做到动态的分配资源才是最可取的。
资源完成动态分配之后,那内存资源本来就是整个内存上划分的内存块,如果是进程之间能通过ipc相互通信且能相互读取内存中的信息,也是不合理的。
通过上面我们得知docker要完成的莫非就是自动化隔离,
在3.8版本内核上才完成了主机名和域名(UTS)的隔离,IPC,mount(挂载树)和PID(进程树)程序需要运行需要进程树和文件树,用户和组,网络这6大块隔离技术(nameespaces名称空间)再加上chroot技术完成了容器的基本功能。
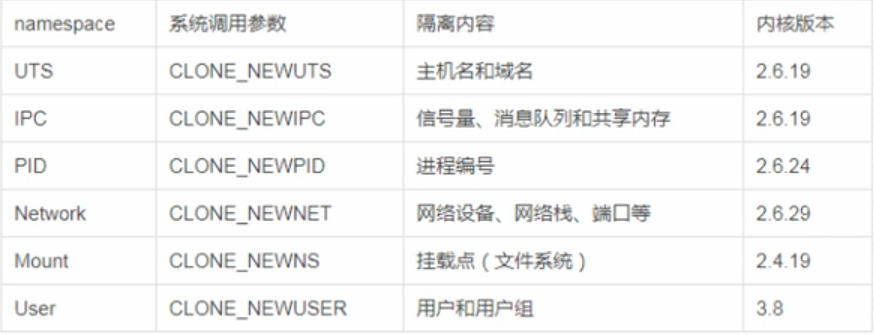
可以看到这些技术说起来简单,但是实现起来却很难,可以看到上图中用户和组的隔离功能一致到3.8的内核版本才完全支持。
容器技术的最核心的隔离功能完成之后,还需要实现一个机制,那就是要实现类似我们VMware可以指定资源的总量是多少,例如宿主机有16G内存,但是一个容器只能我只给分派4G内存,不能出现一个容器因把内存泄露吃干抹净剩余内存导致其它的容器无法正常运行,因为内存是不可压缩的,用完就没有了,相反cpu是有压缩机制的,服务申请cpu运算,如果cpu占用过高,此时服务的请求就得排队。
所以我们需要实现弹性的资源调配,我分给容器4G,这4G就是最大的值,当出现一个容器内部一个比较消耗内存的服务,那么就把容器中一个不常用的服务给kill掉,把空间让出来给这个服务使用,这个机制在linux已经实现,叫cgroups,他将多个系统资源划分成一个组,在将这个组里面的内容分配到每一个用户空间里面的进程上去。
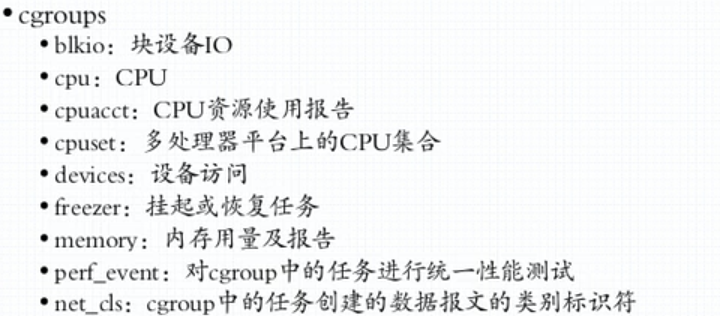
虽然容器技术去掉了很多主机级虚拟化的弊端,但是容器技术也会存在问题,因为我们毕竟在一个内核之上分出来的一个个容器,但是这种隔离技术必然会出现漏洞,当一旦有漏洞,服务就可能绕过这个边界去剥夺其他容器的资源,从而产生问题,一致到现在也没有完全好的解决办法,为了防止这种情况出现,一般用户会开启selinux等安全功能来对这些容器进行加固。
上面我们说简要的说了下容器技术需要完成的功能,但是使用容器技术的工具却是极为不方便,你需要安装不同的工具甚至还要编写代码来完成容器的使用,既然如此,这种技术就被人给开发出来了,就叫做LXC(linuX Container),LXC极大的简化了容器的操作难度,
例如我们可以使用lxc-create来快速的创建一个容器,但是lxc-create是怎么来完成快速创建的了,lxc-create是快速创建了一个模板,并且给这个模板执行权限,这个模板就会去一个指定好的仓库里面把镜像拉下来并chroot进去,完成文件和服务的安装,创建用户等,这样过程其实和我们手动创建一个虚拟机是类似的。
lxc虽然简化了我们使用容器技术的操作,但是依旧有很高的门槛,例如我想快速创建不通性质的容器怎么办,我想大批量的进行容器的迁移怎么办,容器出现故障销毁了,里面存的数据和文件怎么办,lxc在面临分发和大规模使用上依然没有找到很好的突破口,所以后面就出现了docker,从这个性质上来docker只不过是lxc的增强版,弥补了lxc存在的功能缺陷,docker也不是什么容器技术,只不过是方便我们使用容器技术的前段工具罢了,容器技术本身就是又内核去完成的,docker只不过站在了lxc的肩膀上。但是docker逐渐壮大之后就抛弃了lxc,换上自家研发的libcontainer
既然我们想实现容器技术的大规模使用会很难,哪怕是简单的复刻一个一模一样的容器,docker就开始在这些方面找解决办法,docker在起初就是吧lxc重新封装作为容器管理技术的引擎,lxc在快速部署容器的时候使用的模板工具不够完善,docker发现之后,就开始把模板的思路扩展,研究出来一种镜像的工具,在镜像里面我们按照一个程序需要部署的所有步骤事先编排好,再把这个编排好的文件制作成一个镜像文件,最后把这些镜像统一放到一个便于管理的仓库中,当用户执行lxc命令的时候,不是去调用模板,而是去连到镜像仓库去下载一个匹配你当前需要的镜像文件,然后基于镜像启动容器
这样的方式就会极大的简化用户的操作,例如我想运行一个nginx,直接docker run nginx,这一条命令直接出发连接,下载,配置,启动等一系列操作,之前的lxc是创建了一个用户空间,一个用户空间可以运行很多程序,但是docker不一样,它完成的是一个容器运行一个程序。docker的这种逻辑给开发带来了极大的便利,现在的开发环境都是异构的,要满足不同的平台,centos,suse,windows等,对于docker来说我可以快速搭建相应的平台和服务用于开发中的调试,不管是基于java,python还是基于tomcat还是nginx,只要能事先编排好打包成镜像,直接docker run就可以了。但是对运维来说是极为不便利,之前我一个用户空间跑多个服务,可以共享某一个文件或者脚本,但是现在每一个程序都是单独跑在单独的容器之中,意味这文件是不能共享的,这样会造成磁盘空间的浪费,其次以前我如果查看所有服务是否正常,直接ps等命令就能看,但是现有的情况下会变得很麻烦,我得进入每一个容器中去查看,意味着每一个容器里面都需要安装相应的工具,更甚者,之前我能通过linux系统命令来调试的工具,结果到容器里面根本就没有调试工具。
docker还有另外的一个功能,随着docker的不断发展和功能完善,有些情况下就想实现底层我基于centos的一个固定版本,但是上层我想跑不通的服务,基于这种想法,docker开发了分层管理的功能,我单独创建一个centos,在上面安装nginx,tomcat等服务,然后分别打包成镜像,以后我想底层公用一个操作系统centos,上面我跑不同的服务,这样的形式叫做联合挂载技术,这每一个服务都被当做一个只读文件被运行,这样的形式能带来好处,也会带来资源的消耗,而且最重要的就是这每个只读文件所产生的数据怎么办,如果是迁移容器的话,服务不是难点,难的是数据,所以你要使用容器技术,就要实现考虑到长期保存的数据必须采用共享存储系统,这样你想迁移或者销毁服务,没有问题,数据还在就行,再把镜像下载下来,和数据池挂载上,就能运行。
docker后来也制作的容器运行时的标准runC,也制作了镜像文件标准,叫ocf开放容器格式标准。后来在linux基金会也创立了一个oci的标准,围绕容器格式和运行时知道一个开放的工业化标准。
B:K8S介绍
docker能帮我们便捷的管理容器了,但是我们的生产场景是复杂的,生产环境中我们启动程序是存在关联关系的,下游程序的启动必须依赖上游程序的启动,这样的操作我们不能是将容器创建好之后再去操作,我们应该是事先按照一定的顺序和逻辑将其编排好。
随着docker的编排越发变的重要之后,市面上也出现了大量的容器编排工具。
docker自己开发的工具:machine+swarm+compose,docker将这三个工具组合使用形成自己的编排工具;
asf研发的数据中心操作系统有一个统一资源编排工具mesos,mesos不是用来编排容器的,是用来实现统一资源调度的,要想编排工具就需要加一个中间层marathon;
kubernetes:k8s,基于go语言开发,k8s支持很多容器技术,docker只是其中一种。
♣二:docker的使用
A:docker的安装和启动
docker是使用镜像来完成容器内容的创建的,在互联网上,dockerhub.com是全球最大的镜像仓库网站,他提供了大多数的镜像文件,除了docker提供的镜像仓库网站,阿里,等都有镜像仓库网站,除了网路源,你还可以搭建自己的私有镜像仓库。
docker要想完美的运行,需要内核版本在3.10以上,64位的操作系统,centos6的版本也能支持,但是因为红帽公司将支持docker的补丁也挪到了6的版本上,但是稳定性就没有7的版本,至少从某些层面来说。
docker的安装文件在cenos7上直接yum就可以安装,包文件在extras里面,自带镜像里面的docker比较老,我们在网络上找一些共用的镜像或者yum文件下载到本地使用。
可以参考网站清华大写镜像网站信息:清华大学开源镜像网站

[root@localhost yum.repos.d]# wget https://mirrors.tuna.tsinghua.edu.cn/docker-ce/linux/centos/docker-ce.repo
下载清华源repo文件到本地的环境中
[root@localhost yum.repos.d]# cat docker-ce.repo
[docker-ce-stable]
name=Docker CE Stable - $basearch
baseurl=https://download.docker.com/linux/centos/7/$basearch/stable
enabled=1
gpgcheck=1
gpgkey=https://download.docker.com/linux/centos/gpg
但是我们发现虽然是清华的源,但是地址还是指向的docker的官网,因为docker的网站访问太慢,我们改到清华源的地址
https://mirrors.tuna.tsinghua.edu.cn/docker-ce/linux/centos/7/x86_64/stable/Packages/
把这个地址从linux的位置复制出来替换下docker-ce.repo文件的地址里面去
:%s@https://download.docker.com/@https://mirrors.tuna.tsinghua.edu.cn/docker-ce/@
vim的批量替换
yum repolist
源标识                                                        源名称                                                          状态
base/7/x86_64                                                 CentOS-7 - Base                                                 10,019
docker-ce-stable/x86_64                                       Docker CE Stable - x86_64                                           36
extras/7/x86_64                                               CentOS-7 - Extras                                                  371
updates/7/x86_64                                              CentOS-7 - Updates                                               1,163
repolist: 11,589
[root@localhost yum.repos.d]#可以看到Docker CE Stable - x86_64的包
安装
[root@localhost yum.repos.d]# yum -y install docker-ce   ce和ee是docker的社区版和企业版
docker安装成功

[root@localhost docker]# cat daemon.json
{
    "registry-mirrors":["https://registry.docker-cn.com"]
}
[root@localhost docker]# systemctl start docker.service
[root@localhost docker]# ps -aux | grep docker
root      18867  0.1  3.2 781688 61256 ?        Ssl  20:34   0:06 /usr/bin/dockerd -H fd:// --containerd=/run/containerd/containerd.sock
root      20119  0.0  0.0 112724   988 pts/1    S+   21:52   0:00 grep --color=auto docker

[root@localhost ~]# docker version 可以通过version查看客户端和服务器端的版本
Client:
 Version:           18.09.3
 API version:       1.39
 Go version:        go1.10.8
 Git commit:        774a1f4
 Built:             Thu Feb 28 06:33:21 2019
 OS/Arch:           linux/amd64
 Experimental:      false

Server: Docker Engine - Community
 Engine:
  Version:          18.09.3
  API version:      1.39 (minimum version 1.12)
  Go version:       go1.10.8
  Git commit:       774a1f4
  Built:            Thu Feb 28 06:02:24 2019
  OS/Arch:          linux/amd64
  Experimental:     false
[root@localhost ~]# docker info  还可以通过info查看更加详细的信息
Containers: 0    容器的个数
 Running: 0       运行中容器的个数
 Paused: 0         暂停的容器个数
 Stopped: 0        以停止的容器的个数
Images: 0
Server Version: 18.09.3
Storage Driver: overlay2   存储后端引擎,这个很重要,docker早期的版本上是不支持这个存储格式的,那时候主流的centos版本还是6,docker还是使用的dm格式,也就是基于lvm(逻辑卷)的形式,这种格式性能很差,还不是很稳定,在后续的docker版本上就换成了这种格式,centos直到7上才完全兼容overlay2的格式,所以说想很好的使用docker还是需要用到centos7版本
 Backing Filesystem: xfs  备份的文件系统
 Supports d_type: true
 Native Overlay Diff: true
Logging Driver: json-file
Cgroup Driver: cgroupfs
Plugins:     支持的插件
 Volume: local
 Network: bridge host macvlan null overlay
 Log: awslogs fluentd gcplogs gelf journald json-file local logentries splunk syslog
Swarm: inactive
Runtimes: runc
Default Runtime: runc
Init Binary: docker-init
containerd version: e6b3f5632f50dbc4e9cb6288d911bf4f5e95b18e
runc version: 6635b4f0c6af3810594d2770f662f34ddc15b40d
init version: fec3683
Security Options:
 seccomp
  Profile: default
Kernel Version: 3.10.0-957.el7.x86_64
Operating System: CentOS Linux 7 (Core)
OSType: linux
Architecture: x86_64
CPUs: 4
Total Memory: 1.777GiB
Name: localhost.localdomain
ID: BXLI:3OWV:CIBE:BYC2:77XQ:ZJ3Y:736U:Y7M5:FXEW:ONYQ:M6S7:OKWI
Docker Root Dir: /var/lib/docker
Debug Mode (client): false
Debug Mode (server): false
Registry: https://index.docker.io/v1/
Labels:
Experimental: false
Insecure Registries:
 127.0.0.0/8
Registry Mirrors:
 https://registry.docker-cn.com/   加速的地址
Live Restore Enabled: false
Product License: Community Engine
Storage Driver: overlay2参考https://blog.csdn.net/vchy_zhao/article/details/70238690
B:docker的常用命令
docker search:根据指定的关键字搜索镜像

[root@localhost ~]# docker search nginx
NAME                                                   DESCRIPTION                                     STARS               OFFICIAL            AUTOMATED
nginx    没有增加/斜杠的代表顶级镜像,一般是docker官方提供的                                              Official build of Nginx.                        11053               [OK]
jwilder/nginx-proxy    这种加了斜杠的斜杠前面是注册者的账户名,这种镜像一般叫做用户镜像                                Automated Nginx reverse proxy for docker con…   1556                                    [OK]
richarvey/nginx-php-fpm                                Container running Nginx + PHP-FPM capable of…   688                                     [OK]
jrcs/letsencrypt-nginx-proxy-companion                 LetsEncrypt container to use with nginx as p…   492                                     [OK]
kitematic/hello-world-nginx                            A light-weight nginx container that demonstr…   123
webdevops/php-nginx                                    Nginx with PHP-FPM                              123                                     [OK]
zabbix/zabbix-web-nginx-mysql                          Zabbix frontend based on Nginx web-server wi…   91                                      [OK]
bitnami/nginx                                          Bitnami nginx Docker Image                      64                                      [OK]
linuxserver/nginx                                      An Nginx container, brought to you by LinuxS…   56
1and1internet/ubuntu-16-nginx-php-phpmyadmin-mysql-5   ubuntu-16-nginx-php-phpmyadmin-mysql-5          49                                      [OK]
tobi312/rpi-nginx                                      NGINX on Raspberry Pi / armhf                   24                                      [OK]
nginx/nginx-ingress                                    NGINX Ingress Controller for Kubernetes         17
wodby/drupal-nginx                                     Nginx for Drupal container image                12                                      [OK]
nginxdemos/hello                                       NGINX webserver that serves a simple page co…   12                                      [OK]
blacklabelops/nginx                                    Dockerized Nginx Reverse Proxy Server.          12                                      [OK]
schmunk42/nginx-redirect                               A very simple container to redirect HTTP tra…   11                                      [OK]
centos/nginx-18-centos7                                Platform for running nginx 1.8 or building n…   10
centos/nginx-112-centos7                               Platform for running nginx 1.12 or building …   7
nginxinc/nginx-unprivileged                            Unprivileged NGINX Dockerfiles                  4
1science/nginx                                         Nginx Docker images that include Consul Temp…   4                                       [OK]
mailu/nginx                                            Mailu nginx frontend                            3                                       [OK]
travix/nginx                                           NGinx reverse proxy                             2                                       [OK]
toccoag/openshift-nginx                                Nginx reverse proxy for Nice running on same…   1                                       [OK]
wodby/nginx                                            Generic nginx                                   0                                       [OK]
ansibleplaybookbundle/nginx-apb                        An APB to deploy NGINX                          0                                       [OK]
[root@localhost ~]#
docker pull:将镜像拉到本地
在dockerhub官网上每一个镜像都有一个alpine的版本,可以看到这个版本所占的空间非常小,如果是用于开发调试可以使用这个版本,因为体积小下载速度快,但是缺点就是没有相应的操作工具,如果是下载功能全的版本,占用空间也大也消耗带宽,所以最好的办法就是自己制作私有的镜像仓库

[root@localhost ~]# docker image pull nginx:1.14-alpine   pull的时候指定版本信息,不确定的话可以上网站查一下
1.14-alpine: Pulling from library/nginx
6c40cc604d8e: Pull complete
76679ad9f124: Pull complete
389a52582f93: Pull complete
496e2dd2b91a: Pull complete
Digest: sha256:b96aeeb1687703c49096f4969358d44f8520b671da94848309a3ba5be5b4c632
Status: Downloaded newer image for nginx:1.14-alpine

[root@localhost ~]# docker images  可以看到本地已经与镜像了
REPOSITORY          TAG                 IMAGE ID            CREATED             SIZE
nginx               1.14-alpine         66952fd0a8ef        5 weeks ago         16MB
[root@localhost ~]#

通过另外一种命令下载linux上的工具包。
[root@localhost ~]# docker pull busybox
Using default tag: latest
latest: Pulling from library/busybox
697743189b6d: Pull complete
Digest: sha256:061ca9704a714ee3e8b80523ec720c64f6209ad3f97c0ff7cb9ec7d19f15149f
Status: Downloaded newer image for busybox:latest
[root@localhost ~]# docker images
REPOSITORY          TAG                 IMAGE ID            CREATED             SIZE
busybox             latest              d8233ab899d4        3 weeks ago         1.2MB
nginx               1.14-alpine         66952fd0a8ef        5 weeks ago         16MB
[root@localhost ~]#
早期的docker是没有加image来执行的
docker images:列出本地所有镜像

[root@localhost ~]# docker image

Usage:  docker image COMMAND

Manage images

Commands:
  build       Build an image from a Dockerfile
  history     Show the history of an image
  import      Import the contents from a tarball to create a filesystem image
  inspect     Display detailed information on one or more images
  load        Load an image from a tar archive or STDIN
  ls          List images  查看
  prune       Remove unused images
  pull        Pull an image or a repository from a registry  拉镜像到本地
  push        Push an image or a repository to a registry
  rm          Remove one or more images
  save        Save one or more images to a tar archive (streamed to STDOUT by default)
  tag         Create a tag TARGET_IMAGE that refers to SOURCE_IMAGE

Run 'docker image COMMAND --help' for more information on a command.
[root@localhost ~]#
image后面可以接的参数都是新版本的docker提供的,主要是提供了分层。
新的版本也保留了老版本的命令,docker --help能查看到老版本和新版本的命令
docker image rm(新)或者老docer rmi :删除镜像

[root@localhost ~]# docker images
REPOSITORY          TAG                 IMAGE ID            CREATED             SIZE
busybox             latest              d8233ab899d4        3 weeks ago         1.2MB
nginx               1.14-alpine         66952fd0a8ef        5 weeks ago         16MB
[root@localhost ~]# docker image rm  busybox
Untagged: busybox:latest
Untagged: busybox@sha256:061ca9704a714ee3e8b80523ec720c64f6209ad3f97c0ff7cb9ec7d19f15149f
Deleted: sha256:d8233ab899d419c58cf3634c0df54ff5d8acc28f8173f09c21df4a07229e1205
Deleted: sha256:adab5d09ba79ecf30d3a5af58394b23a447eda7ffffe16c500ddc5ccb4c0222f
[root@localhost ~]# docker images
REPOSITORY          TAG                 IMAGE ID            CREATED             SIZE
nginx               1.14-alpine         66952fd0a8ef        5 weeks ago         16MB
[root@localhost ~]#

[root@localhost ~]# docker image ls
REPOSITORY          TAG  (标签)              IMAGE ID(容器id)            CREATED (时间)            SIZE(大小)
nginx               1.14-alpine         66952fd0a8ef        5 weeks ago         16MB
[root@localhost ~]# docker image ls --no-trunc
REPOSITORY          TAG                 IMAGE ID                                                                  CREATED             SIZE
nginx               1.14-alpine         sha256:66952fd0a8efa0598626fad89d3a0827bc24fc92c3adb576adbc9fd58606e1af   5 weeks ago         16MB
[root@localhost ~]#
可以看到IMAGE ID(容器id)就以完整的形式展现出来了,默认只显示前面一段的
docker container run 创建容器之后直接启动
docker container start 启动容器
docker container stop 停止容器
docker container kill 强行停止容器

[root@localhost ~]# docker container --help

Usage:  docker container COMMAND

Manage containers

Commands:
  attach      Attach local standard input, output, and error streams to a running container
  commit      Create a new image from a container's changes
  cp          Copy files/folders between a container and the local filesystem
  create      Create a new container
  diff        Inspect changes to files or directories on a container's filesystem
  exec        Run a command in a running container
  export      Export a container's filesystem as a tar archive
  inspect     Display detailed information on one or more containers
  kill        Kill one or more running containers
  logs        Fetch the logs of a container
  ls          List containers
  pause       Pause all processes within one or more containers
  port        List port mappings or a specific mapping for the container
  prune       Remove all stopped containers
  rename      Rename a container
  restart     Restart one or more containers
  rm          Remove one or more containers
  run         Run a command in a new container
  start       Start one or more stopped containers
  stats       Display a live stream of container(s) resource usage statistics
  stop        Stop one or more running containers
  top         Display the running processes of a container
  unpause     Unpause all processes within one or more containers
  update      Update configuration of one or more containers
  wait        Block until one or more containers stop, then print their exit codes

Run 'docker container COMMAND --help' for more information on a command.
[root@localhost ~]#

[root@localhost ~]# docker container ls
CONTAINER ID(容器启动的id)        IMAGE (基于那个镜像启动的容器)              COMMAND (在容器中运行了什么命令)            CREATED(创建容器的时间)             STATUS (当前状态)             PORTS (映射的端口)              NAMES(容器的名称)
[root@localhost ~]#
docker的网络,dockr一旦启动就会创建一个docker0的网络,而且默认的 172.17.0.1网段,这个网络默认也是nat的方式,这就意味这它可以完成地址转换,转换成能对外通讯的地址。默认也是走在bridge上的。
C:docker容器的启动和相关操作

[root@localhost ~]# docker run --name(给容器取一个名字) docker01 -it(进入交互式镜像) busybox:latest(latest是标签,可以选择不加)
Unable to find image 'busybox:latest' locally
latest: Pulling from library/busybox
697743189b6d: Pull complete
Digest: sha256:061ca9704a714ee3e8b80523ec720c64f6209ad3f97c0ff7cb9ec7d19f15149f
Status: Downloaded newer image for busybox:latest
/ #
busybox默认是进入shell终端窗口的

在busybox容器里面启动httpd服务
在busybox里面创建html的网页目录,编辑网页信息
然后启动httpd -f -h /var/www/html/服务
然后另外开一个窗口访问
[root@localhost ~]# curl 172.17.0.2
hello busybox.server!!
[root@localhost ~]#
可以看到就能访问到信息
[root@localhost ~]# docker ps
CONTAINER ID        IMAGE               COMMAND             CREATED             STATUS              PORTS               NAMES
27bb5e91ac1f        busybox:latest      "sh"                9 minutes ago       Up 9 minutes                            docker001
[root@localhost ~]#
因为当前我们启动的进程是属于sh这个用户空间里面的,创建的httpd服务属于sh这个进程的子进程,他拥有了进程树和文件树,所有也就可以访问了,现在这个httpd服务只能在本地进行访问,因为没有做地址映射。

docker run --name docker001 -it busybox:latest
我们现在使用的是run直接启动,当我们exit退出之后,容器也就暂停了,默认用docker ps是不显示的,需要加参数才能看见
[root@localhost ~]# docker ps -a
CONTAINER ID        IMAGE               COMMAND             CREATED             STATUS                       PORTS               NAMES
27bb5e91ac1f        busybox:latest      "sh"                20 minutes ago      Exited (137) 2 minutes ago                       docker001
0a4f4aeee033        busybox:latest      "sh"                3 hours ago         Exited (0) 3 hours ago                           docker02
b4ddc6132f1b        busybox:latest      "sh"                4 hours ago         Exited (1) 4 hours ago                           docker01

[root@localhost ~]# docker start -ai(这两个参数可以不加) docker001
/ # ls
bin   dev   etc   home  proc  root  sys   tmp   usr   var
/ #
我们可以利用启动的命令江处于暂停的容器启动起来
/var/www/html # [root@localhost ~]# docker ps
CONTAINER ID        IMAGE               COMMAND             CREATED             STATUS              PORTS               NAMES
27bb5e91ac1f        busybox:latest      "sh"                26 minutes ago      Up About a minute                       docker001
[root@localhost ~]#
可以看到容器又处于up状态
[root@localhost ~]# docker ps -a
CONTAINER ID        IMAGE               COMMAND             CREATED             STATUS                   PORTS               NAMES
27bb5e91ac1f        busybox:latest      "sh"                30 minutes ago      Up 27 seconds                                docker001
0a4f4aeee033        busybox:latest      "sh"                4 hours ago         Exited (0) 3 hours ago                       docker02
b4ddc6132f1b        busybox:latest      "sh"                4 hours ago         Exited (1) 4 hours ago                       docker01
[root@localhost ~]# docker kill docker001  可以对处于运行状态的容器进行强停,如果是没有必要千万不要强停容器,可能会造成数据丢失
docker001
[root@localhost ~]# docker ps -a
CONTAINER ID        IMAGE               COMMAND             CREATED             STATUS                       PORTS               NAMES
27bb5e91ac1f        busybox:latest      "sh"                30 minutes ago      Exited (137) 2 seconds ago                       docker001
0a4f4aeee033        busybox:latest      "sh"                4 hours ago         Exited (0) 3 hours ago                           docker02
b4ddc6132f1b        busybox:latest      "sh"                4 hours ago         Exited (1) 4 hours ago                           docker01
[root@localhost ~]# docker ps -a
CONTAINER ID        IMAGE               COMMAND             CREATED             STATUS                       PORTS               NAMES
27bb5e91ac1f        busybox:latest      "sh"                30 minutes ago      Exited (137) 2 seconds ago                       docker001
0a4f4aeee033        busybox:latest      "sh"                4 hours ago         Exited (0) 3 hours ago                           docker02
b4ddc6132f1b        busybox:latest      "sh"                4 hours ago         Exited (1) 4 hours ago                           docker01
[root@localhost ~]# docker rm docker01  使用rm后面接容器名称删除容器
docker01
[root@localhost ~]# docker ps -a
CONTAINER ID        IMAGE               COMMAND             CREATED             STATUS                            PORTS               NAMES
27bb5e91ac1f        busybox:latest      "sh"                32 minutes ago      Exited (137) About a minute ago                       docker001
0a4f4aeee033        busybox:latest      "sh"                4 hours ago         Exited (0) 3 hours ago                                docker02
[root@localhost ~]#

[root@localhost ~]# docker images
REPOSITORY          TAG                 IMAGE ID            CREATED             SIZE
busybox             latest              d8233ab899d4        3 weeks ago         1.2MB
nginx               1.14-alpine         66952fd0a8ef        5 weeks ago         16MB
[root@localhost ~]# docker run --name nginx001 -d(放到后台运行,此时nginx不需要和busybox一样需要交互放后台即可) nginx:1.14-alpine
04e64051bd39c390dfdc618d4f02ef863cef99210c29e353e5ffc33f3352cbf3
[root@localhost ~]# docker ps
CONTAINER ID        IMAGE               COMMAND                  CREATED             STATUS              PORTS               NAMES
04e64051bd39        nginx:1.14-alpine   "nginx -g 'daemon of…(daemon of表示不要跑在后台)"   14 seconds ago      Up 12 seconds       80/tcp              nginx001
nginx -g 'daemon of…(daemon of表示不要在容器中运行在后台)
在docker容器中运行任何程序一定不能让它跑在容器的后台,一旦跑在后台,docker就认为程序没有运行,而且你及时手动启动还是会立马终止
[root@localhost ~]# docker inspect nginx001通过inspect 来查看服务运行在哪个地址上
。。。。。。
"Gateway": "172.17.0.1",
                    "IPAddress": "172.17.0.2", 可以看到运行在172.17.0.2地址上
                    "IPPrefixLen": 16,
                    "IPv6Gateway": "",
[root@localhost ~]# curl 172.17.0.2 访问该地址
<!DOCTYPE html>
<html>
<head>
<title>Welcome to nginx!</title>
<style>
    body {
        width: 35em;
        margin: 0 auto;
        font-family: Tahoma, Verdana, Arial, sans-serif;
    }
</style>
</head>
<body>
<h1>Welcome to nginx!</h1>
<p>If you see this page, the nginx web server is successfully installed and
working. Further configuration is required.</p>

<p>For online documentation and support please refer to
<a href="http://nginx.org/">nginx.org</a>.<br/>
Commercial support is available at
<a href="http://nginx.com/">nginx.com</a>.</p>

<p><em>Thank you for using nginx.</em></p>
</body>
</html>
[root@localhost ~]#
我们是用run的时候,如果本地没有镜像,run回去加速镜像网站去找与之匹配的镜像,但是你要保证在镜像加速网站能找到该镜像。

我们还可以通过exec参数绕过容器的边界到里面去执行一些命令
[root@localhost ~]# docker exec nginx001 -it /bin/sh
OCI runtime exec failed: exec failed: container_linux.go:344: starting container process caused "exec: \"-it\": executable file not found in $PATH": unknown
[root@localhost ~]# docker exec -it nginx001 /bin/sh
/ # ls
bin    dev    etc    home   lib    media  mnt    opt    proc   root   run    sbin   srv    sys    tmp    usr    var
/ # ps
PID   USER     TIME  COMMAND
    1 root      0:00 nginx: master process nginx -g daemon off;
    6 nginx     0:00 nginx: worker process
   25 root      0:00 /bin/sh
   31 root      0:00 ps
/ # netstat -anptu
Active Internet connections (servers and established)
Proto Recv-Q Send-Q Local Address           Foreign Address         State       PID/Program name
tcp        0      0 0.0.0.0:80              0.0.0.0:*               LISTEN      1/nginx: master pro
/ #
可以看到端口也监听了

/ # nginx-debug
2019/03/12 13:32:16 [emerg] 34#34: bind() to 0.0.0.0:80 failed (98: Address in use)
nginx: [emerg] bind() to 0.0.0.0:80 failed (98: Address in use)
2019/03/12 13:32:16 [emerg] 34#34: bind() to 0.0.0.0:80 failed (98: Address in use)
nginx: [emerg] bind() to 0.0.0.0:80 failed (98: Address in use)
2019/03/12 13:32:16 [emerg] 34#34: bind() to 0.0.0.0:80 failed (98: Address in use)
nginx: [emerg] bind() to 0.0.0.0:80 failed (98: Address in use)
2019/03/12 13:32:16 [emerg] 34#34: bind() to 0.0.0.0:80 failed (98: Address in use)
nginx: [emerg] bind() to 0.0.0.0:80 failed (98: Address in use)
2019/03/12 13:32:16 [emerg] 34#34: bind() to 0.0.0.0:80 failed (98: Address in use)
nginx: [emerg] bind() to 0.0.0.0:80 failed (98: Address in use)
2019/03/12 13:32:16 [emerg] 34#34: still could not bind()
nginx: [emerg] still could not bind()
/ #
我们还可以执行nginx相关的命令
我们发现docker在部署启动服务优势很明显,但是docker给我们弄了一个难题就是我们要改服务的配置文件。

[root@localhost ~]# docker logs nginx001
172.17.0.1 - - [12/Mar/2019:13:17:50 +0000] "GET / HTTP/1.1" 200 612 "-" "curl/7.29.0" "-"  可以看到我们之前访问nginx服务的信息
[root@localhost ~]#
因为我们容器里面就跑了一个进程,可以使用logs参数直接获取服务日志信息,当然这种情况下查看日志比较适合调试的过程
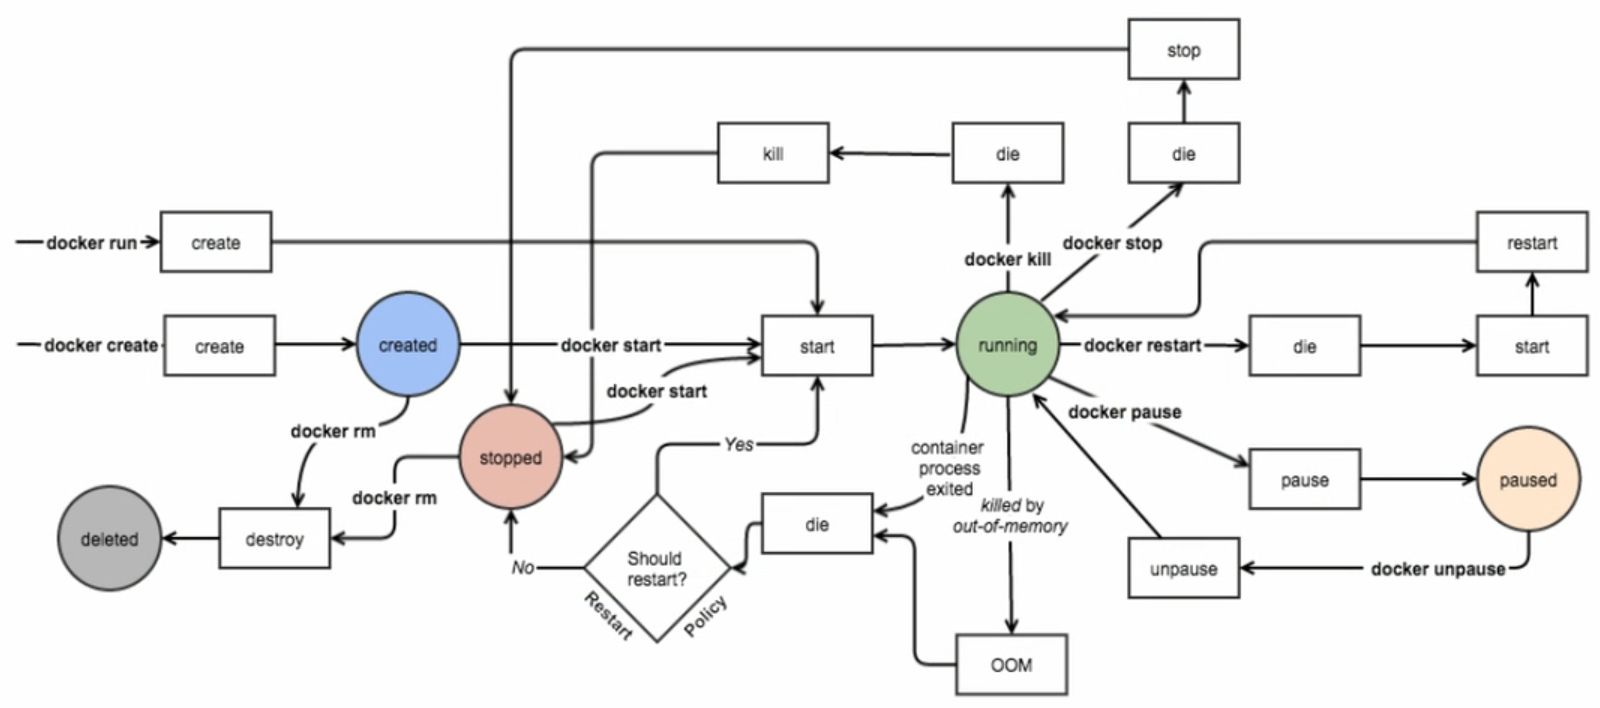
在上图里面容器的创建方式有两种,一种是run,创建之后直接启动,还是就是create,创建之后不启动,需要手动启动,容器一旦启动起来就处于runing状态,这个状态下可以kill,stop操作,这个时候容器就处于stopped停止状态,这个状态下可以rm删除,删除就处于deleted状态,这个状态就没有操作了。图上还有一个paused暂停状态。
如果服务超过限制的内存最大值,将会被oom掉,这个时候就处于挂机的状态,如果你这个时候有重启的策略,服务将被重启,没有的话就会回到停止状态。
docker的简单的使用流程就是在这几个状态之间来回转换的,只要知道什么状态下该需要做什么操作,docker的简单使用就变得简单了。
♣三:docker镜像基础管理
A:docker镜像的基础概念
在docker的基础使用的时候就反复提到了镜像,我们在使用docker host它是由运行在docker里面的守护进程组成的,也就是docker的server端,接收客户端的请求是由http或https与后台交互,而且docker的客户端可以是远程主机。
当docker的server端接收到来自client的请求的时候会在docker host里面创建或者启动一个容器,在一个docker host里面可以创建和启动各种不同的容器,而容器的启动或运行是基于镜像来实现的,当镜像本地没有,docker会自动连到网络例如dockerhub上去获取镜像,获取的镜像会存储到本地一个专门用于存储镜像的空间里面,这个存储空间要求得是特殊的文件系统,这就是我们之前docker info看到的Storage Driver: overlay2,这些镜像放在这个存储空间里面是只读的,而你下载的镜像(应用程序)也是被下载仓库名,而一个仓库里面可以容纳多个相同服务不同版本的镜像,这些不同的版本会通过标签来区分。
docker镜像是含有启动容器所需要的文件系统及其内容,因此镜像的主要功能是创建并启动docker容器。
docker另外一个概念必须要知道的是分层构建机制,类似于建房子,docker的地基层为bootfs,在上层则是rootfs,bootfs和linux启动的是需要加载boot分区一样,主要用于系统引导的文件系统,也提供了内核,容器启动完成之后就会被卸载(只是从内存中移除),便于回收资源,bootfs的加载也是为了引导rootfs而存在的,rootfs就是一个根文件系统,也就是一个用户空间。
在传统的centos6等版本在启动时候,内核挂载rootfs的时候会议只读模式挂载,以便于完成系统自检,这种机制是为了保证系统在自检的时候因出现错误导致误删除数据,当系统自检完成确保没有问题,再将其重新挂载成读写模式。而在docker中,这个rootfs始终都是只读的形式挂载的,后面通过(联合挂载)技术额外挂载一个可写层。
在docker中rootfs一旦启动成功便可以在这个基础之上在去安装其他的镜像,而这个原始底层镜像是不会变动的,例如我们安装了一个最简化的centos系统,而这个centos是没有操作工具的,我们需要安装vim等一系列操作工具,这个时候你再安装的vim工具就是基于最底层centos镜像之上的,这个层你可以理解为vim层,只包含vim工具,然后你再安装tomcat,这个tomcat就是在vim层之上,当你启动tomcat的时候,需要从下层往上一层层的挂载,直到tomcat层,这个就是联合挂载,当你需要对层级里面的文件进行修改的时候,仅能通过整个挂载层最上端的writable(可写)层来实现,当容器被删除的时候,这个writable也会被删除
docker的联合挂载和分层构建必须依赖于专门的文件系统的支撑才能实现,而早期的时候docker是通过aufs(高级多层统一文件系统)来实现linux的联合挂载技术的文件系统,而aufs的前身是unionfs文件系统,据说unionfs这个文件系统申请合并到内核的时候因代码比较糟糕曾多次被李纳斯驳回,后来有人将unionfs重构变成aufs,但是依旧很糟糕,从此aufs这种文件系统如果是想用的话就必须向内核打补丁,从此市场主流的系统就只有ubuntu很早的时候支持了aufs文件系统,因为ubuntu将aufs整合到了内核中,也就意味着早起想使用docker也没有很好的系统选择,后来出现了overlayfs(叠加多层级文件系统),这个文件系统在3.18的版本开始就被整合到linux内核之中。除此之外docker还支持btrfs,devicemapper和vfs等文件系统
而市场上主流的centos既不支持aufs,也不支持overlayfs,这个时候centos就开始主推他的devicemapper文件系统,devicemapper也被拿出去和其它文件系统做比较,结果也发现devicemapper不尽人意。
从此在新版本的docker上会发现都是基于overlayfs文件系统来实现的了,overlayfs是一种抽象的二级文件系统,他需要构建与一个本地文件系统之上,所有我们使用docker info的时候发现backing Filesystem:xfs(后端是基于xfs),前端是overlayfs文件系统。
我们在制作好镜像之后,镜像应该有一个统一存储的位置,这个位置就叫做docker registry,当容器启动的时候,docker daemon会试图从本地获取相关的镜像,本地没有的时候,才去registry(这个registry没有特别指定的时候就是指的dockerhub)中下载镜像本保存在本地。
所以docker的镜像可以是从dockerhub上提供的,也可以是本地的私有镜像仓库,而在本地需要创建私有的仓库的时候可以通过docker提供的软件包老实现,但是你通过软件包制作的镜像必须支持https,因为docker daemon默认必须是https的形式才能被访问,如果是需要使用本地的你得改配置docker daemon,告诉docker daemon虽然是http不够安全,但是能用。
docker registry的分类
第三方的registry,提供给客户和docker社区使用;
第三方的registry,提供给客户使用(之前的加速器就是这种);
由服务商的提供的registry,比如你买了红帽的操作系统;
有能力建设防火墙和安全层的私有实体registry,这种私有的registry是最符合公司内部需求的,因为共有的registry实在难以满足所有客户。
docker registry的组成:
docker registry一般由两部分组成,一部分是由不同程序的不同版本组成的镜像仓库,还有一个就是索引,索引的功能可以方便用户根据之前定义好的信息来找相关的镜像。
docker的私有仓库一般都由专门的镜像开发的人员在镜像网站pull下来一个镜像,在这个镜像基础上进行二次调整之后放到本地的私有仓库上,然后运维人员将这些镜像pull到需要部署的机器上。
在互联网上有很多很好的镜像仓库站点,例如https://quay.io/repository/coreos/flannel, 这些站点在下载镜像的时候,需要指定仓库的地址和标签,不是和我们之前直接指定应用程序即可,例如我们在quay.io上下载一个镜像的方法:docker pull quay.io/bitnami/tomcat:8.5-ol-7 这个pull就是网站的信息加上标签。
B:docker镜像的生成途径:
docker镜像生成的途径一般分为以下几种:
1:我们可以使用dockerfile,我们自己使用一个命令docker build来制作,这个是专门用来做镜像的。
2:我们可以基于某个容器来制作,例如某个容器已经处于运行当中,我们使用docker commit在容器的最上可写层单独创建一个镜像层。
3:还有就是基于dockerhub自动生成的,这种类型的镜像严格来说不算一种方式,dockerhub上的也是基于dockerfile方式产生的,最多算的上制作的一一种途径而已。
基于某个容器来制作镜像:
我们首先启动一个容器,在容器中做好你打算做好的修改,这个我们需要使用到docker commit命令来完成。

[root@localhost ~]# docker run --name box001 -it busybox  我们首先启动一个容器
/ # ls
bin   dev   etc   home  proc  root  sys   tmp   usr   var
/ # mkdir -p /data/html   然后创建一个存html网页的目录
/ # vi /data/html/index.html  并且创建一个网页的内容
/ #
此时我们如果结束容器,这个网页肯定就不存在了,我们现在就想把这个网页给制作成一个镜像,现在的busybox是不能关闭的,一结束容器就暂停了。

[root@localhost ~]# docker commit -h  先看下commit的用法和参数
Flag shorthand -h has been deprecated, please use --help

Usage:  docker commit [OPTIONS] CONTAINER(基于那个容器做镜像) [REPOSITORY(属于哪个仓库)[:TAG(有什么标签)]]
如果是把后面的[REPOSITORY[:TAG]]省略,该镜像就是本地的一个裸镜像,不属于任何仓库也没有标签。

Create a new image from a container's changes

Options:
  -a, --author string    Author (e.g., "John Hannibal Smith <hannibal@a-team.com>")
  -c, --change list      Apply Dockerfile instruction to the created image
  -m, --message string   Commit message
  -p, --pause            Pause container during commit (default true)
-p参数是用暂停下容器使用,因为我们在制作镜像的时候容器是处于运行状态,这个状态会不断产生很多的文件,我们让其暂停下在去制作。
[root@localhost ~]# docker commit -p box001
sha256:25a0f192ba8ab5f56eb9a6e068f617799fb5e8d4fabe0a12f39176dcbf7c7cf9
[root@localhost ~]#
一个镜像就制作完成,我们使用dokcer images查看下信息
[root@localhost ~]# docker images
        REPOSITORY          TAG                 IMAGE ID            CREATED             SIZE
<none>              <none>              25a0f192ba8a        53 seconds ago      1.2MB
busybox             latest              d8233ab899d4        4 weeks ago         1.2MB
nginx               1.14-alpine         66952fd0a8ef        6 weeks ago         16MB
[root@localhost ~]#可以看到我们没有指定仓库名,也标签信息,就是能看到image id和大小,如果镜像的标签还没有规划好,这个标签我们也是可以后补的,使用docker tag命令
[root@localhost ~]# docker tag -h
Flag shorthand -h has been deprecated, please use --help

Usage:  docker tag SOURCE_IMAGE[:TAG指定镜像] TARGET_IMAGE(仓库名称)[:TAG指定标签名称]
如果一个镜像已经存在标签的话,可以为一个镜像打多个标签

Create a tag TARGET_IMAGE that refers to SOURCE_IMAGE

[root@localhost ~]# docker tag 25a0f192ba8a localhost/httpd:v0.0.1
                                              这个在没有仓库的时候我们只能去image id指定
[root@localhost ~]# docker images
REPOSITORY          TAG                 IMAGE ID            CREATED             SIZE
localhost/httpd     v0.0.1              25a0f192ba8a        6 minutes ago       1.2MB
busybox             latest              d8233ab899d4        4 weeks ago         1.2MB
nginx               1.14-alpine         66952fd0a8ef        6 weeks ago         16MB
[root@localhost ~]#可以看到我们已经给之前的镜像打上了标签和所属仓库信息

[root@localhost ~]# docker tag  localhost/httpd:v0.0.1 localhost/httpd:v0.0.2
 如果刚才的镜像有修改了相关的内容,迭代了,我们可以在原有的镜像的基础上重新打一个标签,标记为迭代的版本0.0.2
[root@localhost ~]# docker images
REPOSITORY          TAG                 IMAGE ID            CREATED             SIZE
localhost/httpd     v0.0.1              25a0f192ba8a        9 minutes ago       1.2MB
localhost/httpd     v0.0.2              25a0f192ba8a        9 minutes ago       1.2MB
busybox             latest              d8233ab899d4        4 weeks ago         1.2MB
nginx               1.14-alpine         66952fd0a8ef        6 weeks ago         16MB
[root@localhost ~]#除了tag不一样之外,其它信息均为一致。
[root@localhost ~]# docker image rm localhost/httpd:v0.0.2
迭代的标签内容写错了,我们就可以通过rm删除镜像,注意这个删除不是真正删除镜像,只是删除了标签而已。
Untagged: localhost/httpd:v0.0.2
[root@localhost ~]# docker images
REPOSITORY          TAG                 IMAGE ID            CREATED             SIZE
localhost/httpd     v0.0.1              25a0f192ba8a        14 minutes ago      1.2MB
busybox             latest              d8233ab899d4        4 weeks ago         1.2MB
nginx               1.14-alpine         66952fd0a8ef        6 weeks ago         16MB
[root@localhost ~]# docker run --name box002 -it localhost/httpd:v0.0.1
/ # ls
bin   data  dev   etc   home  proc  root  sys   tmp   usr   var
/ # cat /data/html/index.html
hello busybox html.server
/ #
可以看到我们制作的内容已经保存到了新的镜像当中。
我们的容器一定是基于某个镜像启动的,我们已经通过原始的镜像创建了新的镜像,我们希望这个新的镜像启动的时候默认运行的命令不再是原来镜像上的命令,当然我们专门指导镜像原始的命令是什么了,可以使用之前的docker inspect busybox来查看cmd标记。

[root@localhost ~]# docker inspect busybox
........
 "Cmd": [
                "/bin/sh",   我们可以看到默认运行的是bin/sh
                "-c",
                "#(nop) ",
                "CMD [\"sh\"]"  默认的命令是sh
            ],
........
[root@localhost ~]# docker images
REPOSITORY          TAG                 IMAGE ID            CREATED             SIZE
localhost/httpd     v0.0.1              25a0f192ba8a        32 minutes ago      1.2MB
busybox             latest              d8233ab899d4        4 weeks ago         1.2MB
nginx               1.14-alpine         66952fd0a8ef        6 weeks ago         16MB
[root@localhost ~]# docker inspect localhost/httpd:v0.0.1  查看我们刚才制作的镜像默认使用的命令
......
"Cmd": [
                "sh"
            ],
........
如果是我们要修改原有基础镜像的默认命令也是使用到docker commit命令,加上参数-c。

[root@localhost ~]# docker commit -h
Flag shorthand -h has been deprecated, please use --help

Usage:  docker commit [OPTIONS] CONTAINER [REPOSITORY[:TAG]]

Create a new image from a container's changes

Options:
  -a, --author string    Author (e.g., "John Hannibal Smith <hannibal@a-team.com>")
加上作者信息
  -c, --change list      Apply Dockerfile instruction to the created image
修改原有镜像的命令
  -m, --message string   Commit message
  -p, --pause            Pause container during commit (default true)
[root@localhost ~]# docker commit -a "docker <docker@dockerhub.cn>" -c 'CMD(这里的参数就是我们刚才inspect看到的参数) ["/bin/httpd(文件执行的位置,使用linux下which命令就能查到)","-f(前台运行)","-h(网页的目录)","/data/html(网页目录的路径)"]' -p(在制作的时候暂停) box003 (基于制作的原镜像名)localhost/httpd:v0.0.3(新仓库和标签名)
sha256:fb4677ee396277ef09af92349d011376805bda1be1660004560656e9d0f65d3d
[root@localhost ~]# docker images
REPOSITORY          TAG                 IMAGE ID            CREATED             SIZE
localhost/httpd     v0.0.3              fb4677ee3962        3 minutes ago       1.2MB
localhost/httpd     v0.0.2              6f7c863d7eb0        17 minutes ago      1.2MB
localhost/httpd     v0.0.1              25a0f192ba8a        About an hour ago   1.2MB
busybox             latest              d8233ab899d4        4 weeks ago         1.2MB
nginx               1.14-alpine         66952fd0a8ef        6 weeks ago         16MB
[root@localhost ~]#版本3的镜像已经制作完成
[root@localhost ~]# docker run --name httpd0.2 localhost/httpd:v0.0.2  我们把新镜像启动起来
[root@localhost ~]# docker inspect httpd0.2  查看此时的cmd信息
........
  "Cmd": [
                "/bin/httpd",
                "-f",
                "-h",
                "/data/html"   可以看到原始的命令已经被修改成我们指定的命令了
            ],
                    "Gateway": "172.17.0.1",
                    "IPAddress": "172.17.0.3",可以看到地址信息
.........
[root@localhost ~]# docker ps -a
CONTAINER ID        IMAGE                    COMMAND                  CREATED             STATUS                     PORTS               NAMES
fc4b5604dd39        localhost/httpd:v0.0.2   "/bin/httpd -f -h /d…(可以看到运行的命令就和box001是不一样的,不再是原始的sh了)"   3 minutes ago       Up 3 minutes                                   httpd0.2
7a60a03e9f3f        busybox                  "sh"                     2 hours ago         Exited (0) 3 minutes ago                       box001
32ecea10ad3e        nginx:1.14-alpine        "nginx -g 'daemon of…"   2 days ago          Exited (0) 2 days ago                          nginx
04e64051bd39        nginx:1.14-alpine        "nginx -g 'daemon of…"   3 days ago          Exited (0) 3 days ago                          nginx001
[root@localhost ~]# curl 172.17.0.3 直接访问这个地址提供的信息
hello busybox html.server v0.02
[root@localhost ~]#
我们可以使用commit命令来快速创建一个属于自己的镜像。
当然我们自己制作的镜像也可以推送到dockerhub上用于保存,在dockerhub上你可以选择镜像是公开还是私有,在推送的时候我们选择docker push命令。

[root@localhost ~]# docker push -h
Flag shorthand -h has been deprecated, please use --help

Usage:  docker push [OPTIONS] NAME(名字)[:TAG标签]

Push an image or a repository to a registry

Options:
      --disable-content-trust   Skip image signing (default true)
[root@localhost ~]#这个推送的话可能需要登录
登录的话使用dokcer login
[root@localhost ~]# docker login -h
Flag shorthand -h has been deprecated, please use --help

Usage:  docker login [OPTIONS] [SERVER]
这个登录参数里面如果是dockerhub的话[SERVER]参数是不用指的,如果是别的服务器就需要指定。

Log in to a Docker registry

Options:
  -p, --password string   Password
      --password-stdin    Take the password from stdin
  -u, --username string   Username
[root@localhost ~]# docker login -u ppcserver
Password:
Error response from daemon: Get https://registry-1.docker.io/v2/: net/http: TLS handshake timeout
[root@localhost ~]# docker login -u ppcserver  登录dockerhub
Password:
WARNING! Your password will be stored unencrypted in /root/.docker/config.json.
Configure a credential helper to remove this warning. See
https://docs.docker.com/engine/reference/commandline/login/#credentials-store

Login Succeeded  返回登录成功
在push之前还需要注意的一个点就是你把本地的镜像推送到dockerhub上的时候需要和dockerhub上的仓库名保持一致,不然是不能推送的。
[root@localhost ~]# docker images
REPOSITORY           TAG                 IMAGE ID            CREATED             SIZE
ppcserver/httpd0.2 (本地的仓库名称需要和dockerhub上的保持一致)  v0.0.2              d82b7aeb082a        34 seconds ago      1.2MB
localhost/httpd      v0.0.1              25a0f192ba8a        2 hours ago         1.2MB
busybox              latest              d8233ab899d4        4 weeks ago         1.2MB
nginx                1.14-alpine         66952fd0a8ef        6 weeks ago         16MB
[root@localhost ~]# docker push ppcserver/httpd0.2:v0.0.2
The push refers to repository [docker.io/ppcserver/httpd0.2]
acae7b22ffb2: Pushed
adab5d09ba79: Mounted from library/busybox
v0.0.2: digest: sha256:a1a1a6e9b46683c7f948861b898febb8eb5d3fd76c6cb4053566d9e79b489761 size: 734
[root@localhost ~]#可以看到push成功,可以上dockerhub上查看镜像的信息
我们将本地的镜像删除,去dockerhub上把我们刚才推送的镜像给拉下来
[root@localhost ~]# docker images
REPOSITORY          TAG                 IMAGE ID            CREATED             SIZE
localhost/httpd     v0.0.1              25a0f192ba8a        2 hours ago         1.2MB
busybox             latest              d8233ab899d4        4 weeks ago         1.2MB
nginx               1.14-alpine         66952fd0a8ef        6 weeks ago         16MB
[root@localhost ~]# docker pull ppcserver/httpd0.2:v0.0.2
v0.0.2: Pulling from ppcserver/httpd0.2
697743189b6d: Already exists
a629bcaab0fe: Pull complete
Digest: sha256:a1a1a6e9b46683c7f948861b898febb8eb5d3fd76c6cb4053566d9e79b489761
Status: Downloaded newer image for ppcserver/httpd0.2:v0.0.2
[root@localhost ~]# docker images
REPOSITORY           TAG                 IMAGE ID            CREATED             SIZE
ppcserver/httpd0.2   v0.0.2              d82b7aeb082a        12 minutes ago      1.2MB
localhost/httpd      v0.0.1              25a0f192ba8a        2 hours ago         1.2MB
busybox              latest              d8233ab899d4        4 weeks ago         1.2MB
nginx                1.14-alpine         66952fd0a8ef        6 weeks ago         16MB
[root@localhost ~]#可以看到我们又将我们的镜像pull下来了
如果你是要推送到像阿里云这样的镜像仓库的时候需要带上服务器仓库的地址,在dockerhub上下载的时候也需要注意,尽量不要下载仓库里面用户的镜像,之前有很多镜像下载下来之后导致服务器被肉鸡使用。
C:镜像的导入和导出:
我们很多时候都是用于测试使用,当在一台机器上制作完一个镜像,想放到测试机器上进行测试,这个时候push的方式很麻烦, 这种情况下我们就可以把已有的镜像打包,放到另外一台机器装一下运行即可。我们需要使用到的两个命令:
1:docker save(保存打包文件)

[root@localhost ~]# docker save -h
Flag shorthand -h has been deprecated, please use --help

Usage:  docker save [OPTIONS] IMAGE [IMAGE...]
save一次可以打包多个镜像

Save one or more images to a tar archive (streamed to STDOUT by default)

Options:
  -o, --output string   Write to a file, instead of STDOUT
-o参数指定打包之后存在那个文件中
[root@localhost ~]# docker images
REPOSITORY           TAG                 IMAGE ID            CREATED             SIZE
ppcserver/httpd0.2   v0.0.2              d82b7aeb082a        44 minutes ago      1.2MB
localhost/httpd      v0.0.1              25a0f192ba8a        3 hours ago         1.2MB
busybox              latest              d8233ab899d4        4 weeks ago         1.2MB
nginx                1.14-alpine         66952fd0a8ef        6 weeks ago         16MB
[root@localhost ~]# docker save -o /home/myimages.gz ppcserver/httpd0.2:v0.0.2 localhost/httpd:v0.0.1  我们将版本1和版本2直接打包放在home下取名为myimages,而且并压缩成gz的格式
[root@localhost ~]# cd /home/
[root@localhost home]# ls
docker  myimages.gz
[root@localhost home]#
2:docker load从打包文件直接安装

[root@localhost /]# docker load -h
Flag shorthand -h has been deprecated, please use --help

Usage:  docker load [OPTIONS]

Load an image from a tar archive or STDIN

Options:
  -i, --input string   Read from tar archive file, instead of STDIN
指定从那个文件来load
  -q, --quiet          Suppress the load output
[root@localhost /]# docker images
REPOSITORY          TAG                 IMAGE ID            CREATED             SIZE
busybox             latest              d8233ab899d4        4 weeks ago         1.2MB
nginx               1.14-alpine         66952fd0a8ef        6 weeks ago         16MB
[root@localhost home]# docker load -i myimages.gz
acae7b22ffb2: Loading layer [==================================================>]   5.12kB/5.12kB
Loaded image: ppcserver/httpd0.2:v0.0.2
751d8660062f: Loading layer [==================================================>]   5.12kB/5.12kB
Loaded image: localhost/httpd:v0.0.1
[root@localhost home]# docker images
REPOSITORY           TAG                 IMAGE ID            CREATED             SIZE
ppcserver/httpd0.2   v0.0.2              d82b7aeb082a        About an hour ago   1.2MB
localhost/httpd      v0.0.1              25a0f192ba8a        4 hours ago         1.2MB
busybox              latest              d8233ab899d4        4 weeks ago         1.2MB
nginx                1.14-alpine         66952fd0a8ef        6 weeks ago         16MB
[root@localhost home]#
docker save和docker load两种方式也存在一个问题就是你使用run或者pull的时候,因为你本地没有镜像,还是回去镜像本应该所属的位置去拉镜像下来,所以使用这种方式你本地还是得有镜像。
除了save和load还有export和import。
♣四:容器的虚拟化网络
A:容器虚拟化网络基础:
在文章的最开始我们就介绍了容器的6种命名空间,都是用于隔离技术而存在的,那么容器的虚拟化网络在内核很早的时候已经支持,主要用于隔离协议栈和网路设备。
假如我们的服务器只有一块物理网卡,此时在这台机器上创建了很多容器,远远大于网卡设备的数量,这个时候容器运行的镜像需要进行通讯怎么办,所以需要使用到虚拟网卡来保证服务的正常通讯。
在我们常用的vmwar workstation中我们可以使用虚拟网卡的功能来虚拟出很多网卡设备来保证正常的通讯,而在linux内核中能完全支持二层三层设备的模拟,二层设备就包含我们的网卡,二层设备能封装物理报文在各个设备之间进行报文转发,而且这种网络很独特,每一张网络设备是成对出现的,这就好比一根网线的两头,能连接虚拟机和交换机之上一样,而这种网卡模拟在我们内核就原生支持。在linux上我们可以通过ovs(openvswitch)能工具来模拟交换机等设备。
有了这种工具和内核的支持,我们在一个平台上搭建不不同的容器,然后通过内核和工具,将网络一头接在容器这边,一头接在交换机之上,运用相同的概念,我们就能完容器之间的通讯。这个是简单的网络形式,如果是我在一个平台之上有两个交换机,而且在不同网段怎么办,这个时候也是需要虚拟网络,在通过工具模拟路由器,通过虚拟网路把两边的交换机接到路由器上,这样稍微复杂的网络文明也能实现,但是路由器属于三层设备,要想使用就需要使用一个单独的容器(用户空间)来完成,如果更加复杂的网络就不建议使用这种技术了,因为很容易出现网络风暴,而且效率不高。
我们发现容器在需要通讯的时候因为要不断的考虑网络形态来应对复杂的容器场景,这个里面很容易出现问题,因此我们在面对这种容器网络的情况下就可以使用overlay network(叠加网络技术),这种技术就是在原有的物理机网卡之上建立一个虚拟的网络桥,上层的容器的通讯就借助我们的物理网络来完成报文的隧道转发,可以完成跨设备容器之间的通讯。
假如server1和server9在两台不通的物理服务器上,而且不在同一网段,这个时候当server1需要访问server9的时候,就需要把报文信息发送给网络桥并封装报文信息,在由网络桥转发给物理网卡,server1的物理网卡在此时肯定不会知道server9所在的地址,但是server1知道server9所在的物理网卡地址,此时server1又将已经封装的报文信息二次封装加上发给server9所在的物理网卡,server9在解开封装的报文之后发现是给到server9网络桥之上的机器的,这个时候就再转发给server9所在的虚拟机器。
B:docker的网络形式:
docker在安装之后默认提供了三种网络:
1:bridge(桥接式网络,此处的桥接是net桥,bridge会在本机创建一个软交换机,就是我们之前看到的docker 0,这个docker 0可以充当交换机之外还能充当我们的网卡设备,不给地址的时候就是交换机,给了地址既是交换机又是网络设备)
当我们启动一个容器,就会创建一个veth开头后面随机的网卡信息:

[root@localhost ~]# docker ps -a
CONTAINER ID        IMAGE                       COMMAND                  CREATED              STATUS                  PORTS               NAMES
a71b4f12bed7        ppcserver/httpd0.2:v0.0.2   "/bin/httpd -f -h /d…"   About a minute ago   Up About a minute                           httpd0.2
32ecea10ad3e        nginx:1.14-alpine           "nginx -g 'daemon of…"   3 days ago           Up 4 minutes            80/tcp              nginx
04e64051bd39        nginx:1.14-alpine           "nginx -g 'daemon of…"   3 days ago           Exited (0) 3 days ago                       nginx001
[root@localhost ~]#我们现在处于运行的网卡有两个
[root@localhost ~]# ifconfig
veth11541d3: flags=4163<UP,BROADCAST,RUNNING,MULTICAST>  mtu 1500
        inet6 fe80::d818:72ff:fe50:8e8e  prefixlen 64  scopeid 0x20<link>
        ether da:18:72:50:8e:8e  txqueuelen 0  (Ethernet)
        RX packets 0  bytes 0 (0.0 B)
        RX errors 0  dropped 0  overruns 0  frame 0
        TX packets 22  bytes 2422 (2.3 KiB)
        TX errors 0  dropped 0 overruns 0  carrier 0  collisions 0

veth56e9b13: flags=4163<UP,BROADCAST,RUNNING,MULTICAST>  mtu 1500
        inet6 fe80::fcff:3eff:fed0:c335  prefixlen 64  scopeid 0x20<link>
        ether fe:ff:3e:d0:c3:35  txqueuelen 0  (Ethernet)
        RX packets 0  bytes 0 (0.0 B)
        RX errors 0  dropped 0  overruns 0  frame 0
        TX packets 8  bytes 656 (656.0 B)
        TX errors 0  dropped 0 overruns 0  carrier 0  collisions 0
会发现多处了这两张网卡信息,而且这个网卡都是成对出现的,一个在容器,一个在软桥,就相当于一根网线连接的设备的两头。
上面说了docker 0在没有配置网络的时候就是交换机,我们可以通过brctl show(注意这个命令是要安装bridge-utils包的)命令来看下交换机上是不是有我们ifconfig的网卡,先找到接在交换机上的网卡信息。
[root@localhost ~]# brctl show
bridge name     bridge id               STP enabled     interfaces
docker0         8000.0242bb636b7b       no              veth11541d3
                                                        veth56e9b13
virbr0          8000.525400fb0995       yes             virbr0-nic
[root@localhost ~]# ifconfig
veth11541d3: flags=4163<UP,BROADCAST,RUNNING,MULTICAST>  mtu 1500
        inet6 fe80::d818:72ff:fe50:8e8e  prefixlen 64  scopeid 0x20<link>
        ether da:18:72:50:8e:8e  txqueuelen 0  (Ethernet)
        RX packets 0  bytes 0 (0.0 B)
        RX errors 0  dropped 0  overruns 0  frame 0
        TX packets 22  bytes 2422 (2.3 KiB)
        TX errors 0  dropped 0 overruns 0  carrier 0  collisions 0

veth56e9b13: flags=4163<UP,BROADCAST,RUNNING,MULTICAST>  mtu 1500
        inet6 fe80::fcff:3eff:fed0:c335  prefixlen 64  scopeid 0x20<link>
        ether fe:ff:3e:d0:c3:35  txqueuelen 0  (Ethernet)
        RX packets 0  bytes 0 (0.0 B)
        RX errors 0  dropped 0  overruns 0  frame 0
        TX packets 8  bytes 656 (656.0 B)
        TX errors 0  dropped 0 overruns 0  carrier 0  collisions 0
可以看到软桥上正好存在了两张网卡信息和我们ifconfig对的上,那么另外一般是存在容器里面的,我们先通过ip link show先看下另外一半的简要信息,要和我们现在的看到这半边是衔接上的。
[root@localhost ~]# ip link show
.....
7: veth11541d3@if6: <BROADCAST,MULTICAST,UP,LOWER_UP> mtu 1500 qdisc noqueue master docker0 state UP mode DEFAULT group default
    link/ether da:18:72:50:8e:8e brd ff:ff:ff:ff:ff:ff link-netnsid 0
9: veth56e9b13@if8: <BROADCAST,MULTICAST,UP,LOWER_UP> mtu 1500 qdisc noqueue master docker0 state UP mode DEFAULT group default
    link/ether fe:ff:3e:d0:c3:35 brd ff:ff:ff:ff:ff:ff link-netnsid 1
.....
veth56e9b13@if8网卡信息的两边是通过@符号来分割的,我们可以看到接在软桥上的网卡信息,还能看到另外的半边的信息,虽然就就显示了一部分。
我们使用iptables的时候可以看到这整个nat过程都是自动生成的
Chain POSTROUTING (policy ACCEPT 255 packets, 17822 bytes)
 pkts bytes target     prot opt in     out     source               destination
    0     0 MASQUERADE  all  --  *      !docker0  172.17.0.0/16        0.0.0.0/0
    2   267 RETURN     all  --  *      *       192.168.122.0/24     224.0.0.0/24
    0     0 RETURN     all  --  *      *       192.168.122.0/24     255.255.255.255
    0     0 MASQUERADE  tcp  --  *      *       192.168.122.0/24    !192.168.122.0/24     masq ports: 1024-65535
    0     0 MASQUERADE  udp  --  *      *       192.168.122.0/24    !192.168.122.0/24     masq ports: 1024-65535
    0     0 MASQUERADE  all  --  *      *       192.168.122.0/24    !192.168.122.0/24
  437 30088 POSTROUTING_direct  all  --  *      *       0.0.0.0/0            0.0.0.0/0
  437 30088 POSTROUTING_ZONES_SOURCE  all  --  *      *       0.0.0.0/0            0.0.0.0/0
  437 30088 POSTROUTING_ZONES  all  --  *      *       0.0.0.0/0            0.0.0.0/0
2:host (让容器使用宿主机的网络名称空间)
3:none (是没有网络的,容器里面存在这种网络的意义就是临时处理下数据,处理完成存储到我们的硬盘上,方便其它的容器读取)
docker一共有四种网络形式:
1:closed container(封闭式网络,指的就是我们上面的none,只有lo接口)
2:bridged container (桥接式网络,默认地址是172.17.0.1地址,称作桥接式网络或者nat网络)
3:joined container (联盟式网络,让容器之间部分名称空间是隔离的,但是在uts,nat,ipc共享同一组,然后容器之间就能通讯了)
4:open container (开放式网路,直接共享物理机的网络名称空间,也就意味着物理机能看到的网络,容器也能看到)
C:docker网络的相关操作:
知道docker能够使用的网络形式之后,我们就可以使用命令来指定查看运行中国容器使用的网络是属于哪种网络形式

[root@localhost ~]# docker container inspect httpd0.2
.........
"Networks": {
                "bridge": {  使用的默认的bridge网络
                    "IPAMConfig": null,
                    "Links": null,
                    "Aliases": null,
                    "NetworkID": "4e1f3c27c35496f43410401bc6de83c12f00a48ffae8e4351017a815435db40f",
                    "EndpointID": "68676ed0886db79ff05cdb6a630083daf882bf914b7902b5b767974e14ebbe53",
                    "Gateway": "172.17.0.1",  容器的网关
                    "IPAddress": "172.17.0.2",  地址
                    "IPPrefixLen": 16,
                    "IPv6Gateway": "",
                    "GlobalIPv6Address": "",
                    "GlobalIPv6PrefixLen": 0,
                    "MacAddress": "02:42:ac:11:00:02",  当前容器的mac地址
                    "DriverOpts": null
..........
在开放式网络中,docker的网络名称空间,uts,ipc是能被容器共享的,我们可以手动通过ip命令操作我们名称空间,ip命令所属与iproute包组。

[root@localhost ~]# ip
Usage: ip [ OPTIONS ] OBJECT { COMMAND | help }
       ip [ -force ] -batch filename
where  OBJECT := { link | address | addrlabel | route | rule | neigh | ntable |
                   tunnel | tuntap | maddress | mroute | mrule | monitor | xfrm |
                   netns(我们可以看到ip能够操作网络名称空间) | l2tp | fou | macsec | tcp_metrics | token | netconf | ila |
                   vrf }
       OPTIONS := { -V[ersion] | -s[tatistics] | -d[etails] | -r[esolve] |
                    -h[uman-readable] | -iec |
                    -f[amily] { inet | inet6 | ipx | dnet | mpls | bridge | link } |
                    -4 | -6 | -I | -D | -B | -0 |
                    -l[oops] { maximum-addr-flush-attempts } | -br[ief] |
                    -o[neline] | -t[imestamp] | -ts[hort] | -b[atch] [filename] |
                    -rc[vbuf] [size] | -n[etns] name | -a[ll] | -c[olor]}
[root@localhost ~]# ip netns help
Usage: ip netns list   列出网络名称空间
       ip netns add NAME  添加网络名称空间
       ip netns set NAME NETNSID  设置网络名称空间的sid
       ip [-all] netns delete [NAME]
       ip netns identify [PID]
       ip netns pids NAME
       ip [-all] netns exec [NAME] cmd ...  在网络命令空间内执行相关的命令
       ip netns monitor
       ip netns list-id
       ip link挪动网络名称空间
当我们通过ip命令管理网络名称空间的时候,只有网络名称空间是隔离的,其它的都是处于同一层上的,这和docker的网络名称空间有所不一样的地方。

[root@localhost ~]# ip netns add ip001  通过add添加网络名称空间
[root@localhost ~]# ip netns add ip002
[root@localhost ~]# ip netns list
ip002
ip001
[root@localhost ~]# ip netns exec ip001 ifconfig -a
lo: flags=8<LOOPBACK>  mtu 65536
        loop  txqueuelen 1000  (Local Loopback)
        RX packets 0  bytes 0 (0.0 B)
        RX errors 0  dropped 0  overruns 0  frame 0
        TX packets 0  bytes 0 (0.0 B)
        TX errors 0  dropped 0 overruns 0  carrier 0  collisions 0
我们在001里面执行命令来查看网卡信息,结果是没有的,因为我们单独指定创建网卡设备 ,没有指定的情况下默认就是lo接口
我们还可以通过ip命令创建虚拟网卡对,将网卡的两端分别绑定在ip001和ip002上。
[root@localhost ~]# ip link add(添加) name veth0.1(名字是veth0.1) type veth(虚拟网卡需要使用veth格式) peer(指定另外一半) name veth0.2(名字是veth0.2)
[root@localhost ~]# ip link show
1: lo: <LOOPBACK,UP,LOWER_UP> mtu 65536 qdisc noqueue state UNKNOWN mode DEFAULT group default qlen 1000
    link/loopback 00:00:00:00:00:00 brd 00:00:00:00:00:00
2: ens33: <BROADCAST,MULTICAST,UP,LOWER_UP> mtu 1500 qdisc pfifo_fast state UP mode DEFAULT group default qlen 1000
    link/ether 00:0c:29:00:75:55 brd ff:ff:ff:ff:ff:ff
3: virbr0: <NO-CARRIER,BROADCAST,MULTICAST,UP> mtu 1500 qdisc noqueue state DOWN mode DEFAULT group default qlen 1000
    link/ether 52:54:00:fb:09:95 brd ff:ff:ff:ff:ff:ff
4: virbr0-nic: <BROADCAST,MULTICAST> mtu 1500 qdisc pfifo_fast master virbr0 state DOWN mode DEFAULT group default qlen 1000
    link/ether 52:54:00:fb:09:95 brd ff:ff:ff:ff:ff:ff
5: veth0.2@veth0.1(可以看到名称空间里面各自的一半就是我们指定的内容): <BROADCAST,MULTICAST,M-DOWN> mtu 1500 qdisc noop state DOWN mode DEFAULT group default qlen 1000
    link/ether e2:1f:c1:54:26:18 brd ff:ff:ff:ff:ff:ff
6: veth0.1@veth0.2: <BROADCAST,MULTICAST,M-DOWN> mtu 1500 qdisc noop state DOWN mode DEFAULT group default qlen 1000
    link/ether b6:cb:2e:75:cd:ec brd ff:ff:ff:ff:ff:ff
[root@localhost ~]#这样在我们宿主机上就有了一对网络设备,但是这种方式创建的是没有激活的,我们将网络设备的一边绑定到我们刚才创建好的ip001上。
[root@localhost ~]# ip link set dev veth0.2 netns ip001
使用set参数将0.2添加到netns虚拟网络名称空间ip001里面
[root@localhost ~]# ip link show
1: lo: <LOOPBACK,UP,LOWER_UP> mtu 65536 qdisc noqueue state UNKNOWN mode DEFAULT group default qlen 1000
    link/loopback 00:00:00:00:00:00 brd 00:00:00:00:00:00
2: ens33: <BROADCAST,MULTICAST,UP,LOWER_UP> mtu 1500 qdisc pfifo_fast state UP mode DEFAULT group default qlen 1000
    link/ether 00:0c:29:00:75:55 brd ff:ff:ff:ff:ff:ff
3: virbr0: <NO-CARRIER,BROADCAST,MULTICAST,UP> mtu 1500 qdisc noqueue state DOWN mode DEFAULT group default qlen 1000
    link/ether 52:54:00:fb:09:95 brd ff:ff:ff:ff:ff:ff
4: virbr0-nic: <BROADCAST,MULTICAST> mtu 1500 qdisc pfifo_fast master virbr0 state DOWN mode DEFAULT group default qlen 1000
    link/ether 52:54:00:fb:09:95 brd ff:ff:ff:ff:ff:ff
6: veth0.1@if5(可以看到veth0.2设备已经被挪走了): <BROADCAST,MULTICAST> mtu 1500 qdisc noop state DOWN mode DEFAULT group default qlen 1000
    link/ether b6:cb:2e:75:cd:ec brd ff:ff:ff:ff:ff:ff link-netnsid 0
[root@localhost ~]# ip netns exec ip001 ifconfig -a
ip001就多了一个veth0.2的网络设备
lo: flags=8<LOOPBACK>  mtu 65536
        loop  txqueuelen 1000  (Local Loopback)
        RX packets 0  bytes 0 (0.0 B)
        RX errors 0  dropped 0  overruns 0  frame 0
        TX packets 0  bytes 0 (0.0 B)
        TX errors 0  dropped 0 overruns 0  carrier 0  collisions 0

veth0.2: flags=4098<BROADCAST,MULTICAST>  mtu 1500
        ether e2:1f:c1:54:26:18  txqueuelen 1000  (Ethernet)
        RX packets 0  bytes 0 (0.0 B)
        RX errors 0  dropped 0  overruns 0  frame 0
        TX packets 0  bytes 0 (0.0 B)
        TX errors 0  dropped 0 overruns 0  carrier 0  collisions 0

[root@localhost ~]# ip netns exec ip001 ip link set dev veth0.2 name eth2  我们还可以给网卡设备名改名
[root@localhost ~]# ip netns exec ip001 ifconfig -a
eth2: flags=4098<BROADCAST,MULTICAST>  mtu 1500
        ether e2:1f:c1:54:26:18  txqueuelen 1000  (Ethernet)
        RX packets 0  bytes 0 (0.0 B)
        RX errors 0  dropped 0  overruns 0  frame 0
        TX packets 0  bytes 0 (0.0 B)
        TX errors 0  dropped 0 overruns 0  carrier 0  collisions 0

lo: flags=8<LOOPBACK>  mtu 65536
        loop  txqueuelen 1000  (Local Loopback)
        RX packets 0  bytes 0 (0.0 B)
        RX errors 0  dropped 0  overruns 0  frame 0
        TX packets 0  bytes 0 (0.0 B)
        TX errors 0  dropped 0 overruns 0  carrier 0  collisions 0

[root@localhost ~]# ifconfig veth0.1 2.4.6.8./24 up
通过ifconfig命令给设备veth0.1设置ip为2.4.6.8./24位掩码并激活
[root@localhost ~]# ifconfig
.....
veth0.1: flags=4099<UP,BROADCAST,MULTICAST>  mtu 1500
        inet 2.4.6.8  netmask 255.255.255.0  broadcast 2.4.6.255
        ether b6:cb:2e:75:cd:ec  txqueuelen 1000  (Ethernet)
        RX packets 0  bytes 0 (0.0 B)
        RX errors 0  dropped 0  overruns 0  frame 0
        TX packets 0  bytes 0 (0.0 B)
        TX errors 0  dropped 0 overruns 0  carrier 0  collisions 0
......
[root@localhost ~]# ip netns exec ip001 ifconfig eth2 2.4.6.100/24 up我们通过命令将网络名称空间里面的ip001也给指定ip并启动起来
[root@localhost ~]# ip netns exec ip001 ifconfig -a
eth2: flags=4163<UP,BROADCAST,RUNNING,MULTICAST>  mtu 1500
        inet 2.4.6.100  netmask 255.255.255.0  broadcast 2.4.6.255
        inet6 fe80::e01f:c1ff:fe54:2618  prefixlen 64  scopeid 0x20<link>
        ether e2:1f:c1:54:26:18  txqueuelen 1000  (Ethernet)
        RX packets 14  bytes 1766 (1.7 KiB)
        RX errors 0  dropped 0  overruns 0  frame 0
        TX packets 8  bytes 656 (656.0 B)
        TX errors 0  dropped 0 overruns 0  carrier 0  collisions 0

lo: flags=8<LOOPBACK>  mtu 65536
        loop  txqueuelen 1000  (Local Loopback)
        RX packets 0  bytes 0 (0.0 B)
        RX errors 0  dropped 0  overruns 0  frame 0
        TX packets 0  bytes 0 (0.0 B)
        TX errors 0  dropped 0 overruns 0  carrier 0  collisions 0
[root@localhost ~]# ping 2.4.6.100
PING 2.4.6.100 (2.4.6.100) 56(84) bytes of data.
64 bytes from 2.4.6.100: icmp_seq=1 ttl=64 time=0.103 ms
64 bytes from 2.4.6.100: icmp_seq=2 ttl=64 time=0.117 ms
^Z
[1]+  已停止               ping 2.4.6.100
[root@localhost ~]# 可以看到我们的宿主机和虚拟网络名称空间里面的网络就可以通讯了
[root@localhost ~]# ip link set dev veth0.1 netns ip002
我们将另外一半挪到另外一半名称空间去
[root@localhost ~]# ip netns exec ip002 ifconfig -a
lo: flags=8<LOOPBACK>  mtu 65536
        loop  txqueuelen 1000  (Local Loopback)
        RX packets 0  bytes 0 (0.0 B)
        RX errors 0  dropped 0  overruns 0  frame 0
        TX packets 0  bytes 0 (0.0 B)
        TX errors 0  dropped 0 overruns 0  carrier 0  collisions 0

veth0.1: flags=4098<BROADCAST,MULTICAST>  mtu 1500
        ether b6:cb:2e:75:cd:ec  txqueuelen 1000  (Ethernet)
        RX packets 12  bytes 936 (936.0 B)
        RX errors 0  dropped 0  overruns 0  frame 0
        TX packets 18  bytes 2046 (1.9 KiB)
        TX errors 0  dropped 0 overruns 0  carrier 0  collisions 0

[root@localhost ~]#这样挪进来默认是没有被激活的
[root@localhost ~]# ip netns exec ip002 ip link set dev veth0.1 name eth1
[root@localhost ~]# ip netns exec ip002 ifconfig eth1  2.4.6.200/24 up
[root@localhost ~]# ip netns exec ip002 ifconfig -a
eth1: flags=4163<UP,BROADCAST,RUNNING,MULTICAST>  mtu 1500
        inet 2.4.6.200(可以看到ip002也有了ip地址)  netmask 255.255.255.0  broadcast 2.4.6.255
        inet6 fe80::b4cb:2eff:fe75:cdec  prefixlen 64  scopeid 0x20<link>
        ether b6:cb:2e:75:cd:ec  txqueuelen 1000  (Ethernet)
        RX packets 12  bytes 936 (936.0 B)
        RX errors 0  dropped 0  overruns 0  frame 0
        TX packets 26  bytes 2702 (2.6 KiB)
        TX errors 0  dropped 0 overruns 0  carrier 0  collisions 0

lo: flags=8<LOOPBACK>  mtu 65536
        loop  txqueuelen 1000  (Local Loopback)
        RX packets 0  bytes 0 (0.0 B)
        RX errors 0  dropped 0  overruns 0  frame 0
        TX packets 0  bytes 0 (0.0 B)
        TX errors 0  dropped 0 overruns 0  carrier 0  collisions 0

[root@localhost ~]# ip netns exec ip002 ping 2.4.6.100
我们在ip002里面pingip001的地址是可以通讯的
PING 2.4.6.100 (2.4.6.100) 56(84) bytes of data.
64 bytes from 2.4.6.100: icmp_seq=1 ttl=64 time=0.163 ms
64 bytes from 2.4.6.100: icmp_seq=2 ttl=64 time=0.113 ms
^Z
[4]+  已停止               ip netns exec ip002 ping 2.4.6.100
[root@localhost ~]# ip netns exec ip001 ping 2.4.6.200
反过来也是能通讯的
PING 2.4.6.200 (2.4.6.200) 56(84) bytes of data.
64 bytes from 2.4.6.200: icmp_seq=1 ttl=64 time=0.057 ms
64 bytes from 2.4.6.200: icmp_seq=2 ttl=64 time=0.133 ms
^Z
[5]+  已停止               ip netns exec ip001 ping 2.4.6.200
[root@localhost ~]#

[root@localhost ~]# docker run --name box001 --network(欧阳--network参数指定网络是none) none -it --rm (在容器退出就删除,此处是为了方便测试)busybox:latest
/ # ifconfig
lo        Link encap:Local Loopback
          inet addr:127.0.0.1  Mask:255.0.0.0
          UP LOOPBACK RUNNING  MTU:65536  Metric:1
          RX packets:0 errors:0 dropped:0 overruns:0 frame:0
          TX packets:0 errors:0 dropped:0 overruns:0 carrier:0
          collisions:0 txqueuelen:1000
          RX bytes:0 (0.0 B)  TX bytes:0 (0.0 B)

/ #可以看到就属于封闭式网络

在主机与主机之间通讯很多时候会用到主机名来通讯
[root@localhost ~]# docker run --name box001  -it --rm busybox:latest
/ # hostname
781e119ed613
/ #
可以看待当前容器的主机名是一个自动生成的名称,并且这个名称就是我们容器的id
[root@localhost ~]# docker ps -a
CONTAINER ID        IMAGE               COMMAND             CREATED             STATUS              PORTS               NAMES
781e119ed613        busybox:latest      "sh"                2 minutes ago       Up 2 minutes                            box001
[root@localhost ~]# docker run --name box001 -it -h v1.1host --rm
busybox:latest
我们也可以在创建容器的时候用-h指定主机名
/ # hostname
v1.1host
/ # cat /etc/hosts
127.0.0.1       localhost
::1     localhost ip6-localhost ip6-loopback
fe00::0 ip6-localnet
ff00::0 ip6-mcastprefix
ff02::1 ip6-allnodes
ff02::2 ip6-allrouters
172.17.0.2      v1.1host v1   当有了主机名我们就可以通过主机名来解析
/ # cat /etc/resolv.conf
# Generated by NetworkManager
search localdomain
nameserver 192.168.181.2  可以看到当前容器指定的dns是192.168.181.2,这个地址是我们宿主机的dns地址
这样我们的容器就能通过宿主机的dns顺利的解析到公网的地址信息
/ # nslookup -type=A www.taobao.com
Server:         192.168.181.2
Address:        192.168.181.2:53

Non-authoritative answer:
www.taobao.com  canonical name = www.taobao.com.danuoyi.tbcache.com
Name:   www.taobao.com.danuoyi.tbcache.com
Address: 103.43.210.219
Name:   www.taobao.com.danuoyi.tbcache.com
Address: 103.43.210.61
Name:   www.taobao.com.danuoyi.tbcache.com
Address: 103.43.210.87
Name:   www.taobao.com.danuoyi.tbcache.com
Address: 103.43.210.186
可以看到能够正常解析公网的域名信息
[root@localhost ~]# docker run --name box001 -it -h v1.1host --dns 123.123.123.123 --rm busybox:latest
如果我们不想使用宿主机的dns地址,想自己指定的话也可以自己去指定
/ # cat /etc/resolv.conf
search localdomain
nameserver 123.123.123.123
/ # cat /etc/hosts
127.0.0.1       localhost
::1     localhost ip6-localhost ip6-loopback
fe00::0 ip6-localnet
ff00::0 ip6-mcastprefix
ff02::1 ip6-allnodes
ff02::2 ip6-allrouters
172.17.0.2      v1.1host v1
/ # nslookup -type=A www.baidu.com
Server:         123.123.123.123
Address:        123.123.123.123:53

Non-authoritative answer:
www.baidu.com   canonical name = www.a.shifen.com
Name:   www.a.shifen.com
Address: 119.75.217.109
Name:   www.a.shifen.com
Address: 119.75.217.26

/ #
[root@localhost ~]# docker run --name box001 -it -h v1.1host --dns 123.123.123.123 --add-host www.baidu.com:10.10.10.10 --rm busybox:latest
/ # cat /etc/hosts
我们还可以在docker启动的时候注入hosts的内容
127.0.0.1       localhost
::1     localhost ip6-localhost ip6-loopback
fe00::0 ip6-localnet
ff00::0 ip6-mcastprefix
ff02::1 ip6-allnodes
ff02::2 ip6-allrouters
10.10.10.10     www.baidu.com
172.17.0.2      v1.1host v1
/ #
当我们创建了一个例如nginx这样的服务,这样的服务是需要发布到互联网的,这个时候我们就需要使用到开放式网络,当我们容器运行的nginx监听的是80端口,这个时候我们就需要把80端口暴露在我们物理机的网卡ip地址之上的某个端口。

我们通过启动容器的时候添加选项-p指定容器端口,而这个端口会被映射到主机所有地址的一个动态端口。
[root@localhost ~]# docker run --name web1 --rm -p 80 ppcserver/httpd0.2:v0.0.2
启动容器服务
因为现在走的net桥,指定容器端口是80,现在外面要访问肯定是走宿主机的本机ip,还有就是现在端口在宿主机是动态的,我们可以通过docker port web1来查看映射的动态端口
[root@localhost ~]# docker port web1
80/tcp -> 0.0.0.0:32768   这个0.0.0.0就代表了宿主机的所有地址
[root@localhost ~]# iptables -t nat -vnL 这个地址映射完全是自动的,我们通过iptables就能看整个映射过程,而且整个net规则是通过我们-p选项自动产生的。
当我们停止容器的运行,这条规则也就自动删除了
......
Chain DOCKER (2 references)
 pkts bytes target     prot opt in     out     source               destination
    0 RETURN     all  --  docker0 *       0.0.0.0/0            0.0.0.0/0
    0 DNAT       tcp  --  !docker0 *       0.0.0.0/0            0.0.0.0/0            tcp dpt:32768 to:172.17.0.2:80
.......
可以看到172.17.0.2:80端口被映射成了32768端口,我们通过浏览器直接就可以访问我们宿主机的32678端口就能看到网页内容

如果我们想固定下来使用宿主机的一个地址,不希望被映射到宿主机的所有地址之上,就可以使用-p 加上指定ip
[root@localhost ~]# docker run --name web1 -p 192.168.181.132::80 --rm ppcserver/httpd0.2:v0.0.2
注意指定ip后面的两个冒号是必须的。
[root@localhost ~]# docker port web1
80/tcp -> 192.168.181.132:32768   可以看见现在就是指定的ip地址的动态端口了
我们能不能使用宿主机的所有ip但是出去的端口我要求是固定的80,也是可以实现的。
[root@localhost ~]# docker run --name web1 -p 80:80 --rm ppcserver/httpd0.2:v0.0.2
注意,-p后面没有接ip地址就代表所有宿主机的ip地址,80:80之间只有一个冒号。
[root@localhost ~]# docker port web1
80/tcp -> 0.0.0.0:80
那要既要指定ip也要指定端口也就变得很简单了
[root@localhost ~]# docker run --name web1 -p 192.168.181.132:80:80 --rm ppcserver/httpd0.2:v0.0.2
[root@localhost ~]# docker port web1
80/tcp -> 192.168.181.132:80
docker 开放式网络还有一个-P参数,这个参数会将容器所有计划要暴露的端口全部应设置主机端口
[root@localhost ~]# docker run --name web1 -P --expose 80 --expose 888 --rm ppcserver/httpd0.2:v0.0.2
[root@localhost ~]# docker port web1
80/tcp -> 0.0.0.0:32770
888/tcp -> 0.0.0.0:32769
[root@localhost ~]# docker run --name web1 -P --expose 80 --expose 888 --expose 808 --expose 88 --rm ppcserver/httpd0.2:v0.0.2
[root@localhost ~]# docker port web1
80/tcp -> 0.0.0.0:32774
808/tcp -> 0.0.0.0:32772
88/tcp -> 0.0.0.0:32773
888/tcp -> 0.0.0.0:32771
[root@localhost ~]#

[root@localhost ~]# docker run --name box1 -it busybox:latest  我们开启一个容器,发现会自动的帮忙分派一个ip
/ # ifconfig
eth0      Link encap:Ethernet  HWaddr 02:42:AC:11:00:02
          inet addr:172.17.0.2  Bcast:172.17.255.255  Mask:255.255.0.0
          UP BROADCAST RUNNING MULTICAST  MTU:1500  Metric:1
          RX packets:6 errors:0 dropped:0 overruns:0 frame:0
          TX packets:0 errors:0 dropped:0 overruns:0 carrier:0
          collisions:0 txqueuelen:0
          RX bytes:516 (516.0 B)  TX bytes:0 (0.0 B)

lo        Link encap:Local Loopback
          inet addr:127.0.0.1  Mask:255.0.0.0
          UP LOOPBACK RUNNING  MTU:65536  Metric:1
          RX packets:0 errors:0 dropped:0 overruns:0 frame:0
          TX packets:0 errors:0 dropped:0 overruns:0 carrier:0
          collisions:0 txqueuelen:1000
          RX bytes:0 (0.0 B)  TX bytes:0 (0.0 B)

/ #

[root@localhost ~]# docker run --name box2 -it busybox:latest  再创建一个容器,发现又自动生成了一个ip
/ # ifconfig
eth0      Link encap:Ethernet  HWaddr 02:42:AC:11:00:03
          inet addr:172.17.0.3  Bcast:172.17.255.255  Mask:255.255.0.0
          UP BROADCAST RUNNING MULTICAST  MTU:1500  Metric:1
          RX packets:6 errors:0 dropped:0 overruns:0 frame:0
          TX packets:0 errors:0 dropped:0 overruns:0 carrier:0
          collisions:0 txqueuelen:0
          RX bytes:516 (516.0 B)  TX bytes:0 (0.0 B)

lo        Link encap:Local Loopback
          inet addr:127.0.0.1  Mask:255.0.0.0
          UP LOOPBACK RUNNING  MTU:65536  Metric:1
          RX packets:0 errors:0 dropped:0 overruns:0 frame:0
          TX packets:0 errors:0 dropped:0 overruns:0 carrier:0
          collisions:0 txqueuelen:1000
          RX bytes:0 (0.0 B)  TX bytes:0 (0.0 B)

/ #
我们发现每次容器启动会自动产生一个不一样的ip

[root@localhost ~]# docker run --name box2 --network container:box1 -it --rm busybox:latest  我们在启动容器的时候直接指定共用那个容器的网络名称空间,这样我们就能获得和被指定网络名称空间一样的ip
/ # ifconfig
eth0      Link encap:Ethernet  HWaddr 02:42:AC:11:00:02
          inet addr:172.17.0.2  Bcast:172.17.255.255  Mask:255.255.0.0
          UP BROADCAST RUNNING MULTICAST  MTU:1500  Metric:1
          RX packets:8 errors:0 dropped:0 overruns:0 frame:0
          TX packets:0 errors:0 dropped:0 overruns:0 carrier:0
          collisions:0 txqueuelen:0
          RX bytes:656 (656.0 B)  TX bytes:0 (0.0 B)

lo        Link encap:Local Loopback
          inet addr:127.0.0.1  Mask:255.0.0.0
          UP LOOPBACK RUNNING  MTU:65536  Metric:1
          RX packets:0 errors:0 dropped:0 overruns:0 frame:0
          TX packets:0 errors:0 dropped:0 overruns:0 carrier:0
          collisions:0 txqueuelen:1000
          RX bytes:0 (0.0 B)  TX bytes:0 (0.0 B)

/ #
box1
/ # mkdir /data 我们在第一个容器里面创建目录,
/ # ls
bin   data  dev   etc   home  proc  root  sys   tmp   usr   var
/ #
box2   在另外一个容器是不能看到的
/ # ls
bin   dev   etc   home  proc  root  sys   tmp   usr   var
/ #
我们在box2上个创建一个网页
/ # echo "hello busybox" > /home/index.html
/ # httpd -h /home/
/ # netstat -anput 80
Active Internet connections (servers and established)
Proto Recv-Q Send-Q Local Address           Foreign Address         State       PID/Program name
tcp        0      0 :::80                   :::*                    LISTEN      9/httpd
/ #
在box1上访问
/ # wget -O - -q 127.0.0.1
hello busybox
/ #
可以看到是能访问的,说明他们共享了网络名称空间,但是不会共享其它的名称空间。
既然我们创建的时候能共享容器的网络名称空间,那我们也能共享宿主机的网络名称空间。
[root@localhost ~]# docker run --name box3 --network host -it --rm busybox:latest
/ # ifconfig
......
ens33     Link encap:Ethernet  HWaddr 00:0C:29:00:75:55
          inet addr:192.168.181.132  Bcast:192.168.181.255  Mask:255.255.255.0
          inet6 addr: fe80::d8dc:efca:4044:5802/64 Scope:Link
          UP BROADCAST RUNNING MULTICAST  MTU:1500  Metric:1
          RX packets:6281 errors:0 dropped:0 overruns:0 frame:0
          TX packets:4058 errors:0 dropped:0 overruns:0 carrier:0
          collisions:0 txqueuelen:1000
          RX bytes:621103 (606.5 KiB)  TX bytes:477461 (466.2 KiB)
......
我们创建一个httpd的服务,看看是不是能通过浏览器访问
/ # echo "hello docker.server" > /home/index.html
/ # httpd -h /home/
/ # netstat -anptu | grep 80
tcp        0      0 :::80                   :::*                    LISTEN      8/httpd
/ #
我们通过浏览器就能访问到我们刚才编辑的网页内容了,这种看似和在宿主机上搭建网络没有什么区别,但是你会发现我要快速搭建httpd服务的时候,直接一条命令完事儿,比原始的操作简单太多了。

我们在创建容器的时候一直都是使用的默认172.17.0网段,这个地址和网段是能调整的,这样我们就能在以后不同的容器给到不同的默认网络
这个调整默认ip是需要修改/etc/docker/daemon.json文件。
配置项如下:
{  多项配置逗号分隔
    "bip": "192.168.0.1/24",  指dokcer 0桥的ip地址和掩码
    "fixed-cidr": "10.10.10.0/16",
    "fixed-cidr-v6":
    "mut":
    "default-geteway": "192.168.0.1, 默认网关
    ........
    "dns": ["10.10.10.10","114.114.114.114"] dns不配置就是用户宿主机的,dns最多给到3个,最少一个
     .....
}
[root@localhost ~]# cat /etc/docker/daemon.json
{
    "registry-mirrors":["https://registry.docker-cn.com"],
     "bip": "192.168.0.1/24"  改下配置文件加上指定的默认网段
}

[root@localhost ~]# docker run --name box1 -it --rm busybox:latest
/ # ifconfig
eth0      Link encap:Ethernet  HWaddr 02:42:C0:A8:00:02
          inet addr:192.168.0.2  Bcast:192.168.0.255  Mask:255.255.255.0  可以看到默认地址就是我们指定的地址段了,至于其它的东西,docker会自动帮忙计算生成
          UP BROADCAST RUNNING MULTICAST  MTU:1500  Metric:1
          RX packets:5 errors:0 dropped:0 overruns:0 frame:0
          TX packets:0 errors:0 dropped:0 overruns:0 carrier:0
          collisions:0 txqueuelen:0
          RX bytes:426 (426.0 B)  TX bytes:0 (0.0 B)

lo        Link encap:Local Loopback
          inet addr:127.0.0.1  Mask:255.0.0.0
          UP LOOPBACK RUNNING  MTU:65536  Metric:1
          RX packets:0 errors:0 dropped:0 overruns:0 frame:0
          TX packets:0 errors:0 dropped:0 overruns:0 carrier:0
          collisions:0 txqueuelen:1000
          RX bytes:0 (0.0 B)  TX bytes:0 (0.0 B)

/ #
我们在另外一个docker默认是不能控制宿主机上另外一个docker容器的,因为每个docker指监听了unix指定路径下的sock文件,默认路径在/var/run/docker.sock,如果我们要想其他用户在外网正常访问我们的docker容器,我们就需要使用-H参数
  -H, --host list          Daemon socket(s) to connect to  ,如果我们没有指定访问的信息,默认就是走的本地的sock文件记录的信息
这个时候我们需要先改daemon.json配置文件
"hosts": ["tcp://0.0.0.0:1221", "unix:///var/run/docker.sock"]
然后重启docker,在容器1就能操作容器2。
在执行的时候要加-H --host(ip和端口)。
在docker还可以创建自动以的桥
我们在docker iofo查看信息的时候可以看到docker的网络插件支持如下几种
Network: bridge host macvlan null(封闭式网络) overlay(叠加网络)
我们在使用命令就可以创建自定义的桥bridge
[root@localhost home]# docker network create -d bridge --subnet "192.168.12.1/16" --gateway "192.168.0.1" mybr1
6b16879aaff29aaf34ef1cbba51ac4c5eb4ae6f90624d0bd3c9a215bac28b2e3
[root@localhost home]# docker network ls
NETWORK ID          NAME                DRIVER              SCOPE
a4ff9eacbd15        bridge              bridge              local
562cbe3d542c        host                host                local
6b16879aaff2        mybr1               bridge              local
30c6f39ae8be        none                null                local
[root@localhost home]#可以看到我们就创建了一个自定义的[root@localhost home]# docker network create -d bridge --subnet "192.168.12.1/16" --gateway "192.168.0.1" mybr1
6b16879aaff29aaf34ef1cbba51ac4c5eb4ae6f90624d0bd3c9a215bac28b2e3
[root@localhost home]# docker network ls
NETWORK ID          NAME                DRIVER              SCOPE
a4ff9eacbd15        bridge              bridge              local
562cbe3d542c        host                host                local
6b16879aaff2        mybr1               bridge              local
30c6f39ae8be        none                null                local
[root@localhost home]# ifconfig
br-6b16879aaff2: flags=4099<UP,BROADCAST,MULTICAST>  mtu 1500
        inet 192.168.0.1  netmask 255.255.0.0  broadcast 192.168.255.255
        ether 02:42:0c:b3:a1:e1  txqueuelen 0  (Ethernet)
        RX packets 0  bytes 0 (0.0 B)
        RX errors 0  dropped 0  overruns 0  frame 0
        TX packets 0  bytes 0 (0.0 B)
        TX errors 0  dropped 0 overruns 0  carrier 0  collisions 0
但是网络接口的名称是我们创建的时候生成的加密字符,后续可以通过ip link来调整名字即可
[root@localhost home]# docker run --name box1 -it --net mybr1 busybox:latest
启动容器的时候直接指定网络桥
Unable to find image 'busybox:latest' locally
latest: Pulling from library/busybox
697743189b6d: Pull complete
Digest: sha256:061ca9704a714ee3e8b80523ec720c64f6209ad3f97c0ff7cb9ec7d19f15149f
Status: Downloaded newer image for busybox:latest
/ # ls
bin   dev   etc   home  proc  root  sys   tmp   usr   var
/ # ifconfig
eth0      Link encap:Ethernet  HWaddr 02:42:C0:A8:00:02
          inet addr:192.168.0.2  Bcast:192.168.255.255  Mask:255.255.0.0
          UP BROADCAST RUNNING MULTICAST  MTU:1500  Metric:1
          RX packets:19 errors:0 dropped:0 overruns:0 frame:0
          TX packets:0 errors:0 dropped:0 overruns:0 carrier:0
          collisions:0 txqueuelen:0
          RX bytes:2212 (2.1 KiB)  TX bytes:0 (0.0 B)

lo        Link encap:Local Loopback
          inet addr:127.0.0.1  Mask:255.0.0.0
          UP LOOPBACK RUNNING  MTU:65536  Metric:1
          RX packets:0 errors:0 dropped:0 overruns:0 frame:0
          TX packets:0 errors:0 dropped:0 overruns:0 carrier:0
          collisions:0 txqueuelen:1000
          RX bytes:0 (0.0 B)  TX bytes:0 (0.0 B)

我们在宿主机开启两个容器,分别使用我们自定义的mybr1和默认的bridge。
[root@localhost home]# docker run --name box1 -it --net mybr1 busybox:latest
Unable to find image 'busybox:latest' locally
latest: Pulling from library/busybox
697743189b6d: Pull complete
Digest: sha256:061ca9704a714ee3e8b80523ec720c64f6209ad3f97c0ff7cb9ec7d19f15149f
Status: Downloaded newer image for busybox:latest
/ # ls
bin   dev   etc   home  proc  root  sys   tmp   usr   var
/ # ifconfig
eth0      Link encap:Ethernet  HWaddr 02:42:C0:A8:00:02
          inet addr:192.168.0.2  Bcast:192.168.255.255  Mask:255.255.0.0
          UP BROADCAST RUNNING MULTICAST  MTU:1500  Metric:1
          RX packets:19 errors:0 dropped:0 overruns:0 frame:0
          TX packets:0 errors:0 dropped:0 overruns:0 carrier:0
          collisions:0 txqueuelen:0
          RX bytes:2212 (2.1 KiB)  TX bytes:0 (0.0 B)

lo        Link encap:Local Loopback
          inet addr:127.0.0.1  Mask:255.0.0.0
          UP LOOPBACK RUNNING  MTU:65536  Metric:1
          RX packets:0 errors:0 dropped:0 overruns:0 frame:0
          TX packets:0 errors:0 dropped:0 overruns:0 carrier:0
          collisions:0 txqueuelen:1000
          RX bytes:0 (0.0 B)  TX bytes:0 (0.0 B)

/ #
[root@localhost ~]# docker run --name box2 -it --net bridge  busybox:latest
/ # ifconfig
eth0      Link encap:Ethernet  HWaddr 02:42:AC:11:00:02
          inet addr:172.17.0.2  Bcast:172.17.255.255  Mask:255.255.0.0
          UP BROADCAST RUNNING MULTICAST  MTU:1500  Metric:1
          RX packets:17 errors:0 dropped:0 overruns:0 frame:0
          TX packets:0 errors:0 dropped:0 overruns:0 carrier:0
          collisions:0 txqueuelen:0
          RX bytes:1963 (1.9 KiB)  TX bytes:0 (0.0 B)

lo        Link encap:Local Loopback
          inet addr:127.0.0.1  Mask:255.0.0.0
          UP LOOPBACK RUNNING  MTU:65536  Metric:1
          RX packets:0 errors:0 dropped:0 overruns:0 frame:0
          TX packets:0 errors:0 dropped:0 overruns:0 carrier:0
          collisions:0 txqueuelen:1000
          RX bytes:0 (0.0 B)  TX bytes:0 (0.0 B)
/ # ping 192.168.0.2
PING 192.168.0.2 (192.168.0.2): 56 data bytes
^Z[1]+  Stopped                    ping 192.168.0.2
现在我们用box2访问box1的地址,因为属于不通网段,看似是不能相互访问的,我们可以通过把核心转发功能开启并关闭iptables阻断虚拟桥之间访问的规则,其实两个容器之间是能访问的
[root@localhost ~]# cat /proc/sys/net/ipv4/ip_forward
1
[root@localhost ~]# iptables -vnL
Chain DOCKER-ISOLATION-STAGE-1 (1 references)
 pkts bytes target     prot opt in     out     source               destination
    0     0 DOCKER-ISOLATION-STAGE-2  all  --  br-6b16879aaff2 !br-6b16879aaff2  0.0.0.0/0            0.0.0.0/0
    2   168 DOCKER-ISOLATION-STAGE-2  all  --  docker0 !docker0  0.0.0.0/0            0.0.0.0/0
    0     0 RETURN     all  --  *      *       0.0.0.0/0            0.0.0.0/0
[root@localhost ~]# iptables -F
box2访问box1IP地址
PING 192.168.0.2 (192.168.0.2): 56 data bytes
64 bytes from 192.168.0.2: seq=0 ttl=63 time=0.248 ms
64 bytes from 192.168.0.2: seq=1 ttl=63 time=0.153 ms
^Z[2]+  Stopped                    ping 192.168.0.2
/ #
发现可以通讯了
♣五:docker的存储卷
A:docker的存储卷介绍:
在文章的前面我们我们提到了docker的联合挂载和分层构建技术,事实上docker在启动的时候默认会产生一个读写层,如果用户对运行中的容器修改了现有的一个以存在的文件,那改文件将会从读写层之下的只读层复制一个文件到读写层,该文件的最初版本只读版其实还在,只不过读写层中改文件的原始版本被影藏了,这种机制叫做写时复制机制。
写时复制这种机制在最上层读写层始终可见的就代表下层一定会有,但是读写层删除的(标记为删除,其实就是影藏了),下层并不会删除,如果层级太多,这种机制其实效率并不高,假如我们使用了频繁I/O的服务的时候,这种机制就会在服务自身的瓶颈之上又多了一层瓶颈,而且容器一旦被删除,数据也就删除了,务必会造成数据的丢失。
面对这种情况,我们势必要绕过容器本身的文件系统带来的特定机制,写入数据在容器,存储数据在宿主机上面,这种场景才是可取的,简单理解就是我们在宿主机建立一个特定目录,然后把容器里面的本来要存数据的目录给绑定到外面宿主机的特定目录即可。其实这种场景就像是挂载技术,让容器可以直接访问我宿主机的内容,同时宿主机也能给容器提供内容,二者是相互的。
这种场景不仅仅可以运用于容器和宿主机之间的数据读写,还可以通过宿主机的牵线搭桥,让在同一个宿主机上的多个容器实现一定程度上的文件内容共享。
在docker容器中,宿主机被绑定的目录我们就叫做volume(存储卷),存储卷带来的好处是显而易见的,当容器被删除,我们也不用担心数据丢失了,及时容器被删除,我们也可以执行几条命令就能把数据个容器服务再次关联上保证服务运行。
存储数据的周期不会受到容器的周期影响了,但是我们在创建容器的时候不可能每次都能严格按照一定顺序,一定的命令把容器和存储卷关联上,万一执行的命名少了参数,带来的后果是极为严重的,所有我们还是需要容器的编排工具来完成这种事情,提前编排出来存到一个文件中,容器启动的时候去读取文件,减少人为出现的错误。
我们在把场景扩展下,假如我们宿主机使用的是共享存储文件系统如nfs,这样我们宿主机至上的容器在关联目录的时候就是关联的nfs的之上的目录,这样我们的容器就不局限于在那台机器上运行了。
在实际的运用中,很大一块其实不是在解决上层的服务搭建优化的事情上,很多时间我们都需要面临数据的高效,可持续,动态伸缩,可迁移,负载均衡化等种种问题,及时到目前也没有一种程序或者软件能很好解决此类问题,就像搭建房子一样,地基就已经决定了上层建筑的高度和合理性,所以在未来的企业必然会慢慢走向云服务化,而云也将加速对此前短板的补齐。
存储卷会在容器启动的时候创建,并不需要特定的去创建,存储卷的初衷也是独立于容器的生命周期而存在的,因此删除容器不会删除卷,但是可以通过特定的命令在删除容器的一并删除卷。
B:docker的存储卷的相关操作:
docker两种类型的存储卷:
1:bind mount volume(绑定挂载卷),这种形式的存储卷需要在宿主机和容器上分别创建指定的路径,然后将二者建立关联关系
2:docekr-managed volume(docker管理卷),这种形式的存储卷指需要在容器里面创建一个目录,而宿主机不需要创建关联目录,docker会通过daemon自行创建一个空文件目录或者一个已知的目录来建立关联关系,这个自行创建的目录下文件的名称会以容器的id号来作为文件名称,增加了目录的耦合关系,但是我们就不能指定路径和目录了,不能指定目录的话,也就意味这容器被删除了,再创建的时候你还是得用绑定挂载卷。不然容器又会自行生成一个存数据的文件,这样你的数据就变两段了
在docker中使用存储卷:

[root@localhost ~]# docker run -it --name box1 -v /date(这里的路径指定的是容器里面的路径) buxybox:latest
[root@localhost ~]# docker run --name box1 -it -v /dbfile busybox:latest
/ # ls
bin     dbfile  dev     etc     home    proc    root    sys     tmp     usr     var
/ #
我们怎么知道宿主机上存储数据的路径了,可以docker inspect box1看下
[root@localhost ~]# docker inspect box1
.....
"Mounts": [
            {
                "Type": "volume",
                "Name": "168e18da86a32c77453d4bb7c96537b0d2c31c55d75bc4a1c400b1c676a1a421", 卷的名称
                "Source": "/var/lib/docker/volumes/168e18da86a32c77453d4bb7c96537b0d2c31c55d75bc4a1c400b1c676a1a421/_data",
                 此路径就是宿主机存储数据的路径,可以看到容器的id就是文件名
                "Destination": "/dbfile",  目标路径
                "Driver": "local",
                "Mode": "",
                "RW": true,
                "Propagation": ""
            }
......
 ],
            "ArgsEscaped": true,
            "Image": "busybox:latest",
            "Volumes": {
                "/dbfile": {}  在容器里面我们创建了dbfile路径
            },
.........

[root@localhost docker]# pwd
/var/lib/docker
[root@localhost docker]# tree volumes/  可以看到路径下的目录结构
volumes/
├── 168e18da86a32c77453d4bb7c96537b0d2c31c55d75bc4a1c400b1c676a1a421
│   └── _data
└── metadata.db
我们直接在这个路径下创建一个文件,看看容器里面能不能看到
[root@ _data]# echo "hello docker.volums" >> index.html
[root@ _data]# ls
index.html
[root@ _data]#
/ # cat dbfile/index.html
hello docker.volumes  可以看到我们刚才添加的内容
/ # echo "dbfile" >> /dbfile/index.html  我们在容器里面加一个数据
/ # cat dbfile/index.html
hello docker.volumes
dbfile
/ #
[root@ _data]# cat index.html
hello docker.volumes
dbfile   在宿主机上也是能看到的
[root@ _data]#

[root@localhost ~]# docker run -it --name box1 -v /home/date(宿主机路径): /date(容器路径) busybox:latset
[root@ ~]# docker run --name box2 -it --rm -v /date/volumes/box2:/htmlfile busybox:latest
/ # ls
bin       dev       etc       home      htmlfile  proc      root      sys       tmp       usr       var
/ # cd htmlfile/
/htmlfile # ls
/htmlfile # echo "hello docker.volumes" >> index.html
/htmlfile # cat index.html
hello docker.volumes
/htmlfile # cat index.html
hello docker.volumes
dbfile
/htmlfile #
[root@ /]# cd /date/volumes/box2/  可以看到效果是一样的,而且这个路径是自动创建的
[root@ box2]# ls
index.html
[root@ box2]# cat index.html
hello docker.volumes
[root@ box2]# echo "dbfile" >> index.html
[root@ box2]# cat index.html
hello docker.volumes
dbfile
[root@ box2]#
我们把容器结束掉,在看下文件是否还在

[root@ ~]# docker ps -a
CONTAINER ID        IMAGE               COMMAND             CREATED             STATUS              PORTS               NAMES
[root@ ~]# cat /date/volumes/box2/index.html   可以看到文件是具备持久存储数据的能力的
hello docker.volumes
dbfile
[root@ ~]# docker run --name box3 -it --rm -v /date/volumes/box2:/htmlfile busybox:latest  我们在创建一个新的容器,把文件路径指向到之前容器路径下去,可以看到数据还是能被新容器读取的。
/ # cat /htmlfile/index.html
hello docker.volumes
dbfile
/ #

[root@ ~]# docker run --name box4 -it --rm -v /date/volumes/box2:/1/2/ busybox:latest 而且我们换容器里面的路径还是可以继续访问宿主机存储的数据
/ # cat /1/2/index.html
hello docker.volumes
dbfile
/ #

我们将两个宿主机上的两个容器都指向一个宿主机的同一个文件
[root@localhost box2]#  docker run --name box3 -it --rm -v /date/volumes/box2:/logfile busybox:latest
/ # cat logfile/index.html
hello docker.volumes
dbfile
/ # echo "mybusybox" >> /logfile/index.html
/ #
[root@localhost ~]# docker run --name box1 -it --rm -v /date/volumes/box2:/dbfile busybox:latest
/ # cat dbfile/index.html
hello docker.volumes
dbfile
/ # cat dbfile/index.html
hello docker.volumes
dbfile
mybusybox
/ #

在docker中,如果我们想查看容器的相关信息,可以使用go模板来过滤相关信息
[root@ volumes]# docker inspect -f  {{.Mounts}} box4   例如我们过滤卷相关的信息,-f 然后{}这个最外层的括号是引用模板的固定格式
[{bind  /date/volumes/box2 /1/2   true rprivate}]
[root@ volumes]# docker inspect -f  {{.NetworkSettings.Gateway}} box4
172.17.0.1
[root@ volumes]#因为使用了go语言,必然支持循环判断等条件

启动时候加上--volumes-from
[root@localhost box2]# docker ps -a
CONTAINER ID        IMAGE               COMMAND             CREATED             STATUS              PORTS               NAMES
90f3a89a53c7        busybox:latest      "sh"                About an hour ago   Up About an hour                        box3
810de9a7256e        busybox:latest      "sh"                About an hour ago   Up About an hour                        box1
[root@localhost box2]# docker run --name box5 -it --rm --volumes-from box3  busybox:latest   我们在执行的时候直接指定复制box3的卷
/ # ls
bin      dev      etc      home     logfile  proc     root     sys      tmp      usr      var
/ # cat logfile/index.html
hello docker.volumes
dbfile
mybusybox
/ #
这样我们在规划中我们就可以提前创建一个已经最底层的持久化存储的容器,让其它需要使用到卷的容器取复制规划好的容器存储卷即可,我们还可以在这个提前创建的最底层容器的时候创建共享的网络,这样我们可以完成更加复杂的场景。
我们能够使用到这么多场景了,但是要去实现大量的复制类的操作或很不方便,这个时候就需要用到容器编排工具,在docker中可以使用docker-compose工具,这个工具只能编排单机,但是docker-compose也存在优势就是能帮你创建容器,你可以把创建容器的指令都给写到里面去。
♣六:dockerfile详解
A:dockerfile基础:
在docker启动的时候我们是从dockerhub上拖下来的镜像到本地启动的,我们在启动之前也没有调整过任何的服务的配置文件,这导致我们容器启动的时候服务默认的配置等都是dockerhub给定义好的,那如果是要修改配置文件的话,我们之前也用过docker exec命令的操作,在容器启动之后,通过命令再去改一些文件内容,改好之后在重新加载,这种场景和我们在宿主机上的操作就一致了,当然还可以运用存储卷的功能,把配置文件存在我们宿主机本地,让容器启动的时候去加载,即使这样你也避免不了修改配置文件之后要重启的操作,再不行我们自己做镜像,你依然还是面临这个问题,而且还是这三种里面最不方便的一种,如果环境多,要求的服务版本和配置还各不相同,你可能要为此做大量的不同镜像版本。
那在docker中是怎么解决这事情的了,这个和ansible的templates类似,我们把服务的配置文件拿过来存一个模板,存到一个路径下,然后我们把配置文件需要按照环境调整的项用环境变量的形式来指定,这样我们在容器内部就可以使用环境变量的形式给容器里面运行的服务进行传参了,docker毕竟不是ansible,容器在启动的一瞬间必然需要配置文件,配置文件我们通过存储卷的形式放在外面,docker去加载的时候变量值怎么传给容器了,首先我们在容器主进程启动之前先启动一个其它的程序,这个程序就负责把用户传参给赋值到变量上,用户没有传值的话就使用默认值,然后保存到模板配置文件中,最后我们可以使用exec把当前进程替换成所需要运行的进程即可。
通过变量的形式,我们就可以在不同的环境上去自定义我们容器启动的配置了。
环境变量的格式和我们系统的环境变量类似:

$环境变量名=给变量赋予的指
$环境变量名=默认值(这里我们可以使用一个字符串来去指定默认值,如果变量没有指我们就用默认值,变量有指就用变量的指)
[root@localhost ~]# echo ${NAME:-hello}
hello
[root@localhost ~]# NAME=docker
[root@localhost ~]# echo ${NAME:-hello}
docker
[root@localhost ~]#与之相反的就是+号,变量有指的话就用加号后面的指,没有指就为空,这个可以用于判断变量是否为空来使用
[root@localhost ~]# echo ${NAME:+hello}
hello
[root@localhost ~]# unset NAME
[root@localhost ~]# echo ${NAME:+hello}

[root@localhost ~]#
B:dockerfile的语法格式:
dockerfile是一个指令的集合,可以通过命令行去调用配置文件从而产生一个镜像,dockerfile的指令也是dockerfile自己的指令,并不是我们之前使用的docker的指令,我们只需要弄清楚dockerfile的语法格式和逻辑就能使用dockerfile。
整个dockerfile语法格式就两种:
1:注释信息
2:由instruction开头后面接参数组成一条指令。
instruction自身是不区分大小写的,但是建议还是使用大写。
dockerfile是按照指令顺序来执行的,所以有指令依赖的情况就需要规划好顺序了
在dockerfile中除了注释行,整个文件的第一行应该是FROM指令,用来定义dockerfile制作的镜像是基于那个基础镜像,所以说dockerfile在制作镜像的时候必要的前提就是必须存在一个已知的镜像在本地。
dockerfile的工作逻辑:
1:基于dockerfile来做镜像的话必须指定一个专门的工作目录,然后在指定的工作目录创建或者把之前处理好的dockerfile给放到这个文件目录里面,而且dockerfile首字母必须大写。
2:如果dockerfile需要打包很多镜像所使用到的文件必须是在此目录和此目录之下的目录,不能是上层目录,不然dockerfile会找不到。
假如我们基于dockerfile来做的镜像,目录下面有很多文件,其中有些是我们用不到或者很少很少用到的,dockerfile还支持隐藏文件,当我们遇到此类文件我们可以写到.dockeringore里面去,当dockerfile只要读到包含在.dockeringore文件里面记录的路径下文件就会自动给过滤掉,这样可以使得我们在docker启动的时候可以少下载一些文件,节省资源。
dockerfile制作完成之后我们可以通过docker build来读取dockerfile文件从而来制作镜像,最后打好标签推导仓库里面我们就可以使用了。
其实docker build使用的也只不过是和我们之前启动容器之后连进去再去修改一些参数之后保存为镜像的方式一样的,我们之前制作容器的时候指不过需要启动一个可见的容器,然后基于可写层来制作,docker build也会启动一个容器,只不过是隐藏了不可见而已。还有就是我们编辑容器可写层时候是基于容器自带指令去编辑的,并不是宿主机自带的指令,比如你要在容器执行一个tree命令,你是需要自己装包才能实现的,所有只要容器支持,我们就可以在dockerfile里面编写shell命令,反过来说就是基于制作的镜像不支持shell命令,你想在之后基于这个不支持shell命令的容器来写一些shell命令是做不到的。
C:dockerfile的指令详解:
FROM指令:from指令是dockerfile开篇非注释的第一行,用于为镜像文件构建过程指定镜像文件,可以简单理解为模板镜像文件的指定,如果docker build在去执行的时候发现本地没有可用的镜像就回去你指定的镜像站点切拉镜像下来。比如dockerhub,如果始终找不到docker build就会报错。
FROM 仓库名 [镜像名:镜像标签]
镜像标签省略的话默认使用latest标签的镜像
FROM 仓库名@哈希码(这个码就和我们下载工具包的时候的md5一样,防止镜像被篡改过)
MAINTANIER:这个是用于当dockerfile制作者提供个人详细信息,不过已经废弃了,取代的是LABEL的指令。
MAINTANIER"名称+联系邮箱等"
MAINTANIER可以出现在dockerfile的任何位置,但是建议在FROM之后
LABEL:也是用于dockerfile制作者信息的创建,但是格式已经有明显区别。
LABEL<key>=<value><key>=<value>
已经修改成键值对的形式,这样可以存入跟多信息
COPY: 用于从docker主机复制文件至创建的新镜像像文件
COPY str源文件(可以多个) dest为那个目标文件
COPY [str源文件(可以多个) dest为那个目标文件] 列表形式,这种格式主要可以避免空白字符等特殊情况,避免出现歧义
str:要复制的源文件或目录,支持通配符,使用相对路径
dest:目标路径,即生成文件的目标镜像文件所在的目录,使用绝对路径,否则,需要用到WORKDIR命令
COPY的复制准则:
src必须是build上下文中的路径,不能是父目录中的文件
如果src本身是目录,他会递归的把起内部的文件或者子目录全部复制,就类似我们cp -r的操作,但是src本身不会复制。
如指定了多个src或者在src里面使用的通配符,则dest必须是一个目录,而且必须/结尾,不加/就是语法错误
如果dest事先不存在,它会被自动创建,还包括父目录路径

[root@localhost docker-conf-flie]# cat Dockerfile
#Explain:This is a test image!
FROM busybox:latest
LABEL url=www.baidu.com
COPY index.html /home/www/html/  指定容器的文件在哪里取

[root@localhost docker-conf-flie]# cat index.html  我们定义文件内容
Busybox httpd.server
[root@localhost docker-conf-flie]# tree
.
├── Dockerfile
└── index.html  只要是dockerfile用到的文件,在dockerfile平级或者在dockerfile平级目录之下才行,除此之外,任何地方都不行的

0 directories, 2 files
[root@localhost docker-conf-flie]# docker build -h
Flag shorthand -h has been deprecated, please use --help

Usage:  docker build [OPTIONS] PATH(路径) | URL | -

Build an image from a Dockerfile

Options:
      --add-host list           Add a custom host-to-IP mapping (host:ip)
      --build-arg list          Set build-time variables
      --cache-from strings      Images to consider as cache sources
      --cgroup-parent string    Optional parent cgroup for the container
      --compress                Compress the build context using gzip
      --cpu-period int          Limit the CPU CFS (Completely Fair Scheduler) period
      --cpu-quota int           Limit the CPU CFS (Completely Fair Scheduler) quota
  -c, --cpu-shares int          CPU shares (relative weight)  限制使用多少cpu
      --cpuset-cpus string      CPUs in which to allow execution (0-3, 0,1)
      --cpuset-mems string      MEMs in which to allow execution (0-3, 0,1)
      --disable-content-trust   Skip image verification (default true)
  -f, --file string             Name of the Dockerfile (Default is 'PATH/Dockerfile')
      --force-rm                Always remove intermediate containers
      --iidfile string          Write the image ID to the file
      --isolation string        Container isolation technology
      --label list              Set metadata for an image
  -m, --memory bytes            Memory limit 限制使用多大内存
      --memory-swap bytes       Swap limit equal to memory plus swap: '-1' to enable unlimited swap
      --network string          Set the networking mode for the RUN instructions during build (default "default")
      --no-cache                Do not use cache when building the image
      --pull                    Always attempt to pull a newer version of the image
  -q, --quiet                   Suppress the build output and print image ID on success
      --rm                      Remove intermediate containers after a successful build (default true)
      --security-opt strings    Security options
      --shm-size bytes          Size of /dev/shm 打标签
  -t, --tag list                Name and optionally a tag in the 'name:tag' format
      --target string           Set the target build stage to build.
      --ulimit ulimit           Ulimit options (default [])
[root@localhost docker-conf-flie]# docker build -t busyboxhttpd(仓库名):v0.1(标签) ./(目录,我们指定的当前目录)
Sending build context to Docker daemon  3.072kB
Step 1/3 : FROM busybox:latest
 ---> d8233ab899d4
Step 2/3 : LABEL url=www.baidu.com  我们定义的制作镜像的相关信息
 ---> Running in 39b61095dd5d
Removing intermediate container 39b61095dd5d
 ---> 2d5e9326ad41
Step 3/3 : COPY index.html /home/www/html/
 ---> ce593c489324
Successfully built ce593c489324
Successfully tagged busyboxhttpd:v0.1  告知镜像的名称叫什么
[root@localhost docker-conf-flie]# docker images
REPOSITORY          TAG                 IMAGE ID            CREATED              SIZE
busyboxhttpd        v0.1                ce593c489324        About a minute ago   1.2MB
busybox             latest              d8233ab899d4        5 weeks ago          1.2MB
[root@localhost docker-conf-flie]#可以看到我们制作好的镜像
[root@localhost docker-conf-flie]# docker run --name boxhttpd01 --rm busyboxhttpd:v0.1 cat /home/www/html/index.html
我们可以在容器执行命令的时候接上指定的参数即可查看容器的某些内容
Busybox httpd.server  可以看到我们的dockerfile的内容已经被写到容器里面去了
[root@localhost docker-conf-flie]#

[root@localhost /]# pwd
/
[root@localhost /]# tree date/
date/
└── volumes
    └── box2
        ├── index2.html
        └── index.html

2 directories, 2 files
[root@localhost /]# cp -r date /docker-conf-flie/
[root@localhost docker-conf-flie]# ll
总用量 8
drwxr-xr-x. 3 root root  21 3月  22 20:00 date
-rw-r--r--. 1 root root 108 3月  22 19:34 Dockerfile
-rw-r--r--. 1 root root  22 3月  22 19:33 index.html
[root@localhost docker-conf-flie]# tree date/
date/
└── volumes
    └── box2
        ├── index2.html
        └── index.html

2 directories, 2 files
[root@localhost docker-conf-flie]# cat Dockerfile
#Explain:This is a test image!
FROM busybox:latest
LABEL url=www.baidu.com
COPY index.html /home/www/html/
COPY date /home/date/
此处注意的点就是拷贝的date目录属于父目录,所以说父目录是不会被拷贝的,如果你要保证被拷贝的目录是你将来就要使用的目录名,那需要自己指定下目录名,因为他只会拷贝date下的文件或目录
[root@localhost docker-conf-flie]# docker build -t busyboxhttpd:v0.2 ./
Sending build context to Docker daemon  6.656kB
Step 1/4 : FROM busybox:latest
 ---> d8233ab899d4
Step 2/4 : LABEL url=www.baidu.com
 ---> Using cache
 ---> 2d5e9326ad41
Step 3/4 : COPY index.html /home/www/html/
 ---> Using cache
 ---> ce593c489324
Step 4/4 : COPY date /home/date/
 ---> 0b6fa719a6bf
Successfully built 0b6fa719a6bf
Successfully tagged busyboxhttpd:v0.2
[root@localhost docker-conf-flie]# docker images
REPOSITORY          TAG                 IMAGE ID            CREATED             SIZE
busyboxhttpd        v0.2                0b6fa719a6bf        8 seconds ago       1.2MB
busyboxhttpd        v0.1                ce593c489324        29 minutes ago      1.2MB
busybox             latest              d8233ab899d4        5 weeks ago         1.2MB
[root@localhost docker-conf-flie]# docker run --name boxhttpd2 --rm busyboxhttpd:v0.2 ls /home/date
volumes
[root@localhost docker-conf-flie]# docker run --name boxhttpd2 --rm busyboxhttpd:v0.2 tree /home/date
docker: Error response from daemon: OCI runtime create failed: container_linux.go:344: starting container process caused "exec: \"tree\": executable file not found in $PATH": unknown.
这个就是之前我们说你的容器里面没有安装一些包,有些命令是没有办法用的,所以说你docker执行的命令是你在docker容器里面环境所带来的命令
[root@localhost docker-conf-flie]# docker run --name boxhttpd2 --rm busyboxhttpd:v0.2 ls /home/date/volumes/box2
index.html
index2.html
[root@localhost docker-conf-flie]#
ADD指令:ADD指令类似COPY指令,ADD支持使用tar(压缩包)文件和URL路径,当遇到源文件是tar包的时候,build会自动帮忙解压成目录,但是这个tar必须是 本地的tar包,url网络形式tar包是不会自动解压的。
ADD src .. .. dest
ADD ["src" .. .. "dest"]
至于准则就和COPY一样了

[root@localhost docker-conf-flie]# cat Dockerfile
#Explain:This is a test image!
FROM busybox:latest
LABEL url=www.baidu.com
COPY index.html /home/www/html/
COPY date /home/date/
ADD http://mirrors.shu.edu.cn/apache/tomcat/tomcat-8/v8.5.39/bin/apache-tomcat-8.5.39.tar.gz /home/tomcat/
我们在tomcat官网下载tomcat的包放在我们的容器之中,而且/home/下是没有tomcat这个目录的
[root@localhost docker-conf-flie]# docker build -t busyboxhttpd:v0.3 ./
Sending build context to Docker daemon  6.656kB
Step 1/5 : FROM busybox:latest
 ---> d8233ab899d4
Step 2/5 : LABEL url=www.baidu.com
 ---> Using cache
 ---> 2d5e9326ad41
Step 3/5 : COPY index.html /home/www/html/
 ---> Using cache
 ---> ce593c489324
Step 4/5 : COPY date /home/date/
 ---> Using cache
 ---> 0b6fa719a6bf
Step 5/5 : ADD http://mirrors.shu.edu.cn/apache/tomcat/tomcat-8/v8.5.39/bin/apache-tomcat-8.5.39.tar.gz /home/tomcat/
Downloading [==================================================>]  9.672MB/9.672MB 可以看到这个是连到了url上下载了文件
 ---> 87e5583fdad9
Successfully built 87e5583fdad9
Successfully tagged busyboxhttpd:v0.3

[root@localhost docker-conf-flie]# docker images
REPOSITORY          TAG                 IMAGE ID            CREATED             SIZE
busyboxhttpd        v0.3                87e5583fdad9        2 minutes ago       10.9MB
busyboxhttpd        v0.2                0b6fa719a6bf        24 minutes ago      1.2MB
busyboxhttpd        v0.1                ce593c489324        About an hour ago   1.2MB
busybox             latest              d8233ab899d4        5 weeks ago         1.2MB
[root@localhost docker-conf-flie]# docker run --name boxhttpd03 --rm busyboxhttpd:v0.3 ls /home/tomcat/
apache-tomcat-8.5.39.tar.gz
可以看到并没有帮我们解压
[root@localhost docker-conf-flie]#

[root@localhost docker-conf-flie]# wget https://memcached.org/files/memcached-1.5.12.tar.gz
我们去找一个tar包先存在本地,看看是不是会自动帮我们解压
--2019-03-22 20:45:01--  https://memcached.org/files/memcached-1.5.12.tar.gz
正在解析主机 memcached.org (memcached.org)... 107.170.231.145
正在连接 memcached.org (memcached.org)|107.170.231.145|:443... 已连接。
已发出 HTTP 请求,正在等待回应... 200 OK
长度:457719 (447K) [application/octet-stream]
正在保存至: “memcached-1.5.12.tar.gz”

100%[================================================================================================================>] 457,719     38.3KB/s 用时 12s

2019-03-22 20:45:14 (38.3 KB/s) - 已保存 “memcached-1.5.12.tar.gz” [457719/457719])

[root@localhost docker-conf-flie]# ls
date  Dockerfile  index.html  memcached-1.5.12.tar.gz
[root@localhost docker-conf-flie]# cat Dockerfile
#Explain:This is a test image!
FROM busybox:latest
LABEL url=www.baidu.com
COPY index.html /home/www/html/
COPY date /home/date/
ADD memcached-1.5.12.tar.gz /home/memcached/
[root@localhost docker-conf-flie]# docker build -t busyboxhttpd:v0.4 ./
Sending build context to Docker daemon  464.9kB
Step 1/5 : FROM busybox:latest
 ---> d8233ab899d4
Step 2/5 : LABEL url=www.baidu.com
 ---> Using cache
 ---> 2d5e9326ad41
Step 3/5 : COPY index.html /home/www/html/
 ---> Using cache
 ---> ce593c489324
Step 4/5 : COPY date /home/date/
 ---> Using cache
 ---> 0b6fa719a6bf
Step 5/5 : ADD memcached-1.5.12.tar.gz /home/memcached/
 ---> 1240b10a4851
Successfully built 1240b10a4851
Successfully tagged busyboxhttpd:v0.4
[root@localhost docker-conf-flie]# docker images
REPOSITORY          TAG                 IMAGE ID            CREATED             SIZE
busyboxhttpd        v0.4                1240b10a4851        29 seconds ago      3.12MB
busyboxhttpd        v0.3                87e5583fdad9        13 minutes ago      10.9MB
busyboxhttpd        v0.2                0b6fa719a6bf        34 minutes ago      1.2MB
busyboxhttpd        v0.1                ce593c489324        About an hour ago   1.2MB
busybox             latest              d8233ab899d4        5 weeks ago         1.2MB
[root@localhost docker-conf-flie]# docker run --name boxhttpd04 --rm  busyboxhttpd:v0.4 ls /home/memcached/
memcached-1.5.12
可以看到已经解压
[root@localhost docker-conf-flie]# docker run --name boxhttpd04 --rm  busyboxhttpd:v0.4 ls /home/memcached/memcached-1.5.12
AUTHORS
COPYING
ChangeLog
INSTALL
LICENSE.bipbuffer
Makefile.am
Makefile.in
NEWS
......
WORKDIR:用于指定dockerfile所有的run,cmd,entrypolnt,copy和add设定工作目录
WORKDIR: 路径
可以指定多次,但是指定的目录只会影响到WORKDIR只会的指令

[root@localhost docker-conf-flie]# cat Dockerfile
#Explain:This is a test image!
FROM busybox:latest
LABEL url=www.baidu.com
COPY index.html /home/www/html/
COPY date /home/date/
WORKDIR /home/memcached/  我们指定add的工作目录是/home/memcached/
ADD memcached-1.5.12.tar.gz ./1.5/  add之后的路径我们就不需要指定了,因为这个当前目录就是WORKDIR来指定了,但是我们还是可以单独加目录的
[root@localhost docker-conf-flie]# docker images
REPOSITORY          TAG                 IMAGE ID            CREATED             SIZE
busyboxhttpd        v0.4                1240b10a4851        18 minutes ago      3.12MB
busyboxhttpd        v0.3                87e5583fdad9        31 minutes ago      10.9MB
busyboxhttpd        v0.2                0b6fa719a6bf        About an hour ago   1.2MB
busyboxhttpd        v0.1                ce593c489324        About an hour ago   1.2MB
busybox             latest              d8233ab899d4        5 weeks ago         1.2MB
[root@localhost docker-conf-flie]# docker build -t busyboxhttpd:v0.5 ./
Sending build context to Docker daemon  464.9kB
Step 1/6 : FROM busybox:latest
 ---> d8233ab899d4
Step 2/6 : LABEL url=www.baidu.com
 ---> Using cache
 ---> 2d5e9326ad41
Step 3/6 : COPY index.html /home/www/html/
 ---> Using cache
 ---> ce593c489324
Step 4/6 : COPY date /home/date/
 ---> Using cache
 ---> 0b6fa719a6bf
Step 5/6 : WORKDIR /home/memcached/
 ---> Running in 6da5b7ea24e2
Removing intermediate container 6da5b7ea24e2
 ---> 0fe647ebdf19
Step 6/6 : ADD memcached-1.5.12.tar.gz ./1.5/
 ---> f63491ffb75f
Successfully built f63491ffb75f
Successfully tagged busyboxhttpd:v0.5
[root@localhost docker-conf-flie]# docker images
REPOSITORY          TAG                 IMAGE ID            CREATED             SIZE
busyboxhttpd        v0.5                f63491ffb75f        7 seconds ago       3.12MB
busyboxhttpd        v0.4                1240b10a4851        19 minutes ago      3.12MB
busyboxhttpd        v0.3                87e5583fdad9        32 minutes ago      10.9MB
busyboxhttpd        v0.2                0b6fa719a6bf        About an hour ago   1.2MB
busyboxhttpd        v0.1                ce593c489324        About an hour ago   1.2MB
busybox             latest              d8233ab899d4        5 weeks ago         1.2MB
[root@localhost docker-conf-flie]# docker run --name boxhttpd05 --rm busyboxhttpd:v0.5 ls /home/memcached/1.5/
memcached-1.5.12
[root@localhost docker-conf-flie]#
VOLUME:在镜像中直接定义好卷在宿主机的那个路径,但是要知道在dockerfile下的卷是docker管理的卷,这个可以参照之前的容器卷。
VOLUME 挂载点
VOLUME ["挂载点"]

[root@localhost docker-conf-flie]# cat Dockerfile
#Explain:This is a test image!
FROM busybox:latest
LABEL url=www.baidu.com
COPY index.html /home/www/html/
COPY date /home/date/
WORKDIR /home/memcached/
ADD memcached-1.5.12.tar.gz ./1.5/
VOLUME /home/mysql/

[root@localhost docker-conf-flie]# docker build -t busyboxhttpd:v0.6 ./
Sending build context to Docker daemon  464.9kB
Step 1/7 : FROM busybox:latest
 ---> d8233ab899d4
Step 2/7 : LABEL url=www.baidu.com
 ---> Using cache
 ---> 2d5e9326ad41
Step 3/7 : COPY index.html /home/www/html/
 ---> Using cache
 ---> ce593c489324
Step 4/7 : COPY date /home/date/
 ---> Using cache
 ---> 0b6fa719a6bf
Step 5/7 : WORKDIR /home/memcached/
 ---> Using cache
 ---> 0fe647ebdf19
Step 6/7 : ADD memcached-1.5.12.tar.gz ./1.5/
 ---> Using cache
 ---> f63491ffb75f
Step 7/7 : VOLUME /home/mysql/
 ---> Running in 84178a58f6ba
Removing intermediate container 84178a58f6ba
 ---> 199109e83197
Successfully built 199109e83197
Successfully tagged busyboxhttpd:v0.6
[root@localhost docker-conf-flie]# docker images
REPOSITORY          TAG                 IMAGE ID            CREATED             SIZE
busyboxhttpd        v0.6                199109e83197        13 seconds ago      3.12MB
busyboxhttpd        v0.5                f63491ffb75f        9 minutes ago       3.12MB
busyboxhttpd        v0.4                1240b10a4851        28 minutes ago      3.12MB
busyboxhttpd        v0.3                87e5583fdad9        41 minutes ago      10.9MB
busyboxhttpd        v0.2                0b6fa719a6bf        About an hour ago   1.2MB
busyboxhttpd        v0.1                ce593c489324        2 hours ago         1.2MB
busybox             latest              d8233ab899d4        5 weeks ago         1.2MB
[root@localhost docker-conf-flie]# docker run --name boxhttpd06 --rm busyboxhttpd:v0.6 sleep 60 让容器执行的时候停60秒
[root@localhost ~]# docker inspect -f {{.Mounts}} boxhttpd06 我们来看下容器卷的详细信息
[{volume 5ba8e23864423b049d6cac54d6dd19d74808b7526bb0aaa0c74ce4b372625e30 /var/lib/docker/volumes/5ba8e23864423b049d6cac54d6dd19d74808b7526bb0aaa0c74ce4b372625e30/_data /home/mysql(挂载点) local  true }]
[root@localhost ~]#
EXPOSE:为容器打开容器指定要监听的端口保证和外部通讯,自动帮我们生成了nat规则,但是不能帮我们去指定那个ip去绑定,属于动态绑定,意味着这个绑定就是宿主机的所有端口和随机端口。
这里的随机端口和所有地址是因为dockerfile未来是你不确定要放在那台机器上面,还有未来容器的端口不一定是要暴露在外面的。
EXPOSE port(端口 ) [protocol]
protocol(指传输层协议,可以是tcp或者udp,默认是tcp
EXPOSE指令可以一次指定多个端口,EXPOSE 123/udp 234/tcp

[root@localhost docker-conf-flie]# cat Dockerfile
#Explain:This is a test image!
FROM busybox:latest
LABEL url=www.baidu.com
COPY index.html /home/www/html/
COPY date /home/date/
WORKDIR /home/memcached/
ADD memcached-1.5.12.tar.gz ./1.5/
VOLUME /home/mysql/
EXPOSE 8088/tcp 9099/udp
[root@localhost docker-conf-flie]# docker build -t busyboxhttpd:v0.7 ./
Sending build context to Docker daemon  464.9kB
Step 1/8 : FROM busybox:latest
 ---> d8233ab899d4
Step 2/8 : LABEL url=www.baidu.com
 ---> Using cache
 ---> 2d5e9326ad41
Step 3/8 : COPY index.html /home/www/html/
 ---> Using cache
 ---> ce593c489324
Step 4/8 : COPY date /home/date/
 ---> Using cache
 ---> 0b6fa719a6bf
Step 5/8 : WORKDIR /home/memcached/
 ---> Using cache
 ---> 0fe647ebdf19
Step 6/8 : ADD memcached-1.5.12.tar.gz ./1.5/
 ---> Using cache
 ---> f63491ffb75f
Step 7/8 : VOLUME /home/mysql/
 ---> Using cache
 ---> 199109e83197
Step 8/8 : EXPOSE 8088/tcp 9099/udp
 ---> Using cache
 ---> 339083b60682
Successfully built 339083b60682
Successfully tagged busyboxhttpd:v0.7
[root@localhost docker-conf-flie]# docker images
REPOSITORY          TAG                 IMAGE ID            CREATED             SIZE
busyboxhttpd        v0.6                339083b60682        26 seconds ago      3.12MB
busyboxhttpd        v0.7                339083b60682        26 seconds ago      3.12MB
busyboxhttpd        v0.5                f63491ffb75f        12 hours ago        3.12MB
busyboxhttpd        v0.4                1240b10a4851        13 hours ago        3.12MB
busyboxhttpd        v0.3                87e5583fdad9        13 hours ago        10.9MB
busyboxhttpd        v0.2                0b6fa719a6bf        13 hours ago        1.2MB
busyboxhttpd        v0.1                ce593c489324        14 hours ago        1.2MB
busybox             latest              d8233ab899d4        5 weeks ago         1.2MB
[root@localhost docker-conf-flie]# docker run --name boxhttpd07 --rm busyboxhttpd:v0.7 /bin/httpd -f -h /home/www/html
运行之后我们查看服务访问情况
[root@localhost ~]# docker inspect -f {{.NetworkSettings.IPAddress}} boxhttpd07
172.17.0.2
[root@localhost ~]# curl 172.17.0.2
Busybox httpd.server

[root@localhost ~]# docker port boxhttpd07  我们可以发现此时服务的端口并不会暴露对外监听
[root@localhost docker-conf-flie]# docker run --name boxhttpd07 --rm -P busyboxhttpd:v0.7 /bin/httpd -f -h /home/www/html
我们再次运行加上P参数,这个参数之前提到过,我们不需要在去P参数后面指定端口了,dockerfile已经指定了。
[root@localhost ~]# docker port boxhttpd07
8088/tcp -> 0.0.0.0:32768
9099/udp -> 0.0.0.0:32768
[root@localhost ~]#可以看到端口暴露对外监听了
ENV:用于为镜像定义所需要的环境变量,可被ENV,ADD,COPY等命令所调用
ENV key vaiue 这种格式下key之后所有内容都会被当做value的组成部分,因此一次只能给一个变量
ENV key=value\key=value 这种就解决了上面一次只能给一个变量的问题,通过反斜线(续行)间隔,通过一个ENV给到多个值,建议是用第二种方式
反斜线还能对空格进行转义
写法1
FROM busybox:latest
LABEL url=www.baidu.com
ENV WEBFILE /home/www/html/  如果就一个值前面是变量名后面就是指
COPY index.html $WEBFILE   在需要引用变量的地方直接$符号接上变量即可
.....
写法2:
FROM busybox:latest
LABEL url=www.baidu.com
ENV WEBFILE /home/www/html/  如果就一个值前面是变量名后面就是指
COPY index.html ${WEBFILE:-/home/www/html/}   如果变量没有值就用-号后面我们定义的值,此处参考文章中变量赋值的内容
.....
写法3:
#Explain:This is a test image!
FROM busybox:latest
LABEL url=www.baidu.com
ENV WEBFILE=/home/www/html/\  用反斜线续行写
    MEM_EDITION="memcached-1.5.12.tar.gz"
COPY index.html ${WEBFILE:-/home/www/html/}
COPY date /home/date/
WORKDIR /home/memcached/
ADD ${MEM_EDITION} ./1.6/
....

[root@localhost docker-conf-flie]# docker build -t busyboxhttpd:v0.8 ./
Sending build context to Docker daemon  464.9kB
Step 1/9 : FROM busybox:latest
 ---> d8233ab899d4
Step 2/9 : LABEL url=www.baidu.com
 ---> Using cache
 ---> 2d5e9326ad41
Step 3/9 : ENV WEBFILE=/home/www/html/    MEM_EDITION="memcached-1.5.12.tar.gz"
 ---> Running in 8717be855cb6
Removing intermediate container 8717be855cb6
 ---> d2728a778315
Step 4/9 : COPY index.html ${WEBFILE:-/home/www/html/}
 ---> 32f9c8bfe225
Step 5/9 : COPY date /home/date/
 ---> d154c2fc16a1
Step 6/9 : WORKDIR /home/memcached/
 ---> Running in 6059bbf44d67
Removing intermediate container 6059bbf44d67
 ---> bba487a7779e
Step 7/9 : ADD ${MEM_EDITION} ./1.6/
 ---> 2a22046822b8
Step 8/9 : VOLUME /home/mysql/
 ---> Running in 42ebc490d313
Removing intermediate container 42ebc490d313
 ---> c3d946d88690
Step 9/9 : EXPOSE 8088/tcp 9099/udp
 ---> Running in 1751ba881e93
Removing intermediate container 1751ba881e93
 ---> 34af5bf9ae82
Successfully built 34af5bf9ae82
Successfully tagged busyboxhttpd:v0.8
[root@localhost docker-conf-flie]# docker images
REPOSITORY          TAG                 IMAGE ID            CREATED             SIZE
busyboxhttpd        v0.8                34af5bf9ae82        16 minutes ago      3.12MB
busyboxhttpd        v0.6                339083b60682        2 hours ago         3.12MB
busyboxhttpd        v0.7                339083b60682        2 hours ago         3.12MB
busyboxhttpd        v0.5                f63491ffb75f        14 hours ago        3.12MB
busyboxhttpd        v0.4                1240b10a4851        15 hours ago        3.12MB
busyboxhttpd        v0.3                87e5583fdad9        15 hours ago        10.9MB
busyboxhttpd        v0.2                0b6fa719a6bf        15 hours ago        1.2MB
busyboxhttpd        v0.1                ce593c489324        16 hours ago        1.2MB
busybox             latest              d8233ab899d4        5 weeks ago         1.2MB
[root@localhost docker-conf-flie]# docker run --name boxhttpd08 --rm busyboxhttpd:v0.8 ls /home/memcached/1.6/
memcached-1.5.12
[root@localhost docker-conf-flie]# docker run --name boxhttpd08 --rm busyboxhttpd:v0.8 ls /home/www/html/
index.html
[root@localhost docker-conf-flie]#如果变量传值dockerfile里面我们还不如直接指定,ENV加了之后我们反而还要多写几行。
其实ENV的作用就在于我们在启动容器的时候给变量传参,而不是在dockerfile里面。
[root@localhost docker-conf-flie]# docker run --name boxhttpd08 --rm busyboxhttpd:v0.8 printenv 我们查看在容器里面的变量
PATH=/usr/local/sbin:/usr/local/bin:/usr/sbin:/usr/bin:/sbin:/bin
HOSTNAME=a020c6b82d59
WEBFILE=/home/www/html/
MEM_EDITION=memcached-1.5.12.tar.gz  可以看到这些变量已经存有了值
HOME=/root
[root@localhost docker-conf-flie]# docker run --name boxhttpd08 -e MEM_EDITION="memcached-1.6.6.tar.gz" --rm busyboxhttpd:v0.8 printenv
我们通过-e参数可以在镜像初始化为容器的时候给环境变量赋值。
PATH=/usr/local/sbin:/usr/local/bin:/usr/sbin:/usr/bin:/sbin:/bin
HOSTNAME=4568f836ef4b
MEM_EDITION=memcached-1.6.6.tar.gz
WEBFILE=/home/www/html/
HOME=/root
[root@localhost docker-conf-flie]# docker run --name boxhttpd08 --rm busyboxhttpd:v0.8 ls /home/memcached/1.6/
memcached-1.5.12
可以看到文件并没有变化,这个是因为我们在build的时候是基于容器做镜像,解压的这一步其实在build的时候就已经完成了,我们在做成的镜像上run的时候已经是新的镜像了,解压的文件已经在build的是形成了,run的时候再给变量赋值只不过是第二阶段的事情了,不会影响build。
env在dockerfile适合用于出现反复的目录和文件等。
RUN:在dockerfile添加命令,让其在build的时候去执行命令,从而制作成镜像,这个RUN和CMD是相似的,不过执行的阶段不一样,RUN是build阶段,CMD是run启动容器的时候。
RUN command
这种格式中,command通常是一个shell命令,也就意味着先启动的是shell进程,会以“/bin/sh -c“来运行的,这意味着此进程在容器的id不是1,不能接受uninx信号,当使用 docker stop想停止你容器里面的程序的进程是接收不到的。
RUN ["executanle","param1",....]
第二种语法参数是json的数组,executanle是一个可执行程序的路径下的命令,param1到param...为传递给命令的选项和参数,此种格式下不会以/bin/sh -c来运行,直接由内核启 动,所以这种情况是不支持shell下的通配符等操作,例如(>,*,|)这样的符号。
RUN ["/bin/bash","-c","executanle","param1",....]
如果想解决第二种不能用shell的情况就可以使用第三种格式

[root@localhost docker-conf-flie]# cat Dockerfile
#Explain:This is a test image!
FROM busybox:latest
LABEL url=www.baidu.com
ENV TEM_EDITION="http://mirrors.shu.edu.cn/apache/tomcat/tomcat-8/v8.5.39/bin/apache-tomcat-8.5.39.tar.gz"
在dockerfile中只要是url上下载的tar包docker是不能解压的
ADD ${TEM_EDITION} /home/tomcat/
RUN cd /home/tomcat&&\
    tar xf *.tar.gz 我们需要手动解压,这个命令要注意的是dockerfile可能对我们在命令行习惯输入的-xf前面的横岗不识别的问题
[root@localhost docker-conf-flie]# docker run --name boxhttpd09 --rm busyboxhttpd:v0.9 ls /home/tomcat/
apache-tomcat-8.5.39 可以看到文件已经正常解压
apache-tomcat-8.5.39.tar.gz
run是可以执行多条命令的,如果有多条命令都是处理一个东西的,要保证在一行run里面执行完毕。
只要有的run你指需要考虑你的基础镜像能不能支持你需要操作的命令,只要支持,那你完全可以按照你的要求吧镜像调整为你想实现的样子。
run在制作镜像的时候执行的命令属于bin/sh命令,当你镜像制作完成了,是运行的nginx,那就需要把默认运行的bin/sh改成nginx了,而要实现这个是要通过CMD来完成的。
CMD:在docker run容器运行启动的时候可以通过cmd来执行一些命令,而RUN命令是build的时候已经执行完成了,所以你想在容器运行的时候执行命令就需要
使用到CMD命令。
为什么我们要在dockerfile中给到CMD命令,因为我们的一个容器只负责跑一个程序也就是和这个程序相关的进程存在即可,无需跑其它的进程来浪费容器的资源,我们的linux启动 之后默认就运行了sh相关的进程,我们才可以使用sh相关的命令,但是在容器里面我们也许不需要sh相关的进程存在,我们只需要一个提供服务的nginx,redis相关的进程生效即 可,这个时候我们就需要剥离原有的sh,让nginx启动的时候就为默认的进程。可以把容器就当做一个正常服务,正常服务运行的时候是不需要其他的进程来参与其中的。
CDM在dockerfile中默认只能生效一个,也就是dockerfile中最后一个CMD命令,所以说CMD即使给了多次也只能生效最后一个。
CMD运行在镜像启动为容器的时候
CMD command
这种情况和RUN的一样,默认shell先启动运行,但是想docker stop停止服务进程是做不到的。
CMD ["executanle","param1",....]
和RUN一样
CMD ["param1","param2",....]
第三种和RUN需要结合ENTRYPOINT指令提供默认参数来运行。

[root@ docker-conf-flie]# cat Dockerfile
#Explain:This is a test image!
FROM busybox:latest
LABEL url=www.baidu.com
ENV WEB_HTML_FILE="/www/html/"
RUN mkdir -p $WEB_HTML_FILE &&\
    echo "hello bosybox.html" > ${WEB_HTML_FILE}/index.html  创建目录的命令是属于/bin/sh的,这意味着还是需要调用/bin/sh来完成创建

CMD /bin/httpd -f -h ${WEB_HTML_FILE}
当我们执行build之后,在启动镜像为容器的时候直接执行httpd的命令,从而占据进程标号为1的位置,当有其他的命令的时候为httpd的子进程。
还需要注意的是${WEB_HTML_FILE}这个shell的环境变量,还意味着httpd启动还是需要/bin/sh来完成,那么httpd还是在只要涵盖/bin/sh的时候的还是/bin/sh的子进程,不过启动之后通过cmd可以给替换掉

[root@ docker-conf-flie]# docker run --name boxhttpd1.0 -it --rm busyboxhttpd:v1.0

我们发现启动容器之后不会再出现/#的符号,因为现在是处于httpd的进程,不再是/bin/sh
[root@ ~]# docker image inspect busyboxhttpd:v1.0
......
 ],
            "Cmd": [
                "/bin/sh",
                "-c",  可以看到cmd命令确实以/bin/sh -c来启动了httpd
                "/bin/httpd -f -h ${WEB_HTML_FILE}"
            ],
[root@ ~]# docker ps -a
CONTAINER ID        IMAGE               COMMAND                  CREATED             STATUS                      PORTS               NAMES
136e25bcd07c        busyboxhttpd:v1.0   "/bin/sh -c '/bin/ht…"可以看到确实是以/bin/sh -c来启动的   15 minutes ago      Up 15 minutes                                   boxhttpd1.0
1af850cc1a46        89c27a4b0cd8        "/bin/sh -c 'mkdir $…"   22 minutes ago      Exited (1) 22 minutes ago                       unruffled_dewdney
98ab876bf458        89c27a4b0cd8        "/bin/sh -c 'mkdir $…"   22 minutes ago      Exited (1) 22 minutes ago                       elastic_robinson
881b15b72bbf        busyboxhttpd:v0.9   "sh"                     2 days ago          Exited (0) 2 days ago                           boxhttpd09
[root@ ~]# docker exec -it boxhttpd1.0 /bin/sh  我们使用exec进去的时候以/bin/sh形式来看下
/ # ps
PID   USER     TIME  COMMAND
    1 root      0:00 /bin/httpd -f -h /www/html/  可以发现进行id为1的就是httpd的进程,这里保留的id是方法是方便容器能够接受unix信号,我们能通过docker kill或者stop能停止容器,这样我们通过cmd就吧程序默认启动运行时的环境给改了。
   16 root      0:00 /bin/sh   我们exec调用/bin/sh已经沦为httpd的子进程了
   22 root      0:00 ps
/ # cat www/html/index.html
hello bosybox.html
/ #

[root@ docker-conf-flie]# cat Dockerfile
#Explain:This is a test image!
FROM busybox:latest
LABEL url=www.baidu.com
ENV WEB_HTML_FILE="/www/html/"
RUN mkdir -p $WEB_HTML_FILE &&\
    echo "hello bosybox.html" > ${WEB_HTML_FILE}/index.html

#CMD /bin/httpd -f -h ${WEB_HTML_FILE}
CMD ["/bin/httpd","-f","-h ${WEB_HTML_FILE}"]  我们将cmd改成json数组的形式

[root@ docker-conf-flie]# docker image inspect busyboxhttpd:v1.1
.....
 "Cmd": [
                "/bin/httpd",
                "-f",
                "-h ${WEB_HTML_FILE}"
            ],

我们可以看到cmd已然不是之前/bin/sh了
[root@ docker-conf-flie]# docker run --name boxhttpd1.1 -it busyboxhttpd:v1.1
WARNING: IPv4 forwarding is disabled. Networking will not work.
httpd: can't change directory to ' ${WEB_HTML_FILE}': No such file or directory
我们在运行容器的时候就有报错,这个是因为json格式默认不会以shell的子进程来运行,当出现-h ${WEB_HTML_FILE}会解析成为路径,也就会报这个路径不存在
[root@ docker-conf-flie]# cat Dockerfile
#Explain:This is a test image!
FROM busybox:latest
LABEL url=www.baidu.com
ENV WEB_HTML_FILE="/www/html/"
RUN mkdir -p $WEB_HTML_FILE &&\
    echo "hello bosybox.html" > ${WEB_HTML_FILE}/index.html

#CMD /bin/httpd -f -h ${WEB_HTML_FILE}
CMD ["/bin/sh","-c","/bin/httpd","-f","-h ${WEB_HTML_FILE}"]
我们手动添加指定运行的环境由/bin/sh来解析
[root@ docker-conf-flie]# docker run --name boxhttpd1.2 -it busyboxhttpd:v1.2
WARNING: IPv4 forwarding is disabled. Networking will not work.
在运行的时候容器直接退出了
[root@ docker-conf-flie]# docker ps -a
CONTAINER ID        IMAGE               COMMAND                  CREATED             STATUS                     PORTS               NAMES
304417fbe2ef        busyboxhttpd:v1.2   "/bin/sh -c /bin/htt…"   4 seconds ago       Exited (0) 3 seconds ago                       boxhttpd1.2
可以看到容器处于退出的状态,至少证明我们的dockerfile写法是没有错误的,这种情况下我们就需要借助docke的logs输出来看下到底是什么问题,最大的原因应该和我们的httpd路径的调用方式有关。
大多数情况下我们的应用程序启动如果没有问题,/bin/sh -c也应该是不会有问题的
CMD的第三种命令需要结合ENTRYPOINT来完成
ENTRYPOINT:类似cmd的功能,用于为容器指定默认运行的程序,使得容器像是一个单独的和执行程序。

[root@ docker-conf-flie]# docker run --name boxhttpd1.2 -it busyboxhttpd:v1.2 ls /www/html/
WARNING: IPv4 forwarding is disabled. Networking will not work.
index.html
[root@ docker-conf-flie]#
当我们在运行容器的时候可以让容器不运行本身在dockerfile定义好的内容,转而使用我们后面定义的命令来覆盖dockerfile制作好镜像的命令,那这样就有诉求我不想容器运行的时候默认的命令被覆盖,cmd是做不到的,需要使用ENTRYPOINT命令,这也是ENTRYPOINT与cmd命令的不同之处,ENTRYPOINT启动的程序不会被docker run命令指定的参数所覆盖,而且这些命令参数会被当做参数传递给ENTRYPOINT指定的程序。
ENTRYPOINT command
ENTRYPOINT ["executable","para1".....]

[root@localhost docker-conf-flie]# cat Dockerfile
#Explain:This is a test image!
FROM busybox:latest
LABEL url=www.baidu.com
ENV WEB_HTML_FILE="/www/html/"
RUN mkdir -p $WEB_HTML_FILE &&\
    echo "hello bosybox.html" > ${WEB_HTML_FILE}/index.html

#CMD /bin/httpd -f -h ${WEB_HTML_FILE}
#CMD ["/bin/sh","-c","/bin/httpd","-f","-h ${WEB_HTML_FILE}"]
ENTRYPOINT /bin/httpd -f -h ${WEB_HTML_FILE}

[root@ docker-conf-flie]# docker run --name boxhttpd1.3 -it --rm -P  busyboxhttpd:v1.3 ls /www/html/
WARNING: IPv4 forwarding is disabled. Networking will not work.
我们把cmd替换成ENTRYPOINT,再去执行ls的时候发现并没有出现上面的情况,这个是因为程序默认启动的是httpd,也就是/bin/httpd -f -h ${WEB_HTML_FILE}这一长传的命令,然后把ls这个命令当做参数附在httpd后面,只不过httpd识别不了这个参数不会运行罢了。
然而ENTRYPOINT也是可以被覆盖的,可以通过特定的选项--entrypoint就能完成,docker留有这个参数是让用户明确自己的操作
[root@ docker-conf-flie]# docker run --name boxhttpd1.4 -it --rm -P --entrypoint "top"  busyboxhttpd:v1.4
可以发现--entrypoint我们指定的top命令就覆盖了原先的定义好的命令了
WARNING: IPv4 forwarding is disabled. Networking will not work.
Mem: 1340904K used, 522348K free, 12752K shrd, 2116K buff, 584808K cached
CPU:  0.0% usr  5.0% sys  0.0% nic 95.0% idle  0.0% io  0.0% irq  0.0% sirq
Load average: 0.00 0.01 0.05 2/408 5
  PID  PPID USER     STAT   VSZ %VSZ CPU %CPU COMMAND
    1     0 root     R     1280  0.0   2  0.0 top
[root@ docker-conf-flie]#
cmd和ENTRYPOINT在dockerfile中能定义多个,但是只有最后一个生效。
CMD和ENTRYPOINT混合使用:
当CMD和ENTRYPOINT混合使用的时候,cmd默认则用于为ENTRYPOINT提供默认参数。
CMD ["para1","para2",.....]
此时cmd只能是数组的格式

[root@localhost docker-conf-flie]# cat Dockerfile
#Explain:This is a test image!
FROM busybox:latest
LABEL url=www.baidu.com
ENV WEB_HTML_FILE="/www/html/"
RUN mkdir -p $WEB_HTML_FILE &&\
    echo "hello bosybox.html" > ${WEB_HTML_FILE}/index.html

#CMD /bin/httpd -f -h ${WEB_HTML_FILE}
CMD ["/bin/httpd","-f","-h ${WEB_HTML_FILE}"]
ENTRYPOINT ["/bin/sh","-c"]
此处ENTRYPOINT只能使用数组的形式,因为ENTRYPOINT运行的时候可能会用到/bin/sh -c,如果是没有以数组的形式的话,那就是以/bin/sh -c运行/bin/sh -c了
[root@localhost docker-conf-flie]# docker run --name boxhttpd1.4  -P busyboxhttpd:v1.5因为内部变量交叉混合应用容器是不会起来的
[root@localhost docker-conf-flie]# docker ps -a
CONTAINER ID        IMAGE               COMMAND                  CREATED             STATUS                     PORTS               NAMES
b9d6790bbc5f        busyboxhttpd:v1.5   "/bin/sh -c /bin/htt…"   3 seconds ago       Exited (0) 2 seconds ago                       boxhttpd1.4
但是我们能看到程序是/bin/sh -c /bin/httpd来运行的
[root@localhost docker-conf-flie]# docker inspect -f{{.Config.Cmd}} boxhttpd1.4
[/bin/httpd -f -h ${WEB_HTML_FILE}]
[root@localhost docker-conf-flie]# docker inspect -f{{.Config.Entrypoint}} boxhttpd1.4
[/bin/sh -c]
[root@localhost docker-conf-flie]# docker run --name boxhttpd1.4  -P busyboxhttpd:v1.5 "ls /www/html" 传参的时候加双引号避免出现错误
index.html
当cmd和Entrypoint同事出现的时候,cmd代表默认参数传输了Entrypoint了,当Entrypoint自己有参数(我们在启动时给的ls参数)就会覆盖cmd的参数,而程序此时运行的ENTRYPOINT ["/bin/sh","-c"]的进程,ls也就能正常运行了。
通过上面的案例,我们发现CMD和ENTRYPOINT混合使用的时候按照我们运行的情况来看ENTRYPOINT是完全没有必要使用的,本来可以在cmd里面一行写掉的我们反而多此一举了。

[root@localhost docker-conf-flie]# cat Dockerfile
#Explain:This is a test image!
FROM nginx:1.14-alpine
LABEL url=www.nginx.com

ENV WEB_HTML_FILE="/www/html/" 网页存在的路径

ADD entrypoint.sh /bin/  复制主机我们已经写好的entrypoint.sh脚本到镜像里面,给到后面的ENTRYPOINT去运行。
ADD index.html ${WEB_HTML_FILE}  复制主机的我们写好的网页文件到镜像里面去。

CMD ["/bin/nginx","-g","daemon off;"] 我们要运行的命令
-g标示设定全局选项。
daemon off这个是为了让nginx运行在前台,daemon是守护进程,off是不要运行为守护进程,nginx的配置文件都是分号结尾的,cmd里面也是一样。
ENTRYPOINT ["/bin/entrypoint.sh"]
运行add进来的entrypoint.sh脚本,但是我们上面的案例也看到了,一旦ENTRYPOINT有了默认参数,就会覆盖cmd要运行的命令,这个时候就需要改
我们的entrypoint.sh脚本。
[root@localhost docker-conf-flie]# cat entrypoint.sh
#!/bin/sh   #alpine的镜像是没有bash的只有sh
cat > /etc/nginx/conf.d/www.conf << EOF
server {
        server_name ${HOSTNAME};
        listen ${IP:-0.0.0.0}:${PORT:-80}; :-代表默认参数
        root ${WEB_HTML_FILEI:-/usr/share/nginx/html};
}
EOF
exec "$@"
$@代表当前脚本的所有参数,参数是什么我就运行什么,而且运行完成之后我还要exec退出当前进程。
1:我们先写一个用于初始化定义nginx运行环境的脚本,启动定义的ip和端口,网页的路径等信息。
2:通过add把这个脚本拷贝进镜像里面,启动为容器之后,然后ENTRYPOINT在容器里面运行entrypoint.sh脚本,环境初始化完成再去执行cmd的命令,而且cmd执行成功之后就会顶替sh进程从而成为容器里面唯一的进程。
[root@localhost docker-conf-flie]# docker run --name myweb1.1 --rm -it -P mynginxweb:v1.1启动容器
[root@localhost docker-conf-flie]# docker exec -it myweb1.1 /bin/sh  通过从容器外面指令命令去看容器内的nginx情况
/ # cat /www/html/index.html
Busybox nginx.server

/ # netstat -anptu
Active Internet connections (servers and established)
Proto Recv-Q Send-Q Local Address           Foreign Address         State       PID/Program name
tcp        0      0 0.0.0.0:80              0.0.0.0:*               LISTEN      1/nginx -g daemon o
/ # ps 可以看到编号为1的进程是我们的nginx
PID   USER     TIME  COMMAND
    1 root      0:00 nginx: master process /usr/sbin/nginx -g daemon off;
    8 nginx     0:00 nginx: worker process
   32 root      0:00 /bin/sh
   37 root      0:00 ps
/ # cat /etc/nginx/conf.d/www.conf   配置文件也是我们从外面定义好的文件
server {
        server_name 928e9855e425; 主机名是我们的容器id,我们也可以通过特定的指令来完成
        listen 0.0.0.0:80;
        root /usr/share/nginx/html;
}
/ #
[root@localhost ~]# docker ps -a
CONTAINER ID        IMAGE               COMMAND                  CREATED             STATUS              PORTS                   NAMES
928e9855e425        mynginxweb:v1.1     "/bin/entrypoint.sh …"   28 minutes ago      Up 28 minutes       0.0.0.0:32778->80/tcp   myweb1.1
[root@localhost ~]#
我们将容器的运行环境用变量定义的好处就是我们能在外面给容器传参。
[root@localhost docker-conf-flie]# docker run --name myweb1.1 --rm -it -P -e "PORT=8088" mynginxweb:v1.1
运行容器的时候用-e选项给容器的变量传参,当然这些环境变量名必须是在容器里面能查到的。
/ # [root@localhost docker-conf-flie]# docker exec -it myweb1.1 /bin/sh
/ # netstat -anptu
Active Internet connections (servers and established)
Proto Recv-Q Send-Q Local Address           Foreign Address         State       PID/Program name
tcp        0      0 0.0.0.0:8088            0.0.0.0:*               LISTEN      1/nginx -g daemon o
tcp        0      0 0.0.0.0:80              0.0.0.0:*               LISTEN      1/nginx -g daemon o
/ #
[root@localhost docker-conf-flie]# docker run --name myweb1.1 --rm -it -P -e "HOSTNAME=myngixnweb1.1" mynginxweb:v1.1
[root@localhost docker-conf-flie]# docker exec -it myweb1.1 /bin/sh
/ # cat /etc/nginx/conf.d/www.conf
server {
        server_name myngixnweb1.1;
        listen 0.0.0.0:80;
        root /usr/share/nginx/html;
}
/ #
在dockerhub上很多服务镜像都是使用ENTRYPOINT执行脚本接受参数之后并启动服务的,如果想写一个复杂的Dockerfile可以参考dockerhub上的案例
注:Dockerfile里面只要用到数组类型的都要使用双引号才行,否则会有错误。
USER:用于指定运行镜像或运行Dockerflie中任何的run,cmd,ENTRYPOINT指令指令的程序的用户名和UID
默认情况用户的身份为root
USER uid 用户名
需要注意的是uid可以是任意数字,但是这个数字必须存在容器中/etc/passwd中所存在某个有效用户的uid,否则docker run将失败。
[root@localhost docker-conf-flie]# docker exec -it myweb1.1 /bin/sh
/ # ps
PID   USER     TIME  COMMAND
    1 root(进程运行的用户是root)      0:00 nginx: master process /usr/sbin/nginx -g daemon off;
    8 nginx     0:00 nginx: worker process
   32 root      0:00 /bin/sh
   37 root      0:00 ps
HEALTHCHECK:用于CMD之后接一个固定命令用来检查我们的主进程状态是否正常和健康。如果不想健康状态检查可以接NONE来拒绝任何状态检查,也包括默认的检查机制。除此之外CMD前面还可以接[OPTION]用于周期性的
--intterval=DURATION(default:30s) 默认周期检查是30s,可以设定为其它时间
--timeout=DURATION(default:30s) 当我们周期性检查发起请求了,超过了多少时间就认为是有问题的。
--start-period=DURATION(default:0s) 当我们容器启动起来了,容器里面的进程是需要初始化等一系列工作的,这个必然就会导致有个进程初始化时间,但是我们的健康检查是 随着容器一启动就开始了,很可能此时容器里面的进程还在初始化,这个时候健康检查就会认为进程状态异常就直接给kill掉了,那这种情况容器就永远起不来了,所以--start- period就是用来设定一个时间,等主进程初始化完成之后在进行健康检查,如果进程启动需要2秒,--start-period就可以设置为5秒之后在检查。
--retries=数字(default:3) 判断一次超过多长时间就判定不正常是不严谨的,--retries就是用来定义判断次数的,可以多设置几次。
当上面的检查发起了,会返回一些状态:
0:success 正常的
1:unhealthy 不正常的
2:reserved 预留的,可以自己定义
例如HEALTHCHECK --intterval=5m --timeout=3s CMD curl -f http://localhost/ || exit 1(这个1就代表1:unhealthy 不正常的)

[root@localhost docker-conf-flie]# cat Dockerfile
#Explain:This is a test image!
FROM nginx:1.14-alpine
LABEL url=www.nginx.com

ENV WEB_HTML_FILE='/www/html/'

ADD entrypoint.sh /bin/
ADD index.html ${WEB_HTML_FILE}
HEALTHCHECK --start-period=5s --interval=6s CMD wget -O - -q http://${IP:-0.0.0.0}:8088/
CMD ["/usr/sbin/nginx","-g","daemon off;"]

ENTRYPOINT ["/bin/entrypoint.sh"]

[root@localhost docker-conf-flie]# docker run --name myweb1.2 --rm -P -e "PORT=8088"  mynginxweb:v1.2
127.0.0.1 - - [30/Mar/2019:06:55:23 +0000] "GET / HTTP/1.1" 200 612 "-" "Wget" "-" 可以看到检查是成功的,而且是每隔6秒检查一次
127.0.0.1 - - [30/Mar/2019:06:55:29 +0000] "GET / HTTP/1.1" 200 612 "-" "Wget" "-"
127.0.0.1 - - [30/Mar/2019:06:55:35 +0000] "GET / HTTP/1.1" 200 612 "-" "Wget" "-"
127.0.0.1 - - [30/Mar/2019:06:55:41 +0000] "GET / HTTP/1.1" 200 612 "-" "Wget" "-"
[root@localhost docker-conf-flie]#
SHELL:用来定义程序运行环境的默认shell环境,如果是你的docker是在win系统上运行的话那就需要去指定运行的环境,上面我们一直是/bin/sh -c的环境,如果你的基础镜像是/bin/bash这个时候就需要指定了。
STOPSIGNAL:之前我们说容器里面的进程执行之后可以接收stop指令来停止,是因为docker想容器内部发了一个信号-15,这个-15就代表了停止,如果是想换其它的信号。
STOPSIGNAL 信号名,比如信号9,就等于直接kill掉了。
AGE:和ENV很相似,只要也是支持变量,但是这个变量是在build的时候去使用的,这个好处就在于我们的Dockerfile能适应更多不同的环境来制作镜像文件

[root@localhost docker-conf-flie]# cat Dockerfile
#Explain:This is a test image!
FROM nginx:1.14-alpine

ARG url="www.123.com"
LABEL maintainer="${url}"

ENV WEB_HTML_FILE='/www/html/'

ADD entrypoint.sh /bin/
ADD index.html ${WEB_HTML_FILE}
HEALTHCHECK --start-period=5s --interval=6s CMD wget -O - -q http://${IP:-0.0.0.0}:8088/
CMD ["/usr/sbin/nginx","-g","daemon off;"]

ENTRYPOINT ["/bin/entrypoint.sh"]

[root@localhost docker-conf-flie]# docker image inspect -f {{.ContainerConfig.Labels}} mynginxweb:v1.4
map[maintainer:www.321.com]  可以看到我们就可以在build命令行的同时给传参了
[root@localhost docker-conf-flie]#
ONBUILD:用于在Dockerfile中定义一个触发器,这个触发器不是在build的时候执行的,是在你build制作成镜像之后,别人在拿你的镜像作为基础镜像来做新的镜像的时候触发执行,这种执行又叫延时执行。
ONBUILD dockerfile的指令
ONBUILD不能自我嵌套,不能触发FROM和MAINTAINER指令
使用包含ONBUILD指令的dockerfile构建的镜像应该使用特殊的标签
ONBUILD指令中使用ADD和COPY的时候应该要注意上下文中定义的源文件是否缺失,缺失就会失败。

[root@localhost docker-conf-flie]# cat Dockerfile
#Explain:This is a test image!
FROM nginx:1.14-alpine

ARG url="www.123.com"
LABEL maintainer="${url}"

ENV WEB_HTML_FILE='/www/html/'

ADD entrypoint.sh /bin/
ADD index.html ${WEB_HTML_FILE}
HEALTHCHECK --start-period=5s --interval=6s CMD wget -O - -q http://${IP:-0.0.0.0}:8088/
CMD ["/usr/sbin/nginx","-g","daemon off;"]
ONBUILD ADD https://sourceforge.net/projects/htop/files/latest/download /www/html/  定义一个下载的内容
ENTRYPOINT ["/bin/entrypoint.sh"]
[root@localhost docker-conf-flie]# docker run --name myweb1.5 --rm mynginxweb:v1.5 ls /www/html/
index.html
[root@localhost docker-conf-flie]#可以看到我们制作的镜像启动为容器之后并不会去下载这个文件。
[root@localhost test]# pwd
/home/test
[root@localhost test]# cat Dockerfile  创建另外一个dockerfile
FROM mynginxweb:v1.5  基础镜像用我们上面定义的一个

RUN mkdir /test/
[root@localhost test]# docker build  -t test:v1.1 ./
Sending build context to Docker daemon  2.048kB
Step 1/2 : FROM mynginxweb:v1.5
# Executing 1 build trigger
Downloading [==================================================>]  388.5kB/388.5kB  我们在build的时候就发现有一个下载的内容
 ---> f8e5d36e5950
Step 2/2 : RUN mkdir /test/
 ---> Running in 1634f5932da8
Removing intermediate container 1634f5932da8
 ---> 22eefe8da83d
Successfully built 22eefe8da83d
Successfully tagged test:v1.1
[root@localhost test]# docker run --name test1.1 --rm test:v1.1 ls /www/html/
download
index.html
而且文件也被下载下来了。
如果dockerfile的里面存在源文件,如果是你的镜像源文件如果是ftp等公司内部的站点可以下载到,那就很方便了,直接add下来新的镜像就完成了,当然这种场景适合于私有镜像。
♣七:docker的私有registy
A:docker的私有registy介绍
为什么需要私有的镜像仓库,是因为docker的本意就是为了更加轻量快速的搭建起一整套的环境提供使用,如果你的镜像文件是寄托于dockerhub之上的,那你不得不面临pull镜像的时候占用大量的带宽和时间成本,这种场景是极为不适用于大量服务器的场景的,所以做可取的方案就是本地自建镜像仓库,当然你如果是用的国内的阿里云等云平台,把镜像仓库放在云上面也是很不错的选择,要保证镜像在被pull的时候效率提高,你必须选择就近原则。而且你还得考虑双机热备或者多地存放的方案,随时应对不必要的故障带来的损失。
docker为了方便用户创建私有的镜像仓库也提供了一个程序包docker-distribution,而且这个程序也被制作成了镜像存在了duckerhub上,我们直接pull下来启动就可以使用了。
我们要制作的镜像是基于docker-distribution容器来完成的,docker-distribution容器一旦终止,上面之前你制作的所有镜像也就没有了,所以docker-distribution容器必须指定一个存储卷,这个存储卷最好是稳定的网络存储,这样等于你制作镜像的环境随时可以做一些调整不至于影响制作好的镜像,等于成品镜像我是存到了一个稳定的存储卷上面的。
B:docker的私有registy安装和简单使用
现在在dockerhub上docker-distribution的镜像registry已经到了2.7.1的版本了,我们直接使用本地的yum仓库来安装。

[root@localhost ~]# yum info docker-registry
已加载插件:fastestmirror, langpacks
Determining fastest mirrors
 * base: mirrors.aliyun.com
 * extras: mirrors.aliyun.com
 * updates: ap.stykers.moe
可安装的软件包
名称    :docker-registry
架构    :x86_64
版本    :0.9.1  可以看到registry是0.9.1的版本,但是这个版本只是registry的版本,不是docker-distribution的版本,我们直接安装这个版本。
发布    :7.el7
大小    :123 k
源    :extras/7/x86_64
简介    : Registry server for Docker
网址    :https://github.com/docker/docker-registry
协议    : ASL 2.0
描述    : Registry server for Docker (hosting/delivering of repositories and images).
[root@localhost ~]# yum -y install docker-registry
......
正在安装:
 docker-distribution                       x86_64                       2.6.2-2.git48294d9.el7                         extras                       3.5 M
真正的docker-distribution可以看到是2.6.2的版本,docker-distribution只不过是封装在docker-registry,所以安装的时候还是要看实际的版本。
[root@localhost ~]# rpm -ql docker-distribution
/etc/docker-distribution/registry/config.yml  主配置文件。
/usr/bin/registry  主程序
/usr/lib/systemd/system/docker-distribution.service  主服务
/usr/share/doc/docker-distribution-2.6.2
/usr/share/doc/docker-distribution-2.6.2/AUTHORS
/usr/share/doc/docker-distribution-2.6.2/CONTRIBUTING.md
/usr/share/doc/docker-distribution-2.6.2/LICENSE
/usr/share/doc/docker-distribution-2.6.2/MAINTAINERS
/usr/share/doc/docker-distribution-2.6.2/README.md
/var/lib/registry  上传所有镜像的存储路径,如果是有规划的话,这个路径要改到一个存储空间较大的路径下去
[root@localhost ~]# systemctl start docker-distribution启动服务
[root@localhost ~]# cat /etc/docker-distribution/registry/config.yml
version: 0.1
log:
  fields:
    service: registry
storage:
    cache:
        layerinfo: inmemory   缓存数据在内存空间
    filesystem:
        rootdirectory: /var/lib/registry  镜像存储路径
http:  是一个http的服务
    addr: :5000 默认端口5000,前面冒号之间是没有指明地址的代表本地所有地址
[root@localhost ~]# ss -tnl
State      Recv-Q Send-Q                                Local Address:Port                                               Peer Address:Port
LISTEN     0      128

[root@localhost ~]# docker tag mynginxweb:v1.5 localhost:5000/mynginxweb:v1.5
先给本地的镜像打个标签,localhost:5000因为我们本地机器没有域名就直接指定本地5000端口就可以了,/mynginxweb:v1.5如果是名称的就在斜杠后面加上名称,没有名称就为顶层仓库。
[root@localhost ~]# docker images
REPOSITORY                  TAG                 IMAGE ID            CREATED             SIZE
test                        v1.1                22eefe8da83d        20 hours ago        16.4MB
mynginxweb                  v1.5                d15a52fae68c        20 hours ago        16MB
localhost:5000/mynginxweb   v1.5                d15a52fae68c        20 hours ago        16MB
[root@localhost ~]# docker push localhost:5000/mynginxweb:v1.5
如果推送的时候不指定版本默认是推送mynginxweb整个镜像,所有这个tag很重要。
The push refers to repository [localhost:5000/mynginxweb]
355b0d8dba3a: Pushed
54393d713599: Pushed
129ba078f157: Pushed
8c8f1eccd524: Pushed
68442845474f: Pushed
503e53e365f3: Pushed
v1.5: digest: sha256:3601b3c57d30876a61ef8c5b226bf091cd3ffa61b0eae50aba12a172705b67fa size: 1568
因为我们是本地直接推,不会出现https的报错
[root@localhost yum.repos.d]# docker tag mynginxweb:v1.5 192.168.181.134:5000/mynginxweb:v1.5
[root@localhost yum.repos.d]# docker images
REPOSITORY                             TAG                 IMAGE ID            CREATED             SIZE
test                                   v1.1                22eefe8da83d        24 hours ago        16.4MB
192.168.181.134:5000/mynginxweb        v1.5                d15a52fae68c        24 hours ago        16MB
[root@localhost yum.repos.d]# docker push 192.168.181.134:5000/mynginxweb:v1.5
The push refers to repository [192.168.181.134:5000/mynginxweb]
Get https://192.168.181.134:5000/v2/: http: server gave HTTP response to HTTPS client
当我们要把本地镜像推送到另外的机器上的时候会报错,因为我们推送是基于docker的https协议,但是对端的机器是http的协议,用https访问http肯定会报错,当然如果是内网的环境,无需使用https协议也是可以改成http的协议的
这个时候需要使用到一个参数添加到daemon.json里面,重启docker就可以。
[root@localhost yum.repos.d]# cat /etc/docker/daemon.json
{
    "registry-mirrors":["https://registry.docker-cn.com"],
    "insecure-registries":["192.168.181.134:5000"]
    通过insecure-registries参数指定私有仓库的地址或者域名,而且这个域名或者地址必须是docker images的镜像REPOSITORY名称。
}
[root@localhost yum.repos.d]# docker images
REPOSITORY                             TAG                 IMAGE ID            CREATED             SIZE
test                                   v1.1                22eefe8da83d        25 hours ago        16.4MB
192.168.181.134:5000/mynginxweb        v1.5                d15a52fae68c        25 hours ago        16MB
daemon.json里面定义的insecure-registries必须和images REPOSITORY的指一致。
[root@localhost yum.repos.d]# !1048   (用感叹号加上history出来的指令编号就能执行相应编号的指令
docker push 192.168.181.134:5000/mynginxweb:v1.5
The push refers to repository [192.168.181.134:5000/mynginxweb]
355b0d8dba3a: Pushed
54393d713599: Pushed
129ba078f157: Pushed
8c8f1eccd524: Pushed
68442845474f: Pushed
503e53e365f3: Pushed
v1.5: digest: sha256:3601b3c57d30876a61ef8c5b226bf091cd3ffa61b0eae50aba12a172705b67fa size: 1568
可以看到推送成功了
[root@www repositories]# ls
mynginxweb
[root@www repositories]# pwd
/var/lib/registry/docker/registry/v2/repositories
[root@www repositories]#可以看到对端机器上/var/lib/registry/自动生成了我们镜像相对应名字的文件。
[root@www repositories]# cd mynginxweb/
[root@www mynginxweb]# ls
_layers(镜像生成的层目录,这个层就是之前的联合挂载提到的层)  _manifests  _uploads(上传目录)
[root@www sha256]# pwd
/var/lib/registry/docker/registry/v2/repositories/mynginxweb/_layers/sha256
[root@www sha256]# ls
0833c98aa19af703feb3525ba6b7570c63148a9d8cf175711320281e431720dd
389a52582f93c5d83ca4015d27b0088bd84c256f0eac34810cae4d1508a05f1c
496e2dd2b91a449fbf89d6bb7ef65a85cbab272acca2ce39827cba99e4b2b943
6c40cc604d8e4c121adcb6b0bfe8bb038815c350980090e74aa5a6423f8f82c0
76679ad9f124f838aa51b98a34af7d0fa586fba6bf5ec05d452c7a714141180b
d15a52fae68cb0b3ee2c734350046afea18f8d662a6791ac3767941f58a0fda1
f82709aa42ef56cffb4fac78bbbf03e2045faf5fe3f3bad82808bca1b251dd3c
[root@www 0833c98aa19af703feb3525ba6b7570c63148a9d8cf175711320281e431720dd]# pwd
/var/lib/registry/docker/registry/v2/repositories/mynginxweb/_layers/sha256/0833c98aa19af703feb3525ba6b7570c63148a9d8cf175711320281e431720dd
[root@www 0833c98aa19af703feb3525ba6b7570c63148a9d8cf175711320281e431720dd]# ls
link 可以看到这是一个连接文件,真正的文件是在blobs/sha256下面
[root@www sha256]# ls
08  36  38  49  6c  76  d1  f8  可以看到这每一个文件的前两位都对应_layers/sha256下一长串的文件名
[root@www sha256]# pwd
/var/lib/registry/docker/registry/v2/blobs/sha256
我们在134机器上把我们刚才推送的镜像给pull下来
[root@www home]# cat /etc/docker/daemon.json
{
    "registry-mirrors":["https://registry.docker-cn.com"],
    "insecure-registries":["192.168.181.134:5000"]
    因为你pull也是要走网络的,但是docker默认还是https协议,所以想用http下载下来还是要配置134机器daemon.json的配置文件。
}
[root@www home]# docker pull 192.168.181.134:5000/mynginxweb:v1.5  指定要pull的镜像和具体标签。
v1.5: Pulling from mynginxweb
6c40cc604d8e: Pull complete
76679ad9f124: Pull complete
389a52582f93: Pull complete
496e2dd2b91a: Pull complete
f82709aa42ef: Pull complete
0833c98aa19a: Pull complete
Digest: sha256:3601b3c57d30876a61ef8c5b226bf091cd3ffa61b0eae50aba12a172705b67fa
Status: Downloaded newer image for 192.168.181.134:5000/mynginxweb:v1.5
[root@www home]# docker images  可以看到134机器也pull下来了
REPOSITORY                        TAG                 IMAGE ID            CREATED             SIZE
192.168.181.134:5000/mynginxweb   v1.5                d15a52fae68c        25 hours ago        16MB
如果需要参考docker官方的文档可以访问https://docs.docker.com/
一个简单的本地私有仓库的搭建推送下载过程就完成了,当然和dockerhub官方网站不能相比,能支持搜索等功能,其实docker是能支持web。
提到私有仓库不得不提及到的就是CNCF,为了统一云计算接口和相关标准,2015年7月隶属于 Linux 基金会的云原生计算基金会(CNCF)应运而生。谈到 CNCF,首先它是一个非营利组织,致力于通过技术优势和用户价值创造一套新的通用容器技术,推动本土云计算和服务的发展。CNCF关注于容器如何管理而不是如何创建,因为如果没有一个成熟的平台去管理容器,那么大型企业无法真正放心接受并使用容器。
CNCF官方网站:https://www.cncf.io/
CNCF的明星项目就有k8s,Prometheus(专门为云原生提供实时监控的工具),这里面就包含了一个私有仓库服务器软件Harbor,Harbor也是基于docker-registry来做的二次开发,加进去了很多功能,就包含了web的界面
在未来的计算机服务环境会变的越来越复杂,一旦复杂就需要我们把复杂的程序拆解成很多不同的子母单元,众多的子母单元或者模块每天都可能遇到网络抖动出现的延迟,硬件的故障,软件的bug等等出现的一系列问题导致的服务中断,这众多的子母单元的关联和问题的解决还是运维去手动维护几乎是不可能的,一定通过工具来完成。
当你需要快速的启动一环境的时候需要使用k8s的编排工具,那么环境的基础镜像又是要基于docker来完成,docker制作的镜像大多数情况下还是存在私有的registry中,那么私有的registry必然会用到Harbor。目前通过k8s可以实现自动的扩缩容,问题的自动修复,灰度,金丝雀的发布等功能部分已经能实现,那么在未来k8s和Harbor必然会成为主流。
Harbor在单机部署的时候会很麻烦,需要redis等程序的联合使用,所以Harbor也是有镜像的,而且这个镜像是基于docker compose(单机)编排工具来完成的
https://docs.docker.com/compose/
C:Harbor安装和简单使用
Harbor的官网:https://goharbor.io/
github的项目网站:https://github.com/goharbor/harbor/releases
下载harbor的时候需要看下版本相关的文档,避免依赖的环境不能满足安装的需求。

[root@www home]# wget https://storage.googleapis.com/harbor-releases/release-1.6.0/harbor-offline-installer-v1.6.3.tgz
--2019-03-31 20:32:14--  https://storage.googleapis.com/harbor-releases/release-1.6.0/harbor-offline-installer-v1.6.3.tgz
正在解析主机 storage.googleapis.com (storage.googleapis.com)... 216.58.197.112, 2404:6800:4005:809::2010
正在连接 storage.googleapis.com (storage.googleapis.com)|216.58.197.112|:443... 已连接。
已发出 HTTP 请求,正在等待回应... 200 OK
长度:659737336 (629M) [application/x-tar]
正在保存至: “harbor-offline-installer-v1.6.3.tgz”

100%[=====================================================================================>] 659,737,336  593KB/s 用时 39m 23s

2019-03-31 21:11:38 (273 KB/s) - 已保存 “harbor-offline-installer-v1.6.3.tgz” [659737336/659737336])
因为文件比较大,下载会比较慢
下载之后解压然后稍微修改下配置文件:
hostname = www.distribution.com  改成本机的主机名或者ip
max_job_workers = 2  并行运行的进程数量安好环境来适当分派
log_rotate_size = 200M  日志超过200M就需要进行滚动了
harbor_admin_password = 1q2w3e4r  管理员的密码默认是Harbor123,我们改一下
保存安装
[root@www harbor]# ./install.sh

[Step 0]: checking installation environment ...

Note: docker version: 18.09.4
? Need to install docker-compose(1.7.1+) by yourself first and run this script again.
执行安装脚本的时候会提醒需要安装docker-compose(1.7.1+)或以上的版本,docker-compose是在epel源里面的,可以通过阿里云的仓库去安装epel源
[root@www harbor]# ./install.sh 执行install脚本

[Step 0]: checking installation environment ...

Note: docker version: 18.09.4

Note: docker-compose version: 1.18.0

[Step 1]: loading Harbor images ...
4de51055f30c: Loading layer [==================================================>]  133.2MB/133.2MB
e0571faef8b9: Loading layer [==================================================>]  23.38MB/23.38MB
af771ff8e9c2: Loading layer [==================================================>]  26.88MB/26.88MB
23af616ab835: Loading layer [==================================================>]  7.168kB/7.168kB
bc63d511139a: Loading layer [==================================================>]  11.32MB/11.32MB
c58849213c99: Loading layer [==================================================>]  26.87MB/26.87MB
Loaded image: goharbor/harbor-ui:v1.6.3
69a7338cd264: Loading layer [==================================================>]  23.38MB/23.38MB
f90eaaa05b41: Loading layer [==================================================>]  21.15MB/21.15MB
44d04c9c1fb6: Loading layer [==================================================>]  21.15MB/21.15MB
Loaded image: goharbor/harbor-jobservice:v1.6.3
f3046fec63a0: Loading layer [==================================================>]  23.38MB/23.38MB
bb409c51bc96: Loading layer [==================================================>]  10.95MB/10.95MB
.....可以看到装载了很多镜像。
[Step 3]: checking existing instance of Harbor ...

Creating registry ... done
Creating harbor-ui ... done
Creating network "harbor_harbor" with the default driver
Creating nginx ... done
Creating harbor-db ...
Creating harbor-adminserver ...
Creating registry ...
Creating redis ...
Creating harbor-ui ...
Creating harbor-jobservice ...
Creating nginx ...

? ----Harbor has been installed and started successfully.----

Now you should be able to visit the admin portal at http://www.distribution.com.
For more details, please visit https://github.com/goharbor/harbor .
[root@www harbor]# ss -tnl
State       Recv-Q Send-Q                  Local Address:Port                                 Peer Address:Port
LISTEN      0      128                         127.0.0.1:1514                                            *:*
LISTEN      0      128                                 *:111                                             *:*
LISTEN      0      128                                 *:6000                                            *:*
LISTEN      0      5                       192.168.122.1:53                                              *:*
LISTEN      0      128                                 *:22                                              *:*
LISTEN      0      128                         127.0.0.1:631                                             *:*
LISTEN      0      100                         127.0.0.1:25                                              *:*
LISTEN      0      128                         127.0.0.1:6010                                            *:*
LISTEN      0      128                         127.0.0.1:6011                                            *:*
LISTEN      0      128                                :::111                                            :::*
LISTEN      0      128                                :::80                                             :::*
LISTEN      0      128                                :::6000                                           :::*
LISTEN      0      128                                :::22                                             :::*
LISTEN      0      128                               ::1:631                                            :::*
LISTEN      0      100                               ::1:25                                             :::*
LISTEN      0      128                               ::1:6010                                           :::*
LISTEN      0      128                                :::443                                            :::*
LISTEN      0      128                                :::4443                                           :::*
LISTEN      0      128                               ::1:6011                                           :::*
同时监听了物理机的80,443和4443的端口
安装完成之后就启动了,可以登录网页进行访问了。
使用admin登录网站

使用在harbor.cfg配置文件里面定义好的密码登录harbor。
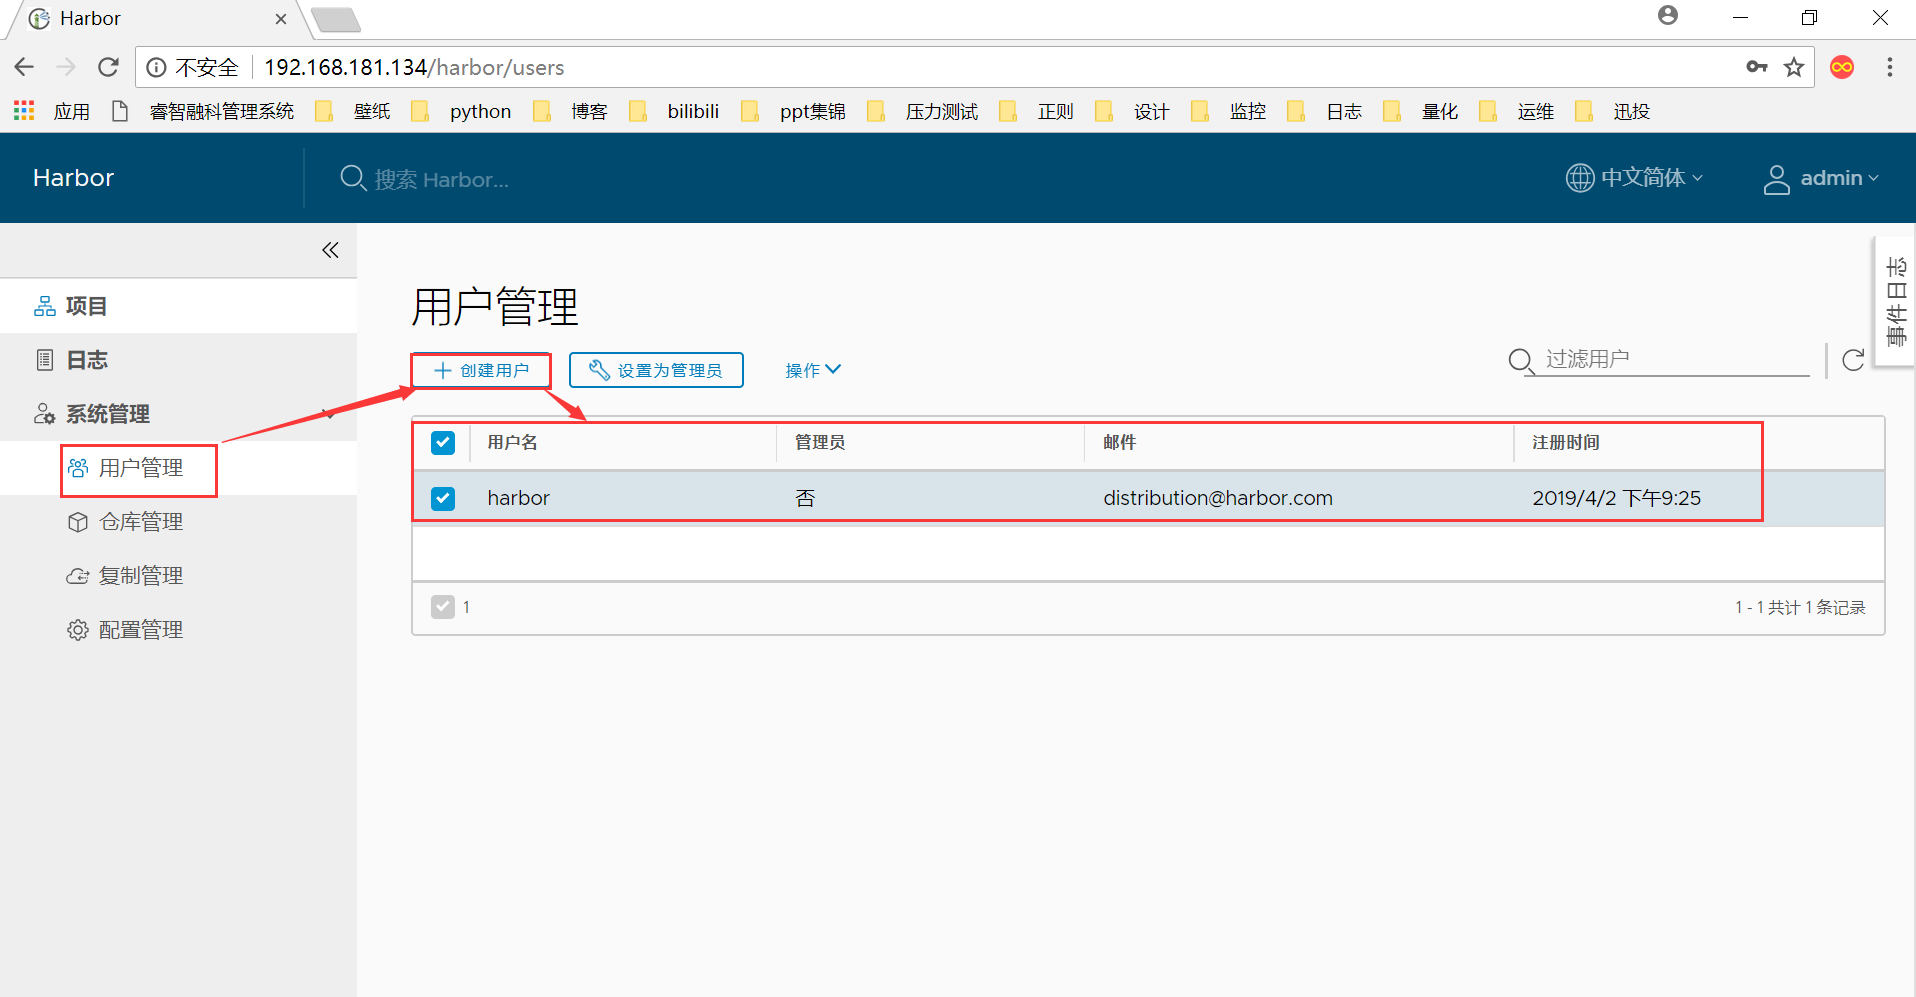
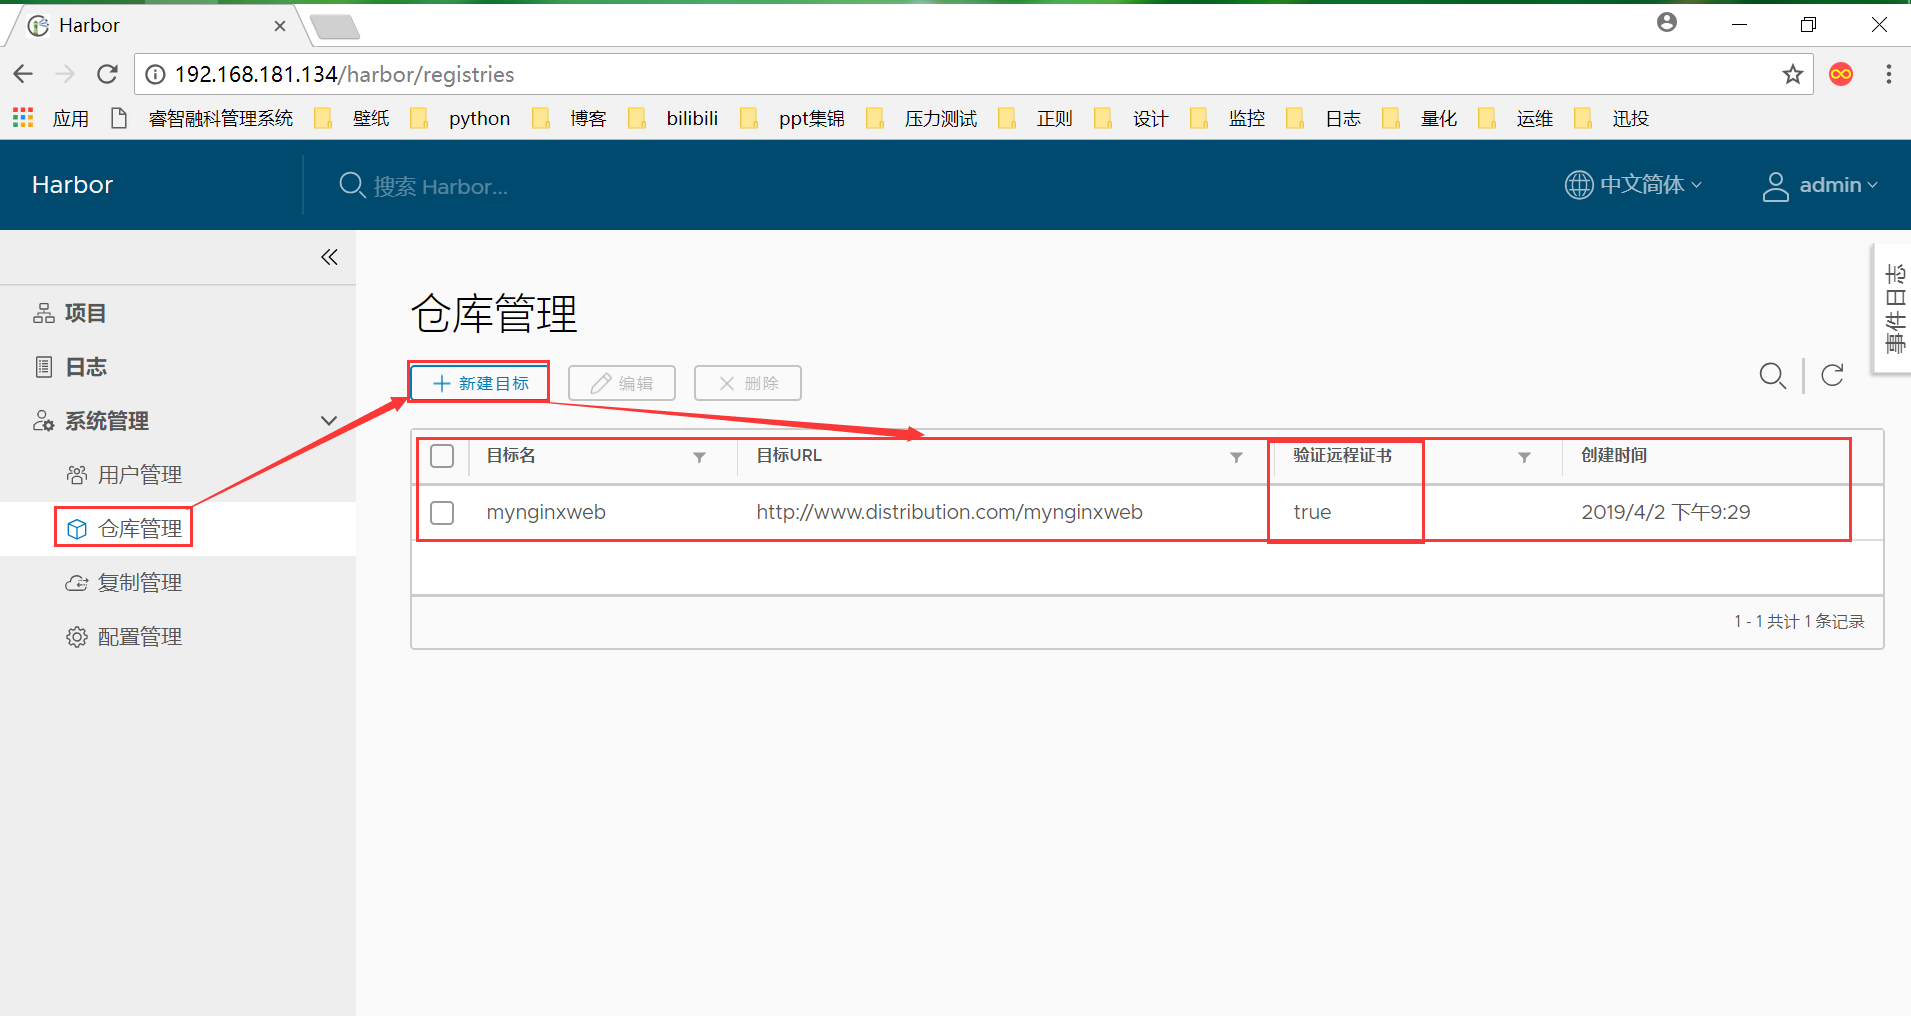
创建用户和仓库
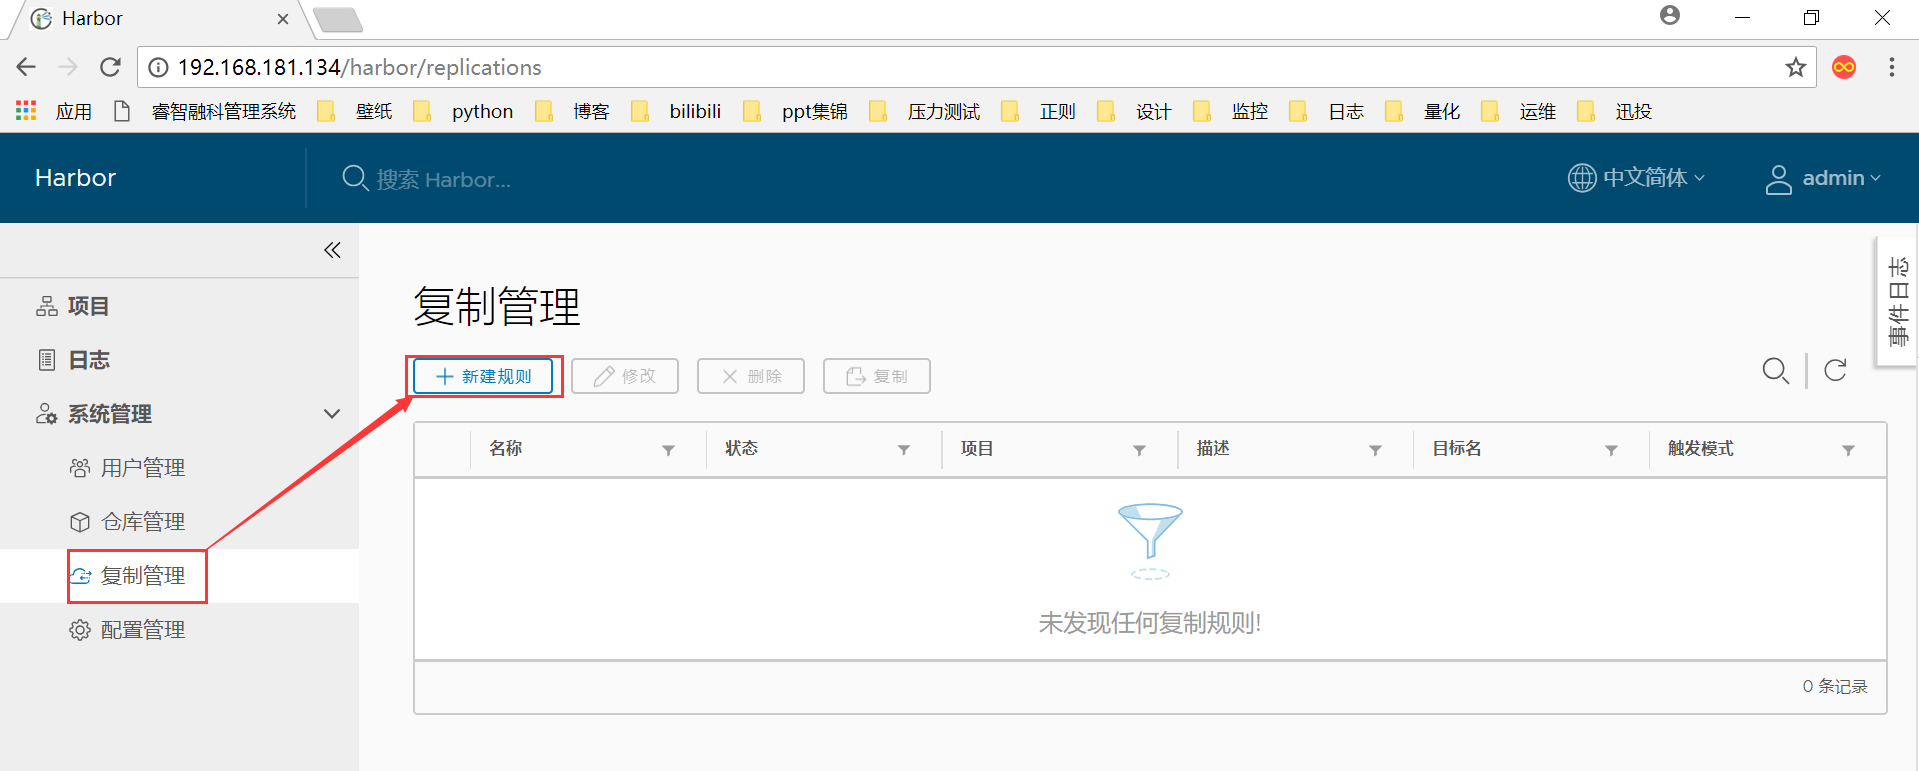
harbor原生支持镜像的复制,只需要配置规则就能把一个harbor上镜像复制到其它的备份环境。
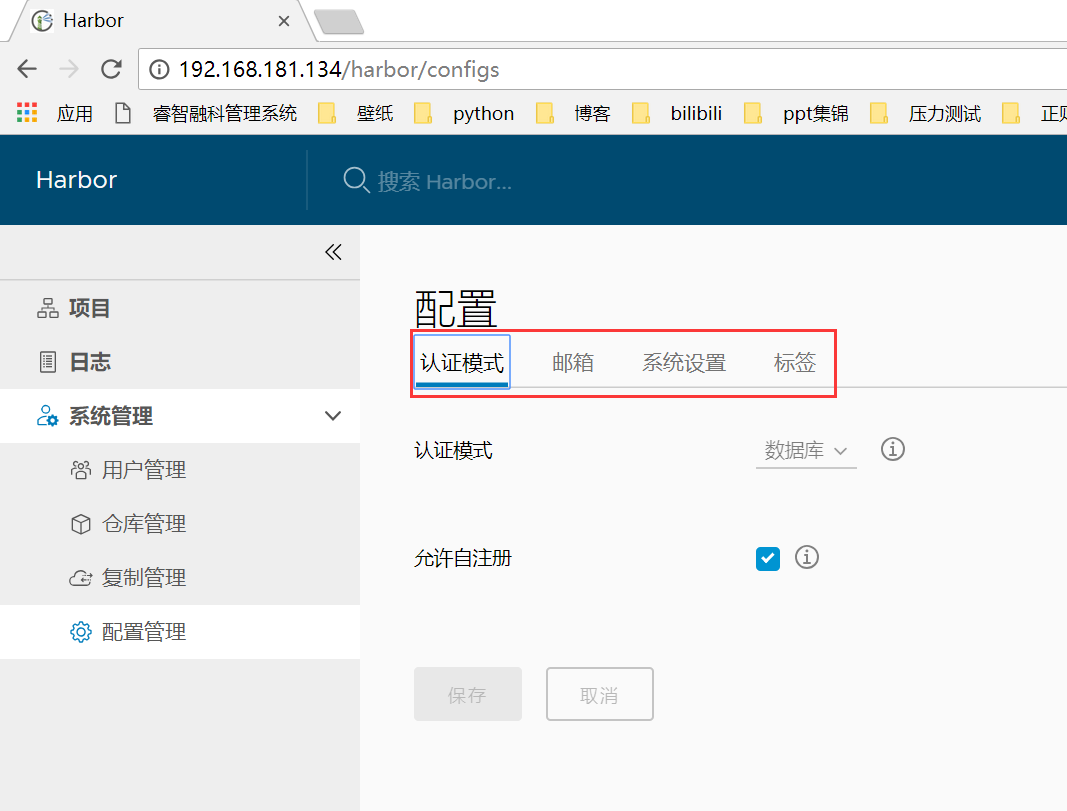
支持配置邮件,谁上传了镜像下载了镜像都可以通过邮件通知

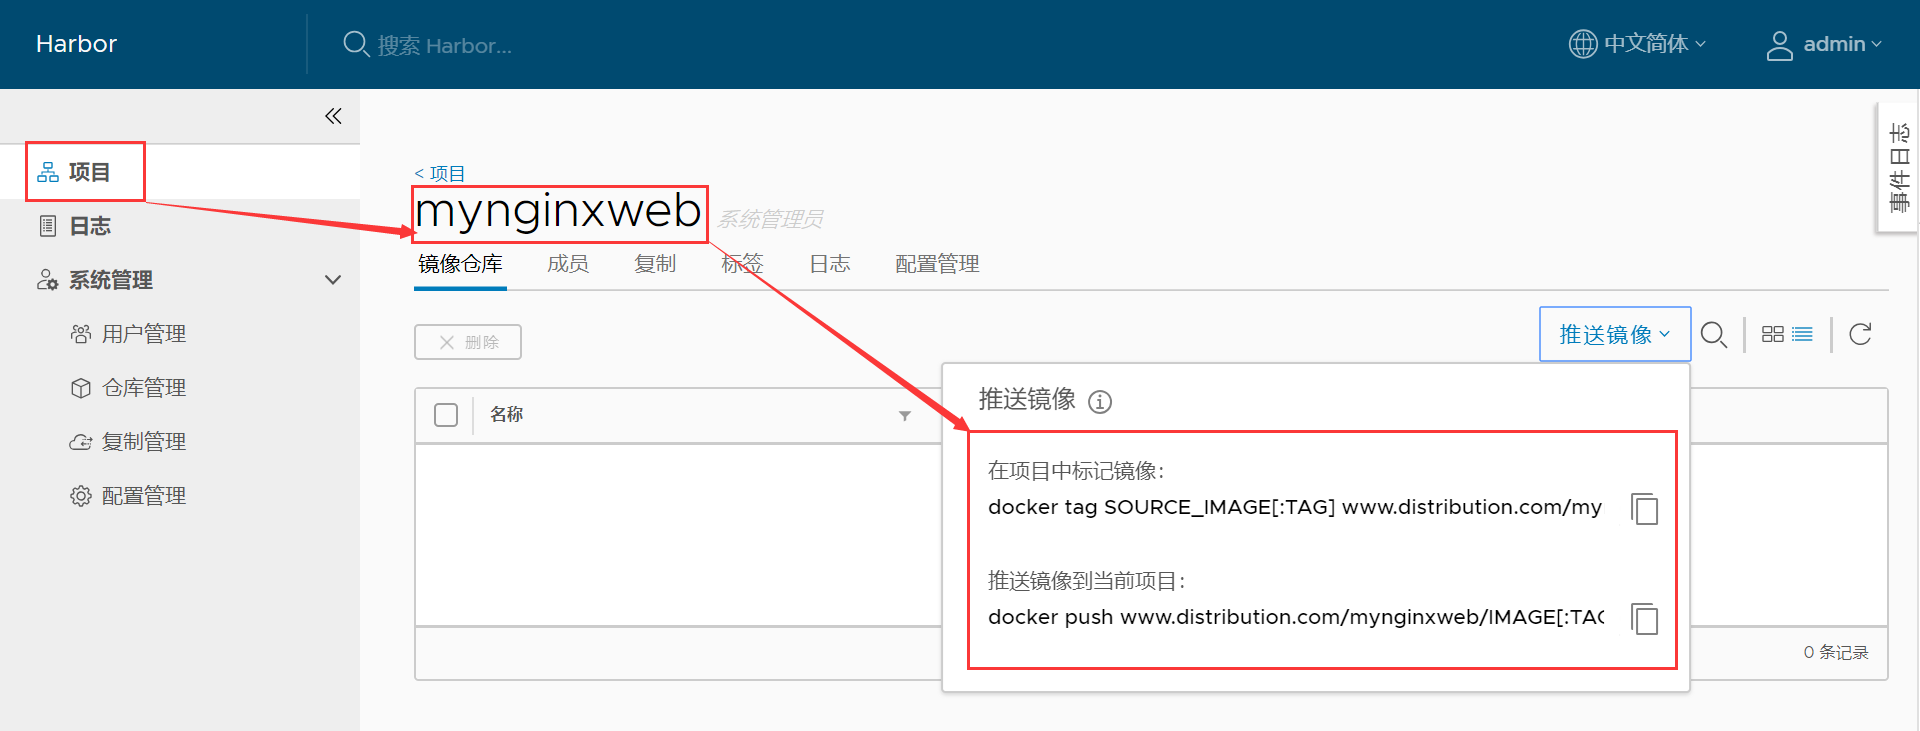
可以看到harbor能提示你给要push的镜像打包的命令和push的方法。

[root@www harbor]# pwd
/home/harbor/harbor
[root@www harbor]# ls
common                          docker-compose.clair.yml   docker-compose.yml  harbor.cfg            install.sh  NOTICE               prepare
docker-compose.chartmuseum.yml  docker-compose.notary.yml  ha                  harbor.v1.6.3.tar.gz  LICENSE     open_source_license
到docker-compose.yml所在的路径下执行相应的命令即可
[root@www harbor]# docker-compose stop
Stopping harbor-log ... done
[root@www harbor]# docker-compose start
Starting log         ... done
Starting registry    ... done
Starting redis       ... done
Starting adminserver ... done
Starting postgresql  ... done
Starting ui          ... done
Starting jobservice  ... done
Starting proxy       ... done
[root@www harbor]# docker-compose --help
Commands:
  build              Build or rebuild services
  bundle             Generate a Docker bundle from the Compose file
  config             Validate and view the Compose file
  create             Create services
  down               Stop and remove containers, networks, images, and volumes
  events             Receive real time events from containers
  exec               Execute a command in a running container
  help               Get help on a command
  images             List images
  kill               Kill containers
  logs               View output from containers
  pause              Pause services
  port               Print the public port for a port binding
  ps                 List containers
  pull               Pull service images
  push               Push service images
  restart            Restart services
  rm                 Remove stopped containers
  run                Run a one-off command
  scale              Set number of containers for a service
  start              Start services
  stop               Stop services
  top                Display the running processes
  unpause            Unpause services
  up                 Create and start containers
  version            Show the Docker-Compose version information
[root@www harbor]#

[root@www harbor]# docker push 192.168.181.134/mynginxweb/mynginxweb:v1.1
The push refers to repository [192.168.181.134/mynginxweb/mynginxweb]
355b0d8dba3a: Preparing
54393d713599: Preparing
129ba078f157: Preparing
8c8f1eccd524: Preparing
68442845474f: Preparing
503e53e365f3: Waiting
denied: requested access to the resource is denied
如果没有登录的话是不能推送镜像到仓库的,需要登录做认证之后才能推送
[root@www harbor]# docker login 192.168.181.134
Username: harbor
Password:
WARNING! Your password will be stored unencrypted in /root/.docker/config.json.
Configure a credential helper to remove this warning. See
https://docs.docker.com/engine/reference/commandline/login/#credentials-store

Login Succeeded
[root@www harbor]# docker push 192.168.181.134/mynginxweb/mynginxweb:v1.1
The push refers to repository [192.168.181.134/mynginxweb/mynginxweb]
355b0d8dba3a: Pushed
54393d713599: Pushed
129ba078f157: Pushed
8c8f1eccd524: Pushed
68442845474f: Pushed
503e53e365f3: Pushed
v1.1: digest: sha256:3601b3c57d30876a61ef8c5b226bf091cd3ffa61b0eae50aba12a172705b67fa size: 1568
登录之后推送就没有问题了
[root@www harbor]#
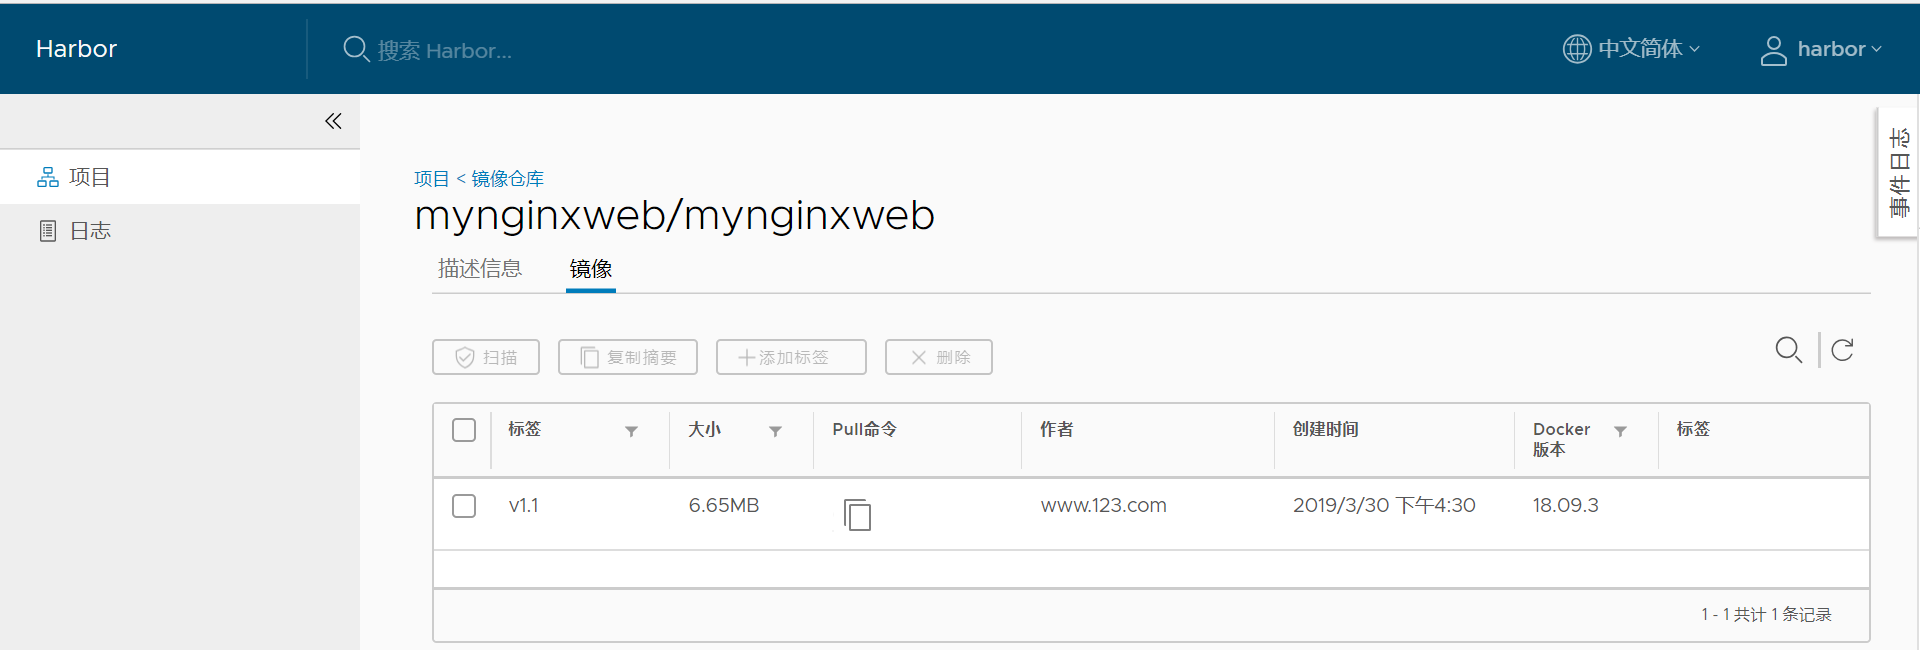
可以看到仓库就能查询到我们刚才推送的镜像了。
♣八:portainer的安装和使用
A:portainer安装和简单使用
portainer是一个强大的docker容器,镜像管理web平台,能更加直观的看到容器的相关信息,例如资源信息,卷,网路,通过网页快速链接容器执行相应的命令等。更加方便。
portainer官方网站:https://www.portainer.io/products-services/
portainer支持linux和windows平台。
portainer安装极为简单,可以参照官方文档进行安装:https://www.portainer.io/installation/,当然前提是你安装了docker并启动了。

$ docker volume create portainer_data
$ docker run -d -p 9000:9000 -v /var/run/docker.sock:/var/run/docker.sock -v portainer_data:/data portainer/portainer
[root@www home]# ss -tnl | grep 9000
LISTEN     0      128         :::9000                    :::*
[root@www home]#
监听的是9000端口,然后就可以通过网页访问了。
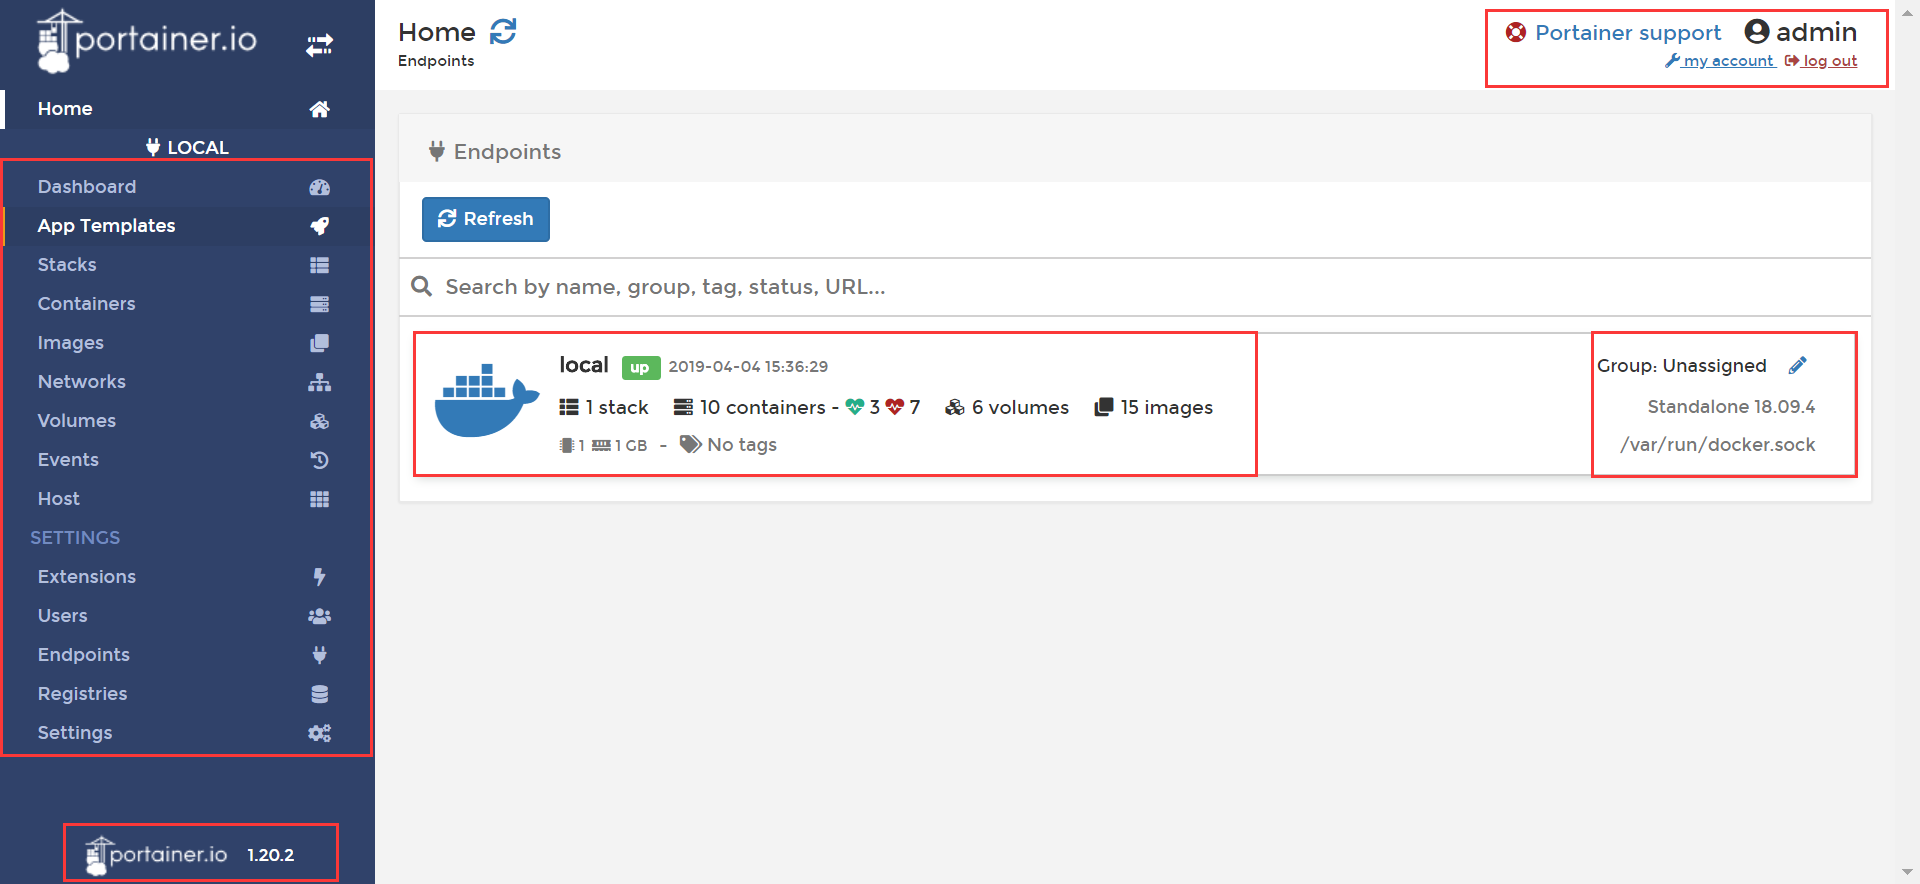
安装之后登陆界面会提示先注册admin用户,然后还可以选择是本地的还是远程的形式去管理,登陆界面之后我们就能看到服务器上的相关信息了,菜单栏分为三大块,1:是home目录,汇总概括显示机器相关的信息,2:容器相关每一个具体信息的查询菜单,3:设置项菜单,可以创建用户,用户组,添加扩展,做快照,添加模板等功能。


可以快速查询当前容器的资源使用情况,使用什么用户执行了什么命令等。
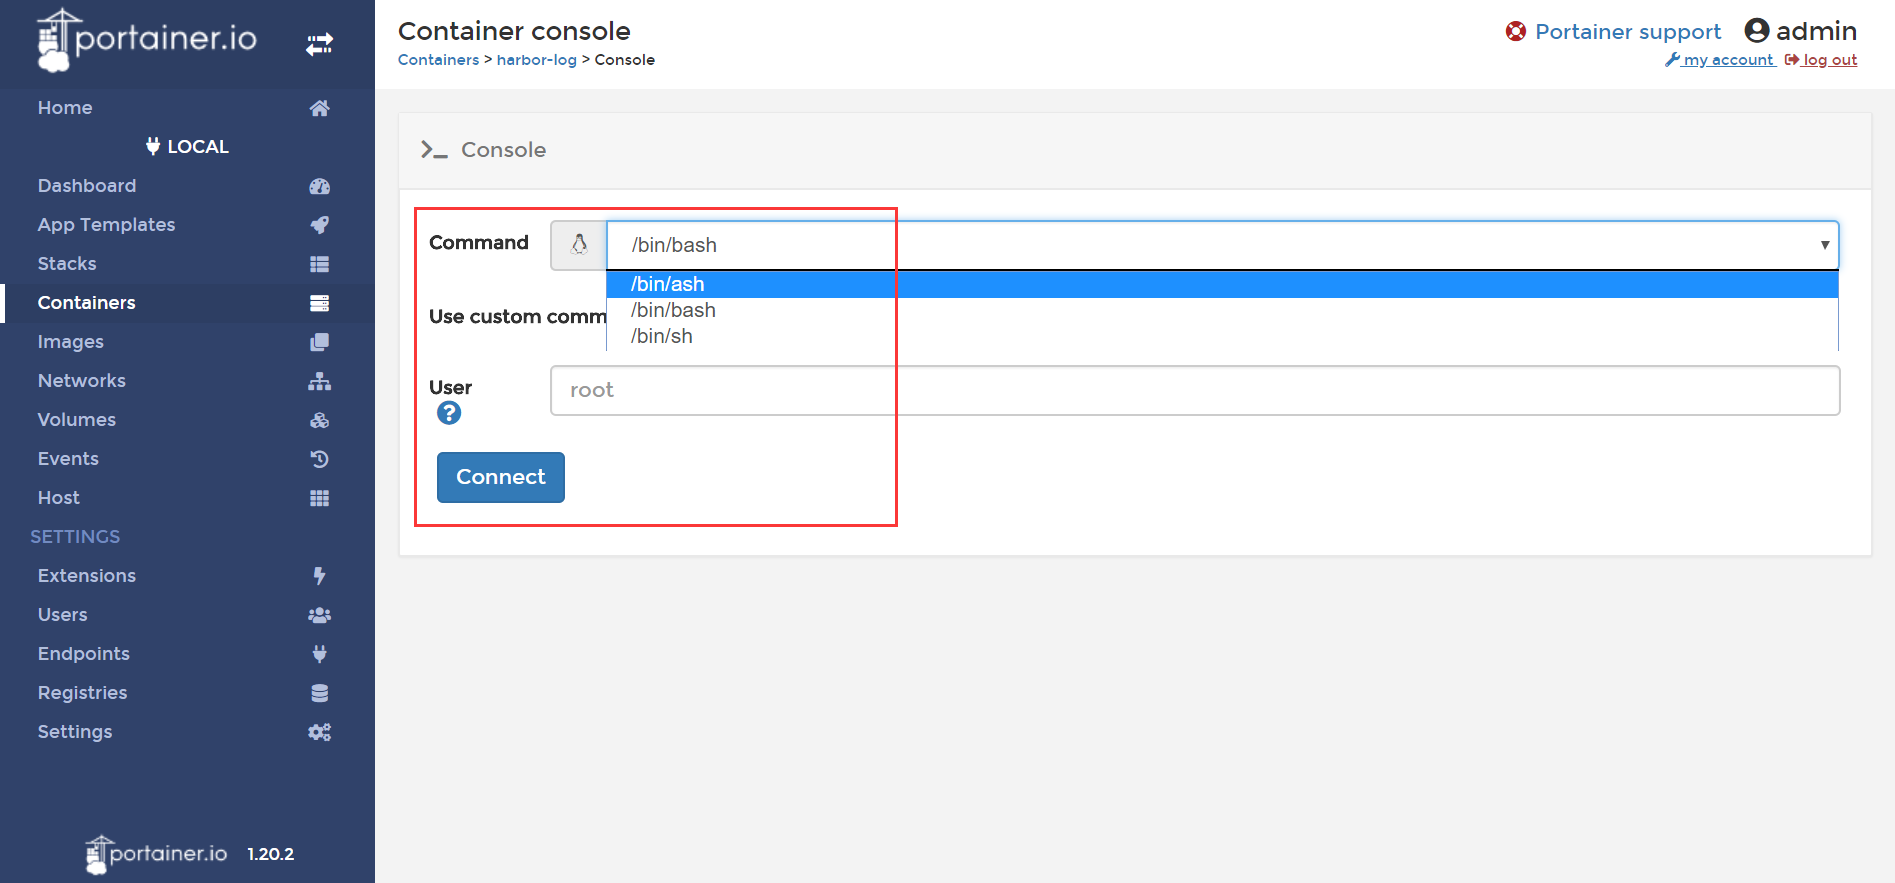
还可以通过sh环境去连接容器执行命令
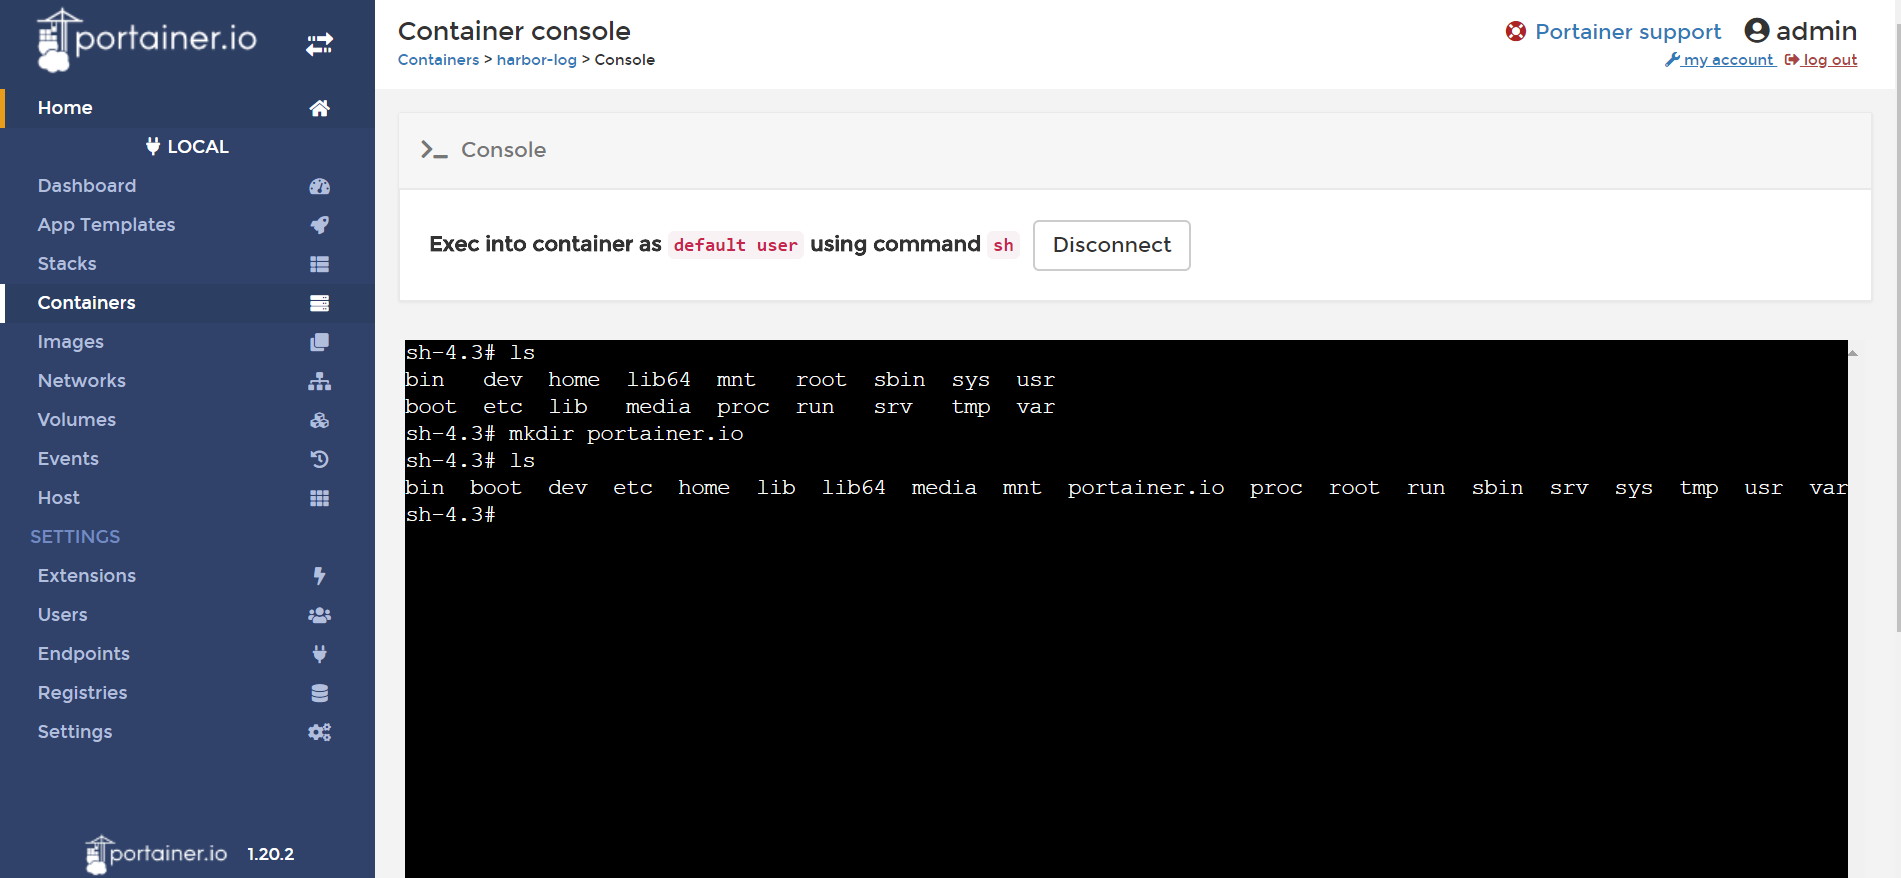
方便用户快速链接容器执行命令。

快速查看容器的相关信息,和在命令行执行docker info的命令结果类似。

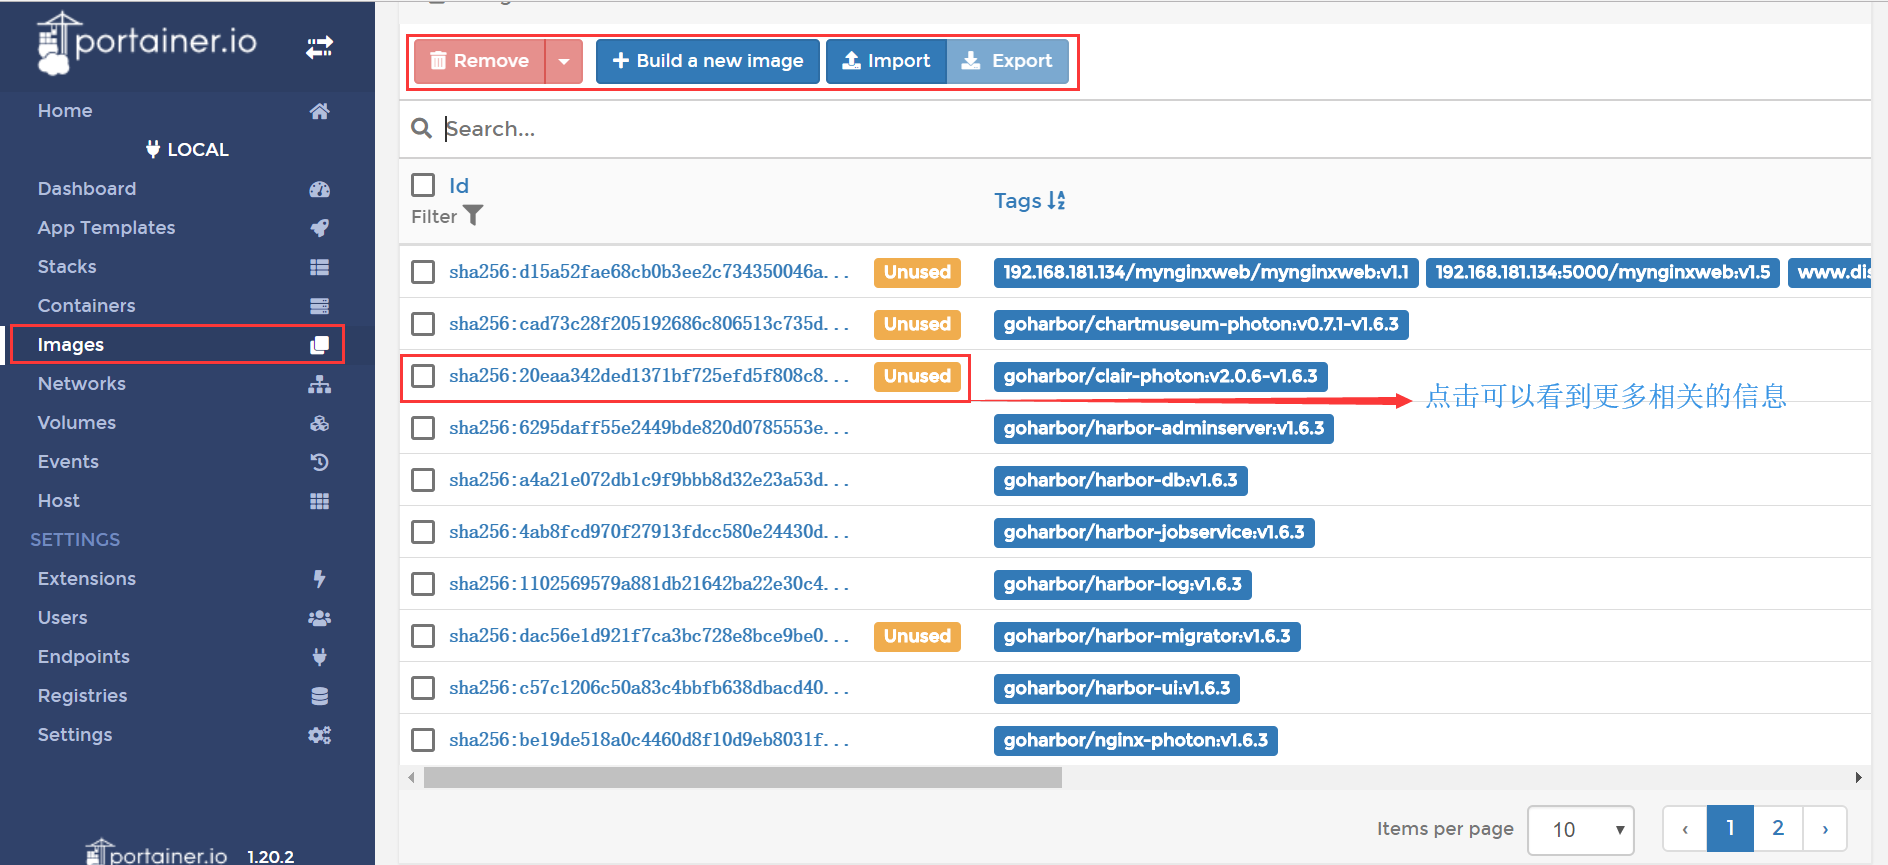
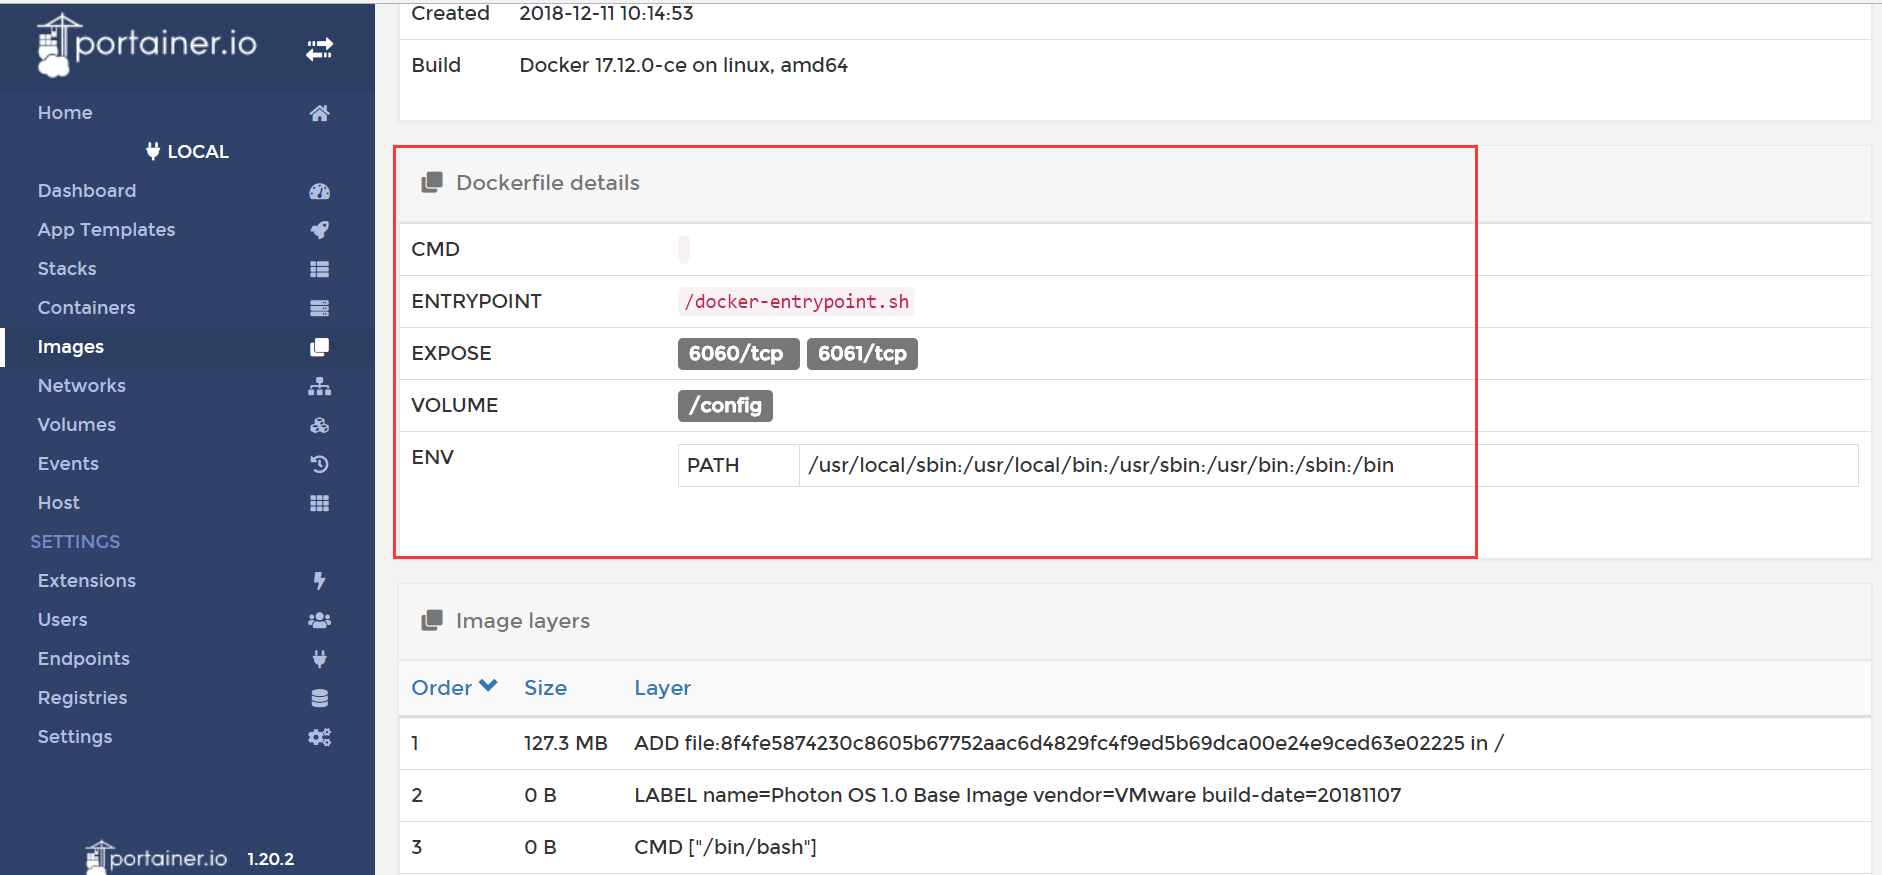
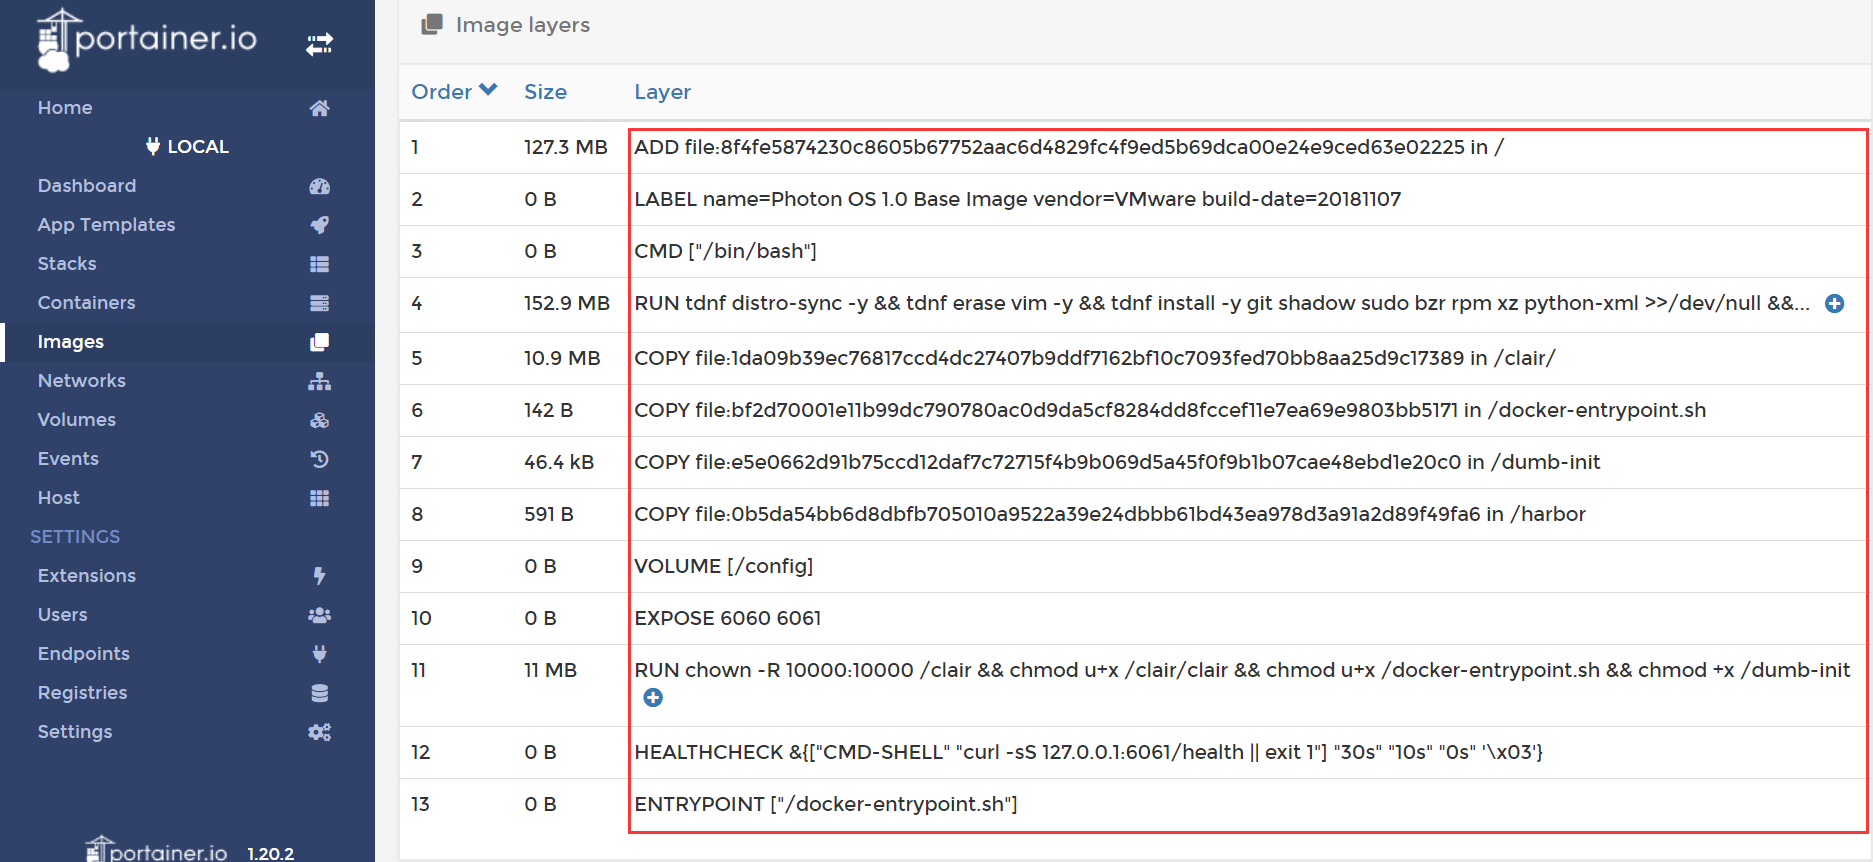
可以看书查看容器的dockerfile的编写命令。
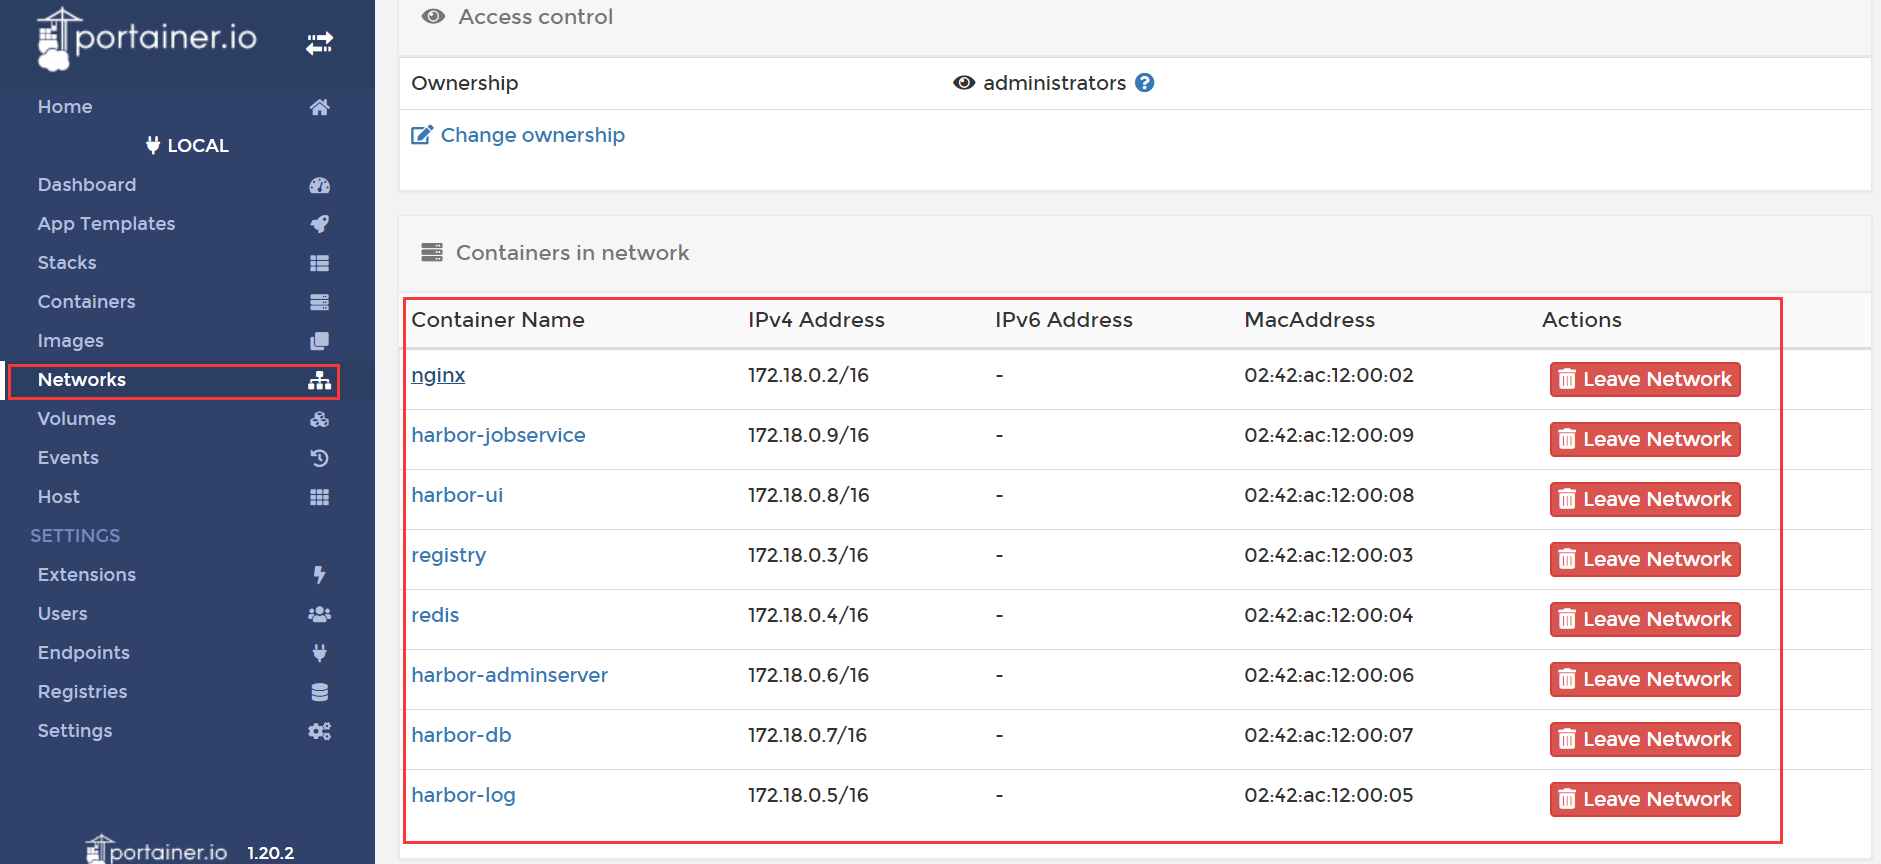
方便快速查看容器的网络。
至于portainer更多的使用方法可以参照官方的文档来查询:https://www.portainer.io/overview/
posted on 2019-04-05 20:35 ppc_server 阅读(2122) 评论(0) 编辑 收藏 举报


