
SpringCloud Finchley基础教程:2,注册中心eureka和配置中心config
版权声明:本文为博主原创文章,未经博主允许不得转载。 https://blog.csdn.net/ifrozen/article/details/80009208
1. 注册中心eureka
1.1 eureka server
1,引入pom依赖
<dependency>
    <groupId>org.springframework.cloud</groupId>
    <artifactId>spring-cloud-starter-netflix-eureka-server</artifactId>
</dependency>
2,启动类上加@EnableEurekaServer注解
@SpringCloudApplication
@EnableEurekaServer //启动一个服务注册中心提供给其他应用进行对话
public class Application {

    public static void main(String[] args) {
        //new SpringApplicationBuilder(ServiceRegistryApplication.class).web(true).run(args);
        SpringApplication.run(Application.class, args);
    }

}
3,加上properties配置
spring:
  application:
    name: scfl-eureka-server
#---------------------------------------------------------------------
server:
  port: 50000
#---------------------------------------------------------------------
eureka:
  instance:
    prefer-ip-address: true
    status-page-url-path: /actuator/info #eureka注册中心的url link
    health-check-url-path: /actuator/health #健康检查的url
    hostname: localhost
  client:
    register-with-eureka: true #是否注册到注册中心
    fetch-registry: false #是否从注册中心拉取注册服务列表
    service-url:
      defaultZone: http://localhost:50000/eureka/
1.2 eureka client
1,引入pom依赖
<dependency>
    <groupId>org.springframework.cloud</groupId>
    <artifactId>spring-cloud-starter-netflix-eureka-client</artifactId>
</dependency>
2,启动类上加@EnableDiscoveryClient注解
@SpringCloudApplication已经包含@EnableDiscoveryClient注解
@SpringCloudApplication
public class Application {

    public static void main(String[] args) {
        //new SpringApplicationBuilder(ServiceRegistryApplication.class).web(true).run(args);
        SpringApplication.run(Application.class, args);
    }

}
3,加上properties配置
spring:
  application:
    name: scfl-comm-jdbc

server:
  port: 50001
  servlet:
    context-path: /jdbc

eureka:
  instance:
    prefer-ip-address: true
    status-page-url-path: /actuator/info
    health-check-url-path: /actuator/health
  client:
    register-with-eureka: true
    fetch-registry: true
    service-url:
      defaultZone: http://localhost:50000/eureka/
2. 配置中心config
2.1 config server
1,引入pom依赖
<dependency>
    <groupId>org.springframework.cloud</groupId>
    <artifactId>spring-cloud-config-server</artifactId>
</dependency>
2,启动类上加@EnableConfigServer注解
@SpringCloudApplication
@EnableConfigServer
public class Application {

    public static void main(String[] args) {
        SpringApplication.run(Application.class, args);
    }

}
3,加上properties配置,可以从local,git,svn取配置文件
git
spring.cloud.config.server.git.uri=http://git.oschina.net/didispace/SpringCloud-Learning/
spring.cloud.config.server.git.searchPaths=Chapter1-1-8/config-repo
spring.cloud.config.server.git.username=username
spring.cloud.config.server.git.password=password
本地
#Config Server会默认从应用的src/main/resource目录下检索配置文件
spring.profiles.active=native
#指定配置文件的位置
spring.cloud.config.server.native.searchLocations=file:F:/properties/
2.2 config client
1,引入pom依赖
<dependency>
    <groupId>org.springframework.cloud</groupId>
    <artifactId>spring-cloud-starter-config</artifactId>
</dependency>
2,不需要单独的启动注解
3,加上properties配置
通过config server的service id来去配置
spring.cloud.config.name=${spring.application.name},db,redis,rabbitmq
#spring.cloud.config.profile=${spring.profiles.active}

#spring.cloud.config.uri=http://localhost:7001/
spring.cloud.config.discovery.enabled=true
spring.cloud.config.discovery.serviceId=config-server

eureka.client.serviceUrl.defaultZone=http://localhost:1111/eureka/
配置文件加载顺序,先加载配置中心的{name}-{profile}.yml,再加载本项目的application.yml,如果遇到重名的key,会以第一个为准。
3. 配置文件动态刷新bus
1,引入pom依赖
<dependency>
    <groupId>org.springframework.boot</groupId>
    <artifactId>spring-boot-starter-actuator</artifactId>
</dependency>
<dependency>
    <groupId>org.springframework.cloud</groupId>
    <artifactId>spring-cloud-starter-bus-amqp</artifactId>
</dependency>
spring-boot-starter-actuator包含刷新端点
spring-cloud-starter-bus-amqp可以通过rabbitmq通知所有config client重新获取配置文件
2,不需要单独的启动注解
3,加上properties配置
#开启端点以及跨域,默认web只开启了health和info
management:
  endpoints:
    web:
      exposure:
        include: "*"
      cors:
        allowed-origins: "*"
        allowed-methods: "*"
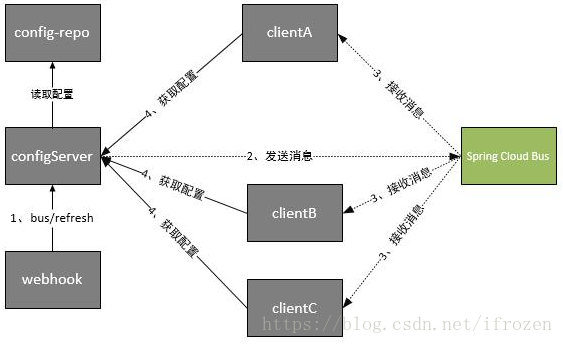
4,通过curl -X POST http://ip:port/context-path//actuator/bus-refresh来动态重新获取配置文件内容即可
5,bus流程图
4. spring cloud常用的starter
| Name | Description |
|---|---|
| spring-cloud-starter-config | config客户端 |
| spring-cloud-config-server | @EnableConfigServer |
| spring-cloud-starter-bus-amqp | /bus/refresh |
| spring-cloud-starter-bus-kafka | /bus/refresh |
| spring-cloud-starter-netflix-eureka-client | eureka-client |
| spring-cloud-starter-netflix-eureka-server | @EnableEurekaServer eureka-server |
| spring-cloud-starter-netflix-hystrix | @EnableCircuitBreaker hystrix |
| spring-cloud-starter-netflix-hystrix-dashboard | @EnableHystrixDashboard /hystrix |
| spring-cloud-starter-netflix-turbine | @EnableTurbine |
| spring-cloud-starter-netflix-ribbon | .ribbon.* |
| spring-cloud-starter-netflix-zuul | zuul |
| spring-cloud-starter-openfeign | @EnableFeignClients @FeignClient(“stores”) |
| spring-cloud-starter-sleuth | sleuth |
| spring-cloud-starter-zipkin | zipkin |
| pring-cloud-starter-gateway | gateway |

 浙公网安备 33010602011771号