SpringBoot整合Elasticsearch
学习本章内容的前提:
1.能独立搭建SpringBoot项目。(SpringBoot的快速入门)
2.Elasticsearch环境搭建完毕。(Elasticsearch环境搭建和介绍(Windows))
1 前奏
Elasticsearch提供的Java客户端有一些不太方便的地方:
- 很多地方需要拼接Json字符串,在java中拼接字符串有多恐怖你应该懂的
- 需要自己把对象序列化为json存储
- 查询到结果也需要自己反序列化为对象
因此,我们这里就不讲解原生的Elasticsearch客户端API了。
而是学习Spring提供的套件:Spring Data Elasticsearch
1.1 简介
Spring Data Elasticsearch是Spring Data项目下的一个子模块。
查看 Spring Data的官网:http://projects.spring.io/spring-data/

Spring Data 的使命是给各种数据访问提供统一的编程接口,不管是关系型数据库(如MySQL),还是非关系数据库(如Redis),或者类似Elasticsearch这样的索引数据库。从而简化开发人员的代码,提高开发效率。
包含很多不同数据操作的模块:

Spring Data Elasticsearch的页面:https://projects.spring.io/spring-data-elasticsearch/

特征:
- 支持Spring的基于
@Configuration的java配置方式,或者XML配置方式 - 提供了用于操作ES的便捷工具类
ElasticsearchTemplate。包括实现文档到POJO之间的自动智能映射。 - 利用Spring的数据转换服务实现的功能丰富的对象映射
- 基于注解的元数据映射方式,而且可扩展以支持更多不同的数据格式
- 根据持久层接口自动生成对应实现方法,无需人工编写基本操作代码(类似mybatis,根据接口自动得到实现)。当然,也支持人工定制查询
1.2 Elasticsearch基本概念
Elasticsearch也是基于Lucene的全文检索库,本质也是存储数据,很多概念与MySQL类似的。
对比关系:
索引库(indices)--------------------------------Databases 数据库
类型(type)-----------------------------Table 数据表

     文档(Document)----------------Row 行

	   字段(Field)-------------------Columns 列
详细说明:
| 概念 | 说明 |
|---|---|
| 索引库(indices) | indices是index的复数,代表许多的索引, |
| 类型(type) | 类型是模拟mysql中的table概念,一个索引库下可以有不同类型的索引,比如商品索引,订单索引,其数据格式不同。不过这会导致索引库混乱,因此未来版本中会移除这个概念 |
| 文档(document) | 存入索引库原始的数据。比如每一条商品信息,就是一个文档 |
| 字段(field) | 文档中的属性 |
| 映射配置(mappings) | 字段的数据类型、属性、是否索引、是否存储等特性 |
是不是与Lucene中的概念类似。
另外,在Elasticsearch有一些集群相关的概念:
- 索引集(Indices,index的复数):逻辑上的完整索引
- 分片(shard):数据拆分后的各个部分
- 副本(replica):每个分片的复制
注意:
Elasticsearch本身就是分布式的,因此即便你只有一个节点,Elasticsearch默认也会对你的数据进行分片和副本操作,当你向集群添加新数据时,数据也会在新加入的节点中进行平衡。
2.1 创建SpringBoot 项目
首先我们要新建一个SpringBoot项目,再进行Elasticsearch的整合。
pom依赖:
<?xml version="1.0" encoding="UTF-8"?>
<project xmlns="http://maven.apache.org/POM/4.0.0" xmlns:xsi="http://www.w3.org/2001/XMLSchema-instance"
         xsi:schemaLocation="http://maven.apache.org/POM/4.0.0 http://maven.apache.org/xsd/maven-4.0.0.xsd">
    <modelVersion>4.0.0</modelVersion>

    <groupId>com.czxy</groupId>
    <artifactId>es-demo</artifactId>
    <version>0.0.1-SNAPSHOT</version>
    <packaging>jar</packaging>

    <name>es-demo</name>
    <description>Demo project for Spring Boot</description>

    <parent>
        <groupId>org.springframework.boot</groupId>
        <artifactId>spring-boot-starter-parent</artifactId>
        <version>2.0.4.RELEASE</version>
        <relativePath/>
    </parent>

    <properties>
        <project.build.sourceEncoding>UTF-8</project.build.sourceEncoding>
        <project.reporting.outputEncoding>UTF-8</project.reporting.outputEncoding>
        <java.version>1.8</java.version>
    </properties>

    <dependencies>
        <dependency>
            <groupId>org.springframework.boot</groupId>
            <artifactId>spring-boot-starter</artifactId>
        </dependency>

        <!-- elasticsearch启动器 (必须)-->
        <dependency>
            <groupId>org.springframework.boot</groupId>
            <artifactId>spring-boot-starter-data-elasticsearch</artifactId>
        </dependency>
        <dependency>
            <groupId>org.springframework.boot</groupId>
            <artifactId>spring-boot-starter-test</artifactId>
            <scope>test</scope>
        </dependency>
    </dependencies>

    <build>
        <plugins>
            <plugin>
                <groupId>org.springframework.boot</groupId>
                <artifactId>spring-boot-maven-plugin</artifactId>
            </plugin>
        </plugins>
    </build>


</project>
application.properties文件配置:
## Elasticsearch配置文件(必须)
## 该配置和Elasticsearch的elasticsearch.yml中的配置信息有关

spring.data.elasticsearch.cluster-name=my-application
spring.data.elasticsearch.cluster-nodes=127.0.0.1:9300
Elasticsearch的elasticsearch.yml中的配置信息如下:
# ======================== Elasticsearch Configuration =========================
#
# NOTE: Elasticsearch comes with reasonable defaults for most settings.
#       Before you set out to tweak and tune the configuration, make sure you
#       understand what are you trying to accomplish and the consequences.
#
# The primary way of configuring a node is via this file. This template lists
# the most important settings you may want to configure for a production cluster.
#
# Please consult the documentation for further information on configuration options:
# https://www.elastic.co/guide/en/elasticsearch/reference/index.html
#
# ---------------------------------- Cluster -----------------------------------
#
# Use a descriptive name for your cluster:
#
cluster.name: my-application
#
# ------------------------------------ Node ------------------------------------
#
# Use a descriptive name for the node:
#
node.name: node-1
#
# Add custom attributes to the node:
#
#node.attr.rack: r1
#
# ----------------------------------- Paths ------------------------------------
#
# Path to directory where to store the data (separate multiple locations by comma):
#
#path.data: /path/to/data
#
# Path to log files:
#
#path.logs: /path/to/logs
#
# ----------------------------------- Memory -----------------------------------
#
# Lock the memory on startup:
#
#bootstrap.memory_lock: true
#
# Make sure that the heap size is set to about half the memory available
# on the system and that the owner of the process is allowed to use this
# limit.
#
# Elasticsearch performs poorly when the system is swapping the memory.
#
# ---------------------------------- Network -----------------------------------
#
# Set the bind address to a specific IP (IPv4 or IPv6):
#
network.host: 0.0.0.0
#
# Set a custom port for HTTP:
#
http.port: 9200
#
# For more information, consult the network module documentation.
#
# --------------------------------- Discovery ----------------------------------
#
# Pass an initial list of hosts to perform discovery when new node is started:
# The default list of hosts is ["127.0.0.1", "[::1]"]
#
#discovery.zen.ping.unicast.hosts: ["host1", "host2"]
#
# Prevent the "split brain" by configuring the majority of nodes (total number of master-eligible nodes / 2 + 1):
#
#discovery.zen.minimum_master_nodes:
#
# For more information, consult the zen discovery module documentation.
#
# ---------------------------------- Gateway -----------------------------------
#
# Block initial recovery after a full cluster restart until N nodes are started:
#
#gateway.recover_after_nodes: 3
#
# For more information, consult the gateway module documentation.
#
# ---------------------------------- Various -----------------------------------
#
# Require explicit names when deleting indices:
#
#action.destructive_requires_name: true

http.cors.enabled: true
http.cors.allow-origin: "*"
node.master: true
node.data: true
2.2 索引操作
2.2.1 创建索引和映射
SpringBoot-data-elasticsearch提供了面向对象的方式操作elasticsearch
业务:创建一个商品对象,有这些属性:
id,title,category,brand,price,图片地址

在SpringDataElasticSearch中,只需要操作对象,就可以操作elasticsearch中的数据
实体类
首先我们准备好实体类:
public class Item {
    private Long id;
    private String title; //标题
    private String category;// 分类
    private String brand; // 品牌
    private Double price; // 价格
    private String images; // 图片地址
}
映射—注解
Spring Data通过注解来声明字段的映射属性,有下面的三个注解:
@Document作用在类,标记实体类为文档对象,一般有两个属性- indexName:对应索引库名称
- type:对应在索引库中的类型
- shards:分片数量,默认5
- replicas:副本数量,默认1
@Id作用在成员变量,标记一个字段作为id主键@Field作用在成员变量,标记为文档的字段,并指定字段映射属性:- type:字段类型,是枚举:FieldType,可以是text、long、short、date、integer、object等
- text:存储数据时候,会自动分词,并生成索引
- keyword:存储数据时候,不会分词建立索引
- Numerical:数值类型,分两类
- 基本数据类型:long、interger、short、byte、double、float、half_float
- 浮点数的高精度类型:scaled_float
- 需要指定一个精度因子,比如10或100。elasticsearch会把真实值乘以这个因子后存储,取出时再还原。
- Date:日期类型
- elasticsearch可以对日期格式化为字符串存储,但是建议我们存储为毫秒值,存储为long,节省空间。
- index:是否索引,布尔类型,默认是true
- store:是否存储,布尔类型,默认是false
- analyzer:分词器名称,这里的
ik_max_word即使用ik分词器
- type:字段类型,是枚举:FieldType,可以是text、long、short、date、integer、object等
示例:
@Document(indexName = "item",type = "docs", shards = 1, replicas = 0)
public class Item {

    /**
     * @Description: @Id注解必须是springframework包下的
     * org.springframework.data.annotation.Id
     *@Author: https://blog.csdn.net/chen_2890
     */
    @Id
    private Long id;

    @Field(type = FieldType.Text, analyzer = "ik_max_word")
    private String title; //标题

    @Field(type = FieldType.Keyword)
    private String category;// 分类

    @Field(type = FieldType.Keyword)
    private String brand; // 品牌

    @Field(type = FieldType.Double)
    private Double price; // 价格

    @Field(index = false, type = FieldType.Keyword)
    private String images; // 图片地址
}
创建索引
ElasticsearchTemplate中提供了创建索引的API:

- 可以根据类的信息自动生成,也可以手动指定indexName和Settings
映射
映射相关的API:

- 一样,可以根据类的字节码信息(注解配置)来生成映射,或者手动编写映射
我们这里采用类的字节码信息创建索引并映射,下面是测试类代码:
@RunWith(SpringRunner.class)
@SpringBootTest(classes = EsDemoApplication.class)
public class EsDemoApplicationTests {

    @Autowired
    private ElasticsearchTemplate elasticsearchTemplate;

    /**
      * @Description:创建索引,会根据Item类的@Document注解信息来创建
      * @Author: https://blog.csdn.net/chen_2890
      * @Date: 2018/9/29 0:51
       */
    @Test
    public void testCreateIndex() {
        elasticsearchTemplate.createIndex(Item.class);
    }
运行testCreateIndex(),索引创建成功后打开elasticsearch-head-master插件(es-head插件的安装)查看索引信息,
索引信息:

2.2.2 删除索引
删除索引的API:

可以根据类名或索引名删除。
示例:
    /**
      * @Description:删除索引
      * @Author: https://blog.csdn.net/chen_2890
      * @Date: 2018/9/29 0:50
       */
    @Test
    public void testDeleteIndex() {
        elasticsearchTemplate.deleteIndex(Item.class);
    }
运行testDeleteIndex(),索引删除成功后打开elasticsearch-head-master插件(es-head插件的安装)查看索引信息,发现item索引已经被删除。
2.3 新增文档数据
2.3.1 Repository接口
Spring Data 的强大之处,就在于你不用写任何DAO处理,自动根据方法名或类的信息进行CRUD操作。只要你定义一个接口,然后继承Repository提供的一些子接口,就能具备各种基本的CRUD功能。
来看下Repository的继承关系:

我们看到有一个ElasticsearchCrudRepository接口:
 .png)
.png)
所以,我们只需要定义接口,然后继承它就OK了。
    /**
      * @Description:定义ItemRepository 接口
      * @Param:
      *     Item:为实体类
      *     Long:为Item实体类中主键的数据类型
      * @Author: https://blog.csdn.net/chen_2890
      * @Date: 2018/9/29 0:50
       */
public interface ItemRepository extends ElasticsearchRepository<Item,Long> {

}
接下来,我们测试新增数据:
2.3.2 新增一个对象
@Autowired
private ItemRepository itemRepository;

    /**
      * @Description:定义新增方法
      * @Author: https://blog.csdn.net/chen_2890
      */
@Test
public void insert() {
    Item item = new Item(1L, "小米手机7", " 手机",
                         "小米", 3499.00, "http://image.baidu.com/13123.jpg");
    itemRepository.save(item);
}
运行insert(),去页面查询看看:

OK,新增成功!
2.3.3 批量新增
代码:
    /**
      * @Description:定义批量新增方法
      * @Author: https://blog.csdn.net/chen_2890
      */
@Test
public void insertList() {
    List<Item> list = new ArrayList<>();
    list.add(new Item(2L, "坚果手机R1", " 手机", "锤子", 3699.00, "http://image.baidu.com/13123.jpg"));
    list.add(new Item(3L, "华为META10", " 手机", "华为", 4499.00, "http://image.baidu.com/13123.jpg"));
    // 接收对象集合,实现批量新增
    itemRepository.saveAll(list);
}
再次去页面查询:

OK,批量新增成功!
2.3.4 修改
elasticsearch中本没有修改,它的修改原理是该是先删除在新增
修改和新增是同一个接口,区分的依据就是id。
    /**
      * @Description:定义修改方法
      * @Author: https://blog.csdn.net/chen_2890
      */
@Test
public void update(){
    Item item = new Item(1L, "苹果XSMax", " 手机",
            "小米", 3499.00, "http://image.baidu.com/13123.jpg");
    itemRepository.save(item);
}
查看结果:

2.4 查询
2.4.1 基本查询
ElasticsearchRepository提供了一些基本的查询方法:

我们来试试查询所有:
    /**
      * @Description:定义查询方法,含对价格的降序、升序查询
      * @Author: https://blog.csdn.net/chen_2890
      */
    @Test
    public void testQueryAll(){
        // 查找所有
        //Iterable<Item> list = this.itemRepository.findAll();
        // 对某字段排序查找所有 Sort.by("price").descending() 降序
        // Sort.by("price").ascending():升序
        Iterable<Item> list = this.itemRepository.findAll(Sort.by("price").ascending());

        for (Item item:list){
            System.out.println(item);
        }
    }
结果:

2.4.2 自定义方法
Spring Data 的另一个强大功能,是根据方法名称自动实现功能。
比如:你的方法名叫做:findByTitle,那么它就知道你是根据title查询,然后自动帮你完成,无需写实现类。
当然,方法名称要符合一定的约定:
| Keyword | Sample |
|---|---|
And |
findByNameAndPrice |
Or |
findByNameOrPrice |
Is |
findByName |
Not |
findByNameNot |
Between |
findByPriceBetween |
LessThanEqual |
findByPriceLessThan |
GreaterThanEqual |
findByPriceGreaterThan |
Before |
findByPriceBefore |
After |
findByPriceAfter |
Like |
findByNameLike |
StartingWith |
findByNameStartingWith |
EndingWith |
findByNameEndingWith |
Contains/Containing |
findByNameContaining |
In |
findByNameIn(Collection<String>names) |
NotIn |
findByNameNotIn(Collection<String>names) |
Near |
findByStoreNear |
True |
findByAvailableTrue |
False |
findByAvailableFalse |
OrderBy |
findByAvailableTrueOrderByNameDesc |
例如,我们来按照价格区间查询,定义这样的一个方法:
public interface ItemRepository extends ElasticsearchRepository<Item,Long> {

    /**
     * @Description:根据价格区间查询
     * @Param price1
     * @Param price2
     * @Author: https://blog.csdn.net/chen_2890
     */
    List<Item> findByPriceBetween(double price1, double price2);
}
然后添加一些测试数据:
    /**
     * @Description:准备测试数据
     * @Author: https://blog.csdn.net/chen_2890
     */
    @Test
    public void insertList() {
        List<Item> list = new ArrayList<>();
        list.add(new Item(1L, "小米手机7", "手机", "小米", 3299.00, "http://image.baidu.com/13123.jpg"));
        list.add(new Item(2L, "坚果手机R1", "手机", "锤子", 3699.00, "http://image.baidu.com/13123.jpg"));
        list.add(new Item(3L, "华为META10", "手机", "华为", 4499.00, "http://image.baidu.com/13123.jpg"));
        list.add(new Item(4L, "小米Mix2S", "手机", "小米", 4299.00, "http://image.baidu.com/13123.jpg"));
        list.add(new Item(5L, "荣耀V10", "手机", "华为", 2799.00, "http://image.baidu.com/13123.jpg"));
        // 接收对象集合,实现批量新增
        itemRepository.saveAll(list);
    }
不需要写实现类,然后我们直接去运行:
    /**
     * @Description:按照价格区间查询
     * @Author: https://blog.csdn.net/chen_2890
     */
    @Test
    public void queryByPriceBetween(){
        List<Item> list = this.itemRepository.findByPriceBetween(2000.00, 3500.00);
        for (Item item : list) {
            System.out.println("item = " + item);
        }
    }
结果:

OK,测试成功!
2.4.3 自定义查询
先来看最基本的matchQuery:
    /**
     * @Description:matchQuery底层采用的是词条匹配查询
     * @Author: https://blog.csdn.net/chen_2890
     */
    @Test
    public void testMatchQuery(){
        // 构建查询条件
        NativeSearchQueryBuilder queryBuilder = new NativeSearchQueryBuilder();
        // 添加基本分词查询
        queryBuilder.withQuery(QueryBuilders.matchQuery("title", "小米手机"));
        // 搜索,获取结果
        Page<Item> items = this.itemRepository.search(queryBuilder.build());
        // 总条数
        long total = items.getTotalElements();
        System.out.println("total = " + total);
        for (Item item : items) {
            System.out.println(item);
        }
    }
-
NativeSearchQueryBuilder:Spring提供的一个查询条件构建器,帮助构建json格式的请求体
-
QueryBuilders.matchQuery(“title”, “小米手机”):利用QueryBuilders来生成一个查询。QueryBuilders提供了大量的静态方法,用于生成各种不同类型的查询:

-
Page<item>:默认是分页查询,因此返回的是一个分页的结果对象,包含属性:-
totalElements:总条数
-
totalPages:总页数
-
Iterator:迭代器,本身实现了Iterator接口,因此可直接迭代得到当前页的数据
-
其它属性:

-
结果:

总的测试代码如下:
    /**
     *
     * @Description:matchQuery
     *@Author: https://blog.csdn.net/chen_2890
     */
    @Test
    public void testMathQuery(){
        // 创建对象
        NativeSearchQueryBuilder queryBuilder = new NativeSearchQueryBuilder();
        // 在queryBuilder对象中自定义查询
        //matchQuery:底层就是使用的termQuery
        queryBuilder.withQuery(QueryBuilders.matchQuery("title","坚果"));
        //查询,search 默认就是分页查找
        Page<Item> page = this.itemRepository.search(queryBuilder.build());
        //获取数据
        long totalElements = page.getTotalElements();
        System.out.println("获取的总条数:"+totalElements);

        for(Item item:page){
            System.out.println(item);
        }


    }


    /**
     * @Description:
     * termQuery:功能更强大,除了匹配字符串以外,还可以匹配
     * int/long/double/float/....
     * @Author: https://blog.csdn.net/chen_2890
     */
    @Test
    public void testTermQuery(){
        NativeSearchQueryBuilder builder = new NativeSearchQueryBuilder();
        builder.withQuery(QueryBuilders.termQuery("price",998.0));
        // 查找
        Page<Item> page = this.itemRepository.search(builder.build());

        for(Item item:page){
            System.out.println(item);
        }
    }
    /**
     * @Description:布尔查询
     * @Author: https://blog.csdn.net/chen_2890
     */
    @Test
    public void testBooleanQuery(){
        NativeSearchQueryBuilder builder = new NativeSearchQueryBuilder();

        builder.withQuery(
                QueryBuilders.boolQuery().must(QueryBuilders.matchQuery("title","华为"))
                                         .must(QueryBuilders.matchQuery("brand","华为"))
        );

        // 查找
        Page<Item> page = this.itemRepository.search(builder.build());
        for(Item item:page){
            System.out.println(item);
        }
    }

    /**
     * @Description:模糊查询
     * @Author: https://blog.csdn.net/chen_2890
     */
    @Test
    public void testFuzzyQuery(){
        NativeSearchQueryBuilder builder = new NativeSearchQueryBuilder();
        builder.withQuery(QueryBuilders.fuzzyQuery("title","faceoooo"));
        Page<Item> page = this.itemRepository.search(builder.build());
        for(Item item:page){
            System.out.println(item);
        }

    }
2.4.4 分页查询
利用NativeSearchQueryBuilder可以方便的实现分页:
    /**
     * @Description:分页查询
     * @Author: https://blog.csdn.net/chen_2890
     */
    @Test
    public void searchByPage(){
        // 构建查询条件
        NativeSearchQueryBuilder queryBuilder = new NativeSearchQueryBuilder();
        // 添加基本分词查询
        queryBuilder.withQuery(QueryBuilders.termQuery("category", "手机"));
        // 分页:
        int page = 0;
        int size = 2;
        queryBuilder.withPageable(PageRequest.of(page,size));

        // 搜索,获取结果
        Page<Item> items = this.itemRepository.search(queryBuilder.build());
        // 总条数
        long total = items.getTotalElements();
        System.out.println("总条数 = " + total);
        // 总页数
        System.out.println("总页数 = " + items.getTotalPages());
        // 当前页
        System.out.println("当前页:" + items.getNumber());
        // 每页大小
        System.out.println("每页大小:" + items.getSize());

        for (Item item : items) {
            System.out.println(item);
        }
    }
结果:

可以发现,Elasticsearch中的分页是从第0页开始。
2.4.5 排序
排序也通用通过NativeSearchQueryBuilder完成:
    /**
     * @Description:排序查询
     * @Author: https://blog.csdn.net/chen_2890
     */
    @Test
    public void searchAndSort(){
        // 构建查询条件
        NativeSearchQueryBuilder queryBuilder = new NativeSearchQueryBuilder();
        // 添加基本分词查询
        queryBuilder.withQuery(QueryBuilders.termQuery("category", "手机"));

        // 排序
        queryBuilder.withSort(SortBuilders.fieldSort("price").order(SortOrder.ASC));

        // 搜索,获取结果
        Page<Item> items = this.itemRepository.search(queryBuilder.build());
        // 总条数
        long total = items.getTotalElements();
        System.out.println("总条数 = " + total);

        for (Item item : items) {
            System.out.println(item);
        }
    }
结果:

2.5 聚合(牛逼!!solr无此功能)
聚合可以让我们极其方便的实现对数据的统计、分析。例如:
- 什么品牌的手机最受欢迎?
- 这些手机的平均价格、最高价格、最低价格?
- 这些手机每月的销售情况如何?
实现这些统计功能的比数据库的sql要方便的多,而且查询速度非常快,可以实现近实时搜索效果。
2.5.1 聚合基本概念
Elasticsearch中的聚合,包含多种类型,最常用的两种,一个叫桶,一个叫度量:
桶(bucket)
桶的作用,是按照某种方式对数据进行分组,每一组数据在ES中称为一个桶,例如我们根据国籍对人划分,可以得到中国桶、英国桶,日本桶……或者我们按照年龄段对人进行划分:010,1020,2030,3040等。
Elasticsearch中提供的划分桶的方式有很多:
- Date Histogram Aggregation:根据日期阶梯分组,例如给定阶梯为周,会自动每周分为一组
- Histogram Aggregation:根据数值阶梯分组,与日期类似
- Terms Aggregation:根据词条内容分组,词条内容完全匹配的为一组
- Range Aggregation:数值和日期的范围分组,指定开始和结束,然后按段分组
- ……
综上所述,我们发现bucket aggregations 只负责对数据进行分组,并不进行计算,因此往往bucket中往往会嵌套另一种聚合:metrics aggregations即度量
度量(metrics)
分组完成以后,我们一般会对组中的数据进行聚合运算,例如求平均值、最大、最小、求和等,这些在ES中称为度量
比较常用的一些度量聚合方式:
- Avg Aggregation:求平均值
- Max Aggregation:求最大值
- Min Aggregation:求最小值
- Percentiles Aggregation:求百分比
- Stats Aggregation:同时返回avg、max、min、sum、count等
- Sum Aggregation:求和
- Top hits Aggregation:求前几
- Value Count Aggregation:求总数
- ……
注意:在ES中,需要进行聚合、排序、过滤的字段其处理方式比较特殊,因此不能被分词。这里我们将color和make这两个文字类型的字段设置为keyword类型,这个类型不会被分词,将来就可以参与聚合
2.5.2 聚合为桶
桶就是分组,比如这里我们按照品牌brand进行分组:
    /**
     * @Description:按照品牌brand进行分组
     * @Author: https://blog.csdn.net/chen_2890
     */
    @Test
    public void testAgg(){
        NativeSearchQueryBuilder queryBuilder = new NativeSearchQueryBuilder();
        // 不查询任何结果
        queryBuilder.withSourceFilter(new FetchSourceFilter(new String[]{""}, null));
        // 1、添加一个新的聚合,聚合类型为terms,聚合名称为brands,聚合字段为brand
        queryBuilder.addAggregation(
            AggregationBuilders.terms("brands").field("brand"));
        // 2、查询,需要把结果强转为AggregatedPage类型
        AggregatedPage<Item> aggPage = (AggregatedPage<Item>) this.itemRepository.search(queryBuilder.build());
        // 3、解析
        // 3.1、从结果中取出名为brands的那个聚合,
        // 因为是利用String类型字段来进行的term聚合,所以结果要强转为StringTerm类型
        StringTerms agg = (StringTerms) aggPage.getAggregation("brands");
        // 3.2、获取桶
        List<StringTerms.Bucket> buckets = agg.getBuckets();
        // 3.3、遍历
        for (StringTerms.Bucket bucket : buckets) {
            // 3.4、获取桶中的key,即品牌名称
            System.out.println(bucket.getKeyAsString());
            // 3.5、获取桶中的文档数量
            System.out.println(bucket.getDocCount());
        }

    }
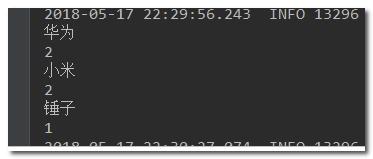
显示的结果:

关键API:
AggregationBuilders:聚合的构建工厂类。所有聚合都由这个类来构建,看看他的静态方法:

(1)统计某个字段的数量
  ValueCountBuilder vcb=  AggregationBuilders.count("count_uid").field("uid");
(2)去重统计某个字段的数量(有少量误差)
 CardinalityBuilder cb= AggregationBuilders.cardinality("distinct_count_uid").field("uid");
(3)聚合过滤
FilterAggregationBuilder fab= AggregationBuilders.filter("uid_filter").filter(QueryBuilders.queryStringQuery("uid:001"));
(4)按某个字段分组
TermsBuilder tb=  AggregationBuilders.terms("group_name").field("name");
(5)求和
SumBuilder  sumBuilder=    AggregationBuilders.sum("sum_price").field("price");
(6)求平均
AvgBuilder ab= AggregationBuilders.avg("avg_price").field("price");
(7)求最大值
MaxBuilder mb= AggregationBuilders.max("max_price").field("price");
(8)求最小值
MinBuilder min=    AggregationBuilders.min("min_price").field("price");
(9)按日期间隔分组
DateHistogramBuilder dhb= AggregationBuilders.dateHistogram("dh").field("date");
(10)获取聚合里面的结果
TopHitsBuilder thb=  AggregationBuilders.topHits("top_result");
(11)嵌套的聚合
NestedBuilder nb= AggregationBuilders.nested("negsted_path").path("quests");
(12)反转嵌套
AggregationBuilders.reverseNested("res_negsted").path("kps ");
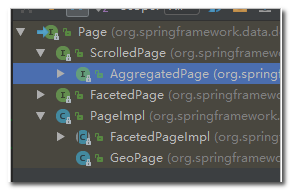
AggregatedPage:聚合查询的结果类。它是Page<T>的子接口:

AggregatedPage在Page功能的基础上,拓展了与聚合相关的功能,它其实就是对聚合结果的一种封装。

而返回的结果都是Aggregation类型对象,不过根据字段类型不同,又有不同的子类表示

2.5.3 嵌套聚合,求平均值
代码:
    /**
     * @Description:嵌套聚合,求平均值
     * @Author: https://blog.csdn.net/chen_2890
     */
    @Test
    public void testSubAgg(){
        NativeSearchQueryBuilder queryBuilder = new NativeSearchQueryBuilder();
        // 不查询任何结果
        queryBuilder.withSourceFilter(new FetchSourceFilter(new String[]{""}, null));
        // 1、添加一个新的聚合,聚合类型为terms,聚合名称为brands,聚合字段为brand
        queryBuilder.addAggregation(
            AggregationBuilders.terms("brands").field("brand")
            .subAggregation(AggregationBuilders.avg("priceAvg").field("price")) // 在品牌聚合桶内进行嵌套聚合,求平均值
        );
        // 2、查询,需要把结果强转为AggregatedPage类型
        AggregatedPage<Item> aggPage = (AggregatedPage<Item>) this.itemRepository.search(queryBuilder.build());
        // 3、解析
        // 3.1、从结果中取出名为brands的那个聚合,
        // 因为是利用String类型字段来进行的term聚合,所以结果要强转为StringTerm类型
        StringTerms agg = (StringTerms) aggPage.getAggregation("brands");
        // 3.2、获取桶
        List<StringTerms.Bucket> buckets = agg.getBuckets();
        // 3.3、遍历
        for (StringTerms.Bucket bucket : buckets) {
            // 3.4、获取桶中的key,即品牌名称  3.5、获取桶中的文档数量
            System.out.println(bucket.getKeyAsString() + ",共" + bucket.getDocCount() + "台");

            // 3.6.获取子聚合结果:
            InternalAvg avg = (InternalAvg) bucket.getAggregations().asMap().get("priceAvg");
            System.out.println("平均售价:" + avg.getValue());
        }

    }
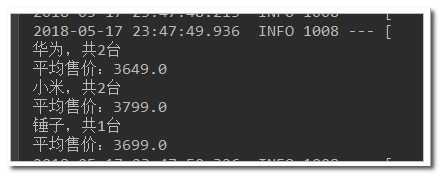
结果:

ok,SpringBoot整合Spring Data Elasticsearch到此完结


