SpringBoot配置mybatis
一直都说SpringBoot是零配置,当然,真正实现零配置是不可能的,但是在配置mybatis这里真的是太简单了,哈哈,下面我们一起看一下。
1.先导入基于SpringBoot的mybatis依赖包
        <dependency>
            <groupId>org.mybatis.spring.boot</groupId>
            <artifactId>mybatis-spring-boot-starter</artifactId>
       <version>1.3.0</version>
        </dependency>
2.引入mybatis的基本配置文件mybatis.cfg.xml,这里就不过多做其他的配置了,一个最简单的配置文件如下
<!DOCTYPE configuration PUBLIC "-//mybatis.org//DTD Config 3.0//EN"
        "http://mybatis.org/dtd/mybatis-3-config.dtd">

<configuration>
    <!-- 进行Mybatis的相应的环境的属性定义 -->
    <settings>   <!-- 在本项目中开启二级缓存 -->
            <setting name="cacheEnabled" value="true"/>
    </settings>
</configuration>
3.在application.yml下配置mybatis相关。此配置主要是针对mybatis配置文件和mapper配置文件以及bean的路径。
mybatis:
  config-location: classpath:mybatis/mybatis.cfg.xml      #mybatis配置文件所在路径
  type-aliases-package: cn.mldn.microboot.vo              #定义所有操作类的别名所在包
  mapper-locations:                                       #所有的mapper映射文件
  - classpath:mybatis/mapper/**/*.xml
4.我们做一个Student对象的映射,实现基本的增删改查功能,Student表和bean已经提前建好。
<?xml version="1.0" encoding="UTF-8" ?>
<!DOCTYPE mapper PUBLIC "-//mybatis.org//DTD Mapper 3.0//EN"
        "http://mybatis.org/dtd/mybatis-3-mapper.dtd">
<mapper namespace="cn.mldn.microboot.dao.IStudentDAO">
    <select id="findAll" resultType="Student">
        SELECT * FROM student;
    </select>
    <insert id="doCreate" parameterType="Student">
        INSERT INTO    student(name,age,sex,birthday) VALUES(#{name},#{age},#{sex},#{birthday})
    </insert>
    <update id="doUpdate" parameterType="Student">
        UPDATE student set name = #{name} where id=#{id}
    </update>
    <delete id="doDelete" parameterType="int">
        Delete from student Where id=#{id}
    </delete>
</mapper>
这里的namespace属性值对应我们Dao层,id则为方法名。先看一下Dao层的代码。
import java.util.List;

import org.apache.ibatis.annotations.Mapper;

import cn.mldn.microboot.vo.Student;
@Mapper
public interface IStudentDAO {
        public List<Student> findAll();
        public boolean doCreate(Student vo);
        public boolean doUpdate(Student vo);
        public boolean doDelete(Integer id);
}
看到了,就是这么简单,一个Mapper注解,解决了所有问题。
5.接下来我们写一下Servic层和调用的测试类。
Service层接口定义如下:
import java.util.List;

import org.springframework.transaction.annotation.Propagation;
import org.springframework.transaction.annotation.Transactional;

import cn.mldn.microboot.vo.Student;

public interface IStudentService {
    @Transactional(readOnly = true)
    public List<Student> list();
    @Transactional(propagation=Propagation.REQUIRED)
    public boolean add(Student vo);
    @Transactional(propagation=Propagation.REQUIRED)
    public boolean update(Student vo);
    @Transactional(propagation=Propagation.REQUIRED)
    public boolean delete(Integer id);
}
Transactional注解是对事物的控制。
下面是Service的实现
import java.util.List;

import javax.annotation.Resource;

import org.springframework.stereotype.Service;

import cn.mldn.microboot.dao.IStudentDAO;
import cn.mldn.microboot.service.IStudentService;
import cn.mldn.microboot.vo.Student;
@Service
public class StudentServiceImpl implements IStudentService {
    @Resource
    private IStudentDAO studentDao;
    @Override
    public List<Student> list() {
        return this.studentDao.findAll();
    }
    @Override
    public boolean add(Student vo) {
        return this.studentDao.doCreate(vo);
    }
    @Override
    public boolean update(Student vo) {
        return this.studentDao.doUpdate(vo);
    }
    @Override
    public boolean delete(Integer id) {
        return this.studentDao.doDelete(id);
    }
}
最后我们写下测试类
import javax.annotation.Resource;

import org.junit.Test;
import org.junit.runner.RunWith;
import org.springframework.boot.test.context.SpringBootTest;
import org.springframework.test.context.junit4.SpringJUnit4ClassRunner;
import org.springframework.test.context.web.WebAppConfiguration;

import cn.mldn.microboot.StartSpringBootMain;
import cn.mldn.microboot.service.IStudentService;
import cn.mldn.microboot.vo.Student;

@SpringBootTest(classes = StartSpringBootMain.class)
@RunWith(SpringJUnit4ClassRunner.class)
@WebAppConfiguration
public class TestStudentService {
    @Resource
    private IStudentService studentService;
    @Test
    public void testList() throws Exception{
        System.out.println(this.studentService.list());
    }
    @Test
    public void testAdd() throws Exception{
        Student student = new Student();
        student.setAge(26);
        student.setName("来来来");
        student.setBirthday("2018/03/01");
        student.setSex(true);
        System.out.println(this.studentService.add(student));
    }
}
这里只写了查询和添加的测试类,测试

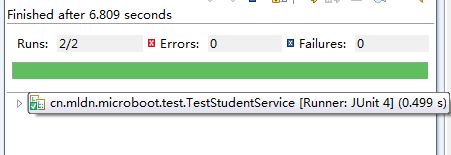
测试后,成功添加与查询。


 浙公网安备 33010602011771号