SpringBoot整合Redis 发布订阅
v博客前言
SUBSCRIBE, UNSUBSCRIBE 和 PUBLISH 实现了 发布/订阅消息范例,发送者 (publishers) 不用编程就可以向特定的接受者发送消息 (subscribers). Rather, 发布的消息进入通道,不需要知道有没有订阅者. 订阅者发表感兴趣的一个或多个通道,并且只接受他们感兴趣的消息,不管发布者是不是存在. 发布者和订阅者的解耦可以允许更大的伸缩性和更多动态的网络拓扑。
关于发布订阅(消息队列)之前也过一篇《SpringBoot进阶教程(二十二)集成RabbitMQ---MQ实战演练》。感兴趣的可以看看。今天说的发布订阅,是基于Redis的。
v准备工作
学习本章节之前,建议依次阅读以下文章,更好的串联全文内容,如已掌握以下列出知识点,请跳过:
v命令行操作发布订阅
下面实例中,图中左侧窗口视为客户端1,右侧窗口视为客户端2.
1.1 客户端1中订阅频道chatDemo
subscribe chatDemo

1.2 客户端2向频道chatDemo中发送两次消息,客户端1中会实时接收这两次消息。
publish chatDemo "Hello World."
publish chatDemo "Hello Demo."

1.3 在客户端1中退订频道,或者Ctrl+C退出redis连接模式。
unsubscribe chatDemo

以上例子中主要介绍了订阅频道、向指定的频道发布消息、然后消息推送到订阅者以及取消订阅。
v项目中操作发布订阅
2.1 消息监听类
package com.demo.common;

import org.springframework.stereotype.Component;

/**
 * Created by toutou on 2019/2/23.
 */
@Component
public class RedisReceiver {
    public void receiveMessage(String message) {
        // TODO 这里是收到通道的消息之后执行的方法
        System.out.println(message);
    }
}
2.2 Redis消息订阅配置类
package com.demo.Redis;

import com.demo.common.RedisReceiver;
import org.springframework.cache.annotation.EnableCaching;
import org.springframework.context.annotation.Bean;
import org.springframework.context.annotation.Configuration;
import org.springframework.data.redis.connection.RedisConnectionFactory;
import org.springframework.data.redis.core.StringRedisTemplate;
import org.springframework.data.redis.listener.PatternTopic;
import org.springframework.data.redis.listener.RedisMessageListenerContainer;
import org.springframework.data.redis.listener.adapter.MessageListenerAdapter;

/**
 * Created by toutou on 2019/1/20.
 */
@Configuration
@EnableCaching
public class RedisCacheConfig {
    @Bean
    RedisMessageListenerContainer container(RedisConnectionFactory connectionFactory,
                                            MessageListenerAdapter listenerAdapter) {

        RedisMessageListenerContainer container = new RedisMessageListenerContainer();
        container.setConnectionFactory(connectionFactory);
        // 可以添加多个 messageListener,配置不同的交换机
        container.addMessageListener(listenerAdapter, new PatternTopic("channel:test"));

        return container;
    }

    /**
     * 消息监听器适配器,绑定消息处理器,利用反射技术调用消息处理器的业务方法
     * @param receiver
     * @return
     */
    @Bean
    MessageListenerAdapter listenerAdapter(RedisReceiver receiver) {
        System.out.println("消息适配器1");
        return new MessageListenerAdapter(receiver, "receiveMessage");
    }

    @Bean
    StringRedisTemplate template(RedisConnectionFactory connectionFactory) {
        return new StringRedisTemplate(connectionFactory);
    }
}
2.3 测试接口
package com.demo.controller;

import lombok.extern.slf4j.Slf4j;
import org.springframework.beans.factory.annotation.Autowired;
import org.springframework.data.redis.core.StringRedisTemplate;
import org.springframework.web.bind.annotation.RequestMapping;
import org.springframework.web.bind.annotation.RestController;

import java.util.Date;

/**
 * Created by toutou on 2019/1/20.
 */
@RestController
@Slf4j
public class RedisController {
    @Autowired
    StringRedisTemplate template;

    @RequestMapping(value = "/syncmessage")
    public String SyncMessage(){
        for(int i = 1; i <= 5; i++){
            try{
                // 为了模拟消息,sleep一下。
                Thread.sleep(2000);
            }catch(InterruptedException ex){}
            template.convertAndSend("channel:test", String.format("我是消息{%d}号: %tT", i, new Date()));
        }

        return "5";
    }
}
2.4 项目目录结构

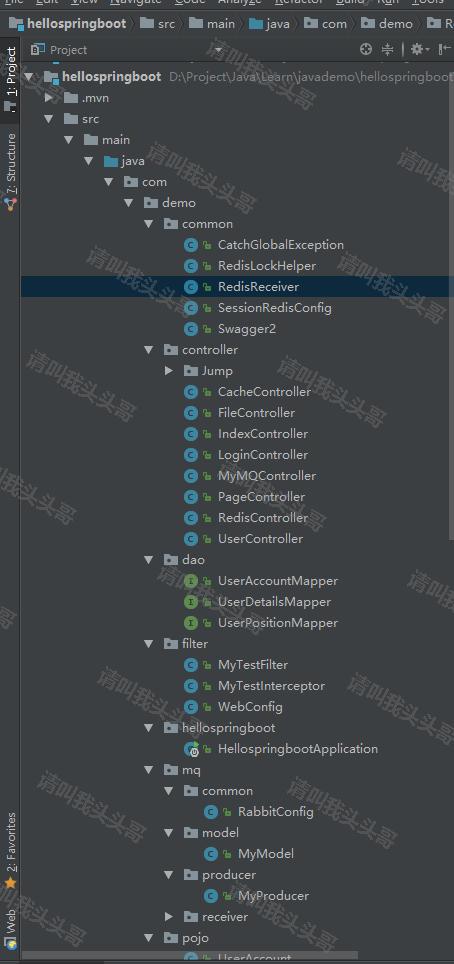
2.5 运行效果

v源码地址
https://github.com/toutouge/javademosecond/tree/master/hellospringboot


