在NestJS应用程序中使用 Unleash 实现功能切换的指南
前言
近年来,软件开发行业迅速发展,功能开关(Feature Toggle)成为了一种常见的开发实践。通过功能开关,可以在运行时动态地启用或禁用应用程序的特定功能,以提供更灵活的软件交付和配置管理。对于使用 NestJS 框架构建的应用程序而言,实现功能开关也是一项重要的任务。而 Unleash 是一个功能切换服务,它提供了一种简单且可扩展的方式来管理和控制应用程序的功能切换。因此本文小编将为大家介绍如何在 NestJS 应用程序中使用 Unleash 实现功能切换。下面是具体的操作步骤:
安装 NestJS
NestJS 的安装非常简单,在安装之前需要确保你的机器中已经安装了 Node,然后执行以下命令即可在全局安装 NestJS。
npm i -g @nestjs/cli
nest new project-name (creates a new project with all scaffoldings and bolerplate code)
创建后的项目结构:

安装 Unleash 服务器
选择 unleash 服务器的 docker 基础安装,使用下面的 docker compose 文件来启动 Unleash 服务器。
docker-compose up -d --build (run this command where you have dockercompose file)
This docker compose setup configures:
- the Unleash server instance + the necessary backing Postgres database
- the Unleash proxy
#
To learn more about all the parts of Unleash, visit
https://docs.getunleash.io
#
NOTE: please do not use this configuration for production setups.
Unleash does not take responsibility for any data leaks or other
problems that may arise as a result.
#
This is intended to be used for demo, development, and learning
purposes only.

version: "3.9"
services:

  The Unleash server contains the Unleash configuration and
  communicates with server-side SDKs and the Unleash Proxy
  web:
    image: unleashorg/unleash-server:latest
    ports:
      - "4242:4242"
    environment:
      This points Unleash to its backing database (defined in the
      DATABASE_URL: "postgres://postgres:unleash@db/postgres"
      Disable SSL for database connections. @chriswk: why do we do this?
      DATABASE_SSL: "false"
      Changing log levels:
      LOG_LEVEL: "warn"
      Proxy clients must use one of these keys to connect to the
      Proxy. To add more keys, separate them with a comma (
      INIT_FRONTEND_API_TOKENS: "default:development.unleash-insecure-frontend-api-token"
      Initialize Unleash with a default set of client API tokens. To
      initialize Unleash with multiple tokens, separate them with a
      comma (
      INIT_CLIENT_API_TOKENS: "default:development.unleash-insecure-api-token"
    depends_on:
      db:
        condition: service_healthy
    command: [ "node", "index.js" ]
    healthcheck:
      test: wget --no-verbose --tries=1 --spider http://localhost:4242/health || exit 1
      interval: 1s
      timeout: 1m
      retries: 5
      start_period: 15s
  db:
    expose:
      - "5432"
    image: postgres:15
    environment:
      create a database called
      POSTGRES_DB: "db"
      trust incoming connections blindly (DON'T DO THIS IN PRODUCTION!)
      POSTGRES_HOST_AUTH_METHOD: "trust"
    healthcheck:
      test:
        [
          "CMD",
          "pg_isready",
          "--username=postgres",
          "--host=127.0.0.1",
          "--port=5432"
        ]
      interval: 2s
      timeout: 1m
      retries: 5
      start_period: 10s
使用unleash实现功能切换
现在已经有了代码库并启动并运行了 unleash 服务器,在开始其他任何事情之前,需要先安装一些依赖项。
yarn add unleash-client @nestjs/config
然后在项目的根目录中添加一个 .env 文件。
APP_NAME=nestjs-experimental-feature-toggle
API_KEY=<YOUR SERVER KEY>
UNLEASH_API_ENDPOINT=http://localhost:4242/api
METRICS_INTERVAL=1
REFRESH_INTERVAL=1
SERVER_PORT=3000
从 app.module.ts 文件开始。这是初始化并注入到引导文件 main.ts 的文件。
在此文件中,注入所有控制器、服务器和其他模块,如下所示。
ConfigModule.forRoot() 将扫描根目录中的 .env 文件并将其加载到应用程序中。
import { Module } from '@nestjs/common';
import { ConfigModule } from '@nestjs/config';
import { AppController } from './controllers/app.controller';
import { AppService } from './services/app.service';

@Module({
  imports: [ConfigModule.forRoot()],
  controllers: [AppController],
  providers: [AppService],
})
export class AppModule {}
main.ts 是引导文件
import { NestFactory } from '@nestjs/core';
import { AppModule } from './app.module';
import * as process from 'process';
async function bootstrap() {
  const app = await NestFactory.create(AppModule);
  await app.listen(process.env.SERVER_PORT);
}
bootstrap();
现在构建名为 app.service.ts 的服务器层,如下所示。
import { Injectable } from '@nestjs/common';

@Injectable()
export class AppService {
  private response = {};
  constructor() {
    this.response['XS'] = '5';
    this.response['S'] = '15';
    this.response['M'] = '25';
    this.response['L'] = '38';
    this.response['XL'] = '28';
    this.response['XXL'] = '15';
  }

  dataAnalytics = (): any => {
    return this.response;
  };
}
创建控制器 app.controller.ts ,它由以下多个部分组成:
1. constructor 是注入类所需的依赖项。
2. init 是使用所需的配置初始化 Unleash 客户端库。
3. dataAnalytics 是检查切换开关状态,并根据该状态决定要做什么的方法。
import { Controller, Get, Logger } from '@nestjs/common';
import { AppService } from '../services/app.service';
import { startUnleash, Unleash } from 'unleash-client';
import { ConfigService } from '@nestjs/config';

@Controller('/api/v1')
export class AppController {
  private unleash: Unleash;
  private readonly logger: Logger = new Logger(AppController.name);

  constructor(
    private readonly appService: AppService,
    private readonly configService: ConfigService,
  ) {
    this.init();
  }

  private init = async (): Promise<void> => {
    this.unleash = await startUnleash({
      url: this.configService.get<string('UNLEASH_API_ENDPOINT'),
      appName: 'beta-api',
      metricsInterval: parseInt(this.configService.get('METRICS_INTERVAL'), 10),
      refreshInterval: parseInt(this.configService.get('REFRESH_INTERVAL'), 10),
      customHeaders: {
        Authorization: this.configService.get<string('API_KEY'),
      },
    });
  };

  @Get('/analytics')
  dataAnalytics(): any {
    // Unleash SDK has now fresh state from the unleash-api
    const isEnabled: boolean = this.unleash.isEnabled('beta-api');
    this.logger.log(`feature switch "beta-api" is ${isEnabled}`);
    if (isEnabled) {
      return this.appService.dataAnalytics();
    } else {
      return {
        response: 'can not access this api as its in experimental mode',
      };
    }
  }
}
紧接着需要在 unleash 中创建一个功能切换,使用 url 访问 unleash 的 Web 控制台:http://localhost:4242
单击默认项目并创建一个新的切换并向切换添加策略,在例子中,小编选择了 Gradual rollout 策略。创建功能切换后,前往项目设置并创建项目访问令牌(创建服务器端访问令牌)。
Web 控制台显示如下:


运行以下命令,您会看到如下内容:
| PowerShell yarn start:dev |
|---|

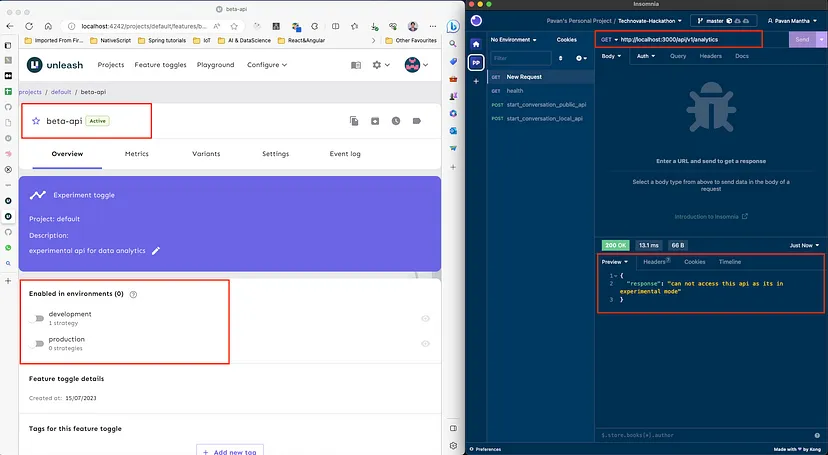
选择任何你最喜欢的 API 测试工具,比如 postman on insomnia 或其他任何东西,小编喜欢用insomnia 来测试 API。现在可通过切换开关来测试 API,并查看 Application 的表现。


结论
本文介绍了如何安装NestJS和Unleash服务器以及如何使用Unleash实现功能切换。通过本文的指导,读者能够快速搭建并配置这两个工具,以便在应用中灵活控制功能。
Redis从入门到实践
一节课带你搞懂数据库事务!
Chrome开发者工具使用教程
扩展链接:

