filebeat+Elk实现日志收集并使用kibana展示
工作流程图
通过Filegeat收集日志,将日志的数据推送到kafka然后通过logstash去消费发送到Es,再通过索引的方式将数据用kibana进行展示;
1、部署测试机器规划
| ip | logstash 版本 | es,kibana,logstash 版本 | filbeat 版本 | kafka |
| 192.168.113.130 | V7.16.2 | V7.16.2(es,logstash,Filegeat) | V7.16.2 | V3.0.1 |
| 192.168.113.131 | V7.16.2 | V7.16.2(es) | V7.16.2 | V3.0.1 |
| 192.168.113.132 | V7.16.2 | V7.16.2(es,kibana) | V7.16.2 | V3.0.1 |
2、部署kafka请参考文章centos-7部署kafka-v2.13.3.0.1集群
创建一个topic用于测试fibeat发送nginx日志消息到kafka并让logstash消费
[root@localhost bin]# ./kafka-topics.sh --create --replication-factor 1 --partitions 2 --topic nginx-log --bootstrap-server 192.168.113.130:9092查看创建好的topic以及副本数跟分区
[root@localhost kafka]# ./bin/kafka-topics.sh --describe --topic nginx-log --bootstrap-server 192.168.113.130:9092查看当前所有topic
[root@localhost kafka]# ./bin/kafka-topics.sh --bootstrap-server 192.168.113.130:9092 --list查看组
[root@localhost kafka]# ./bin/kafka-consumer-groups.sh --bootstrap-server 192.168.113.130:9092 --list查看组下面的topic的消费情况
[root@localhost kafka]# ./bin/kafka-consumer-groups.sh --bootstrap-server 192.168.113.130:9092 --describe --group +组名3、部署Elasticsearch请参考文档centos7部署elasticsearch-7.16.2分布式集群
4、安装部署kibana
规划:把kibana单机安装在192.168.113.132上面
下载相应版本的kibana并解压
wget https://artifacts.elastic.co/downloads/kibana/kibana-7.16.2-linux-x86_64.tar.gz
tar xf kibana-7.16.2-linux-x86_64
修改配置文件
[root@localhost opt]# mv kibana-7.16.2-linux-x86_64 kafka && cd kibana
[root@localhost kibana]# vim config/kibana.yml
如果配置了nginx代理还需要配置server.publicBaseUrl: "http://nginx地址"
如果配置了ES安全认证需要在配置里面加上连接ES的账号跟密码

后台启动kibana(跟es一样不能使用root账号启动,这里我就使用启动es的账号去启动kibana)
[root@localhost kibana]# chown -R es:es ../kibana/
[root@localhost kibana]# su es
[es@localhost kibana]$ nohup /opt/kibana/bin/kibana 1> /dev/null 2>&1 &访问kibana,如果加了认证使用elastic账号进行登录

安装单机logstash(192.168.113.130)测试
下载logstash
[root@localhost opt]# wget https://artifacts.elastic.co/downloads/logstash/logstash-7.16.2-linux-x86_64.tar.gz
[root@localhost opt]# tar xf logstash-7.16.2
[root@localhost opt]# mv logstash-7.16.2 logstash && cd logstash/
创建一个测试logstash配置文件
[root@localhost logstash]# tash]# vim config/logstash-nginx.conf
input {
    kafka {
        bootstrap_servers => "192.168.113.130:9092,192.168.113.131:9092,192.168.113.130:9092"
        codec ==> "json"
        client_id => "test"
        group_id => "logstash"
        auto_offset_reset => "latest"
        topics => ["nginx-log"]
        decorate_events => true
        consumer_threads => 5    #Logstash线程数,根据topic的Partition数量设置,为了怎加消费消费速度
        type => "nginx"
    }
}
filter {
    grok {
       match => {"message" => "%{LOGLEVEL:log_level}"}
    }
}

output {
    if[type] == "nginx" {
     elasticsearch {
         hosts => ["192.168.113.130:9200","192.168.113.131:9200","192.168.113.132:9200"]
         #user => "elastic"              #如果开启了认证需要配置这项
         #password => "密码"
         index => "nginx-log-%{+YYYY-MM-dd}"
     }
    }
    stdout{
        codec => rubydebug
    }
}
后台启动logstash
[root@localhost logstash]# /opt/logstash/bin/logstash -f /opt/logstash/config/logstash-nginx.conf 1 > /dev/null 2>&1 &在192.168.113.130上面简单安装一个nginx并配置filebeat推送日志
安装ningx
[root@localhost ~]# yum -y epel-release  #安装第三方源
[root@localhost ~]# yum install nginx -y
[root@localhost ~]# systemctl start nginx
安装并配置filebeat
[root@localhost opt]# wget https://artifacts.elastic.co/downloads/beats/filebeat/filebeat-7.16.2-linux-x86_64.tar.gz
[root@localhost opt]# tar xf filebeat-7.16.2-linux-x86_64.tar.gz
[root@localhost opt]# mv filebeat-7.16.2-linux-x86_64 filebeat && cd filebeat
修改配置文件
[root@localhost filebeat]# vim filebeat.yml
filebeat.inputs:
setup.template.settings:
  index.number_of_shards: 3
filebeat.config.modules:
  path: ${path.config}/modules.d/*.yml
  reload.enabled: false
#processors:
#- drop_fields:
#    fields: ["beat","input","source","offset","topicname","timestamp","@metadata","%{host}"]
output.kafka:
    hosts: ["192.168.113.130:9092","192.168.113.131:9092","192.168.113.132:9092"]
    max_message_bytes: 10000000
    topic: nginx-log    #前面创建的topic
配置nginx日志规则
[root@localhost filebeat]# vim modules.d/nginx.yml
- module: nginx
  access:
    var.paths: ["/var/log/nginx/*access.log"]
    enabled: true
  error:
    var.paths: ["/var/log/nginx/*error.log"]
    enabled: true
  ingress_controller:
    enabled: false
后台运行filebeat
[root@localhost filebeat]# nohup /opt/filebeat/filebeat -e -c /opt/filebeat/filebeat.yml 1 > /dev/null 2>&1 &访问kibana进入权限管理并添加相应的es索引
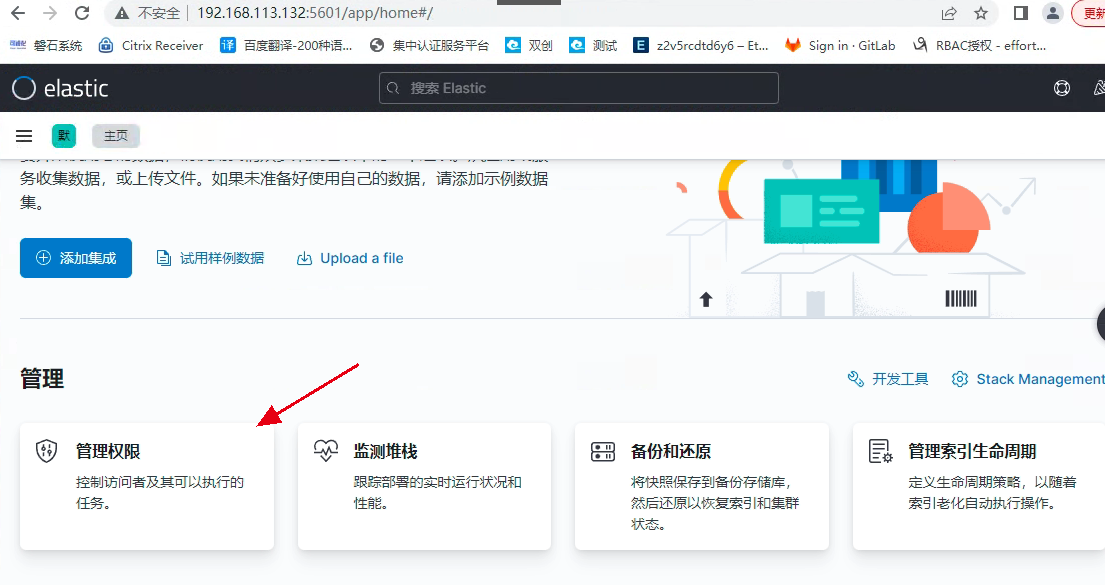
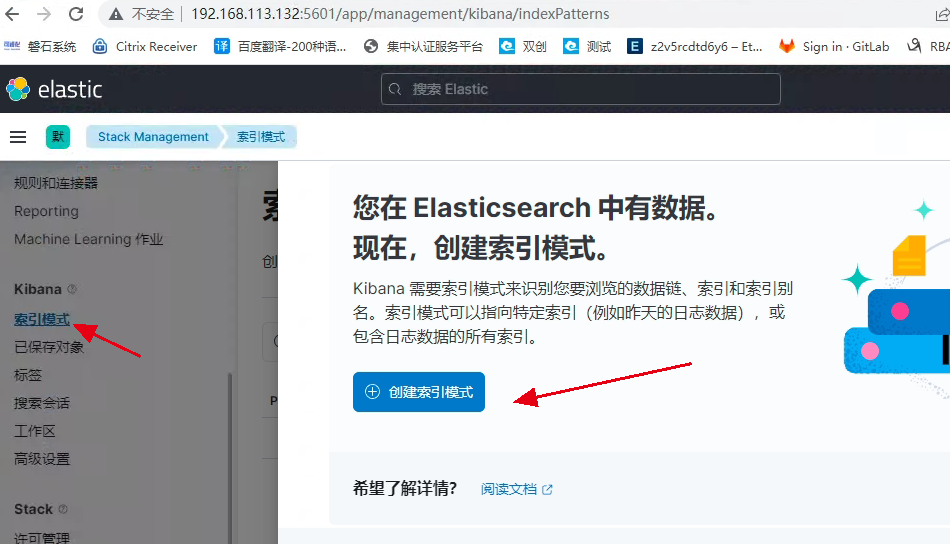
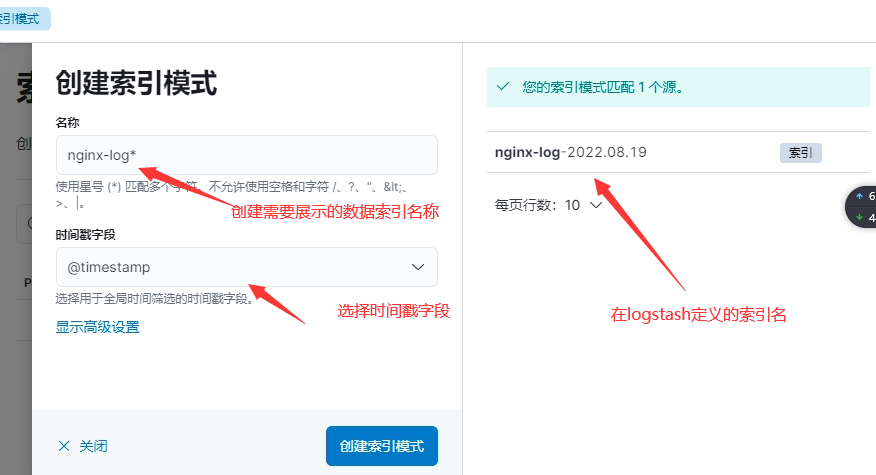
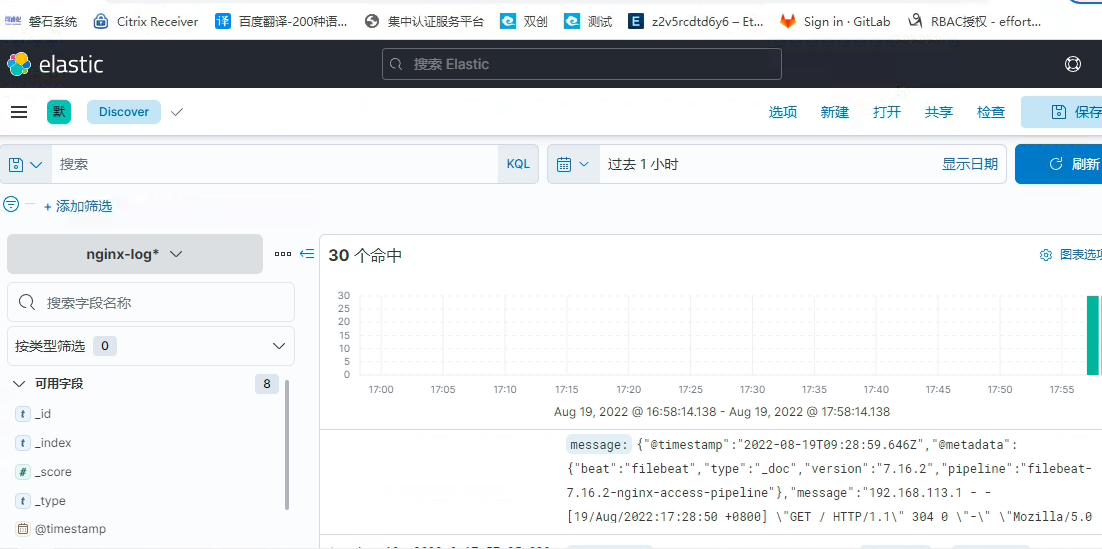
查看创建好的
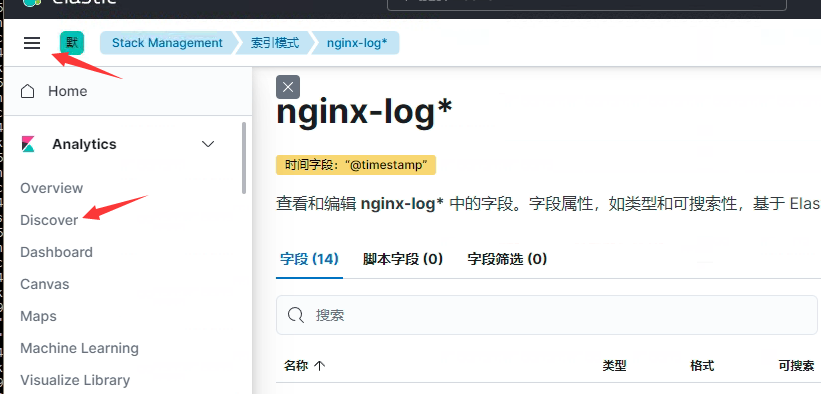
这里日志的数据就展示出来了
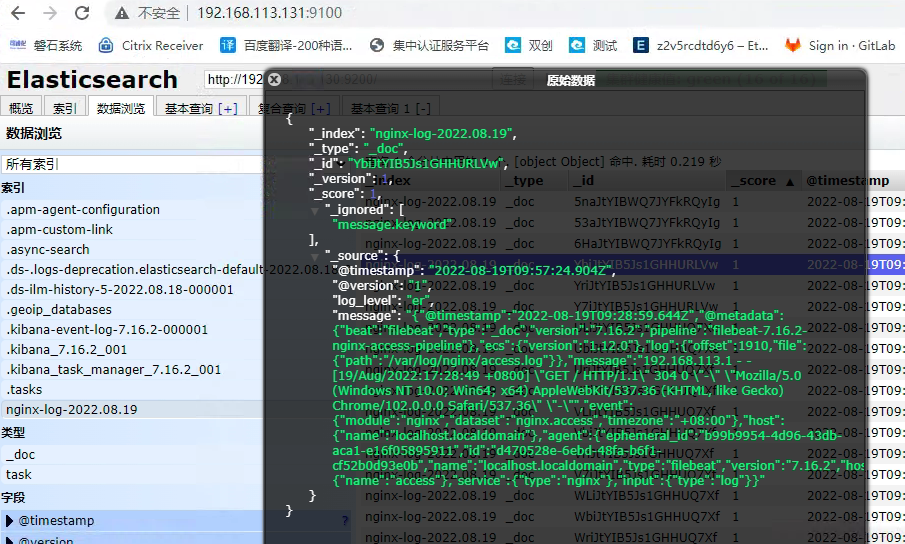
查看es上面索引的数据一切正常
总结,需要推送其他的日志数据只需要在日志所在的服务器配置相应的filebeat就可以了
配置logstash将多个从filebeat将日志数据推送到kafka的多个topic案例
filebeat可以同上面的nginx配置同理,如果是微服务将filebeat继承到容器里面就可以
编辑logstash配置文件
vim /opt/logstash/conf/logstash.conf (这里是新弄的一个测试配置,如果nginx还需要将这个配置添加到nginx的那个配置文件就行)
input{
      kafka{
        bootstrap_servers => "192.168.113.129:9002,192.168.113.130:9002,192.168.113.131:9002"
        codec => "json"
        client_id => "test1"
        group_id => "test"                  //会将这个topic加入到这个组,如果没有启动logstash后会自动创建
        auto_offset_reset => "latest"      //从最新的偏移量开始消费
        consumer_threads => 5
        decorate_events => true        //此属性会将当前topic、offset、group、partition等信息也带到message中
        topics => ["test1"]          //数组类型,可配置多个topic以逗号隔开:例 ["test1","test2"]如果kafka里面没有这个topic会自动创建,默认一个partitions
        type => "test"               //所有插件通用属性,尤其在input里面配置多个数据源时很有用
      }

      kafka{
        bootstrap_servers => "192.168.113.129:9002,192.168.113.130:9002,192.168.113.131:9002"
        codec => "json"
        client_id => "test2"
        group_id => "test"
        auto_offset_reset => "latest"
        consumer_threads => 5
        decorate_events => true
        topics => ["test2"]
        type => "sms"
      }
}
filter {
        ruby {
        code => "event.timestamp.time.localtime"
      }


        mutate {
        remove_field => ["beat"]
    }
        grok {
             match => {"message" => "[(?<time>d+-d+-d+sd+:d+:d+)] [(?<level>w+)] (?<thread>[w|-]+) (?<class>[w|.]+) (?<lineNum>d+):(?<msg>.+)"}
    }
  }

output {
        if[type] == "test"{
          elasticsearch{
               hosts => ["192.168.113.129:9200,192.168.113.130:9200,192.168.113.131:9200"]
               #user => "elastic"
               #password => "密码"     #开启了认证的需要配置这项
               index => "test1-%{+YYYY-MM-dd}"
          }
    }
        if[type] == "sms"{
          elasticsearch{
               hosts => ["192.168.113.129:9200,192.168.113.130:9200,192.168.113.131:9200"]
               #user => "elastic"
               #password => "密码"
               index => "test2-%{+YYYY-MM-dd}"
          }
    }
    stdout {
        codec => rubydebug
    }
}
metricbeat 7.16.2实现主机和kafka应用指标监控
在一台机器上做测试,如果开启kafka监控在一台上面开启kafka监控就可以了,其它部署启动监控主机指标就好
1. 下载metricbeat地址
wget https://artifacts.elastic.co/downloads/beats/metricbeat/metricbeat-7.16.2-linux-x86_64.tar.gz2. 配置文件metricbeat.yml
该配置文件中,可以配置elasticsearch参数,如果都是按默认配置部署,可以不做修改。如果使用了安全认证开启用户和密码认证配置
output.elasticsearch:
  # Array of hosts to connect to.
  hosts: ["192.168.113.129:9200","192.168.113.130:9200","192.168.113.131:9200"]
3. 开启kafka指标
执行命令:
./metricbeat modules enable kafka在modules.d/kafka.yml中进行kafka相关配置
- module: kafka
  #metricsets:
  #  - partition
  #  - consumergroup
  period: 10s
  hosts: ["192.168.113.129:9092","192.168.113.130:9092","192.168.113.131:9092"]
执行初始化并启动
# 初始化模板
./metricbeat setup --dashboards

# 查看启用的模块
./metricbeat modules list

# 执行启动并输出控制台日志
./metricbeat -e
#后台启动
nohup ./metricbeat -e 1>/dev/null 2>&1 &
kibana查看主机metrics
从kibana的metrics菜单可以看到监控信息。

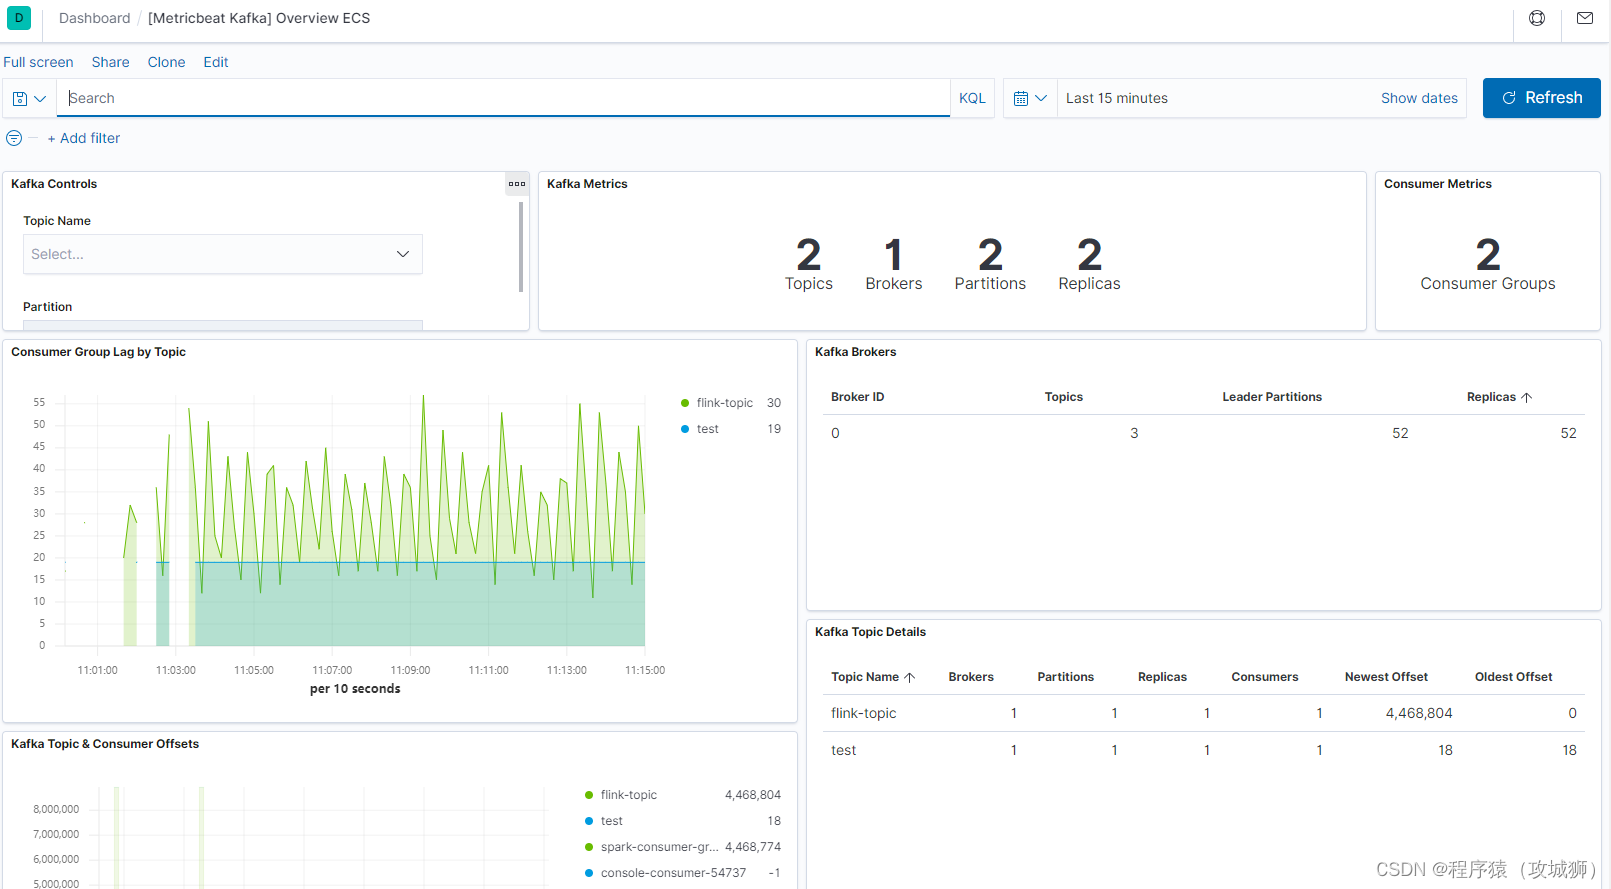
5. kibana查看kafka指标
kafka指标在dashboard中进行查看,选择kafka后,可以看到kafka的监控信息:


【推荐】国内首个AI IDE,深度理解中文开发场景,立即下载体验Trae
【推荐】编程新体验,更懂你的AI,立即体验豆包MarsCode编程助手
【推荐】抖音旗下AI助手豆包,你的智能百科全书,全免费不限次数
【推荐】轻量又高性能的 SSH 工具 IShell:AI 加持,快人一步
· 25岁的心里话
· 基于 Docker 搭建 FRP 内网穿透开源项目(很简单哒)
· 闲置电脑爆改个人服务器(超详细) #公网映射 #Vmware虚拟网络编辑器
· 一起来玩mcp_server_sqlite,让AI帮你做增删改查!!
· 零经验选手,Compose 一天开发一款小游戏!